
Search results for "Main issue" in Home Design Ideas
 Fix It 2 Sell It
The Otter street basement renovation was a fix-to-sell project. The homeowners were being relocated by the military, and they needed to do a facelift on their home before selling.
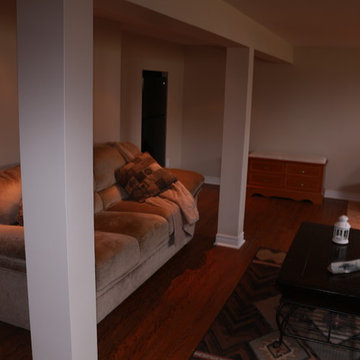
The main point of contention was the basement: it had been finished in a country-barn style, and was dark and uninviting. The walls were in bad shape, and the electrical needed to be brought up to code.
Also in this project, were other touch-ups including replacing the kitchen backsplashes.
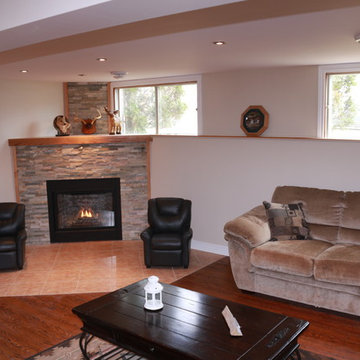
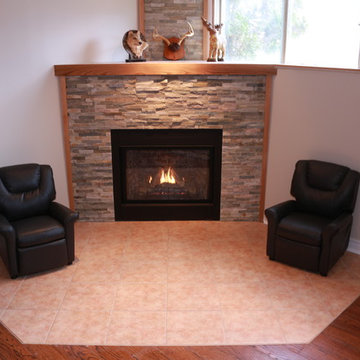
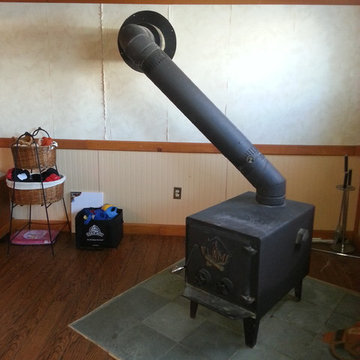
The main issue was a wood-burning stove that was placed on a pad of tiles, which really took up space in the room, and was an eye-sore. The solution to this was to replace it with a gas-burning efficient direct vent corner fireplace, and cut away the flooring to make a symmetrical tiled pad.
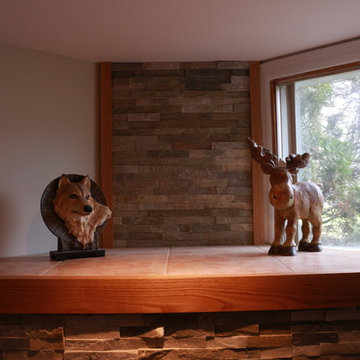
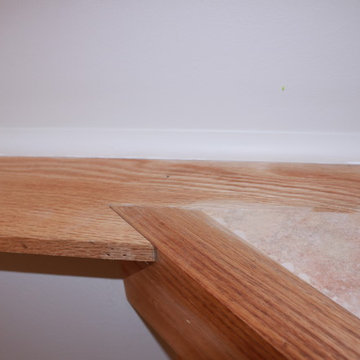
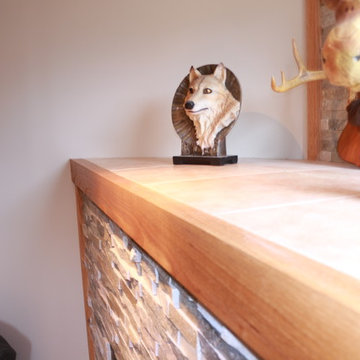
The opposite corner had to have a pipe concealed, so we decided to make it look like the fireplace mantel. The fireplace mantel, the corner mantel, and the window sill were all done in red oak, and were tied together.
The tops of the mantels were done with the same tiles as on the floor.
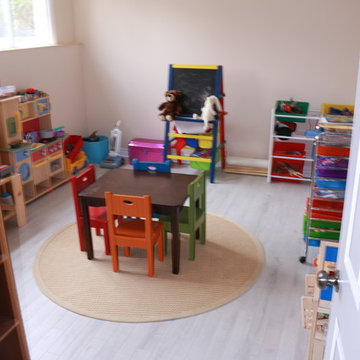
The kids' playroom had new walls, ceiling, and flooring to brighten it up.
This house was placed on the market after a month of renovations, and was sold within 24 hours with an offer in excess of 98% of the asking price.
Now that's a Fix It 2 Sell It success!
 Fix It 2 Sell It
The Otter street basement renovation was a fix-to-sell project. The homeowners were being relocated by the military, and they needed to do a facelift on their home before selling.
The main point of contention was the basement: it had been finished in a country-barn style, and was dark and uninviting. The walls were in bad shape, and the electrical needed to be brought up to code.
Also in this project, were other touch-ups including replacing the kitchen backsplashes.
The main issue was a wood-burning stove that was placed on a pad of tiles, which really took up space in the room, and was an eye-sore. The solution to this was to replace it with a gas-burning efficient direct vent corner fireplace, and cut away the flooring to make a symmetrical tiled pad.
The opposite corner had to have a pipe concealed, so we decided to make it look like the fireplace mantel. The fireplace mantel, the corner mantel, and the window sill were all done in red oak, and were tied together.
The tops of the mantels were done with the same tiles as on the floor.
The kids' playroom had new walls, ceiling, and flooring to brighten it up.
This house was placed on the market after a month of renovations, and was sold within 24 hours with an offer in excess of 98% of the asking price.
Now that's a Fix It 2 Sell It success!
 Fix It 2 Sell It
The Otter street basement renovation was a fix-to-sell project. The homeowners were being relocated by the military, and they needed to do a facelift on their home before selling.
The main point of contention was the basement: it had been finished in a country-barn style, and was dark and uninviting. The walls were in bad shape, and the electrical needed to be brought up to code.
Also in this project, were other touch-ups including replacing the kitchen backsplashes.
The main issue was a wood-burning stove that was placed on a pad of tiles, which really took up space in the room, and was an eye-sore. The solution to this was to replace it with a gas-burning efficient direct vent corner fireplace, and cut away the flooring to make a symmetrical tiled pad.
The opposite corner had to have a pipe concealed, so we decided to make it look like the fireplace mantel. The fireplace mantel, the corner mantel, and the window sill were all done in red oak, and were tied together.
The tops of the mantels were done with the same tiles as on the floor.
The kids' playroom had new walls, ceiling, and flooring to brighten it up.
This house was placed on the market after a month of renovations, and was sold within 24 hours with an offer in excess of 98% of the asking price.
Now that's a Fix It 2 Sell It success!
Find the right local pro for your project
 Fix It 2 Sell It
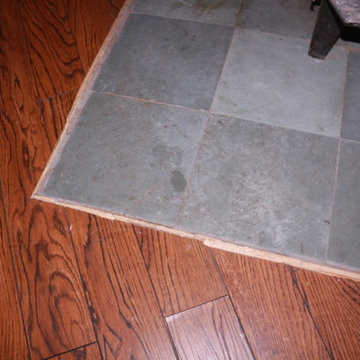
The trim around the tiles was breaking apart, and the overall look was shabby and messy. Time to clean things up!
The Otter street basement renovation was a fix-to-sell project. The homeowners were being relocated by the military, and they needed to do a facelift on their home before selling.
The main point of contention was the basement: it had been finished in a country-barn style, and was dark and uninviting. The walls were in bad shape, and the electrical needed to be brought up to code.
Also in this project, were other touch-ups including replacing the kitchen backsplashes.
The main issue was a wood-burning stove that was placed on a pad of tiles, which really took up space in the room, and was an eye-sore. The solution to this was to replace it with a gas-burning efficient direct vent corner fireplace, and cut away the flooring to make a symmetrical tiled pad.
The opposite corner had to have a pipe concealed, so we decided to make it look like the fireplace mantel. The fireplace mantel, the corner mantel, and the window sill were all done in red oak, and were tied together.
The tops of the mantels were done with the same tiles as on the floor.
The kids' playroom had new walls, ceiling, and flooring to brighten it up.
This house was placed on the market after a month of renovations, and was sold within 24 hours with an offer in excess of 98% of the asking price.
Now that's a Fix It 2 Sell It success!
 Fix It 2 Sell It
The Otter street basement renovation was a fix-to-sell project. The homeowners were being relocated by the military, and they needed to do a facelift on their home before selling.
The main point of contention was the basement: it had been finished in a country-barn style, and was dark and uninviting. The walls were in bad shape, and the electrical needed to be brought up to code.
Also in this project, were other touch-ups including replacing the kitchen backsplashes.
The main issue was a wood-burning stove that was placed on a pad of tiles, which really took up space in the room, and was an eye-sore. The solution to this was to replace it with a gas-burning efficient direct vent corner fireplace, and cut away the flooring to make a symmetrical tiled pad.
The opposite corner had to have a pipe concealed, so we decided to make it look like the fireplace mantel. The fireplace mantel, the corner mantel, and the window sill were all done in red oak, and were tied together.
The tops of the mantels were done with the same tiles as on the floor.
The kids' playroom had new walls, ceiling, and flooring to brighten it up.
This house was placed on the market after a month of renovations, and was sold within 24 hours with an offer in excess of 98% of the asking price.
Now that's a Fix It 2 Sell It success!
 Fix It 2 Sell It
The old wood stove was sitting on an ugly pad, in a non-symmetrical position, and was an eye-sore.
The Otter street basement renovation was a fix-to-sell project. The homeowners were being relocated by the military, and they needed to do a facelift on their home before selling.
The main point of contention was the basement: it had been finished in a country-barn style, and was dark and uninviting. The walls were in bad shape, and the electrical needed to be brought up to code.
Also in this project, were other touch-ups including replacing the kitchen backsplashes.
The main issue was a wood-burning stove that was placed on a pad of tiles, which really took up space in the room, and was an eye-sore. The solution to this was to replace it with a gas-burning efficient direct vent corner fireplace, and cut away the flooring to make a symmetrical tiled pad.
The opposite corner had to have a pipe concealed, so we decided to make it look like the fireplace mantel. The fireplace mantel, the corner mantel, and the window sill were all done in red oak, and were tied together.
The tops of the mantels were done with the same tiles as on the floor.
The kids' playroom had new walls, ceiling, and flooring to brighten it up.
This house was placed on the market after a month of renovations, and was sold within 24 hours with an offer in excess of 98% of the asking price.
Now that's a Fix It 2 Sell It success!
 Fix It 2 Sell It
The Otter street basement renovation was a fix-to-sell project. The homeowners were being relocated by the military, and they needed to do a facelift on their home before selling.
The main point of contention was the basement: it had been finished in a country-barn style, and was dark and uninviting. The walls were in bad shape, and the electrical needed to be brought up to code.
Also in this project, were other touch-ups including replacing the kitchen backsplashes.
The main issue was a wood-burning stove that was placed on a pad of tiles, which really took up space in the room, and was an eye-sore. The solution to this was to replace it with a gas-burning efficient direct vent corner fireplace, and cut away the flooring to make a symmetrical tiled pad.
The opposite corner had to have a pipe concealed, so we decided to make it look like the fireplace mantel. The fireplace mantel, the corner mantel, and the window sill were all done in red oak, and were tied together.
The tops of the mantels were done with the same tiles as on the floor.
The kids' playroom had new walls, ceiling, and flooring to brighten it up.
This house was placed on the market after a month of renovations, and was sold within 24 hours with an offer in excess of 98% of the asking price.
Now that's a Fix It 2 Sell It success!
 Fix It 2 Sell It
The Otter street basement renovation was a fix-to-sell project. The homeowners were being relocated by the military, and they needed to do a facelift on their home before selling.
The main point of contention was the basement: it had been finished in a country-barn style, and was dark and uninviting. The walls were in bad shape, and the electrical needed to be brought up to code.
Also in this project, were other touch-ups including replacing the kitchen backsplashes.
The main issue was a wood-burning stove that was placed on a pad of tiles, which really took up space in the room, and was an eye-sore. The solution to this was to replace it with a gas-burning efficient direct vent corner fireplace, and cut away the flooring to make a symmetrical tiled pad.
The opposite corner had to have a pipe concealed, so we decided to make it look like the fireplace mantel. The fireplace mantel, the corner mantel, and the window sill were all done in red oak, and were tied together.
The tops of the mantels were done with the same tiles as on the floor.
The kids' playroom had new walls, ceiling, and flooring to brighten it up.
This house was placed on the market after a month of renovations, and was sold within 24 hours with an offer in excess of 98% of the asking price.
Now that's a Fix It 2 Sell It success!
 Fix It 2 Sell It
The Otter street basement renovation was a fix-to-sell project. The homeowners were being relocated by the military, and they needed to do a facelift on their home before selling.
The main point of contention was the basement: it had been finished in a country-barn style, and was dark and uninviting. The walls were in bad shape, and the electrical needed to be brought up to code.
Also in this project, were other touch-ups including replacing the kitchen backsplashes.
The main issue was a wood-burning stove that was placed on a pad of tiles, which really took up space in the room, and was an eye-sore. The solution to this was to replace it with a gas-burning efficient direct vent corner fireplace, and cut away the flooring to make a symmetrical tiled pad.
The opposite corner had to have a pipe concealed, so we decided to make it look like the fireplace mantel. The fireplace mantel, the corner mantel, and the window sill were all done in red oak, and were tied together.
The tops of the mantels were done with the same tiles as on the floor.
The kids' playroom had new walls, ceiling, and flooring to brighten it up.
This house was placed on the market after a month of renovations, and was sold within 24 hours with an offer in excess of 98% of the asking price.
Now that's a Fix It 2 Sell It success!
 Tile Doctor Ltd
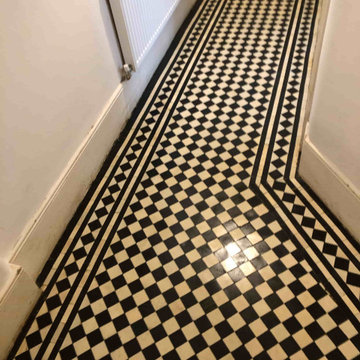
This property was in theLadbroke Grove area of West London near Kensington. The client had found an old and probably original black and white checkered pattern Victorian tiled floor under their cork tiled flooring. They also reported that it was badly damaged so I thought it would be best if I paid them a visit first to see how extensive the damage was and whether it was repairable. The floor was in a quite a state, the tiles were covered in glue from the cork and had several areas had been back filled with cement.
I reassured them that the damage could be rectified, and that it would be possible to completely restore the floor back to a good standard. I would have to remove the glue, remove the cement that had been used to level the floor and replace with reclaimed tiles to match. They were relieved to find out it could be done and happy with my quote I was instructed to go ahead with the work.
We started by taping up the skirting boards to protect the woodwork. With this done attention was turned to the glue which was softened using a strong dilution of Tile Doctor Remove and Go so it could be carefully scraped off. Multiple techniques and tools were needed to remove the glue including hand-held scrappers and a black pad fitted to a buffing machine. For the stubborn areas steam was applied to help lift the adhesive out the tile.
Once all the glue was removed the floor was rinsed and the alkaline cleaner neutralised with Tile Doctor Grout Clean Up which further cleaned the tiles and removed old traces of grout from the floor. Old floors like this generally don’t have a damp proof membrane underneath so the acids in the Grout Clean-up also counter any efflorescent salts trapped in the tile.
Once this was completed the slurry was removed with a wet vacuum and left to fully dry out overnight.
The following day focus turned to repairing the areas of the floor where the tiles were missing or broken. The main issue being the cemented areas, we see this a lot with Victorian Hallways and generally what happens is a heating engineer digs out the floor to install pipework. Not being tilers, your average plumber then repairs the floor with a self-levelling cement that brings the level up to the surface of the tile so it can be covered with lino, carpet of in this case cork.
The sub floor was then rebuilt with rapid setting self-levelling compound but this time to below the level of the tile.
Once the new base was dry it was a just a question of re-tiling with the replacement tiles to match the original checkered pattern. The replacement reproduction tiles were sourced from Original Features in Crouch End North London. After grouting we left the floor to dry out over the weekend.
When we returned to seal the floor our first step was to check the floor was dry using a moisture meter. This is critical as the sealant will not cure correctly if there is too much moisture in the floor. In this case the extra two days we had allowed had done its job and the test had confirmed it was ready to accept a sealer.
The client wanted the floor finish not to be too shiny once sealed so we opted to seal with two coats of Tile Doctor Seal and Go Extra. This is good choice for old Victorian floors such as this example as it’s special acrylic-based formula allows for moisture vapour transmission which as mentioned previously is a concern where no damp proof membrane has been installed.
I’m please to confirm my clients were delighted with the result, as you can see from the pictures the black and white floor restoration makes for a dramatic entrance well in keeping with the style of the property. For aftercare I recommended the use of Tile Doctor Neutral Tile Cleaner which will keep the tiles in good condition going forward without damaging the new sealer.
Jackson Davis
Central London Tile Doctor
 Tile Doctor Ltd
Recently I was called to a house in the very small town of Marton in Warwickshire which is known for its proximity to the medieval “Marton Bridge”, which lies just to the north, crossing the River Leam.
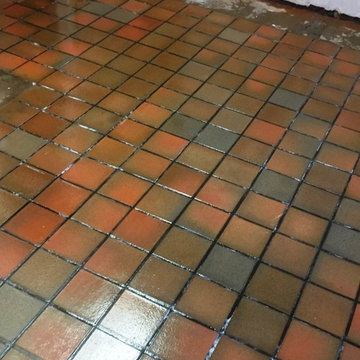
The entire downstairs flooring of my client’s house consisted of Quarry tiles apart from one room where the tiles had been covered by screed and then linoleum. Quarry tiles are a classic hard wearing tile used for both internal and external commercial and residential flooring due to its ability to withstand heavy usage. Reception areas, outdoor patios and porches, for example, are commonly tiled using Quarry.
My client wanted to restore the covered floor back to its original state so that it would match the rest of the downstairs. Realising that this would be a complex and physically demanding task, my client decided to call in Tile Doctor to carry out the restoration.
Removing the Linoleum covering was a relatively straightforward process, so I was able to do this relatively quickly. The main issue concerned removing the screed, which is far more difficult to remove, requiring a lot of physical scraping. Thus I opted to call in some extra manpower in the form of the Nottinghamshire Tile Doctor, Steve Carpenter. With the two of us armed with scrapers we set about removing the screed, taking extra care not to damage the Quarry tile underneath.
Once Steve and I had scraped off as much of the screed as physically possible, I applied a strong dilution of Tile Doctor Remove & Go, a stripper with cleaning properties that is particularly effective at breaking down coatings such as adhesives, plasters and sealers. The product was left to dwell for ten minutes before I worked it into the stone with a scrubbing pad.
After cleaning the tiles, I noticed a layer of grout haze on the surface of the exposed Quarry tiles, so I applied Tile Doctor Grout Clean-Up to remove it. Once the cleaning process was complete I gave the floor a thorough rinse with clean water, before soaking up the resulting residue with a wet-vac machine. The first day of work was a gruelling 12 hours long, but I was very pleased with the results and left the floor to dry overnight.
On day two I returned to finish the job by sealing the newly uncovered Quarry tiles, but not before using a damp meter to check that they were completely dry. Any excess moisture left on unsealed tiles can potentially effect the performance of any sealers that are applied. I sealed the tiles using Tile Doctor Colour Grow, an impregnating, colour-enhancing sealer which gave the surface an aesthetically pleasing shine, as well as durable protection against dirt and wear for the future.
After two long days of work the job was done and the transformation was fantastic and highly rewarding to see, the house now has a fantastic looking Quarry tiled floor running throughout the entirety of the lower level.
Mick Gayton
Warwickshire Tile Doctor
 Designer
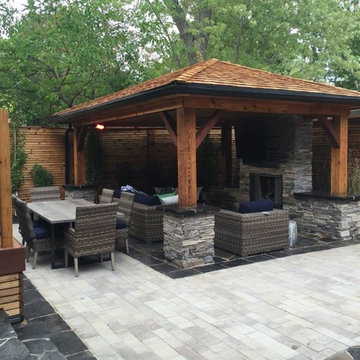
Designed for a very small space and many attributes. Permits and setbacks were a main issue with this backyard. In the end the client couldn't have been happier
 IK Home Improvement INC.
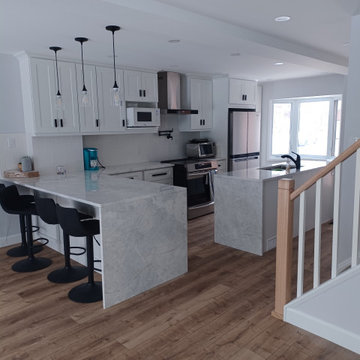
This two storey house was built 30 years ago with some very serious structural errors. The main issue was that the load bearing wall of the main floor was built about 5 feet away from the basement beam, as a result the floor is not even. The structural issue was resolved with installation of the heavy duty steel beam on the full length of the house. From the front foundation to the back one. This improvement let us level the subfloor, install the new floor, and build a beautiful new and modern kitchen and staircase.
 Murphy Bros. Design | Build | Remodel
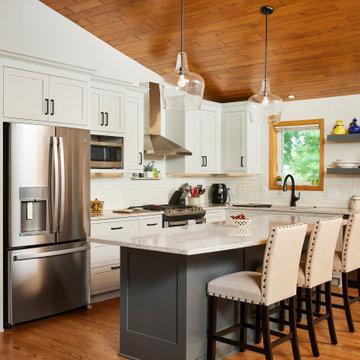
When functionality is the main issue, drastic measures must be considered to correct the problems. In this Hugo remodel, we did a 180-degree transformation, moving the kitchen to where the living room and fireplace used to be and visa-verse.
 Tile Doctor Ltd
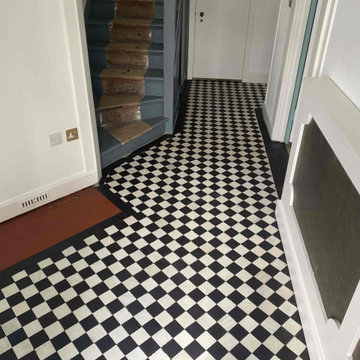
This client from North London had recently bought a property in Highgate N6 and during renovation had discovered an original Victorian tiled floor in the hallway. The floor was laid in a classic black and white diamond pattern but unfortunately a large section was missing and had been filled with concrete. Furthermore, most of the remaining floor had been covered in cement and glue.
I carried out a survey of the floor to determine the main issues and was then able to email over a quote later that day that included rebuilding the missing section of flooring. I suspect the floor had been excavated at some point in the past to install central heating and then rather than have the excavated section restored it was simply back filled and then levelled with a cement screed before finally gluing down a carpet on top.
Once the quote was accepted, I sourced replacement tiles from the Vintage Floor Tile company. Situated in Kent they are a reclamation yard that specialises in supplying original geometric and encaustic tiles including the major historical makers such as Minton and Craven Dunnill.
Armed with replacement tiles I started by removing the concrete that had been used to backfill the missing section and prepare a new surface for tiling with quick drying cement. When ready I was able to carefully build back the original pattern using the replacements. The tiles were secured with tile adhesive and once that had gone off, they were grouted.
The floor was left to set fully overnight and then the next day I was able to return and clean the whole floor using a strong dilution of Tile Doctor Remove and Go. As usual this was left to soak into the tiles for a good ten minutes before being scrubbed into the tiles using a black scrubbing pad. The Tile Doctor Remove and Go did a good job of cleaning the floor and the cleaning solution soon turned black with dirt during the scrubbing. The floor was rinsed with water and the soil extracted with a wet vacuum. After inspecting the floor any areas that needed further work were hand scrubbed and rinsed again until I was happy the floor was clean.
The last part of the cleaning process was to give the tiles an acid wash using Tile Doctor Acid Gel which further cleans the floor by removing old cement residue and grout haze. It also neutralises efflorescent salts in the tiles which are a common issue with floors of this age with no damp proof membrane. After another rinse and extraction, the floor was given a final rinse and then dried as much as possible using the wet vacuum.
I left the floor to dry out for a couple of days before returning to apply a protective sealer. Tile and Stone should be dry before sealing so I use a damp meter first to double check. All was well so to seal the tiles I proceeded to apply the first of what would be three coats of sealer. I used Tile Doctor Colour Grow for this, it works by impregnating the tile occupying the pores and thereby preventing dirt from becoming ingrained there. This product also enhances the black and white colour of the tiles and makes the floor much easier to clean.
Once done the floor was transformed and needless to say my customer was very pleased with the result. For the aftercare of Victorian Tiled floors, I recommend the use of a ph neural tile cleaner such as Tile Doctor Neutral Cleaner; most supermarket tile cleaners are simply too strong for use on sealed floors and can strip off the sealer prematurely.
Andrew Newstead
North London Tile Doctor
 Exclusive Home Interiors
Passion, character, nostalgia
Think of a style that resembles you.
Of a meeting with elegance as an expression of personality Chose your dimension in each detail.
Key-words for Grand Elegance and main issues leading our philosophy from the very early steps.
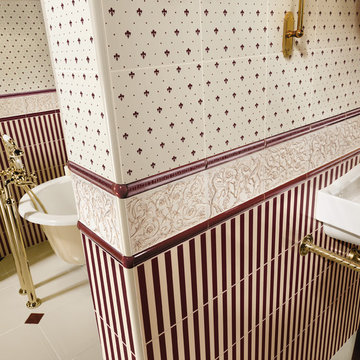
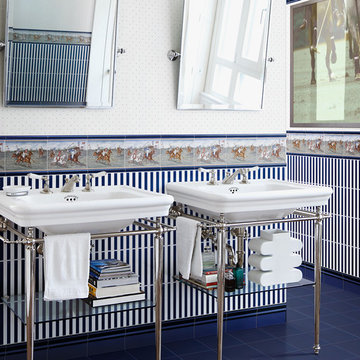
Our basic idea consists of shifting to ceramics all the living passions so that ceramics itself rises as metaphorical reference for life styles and little daily fads. So the sea and sailing, flowers, gardens, animals, classic sport, country-side and leisure time become all bricks of our imagination. Just like a classic novel, Grand Elegance collection describes our tradition that emphasizes individual attitudes and choices.
 Exclusive Home Interiors
Passion, character, nostalgia
Think of a style that resembles you.
Of a meeting with elegance as an expression of personality Chose your dimension in each detail.
Key-words for Grand Elegance and main issues leading our philosophy from the very early steps.
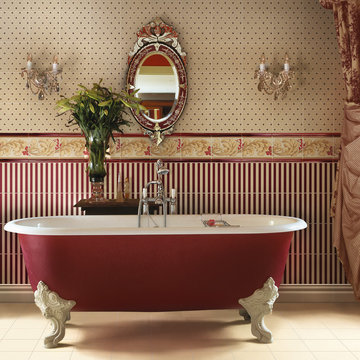
Our basic idea consists of shifting to ceramics all the living passions so that ceramics itself rises as metaphorical reference for life styles and little daily fads. So the sea and sailing, flowers, gardens, animals, classic sport, country-side and leisure time become all bricks of our imagination. Just like a classic novel, Grand Elegance collection describes our tradition that emphasizes individual attitudes and choices.
 Exclusive Home Interiors
Passion, character, nostalgia
Think of a style that resembles you.
Of a meeting with elegance as an expression of personality Chose your dimension in each detail.
Key-words for Grand Elegance and main issues leading our philosophy from the very early steps.
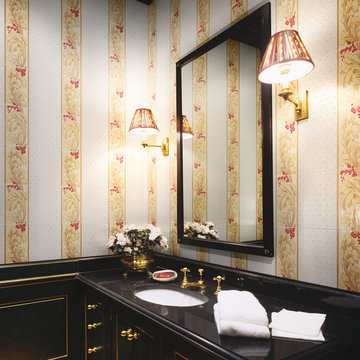
Our basic idea consists of shifting to ceramics all the living passions so that ceramics itself rises as metaphorical reference for life styles and little daily fads. So the sea and sailing, flowers, gardens, animals, classic sport, country-side and leisure time become all bricks of our imagination. Just like a classic novel, Grand Elegance collection describes our tradition that emphasizes individual attitudes and choices.
 Exclusive Home Interiors
Passion, character, nostalgia
Think of a style that resembles you.
Of a meeting with elegance as an expression of personality Chose your dimension in each detail.
Key-words for Grand Elegance and main issues leading our philosophy from the very early steps.
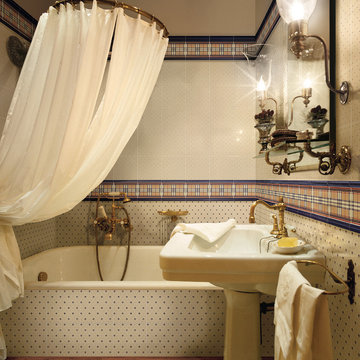
Our basic idea consists of shifting to ceramics all the living passions so that ceramics itself rises as metaphorical reference for life styles and little daily fads. So the sea and sailing, flowers, gardens, animals, classic sport, country-side and leisure time become all bricks of our imagination. Just like a classic novel, Grand Elegance collection describes our tradition that emphasizes individual attitudes and choices.
 Exclusive Home Interiors
Passion, character, nostalgia
Think of a style that resembles you.
Of a meeting with elegance as an expression of personality Chose your dimension in each detail.
Key-words for Grand Elegance and main issues leading our philosophy from the very early steps.
Our basic idea consists of shifting to ceramics all the living passions so that ceramics itself rises as metaphorical reference for life styles and little daily fads. So the sea and sailing, flowers, gardens, animals, classic sport, country-side and leisure time become all bricks of our imagination. Just like a classic novel, Grand Elegance collection describes our tradition that emphasizes individual attitudes and choices.
8