
Search results for "Maintainable method" in Home Design Ideas
 AquaTerra Outdoors
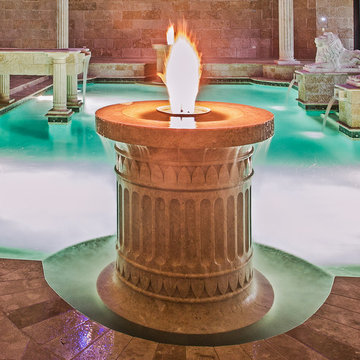
The remarkable Greek inspired indoor pool facility has a blend of contemporary rectilinear components with Greek-Roman architectural elements and finishes, such as the over-extending, ancient-style aqueduct that transitions from the spa into the pool, and the hand carved fire-water features at each end of the room. The aqueduct is a key relevance to the style which portrays an ancient cultural method of elutriating stagnant bath water with a continuous supply of fresh water. Each elaborately hand carved feature sets a mood of Greek architectural expression in this space. The two fire-water features at each end of the pool and all of the column structural support depict a ‘Doric’ style consisting of channeled columns. Also, to enhance this space with a full perspective of Greek-Roman style, the convex ceiling depicts a vision of an opened-ceiling that reveals a fully animated Greek-mythological star setting created by fiber optic lighting. Geothermal technology is the primary source for heating and cooling the pool and spa. Although they appear to be one body of water, they are independent so the spa can be maintained at 103degrees all year round.
Photography: Daniel Driensky



Find the right local pro for your project
 CARNEMARK design + build
SPLIT LEVELS.
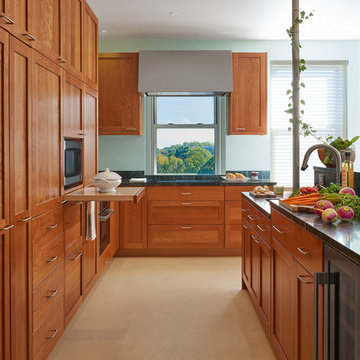
Perimeter cabinetry houses an under-counter speed oven, induction cooktop, and drawer bases for convenient access. Counters measure 32.5 inches in height—lower than the usual 36 inches—
to increase usability. The matching island has
two levels: standard-height to accommodate the dishwasher and wine fridge and a lowered prep sink and work area.
Photography by Anice Hoachlander
 Tile Doctor Ltd
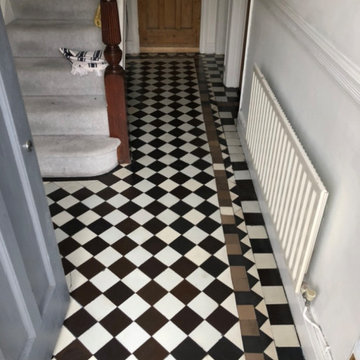
This job was carried out in a terraced property in Llanelli which had a Victorian Tiled Hallway laid in a diamond pattern that looking worse for wear and in need of some attention. The clients were a young couple who had moved in two years previously and had only recently decided they wanted the floor renovated. This was earlier in the year, so I was able to pop over to the property and take a detailed look at the floor before recommending a course of action to renovate the tiles.
Upon arrival the first thing we noticed was that the border had been laid with an inconsistent pattern, non- matching tiles had been patched in essentially filling voids as you can see in the images. The floor wasn’t terribly dirty however it wasn’t very clean either.
I discussed with the client replacing the non-matching tiles, so the floor pattern was uniform however they decided against it and were happy to just to have it cleaned and sealed. We can usually source either reclaimed original tiles or some great reproduction ones, so most floors can be restored if needed. I worked out a quote for the work and they were happy to go ahead.
If you have never been you should know that Llanelli is the largest town in the county of Carmarthenshire and famous for Rugby and the production of Tin. It is located on the Loughor Estuary, some 10 miles from Swansea and 12 miles from Carmarthen.
With no tiling to do the first job was to protect the woodwork such as skirting and staircase with tape. Once done the process of cleaning began with the application of a 400-grit burnishing pad fitted to a buffing machine. The process is lubricated with water and the pad run over the whole floor two to three times to remove dirt and refine the appearance of the tile. Even after the first application of the pad we could see a massive improvement to the appearance of the tiles. To get right into the edges of the tiled floor we use a 400-grit handheld diamond block, this proved especially useful under the stairs where our buffer machine could not reach.
During this process, the water turns into a fine slurry which is rinsed off with more water and extracted with a wet vacuum. On this occasion the floor was not dirty enough to require any chemicals, the use of water and the machine was enough to get the floor cleaned up.
This job was very straight forward, and we did not run into any problems at all. After allowing the floor to dry out for 24 hours we returned to seal the tiles checking first that the floor was sufficiently dry first using a damp meter. Fortunately, the burnishing method uses a lot less water than a chemical clean, so I was able to get straight on with sealing.
The client wanted a satin sheen finish, so I applied four coats of Tile Doctors Seal and Go which works well on Victorian tiles. The sealer really put the life back into the tiles and will protect them from staining going forward. It will also make the floor much easier to maintain and keep it looking good for much longer.
I’m pleased to say the owners were very happy with the floor and recommended us to one of their friends who we also did some work for. For aftercare I recommended the use of Tile Doctor Neutral Tile Cleaner. This is an everyday tile cleaning product that is sealer friendly and not prematurely reduce the life of the sealer which can happen with many household cleaning products which are simply too strong.
Adrian Iacono
Swansea Tile Doctor

 Chapman Design Group, Inc.
Established in 2005, Stonebridge at Rankin’s Lake is proud to be Duke Energy’s “First All-Electric Energy Star Certified Community” in South Carolina. Each home has been constructed with strict guidelines to insure each individual home will receive it’s own Energy Star certificate which in turn results in a reduced rate from Duke Energy on the energy bill for the life of the home.
Through a partnership between the architecture firm, Chapman Design Group, Inc. and it’s construction arm, Icon Construction of South Carolina, Inc., special emphasis is placed on quality construction, methods and design details a well as a stringent construction quality control standard. The total efforts, skills, resources provide unyielding commitment directed toward building superior homes that will bring our homeowners many years of comfortable and carefree living.
This 107 home community was created on a 43 acre property that was planned into two phases. Approximately 17 of these acres are to be left natural, providing the feel of an established neighborhood from the very beginning. The featured attraction is Rankin’s Lake. It is approximately 4 acres in size and was once a well-known fishing lake in Anderson in the 1940s and 50s. A stone bridge will adorn its spillway and will be constructed during the second phase of the project.
The traditional style streetscape is enhanced with grass medians separating curb lines and sidewalks. This feature is accentuated in intermittent Alee Elm Trees and decorative post streetlights throughout the neighborhood. Every front and side lawn as well as all common areas continue to be maintained on a weekly basis by a private landscape maintenance company. This perpetual maintenance provided through the Homeowner’s Association insures a constant harmonious look throughout the entire community.
From day one, several development principles were established and achieved:
• The development’s concept was designed with all water front lots facing into Rankin’s Lake to have the street running between the homes and the lake. With this concept, it allows all of the neighborhood residents and their guest to take advantage of the pathways as well as enjoy to natural scenery of the lake each time the upon entering and exiting the neighborhood. This became a positive selling point as it encouraged the selection of building sites deeper into the development once you passed the lake.
• The design concept of the development was to create a variation of the traditional home neighborhood where the homes, all with front porches are intentionally built closer to the sidewalk lined streets to encourage neighborly interaction.
• Plans were designed with the garages at the rear of the lot as to make the neighborhood less about cars and more about the home and it’s residents. This was prioritized due to many subdivisions today are designed in such a way the home’s primary feature is a front facing garage which often have two cars in the driveway… hence, Stonebridge at Rankin’s Lake want to provide an alternative.
• Each home design includes a spacious front porch, a screened porch and or a sunroom to encourage neighborly interaction and casual living.
• The floor plans include both 2 and 3 bedroom plans with 2 to 3.5 baths with all master suites remaining on the main level.
The entire development would have only Energy Star Certified homes.
 R&J Painting LLC
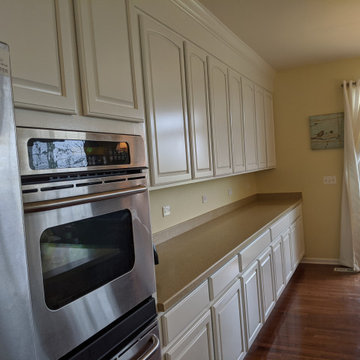
-Removed all Hardware, Doors and Drawer Fronts
-Cleaned and Degreased all Cabinetry
-Filled all Door and Drawer Holes
-Scuff Sanded all Cabinetry
-All Doors and Drawer Fronts Primed and Painted at Contractors controlled environment shop for a factory like finish. We found this method most favored by our clients, so that continued use of Kitchen can be maintained.
-Doors, Drawers and Hardware re-installed onsite upon completion
Sponsored
Sunbury, OH

J.Holderby - Renovations
Franklin County's Leading General Contractors - 2X Best of Houzz!
 Deluxe Garages
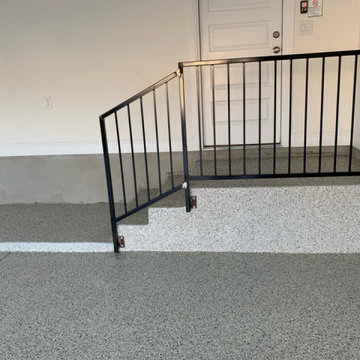
Deluxe Garages is a premier concrete coating expert in Austin, Texas, and surrounding areas. We do Garage Floor Coatings, Metallic Epoxy Floors, Basement Floor Coatings, Pool Decks, Concrete Staining, Polishing, and Overlays. Our team makes sure to provide homeowners and businesses with top epoxy flooring solutions to complete their flooring projects. We have specialized equipment and long-term experience in concrete flooring and ensures every installation exceeds their expectations.
Quality is the cornerstone of our process. We utilize the high-quality materials and methods as we strive to outlast and outperform any other epoxy concrete floor coatings being offered today. We maintain long-standing relationships with our customers, and our commitment ensures that working with us will be an asset to you and to your business.
 Eco Star Painting
Step #1 Apply BM CLEAN
As you can see in the 'Before' picture above, this cedar deck was extremly dirty. This required an extra step in comparison to the typical deck stripping process. My paint rep at Benjamin Moore recommended a product called CLEAN. It comes in one gallon plastic containers and can be applied out of a plastic pail or with a garden sprayer. We used a Garden sprayer and chose a flat tip for application. The three gallon garden sprayer was filled with 2 gallons of water and one gallon of the CLEAN solution. This is a strong mixture and can be reduced to up to 6 parts water and one part of the Benjamin Moore CLEAN.
This approximately 22x20 deck had a board running perpindicular to the rest of the floor boards which divided it into 2 equal parts. Our method was to apply the solution to 3-4 of these 10' boards at a time. Allow it to set up for a few minutes and then scrub away with the deck brush. The agitation loosens up the dirt and grime and is then removed with a pressure washer a board a time. The flat tip on the pressure washer was almost the same width as the floor board. It is important to clean the sides of the board too because any remaining dirt or stain will be visible.
Benjamin Moore Deck Restoration products named Clean,Restore,brighten
Step #2 Apply BM RESTORE
The second step is exactly the same as the first step but with a different solution called Benjamin Moore RESTORE. The deck was dry before we started the 2nd step becuase it was baking hot outside. You use the same 2/1 mixture of water to chemical. This chemical will remove the stain still present in the deck floor. Make sure to rinse the garden sprayer clean before adding the restore solution. Unlike the BM CLEAN, the BM RESTORE has an orange-ish color in appearance. It did a fine job of removing most of the stain, but not 100% of it. There were a few areas that required a 3rd coat of restore but the process was quicker.
Step #3 Apply BM BRIGHTEN
The third step is exactly the same as the first two step but the chemical solution used was Benjamin Moore 'BRIGHTEN'. Again, the garden sprayer was cleaned and filled with 2 parts water and one part Brighten. The brightener not only lightens the wood but it also neutralizes the previous stripper solution. As stated before the Restore adds a bit of color and the Brighten will remove any traces of it. you still have to agitate the brightener with a scrub brush and either pressure wash it off or use a garden hose. We used the pressure washer for faster results. After it dries the wood look a lot brighter but we still found some spots of stain that had not come off.
Apply Sikkens Stain
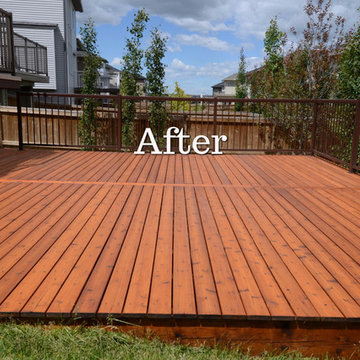
As stated above the stain we used is called "Sikkens Proluxe" which is basically just a slight re-branding of the classic Sikkens Stain. The formula is exactly the same. In fact, the secondary name is still called 'Cetol' SRD RE. The color chosen was "CEDAR".
The weather was quite hot for a typical Calgary Spring day so we stained a 10' section of floor board at a time. The deck has a metal railing so the supporting feet had to be brushed in with a 2.5" natural bristle paint brush. for the rest of the job a 6" Wooster natural bristle deck brush was used. The handle was remove and a broom handle was inserted. The stain was stirred frequently and poured into a plastic Simms brand roller pan. Semi transparent Oil based stain has the consistency of water so you need to be careful not to spill any of it. When applying to a board you hit the sides first with the brush and then fillin the rest. Ten feet of floor board can be stain in a short period of time. it's important not to leave any streaks so it is adviseable to back-brush the entie length before moving on to the next board. The staining only took about 2.5 hours to complete. One coat is the manufacturers recommendation.
One last thing about Sikkens Stain. To maintain this beautiful look the deck should be re- coated once a year, preferably every spring. It's like applying sunscreen yearly to protect the wood against further damage. Two gallons was enough to cover this 450 sq foot deck.
12