
Search results for "Major plastic" in Home Design Ideas

 John Case Adams, Architect
This was part of a major interior and exterior renovation of a 1920's Tudor house in Dobbs Ferry, NY. A previous renovation in the 70's had stripped away most of the original exterior wood details and had added plain modern widows with no casings or detail at all, culminating in a hideous 8'x8' plastic bubble skylight on the roof. So we embarked on a process of adding detail back into the house and we decided early on to pitch the style more in a Craftsman direction. We replaced all the windows and doors with pre-finished wood Norwood windows and doors, with simulated divided lites and enlarged head casings and sills. We re-wired and re-stucco'd the exterior, covering the previous sprayed on stucco with a new hand troweled smooth finish. We added a small gabled addition to the Kitchen wing which matched exactly a gable at the other side of the house and we redid all the flashing, gutters and leaders in copper.

 DMA Bellows
 is the leading Bellows Manufacturers in India. We are the best Bellows Manufacturer. Major users of the products we provide include the food, paper, plastic, and automotive processing industries.
As an established Metallic Expansion Joint Manufacturers. These things are prized for their attributes, which include being dimensionally correct, strong, compact, and easy to install.
In addition, we provide maintenance services for
Bellows Supplier in Bangladesh
Bellows Supplier in Oman
Bellows Supplier in Qatar
Bellows Supplier in Saudi Arabia
Bellows Supplier in Canada
Bellows Supplier in Malaysia
Bellows Supplier in UAE
Bellows Supplier in USA
Bellows Supplier in Brazil
Bellows Supplier in Nigeria
Bellows Supplier in Mexico
Bellows Supplier in Iran
Bellows Supplier in South Korea
Bellows Supplier in Kuwait
Bellows Supplier in Turkey
Bellows Supplier in Bahrain
Bellows Supplier in Spain
Bellows Supplier in Algeria
Bellows Supplier in Netherland
Bellows Supplier in Australia
Bellows Supplier in Singapore
Bellows Supplier in Zambia
Bellows Supplier in Egypt
Bellows Supplier in Venezuela
Bellows Supplier in Sudan
Bellows Supplier in UK
Bellows Supplier in Benin
Bellows Supplier in Vietnam
We are trusted Rubber Expansion Bellows Manufacturers in India and Clamshell Bellows Manufacturer in India. Product Source: Bellows Expansion Joints Email: dmabellows@gmail.com Contact Us +91 70455 13080
We are trusted Rubber Expansion Bellows Manufacturers in India and Clamshell Bellows Manufacturer in India. Product Source: Bellows Expansion Joints Email: dmabellows@gmail.com Contact Us +91 70455 13080
 Alexandra Crafton
Photo: Alexandra Crafton © 2016 Houzz
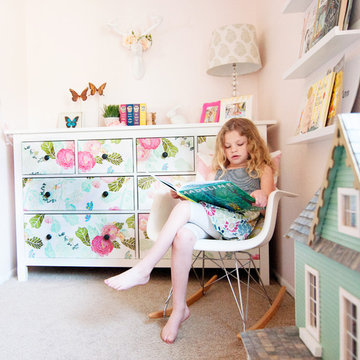
Wall paint: Gentle Butterfly, Benjamin Moore; 8 drawer dresser: Hemnes, Ikea (DIY-ed with removable wallpaper); deer mount: Z Gallerie; bunny nightlight: Pillowfort Collection, Target
Find the right local pro for your project
 Stretch Ceiling Miami
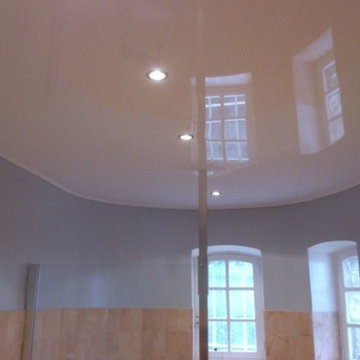
The Stretch Ceiling Film Membrane can be UV printed using Eco-Solvent, we also have hundreds of art prints to choose from in our catalogues.
The Stretch Ceiling is very resistent and, in case of accidental flooding, the membrane can hold up to about 26 gallons of water per 10 square feet.
It’s 100% fire proof and UL approved, as well as 100% recyclable.
The Stretch Ceiling Film is 0.0071 inches thin (0.18mm or 18/100mm).
The Stretch Ceiling comes with a 10-Year installation warranty and a 25-year warranty on the membrane.
.
Our company exclusively uses the highest quality European materials, highly regarded in the industry and approved for years in the installation process. These materials are fully compliant and meet all major INTERNATIONAL quality and safety requirements, including UL standards.
Our main European partners are quite well-known PVC film manufacturers, such as:
RENOLIT AG, ALKOR DRAKA, SEF.


 User
This is an organic Lime Wash done with a true lime wash product as opposed to a brick mortar or concrete that is often seen on new houses. This product can be applied as a solid coating making the surface completely white, or can be applied and "washed off" in many artistic ways, as seen here. If you hate your brick or just want something unique this is a great option!
Photo credit: Jeff Murrey

 Suzanne Zahr, Art & Architecture
Thick slabs of sand-textured granite and quarter-sawn white oak cabinets, equipped with special compartments for things such as cutting boards and plastic container lids, replaced old, sun-exposed cabinetry. A major transformation happened when the the low-height partition, separating the family room and kitchen was knocked down to allow in more light and warmth from the west-facing windows. The placement of the stovetop was adjusted to assist the left-handed couple, and a large 4-foot by 8-foot backing counter was added for the girls.
SZ made 'homes' for everything in the kitchen, from a state-of-the-art Miele integrated coffee station for Cameron to special cabinets for the Dean & Deluca spices that Linda likes to use. To accommodate Linda's petite stature, the countertops were set at a lower height. SZ even designed cereal-box-specific cabinets to ensure that everything would fit just right. Low-voltage strip lighting, operated with dimmers, borders every glass cabinet and spotlights the couple's funky '60s-inspired Jill Rosenwald ceramic serving pieces and a favorite clay sculpture entitled Love Entwined that they bought in Paris.
Today, the kitchen is almost unrecognizable from its former self. A dramatic evolution from stark and imposing to bright and spacious the clean lines and warm tones still give the family-functional space a grown-up edge. "if we're not hosting a charity event or inviting a group of 20 kindergartners over for a party, you'll still find all of us int the kitchen," says Linda. "Except how it feels right. The kitchen has our personalities stamped all over it." Not to mention a few handprints from three little girls.'

 Suzanne Zahr, Art & Architecture
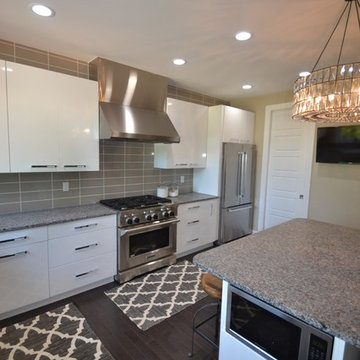
Thick slabs of sand-textured granite and quarter-sawn white oak cabinets, equipped with special compartments for things such as cutting boards and plastic container lids, replaced old, sun-exposed cabinetry. A major transformation happened when the the low-height partition, separating the family room and kitchen was knocked down to allow in more light and warmth from the west-facing windows. The placement of the stovetop was adjusted to assist the left-handed couple, and a large 4-foot by 8-foot backing counter was added for the girls.
SZ made 'homes' for everything in the kitchen, from a state-of-the-art Miele integrated coffee station for Cameron to special cabinets for the Dean & Deluca spices that Linda likes to use. To accommodate Linda's petite stature, the countertops were set at a lower height. SZ even designed cereal-box-specific cabinets to ensure that everything would fit just right. Low-voltage strip lighting, operated with dimmers, borders every glass cabinet and spotlights the couple's funky '60s-inspired Jill Rosenwald ceramic serving pieces and a favorite clay sculpture entitled Love Entwined that they bought in Paris.
Today, the kitchen is almost unrecognizable from its former self. A dramatic evolution from stark and imposing to bright and spacious the clean lines and warm tones still give the family-functional space a grown-up edge. "if we're not hosting a charity event or inviting a group of 20 kindergartners over for a party, you'll still find all of us int the kitchen," says Linda. "Except how it feels right. The kitchen has our personalities stamped all over it." Not to mention a few handprints from three little girls.'
 Suzanne Zahr, Art & Architecture
Thick slabs of sand-textured granite and quarter-sawn white oak cabinets, equipped with special compartments for things such as cutting boards and plastic container lids, replaced old, sun-exposed cabinetry. A major transformation happened when the the low-height partition, separating the family room and kitchen was knocked down to allow in more light and warmth from the west-facing windows. The placement of the stovetop was adjusted to assist the left-handed couple, and a large 4-foot by 8-foot backing counter was added for the girls.
SZ made 'homes' for everything in the kitchen, from a state-of-the-art Miele integrated coffee station for Cameron to special cabinets for the Dean & Deluca spices that Linda likes to use. To accommodate Linda's petite stature, the countertops were set at a lower height. SZ even designed cereal-box-specific cabinets to ensure that everything would fit just right. Low-voltage strip lighting, operated with dimmers, borders every glass cabinet and spotlights the couple's funky '60s-inspired Jill Rosenwald ceramic serving pieces and a favorite clay sculpture entitled Love Entwined that they bought in Paris.
Today, the kitchen is almost unrecognizable from its former self. A dramatic evolution from stark and imposing to bright and spacious the clean lines and warm tones still give the family-functional space a grown-up edge. "if we're not hosting a charity event or inviting a group of 20 kindergartners over for a party, you'll still find all of us int the kitchen," says Linda. "Except how it feels right. The kitchen has our personalities stamped all over it." Not to mention a few handprints from three little girls.'
 Suzanne Zahr, Art & Architecture
Thick slabs of sand-textured granite and quarter-sawn white oak cabinets, equipped with special compartments for things such as cutting boards and plastic container lids, replaced old, sun-exposed cabinetry. A major transformation happened when the the low-height partition, separating the family room and kitchen was knocked down to allow in more light and warmth from the west-facing windows. The placement of the stovetop was adjusted to assist the left-handed couple, and a large 4-foot by 8-foot backing counter was added for the girls.
SZ made 'homes' for everything in the kitchen, from a state-of-the-art Miele integrated coffee station for Cameron to special cabinets for the Dean & Deluca spices that Linda likes to use. To accommodate Linda's petite stature, the countertops were set at a lower height. SZ even designed cereal-box-specific cabinets to ensure that everything would fit just right. Low-voltage strip lighting, operated with dimmers, borders every glass cabinet and spotlights the couple's funky '60s-inspired Jill Rosenwald ceramic serving pieces and a favorite clay sculpture entitled Love Entwined that they bought in Paris.
Today, the kitchen is almost unrecognizable from its former self. A dramatic evolution from stark and imposing to bright and spacious the clean lines and warm tones still give the family-functional space a grown-up edge. "if we're not hosting a charity event or inviting a group of 20 kindergartners over for a party, you'll still find all of us int the kitchen," says Linda. "Except how it feels right. The kitchen has our personalities stamped all over it." Not to mention a few handprints from three little girls.'
 Suzanne Zahr, Art & Architecture
Thick slabs of sand-textured granite and quarter-sawn white oak cabinets, equipped with special compartments for things such as cutting boards and plastic container lids, replaced old, sun-exposed cabinetry. A major transformation happened when the the low-height partition, separating the family room and kitchen was knocked down to allow in more light and warmth from the west-facing windows. The placement of the stovetop was adjusted to assist the left-handed couple, and a large 4-foot by 8-foot backing counter was added for the girls.
SZ made 'homes' for everything in the kitchen, from a state-of-the-art Miele integrated coffee station for Cameron to special cabinets for the Dean & Deluca spices that Linda likes to use. To accommodate Linda's petite stature, the countertops were set at a lower height. SZ even designed cereal-box-specific cabinets to ensure that everything would fit just right. Low-voltage strip lighting, operated with dimmers, borders every glass cabinet and spotlights the couple's funky '60s-inspired Jill Rosenwald ceramic serving pieces and a favorite clay sculpture entitled Love Entwined that they bought in Paris.
Today, the kitchen is almost unrecognizable from its former self. A dramatic evolution from stark and imposing to bright and spacious the clean lines and warm tones still give the family-functional space a grown-up edge. "if we're not hosting a charity event or inviting a group of 20 kindergartners over for a party, you'll still find all of us int the kitchen," says Linda. "Except how it feels right. The kitchen has our personalities stamped all over it." Not to mention a few handprints from three little girls.'

 OKLAHOMA SHUTTERS
Benefits of Plantation Shutters
Plantation shutters offer advantages and benefits to homeowners over other window coverings including:
• A permanent addition to a house: While they don't add much to the sale price and don't guarantee a return on investment, the curb appeal helps the house sell faster. The permanency of plantation shutters allows them to be included in appraisals.
• Versatility: Many have the ability to open only halfway if desired. If you want to let in all the light, plantation shutters swing away from the window to grant an unobstructed view.
• Insulation: When all louvers are closed, a good insulating barrier is created, trapping unwanted temperatures and saving you money on your energy bill.
• Easy maintenance: With wide louvers, a simple wipe-down is often all that's needed. Vinyl shutters can be taken off their hinges and sprayed off for a major cleaning.
• Elegance: The classic, yet modern look conveys a permanency like no other window dressing can. Whether painted or natural wood, they all have a look that says; welcome home.
Wood vs. Faux Wood
It's not hard to argue that natural wood is more appealing than vinyl or PVC. However, "faux wood," as it's sometimes called, has some advantages:
• Price -- Faux wood shutters are often lower in price than real wood.
• Weight -- Because some shutters are made "hollow core" (as opposed to vinyl-wrapped medium density fiberboard, MDF), they can be significantly lighter.
• Moisture Resistance -- If you live in an area with high humidity, hollow faux wood or aluminum core will resist expanding and sagging. (MDF core louvers will tend to expand and crack as the material swells with moisture.)
Natural wood is the choice for those who have a very healthy budget or for whom a specific appearance is a must. Among the advantages are:
• Size -- Because wood plantation shutters are made of hardwood, they can be quite a bit larger than plastic or vinyl. Vinyl shutters larger than 29 inches may be prone to sag, so they need divider rails or other supports which can destroy the traditional look of a plantation shutter.
• Natural -- While vinyl or plastic shutters can be painted to match any color scheme, the natural shades and finishes of the various species of wood have something for every look.
• Classic -- While many plastic shutters can be made to look like real wood, the faux wood finishes can vary significantly depending on manufacturer and model. Up close, it can be easy to tell they're plastic. The warmth of natural wood is a classic feel that's impossible to beat.
Popular Plantation Shutter Brands
When you go to purchase your plantation shutters, brands names may offer a good representation of high-, mid-, and low-cost range of what's available. Which one you choose depends on your budget and your tastes. Hunter-Douglas and Norman Shutters produce three lines of plantation shutters in both real wood and faux wood styles. A higher-end product, Hunter-Douglas may be worth the cost for beauty and quality of workmanship. The Window Outfitters and Sunland produce a mid-cost line of shutters. The mid-range pricing may be for those who are balancing aesthetics with a budget. National franchise and or box stores may not offer an in-house expert or designer. Look to local companies that specialize in plantation shutters looking online may offer a low-cost brand for budget-minded DIYers. Available in both faux and real wood, the affordability combines with the visual appeal to make this a very popular choice for plantation shutters. Regardless of which line you go with, be sure to ask about frames. Generally all manufactures offer frame choices and may add to the cost, but they add an unsurpassed beauty and warmth to a room with plantation shutters.
Plantation shutters look like similar to wooden blinds, but there are significant differences. Blinds are often narrow, made of aluminum or vinyl, and the slats tilt based on a gear and pulley mechanism and they hang in the window with cords. By contrast, plantation shutters have wide compound louvers that fit into a frame and are controlled by way of a wooden rod running up the middle. When not needed, they can be manufactured to swing back onto the wall. Options to are available to build a more contemporary look with a larger view with a “hidden tilt” feature.
Cost of Plantation Shutters
Nationally, the cost of plantation shutters, depending on their size and the material, whether or not they are custom arches and colors or stains, may vary. Most manufacturers want their shutters to be professionally installed to keep the warranty intact which is a benefit to the customer in the long run. They will usually have a limited lifetime warranty.
Cost of Installation
Costs for having plantation shutters installed by a contractor are a bit more predictable. Contractors who have installed plantation shutters before can quickly get accurate measurements and suggest which materials would work best in different rooms. For example, while natural wood may look beautiful in your living room, it might not be so practical in a bathroom where moisture will cause the wood to warp. The size, material, and quality of the shutter will have a significant effect on the cost. Contractors usually go through a shutter supplier and can get various sizes that are not normally available at home improvement stores. Hiring a professional team of knowledgeable suppliers and installers is a good choice.
Here are some sample prices of the shutters most contractors use for standard-sized windows: In general, plantation shutters should cost approximately $20 to $26 per square foot. Labor costs depend on factors such as the contractor's workload, remoteness of the location, environment, and the contractor's overhead. Labor generally runs about $100 per hour and will be added to the shutter cost.
• 16x20 -- Faux wood $120. Real wood $156
• 24x50 -- Faux wood $160. Real wood $208
• 36x54 -- Faux wood $270. Real wood $351
• 36x60 -- Faux wood $300 Real wood $390
• 42x72 -- Faux wood $420. Real wood $546
• 48x82 -- Faux wood $550. Real wood $715
DIY
Plantation shutters can be purchased and installed by the homeowners. How much they cost will depend on size and material. Faux wood shutter’s cost depends on size and wooden shutter’s cost will depend on size and whether or not they are painted or stained.
• Natural wood is $90-$600 depending on size. Many companies offer standard stained selection but custom color matching may be available from $175 -$250.
• Faux wood will be from $120-$500.
• Additional tools include: Hang Strips $4-$15 and about $4 for mounting hardware. Locks or closures can cost up to $15 for each shutter.
Finally, if you order them online, you can expect to pay $30-$70 shipping per shutter or per set of shutters per window depending on the supplier. Keep in mind that even if you're handy with tools, installing shutters can be time-consuming if you've never done it before there is defiantly a learning curve.
 John Case Adams, Architect
This was part of a major interior and exterior renovation of a 1920's Tudor house in Dobbs Ferry, NY. A previous renovation in the 70's had stripped away most of the original exterior wood details and had added plain modern widows with no casings or detail at all, culminating in a hideous 8'x8' plastic bubble skylight on the roof. So we embarked on a process of adding detail back into the house and we decided early on to pitch the style more in a Craftsman direction. We replaced all the windows and doors with pre-finished wood Norwood windows and doors, with simulated divided lites and enlarged head casings and sills. We re-wired and re-stucco'd the exterior, covering the previous sprayed on stucco with a new hand troweled smooth finish. We added a small gabled addition to the Kitchen wing which matched exactly a gable at the other side of the house and we redid all the flashing, gutters and leaders in copper.
In the interior we renovated the ground floor including the Kitchen that you see. in the photos. The stone chimney was a happy find...previously covered in stucco which we had removed. We found a local mill in CT to custom cut the random width wide plank white oak floor boards which we installed with antique square face nails. The floor tiles in the Kitchen are actually salvaged 19th century Chicago building bricks, which were sliced to tile thickness and installed in a basketweave pattern.
The fact we are most proud of with this project, is that all of this work was done within a 3 months construction schedule. We managed the construction together with our client, a filmmaker who was a wizard at running crews, and it all came together beautifully.....on a schedule we haven't seen before or since.


 Advance Design Studio, Ltd.
Jennifer and Dan have lived in their Deer Park Illinois home for 15 years, slowly making minor fixes like painting and decorating; but they had a new plan for their kitchen the entire time. An awkwardly placed garage door, and an island cooktop with a terrible downdraft made a full-scale kitchen remodel an absolute must. Jennifer had many ideas in mind and wanted to work with a company that could provide high-end work, while partnering with a designer that would tailor the kitchen to her ideas.
She was intrigued by the phrase “Common Sense Remodeling” in Advance Design’s feature she discovered while perusing an issue of the community’s Quintessential Barrington Magazine. Doing further research on the company’s website, as she looked through project profiles and read about Advance Design’s “Common Sense Remodeling” philosophy, she promptly scheduled an appointment to see if the people and ideas she read about were truly who they said they were. The more she read, the more she knew that the “Common Sense” approach to remodeling they described was exactly the type of company she was looking for.
The partnership was sealed after an initial consultation with Owner Todd Jurs and Project Designer Michelle Lecinski. They displayed a combination of friendliness, professionalism and respect that was unmatched by any of the other companies Jennifer talked to. She knew that with Advance Design, she would be able to retain the vision that she had in mind with high-quality craftsmanship.
“I reached out to Advance Design because of the ‘Common Sense Remodeling’ tagline,” Jennifer said. “That’s what lingered for me”. “Advance Design was the most respectful- of the house and of my design ideas, and the most professional of the handful of companies that looked at my project”.
Soon after the meeting Jennifer began working with Michelle on the project design. They quickly developed chemistry. Jennifer loved how Michelle researched and located every detail that Jennifer wanted for the kitchen. Between the two of them, every concept and idea was worked through and perfected. “Jennifer had definite ideas about what she wanted the new kitchen to look like, she just didn’t know how to bring it all together. We worked together really well to make her ideas into the practical reality necessary for a well-functioning kitchen, with the look and feel that she had envisioned”, says Michelle.
“Michelle was wonderful in using the CAD system she would show me new drawings every time we changed the layout while working through the design,” Jennifer said. “She was a really wonderful partner in execution, she made sure everything happened quickly and easily.”
The finished design drew out elements of Jennifer’s style and personality. The pair call the look “sophisticated farmhouse” to describe the kitchen renovation to family and friends. The result was a beautifully crafted, authentic-feeling space that satisfied Jennifer’s dreams 15 years in the making. The whole project consisted of a kitchen remodel, mudroom upgrade with powder room, and garage entry relocation. “The projects I personally like the best, are the ones that put the client’s dreams on display,” Project Designer Michelle said. “And this is one of those projects.”
The main focal point of the kitchen is custom zinc and brass ventilation hood with a vintage sheen, which was hand made to order by a small company in Indiana named Vogler Metalworking. “It’s like sculpture, a true work of art”, says Jennifer. Your eye is immediately drawn towards this elegant yet practical hood that eliminated the home’s downdraft problem and added a striking conversation piece at the same time. The carpenters had to use special gloves when transporting and installing it, so they didn’t smudge it with fingerprints. The beautiful hood centers proudly over the stunning black enamel and brass LaCornue Range. “I had a friend who had a LaCornue range and after learning how easy it was to cook perfect meals, I was convinced I wanted to have one”, says Jennifer. This unique, breathtaking combination anchors the entire kitchen and is apparent immediately as you walk into the great room the surrounds the space.
DuraSupreme Crestwood cabinets with a Kendall Panel add function and sophistication. A custom gray paint color paired with a storm blue was developed so that the new kitchen looked like it belonged to the existing space. Unlacquered brass faucets and hardware were important to Jennifer because she wanted the living finishes to age over time. Remarkable brass diamond mesh cabinet door inserts imported from the UK continue to add this one-of-a-kind kitchen renovation; giving it a “you won’t see this everywhere” quality. The use of old railcar flooring for the coffee bar countertop and reclaimed oak for the open shelving gives an authenticity to the space uncommon in kitchens today.
Jennifer and Michelle fell in love with the Limestone Grey Stone while they were investigating unique island countertop ideas. They liked the fact that the limestone as a living finish will age and change over time. Calcutta Miel Quartz countertops made for an excellent pairing around the perimeter, as it’s durable and perfect for cooking preparations. A textured white subway tile backsplash that runs to the ceiling keeps your eye moving towards the open shelving, and to the main focal point of the stunning range hood combination.
“The kitchen functions beautifully, and it’s gorgeous,” beams Jennifer as she gestures with both hands while smiling ear to ear. “The most important thing was I wanted a kitchen that had a wonderful flow, cooked beautiful meals and was a great gathering place for family and friends, and this space does that perfectly! Beauty wise, it turned out exactly how I had envisioned. I felt the function part was the hardest part, and that was nailed”!
Relocating the garage entry to the new mudroom was a huge priority and has finally separated the family’s arriving home functions from their kitchen. Now coats and shoes and bags have their own area for dropping once members arrive home. Matching gray DuraSupreme cabinetry helped create gorgeous, purposeful lockers for the family. A reclaimed vintage sink and custom wall paper were added to the tiny powder room to beautify the once previously only functional space. Advance Design was even able to create a custom space for their dog to sleep while the family is away.
“It was unbelievable that a project of this size was completed in such a short time, and I think that’s because of the large amount of planning and preparation that went into it,” Jennifer marveled, “When we started, we were ready, and everything was prepared”.
When it came to execution, Project Manager Justin Davis and his crew were quick, accessible, and organized. Projects like this kitchen are typically completed in as little as 8-10 weeks. Jennifer’s kitchen however despite the relocation of some challenging HVAC in a soffit and moving of an exterior door was completed remarkably fast in part because the team was working with an existing tile floor that ran throughout the first floor that the client really loved.
“You get to know these people really well because they’re living in your house while you’re living in your house. They were so fast and really good, it didn’t take as long as even planned” reported Jennifer. “I would text Justin and he always responded almost immediately. I got to know all the guys who were working in our house and they were all wonderful people”.
Details in a customized kitchen like this one require skill and care from the people who install it. “All the guys on the job were skilled at what the did. I wanted small details like little feet to look like furniture, that is where their carpentry skill came in to make these all perfect”, said Jennifer. “The tile guys were wonderful. They even let me determine how I wanted the texture with the grout to appear for a salt and pepper look; now that is a very skilled trade person making it custom”.
In Jennifer’s interview, she continued to reference Advance Design’s “Common Sense Remodeling”, so I took a minute to ask her exactly what that phrase meant to her and how it played out in her experience with her project and the Advance Design team. Here is what she said: “I was intrigued about Common Sense Remodeling and in my head that there would be clear costs and prices, great communication between the design team, the execution team and me”, said Jennifer. They did deliver on that, it was so clear about the cost breakdown, what I could expect from everyone who came to my house, and everything that we had ordered. That to me is the Common Sense”!
It’s great to see a client take literally our assertion that a well-planned remodeling project is simply “Common Sense”! She anticipated each step of the way would be clear, concise, and predictable, all the while protecting the outcome due to the careful upfront planning. “Advance Design delivered on their ‘Common Sense Remodeling’ promise,” Jennifer said. “From the design team, to the execution team - everything was straight forward like I imagined. The project turned out exactly how I envisioned, I enjoyed this process and absolutely would recommend Advance Design Studio to anyone.”

 Just the Thing Decorating, Staging, and Windows
This recent renovation project began with a desire to open up the kitchen to the family room. Today everyone seems to want the big island to live and entertain around, right?
I always recommend taking your time during the planning phase—6 weeks at least! Kitchens and bathrooms are highly functional areas, so you want to give yourself time to think thoughts like, “where am I going to put all my plastic cups?” I ask my clients lots of questions during this phase to help them design a kitchen that truly has a place for everything. Appliances and plumbing are part of this phase as well.
Once the cabinet design was finalized, the demo began! Because that troublesome wall was load bearing, so the GC, Miland Home Construction, had to install a beam to support the second floor. But once that was done, boy we had a lot of space to work with!
Picking your countertops is a little like picking an ice cream flavor: you really want to see all your options! Not only is function important here, but your counter material is really a major element of the kitchen, so pick one you love! This client fell in love with Taj Mahal Quartzite.
The backsplash was the next layer of fun. Now the mood of the kitchen becomes clear. Will it be elegant? Homey? Rustic? Picking the lighting then becomes like the fine tuner on a microscope, adjusting the view to its perfect clarity.
With construction underway, and the mood of the new space established, soft furnishings become the focus. Layering in luxurious, yet durable fabrics are the name of the game for most families. We all want beautiful spaces that can stand up to spouses, kids, and pets! It’s always a lot fun to select a deep and comfy sofa and chairs!
The finishing touches are what really give the project that designer look—so be sure to save room in the budget for art, window treatments, and accessories. In this home I wallpapered the wall behind the tv with a subtle grasscloth, selected a large abstract to center the room, and echoed its colors throughout the accessories. The result is eye-pleasing indeed: soft, textured, interesting and peaceful. This busy family was thrilled with the results.
 Just the Thing Decorating, Staging, and Windows
This recent renovation project began with a desire to open up the kitchen to the family room. Today everyone seems to want the big island to live and entertain around, right?
I always recommend taking your time during the planning phase—6 weeks at least! Kitchens and bathrooms are highly functional areas, so you want to give yourself time to think thoughts like, “where am I going to put all my plastic cups?” I ask my clients lots of questions during this phase to help them design a kitchen that truly has a place for everything. Appliances and plumbing are part of this phase as well.
Once the cabinet design was finalized, the demo began! Because that troublesome wall was load bearing, so the GC, Miland Home Construction, had to install a beam to support the second floor. But once that was done, boy we had a lot of space to work with!
Picking your countertops is a little like picking an ice cream flavor: you really want to see all your options! Not only is function important here, but your counter material is really a major element of the kitchen, so pick one you love! This client fell in love with Taj Mahal Quartzite.
The backsplash was the next layer of fun. Now the mood of the kitchen becomes clear. Will it be elegant? Homey? Rustic? Picking the lighting then becomes like the fine tuner on a microscope, adjusting the view to its perfect clarity.
With construction underway, and the mood of the new space established, soft furnishings become the focus. Layering in luxurious, yet durable fabrics are the name of the game for most families. We all want beautiful spaces that can stand up to spouses, kids, and pets! It’s always a lot fun to select a deep and comfy sofa and chairs!
The finishing touches are what really give the project that designer look—so be sure to save room in the budget for art, window treatments, and accessories. In this home I wallpapered the wall behind the tv with a subtle grasscloth, selected a large abstract to center the room, and echoed its colors throughout the accessories. The result is eye-pleasing indeed: soft, textured, interesting and peaceful. This busy family was thrilled with the results.
 Just the Thing Decorating, Staging, and Windows
This recent renovation project began with a desire to open up the kitchen to the family room. Today everyone seems to want the big island to live and entertain around, right?
I always recommend taking your time during the planning phase—6 weeks at least! Kitchens and bathrooms are highly functional areas, so you want to give yourself time to think thoughts like, “where am I going to put all my plastic cups?” I ask my clients lots of questions during this phase to help them design a kitchen that truly has a place for everything. Appliances and plumbing are part of this phase as well.
Once the cabinet design was finalized, the demo began! Because that troublesome wall was load bearing, so the GC, Miland Home Construction, had to install a beam to support the second floor. But once that was done, boy we had a lot of space to work with!
Picking your countertops is a little like picking an ice cream flavor: you really want to see all your options! Not only is function important here, but your counter material is really a major element of the kitchen, so pick one you love! This client fell in love with Taj Mahal Quartzite.
The backsplash was the next layer of fun. Now the mood of the kitchen becomes clear. Will it be elegant? Homey? Rustic? Picking the lighting then becomes like the fine tuner on a microscope, adjusting the view to its perfect clarity.
With construction underway, and the mood of the new space established, soft furnishings become the focus. Layering in luxurious, yet durable fabrics are the name of the game for most families. We all want beautiful spaces that can stand up to spouses, kids, and pets! It’s always a lot fun to select a deep and comfy sofa and chairs!
The finishing touches are what really give the project that designer look—so be sure to save room in the budget for art, window treatments, and accessories. In this home I wallpapered the wall behind the tv with a subtle grasscloth, selected a large abstract to center the room, and echoed its colors throughout the accessories. The result is eye-pleasing indeed: soft, textured, interesting and peaceful. This busy family was thrilled with the results.
 Just the Thing Decorating, Staging, and Windows
This recent renovation project began with a desire to open up the kitchen to the family room. Today everyone seems to want the big island to live and entertain around, right?
I always recommend taking your time during the planning phase—6 weeks at least! Kitchens and bathrooms are highly functional areas, so you want to give yourself time to think thoughts like, “where am I going to put all my plastic cups?” I ask my clients lots of questions during this phase to help them design a kitchen that truly has a place for everything. Appliances and plumbing are part of this phase as well.
Once the cabinet design was finalized, the demo began! Because that troublesome wall was load bearing, so the GC, Miland Home Construction, had to install a beam to support the second floor. But once that was done, boy we had a lot of space to work with!
Picking your countertops is a little like picking an ice cream flavor: you really want to see all your options! Not only is function important here, but your counter material is really a major element of the kitchen, so pick one you love! This client fell in love with Taj Mahal Quartzite.
The backsplash was the next layer of fun. Now the mood of the kitchen becomes clear. Will it be elegant? Homey? Rustic? Picking the lighting then becomes like the fine tuner on a microscope, adjusting the view to its perfect clarity.
With construction underway, and the mood of the new space established, soft furnishings become the focus. Layering in luxurious, yet durable fabrics are the name of the game for most families. We all want beautiful spaces that can stand up to spouses, kids, and pets! It’s always a lot fun to select a deep and comfy sofa and chairs!
The finishing touches are what really give the project that designer look—so be sure to save room in the budget for art, window treatments, and accessories. In this home I wallpapered the wall behind the tv with a subtle grasscloth, selected a large abstract to center the room, and echoed its colors throughout the accessories. The result is eye-pleasing indeed: soft, textured, interesting and peaceful. This busy family was thrilled with the results.
 Just the Thing Decorating, Staging, and Windows
This recent renovation project began with a desire to open up the kitchen to the family room. Today everyone seems to want the big island to live and entertain around, right?
I always recommend taking your time during the planning phase—6 weeks at least! Kitchens and bathrooms are highly functional areas, so you want to give yourself time to think thoughts like, “where am I going to put all my plastic cups?” I ask my clients lots of questions during this phase to help them design a kitchen that truly has a place for everything. Appliances and plumbing are part of this phase as well.
Once the cabinet design was finalized, the demo began! Because that troublesome wall was load bearing, so the GC, Miland Home Construction, had to install a beam to support the second floor. But once that was done, boy we had a lot of space to work with!
Picking your countertops is a little like picking an ice cream flavor: you really want to see all your options! Not only is function important here, but your counter material is really a major element of the kitchen, so pick one you love! This client fell in love with Taj Mahal Quartzite.
The backsplash was the next layer of fun. Now the mood of the kitchen becomes clear. Will it be elegant? Homey? Rustic? Picking the lighting then becomes like the fine tuner on a microscope, adjusting the view to its perfect clarity.
With construction underway, and the mood of the new space established, soft furnishings become the focus. Layering in luxurious, yet durable fabrics are the name of the game for most families. We all want beautiful spaces that can stand up to spouses, kids, and pets! It’s always a lot fun to select a deep and comfy sofa and chairs!
The finishing touches are what really give the project that designer look—so be sure to save room in the budget for art, window treatments, and accessories. In this home I wallpapered the wall behind the tv with a subtle grasscloth, selected a large abstract to center the room, and echoed its colors throughout the accessories. The result is eye-pleasing indeed: soft, textured, interesting and peaceful. This busy family was thrilled with the results.
 Just the Thing Decorating, Staging, and Windows
This recent renovation project began with a desire to open up the kitchen to the family room. Today everyone seems to want the big island to live and entertain around, right?
I always recommend taking your time during the planning phase—6 weeks at least! Kitchens and bathrooms are highly functional areas, so you want to give yourself time to think thoughts like, “where am I going to put all my plastic cups?” I ask my clients lots of questions during this phase to help them design a kitchen that truly has a place for everything. Appliances and plumbing are part of this phase as well.
Once the cabinet design was finalized, the demo began! Because that troublesome wall was load bearing, so the GC, Miland Home Construction, had to install a beam to support the second floor. But once that was done, boy we had a lot of space to work with!
Picking your countertops is a little like picking an ice cream flavor: you really want to see all your options! Not only is function important here, but your counter material is really a major element of the kitchen, so pick one you love! This client fell in love with Taj Mahal Quartzite.
The backsplash was the next layer of fun. Now the mood of the kitchen becomes clear. Will it be elegant? Homey? Rustic? Picking the lighting then becomes like the fine tuner on a microscope, adjusting the view to its perfect clarity.
With construction underway, and the mood of the new space established, soft furnishings become the focus. Layering in luxurious, yet durable fabrics are the name of the game for most families. We all want beautiful spaces that can stand up to spouses, kids, and pets! It’s always a lot fun to select a deep and comfy sofa and chairs!
The finishing touches are what really give the project that designer look—so be sure to save room in the budget for art, window treatments, and accessories. In this home I wallpapered the wall behind the tv with a subtle grasscloth, selected a large abstract to center the room, and echoed its colors throughout the accessories. The result is eye-pleasing indeed: soft, textured, interesting and peaceful. This busy family was thrilled with the results.
3