
Search results for "Methodically resolve" in Home Design Ideas
 Stebnitz Builders, Inc.
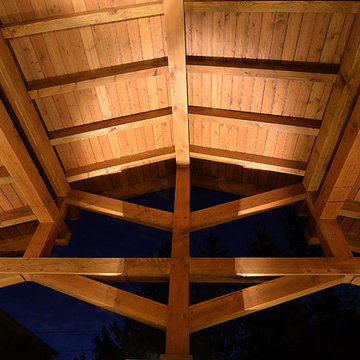
This East Troy home on Booth Lake had a few drainage issues that needed to be resolved, but one thing was clear, the homeowners knew with the proper design features, their property had amazing potential to be a fixture on the lake.
Starting with a redesign of the backyard, including retaining walls and other drainage features, the home was then ready for a radical facelift. We redesigned the entry of the home with a timber frame portico/entryway. The entire portico was built with the old-world artistry of a mortise and tenon framing method. We also designed and installed a new deck and patio facing the lake, installed an integrated driveway and sidewalk system throughout the property and added a splash of evening effects with some beautiful architectural lighting around the house.
A Timber Tech deck with Radiance cable rail system was added off the side of the house to increase lake viewing opportunities and a beautiful stamped concrete patio was installed at the lower level of the house for additional lounging.
Lastly, the original detached garage was razed and rebuilt with a new design that not only suits our client’s needs, but is designed to complement the home’s new look. The garage was built with trusses to create the tongue and groove wood cathedral ceiling and the storage area to the front of the garage. The secondary doors on the lakeside of the garage were installed to allow our client to drive his golf cart along the crushed granite pathways and to provide a stunning view of Booth Lake from the multi-purpose garage.
Terry Mayer http://www.terrymayerphotography.com/
 Allscape Patio & Landscape
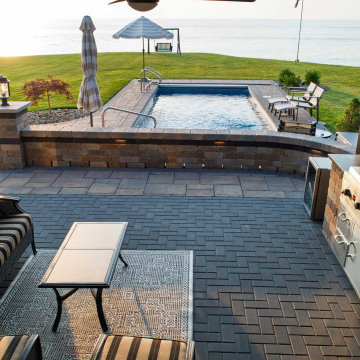
A complete outdoor living environment designed and built for a lakefront property in Northeast Ohio, where the water view had to remain the organizing element of the entire space.
The plan is built around a multi-level paver patio set on a concrete base — a construction method that holds line and elevation through freeze-thaw cycles rather than settling over time. Curved steps with integrated riser lighting connect the upper terrace to the lower patio, and a seat wall with column piers defines the transition without closing off the view.
A motorized pergola anchors the upper level, positioned against the home and detailed to match its lines. Beneath it, a full outdoor kitchen with stainless appliances sits under cover, with a lounge area alongside it. The lower terrace carries a gas fire pit and seating, oriented so the lake stays in view from every position.
The in-ground pool was set into the grade between the patio and the lawn, with paver coping and surround carried through in the same material palette so the pool reads as part of the environment rather than a separate installation.
Patio, pool, pergola, kitchen, fire feature, and lighting were designed together and installed by Allscape Patio. Every element was planned in relation to the others, which is what allows a space of this size to feel resolved rather than assembled.
Scope: multi-level paver patio on concrete, in-ground swimming pool, motorized pergola, outdoor kitchen, gas fire pit, seat walls and column piers, landscape lighting.
 Allscape Patio & Landscape
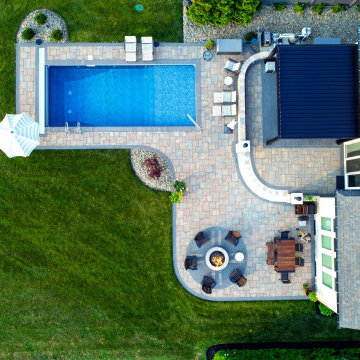
A complete outdoor living environment designed and built for a lakefront property in Northeast Ohio, where the water view had to remain the organizing element of the entire space.
The plan is built around a multi-level paver patio set on a concrete base — a construction method that holds line and elevation through freeze-thaw cycles rather than settling over time. Curved steps with integrated riser lighting connect the upper terrace to the lower patio, and a seat wall with column piers defines the transition without closing off the view.
A motorized pergola anchors the upper level, positioned against the home and detailed to match its lines. Beneath it, a full outdoor kitchen with stainless appliances sits under cover, with a lounge area alongside it. The lower terrace carries a gas fire pit and seating, oriented so the lake stays in view from every position.
The in-ground pool was set into the grade between the patio and the lawn, with paver coping and surround carried through in the same material palette so the pool reads as part of the environment rather than a separate installation.
Patio, pool, pergola, kitchen, fire feature, and lighting were designed together and installed by Allscape Patio. Every element was planned in relation to the others, which is what allows a space of this size to feel resolved rather than assembled.
Scope: multi-level paver patio on concrete, in-ground swimming pool, motorized pergola, outdoor kitchen, gas fire pit, seat walls and column piers, landscape lighting.
Find the right local pro for your project

 Free Lancing
Effective residential construction project management is crucial in today’s fast-moving building industry. It means overseeing every step of building a home, from planning to finishing, to ensure projects are completed time, within budget, and with high quality. Unlike commercial projects, residential projects require special attention to meet homeowners' unique needs and wishes, requiring a customized approach from the beginning to the end.
In 2025, the construction sector will use advanced technologies like AI and integrated project delivery (IPD) to streamline processes and improve stakeholder collaboration. However, project managers face significant challenges, including managing risks, maintaining quality control, and ensuring effective communication among team members.
A WIP Report (Work-in-Progress Report) is a key tool that helps track a project's budget, progress, and resource use. It provides clear insights, making managing costs easier, avoiding delays, and making informed decisions.
By adopting best practices and using modern construction management tools, project managers can overcome these challenges and deliver successful residential construction projects that meet client expectations and contribute to a sustainable future.
This article provides a brief overview of residential construction project management, highlights its importance, and touches on the challenges faced by project managers while incorporating the latest trends and technologies in the field.
Types of Residential Construction Management
Here are the different types of Residential Construction Management:
Single-Family Homes: These are standalone houses built for individual families. Managing these projects involves overseeing construction from planning to completion, ensuring that the home meets the owner's preferences and budget.
Multi-Family Housing: This includes apartments, condominiums, and townhouses. Projects of this type require managing multiple units, often with shared facilities, and ensuring compliance with local building codes.
Custom Home Building: This involves constructing homes tailored to specific client needs. Close collaboration with architects and designers is required to ensure the house reflects the owner's personality and preferences.
Home Renovation and Remodeling: These projects focus on updating or expanding existing homes. They often involve working with subcontractors for specialized tasks like electrical or plumbing work.
Components of Residential Construction Project Management
Managing a residential construction project requires carefully coordinating people, materials, and timelines. A well-structured approach ensures efficiency, cost control, and high-quality results.
Roles and Responsibilities
A project manager plays a vital role in residential construction. They oversee every step from planning to completion and ensure the project stays on schedule, within budget, and meets quality standards.
Project Manager’s Role in Home Construction
The project manager is responsible for organizing tasks, managing resources, and solving problems that arise during construction. They coordinate between different teams, track progress, and ensure safety regulations are followed.
Collaboration with Contractors, Architects, and Stakeholders
Successful residential construction requires teamwork. Project managers work closely with architects to bring designs to new heights, coordinate with contractors to manage labor and materials, and keep stakeholders (such as homeowners and investors) informed about project updates.
Client Communication and Expectations Management
Clear communication with clients is essential. The project manager keeps homeowners updated on timelines, changes, and challenges. Setting realistic expectations and providing regular updates, they help avoid misunderstandings and keep the project running smoothly.
Project Scope & Planning
Practical project planning sets the foundation for a successful residential construction project. It ensures clear goals, minimizes risks, and keeps the project on track.
Defining Project Objectives and Deliverables:
Clearly outlining what needs to be done and what the final result should look like is essential. This involves setting specific, measurable goals that align with the homeowner's vision and budget.
Managing Homeowner Expectations and Scope Creep:
Homeowners often have changing needs or ideas. Effective project managers must manage these expectations to prevent "scope creep," which can delay projects and increase costs. This involves open communication and setting clear boundaries.
Ensuring Compliance with Zoning Laws and Permits:
Before construction begins, it's crucial to ensure that all necessary permits are obtained and that the project complies with local zoning laws. This step avoids costly fines and delays, ensuring the project moves forward smoothly.
Budgeting & Cost Control
Proper budgeting is essential for keeping residential construction projects financially viable. Effective cost management prevents overspending and ensures profitability.
Accurate Cost Estimation for Residential Projects
A precise cost estimate considers labor, materials, permits, and unexpected expenses. Using historical data and Sage 300 CRE for financial management improves accuracy and helps set realistic budgets.
Budget Allocation and Tracking
Allocating funds efficiently ensures that each phase of the project receives the necessary resources. Tracking expenses through Construction & Financial Dashboards allows for real-time monitoring and early detection of budget deviations.
Preventing Budget Overruns
Uncontrolled costs can derail a project. Regular financial reviews, automated alerts for overspending, and contingency planning help keep expenses in check and prevent financial strain.
Scheduling & Timeline Management
Timely project completion is crucial in residential construction. Effective scheduling minimizes delays and ensures a smooth workflow.
Creating Detailed Project Schedules
A structured schedule outlines all tasks, deadlines, and dependencies. Breaking down the project into phases, planning, execution, and finishing, helps maintain order and clarity.
Preventing Delays & Meeting Deadlines
Delays can result from labor shortages, weather conditions, or supply chain issues. To avoid problems, it’s good to check for risks ahead of time, add extra time to schedules, and keep everyone on the same page.
Using Gantt Charts and Critical Path Methods
CPM for Construction helps identify critical activities that directly impact project completion, while Gantt charts provide a visual timeline of tasks. Both tools optimize scheduling and improve efficiency.
Residential Construction Project Management Phases
Managing a residential construction project effectively requires a structured approach through various phases. Each phase plays a critical role in ensuring the project's success, from initial planning to completion.
Pre-Construction Phase
The pre-construction phase sets the foundation for a smooth and efficient building process. Proper planning at this stage helps prevent costly changes and delays later.
Site Analysis & Approvals: A thorough site analysis assesses soil conditions, topography, and environmental factors. Feasibility studies evaluate project viability, including costs and regulatory compliance. Obtaining zoning approvals, permits, and other legal clearances is crucial before breaking ground.
Selecting Materials and Procurement Strategies: Choosing the right materials impacts durability, sustainability, and cost efficiency. A well-planned procurement strategy, including bulk purchasing and reliable supplier partnerships, ensures timely delivery and cost savings. Using Sage 300 CRE for procurement management helps streamline material sourcing and financial planning.
Construction Phase
The construction phase transforms plans into reality. Effective coordination and strict quality control ensure a successful build.
Resource Allocation and Workflow Coordination: Efficiently managing labor, equipment, and materials is key to maintaining progress. Using CPM for Construction, project managers can allocate resources strategically, prevent bottlenecks, and optimize workflows for timely completion.
Project Closeout & Handover
The final phase of residential construction project management is crucial for ensuring a smooth transition from construction to occupancy. Proper closeout procedures guarantee quality, client satisfaction, and long-term project success.
Final Inspections and Quality Assurance: Before finishing the project, a final inspection checks that everything meets safety rules and quality standards. Any problems need to be fixed quickly. Using Procore helps make inspections and tracking issues easier, ensuring a high-quality final product.
Client Walkthrough and Support: A final check helps homeowners see the finished work, ask questions, and make sure it meets their expectations. This is also a chance to explain important home features and maintenance tips. Good communication here builds trust and strengthens relationships.
Warranty Management and Feedback: Efficient warranty management ensures clients get quick help for any issues after construction. A clear process for tracking requests and keeping in touch with homeowners boosts satisfaction. Collecting feedback helps improve future projects. Using S-Curve Forecasting tracks performance trends and refines management strategies.
Software for Residential Construction Project Management
The integration of technology in residential construction project management has revolutionized the way projects are planned, executed, and monitored. Digital tools streamline operations, reduce costs, and improve communication, making them essential for modern construction firms.
Importance of Digital Tools
Investing in digital tools is crucial for construction firms as it transforms the industry by enhancing efficiency, accuracy, and collaboration across the entire project lifecycle. They also improve project management by streamlining processes, automating tasks, and facilitating real-time stakeholder communication.
Top Construction Management Software for Residential Projects
Several software solutions are available for managing residential construction projects:
Procore: Known for its comprehensive project management features, including document management and collaboration tools.
Sage 300 CRE: Offers robust accounting and financial management capabilities, ideal for large-scale construction projects.
Buildertrend: Specializes in residential construction, providing tools for project scheduling, budgeting, and client communication.
CoConstruct: Focuses on custom home building and remodeling, offering features for estimating, scheduling, and project management.
WIP Reports: Useful for tracking work-in-progress and managing project finances effectively.
Features Comparison and Best Use Cases:
Procore: Best for large projects requiring extensive collaboration and document management.
Sage 300 CRE: Ideal for firms needing robust financial management.
Buildertrend: Suitable for residential builders focusing on client communication and project scheduling.
CoConstruct: Perfect for custom home builders who need detailed estimating and scheduling tools.
WIP Reports: Useful for firms needing to track project finances closely.
How Software Improves Project Efficiency
Construction management software significantly enhances project efficiency in several ways:
Automating Accounting and Job Costing: Software like Sage 300 CRE automates financial tasks, reducing manual errors and improving budget tracking.
Streamlining Document Management and Communication: Tools like Procore centralize documents and facilitate real-time communication among team members, reducing misunderstandings and delays.
Mobile-Friendly Solutions for Real-Time Tracking: Mobile apps from platforms like Buildertrend allow for on-site access to project data, enabling real-time tracking and decision-making.
These digital tools and software solutions are essential for modern residential construction project management, offering benefits such as improved efficiency, enhanced collaboration, and better financial control.
Challenges in Residential Construction Project Management
Residential construction projects face a variety of challenges that can impact their success. Here are some of the key issues project managers encounter:
Managing Subcontractors and Labor Shortages
One of the biggest challenges in residential construction is managing subcontractors and dealing with labor shortages. Subcontractors often have their own schedules and priorities, which can lead to delays if not coordinated properly. Additionally, labor shortages can slow down projects and increase costs due to the need for overtime or hiring temporary workers.
Budget Overruns and Unexpected Costs
Budget overruns are common in residential construction due to factors like material price fluctuations, unexpected site conditions, or changes in project scope. Effective budget management involves regularly monitoring expenses and having contingency plans for unexpected costs.
Changing Construction and Eco Rules
Construction and Eco Rules are always changing, so project managers need to keep up with the latest regulations. This involves following guidelines for saving energy, protecting the environment, and ensuring safety. Ignoring these rules can lead to fines, delays, or even stopping the project.
Best Practices
To ensure your residential construction projects run smoothly and successfully, follow these essential best practices:
Setting Clear Project Goals and Milestones
Clearly defining what you want to achieve is the first step to success. Set specific, measurable, achievable, relevant, and time-bound (SMART) goals. This helps everyone involved understand what needs to be done and by when. For example, instead of saying "build a house," say "build a house with three bedrooms and two bathrooms within the next nine months."
Stakeholder Collaboration
Good communication is key to keeping everyone on the same page. Regular meetings with contractors, suppliers, and homeowners help prevent misunderstandings and ensure that everyone knows what's happening and what's next. This open dialogue also helps resolve issues quickly, preventing small problems from becoming big delays.
Using Data-Driven Insights for Decision-Making
Making decisions based on facts rather than guesses is crucial. Use data and analytics to understand project progress, identify potential issues early, and make informed decisions. For instance, if data shows that a particular material is consistently causing delays, you can plan ahead to avoid those delays in the future.
Proactive Risk Management Strategies
Things don't always go as planned, so being prepared is essential. Identify potential risks early and have a plan to manage them. This might include having backup suppliers, planning for weather conditions, or setting aside extra funds for unexpected expenses. Being proactive can prevent small issues from turning into major problems.
Conclusion
Effective residential construction project management requires careful planning, clear communication, and the right digital tools. From single-family homes to multi-family housing and custom projects, managing timelines, budgets, and quality is essential for success.
By following best practices, using project management software, and staying ahead of industry trends, project managers can ensure smooth execution and client satisfaction despite challenges like labor shortages, budget overruns, and regulatory compliance; modern technology and strategic planning help mitigate risks.
Construction firms can improve efficiency, enhance collaboration, and maintain financial control by adopting advanced tools like Procore, Sage 300 CRE, and Buildertrend. A well-managed project delivers a quality home and builds trust and long-term success in the industry.
FAQs
What is residential construction project management?
It involves overseeing all aspects of building residential properties, from initial planning and design to construction and completion, ensuring projects are completed on time, within budget, and to the desired quality standards.
How can I prevent budget overruns in my construction project?
Accurate cost estimation, continuous budget tracking, and having contingency plans for unexpected expenses are key strategies to prevent budget overruns.
What are the main stages of a residential construction project?
The primary stages include design, pre-construction, procurement, and construction.
How does construction management software improve project efficiency?
It streamlines processes like scheduling, budgeting, and communication, providing real-time data access and collaboration among stakeholders, which enhances overall project efficiency.
How can I ensure my project complies with local building codes and regulations?
Engage professionals familiar with local laws, obtain all necessary permits before starting, and conduct regular inspections to ensure adherence to building codes and regulations.

 Dale Cohen Designstudio
Dale was chosen to participate in the 2013 Hampton Designer Showhouse, sponsored by Traditional Home Magazine, because she has built a reputation for precise, elegant, and livable design work in Manhattan. The challenge of the showhouse, essentially a blank canvas with an imaginary client, was not beyond her. The room she was given is the Terrace Level Lounge; she chose a program to embrace a burgeoning art collection, and devise areas of repose to enjoy the work. And Ms. Cohen’s early training as a painter and photographer clearly are clearly a great asset in this particular room. Her method is to analyze the room as an architectural proposition. A Yale Architectural School graduate, she is able to cast a few intelligent moves to make the room a stage rather than a hallway. Creating a platform for her creative collaboration and designing the Monumental Lantern with artist John Houshmand.
The seating areas are a series of compressed compositions with shapes and forms of chairs, a Minotti sofa, a Valerie Goodman Gallery coffee table, and the Holland and Sherry geometric throw pillows that evoke the early modernist paintings of Jean Arp. Accented by ceiling panels covered in a Maharam wallpaper. Her next big move was enrolling the work of artist and furniture maker John Houshmand. Ms. Cohen thrives on creative collaboration and designing the Monumental Lantern that with Houshmand, that she boldly placed in one entire corner of the room. Few designers would welcome a giant rough sawn luminaire but Ms. Cohen’s early apprenticeship with Richard Serra is evident in this wonderful juxtaposition of scale. Ms. Cohen’s reputation as a brave designer has been established with the inclusion of Houshmand’s piece.
Ms. Cohen’s method is to analyze the room as an architectural proposition. A Yale Architectural School graduate, she is able to cast a few intelligent moves to make the room a stage rather than a hallway. The stairway was divided into two events, one behind a scrim and the other revealed. This gave the sitting area a theatrical backdrop as well as choreographing a Hollywood-style entrance for the visitor walking down the stairs. In fact Ms. Cohen uses a series of fabric backdrops throughout the space to denote different spatial conditions.
The color palette, if said aloud, is the prototypical Hamptons beach house cheery; though Ms. Cohen’s take is altogether different. With a sea blue as her base, she treats the envelope of the space with tinted whites and grays, and just as you are comfortable with this resolve she infuses the space with drops of chartreuse. The optic shock of an electric green is a sign of strength in Ms. Cohen’s tool box. The result is a perfect balance of whimsy and sophistication.
Whimsy, bravery, and compositional sophistication will not be evident or sufficient without Ms. Cohen’s razor sharp rigor. Her attention to detail is what makes one want to sit in the Fritz Hansen chair, under the reading light, with cashmere throw at its side. Ms. Cohen’s embrace of the luxury of detail is what makes for valuable moments in the design world and what sets her work apart.
 Tile Doctor Ltd
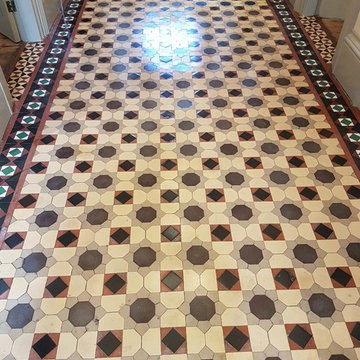
I recently re-visited a Victorian period property in the Leeds suburb of Headingley which had an unusually large tiled entrance hall which we believe to be as old as the property itself. I say re-visited as I actually gave this floor a deep clean and reseal around five years ago; it’s always nice to be asked to return to a job as it shows the customers was very happy with the work. However, with five years of wear and tear the sealer had worn down and the floor was now starting to trap dirt, also it had lost the attractive shine added by the sealer and the owner felt it was time to have it done again. Additionally, the owner had recently had the whole house decorated and wanted the floor to look its best and match the fresh appearance of the property.
Sealers do wear off with use and so it is inevitable that the tiles will need to be cleaned and sealed again with time. Given it hadn’t had a professional clean and seal for five years the floor wasn’t looking too bad as you can see from the picture, it was just a bit dull in the high traffic areas such as along the centre. I’ve certainly seen a lot worse.
Initially I wasn’t 100% sure on which cleaning method l was going to use on this floor. Originally l thought about using a coarse 200-grit burnishing pad to take off a couple of layers of sealer and then re-apply 2 more coats. However, the finish on the floor wasn’t even across the width of the hallway and l felt using that approach wouldn’t resolve that. Additionally, a lot of tiles were pitted and a burnishing pad would struggle to get into the holes. So instead I decided to completely strip the floor and re-seal it which would ensure a uniform finish across the floor.
I used a strong 50:50 dilution of Tile Doctor Pro-Clean on the tiles and scrubbed it in with a black floor pad which removed the old sealer and ingrained dirt. The large floor pads are not very effective in the corners and edges, so I used a 6-inch red buffing pad fitted to a hand buffer for those. The floor was rinsed with water and the soil extracted using a wet vacuum. After inspecting the floor some areas were retreated with a repeat of the same process.
After a final rinse and extraction of the soiled water the floor was left to dry overnight.
The next day after first checking the floor was dry with a damp meter it was sealed with four coats of Tile Doctor Seal and Go. This is a water based sealer that gives a lovely sheen and allows the colours to shine through as well as letting the floor breath, which is important in properties of this age that usually do not have a damp proof membrane.
I was very pleased with the finished result as the pictures show and glad that l had chosen to do a deep clean and not just apply more coats of sealer. The client was over the moon.
Nigel Stoker
North West Yorkshire Tile Doctor
 Tile Doctor Ltd
I was contacted about a Georgian property in the Kent village of Leeds , to see if I could do anything to improve a Travertine tiled floor. The use of Travertine was extensive and had been installed throughout the ground floor including the kitchen, dining room, utility and bathroom WC. Travertine is probably my favourite stone, but it is acid sensitive and attracts dirt easily, due to its ‘holey’ composition.
Initially we discussed the floor over the phone where I got to know about the issues they were experiencing, and I detailed the renovation process I normally use to restore it including the products and timelines. Naturally they wanted to me to provide a quote for the work however its tricky to do that accurately without seeing the floor, so I arranged a date to pop over.
Upon arriving I could see the tiles and the wide grout joints had extensive, ingrained dirt indicating the previous sealer had long since worn away. This is a common issue with stone floors, and to re-assure myself and the client it could be resolved I cleaned a small area in the utility room with pleasing results!
This test clean helped me to understand which products and methods would work best on the floor and later that day I emailed over a detailed quote for the renovation. Happy with the quote I received a reply the same day asking when I could start.
My colleague and I arrived on the agreed date and work started with adding protection to all areas that required it. We use a lot of water during the cleaning process and some materials such as MDF can become damaged with water ingress, so it makes sense to do this.
To get the floor clean, a coarse Carbide Brush fitted to a rotary machine was run over the Travertine tiles to scrub in a strong solution of Tile Doctor Pro-Clean. This process generates a lot of slurry as the dirt was washed out of the stone and grout which is extracted with a wet vacuum as we progressed.
Next it was on hands and knees with more Tile Doctor Pro-Clean and handheld brushes run over stubborn areas and along the grout lines to take them from 80% up to 100%.
Happy with the results, the next step was to renovate the stone using a series of diamond encrusted burnishing pads. Using only water for lubrication this process starts with the application of a coarse 400-grit burnishing pad attached to the floor buffer. This produces a lot of slurry which again was removed with a wet vacuum.
This left the Travertine clean, but the pores of the stone had been opened giving the floor a matt finish and more absorbent than it was originally. To further refine the appearance of the stone the next two burnishing pads were applied which are 800 and 1500-grit. These pads polish the stone and close the pores, restoring the natural sheen in the process. After each pad was applied the slurry was rinsed off the floor with water and extracted with the wet vacuum. Once complete the floor was left to dry off fully overnight.
I arrived the next day and took several moisture readings from the floor to check that it had dried off sufficiently overnight. The results were good, so work moved onto sealing the Travertine with two coats of Tile Doctor Ultra Seal which is a natural look impregnating sealer. It works by soaking into the stone, occupying the pores and thereby preventing dirt from becoming ingrained there. This ensures dirt remains on the surface where it is easily cleaned away.
The final step in the floor’s renovation was to apply the last of the diamond polishing pads which is a very fine 3000-grit. This pad further improves the polished appearance of the stone resulting in a satisfying sheen.
The work made a massive difference to the floor, and I received an email the next day from one of the owners who was really pleased with the transformation:
”Floors look brilliant. Very pleased.”
For the care and maintenance of polished sealed floors I recommend the use of Tile Doctor’s Stone Soap which is a gentle but effective cleaning product that won’t impact the sealer and contains a patina enhancer. When it comes to sealed floors my mantra is:
“If you look after the sealer, the sealer will look after the floor!”
Graham Davis
North Kent Tile Doctor
 Tile Doctor Ltd
Bridgwater is known to be one of Somerset’s liveliest towns. With a history dating back over 1000 years, it has many traditions, including a carnival which happens every November, and is hailed as the world’s largest illumination procession.
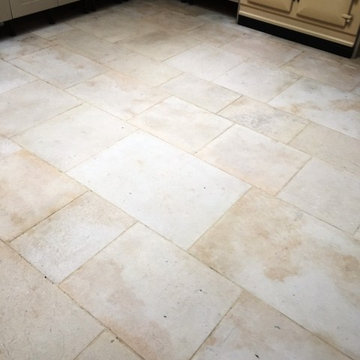
What wasn’t looking lively, however, was this Limestone tiled kitchen floor at a house in the town. It had been laid five years previously but at the time of laying hadn’t been sealed with adequate amounts of sealer.
As a result, the Limestone had absorbed a lot of wet footprints and other dirty stains. The sealer simply broke down after a while, leaving the homeowner with a floor that never looked clean no matter how much they cleaned it – using all kinds of products. In fact, the tiles looked blackened and mouldy, as you can see in the photos below.
It was time for the homeowner to seek out professional assistance, so she decided to contact her local Tile Doctor. I was asked to completely restore the look of the floor – something the homeowner had deemed impossible at this point.
In practice, I knew the floor could be restored using the right products and methods including a really deep clean and resealing with the right type of sealer for these tiles.
I scrubbed in Tile Doctor Remove and Go, which is a powerful coatings remover which draws out ingrained stains and strips away any old sealer remaining on the tiles. The floor was then rinsed thoroughly with plain water to neutralise it, and the resulting soiled solution was extracted using a wet vacuum. I repeated the process on stubborn areas, eventually transforming the floor back to its natural and clean state.
I allowed the Limestone to dry out completely overnight before returning to the property to seal the tiles. This is important as the slightest amount of excess moisture can damage the performance of the sealer, and we would’ve been back to square one!
After checking with a damp meter, I could see everything was fine, so I proceeded to seal the floor with Tile Doctor Colour Grow, which is not only a robust impregnating sealer that will protect the floor going forward but also enhancing the natural colours in the stone at the same time.
In the space of two days, the Limestone tiles had been completely transformed. Now it had been properly sealed, the floor will be much easier to clean and therefore should stay looking great for a long time to come. The customer was very happy to have finally resolved the problem with some assistance from the Somerset Tile Doctor!
Dave Hurst
Somerset Tile Doctor
 Tile Doctor Ltd
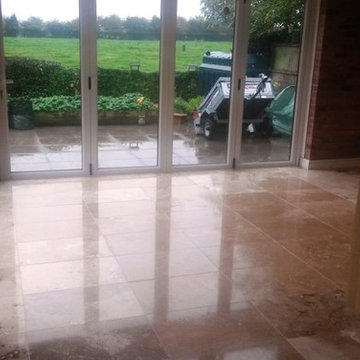
This customer had some real difficulty in getting their fantastic Travertine tiled kitchen area looking as good as it should. The cleaning methods they had previously employed were unable to prevent the tiles from appearing dull, and the customer was also unable to deal with the displeasing marks and small cracks damaging the stone.
Keen to get the floor back to looking its best, the customer called me down to their property, which overlooks the beautiful countryside area of Ashbourne, to see what could be done to restore the tiles.
Upon my arrival at the property, I assessed the situation and resolved that the best way to restore the polish and general appearance of the floor was to use a process known as burnishing. The burnishing process, which involves the application of four diamond encrusted polishing pads of varying grit, works to grind away ingrained dirt while smoothing and polishing rough surfaces. Most commonly we use burnishing to restore the shine to Limestone and Marble tiles, but it can be used on most types of natural stone floor where a deep polish is required.
To start the process, I applied the Coarse 400 grit burnishing pad to the floor using a small amount of water as lubrication in order to break down and remove any old sealer from the stone. Once this had been done across the entirety of the floor, I removed any soiled water with a wet-vac machine; this removal of soiled residue was repeated after each use of a burnishing pad.
Next, I moved on to the Medium 800 grit pad which is less coarse than the 400 grit, but still rough enough still to break down layers of ingrained dirt. I followed this up with the application of a Fine 1500 grit pad, which started to smooth down the rough areas of the surface to prepare the floor for a final polish with an even finer burnishing pad later on. Before moving straight on to the final of the four pads, I took the time to carefully fill in the all of the small cracks and holes in the stone, before leaving the floor to dry until the next day.
The next morning, I returned to the property to finish off the floor restoration. As soon as I arrived I used a damp tester to make sure the floor was completely dry. Noticing a number of small damp spots, I opted to use my heat gun to speed up the drying process.
Once the floor was completely dry, I used the Very Fine 3000 burnishing pad – the last of the four – without any lubricant to finally achieve a high quality polished finish. For polished floors it is recommended to use an impregnating sealer that penetrates into the pores of the stone rather than sitting on the surface of the floor, as this ensures the quality of the polish isn’t damaged.
As such I opted to use Tile Doctor Colour Grow to seal the tiles. This is a colour intensifying sealer that provides durable surface protection and allows the surface to breathe whilst enhancing the natural colours in the stone. It’s important that any sealer that doesn’t penetrate into the stone is removed by polishing it off with a cloth.
After completing the seal, I went over the floor for a final time with the 3000 grit diamond burnishing pad to leave a smooth and shiny polished finish. Needless to say that the customer was very happy with result as they had never before been able to get the floor looking this good!
Tony Olmet
Derbyshire Tile Doctor
 Tile Doctor Ltd
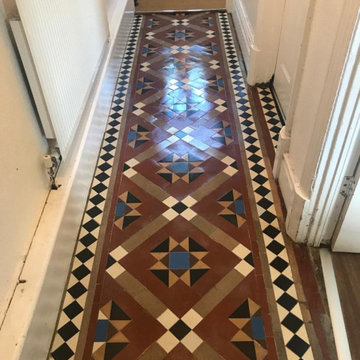
I recently worked on the restoration of a Victorian tiled hallway in Cwmbran Wales which is six miles North of Newport. As you can see from the photographs the floor was in quite a neglected dirty state and many of the the black and white border tiles needed removing and replacing. The worst part was the area by the front door where most of the tiles had been removed and then backfilled with concrete. I can only assume at some point in the past it was deemed to difficult or expensive to restore the floor, so they simply covered it up.
After visiting to survey the floor I did offer to source replacements for the concreted section and restore that as part of the work however my client’s budget would not stretch to that at the time. My quote was therefore focused on the main section of flooring and included replacing border tiles, deep cleaning the whole floor and then sealing the tiles to add protection. Although I did need to check that I could indeed source the replacement tiles before being able to provide the quote which as it turned out would not be an issue.
They were happy to go ahead and we arranged a suitable time to carry out the work which would enable me to work in the property whilst minimising contact with the owners due to the Covid-19 situation.
I spend the first day sorting out the black and white border tiles which needed to be gently prised out of position without upsetting the main part of the floor. The exposed subfloor was then cleaned up to remove old adhesive and replacements were fitted where required and secured into place. The floor would need to be solid before cleaning so that was left for day two so the new adhesive could go off overnight.
On day two I gave the floor an initial clean using a combination of Tile Doctor Pro-Clean and Remove and Go diluted with water. This produces a strong cleaner/stripper that will tackle dirt and remove coatings such as previous sealers. The old tiles had accumulated years of ingrained dirt, so I needed this extra power to remove the years of dirt and contaminates from the tile. It was sprayed onto the tiles and then left to soak in for ten minutes before being actively scrubbed into the tile using a rotary machine fitted with a black scrubbing pad. The soil was then rinsed off with water and extracted with a wet vacuum. The floor was inspected, and the process repeated on the tough stains until I was satisfied all the dirt had been removed.
Next the floor was treated to an acid wash using Tile Doctor Acid Gel using a similar method as before. This is an important treatment for these old Victorian floors that have no damp proof course as it neutralises efflorescent salts trapped in the tile which can appear as white salt deposits later. Once I was happy with the condition of the floor it was given a final rinse and left to dry off. I use a wet vacuum to remove liquids from the floor and on this last extraction I spent extra time to remove as much moisture from the tiles as possible.
I came back a few days later and after checking the tiles were dry using a damp meter, I started the application of the sealer. For this floor I applied seven coats of Tile Doctor Seal and Go for a satin finish. Tile Doctor Seal and Go is a specially formulated water-based sealer that provides both stain resistance and a durable low-sheen finish. It is perfect on a floor of this age where it leaves a lovely finish and will remain durable in what is a essentially a high traffic area.
Although we didn’t manage to sort out the area by the front door the client managed to fit a made to measure coir door mat along with carpet bar which was quite practical and looked fine so they were able to resolve that problem without blowing their budget.
The client was over the moon with results, the floor had a lovely pattern and the colours now shone through. I suggested the use of Tile Doctor Neutral Tile Cleaner to keep the floor clean and in good condition. It is neutral in pH so will ensure that the newly applied sealer stays in place and will ensure maintenance is nice and easy for them.
Paul Wales
Monmouthshire Tile Doctor
 Tile Doctor Ltd
It’s not often that we get called abroad for a job, but when we do, it’s always a fantastic experience. We have done a few jobs abroad in the past, including the restoration of Terracotta tiled restaurant floor at a hotel in Addis Ababa, Ethiopia. This job was closer to home at a chateau in the town of Arcis-le-Ponsart near Reims, located in the Champagne-Ardenne region of North Eastern France. As its name suggests, the Champagne-Ardenne region is famous for its champagne.
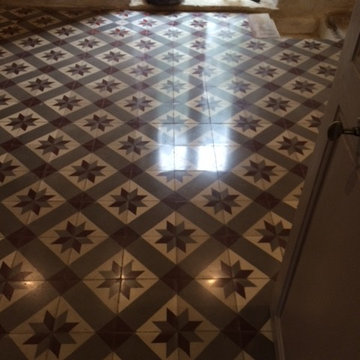
The owner of the chateau was, in fact, an English property developer. He asked us to work on two floors: a Terracotta tiled hallway, and a French Victorian tiled floor. The French style of Victorian tiles are actually made of encaustic cement rather than clay, so we were excited to have the chance to work on something a bit out of the ordinary.
It was going to be a long trip, so after packing the van with the necessary equipment and Tile Doctor products Heidi and I set off to France via the Channel Tunnel. Fortunately, we avoided any disruptions both on the way there and the way back!
On arrival at the chateau, we immediately spent two hours running tests on the two floors to determine the most effective processes. We had four days in which to complete the job, so it was essential to make sure our methods were correct before beginning to avoid any unwelcome surprises later on!
After running the tests, we set about cleaning the Victorian tiles using a combination of clean water and diamond burnishing pads. No damage was done to the tiles, and they polished up well. Following the cleaning process, we began sealing the floor using Tile Doctor Colour Grow, a sealer which helps to bring out the colour in the stone while also providing durable surface protection. We were only able to apply one coat of sealer, however, as the second coat kept smearing, preventing the shine from settling in – this was despite testing the process earlier. Nonetheless, we resolved to polish off the one coat we could apply with a fine burnishing pad. Thankfully, the results were still very good.
The Terracotta tiled hallway had no sealer, and so it had, over time, become very dirty. We cleaned the tiles using a solution of one part Tile Doctor Pro Clean to five parts clean water, in combination with a couple of black burnishing pads.
As you can see from the pictures, the combination really helped to lift out the ingrained dirt, leaving the tiles looking at their best again. The floor took three days to dry completely before we could begin the sealing process. Once the floor was dry enough to seal, we applied eight coats of Tile Doctor Seal & Go, which is suitable for use on a variety of internal, unsealed porous surfaces.
It was a long and exhausting week but the client was delighted with the results on both floors and left the following comments, he also mentioned using Tile Doctor in the future to work on the other properties he is developing.
“Thanks for yours and Heidi’s work in renovating our floors. It was also great to meet you guys and I hope you have enjoyed your visit to champagne and will come back some time. “
 Tile Doctor Ltd
If you have a tiled shower area in your home, it’s very likely you’ve experienced problems with the grout becoming excessively dirty and ridden with displeasing black spots of mould. The underlying issue is due to inadequate ventilation which can be a real problem in modern insulated houses and occasionally the grout can get so imbued with contamination that the problem needs to be resolved professionally.
In the case of this Ceramic tiled shower area, located at a property in Galgate, Lancashire, mould had turned the grout black and had got into the sealant strip around the base. The property owner had tried using the run-of-the-mill cleaning products you can buy in superstores, but they simply couldn’t get the job done. So, she contacted me to see what could be done.
At Tile Doctor, we come across the problem of mouldy shower tiles very often. Excess soaps and shampoos – many of which contain chemicals that harmful to the grout – can quickly build-up if not removed, causing mould and soap scum to emerge quickly, and before you know it, you have a problem like this one.
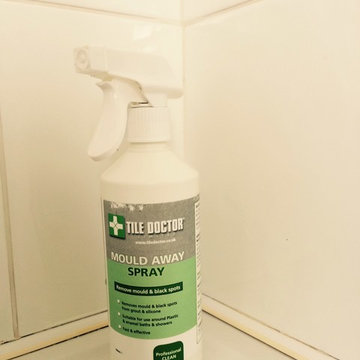
Thankfully, with the right strength product and cleaning methods, mould can be removed quite easily. The cleaning product used here was Tile Doctor Mould Away, which does what it says on the bottle and can quickly remove mould and black spots from grout and silicone. I applied Mould Away to the grout and surrounding Ceramic tiles and left it to dwell for a short period, before starting to clean the affected areas carefully using soft nail brushes and a small amount of water.
Sometimes it is necessary to repeat this process several times to achieve the best possible results, but in this case two attempts was all it took to get the grout looking like new once again.
Following the cleaning, the area was rinsed thoroughly with water, before bring dried off quickly with a heat gun on a low setting. I then sealed the grout with a single coat of Tile Doctor Wall Grout Sealer, which is a water-based sealer designed to protect against water, oil and acid-based contaminants, and stop them from spoiling the appearance of the grout. It also provides a transparent finish that does not diminish the original colouring of the grout. To add the finishing touches, I polished off the Ceramic tiles as these were already fully glazed and did not require any extra sealer.
The before and after photos are a testament to how significantly the condition and appearance of the grout was quickly improved and needless to say, the customer was very satisfied with the result.
Russell Taylor
Lancashire Tile Doctor
 Allscape Patio & Landscape
A complete outdoor living environment designed and built for a lakefront property in Northeast Ohio, where the water view had to remain the organizing element of the entire space.
The plan is built around a multi-level paver patio set on a concrete base — a construction method that holds line and elevation through freeze-thaw cycles rather than settling over time. Curved steps with integrated riser lighting connect the upper terrace to the lower patio, and a seat wall with column piers defines the transition without closing off the view.
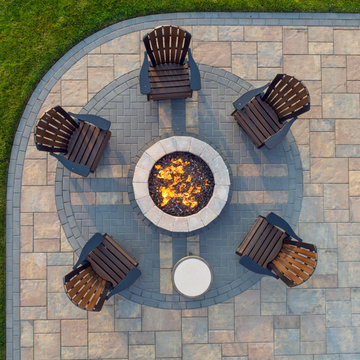
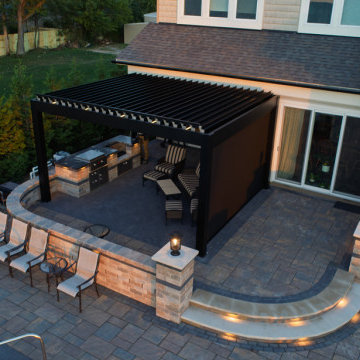
A motorized pergola anchors the upper level, positioned against the home and detailed to match its lines. Beneath it, a full outdoor kitchen with stainless appliances sits under cover, with a lounge area alongside it. The lower terrace carries a gas fire pit and seating, oriented so the lake stays in view from every position.
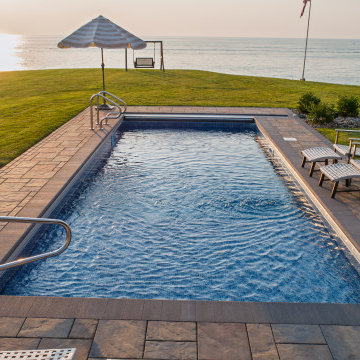
The in-ground pool was set into the grade between the patio and the lawn, with paver coping and surround carried through in the same material palette so the pool reads as part of the environment rather than a separate installation.
Patio, pool, pergola, kitchen, fire feature, and lighting were designed together and installed by Allscape Patio. Every element was planned in relation to the others, which is what allows a space of this size to feel resolved rather than assembled.
Scope: multi-level paver patio on concrete, in-ground swimming pool, motorized pergola, outdoor kitchen, gas fire pit, seat walls and column piers, landscape lighting.
 Allscape Patio & Landscape
A complete outdoor living environment designed and built for a lakefront property in Northeast Ohio, where the water view had to remain the organizing element of the entire space.
The plan is built around a multi-level paver patio set on a concrete base — a construction method that holds line and elevation through freeze-thaw cycles rather than settling over time. Curved steps with integrated riser lighting connect the upper terrace to the lower patio, and a seat wall with column piers defines the transition without closing off the view.
A motorized pergola anchors the upper level, positioned against the home and detailed to match its lines. Beneath it, a full outdoor kitchen with stainless appliances sits under cover, with a lounge area alongside it. The lower terrace carries a gas fire pit and seating, oriented so the lake stays in view from every position.
The in-ground pool was set into the grade between the patio and the lawn, with paver coping and surround carried through in the same material palette so the pool reads as part of the environment rather than a separate installation.
Patio, pool, pergola, kitchen, fire feature, and lighting were designed together and installed by Allscape Patio. Every element was planned in relation to the others, which is what allows a space of this size to feel resolved rather than assembled.
Scope: multi-level paver patio on concrete, in-ground swimming pool, motorized pergola, outdoor kitchen, gas fire pit, seat walls and column piers, landscape lighting.
 Allscape Patio & Landscape
A complete outdoor living environment designed and built for a lakefront property in Northeast Ohio, where the water view had to remain the organizing element of the entire space.
The plan is built around a multi-level paver patio set on a concrete base — a construction method that holds line and elevation through freeze-thaw cycles rather than settling over time. Curved steps with integrated riser lighting connect the upper terrace to the lower patio, and a seat wall with column piers defines the transition without closing off the view.
A motorized pergola anchors the upper level, positioned against the home and detailed to match its lines. Beneath it, a full outdoor kitchen with stainless appliances sits under cover, with a lounge area alongside it. The lower terrace carries a gas fire pit and seating, oriented so the lake stays in view from every position.
The in-ground pool was set into the grade between the patio and the lawn, with paver coping and surround carried through in the same material palette so the pool reads as part of the environment rather than a separate installation.
Patio, pool, pergola, kitchen, fire feature, and lighting were designed together and installed by Allscape Patio. Every element was planned in relation to the others, which is what allows a space of this size to feel resolved rather than assembled.
Scope: multi-level paver patio on concrete, in-ground swimming pool, motorized pergola, outdoor kitchen, gas fire pit, seat walls and column piers, landscape lighting.
 Allscape Patio & Landscape
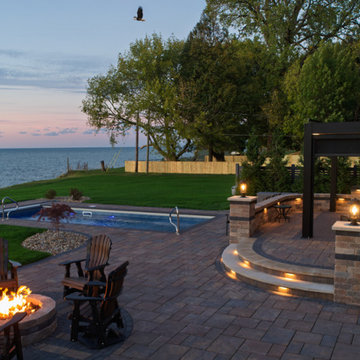
A complete outdoor living environment designed and built for a lakefront property in Northeast Ohio, where the water view had to remain the organizing element of the entire space.
The plan is built around a multi-level paver patio set on a concrete base — a construction method that holds line and elevation through freeze-thaw cycles rather than settling over time. Curved steps with integrated riser lighting connect the upper terrace to the lower patio, and a seat wall with column piers defines the transition without closing off the view.
A motorized pergola anchors the upper level, positioned against the home and detailed to match its lines. Beneath it, a full outdoor kitchen with stainless appliances sits under cover, with a lounge area alongside it. The lower terrace carries a gas fire pit and seating, oriented so the lake stays in view from every position.
The in-ground pool was set into the grade between the patio and the lawn, with paver coping and surround carried through in the same material palette so the pool reads as part of the environment rather than a separate installation.
Patio, pool, pergola, kitchen, fire feature, and lighting were designed together and installed by Allscape Patio. Every element was planned in relation to the others, which is what allows a space of this size to feel resolved rather than assembled.
Scope: multi-level paver patio on concrete, in-ground swimming pool, motorized pergola, outdoor kitchen, gas fire pit, seat walls and column piers, landscape lighting.
 Allscape Patio & Landscape
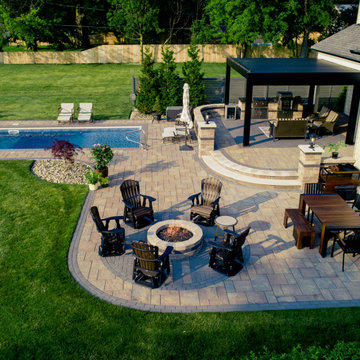
A complete outdoor living environment designed and built for a lakefront property in Northeast Ohio, where the water view had to remain the organizing element of the entire space.
The plan is built around a multi-level paver patio set on a concrete base — a construction method that holds line and elevation through freeze-thaw cycles rather than settling over time. Curved steps with integrated riser lighting connect the upper terrace to the lower patio, and a seat wall with column piers defines the transition without closing off the view.
A motorized pergola anchors the upper level, positioned against the home and detailed to match its lines. Beneath it, a full outdoor kitchen with stainless appliances sits under cover, with a lounge area alongside it. The lower terrace carries a gas fire pit and seating, oriented so the lake stays in view from every position.
The in-ground pool was set into the grade between the patio and the lawn, with paver coping and surround carried through in the same material palette so the pool reads as part of the environment rather than a separate installation.
Patio, pool, pergola, kitchen, fire feature, and lighting were designed together and installed by Allscape Patio. Every element was planned in relation to the others, which is what allows a space of this size to feel resolved rather than assembled.
Scope: multi-level paver patio on concrete, in-ground swimming pool, motorized pergola, outdoor kitchen, gas fire pit, seat walls and column piers, landscape lighting.
 Allscape Patio & Landscape
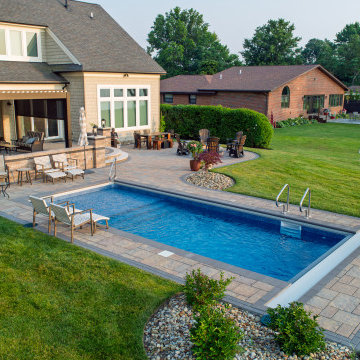
A complete outdoor living environment designed and built for a lakefront property in Northeast Ohio, where the water view had to remain the organizing element of the entire space.
The plan is built around a multi-level paver patio set on a concrete base — a construction method that holds line and elevation through freeze-thaw cycles rather than settling over time. Curved steps with integrated riser lighting connect the upper terrace to the lower patio, and a seat wall with column piers defines the transition without closing off the view.
A motorized pergola anchors the upper level, positioned against the home and detailed to match its lines. Beneath it, a full outdoor kitchen with stainless appliances sits under cover, with a lounge area alongside it. The lower terrace carries a gas fire pit and seating, oriented so the lake stays in view from every position.
The in-ground pool was set into the grade between the patio and the lawn, with paver coping and surround carried through in the same material palette so the pool reads as part of the environment rather than a separate installation.
Patio, pool, pergola, kitchen, fire feature, and lighting were designed together and installed by Allscape Patio. Every element was planned in relation to the others, which is what allows a space of this size to feel resolved rather than assembled.
Scope: multi-level paver patio on concrete, in-ground swimming pool, motorized pergola, outdoor kitchen, gas fire pit, seat walls and column piers, landscape lighting.
3