
Search results for "Mineral" in Home Design Ideas
 Tile Doctor Ltd
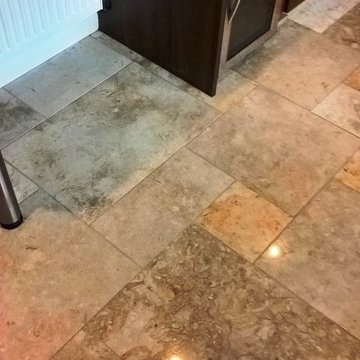
The photographs below are of a Polished limestone floor that had been installed in the Kitchen of a house in Cheltenham approximately eight years prior. The polish and sealer had worn off over that time allowing dirt to become ingrained into the pores of the stone making it difficult to clean.
This is a common problem with all types of porous stone and tile which need to be sealed to maintain their appearance. Sealers do wear down over time with use however and need to be maintained, this is why Tile Doctor have created a maintenance program whereby we pop by every 12 months to give the floor a light clean and top-up the sealer, it only takes a few hours, but it keeps your sealer in good condition.
Cheltenham by the way is a lovely town situated on the edge of the Cotswolds which is an area of Outstanding Natural Beauty. It has a racecourse and is well known for the mineral springs which were discovered here in 1716.
My first job was to protect the wooden kitchen units from any splashes by covering them some cotton sheets. Next, I set about restoring the Limestone’s appearance using a set of Burnishing Pads which is a form of polishing which involves the sequential application of four diamond encrusted pads of different grit levels.
The first pad applied is a Coarse 400 grit pad which is applied to the floor with a buffing machine and lubricated with water. This process grinds away the top layer of dirt and staining from the stone, along with any old sealer, the floor is then rinsed to remove the soil that is generated. I then move through the system, applying the Medium and then Fine pads using less and less water as you go but rinsing in-between and extracting the water with a wet-vac machine.
Once I was happy with the stone I scrubbed the grout lines to remove any soiling that the pads had failed to pick up. The floor was then given a final rinse and the wet vacuum used to extract as much moisture as possible. The floor was then left to dry out completely overnight.
The next day I gave the floor a polish with the Very Fine 3,000 grit diamond burnishing pad, this is applied using a technique we call a “spray burnish” due to the fact that very little water is used during its application.
The next step was to seal the stone using for which I used Tile Doctor Colour Grow which is an impregnating sealer that protects the stone from within by occupying its pores. Colour Grow also has the added benefit of intensifying the natural colours in the stone. The floor was then left to dry for an hour before I gave it one final dry polish using the Very Fine burnishing pad.
My customer was very happy with the final result and made the comment that they thought the floor looked brand new.
Malcolm Crowther
Gloucester Tile Doctor
 Tile Doctor Ltd
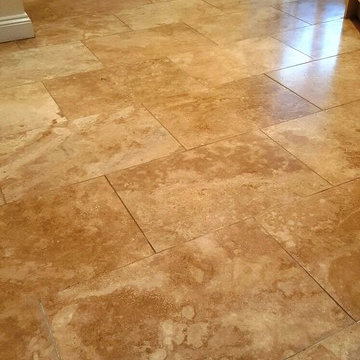
This fantastic Travertine tiled kitchen floor was in a bad way. Not only had it not been treated to a proper clean and seal in a long while, but it has also suffered from natural pitting, leaving lots of little holes that damaged the overall appearance of the floor. Travertine is very aesthetic, but suffers from the drawback of being quite soft compared to other types of stone (typically it sits between 3-4 on the Moh’s scale of mineral hardness).
The customer, who lives in the town of Sleaford a small Lincolnshire market town, was keen to have the situation remedied through a complete restoration. This would need to include small repairs, along with a deep clean and a fresh seal.
My first job was to deep clean the whole area, which I did using a solution of Tile Doctor Pro Clean and clean water. Pro Clean is a strong alkaline product which has a long history of producing reliable results of a wide range of natural stone floors, including Travertine, Granite, Limestone, and Slate. I applied the solution to both the tiles and the grout lines, and proceeded to scrub it in using a scrubbing pad fitted to a rotary floor machine.
This left the floor fresh and clean, but I would also need to restore the polish to the Travertine to really take its appearance to the next level. To do this I used the process known as burnishing, which essentially involves the consecutive application of different gritted pads to achieve a high quality polish on tiles. Our burnishing system, which consists of four pads, achieves fantastic results on high-end polished stone like Limestone, Marble and, of course, Travertine. I started by applying the Coarse grit burnishing pad, before gradually working my way through to the Medium, Fine, and finally Very Fine pads to achieve a brilliant shine and light reflection finish.
To round off the first day of the restoration, I used a flexible matching filler to fill up any pitted holes present on the surface of the tiles. Following this, I installed a turbo dryer to make sure the floor would dry fully overnight, and be ready to seal the following day.
The next day I returned to the property and proceeded to seal the Travertine tiles using several costs of Tile Doctor Colour Grow sealer to protect the tiles and also really enhance the natural colours in the stone. As an impregnating sealer, Colour Grow penetrates into the stone and fills its pores to safeguard it against ingrained dirt and stains from within.
As you can see from the photographs, the combination of a deep clean, high quality polish and fresh seal really transformed the appearance of the floor from dull and lifeless to a really asset to the kitchen. The customer was absolutely delighted with the results, leaving the following feedback: “Very good job – delighted! Thank you Phil!”
Phil Barrs
Lincolnshire Tile Doctor
 Five Star Tree Care
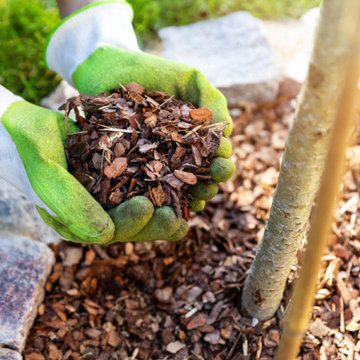
Adding woodchips underneath your trees has many benefits. Some of these benefits include:
-soil moisture retention
-nutrient leaching when decomposing over time
-smother weeds and invasive plants
But before you add any woodchips to your gardens and trees, it’s important to make sure you aerate the root zone. Doing so improves the oxygen supply and leaching to the roots. You will see more growth when there is more oxygen. Our team at Five Star Tree Services has come up with a guide on how you can use woodchips in your gardens.
Where To Place Woodchips
Even though there are many benefits for your trees, there is a right and wrong way to use them. If used incorrectly, you can actually end up hurting your tree instead of helping it. This can happen when there is an excessive amount piled up around a tree, its roots, and the trunk. Woodchips should never touch the trunk of a tree for extended periods of time. What happens is that moisture is retained in the chips and will eventually cause the tree to rot. The end result is death if not caught in time.
An indication of rot and decay is fruiting bodies or mushrooms. It is important to keep an eye out for these indicators by taking a good look at your trees. To avoid this situation, make sure to evenly and carefully spread out the chips around the root zone. Clear any chips away from the trunk by an inch or two.
When applied correctly; you will see your trees thrive and prosper. They will stay healthy and vivacious from the moisture retention and gradual organic leaching.
Soil Compaction
Soil compaction can dramatically affect your trees. This is often an overlooked issue for many landscapers. Due to things like foot traffic, large amounts of rain, construction, and the use of heavy machinery, are all factors that result in soil compaction. Things like water and nutrients can’t saturate through the soil when it becomes too compact. This results in soil that is without minerals and dry. When this happens, tree roots struggle to push through the soil, resulting in stressed trees.
Preventing Soil Compaction
If a tree is left in compacted soil, it will eventually die. One way to avoid this if you are having any construction done in your yard is to set up a Tree Protection Zone, or TPZ. Fences are used to create a barrier where heavy equipment and machinery can’t go in. When heavy machinery is used, this creates extremely compact soil and has been known to crush roots.
How Five Star Tree Services Can Help
Using woodchips is a great way to help your gardens thrive. But it is vitally important to use it properly, otherwise you will end up hurting your trees, instead of helping them. If you require any Richmond Hill Tree Care Services, don’t hesitate to give us at Five Star Tree Services a call at (416) 990-3355!
Find the right local pro for your project
 Tile Doctor Ltd
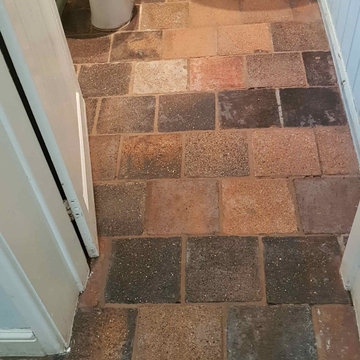
We were contacted by a client from Formby asking for advice on how to remove a thick layer of floor leveller from her Quarry tiled floor. I suspect at some point in the past a previous owner had decided to cover the tiles with lino and a cement-based levelling compound was applied to level the floor first. My client had tried to remove it herself but found it very hard going and after realising she had quite a project on her hands decided to call us instead and see if we could help with the restoration.
I worked out a quote for the client which would include removing the self-levelling compound, cleaning up the tiles and then sealing them to improve its appearance and protect it going forward. The quote was accepted, and a date agreed for the restoration to be completed which would take two days.
We have a variety of tools that we can use for removing cement but in this case, I decided to use an air operated pin gun. The head of the gun has long pins of different length which are fired at the floor gently chipping away at the floor compound, this made short work of breaking up the cement so it could be swept away. A lot easier than the method the client had previously tried.
With the floor clear of cement, it was given an acid wash with Tile Doctor Acid Gel scrubbed in with a buffing machine fitted with a black pad. The acidic formula cleans up the stone of old cement including fine particles of dust. Afterwards the gel was rinsed off the floor with water and extracted with a wet vacuum.
We let the floor dry out overnight and returned the next morning to apply the sealer. For the best results, the stone needs to be dry so before sealing I always take several moisture readings with a damp meter to make sure. The results were good so the first of what would be three coats of sealer were applied to the floor. I used Tile Doctor Colour Grow for sealing, it is an impregnating sealer that works by occupying the pores in the store thereby protecting it from within, it also brings out the colour in the stone.
Once done the floor looked great, the old self-levelling compound was gone and the rich colours in the tile had been restored. In fact is was only when finished did we realise these were in fact Baked Clay Quarry Tiles, minerals are added during manufacturing to give then colour, although 95% clay they are very tough like stone. The client was over the moon with the outcome, the floor had been restored to its’ former glory.
For aftercare I recommended the use of Tile Doctor Neutral Tile Cleaner to keep the floor in good condition. It is pH neutral so will ensure the newly applied sealer is not compromised and the floor will continue to look good for a long while to come.
Andrew Robb
Merseyside Tile Doctor
 Tile Doctor Ltd
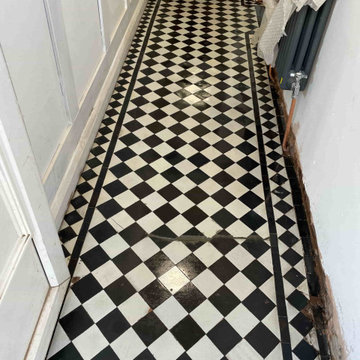
This 1920s single bay house in Earlsdon had been restored by the builder from top to bottom. The hallway floor had been covered in laminate flooring which had been removed, revealing an Edwardian tiled floor beneath. Unfortunately, the plasterer had not covered the floor when working on the walls, so the tiles were now covered in plaster!
The client was keen to keep as many original features as possible and called me in to see if the original 100-year-old floor could be renovated in keeping with the rest of the house. I visited the property to survey the tiles and explained that it certainly could be and having worked on hundreds of these renovations before I was confident of getting a good result. They were happy to go with my quotation and we arranged a time to carry out the work.
The floor tiles themselves were in good condition, but I had to hand carefully scrape the plaster off the tiles before starting on the deep clean. With the plaster removed from the floor I applied Tile Doctor Acid Gel and worked it into the tiles with a coarse 100-grit pad. The floor was then rinsed, and the waste extracted from the floor using a wet vacuum. The process was then repeated with a 200-Grit and then a 400-grit pad until I was happy.
The floor was then speed dried with fans whilst I worked on a repair around the threshold of one of the doors. The repair was relatively straight forward, and I managed to restore the tiling, so the repair was unnoticeable.
The floor was then left overnight to completely dry out. Floors of this age don’t have a damp proof membrane so moisture can build up if they have been covered as in this case. The next stage in the restoration would be to apply a sealer and the floor needs to be dry before you do this otherwise the result can be patchy.
Returning the following day, I first tested the floor with a damp meter to check the moisture levels in different parts of the floor to ensure it was dry enough to seal. The fans had done a good job and I was pleased to find that the floor was dry.
To seal this floor, I used Tile Doctor Seal and Go Extra, it’s a breathable acrylic based sealer that allows for moisture vapour to rise through the tile and evaporate at the surface. This makes it ideal for situations where no damp proof membrane has been installed and there is a low risk of mineral salt deposits being formed (efflorescence).
Once completed the transformation was huge and he Victorian tiles looked well suited to the hallway. Feedback from my client was they were over the moon with the newly restored floor!
For regular cleaning, I recommended Tile Doctor Neutral Tile Cleaner, this is a gentle pH neutral cleaner that will ensure the newly applied seal is retained and not eroded prematurely. This can be the problem with most household cleaning products which contain strong chemicals like bleach which can break down the sealer over time. Without a sealer dirt gets back into the pores of the tile which will mean the homeowner will need to get the floor cleaned and sealed again – a vicious circle!
Mick Gayton
Warwickshire Tile Doctor

 The English Contractor & Remodeling Services
Walk-in shower - large transitional master gray tile and marble tile marble floor and gray floor walk-in shower idea in Cincinnati with recessed-panel cabinets, gray cabinets, white walls, an undermount sink, marble countertops, a hinged shower door and gray countertops

 Elegant Hardwood Floors
maple hardwood floor, water-popped, and stained with 50% rosewood and 50% neutral stains.
Inspiration for a timeless medium tone wood floor living room remodel in Salt Lake City
Inspiration for a timeless medium tone wood floor living room remodel in Salt Lake City
 Tile Doctor Ltd
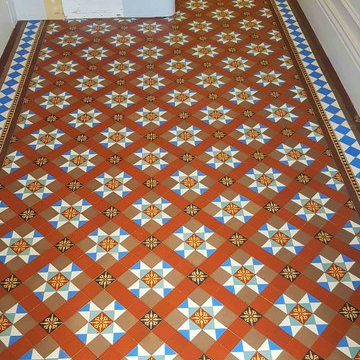
This beautiful Victorian tiled hallway was in desperate need of some TLC. The house had recently changed hands and the new owners of the house were having the entire property renovated. The last part of the renovation plan was to have the Victorian hallway tiles restoring back to their former glory. Floors are always best left until last, especially hallways as last as workmen don’t usually take a lot of care in my experience.
The house was built in the early 1900’s and was situated close to Doncaster town centre a couple of streets away in fact from the famous Doncaster Racecourse which dates to the late 1500’s.
There were a few areas of damage to the floor that would need dealing with first. This is not surprising given the age of the floor which must have seen a lot of comings and goings over the years. Our first task therefore was to repair the damage using replica tiles sourced to be as close a match to the originals as possible. We usually find any slight differences disappear once the floor has been deep cleaned and sealed. Once removing the damaged tile and cleaning the base we use a fast setting adhesive to fix the replacement tiles in place so we can get on with the cleaning as soon as possible.
Once the replacement tiles had set, we unloaded our slow speed rotary floor machine and large wet vacuum which would be used during the cleaning. To start the cleaning the floor was sprayed with Tile Doctor Remove & Go and this was left to dwell on the tiles for twenty minutes. This gives time for the product to break down old floor coatings and grime, this was followed by scrubbing the tiles with a 200-grit diamond pad fitted to the floor machine and assisted with the addition of more water to help lubricate the process. This process generates a lot of slurry as the dirt and old sealers etc are released from the tiles and this is extracted from the surface of the floor using the wet vacuum.
The next step was to give the floor an acid wash using Tile Doctor Acid Gel which is applied to the tiles and left to dwell for fifteen minutes and scrubbed in again with the floor buffer and 200-grit diamond pad. Once done the floor was rinsed with water and then dried using the wet vacuum to extract as much moisture as possible. This last process is designed to counter any alkaline salts that may be present in the floor which may cause efflorescence to appear later. It also removes old mineral deposits and generally get the tiles looking much brighter. Once complete the floor was left to dry off naturally overnight.
I came back the next day to seal the tiles first checking the floor was dry using a moisture meter. Satisfied that the floor was ready for sealing I started to seal the tiles using multiple coats of Tile Doctor Seal and Go Extra which is a fully breathable sealer which is important for old floors like this. Seal and Go Extra also leaves a lovely satin finish which works well on Victorian tiles and brings the floor alive.
This was the last step in this properties renovation, and I think you will agree that the floor responded really well to the restoration process and the colours in the tiles are now very vibrant.
Matthew Lovett
South Yorkshire Tile Doctor
 Five Star Tree Care
There are thousands of tree species all over the world and all these trees share the same anatomical features. All trees have trunks, branches, intricate rooting systems and leaves that make up their core systems. If you are curious about the anatomy and importance of each part, reading this guide by Five Star Tree Services is a great way to educate yourself.
Tree Branches & Twigs
The branches grow from the trunk of the tree and they help support the flowers, fruits and leaves the tree produces. The twigs and branches are also used as transport between the trunk and leaves. The top part of the tree along with the leaves is called the tree crown. This area filters dust and other debris from the atmosphere. In addition to cleaning the air, the crown also offers shade for animals and humans alike.
Tree Leaves
The leaves of a tree manage the photosynthesis process which ensures the tree has food and maintains its health. The leaves are also tasked with drawing in carbon monoxide and releasing oxygen for the rest of us to use. Many leaves have different edges which work to collect water, repel pests, and reduce wind resistance.
The Tree Trunk
The trunk of every tree has five layers. These layers consist of the inner bark, the outer bark, heartwood, sapwood, and cambium cell. The outer bark protects from harsh temperatures and pests, in addition to helping the tree retain moisture.
The inner bark, specifically the phloem is the digestive system that passes the food through to other parts of the tree. This part of the tree has a very short life, and it turns into cork before merging with the outer layer of bark when it dies. The cambium cell layer produces new tree bark and wood as the tree grows and this is generated from the hormones that come from the leaves and pass to the inner layer.
Sapwood is tasked with moving water to the leaves of the tree and as the wood ages, it transforms into heartwood, which is in the tree center. The heartwood is the main support of the tree structure and though it no longer grows, it won’t decay or become frail as long as it is protected by the outer layers.
The Tree Root System
One of the most important parts of the tree is its root system. These are found in the first three feet of soil around the tree and can extend as much as four times further away than the total circumference of the tree crown. The roots collect minerals and water from the ground, store food for the tree, and help secure it to its spot in the ground.
How Five Star Tree Services Can Help
Here at Five Star Tree Services, we care about the life and health of your trees. Our arborist offers 24-hour emergency services in addition to our regular tree and plant care services. If you are in need of trimming, tree assessment, deep root feeding, or tree removal in Toronto or the GTA, give us a call at (416) 990-3355 to set up an appointment.
 Tile Doctor Ltd
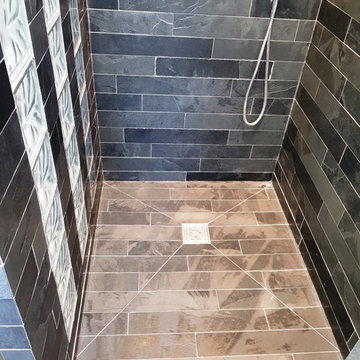
Our client contacted Tile Doctor as they were having problems cleaning their Slate tiled ensuite bathroom. We visited the property in nearby Stevenage, a London commuter town which is between Letchworth Garden City and Welwyn Garden City. The bathroom had been fitted some time ago, but due to the hard water in the area, there had been a large build up of limescale. The dark slate tiles showed this up even more.
My client had tried numerous household products on the tiles, but nothing was shifting the heavy build up. I discussed with them what Tile Doctor could do and completed a small demonstration. They were surprised how easily we were able to improve the tiles. We agreed a price and a timescale and booked the work in for a few weeks’ time.
The ensuite shower required intensive cleaning to the shower walls and floor where excessive limescale was present so we got to work cleaning with Tile Doctor Oxy-Gel, this is a strong alkaline based cleaner and degreaser, it is a gel so it works well on vertical surfaces where a long dwell time is required to break down dirt, grime, soap scum, oil based products. We left the product on the surface for approximately 10 minutes, removing all previous sealers and dirt. The residue was rinsed off and followed this up with a second clean using Tile Doctor Grout Clean-Up.
Grout Clean-Up is an acidic product designed to remove mineral deposits however you need to be careful with some types of stone as it can etch the surface if used incorrectly. To apply the product was diluted with water in a spray bottle and sprayed on to the wall tiles where it was scrubbed in and then rinsed off. The process was then repeated on the floor rinsing down thoroughly afterwards with water.
Once the slate was clean and dry we proceeded to cut out the existing silicone sealant which was equally stained and was beyond cleaning. This is a slow job and care needs to be taken not to scratch the tiles. It is important to ensure all the old silicone is removed so there is a nice clean surface to reapply the new. This also gave the shower area more time to dry out.
We tested with the moisture meter to ensure the shower area was fully dry and then applied the sealer. We chose to apply three coats of Tile Doctor Colour Grow, this is an impregnating sealer that works by occupying the pores in the stone, so dirt can’t become ingrained there, its also a colour enhancing sealer that provides durable protection. We applied the coats then lightly buffed off the excess with a soft cloth and allowed the slate to dry. The following day we returned to re-silicone all the edges and joints.
We recommended to the customer to use a mild solution of Tile Doctor Stone Soap as a maintenance cleaner for the slate. The client was very happy with the result and could see that cleaning with the appropriate product would ensure the ensuite bathroom continued to look good. The whole job took a day and a half to complete.
Robert Voyce
Hertfordshire Tile Doctor

 RBA Residences
En la sala principal de House Amenitá está la pieza más singular de todo el proyecto: una chimenea monumental de forma curva que baja desde un tragaluz circular en el techo hasta integrarse por completo con el piso del área de estar. Cubierta en microcemento color arena, su superficie fluida contrasta a propósito con los muros de piedra apilada que enmarcan el espacio, creando una composición en la que lo orgánico y lo mineral convive sin pelear entre sí.
Justo sobre la parte superior de la chimenea, un óculo cenital deja entrar luz natural directamente sobre la pieza escultórica a lo largo del día, cambiando de forma constante cómo se percibe. Este manejo intencional de la luz es propio de los despachos de arquitectura especializados en casas de lujo que entienden la iluminación natural como un material más del diseño y no solo como un recurso funcional.
Los muros laterales de piedra apilada incluyen repisas empotradas, talladas directamente sobre el material, que exhiben una selección curada de objetos de barro y cerámica artesanal. Este detalle le da calidez humana a un espacio que, sin él, podría sentirse demasiado escultórico o de museo, y muestra el cuidado que RBA Residences pone en cada proyecto de construcción de casas de lujo.
El área de estar, en un nivel ligeramente hundido respecto al resto del espacio, integra asientos perimetrales tapizados en tonos arena que favorecen la convivencia grupal sin depender de muebles convencionales. Cojines en textiles naturales y una mesa baja de madera completan una composición pensada para quedarse un buen rato, no solo para pasar de largo.
Al fondo, ventanales de piso a techo conectan el interior con un jardín de vegetación nativa, mientras un móvil escultórico suspendido del techo aporta un elemento cinético discreto a la composición. Esta relación constante entre interior y exterior es una firma reconocible entre los mejores arquitectos para una casa de lujo que evitan cerrar por completo los espacios sociales.
House Amenitá demuestra, a través de esta sala, que la arquitectura contemplativa no tiene que renunciar a la función social: la chimenea, lejos de ser un elemento decorativo aislado, organiza y le da sentido a todo el espacio de convivencia de la casa.
 RBA Residences
En el vestíbulo de doble altura de Casa Florentino, la circulación vertical de la casa se resuelve con una escalera curva recubierta en madera oscura y barandal metálico integrado. Su geometría orgánica, poco común dentro de la construcción de casas de lujo más convencional, contrasta a propósito con la rigidez de los muros de piedra que enmarcan el espacio, y de ahí nace buena parte del carácter de todo el recorrido.
En uno de los muros centrales, revestido en piedra clara, destaca una escultura metálica de líneas fluidas con acabados en bronce y cobre, retroiluminada para crear un efecto de profundidad que cambia según el ángulo desde donde se observe. Integrar una pieza así directamente a la arquitectura del muro, en lugar de tratarla como un elemento aparte, es propio de los despachos de arquitectura especializados en casas de lujo que ven el arte como parte estructural del proyecto, no como una decoración que se añade al final.
Del techo baja una composición de esferas de vidrio soplado a distintas alturas, pensada para funcionar como instalación lumínica tanto de día como de noche, justo sobre el área de estar del vestíbulo. Este tipo de solución, en un espacio de transición que en otros proyectos suele pasar desapercibido, refleja el nivel de detalle que aplican los arquitectos de casas de lujo con un enfoque más cuidadoso.
A través de ventanales de piso a techo, al fondo del vestíbulo, se abre un patio interior con cactáceas de gran formato y una fogata circular, que funciona como un segundo punto de atención visible desde distintos ángulos del espacio. Combinar vegetación desértica dentro de un esquema arquitectónico predominantemente mineral responde a una lectura particular del clima y el paisaje de Ciudad de México, algo habitual entre los mejores arquitectos para una casa de lujo con sensibilidad hacia su entorno.
En primer plano, un área de estar con sillones tapizados en gris y una mesa de centro en piedra oscura ofrece un punto de descanso inmediato al llegar a la casa, reforzando la idea de Casa Florentino como un santuario residencial pensado para pausar el mundo desde el primer paso adentro, un proyecto firmado por las constructoras de casas de lujo detrás de RBA Residences.
 Ann Lowengart Interiors
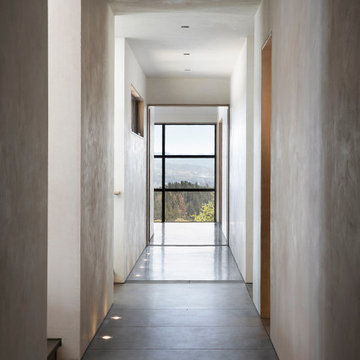
Initially designed as a bachelor's Sonoma weekend getaway, The Fan House features glass and steel garage-style doors that take advantage of the verdant 40-acre hilltop property. With the addition of a wife and children, the secondary residence's interiors needed to change. Ann Lowengart Interiors created a family-friendly environment while adhering to the homeowner's preference for streamlined silhouettes. In the open living-dining room, a neutral color palette and contemporary furnishings showcase the modern architecture and stunning views. A separate guest house provides a respite for visiting urban dwellers.
 Tile Doctor Ltd
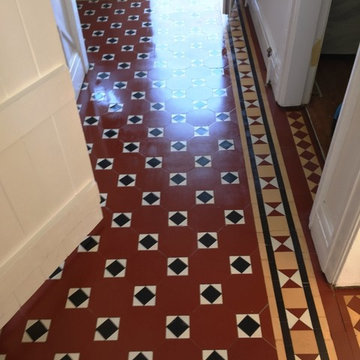
This Victorian tiled hallway was one of the most beautiful Victorian floors I have ever had the pleasure to work on. With the wide range of patterns and colours they are available in, it seems no two Victorian tiled floors are exactly the same, and this uniqueness is part of what makes them so appealing to property owners.
Unfortunately, this floor had been poorly maintained over the years, even suffering from a few loose and missing tiles. There was a thick coating of dust and dirt soiling its appearance, and the property owner was understandably keen to remedy the situation. Having realised that everyday household cleaners are not likely to achieve great results, she asked me to carry out a full professional restoration, including making some repairs where necessary. I was pleasantly surprised to find out that this property was situated in the town of Wyken, which is a few miles outside of Coventry city centre and in fact just down the road from where I live myself!
Before making a start on the cleaning process, it was first necessary to re-fix the small number of loose tiles and replace a single missing tile by the radiator. Fortunately, I’ve been working on these types of floors for some time and have built up a good collection of replacement Victorian tiles so I was able to find one that matched in nicely with the rest of the floor without too much problem.
To clean the tiles, I began by applying a layer of Tile Doctor Oxy-Gel directly into the floor with a small brush. This product is very similar to the popular Tile Doctor Pro Clean: both are strong alkaline cleaners, strippers and degreasers, with the main difference being that Oxy-Clean comes in a gel form, making it easier to control and therefore ideal for precise cleaning, or for application to vertical surfaces. Like Pro Clean and being an alkaline base it is suitable for use on all types of natural stone and tile. The Oxy-Gel was left to soak into the tiles for around ten minutes before being scrubbed in and then rinsed off carefully with water, I then used a wet vacuum to extract the now soiled cleaning solution off the floor.
The next step was to acid wash the floor using Tile Doctor Acid Gel; this served to break down alkaline mineral deposits inherent in the grout along with some excess grout that had been left on the untidily left on tile from installation. It is recommended not to use this product on acid-sensitive soon such as Marble and Limestone as it can cause irreparable etching but its fine on Victorian tiles as long as you don’t leave it on too long.
Finally, the floor was given a rinse with clean water to remove any trace of chemicals from the cleaning and to neutralise the area in preparation for sealing.
I left the floor for 48 hours to dry before returning to the property to seal the tiles. This allowed plenty of time for the floor to dry completely, which is important as any excess moisture can damage the ability of the sealer to protect against dirt and stains.
My choice of sealer for this floor was Tile Doctor High Shine; three coats in total were applied, providing – as the product name suggests – the high shine finish that the customer had requested. The sealer will provide durable surface protection going forward preventing dirt from becoming ingrained into the pores of the tile and ensuring it remains easy to clean and keeping its appearance for some time to come.
As a big fan of Victorian tiles, it was a great pleasure to restore this floor, and my customer was certainly pleased too. It’s amazing how far a little professional maintenance can go to improving the appearance of these fantastic types of floor.
Mick Gayton
Warwickshire Tile Doctor


 Tile Doctor Ltd
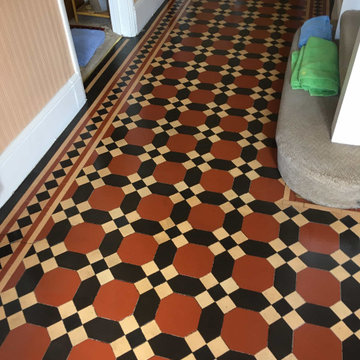
This Victorian floor in Twickenham, Middlesex was in good physical condition for its age but needed a good deep clean. Our customer had informed us that they had never cleaned or sealed the floor in the sixteen years that they had lived there so it was well overdue.
I went over to survey the floor and completed a test clean on a small section of tiling to see which products/techniques would work best. I like to do this as it demonstrates to the client what can be done, and it allows me to come up with an accurate price for doing the work.
As you can see from the pictures, there was quite a difference in the test patch compared to the rest of the floor. Years of foot traffic from the street had taken its’ toll and the floor was very dirty. Luckily, the floor was in very good condition and had not worn too badly.
Once they had seen the test patch, they were confident that it would be worth go ahead with my quote. It would ensure that the period feature was retained for many years to come. The colours on the floor were quite faded so it would be nice to get it restored.
I started the cleaning process by first taping up the surrounding skirting boards and doors to ensure they were protected from potential splashing. Cleaning involved spraying the Victorian tiles with a strong dilution of Tile Doctor Pro-Clean which is a dedicated Tile and Grout cleaning product. This was left to soak in for about ten minutes and then scrubbed in using a black pad fitted to a heavy-duty rotary scrubber.
This gives the floor a good mechanical scrub and works wonders releasing the ground-in dirt and soil from the tiles. The strong dilution of Pro-Clean will also remove any remaining sealers from the tile, however after sixteen years I doubted there would much trace of sealer left. Once done the floor was rinsed with water and all the soils removed with a wet vacuum.
Following the initial clean the colours were already much stronger. Next step however was to improve on that by giving the floor an acid rinse using Tile Doctor Grout Clean-Up. This removes mineral deposits and generally brightens up the appearance of the tile. After another round of scrubbing the floor was rinsed with our high-pressure washer and then vacuumed, extracting all of the dirty water and dirt away in one go. The floor was looking a lot better and was left to dry overnight.
After allowing the floor to dry overnight, we returned the next day to seal the floor. First, checking the floor was dry using the damp meter. Floors of this age can take a little longer to dry as there is no damp-proof membrane so it’s always worth checking as applying a sealer to damp tiles is not a good idea.
Once I was satisfied it was dry eight coats of Tile Doctor Seal and Go sheen finish sealer were applied. This takes a while to do as each coat needs to dry before applying the next. The sealer will protect the Victorian tiles for dirt and stains, it also enhanced the colours in the tile and will make it easier to keep the floor clean going forward.
My client was very pleased with the floor and mentioned that they should have called me in sooner! For aftercare cleaning I recommended Tile Doctor Neutral Clean which is an effective cleaner with a neutral pH, its designed for cleaning tiles without degrading the sealer.
Jonathan Oldham
South Middlesex Tile Doctor
 Tile Doctor Ltd
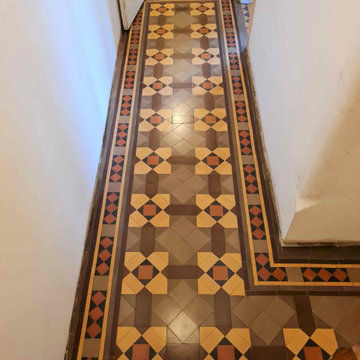
We were contacted by a customer in West Kirby who needed help renovating a Victorian tiled hallway in a house they had just purchased. Kirby is a desirable seaside location North of Heswall that expanded with the arrival of the railway in 1848. The railway brought a demand for property and so it’s not unusual to find housing stock in this area dating back to the Victorian era.
The Victorian tiles at this property appear to have been neglected by the previous owner and were now looking very dull and marked by paint from decorating; all the colours looked washed out and the floor was now looking very unappealing.
The good news however is that this problem is not uncommon and with a deep clean and a fresh sealer applied it can be transformed. I gave the owner a quote which was accepted a date agreed for my return to do the work.
On the first day the floor was sprayed with a neat solution of Tile Doctor Remove and Go which is a powerful alkaline cleaning and stripping agent used to remove old seals and paint. The solution was left to dwell for about twenty minutes so it could soak in and get to work. It was then scrubbed into the tiles using a coarse 200-grit pad fitted to a heavy buffing machine. Water was then added to the floor for lubrication and the soils released from the pores of the tile during scrubbing was removed by with a wet vacuum.
To treat the stubborn paint stains and remains of what I suspect was carpet adhesive a hand scraper and wire brush was used, this was made easier by the Remove and Go which had softened the paint etc.
The next stage was to give the Victorian tiles a mild acid wash using Acid Gel which is applied to the floor, scrubbed in, and rinsed off with a little water then extracted using the wet vacuum. We always recommend an acid wash for old floors like these as it will counter any efflorescent salts resident in the tiles and helps to remove other mineral contaminates and old grout that can mask the true beauty of the tiles.
I left the tiles to dry out for two days before returning to apply the sealer, first checking it was dry by testing for moisture in various places with an electronic damp tester. It’s not a good idea to apply a sealer to a damp floor so we always check first.
Satisfied the floor was dry, I started applying a coat of Tile Doctor Colour Grow which is a colour enhancing impregnating sealer that helps to bring out the true colours in the tile. This was allowed to dry for thirty minutes and then followed up five coats of Tile Doctor Seal and Go Extra which is a breathable sealer that leaves a lovely satin finish and builds on the protection.
Once done the Victorian hallway tiles looked so much cleaner and healthier. It was quite a transformation and the new sealer had given the floor a nice low sheen shine which the customer was very happy with.
For aftercare cleaning I left them with a bottle of Tile Doctor Neutral Cleaner which is specially formulated for cleaning sealed tiles. We don’t recommend tile cleaning products you find on supermarket shelves as the are usually too strong and can strip a sealer off the floor prematurely. If your choosing another product to clean your floor always read the label to make sure its compatible.
Andrew Robb
Merseyside Tile Doctor

 Sunshine Construction LLC
“I learned to let workers walk around to gape at the ornate details during their first visit before trying to engage them with any business.” This 1904 home was built by partners of the Pantages Theaters. Oak floors with marquetry borders, ornate plaster ceilings, beveled glass windows, molded trim, and carved figureheads create an elegant home. Unfortunately a multiyear leak had ruined a corner of the dining room, so specialists were found to match the original decorative plaster and basket weave inlaid flooring. Workers painstakingly set 10,000 finish nails into the flooring.
“We want to retrofit to Passivhaus standards.” We undertook a thorough sealing of the old walls and attic, insulated the basement with polyiso, and blew piles of cellulose in the attic. Windows on the second floor and basement were replaced with triple glazed units, while the elegant first floor windows were refurbished and fitted with interior storms. Barred from removing the interior plaster or exterior stucco, we insulated the first floor walls from above. Analysis of dollars per BTU saved guided our decision to not remove the stucco to outsulate with mineral wool. In the end, we cut heat losses by 84% from an EUI of 121 to just 19, and received Built Green 4-Star certification.
“We’d like to view Mt. Rainier from the master bedroom.” The entire second floor was demolished back to the studs, except for the elegant central stair hall. The floor plan was completely rearranged to fit three bedrooms plus a study under the existing roof. New waste plumbing pipes were threaded down through the house in two directions to serve the new family bathroom, split into a bathing chamber and a toilet chamber.
“We love to cook and entertain dinner guests.” The old servant kitchen, tucked away in the back with its own separate stair, was replaced by a new mud room and bathroom. The old 3 foot door from dining to kitchen was widened to an 8 foot archway, carefully replicating the door casing so it appears to be original. The new kitchen has views to the back yard garden, soapstone countertops, custom cherry cabinets, a glass tile splash, energy- and water-efficient appliances, and even a filtered water stub out for the espresso maker.
“I really want 4 more inches of head room in the basement.” We demolished the old slab, excavated without undermining the shallow footings, installed new gravel, insulation, vapor retarder and concrete slab. The northeast basement corner was thermally isolated to become a root cellar which will store food produced by the entire yard’s conversion to permaculture. The basement now houses the guest bed and bath, family room, laundry, and mechanical room.
“We expected lead paint, but I’ve never seen asbestos in plaster before.” The hazmat crew did all necessary plaster demo. Trim and doors were carefully removed, labeled, and stored for reinstallation. Lead RRP and construction IAQ procedures were vigorously followed. When the new HRV and flexible ventilation tubing arrived on site, we set up a clean room where all HVAC materials were stored and cut prior to installation to assure pristine air quality.
“We don’t want to draw our fresh air from down near the ground.” The old laundry chute, our only existing vertical chase, had been promised three times over for plumbing, wiring, and ducts. So we routed the new fresh air duct from the basement HRV up through the old furnace chimney to the sky, a symbol of clean green replacing dirty fossil fuel.

 All Surface Restoration
Exposed Aggregate Driveway After Application Of Paver Gloss Acrylic Sealer.
This is an example of a large front yard driveway in Detroit.
This is an example of a large front yard driveway in Detroit.

 Universal Appliance and Kitchen Center
Wolf 24" Coffee System EC24/S - Stainless
Available at Universal Appliance and Kitchen Center | uakc.com
Striking stainless steel design. Strikingly delicious drinks — espresso, cappuccino, latte, macchiato, long or short coffee, even hot water for tea. Simply touch a couple of buttons and in seconds you’ll be enjoying a professional-quality coffee drink, made your way. On top of that, the Wolf coffee system lets you easily customize the details of your drink, from temperature to strength to level of foam, to meet your personal definition of the “perfect cup.”
You’ll also enjoy how hassle-free the Wolf coffee system is to own. It needs no plumbing connections, and it steam-cleans the milk nozzle with one push of a button; milk never enters the system’s internal mechanisms.
The 24” coffee system in stainless can be installed with a 24" cup warming drawer to create an ultimate in-home coffee station, and coordinates beautifully with Wolf convection steam and microwave ovens of the same size. For ideal pairing with 30” Wolf ovens, the 24” coffee system in black (EC24/B) should be purchased and customized with any of five accessory trim kits.
DESIGN AND PERFORMANCE FEATURES
Make all your favorite coffee beverages:
What's your pleasure? Make long or short coffee, espresso, cappuccino, latte, or a macchiato in seconds. Even steam or froth milk for, say, a chai latte or the kids' hot chocolate.
Coffee, made to size:
Select the size you want from four pushbutton presets, everything from a one-ounce espresso shot to a 12-ounce coffee. Unique sizes (up to 7 oz.) can be programmed and saved using the customizable "My Coffee" setting.
Strength, to your taste:
When brewing from whole bean coffee, five strength settings from extra-mild to extra-strong give you precisely the flavor you prefer at any selected size.
No plumbing needed:
Unlike units that must be connected to a water line, the Wolf coffee system can be installed anywhere without additional plumbing. The easily accessible water reservoir holds 60.9 fluid oz. (1.8 liters), enough for several drinks between refills.
Easy to clean:
Unlike coffee systems that pipe milk through the internal mechanism, the Wolf system cleans with pushbutton ease. Rinse the brew head, or clean the milk spout with a jet of steam. It's all done in seconds. The milk carafe is dishwasher safe, too.
Uses whole-bean and pre-ground coffee:
The machine holds a generous supply of whole-bean coffee — about half a pound — and grinds it automatically to make your drink. It can brew single-cups from pre-ground coffee, too, so you can have your breakfast blend even when the bean reservoir is full of espresso roast.
Adjustable built-in stainless steel burr grinder:
Thirteen grind settings allow you to customize your whole-bean coffee for the taste and body you prefer.
Make it a double:
For two identical coffees, just press the Double Coffee button and position a cup under each of the two spouts. Or select Double Coffee and place your mug under the spouts to make a double-size coffee for one.
Removable milk carafe for freshness and convenience:
The dishwasher-safe carafe plugs into the machine to make milk drinks, then can go right in the refrigerator to keep milk fresh. Milk is steamed and frothed without passing through the system's internal components. That makes cleaning infinitely easier.
Hot water on demand — tea, anyone?
Tea, hot chocolate, oatmeal, you name it. The system can deliver up to 14 ounces of hot water with the push of a button. How hot? That's up to you. The temperature is adjustable.
Push-button control panel:
Brewing the drink you want at the size and with the taste you want is as easy as pressing a few buttons. The bright LCD control panel provides clear information.
Programmable start time and auto off:
Program a time for the system to turn on and warm up automatically, it will be ready to brew when you're ready to enjoy. For safety and energy efficiency, the system powers down after a set period of inactivity.
More enjoying, less cleaning:
After the system prepares a coffee drink, it ejects the compressed grounds into a container, then lets you know when the container is ready to be emptied. Meanwhile, a removable drip tray catches excess water from brewing and rinsing. Simply rinse it out just as you would your coffee cup.
Built into cabinetry, works like a drawer:
Designed to be built seamlessly into your kitchen cabinetry, the Wolf coffee system has an ingenious feature: glide rails that enable you to slide the unit out from the wall for easy access to the whole-bean and ground coffee reservoirs. It's like opening a drawer.
Supplies are in reach but out of sight:
Pull the unit out on its glide rails to access handy integrated storage trays where you can keep bottles of flavored syrup, sugars and other supplies at the ready.
Auto-descale reminders:
Minerals from water naturally build up on heating surfaces and reduce efficiency. The Wolf coffee system is engineered to monitor this and let you know when to descale the system. Result: Your drinks always come out at the temperature you expect.
TECHNICAL FEATURES:
- Electrical Requirements: 120 V AC, 60 Hz, 15-amp dedicated circuit, grounded
- Shipping Weight (lbs): 60
- Water reservoir (fl oz): 60.9 (1.8 L)
- Whole Bean Reservoir (oz): 8.8 (~1/2 lb)
- Removable milk carafe holds just over 3 cups
209