
Search results for "Nice method" in Home Design Ideas

 Migala Carpet One
Master Bath Floor: MSI Navona 20x20
Color: Sole with 961 Sandstone Beige Grout
Master Shower: MSI Navona 20x20
Color: Sole with 961 Sandstone Beige grout
Deco Inside Niche Only: MSI Fossil Canyon Blend
Shower Floor: MSI Navona 2x2
Color: Sole

 Bloomington Carpet One
Beautiful custom runner to match the unique measurements of this staircase.
Small wooden curved staircase photo in Minneapolis with wooden risers
Small wooden curved staircase photo in Minneapolis with wooden risers

 Kitchen Design Concepts
We introduce to you one of our newer services we are providing here at Kitchen Design Concepts: spaces that just need a little reviving! As of recent, we are taking on projects that are in need of minimal updating, as in, spaces that don’t need a full-on remodel. Yes, you heard right! If your space has good bones, you like the layout of your kitchen, and you just need a few cosmetic changes, then today’s feature is for you! Recently, we updated a space where we did just this! The kitchen was in need of a little love, some fresh paint, and new finishes. And if we’re being honest here, the result looks almost as if the kitchen had a full-on remodel! To learn more about this space and how we did our magic, continue reading below:
The Before and After
First, see what an impact new finishes can make! The “before” image shows a kitchen with outdated finishes such as the tile countertops, backsplash, and cabinetry finish. The “after” image, is a kitchen that looks almost as if its brand new, the image speaks for itself!
Cabinetry
With the wooden cabinetry in this kitchen already having great bones, all we needed to do was our refinishing process that involved removing door and drawer fronts, sanding, priming, and painting. The main color of the cabinetry is white (Sherwin Williams Pure White 7005) and as an accent, we applied a deep navy blue that really pops in this space (Sherwin Willaims Naval 6244). As a special design element, we incorporated a natural wooden band across the hood which is subtle but adds an element of surprise.
Countertops
The original countertops in this space were a 12×12 tile with cracks and discolored grout from all the wear and tear. To replace the countertops, we installed a clean and crisp quartz that is not only durable but easy to maintain (no grout here!). The 3cm countertops are a Cambria quartz in a grey-tone color (Carrick).
Backsplash
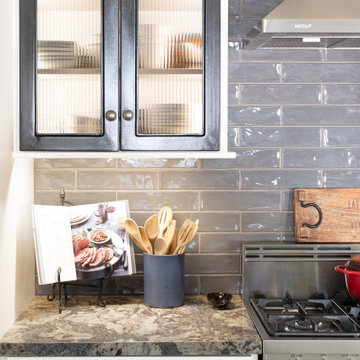
Keeping things simple, yet classic, we installed a 3×6 subway tile from Interceramic. The crisp white pairs well with all the other finishes of the space and really brighten the space up! To spice things up, we paired the white tile with a contrasting grout color (Cape Grey) that matches the countertop. This is a simple method to add interest to your white backsplash!
Fixtures and Fittings
For the fixtures and fittings of the kitchen, we wanted pieces that made a statement. That’s why we selected this industrial style faucet from Brizo! The faucet is a Brizo LITZE™ PULL-DOWN FAUCET WITH ARC SPOUT AND INDUSTRIAL HANDLE (63044LF-BLGL). The matte black paired with the luxe gold elements really make a statement! To match the gold elements of the faucet, we installed cabinetry hardware from Topknobs in the same gold finish. The hardware is a Channing pull TK743HB. Lastly, the large single bowl sink (who doesn’t want a large sink?!) is a great functional touch to the kitchen. The sink is a Blanco Precision 16″ R10 super single with 16″ Drainer in stainless steel (516216).
Find the right local pro for your project
 RHEINZINK
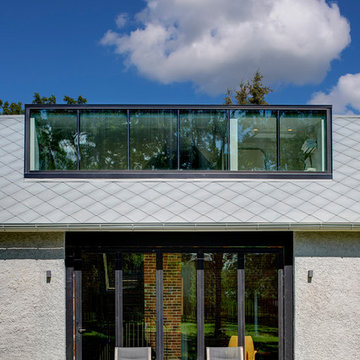
Prior to its near-total reconstruction, the Jett Residence was an overgrown structure hidden in a grove of trees in Iowa City, IA. The strikingly-renovated cottage now serves as a retreat house for its owners. Originally built in 1853, the residence retains a significant portion of the original, locally-made red brick. An original, vaulted stone root cellar—rumored to have been part of the Underground Railroad—also remains on the property.
The owners were deeply involved in working with Neumann Monson Architects, Iowa City, in planning the renovation, according to co-owner Bobby Jett. The interior design of the 1,870 sq. ft. cottage offers a highly contemporary flair within the historic setting.
The most prominent feature of the exterior is the RHEINZINK roof. “Everyone loves the roof,” Jett said. “They’ve never seen anything like it.” Approximately 2,500 sq. ft. of RHEINZINK Square Tiles were utilized. The 0.8mm prePATINA blue-grey Square Tiles were installed in a diamond pattern.
Selection of the RHEINZINK Square Tiles was inspired by an old black and white photo of the house taken more half a century ago. “At that time, the roof of the house had diamond shaped shingles. We wanted to replicate that look,” according to Jett. “The architect suggested that RHEINZINK could provide the look and durability we wanted.”
“We definitely wanted to replicate the roof’s visual pattern that we saw in the old photo but obviously wanted it to have more permanence and durability,” said Tim Schroeder, vice president at Neumann Monson Architects. “We’ve worked with zinc before and thought it would be a good complement to the dormers that would provide a nice crisp appearance. The RHEINZINK was definitely a nod to the historic element but provided a progressive look as well.”
Fabrication of the Square Tiles was done by RHEINZINK systems partner Sheet Metal Supply (SMS), Mundelein, IL.
Installation of the RHEINZINK Square Tiles was performed by Natural Metal Associates, Mont Vernon, NH. The owner of Natural Metal Associates, Lou Rondeau, has extensive hands-on experience with zinc fabrication methods and techniques. “I knew this was a unique project and I really wanted to be a part of it,” Rondeau said. Rondeau was accompanied by an apprentice and personally did the hand-cutting and folding associated with detailing the valleys and edges. The work also included installation of the RHEINZINK half-round 5½” gutter system.
The installation was completed in nine days, according to Rondeau. “Zinc is a premium material that’s a real pleasure to work with,” he said.
 Twelve Stones Designs, LLC
The owners of this kitchen had spent the money to upgrade the finishes in their kitchen upon building the home 12 years ago, but after living in the space for several years they realized how nonfunctional the layout really was. The (then) two preschool aged children had grown into busy, hungry teenagers with many friends who also liked to hang out at the house. So the family needed a more functional kitchen with better traffic flow, space for daily activities revolving around the kitchen at different times of day, and a kitchen that could accommodate cooking for and serving large groups. Furthermore, the dark, traditional finishes no longer reflected the homeowners’ style. They requested a brighter, more relaxed, coastal style that reflected their love of the seaside cities they like to visit.
Originally, the kitchen was U-shaped with a narrow island in the middle. The island created narrow aisles that bottle-necked at the dishwasher, refrigerator, and cooktop areas. There was a pass-through from the foyer into the kitchen, but the owners never liked that the pass-through was also located so close to the powder room. The awkward proximity was unappealing and made guests feel uncomfortable.
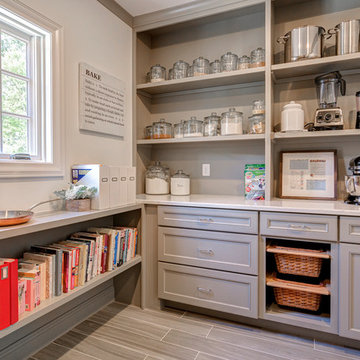
The kitchen’s storage was made up of lots of narrow cabinets, apothecary drawers, clipped corner units, and very few drawers. It lacked useful storage for the larger items the family used on a daily basis. And the kitchen’s only pantry was small closet that had only builder-grade, narrow shelving with no illumination to be able to see the contents inside.
Overall, the kitchen’s lighting plan was poorly executed. Only six recessed cans illuminated the entire kitchen and nook areas. The under cabinet lighting was not evenly distributed either. In fact, the builder had mis-placed the under cabinet lighting around the decorative pilasters which made for choppy, dark cubbies. Further, the builder didn’t include any lighting over the sink or the bar area, which meant whoever was doing the dishes was always in their own shadow. That, coupled with the steep overhang of the game room above made the bar area feel like a dim, cavernous space that wasn’t inviting or task oriented. The kitchen looked out into the main living space, but the raised bar and a narrow wall (which held the only large cabinet in the kitchen) created more of a barrier than a relationship to the living room or breakfast nook. In fact, one couldn’t even see the breakfast nook from the cooktop or sink areas due to its orientation. The raised bar top was too narrow to comfortably sit to either dine at or chat from due to the lack of knee space. The the homeowners confided that the kitchen felt more like a dark, dirty prison than place where the family, or their guests, wanted to gather and commune.
The clients' needs and desires were:
➢ to create a kitchen that would be a space the family loved to be in; to relate to the adjacent spaces all around, and to have better flow for entertaining large groups
➢ to remove the walls between the breakfast nook and living area and to be able to utilize the natural light from the windows in both those areas
➢ to incorporate a functional chopping block for prepping fresh food for home cooked meals, an island with a large sink and drain board, 2 pull out trash cans, and seating for at least the 2 teens to eat or do homework
➢ to design a kitchen and breakfast nook with an airy, coastal, relaxed vibe that blended with the rest of the house's coastal theme
➢ to integrate a layered lighting plan which would include ample general illumination, specific task lighting, decorative lighting, and lots of illuminated storage
➢ to design a kitchen with not only more storage for all the husband’s kitchen gadgets and collection of oils and spices, but smart storage, including a coffee/breakfast bar and a place to store and conceal the toaster oven and microwave
➢ to find a way to utilize the large open space between the kitchen, pantry area, and breakfast nook
Twelve Stones Designs achieved the owner's goals by:
➢ removing the walls between the kitchen and living room to allow the natural light to filter in from the adjacent rooms and to create a connection between the kitchen, nook, and living spaces for a sense of unity and communion
➢ removing the existing pantry and designing 3 large pantry style cabinets with LED tape lights and rollout drawers to house lots of kitchen appliances, gadgets, and tons of groceries. We also took the cabinets all the way up to the 9’ ceiling for additional storage for seasonal items and bulk storage.
➢ designing 2 islands - 1 with a gorgeous black walnut chopping block that houses a drawer for chopping and carving knives and a custom double pull out trash unit for point of use utilization - and 1 that houses the dishwasher, a large Blanco Gourmet sink with integrated drain board, woven baskets for fresh root vegetables and kitchen towels, plenty of drawer storage for kitchen items, and bar seating for up to 4 diners.
➢ closing off the space between the kitchen and the powder room to create a beautiful new private alcove for the powder room as well as adding some decorative storage. This also gave us space to include more tall storage near the new range for precision placement of the husband’s extensive oil and spice collection as well as a location for a combo-steam oven the wife wanted for baking and cooking healthy meals.
The project is enhanced functionally by:
➢ incorporated USB and standard receptacles for the kids’ laptops and phone charging in the large island
➢ designing the small island to include additional open shelving for items used on a daily basis such as a variety of bowls, plates, and colanders. This set up also works well for the husband who prefers to “plate” his dinners in restaurant-style fashion before presenting them to the table.
➢ the integration of specific storage units, such as double stacked cutlery drawers, a custom spice pull-out, a Kuerig coffee and tea pod drawer, and custom double stacked utensil drawers
➢ moving the refrigerator to the old oven location - this eliminated the bottle neck as well as created a better relationship to the eating table. It also utilizes the floor space between the pantry, nook, and kitchen
➢ creating a banquet style breakfast nook - this banquette seating not only doubles the amount of seating for large gatherings but it better utilizes the odd space between the kitchen and the previous nook area. It also helps to create a distinct pathway from the mudroom room through the pantry area, kitchen, nook, and living room.
➢ the coffee/breakfast bar area which includes the perfect location for the concealed microwave and toaster oven, convenient storage for the coffee pods and tea accoutrements. Roll-out drawers below also house the smoothie maker, hot water kettle, and a plethora of smoothie-making ingredients such as protein powders, smoothie additives, etc. Furthermore, the drawers below the Keurig house measuring utensil, cutlery, baking supplies and tupperware storage.
➢ incorporating lots of wide drawers and pullouts to accommodate large cookware.
➢ utilizing as much vertical space as possible by building storage to the ceiling which accommodates the family’s abundant amount of serving platters, baking sheets, bakeware, casserole dishes, and additional cutting boards.
The project is enhanced aesthetically by:
➢ new 5-piece Versailles pattern porcelain tile that now seamlessly joins the entire down stairs area together creating a bright, cohesiveness feeling instead of choppy separated spaces - it also adds a coastal feeling
➢ designing a cabinet to conceal the microwave and toaster oven
➢ the coastal influenced light fixtures over the nook table and island
➢ the sandy colors of the Langdon Cambria countertops. The swirling pattern and sparkling quartz pieces remind the homeowner of black-and-tan sandy beaches
➢ the striped banquet seating whose creamy white background and blue-green stripes were the inspiration for the cabinet and wall colors.
➢ All the interior doors were painted black to coordinate with the blacks and grays in the backsplash tile and countertop. This also adds a hint of tailored formality to an otherwise casual space.
➢ the use of WAC's Oculux small aperture LED units for the overhead lighting complimented with Diode LED strips for task lighting under the cabinets and inside the pantry and glass wall cabinets. All of the lighting applications are on separate dimmer switches.
Innovative uses of materials or construction methods by Realty Restoration LLC:
➢ Each 1-1/2” x 3” block of reclaimed end-grain black walnut that makes up the center island chopping block was hand milled and built in the shop. It was designed to look substantial and proportional to the surrounding elements, executed by creating the 4 inch tall top with a solid wood chamfered edge band.
➢ The metal doors on either side of the vent hood were also custom designed for this project and built in the Realty Restoration LLC shop. They are made 1x2, 11-gauge mild steel with ribbed glass. Weighing 60 lbs a piece, heavy duty cabinet hinges were added to support the weight of the door and keep them from sagging.
➢ Under-cabinet receptacles were added along the range wall in order to have a clean, uninterrupted backsplash.
Design obstacles to overcome:
➢ Because we were removing the demising walls between the kitchen and living room, we had to find a way to plumb and vent the new island. We did this by tunneling through the slab (the slab had post tension cables which prevented us from just trenching) to run a new wet vent through a nearby structural wall. We pulled the existing hot and cold lines between upper floor joists and ran them down the structural wall as well and up through a conduit in the tunnel.
➢ Since we were converting from wall overs to a gas range it allowed us to utilize the 220 feed for the wall ovens to provide a new sub panel for all the new kitchen circuits
➢ Due to framing deficiencies inherited from the original build there was a 1-1/2” differential in the floor-to-ceiling height over a 20 foot span; by utilizing the process of cutting and furring coupled with the crown moulding details on the cabinet elevations we were able to mask the problem and provide seamless transitions between the cabinet components.
Evidence of superior craftsmanship:
➢ uniquely designed, one-of-a-kind metal “X” end panels on the large island. The end panels were custom made in the Realty Restoration LLC shop and fitted to the exact dimensions of the island. The welding seams are completely indistinguishable - the posts look like they are cut from a single sheet of metal
➢ square metal posts on the small island were also custom made and designed to compliment and carry through the metal element s throughout the kitchen
➢ the beautiful, oversized end panels on the pantry cabinets which give the breakfast nook a tailored look
➢ integrating a large format 5 piece Versailles tile pattern to seamlessly flow from the existing spaces into the new kitchen space
➢ By constructing a custom cabinet that jogged around a corner we could not remodel (housing the entry way coat closet) we were able to camouflage the adjacent wall offset within the upper and lower cabinets. By designing around the existing jog in the structural walls we accomplished a few things: we were able to find the space to house, and hide, the microwave and toaster oven yet still have a clean cohesive appearance from the kitchen side. Additionally, the owners were able to keep their much needed coat closet and we didn’t have to increase the budget with unnecessary structural work.

 Travis
Inspiration for a small contemporary gray tile and ceramic tile ceramic tile bathroom remodel in San Diego with gray walls

 Northwest Granite & Flooring
Bench made of LG Viatera 3cm quartz. 12x24 Wall tile is Tierra Sol "Eramosa". Floor done in Tierra Sol's Borneo pebbles.
Inspiration for a large contemporary 3/4 gray tile and ceramic tile porcelain tile alcove shower remodel in Seattle with a two-piece toilet, beige walls and a vessel sink
Inspiration for a large contemporary 3/4 gray tile and ceramic tile porcelain tile alcove shower remodel in Seattle with a two-piece toilet, beige walls and a vessel sink
Sponsored
Columbus, OH

Hope Restoration & General Contracting
Columbus Design-Build, Kitchen & Bath Remodeling, Historic Renovations

 User
scr.co.nz
shower fittings
Example of a small minimalist gray tile and ceramic tile ceramic tile alcove bathtub design in Auckland with flat-panel cabinets and white cabinets
Example of a small minimalist gray tile and ceramic tile ceramic tile alcove bathtub design in Auckland with flat-panel cabinets and white cabinets

 Maraya Interior Design
Old World European, Country Cottage. Three separate cottages make up this secluded village over looking a private lake in an old German, English, and French stone villa style. Hand scraped arched trusses, wide width random walnut plank flooring, distressed dark stained raised panel cabinetry, and hand carved moldings make these traditional buildings look like they have been here for 100s of years. Newly built of old materials, and old traditional building methods, including arched planked doors, leathered stone counter tops, stone entry, wrought iron straps, and metal beam straps. The Lake House is the first, a Tudor style cottage with a slate roof, 2 bedrooms, view filled living room open to the dining area, all overlooking the lake. European fantasy cottage with hand hewn beams, exposed curved trusses and scraped walnut floors, carved moldings, steel straps, wrought iron lighting and real stone arched fireplace. Dining area next to kitchen in the English Country Cottage. Handscraped walnut random width floors, curved exposed trusses. Wrought iron hardware. The Carriage Home fills in when the kids come home to visit, and holds the garage for the whole idyllic village. This cottage features 2 bedrooms with on suite baths, a large open kitchen, and an warm, comfortable and inviting great room. All overlooking the lake. The third structure is the Wheel House, running a real wonderful old water wheel, and features a private suite upstairs, and a work space downstairs. All homes are slightly different in materials and color, including a few with old terra cotta roofing. Project Location: Ojai, California. Project designed by Maraya Interior Design. From their beautiful resort town of Ojai, they serve clients in Montecito, Hope Ranch, Malibu and Calabasas, across the tri-county area of Santa Barbara, Ventura and Los Angeles, south to Hidden Hills.
Christopher Painter, contractor

 Craig Alan Homes, Inc
Mid-sized elegant wooden u-shaped staircase photo in Atlanta with painted risers
 Midwest Mosaic, Inc.
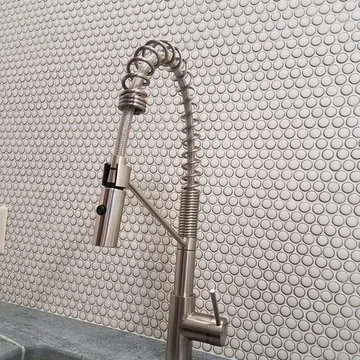
We love the penny round tiles and we think completes very well the modern industrial style in that space, it’s like a highlight for the countertop.
Trendy home design photo in Detroit with a farmhouse sink, granite countertops, white backsplash, mosaic tile backsplash, stainless steel appliances and an island
Trendy home design photo in Detroit with a farmhouse sink, granite countertops, white backsplash, mosaic tile backsplash, stainless steel appliances and an island
 Tile Doctor Ltd
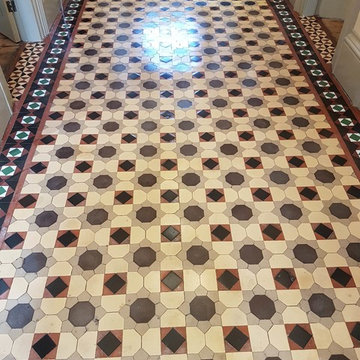
I recently re-visited a Victorian period property in the Leeds suburb of Headingley which had an unusually large tiled entrance hall which we believe to be as old as the property itself. I say re-visited as I actually gave this floor a deep clean and reseal around five years ago; it’s always nice to be asked to return to a job as it shows the customers was very happy with the work. However, with five years of wear and tear the sealer had worn down and the floor was now starting to trap dirt, also it had lost the attractive shine added by the sealer and the owner felt it was time to have it done again. Additionally, the owner had recently had the whole house decorated and wanted the floor to look its best and match the fresh appearance of the property.
Sealers do wear off with use and so it is inevitable that the tiles will need to be cleaned and sealed again with time. Given it hadn’t had a professional clean and seal for five years the floor wasn’t looking too bad as you can see from the picture, it was just a bit dull in the high traffic areas such as along the centre. I’ve certainly seen a lot worse.
Initially I wasn’t 100% sure on which cleaning method l was going to use on this floor. Originally l thought about using a coarse 200-grit burnishing pad to take off a couple of layers of sealer and then re-apply 2 more coats. However, the finish on the floor wasn’t even across the width of the hallway and l felt using that approach wouldn’t resolve that. Additionally, a lot of tiles were pitted and a burnishing pad would struggle to get into the holes. So instead I decided to completely strip the floor and re-seal it which would ensure a uniform finish across the floor.
I used a strong 50:50 dilution of Tile Doctor Pro-Clean on the tiles and scrubbed it in with a black floor pad which removed the old sealer and ingrained dirt. The large floor pads are not very effective in the corners and edges, so I used a 6-inch red buffing pad fitted to a hand buffer for those. The floor was rinsed with water and the soil extracted using a wet vacuum. After inspecting the floor some areas were retreated with a repeat of the same process.
After a final rinse and extraction of the soiled water the floor was left to dry overnight.
The next day after first checking the floor was dry with a damp meter it was sealed with four coats of Tile Doctor Seal and Go. This is a water based sealer that gives a lovely sheen and allows the colours to shine through as well as letting the floor breath, which is important in properties of this age that usually do not have a damp proof membrane.
I was very pleased with the finished result as the pictures show and glad that l had chosen to do a deep clean and not just apply more coats of sealer. The client was over the moon.
Nigel Stoker
North West Yorkshire Tile Doctor
 Tile Doctor Ltd
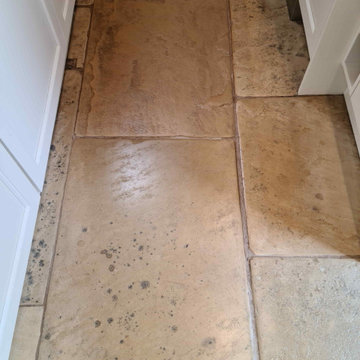
These pictures are of a beautiful Sandstone floor in Ilkley, the tiles were sourced from Lapicida of Harrogate and installed around twelve years prior. If you take a look at their website now you will see they are selling a similar London White Sandstone for nearly £100 per m2. This floor was 35 square metres so clearly this was a significant investment for the owner at the time.
After twelve years of use however the sealer had worn off the floor and dirt had become ingrained in the pores of the stone making it very difficult to keep clean. A good sealer takes a long time to wear off so the change to the appearance of the stone happens so slowly you don’t notice it. The floor was now looking permanently dirty, and the owner of the property had decided it was time to get it renovated.
Before quoting I paid a visit to the property to survey the floor and conduct an initial test clean which came out well. The test cleaning did not go as quickly as I had hoped it might however, due to traces of old satin sealer on some of the stone. It’s important to remove all the old sealer before applying new or you can end up with a patchy appearance. The remnants of old sealer proved challenging to remove as a result I had to try several products and methods before working out the right approach. In the end I resulted to using a product called Tile Doctor Wax Away. I had considered applying diamond burnishing pads which would have been a quicker option, but the flagstones had a riven finish, and the dirt was deeply pitted.
With a successful cleaning plan worked out I provided the client with a which was accepted, and a date agreed for my return.
The cleaning plan I had worked out was to apply a strong dilution of Tile Doctor Wax Away, leave it to soak into the stone for thirty minutes and then scrub it in with a rotary buffer fitted with a black scrubbing pad. The old sealer proved to be tough to remove and in total I used five litres of Tile Doctor Wax Away in the process, as I said it was a big floor!
On day three, I sealed the floor using three coats of Tile Doctor Seal and Go which gave the Sandstone a lovely satin finish that the client liked. This product is also water based so it doesn’t leave a smell as it dries.
Once done the floor was completely transformed, and my client very pleased with the floor which looked so much lighter and cleaner. For aftercare cleaning I recommended the use of Tile Doctor Neutral Tile Cleaner for maintenance, it is pH neutral so will ensure the newly applied seal is protected. It has a nice fresh smell and is gentle enough to use frequently keeping the newly renovated floor looking lovely.
Nigel Stoker
North West Yorkshire Tile Doctor
Sponsored
Delaware, OH

Buckeye Basements, Inc.
Central Ohio's Basement Finishing ExpertsBest Of Houzz '13-'21

 Nampa Floors and Interiors
Alcove shower - contemporary black tile, brown tile, white tile and glass tile pebble tile floor alcove shower idea in Boise


 HRP Home Remodel Pro
Home Remodel Pro all rights reserved
Drop-in bathtub - mid-sized transitional master beige tile and stone tile travertine floor drop-in bathtub idea in Dallas with an undermount sink, white cabinets, granite countertops, a two-piece toilet and beige walls
Drop-in bathtub - mid-sized transitional master beige tile and stone tile travertine floor drop-in bathtub idea in Dallas with an undermount sink, white cabinets, granite countertops, a two-piece toilet and beige walls
 Tile Doctor Ltd
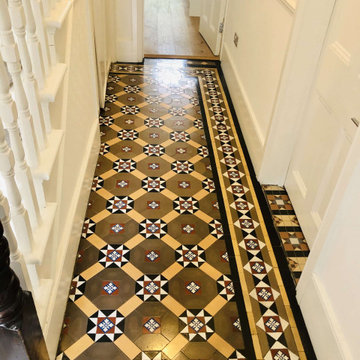
This customer had just moved into a property in Chesham around eighteen months ago. During that time, they had completely renovated the property and in the process had pulled up the hallway carpet to discover a lovely Victorian tiled floor which appeared to be in good condition but very dirty. Period features like these can add a lot of value to a house these days and so they decided to investigate having it professionally cleaned and contacted me for a quote.
Although I can give some indication of price over the phone you never know exactly what to expect so my preference is to visit the property a conduct a test clean. It’s a little trickier to do this now due to COVID-19 but using a combination of PPE, maximum ventilation and social distancing measures I was able to work on the floor. The tiles were in good order with no replacements needed so my focus would be removing carpet adhesive and ingrained dirt. The test went well, and I followed up with a quotation which was accepted, and a date arranged to do the work.
I had worked out previously that the quickest was to deep clean the floor and remove the glue and any old seal was to apply Tile Doctor Remove and Go which as its name suggests is a coatings removed designed for Tiled floors. My method was to spray strong a dilution of Remove and Go onto the Victorian tiles and leave it to soak in for fifteen minutes. Then it was scrubbed in with a black scrubbing pad fitted to a rotary machine. The soil was rinsed off using a minimal of water and extracted with a wet vacuum.
Once the floor had dried, I inspected the tiles and could see more work would be needed to get the white tiles really sparkling. For this I went over the floor using a 200-grit resurfacing pad using water to lubricate the process, I also used handheld burnishing blocks of different grits to do the edges. With this extra effort and another rinse with water to remove the soil the floor looked great, and so I left for the day so it could dry out ready for sealing.
I came back the next day and started by taking moisture readings with a damp meter to ensure the tiles were dry and ready for sealing. This is important as you don’t want to apply sealer to a damp tile and old floors can suffer from damp issues due to the lack of a damp proof membrane.
All was well with the floor, so I was able to move straight onto sealing which started with the application of a single coat of Tile Doctor Colour Grow. This is an impregnating sealer that soaks into the pores of the tile enhancing colour and adding protection. Once this had dried, I followed up with another seven coats of Tile Doctor Seal and Go which adds further protection and leaves a nice subtle sheen to the tiles. This product works really well on old Victorian Tiles like these and being water based it doesn’t leave a smell as it dries.
Andrew Newstead
South Buckinghamshire Tile Doctor
Sponsored
Sunbury, OH

J.Holderby - Renovations
Franklin County's Leading General Contractors - 2X Best of Houzz!

 Cherry City Interiors & Design
Materials and interior paint selected by Cherry City Interiors & Design
Freestanding bathtub - mid-sized contemporary master beige tile and ceramic tile porcelain tile freestanding bathtub idea in Portland with shaker cabinets, dark wood cabinets, white walls, a drop-in sink and tile countertops
Freestanding bathtub - mid-sized contemporary master beige tile and ceramic tile porcelain tile freestanding bathtub idea in Portland with shaker cabinets, dark wood cabinets, white walls, a drop-in sink and tile countertops

 Bay Area Kitchens
Japanese style soaking tub by Americh with molded seat, whirlpool system and inline heater
Large transitional master beige tile and porcelain tile porcelain tile bathroom photo in Houston with marble countertops, green walls, raised-panel cabinets, dark wood cabinets and an undermount sink
Large transitional master beige tile and porcelain tile porcelain tile bathroom photo in Houston with marble countertops, green walls, raised-panel cabinets, dark wood cabinets and an undermount sink

 Value Builders
Have you ever wondered about the installation Process of a C-Thru Sunroom? Take a look at the Video Below to see the process from start to finish. Contact us for more information on a C-Thru Sunroom.
1- The first step in any sunroom build is pre-construction and demo. Here you can see our builders are setting forms for the foundation. A nice level foundation will ensure a water tight seal to last and last and prevent against perimeter leaks.
3 - In this particular sunroom the client wanted a higher roof so we built her what is called a roof saddle
4 - The benefits of a roof saddle include, extra height, better drainage, more light with upper glass transoms and even an option to match your existing roof
5- We have the safest delivery methods for your materials they will arrive in customized prepackaging.
6 - We carefully unload and stage materials in your backyard.
7- Here, our certified C Thru Installers are anchoring perimeter channels that holds the walls in place.
8 - These channels are specially designed with an anti-moisture system to prevent perimeter leaks Guaranteeing a moisture free environment.
9- Our installers are putting up the walls - carefully leveling and plumbing each section to the house, we can achieve a custom fit to any house wall with modifications as needed.
10- all though our roof systems are water tight as is, we offer composition roofing to match your existing roof and add to the over all aesthetics of the structure. Flooring, Heating and cooling, fans, lights, and many other custom interior and exterior aesthetic options are available.
While other sunroom additions are only available in stock sizes, or rely on panels and miscellaneous parts to be mixed and matched to fit your home as best they can, C-Thru sunrooms are individually designed and engineered according to the exact specifications of your home. Each and every piece of our sunrooms is fabricated with total precision in our innovative manufacturing facility using industry-leading Computer Aided Design technology. This means that every single sunroom we build is engineered with efficiency, perfect sizing, and optimal visual appeal in mind.
Custom Sunroom Additions for Every Home
When it comes to custom sunroom additions, C-Thru offers a multitude of options to fit your exact preferences and the specific needs of your home. And thanks to our efficient, precision manufacturing technology, a sunroom addition installation with us can be finished in a matter of days—not weeks. When you work with us, you’ll have access to a variety of energy efficient elements to choose from, including Roof Styles: Window Styles: Interior/Exterior Styles:
Make your sunroom truly your own, with options to personalize every feature to your preference. From heated flooring to cable-ready installation, we can make sure your sunroom is ready for its intended purpose.
Thank you for watching, for an estimate please do not hesitate to contact us! We are happy to help with your patio cover or sunroom project.
Contact us today for an estimate!
P: 1-650-339-1477
E: marco.truvaluebuilders@gmail.com
cthrusunroomsnocal.com
patiocoversgalore.com
https://www.youtube.com/watch?v=OoFZ3vZ_yfk&t=71s
#GabledSunrooms #PatioCovers #PatioEnclosures #ScreenRooms #StudioSunrooms #ThreeSeasonRooms #FourSeasonRooms #Enclosures #Solarium #Awning #Retractable #Awning #BayArea #SF #SanJose #SantaClara #Hayward #SanMateo #Burligame #EastBay #Concord #Penninsula #California #NorCal #NorthBayArea #sunroom #patioenclosure #pergola #patiocovering #shed #greenhouse #Solarium #sunroom
At C-Thru Sunrooms we have bi-parting windows and doors! Easy to operate door panels allow for quick opening and closing allowing for lots of ventilation and easy of movement in and out. These doors are great for entertaining a large croud or family event!
We are also one of the first sunroom manufactures to offer a solution to all your lighting needs. Our recessed lighting and fans are sure to illuminate your night!
Contact us today for an estimate!
P: 1-650-339-1477
E: marco.truvaluebuilders@gmail.com
cthrusunroomsnocal.com
patiocoversgalore.com
link to video
https://www.youtube.com/watch?v=esXIo3IA1uQ&t=56s
#GabledSunrooms #PatioCovers #PatioEnclosures #ScreenRooms #StudioSunrooms #ThreeSeasonRooms #FourSeasonRooms #Enclosures #Solarium #Awning #Retractable #Awning #BayArea #SF #SanJose #SantaClara #Hayward #SanMateo #Burligame #EastBay #Concord #Penninsula #California #NorCal #NorthBayArea #sunroom #patioenclosure #pergola #patiocovering #shed #greenhouse #Solarium #sunroom
37