
Search results for "Overcome specific" in Home Design Ideas
 Twelve Stones Designs, LLC
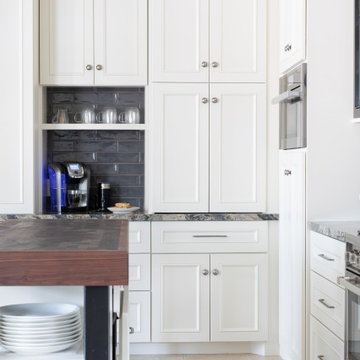
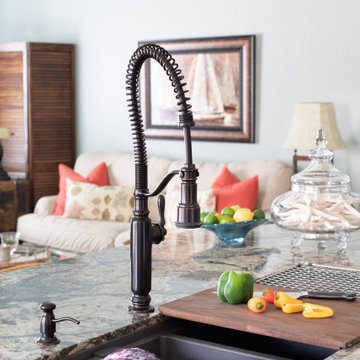
The owners of this kitchen had spent the money to upgrade the finishes in their kitchen upon building the home 12 years ago, but after living in the space for several years they realized how nonfunctional the layout really was. The (then) two preschool aged children had grown into busy, hungry teenagers with many friends who also liked to hang out at the house. So the family needed a more functional kitchen with better traffic flow, space for daily activities revolving around the kitchen at different times of day, and a kitchen that could accommodate cooking for and serving large groups. Furthermore, the dark, traditional finishes no longer reflected the homeowners’ style. They requested a brighter, more relaxed, coastal style that reflected their love of the seaside cities they like to visit.
Originally, the kitchen was U-shaped with a narrow island in the middle. The island created narrow aisles that bottle-necked at the dishwasher, refrigerator, and cooktop areas. There was a pass-through from the foyer into the kitchen, but the owners never liked that the pass-through was also located so close to the powder room. The awkward proximity was unappealing and made guests feel uncomfortable.
The kitchen’s storage was made up of lots of narrow cabinets, apothecary drawers, clipped corner units, and very few drawers. It lacked useful storage for the larger items the family used on a daily basis. And the kitchen’s only pantry was small closet that had only builder-grade, narrow shelving with no illumination to be able to see the contents inside.
Overall, the kitchen’s lighting plan was poorly executed. Only six recessed cans illuminated the entire kitchen and nook areas. The under cabinet lighting was not evenly distributed either. In fact, the builder had mis-placed the under cabinet lighting around the decorative pilasters which made for choppy, dark cubbies. Further, the builder didn’t include any lighting over the sink or the bar area, which meant whoever was doing the dishes was always in their own shadow. That, coupled with the steep overhang of the game room above made the bar area feel like a dim, cavernous space that wasn’t inviting or task oriented. The kitchen looked out into the main living space, but the raised bar and a narrow wall (which held the only large cabinet in the kitchen) created more of a barrier than a relationship to the living room or breakfast nook. In fact, one couldn’t even see the breakfast nook from the cooktop or sink areas due to its orientation. The raised bar top was too narrow to comfortably sit to either dine at or chat from due to the lack of knee space. The the homeowners confided that the kitchen felt more like a dark, dirty prison than place where the family, or their guests, wanted to gather and commune.
The clients' needs and desires were:
➢ to create a kitchen that would be a space the family loved to be in; to relate to the adjacent spaces all around, and to have better flow for entertaining large groups
➢ to remove the walls between the breakfast nook and living area and to be able to utilize the natural light from the windows in both those areas
➢ to incorporate a functional chopping block for prepping fresh food for home cooked meals, an island with a large sink and drain board, 2 pull out trash cans, and seating for at least the 2 teens to eat or do homework
➢ to design a kitchen and breakfast nook with an airy, coastal, relaxed vibe that blended with the rest of the house's coastal theme
➢ to integrate a layered lighting plan which would include ample general illumination, specific task lighting, decorative lighting, and lots of illuminated storage
➢ to design a kitchen with not only more storage for all the husband’s kitchen gadgets and collection of oils and spices, but smart storage, including a coffee/breakfast bar and a place to store and conceal the toaster oven and microwave
➢ to find a way to utilize the large open space between the kitchen, pantry area, and breakfast nook
Twelve Stones Designs achieved the owner's goals by:
➢ removing the walls between the kitchen and living room to allow the natural light to filter in from the adjacent rooms and to create a connection between the kitchen, nook, and living spaces for a sense of unity and communion
➢ removing the existing pantry and designing 3 large pantry style cabinets with LED tape lights and rollout drawers to house lots of kitchen appliances, gadgets, and tons of groceries. We also took the cabinets all the way up to the 9’ ceiling for additional storage for seasonal items and bulk storage.
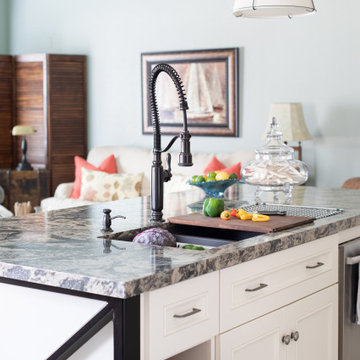
➢ designing 2 islands - 1 with a gorgeous black walnut chopping block that houses a drawer for chopping and carving knives and a custom double pull out trash unit for point of use utilization - and 1 that houses the dishwasher, a large Blanco Gourmet sink with integrated drain board, woven baskets for fresh root vegetables and kitchen towels, plenty of drawer storage for kitchen items, and bar seating for up to 4 diners.
➢ closing off the space between the kitchen and the powder room to create a beautiful new private alcove for the powder room as well as adding some decorative storage. This also gave us space to include more tall storage near the new range for precision placement of the husband’s extensive oil and spice collection as well as a location for a combo-steam oven the wife wanted for baking and cooking healthy meals.
The project is enhanced functionally by:
➢ incorporated USB and standard receptacles for the kids’ laptops and phone charging in the large island
➢ designing the small island to include additional open shelving for items used on a daily basis such as a variety of bowls, plates, and colanders. This set up also works well for the husband who prefers to “plate” his dinners in restaurant-style fashion before presenting them to the table.
➢ the integration of specific storage units, such as double stacked cutlery drawers, a custom spice pull-out, a Kuerig coffee and tea pod drawer, and custom double stacked utensil drawers
➢ moving the refrigerator to the old oven location - this eliminated the bottle neck as well as created a better relationship to the eating table. It also utilizes the floor space between the pantry, nook, and kitchen
➢ creating a banquet style breakfast nook - this banquette seating not only doubles the amount of seating for large gatherings but it better utilizes the odd space between the kitchen and the previous nook area. It also helps to create a distinct pathway from the mudroom room through the pantry area, kitchen, nook, and living room.
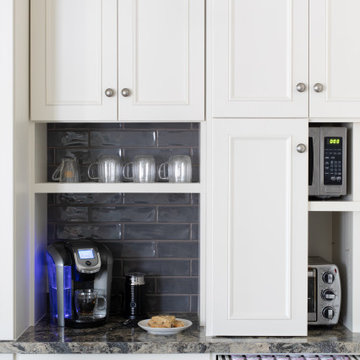
➢ the coffee/breakfast bar area which includes the perfect location for the concealed microwave and toaster oven, convenient storage for the coffee pods and tea accoutrements. Roll-out drawers below also house the smoothie maker, hot water kettle, and a plethora of smoothie-making ingredients such as protein powders, smoothie additives, etc. Furthermore, the drawers below the Keurig house measuring utensil, cutlery, baking supplies and tupperware storage.
➢ incorporating lots of wide drawers and pullouts to accommodate large cookware.
➢ utilizing as much vertical space as possible by building storage to the ceiling which accommodates the family’s abundant amount of serving platters, baking sheets, bakeware, casserole dishes, and additional cutting boards.
The project is enhanced aesthetically by:
➢ new 5-piece Versailles pattern porcelain tile that now seamlessly joins the entire down stairs area together creating a bright, cohesiveness feeling instead of choppy separated spaces - it also adds a coastal feeling
➢ designing a cabinet to conceal the microwave and toaster oven
➢ the coastal influenced light fixtures over the nook table and island
➢ the sandy colors of the Langdon Cambria countertops. The swirling pattern and sparkling quartz pieces remind the homeowner of black-and-tan sandy beaches
➢ the striped banquet seating whose creamy white background and blue-green stripes were the inspiration for the cabinet and wall colors.
➢ All the interior doors were painted black to coordinate with the blacks and grays in the backsplash tile and countertop. This also adds a hint of tailored formality to an otherwise casual space.
➢ the use of WAC's Oculux small aperture LED units for the overhead lighting complimented with Diode LED strips for task lighting under the cabinets and inside the pantry and glass wall cabinets. All of the lighting applications are on separate dimmer switches.
Innovative uses of materials or construction methods by Realty Restoration LLC:
➢ Each 1-1/2” x 3” block of reclaimed end-grain black walnut that makes up the center island chopping block was hand milled and built in the shop. It was designed to look substantial and proportional to the surrounding elements, executed by creating the 4 inch tall top with a solid wood chamfered edge band.
➢ The metal doors on either side of the vent hood were also custom designed for this project and built in the Realty Restoration LLC shop. They are made 1x2, 11-gauge mild steel with ribbed glass. Weighing 60 lbs a piece, heavy duty cabinet hinges were added to support the weight of the door and keep them from sagging.
➢ Under-cabinet receptacles were added along the range wall in order to have a clean, uninterrupted backsplash.
Design obstacles to overcome:
➢ Because we were removing the demising walls between the kitchen and living room, we had to find a way to plumb and vent the new island. We did this by tunneling through the slab (the slab had post tension cables which prevented us from just trenching) to run a new wet vent through a nearby structural wall. We pulled the existing hot and cold lines between upper floor joists and ran them down the structural wall as well and up through a conduit in the tunnel.
➢ Since we were converting from wall overs to a gas range it allowed us to utilize the 220 feed for the wall ovens to provide a new sub panel for all the new kitchen circuits
➢ Due to framing deficiencies inherited from the original build there was a 1-1/2” differential in the floor-to-ceiling height over a 20 foot span; by utilizing the process of cutting and furring coupled with the crown moulding details on the cabinet elevations we were able to mask the problem and provide seamless transitions between the cabinet components.
Evidence of superior craftsmanship:
➢ uniquely designed, one-of-a-kind metal “X” end panels on the large island. The end panels were custom made in the Realty Restoration LLC shop and fitted to the exact dimensions of the island. The welding seams are completely indistinguishable - the posts look like they are cut from a single sheet of metal
➢ square metal posts on the small island were also custom made and designed to compliment and carry through the metal element s throughout the kitchen
➢ the beautiful, oversized end panels on the pantry cabinets which give the breakfast nook a tailored look
➢ integrating a large format 5 piece Versailles tile pattern to seamlessly flow from the existing spaces into the new kitchen space
➢ By constructing a custom cabinet that jogged around a corner we could not remodel (housing the entry way coat closet) we were able to camouflage the adjacent wall offset within the upper and lower cabinets. By designing around the existing jog in the structural walls we accomplished a few things: we were able to find the space to house, and hide, the microwave and toaster oven yet still have a clean cohesive appearance from the kitchen side. Additionally, the owners were able to keep their much needed coat closet and we didn’t have to increase the budget with unnecessary structural work.
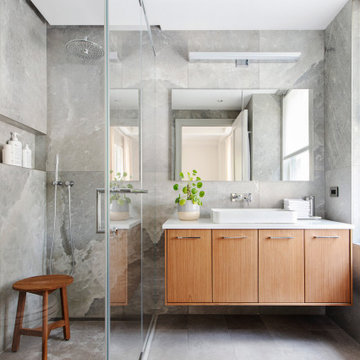

 Twelve Stones Designs, LLC
The owners of this kitchen had spent the money to upgrade the finishes in their kitchen upon building the home 12 years ago, but after living in the space for several years they realized how nonfunctional the layout really was. The (then) two preschool aged children had grown into busy, hungry teenagers with many friends who also liked to hang out at the house. So the family needed a more functional kitchen with better traffic flow, space for daily activities revolving around the kitchen at different times of day, and a kitchen that could accommodate cooking for and serving large groups. Furthermore, the dark, traditional finishes no longer reflected the homeowners’ style. They requested a brighter, more relaxed, coastal style that reflected their love of the seaside cities they like to visit.
Originally, the kitchen was U-shaped with a narrow island in the middle. The island created narrow aisles that bottle-necked at the dishwasher, refrigerator, and cooktop areas. There was a pass-through from the foyer into the kitchen, but the owners never liked that the pass-through was also located so close to the powder room. The awkward proximity was unappealing and made guests feel uncomfortable.
The kitchen’s storage was made up of lots of narrow cabinets, apothecary drawers, clipped corner units, and very few drawers. It lacked useful storage for the larger items the family used on a daily basis. And the kitchen’s only pantry was small closet that had only builder-grade, narrow shelving with no illumination to be able to see the contents inside.
Overall, the kitchen’s lighting plan was poorly executed. Only six recessed cans illuminated the entire kitchen and nook areas. The under cabinet lighting was not evenly distributed either. In fact, the builder had mis-placed the under cabinet lighting around the decorative pilasters which made for choppy, dark cubbies. Further, the builder didn’t include any lighting over the sink or the bar area, which meant whoever was doing the dishes was always in their own shadow. That, coupled with the steep overhang of the game room above made the bar area feel like a dim, cavernous space that wasn’t inviting or task oriented. The kitchen looked out into the main living space, but the raised bar and a narrow wall (which held the only large cabinet in the kitchen) created more of a barrier than a relationship to the living room or breakfast nook. In fact, one couldn’t even see the breakfast nook from the cooktop or sink areas due to its orientation. The raised bar top was too narrow to comfortably sit to either dine at or chat from due to the lack of knee space. The the homeowners confided that the kitchen felt more like a dark, dirty prison than place where the family, or their guests, wanted to gather and commune.
The clients' needs and desires were:
➢ to create a kitchen that would be a space the family loved to be in; to relate to the adjacent spaces all around, and to have better flow for entertaining large groups
➢ to remove the walls between the breakfast nook and living area and to be able to utilize the natural light from the windows in both those areas
➢ to incorporate a functional chopping block for prepping fresh food for home cooked meals, an island with a large sink and drain board, 2 pull out trash cans, and seating for at least the 2 teens to eat or do homework
➢ to design a kitchen and breakfast nook with an airy, coastal, relaxed vibe that blended with the rest of the house's coastal theme
➢ to integrate a layered lighting plan which would include ample general illumination, specific task lighting, decorative lighting, and lots of illuminated storage
➢ to design a kitchen with not only more storage for all the husband’s kitchen gadgets and collection of oils and spices, but smart storage, including a coffee/breakfast bar and a place to store and conceal the toaster oven and microwave
➢ to find a way to utilize the large open space between the kitchen, pantry area, and breakfast nook
Twelve Stones Designs achieved the owner's goals by:
➢ removing the walls between the kitchen and living room to allow the natural light to filter in from the adjacent rooms and to create a connection between the kitchen, nook, and living spaces for a sense of unity and communion
➢ removing the existing pantry and designing 3 large pantry style cabinets with LED tape lights and rollout drawers to house lots of kitchen appliances, gadgets, and tons of groceries. We also took the cabinets all the way up to the 9’ ceiling for additional storage for seasonal items and bulk storage.
➢ designing 2 islands - 1 with a gorgeous black walnut chopping block that houses a drawer for chopping and carving knives and a custom double pull out trash unit for point of use utilization - and 1 that houses the dishwasher, a large Blanco Gourmet sink with integrated drain board, woven baskets for fresh root vegetables and kitchen towels, plenty of drawer storage for kitchen items, and bar seating for up to 4 diners.
➢ closing off the space between the kitchen and the powder room to create a beautiful new private alcove for the powder room as well as adding some decorative storage. This also gave us space to include more tall storage near the new range for precision placement of the husband’s extensive oil and spice collection as well as a location for a combo-steam oven the wife wanted for baking and cooking healthy meals.
The project is enhanced functionally by:
➢ incorporated USB and standard receptacles for the kids’ laptops and phone charging in the large island
➢ designing the small island to include additional open shelving for items used on a daily basis such as a variety of bowls, plates, and colanders. This set up also works well for the husband who prefers to “plate” his dinners in restaurant-style fashion before presenting them to the table.
➢ the integration of specific storage units, such as double stacked cutlery drawers, a custom spice pull-out, a Kuerig coffee and tea pod drawer, and custom double stacked utensil drawers
➢ moving the refrigerator to the old oven location - this eliminated the bottle neck as well as created a better relationship to the eating table. It also utilizes the floor space between the pantry, nook, and kitchen
➢ creating a banquet style breakfast nook - this banquette seating not only doubles the amount of seating for large gatherings but it better utilizes the odd space between the kitchen and the previous nook area. It also helps to create a distinct pathway from the mudroom room through the pantry area, kitchen, nook, and living room.
➢ the coffee/breakfast bar area which includes the perfect location for the concealed microwave and toaster oven, convenient storage for the coffee pods and tea accoutrements. Roll-out drawers below also house the smoothie maker, hot water kettle, and a plethora of smoothie-making ingredients such as protein powders, smoothie additives, etc. Furthermore, the drawers below the Keurig house measuring utensil, cutlery, baking supplies and tupperware storage.
➢ incorporating lots of wide drawers and pullouts to accommodate large cookware.
➢ utilizing as much vertical space as possible by building storage to the ceiling which accommodates the family’s abundant amount of serving platters, baking sheets, bakeware, casserole dishes, and additional cutting boards.
The project is enhanced aesthetically by:
➢ new 5-piece Versailles pattern porcelain tile that now seamlessly joins the entire down stairs area together creating a bright, cohesiveness feeling instead of choppy separated spaces - it also adds a coastal feeling
➢ designing a cabinet to conceal the microwave and toaster oven
➢ the coastal influenced light fixtures over the nook table and island
➢ the sandy colors of the Langdon Cambria countertops. The swirling pattern and sparkling quartz pieces remind the homeowner of black-and-tan sandy beaches
➢ the striped banquet seating whose creamy white background and blue-green stripes were the inspiration for the cabinet and wall colors.
➢ All the interior doors were painted black to coordinate with the blacks and grays in the backsplash tile and countertop. This also adds a hint of tailored formality to an otherwise casual space.
➢ the use of WAC's Oculux small aperture LED units for the overhead lighting complimented with Diode LED strips for task lighting under the cabinets and inside the pantry and glass wall cabinets. All of the lighting applications are on separate dimmer switches.
Innovative uses of materials or construction methods by Realty Restoration LLC:
➢ Each 1-1/2” x 3” block of reclaimed end-grain black walnut that makes up the center island chopping block was hand milled and built in the shop. It was designed to look substantial and proportional to the surrounding elements, executed by creating the 4 inch tall top with a solid wood chamfered edge band.
➢ The metal doors on either side of the vent hood were also custom designed for this project and built in the Realty Restoration LLC shop. They are made 1x2, 11-gauge mild steel with ribbed glass. Weighing 60 lbs a piece, heavy duty cabinet hinges were added to support the weight of the door and keep them from sagging.
➢ Under-cabinet receptacles were added along the range wall in order to have a clean, uninterrupted backsplash.
Design obstacles to overcome:
➢ Because we were removing the demising walls between the kitchen and living room, we had to find a way to plumb and vent the new island. We did this by tunneling through the slab (the slab had post tension cables which prevented us from just trenching) to run a new wet vent through a nearby structural wall. We pulled the existing hot and cold lines between upper floor joists and ran them down the structural wall as well and up through a conduit in the tunnel.
➢ Since we were converting from wall overs to a gas range it allowed us to utilize the 220 feed for the wall ovens to provide a new sub panel for all the new kitchen circuits
➢ Due to framing deficiencies inherited from the original build there was a 1-1/2” differential in the floor-to-ceiling height over a 20 foot span; by utilizing the process of cutting and furring coupled with the crown moulding details on the cabinet elevations we were able to mask the problem and provide seamless transitions between the cabinet components.
Evidence of superior craftsmanship:
➢ uniquely designed, one-of-a-kind metal “X” end panels on the large island. The end panels were custom made in the Realty Restoration LLC shop and fitted to the exact dimensions of the island. The welding seams are completely indistinguishable - the posts look like they are cut from a single sheet of metal
➢ square metal posts on the small island were also custom made and designed to compliment and carry through the metal element s throughout the kitchen
➢ the beautiful, oversized end panels on the pantry cabinets which give the breakfast nook a tailored look
➢ integrating a large format 5 piece Versailles tile pattern to seamlessly flow from the existing spaces into the new kitchen space
➢ By constructing a custom cabinet that jogged around a corner we could not remodel (housing the entry way coat closet) we were able to camouflage the adjacent wall offset within the upper and lower cabinets. By designing around the existing jog in the structural walls we accomplished a few things: we were able to find the space to house, and hide, the microwave and toaster oven yet still have a clean cohesive appearance from the kitchen side. Additionally, the owners were able to keep their much needed coat closet and we didn’t have to increase the budget with unnecessary structural work.
Find the right local pro for your project
 Haus Interior Design
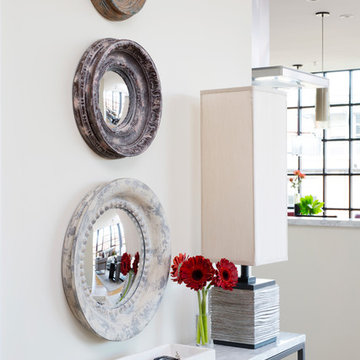
Who wouldn't fall in love with the Water Street building, and the elegant industrial vibe? The light that floods in through the floor-to-ceiling windows makes this a perfect spot to entertain and host friends from California or adult kids who visit. The location can't be beat--these clients ride their bikes to meet friends for lunch or a tour through the Hirschhorn. We knocked down a wall to open the kitchen, and added modern furnishings punctuated by splashes of deep orangey-red. High contrast and lots of rich textures can be found throughout this urban loft.
Photography: Stacy Zarin Goldberg
 Good Earth Plant Company and GreenScaped Buildings
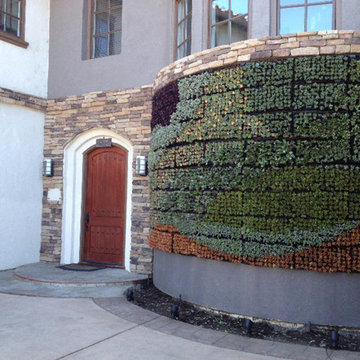
A client who had seen our stunning installation at Spring Hill Suites in Oceanside, California wanted to surprise his wife for her birthday and give her a 112 square foot living wall at the front entry of their house. He was set on the style of the wall being succulents in a tight pattern. This raised two huge challenges:
1) How to overcome his three week lead time: First, the manufacturer's lead time to get us the wall materials is four weeks. The plants in this type of system usually require three months to get rooted.
2) How to attach a system meant for flat surfaces onto his CURVED front wall. Square peg, meet curved hole.
Operations Manager Kerry Bauer made drawings and a mock up for a system created from the green ROOF components GreenScaped Buildings has used on certain projects. She chose parts she knew shipped within one week to eliminate the lead time issue. A landscape edging element, specifically designed to handle curves, could also overcome the challenge of the curved wall.
But what about the time needed for growing the plants? By using an advanced soil replacement media block, the wall installation could allow the plants to root while installed vertically.
GreenScaped Buildings collaborated with the client and supplier Green Meadow Growers to choose appropriate sedums and succulents for the east-facing coastal climate of Encinitas and lay out a pattern of organic wave shapes. Katelyn Hutchings tackled the procurement aspects of the project while construction foreman John Rodenbo prepared the site and installation logistics.
Installation took three days. How do you think it turned out?
The final product exceeded the client's expectations, and he has already invited GreenScaped Buildings to collaborate on his upcoming commercial hotel project with the goal of integrating a living wall there to enhance his hotel as much as it has enhanced his home.
 Studio 1200
While most people in town considered this building a "tear-down", the new homeowners wanted to revive the property with an ambitions renovation and addition project. Two major challenges needed to be overcome on this project: the first was preserving the integrity of the original 200 year old barn; the second was designing a complementary structure that would co-exist on the site without looking like a 21st century addition.
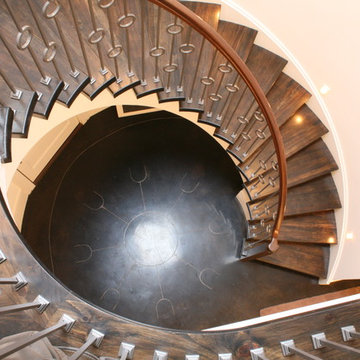
In order to achieve these goals, our team studied how farm buildings evolve on a site over time. Additions are usually constructed based on need and function. With this protocol in mind, a grain silo was designed to act as our entry tower and buffer the intersection of the two buildings. The silo acts as our focal point and allowed us to construct very simple buildings to house the balance of the owner’s program. The team paid very close attention to scale, use of materials (many of which were recycled) and developed a vocabulary of modern interior detailing that would complement the original house.
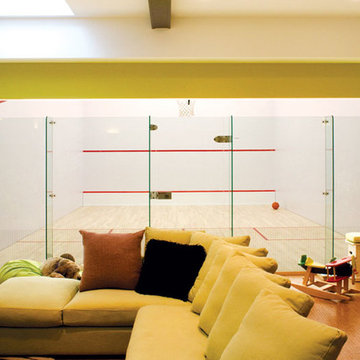
Specific program requirements for the project included: large entertainment spaces, gourmet kitchen with adjacent family room, a squash court, multiple bedrooms and bathrooms, master suite, and plenty of storage space. In addition, since both adults work from home and receive clients in their offices, two offices needed to be created and it was critical to separate the work areas for the more private family spaces. The new silo, with central stair, became the element that allowed these different program needs to coexist effectively.
 Studio 1200
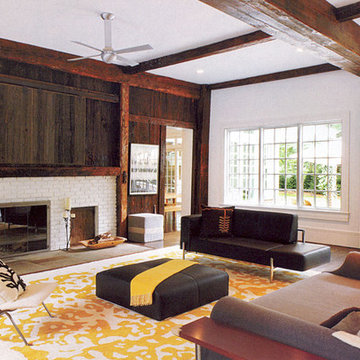
While most people in town considered this building a "tear-down", the new homeowners wanted to revive the property with an ambitions renovation and addition project. Two major challenges needed to be overcome on this project: the first was preserving the integrity of the original 200 year old barn; the second was designing a complementary structure that would co-exist on the site without looking like a 21st century addition.
In order to achieve these goals, our team studied how farm buildings evolve on a site over time. Additions are usually constructed based on need and function. With this protocol in mind, a grain silo was designed to act as our entry tower and buffer the intersection of the two buildings. The silo acts as our focal point and allowed us to construct very simple buildings to house the balance of the owner’s program. The team paid very close attention to scale, use of materials (many of which were recycled) and developed a vocabulary of modern interior detailing that would complement the original house.
Specific program requirements for the project included: large entertainment spaces, gourmet kitchen with adjacent family room, a squash court, multiple bedrooms and bathrooms, master suite, and plenty of storage space. In addition, since both adults work from home and receive clients in their offices, two offices needed to be created and it was critical to separate the work areas for the more private family spaces. The new silo, with central stair, became the element that allowed these different program needs to coexist effectively.
 Studio 1200
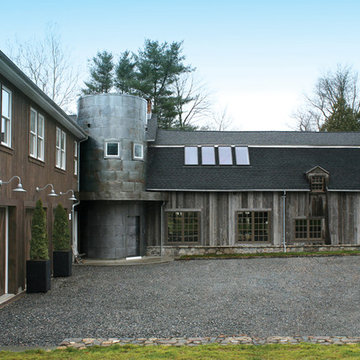
While most people in town considered this building a "tear-down", the new homeowners wanted to revive the property with an ambitions renovation and addition project. Two major challenges needed to be overcome on this project: the first was preserving the integrity of the original 200 year old barn; the second was designing a complementary structure that would co-exist on the site without looking like a 21st century addition.
In order to achieve these goals, our team studied how farm buildings evolve on a site over time. Additions are usually constructed based on need and function. With this protocol in mind, a grain silo was designed to act as our entry tower and buffer the intersection of the two buildings. The silo acts as our focal point and allowed us to construct very simple buildings to house the balance of the owner’s program. The team paid very close attention to scale, use of materials (many of which were recycled) and developed a vocabulary of modern interior detailing that would complement the original house.
Specific program requirements for the project included: large entertainment spaces, gourmet kitchen with adjacent family room, a squash court, multiple bedrooms and bathrooms, master suite, and plenty of storage space. In addition, since both adults work from home and receive clients in their offices, two offices needed to be created and it was critical to separate the work areas for the more private family spaces. The new silo, with central stair, became the element that allowed these different program needs to coexist effectively.
 Twelve Stones Designs, LLC
The owners of this kitchen had spent the money to upgrade the finishes in their kitchen upon building the home 12 years ago, but after living in the space for several years they realized how nonfunctional the layout really was. The (then) two preschool aged children had grown into busy, hungry teenagers with many friends who also liked to hang out at the house. So the family needed a more functional kitchen with better traffic flow, space for daily activities revolving around the kitchen at different times of day, and a kitchen that could accommodate cooking for and serving large groups. Furthermore, the dark, traditional finishes no longer reflected the homeowners’ style. They requested a brighter, more relaxed, coastal style that reflected their love of the seaside cities they like to visit.
Originally, the kitchen was U-shaped with a narrow island in the middle. The island created narrow aisles that bottle-necked at the dishwasher, refrigerator, and cooktop areas. There was a pass-through from the foyer into the kitchen, but the owners never liked that the pass-through was also located so close to the powder room. The awkward proximity was unappealing and made guests feel uncomfortable.
The kitchen’s storage was made up of lots of narrow cabinets, apothecary drawers, clipped corner units, and very few drawers. It lacked useful storage for the larger items the family used on a daily basis. And the kitchen’s only pantry was small closet that had only builder-grade, narrow shelving with no illumination to be able to see the contents inside.
Overall, the kitchen’s lighting plan was poorly executed. Only six recessed cans illuminated the entire kitchen and nook areas. The under cabinet lighting was not evenly distributed either. In fact, the builder had mis-placed the under cabinet lighting around the decorative pilasters which made for choppy, dark cubbies. Further, the builder didn’t include any lighting over the sink or the bar area, which meant whoever was doing the dishes was always in their own shadow. That, coupled with the steep overhang of the game room above made the bar area feel like a dim, cavernous space that wasn’t inviting or task oriented. The kitchen looked out into the main living space, but the raised bar and a narrow wall (which held the only large cabinet in the kitchen) created more of a barrier than a relationship to the living room or breakfast nook. In fact, one couldn’t even see the breakfast nook from the cooktop or sink areas due to its orientation. The raised bar top was too narrow to comfortably sit to either dine at or chat from due to the lack of knee space. The the homeowners confided that the kitchen felt more like a dark, dirty prison than place where the family, or their guests, wanted to gather and commune.
The clients' needs and desires were:
➢ to create a kitchen that would be a space the family loved to be in; to relate to the adjacent spaces all around, and to have better flow for entertaining large groups
➢ to remove the walls between the breakfast nook and living area and to be able to utilize the natural light from the windows in both those areas
➢ to incorporate a functional chopping block for prepping fresh food for home cooked meals, an island with a large sink and drain board, 2 pull out trash cans, and seating for at least the 2 teens to eat or do homework
➢ to design a kitchen and breakfast nook with an airy, coastal, relaxed vibe that blended with the rest of the house's coastal theme
➢ to integrate a layered lighting plan which would include ample general illumination, specific task lighting, decorative lighting, and lots of illuminated storage
➢ to design a kitchen with not only more storage for all the husband’s kitchen gadgets and collection of oils and spices, but smart storage, including a coffee/breakfast bar and a place to store and conceal the toaster oven and microwave
➢ to find a way to utilize the large open space between the kitchen, pantry area, and breakfast nook
Twelve Stones Designs achieved the owner's goals by:
➢ removing the walls between the kitchen and living room to allow the natural light to filter in from the adjacent rooms and to create a connection between the kitchen, nook, and living spaces for a sense of unity and communion
➢ removing the existing pantry and designing 3 large pantry style cabinets with LED tape lights and rollout drawers to house lots of kitchen appliances, gadgets, and tons of groceries. We also took the cabinets all the way up to the 9’ ceiling for additional storage for seasonal items and bulk storage.
➢ designing 2 islands - 1 with a gorgeous black walnut chopping block that houses a drawer for chopping and carving knives and a custom double pull out trash unit for point of use utilization - and 1 that houses the dishwasher, a large Blanco Gourmet sink with integrated drain board, woven baskets for fresh root vegetables and kitchen towels, plenty of drawer storage for kitchen items, and bar seating for up to 4 diners.
➢ closing off the space between the kitchen and the powder room to create a beautiful new private alcove for the powder room as well as adding some decorative storage. This also gave us space to include more tall storage near the new range for precision placement of the husband’s extensive oil and spice collection as well as a location for a combo-steam oven the wife wanted for baking and cooking healthy meals.
The project is enhanced functionally by:
➢ incorporated USB and standard receptacles for the kids’ laptops and phone charging in the large island
➢ designing the small island to include additional open shelving for items used on a daily basis such as a variety of bowls, plates, and colanders. This set up also works well for the husband who prefers to “plate” his dinners in restaurant-style fashion before presenting them to the table.
➢ the integration of specific storage units, such as double stacked cutlery drawers, a custom spice pull-out, a Kuerig coffee and tea pod drawer, and custom double stacked utensil drawers
➢ moving the refrigerator to the old oven location - this eliminated the bottle neck as well as created a better relationship to the eating table. It also utilizes the floor space between the pantry, nook, and kitchen
➢ creating a banquet style breakfast nook - this banquette seating not only doubles the amount of seating for large gatherings but it better utilizes the odd space between the kitchen and the previous nook area. It also helps to create a distinct pathway from the mudroom room through the pantry area, kitchen, nook, and living room.
➢ the coffee/breakfast bar area which includes the perfect location for the concealed microwave and toaster oven, convenient storage for the coffee pods and tea accoutrements. Roll-out drawers below also house the smoothie maker, hot water kettle, and a plethora of smoothie-making ingredients such as protein powders, smoothie additives, etc. Furthermore, the drawers below the Keurig house measuring utensil, cutlery, baking supplies and tupperware storage.
➢ incorporating lots of wide drawers and pullouts to accommodate large cookware.
➢ utilizing as much vertical space as possible by building storage to the ceiling which accommodates the family’s abundant amount of serving platters, baking sheets, bakeware, casserole dishes, and additional cutting boards.
The project is enhanced aesthetically by:
➢ new 5-piece Versailles pattern porcelain tile that now seamlessly joins the entire down stairs area together creating a bright, cohesiveness feeling instead of choppy separated spaces - it also adds a coastal feeling
➢ designing a cabinet to conceal the microwave and toaster oven
➢ the coastal influenced light fixtures over the nook table and island
➢ the sandy colors of the Langdon Cambria countertops. The swirling pattern and sparkling quartz pieces remind the homeowner of black-and-tan sandy beaches
➢ the striped banquet seating whose creamy white background and blue-green stripes were the inspiration for the cabinet and wall colors.
➢ All the interior doors were painted black to coordinate with the blacks and grays in the backsplash tile and countertop. This also adds a hint of tailored formality to an otherwise casual space.
➢ the use of WAC's Oculux small aperture LED units for the overhead lighting complimented with Diode LED strips for task lighting under the cabinets and inside the pantry and glass wall cabinets. All of the lighting applications are on separate dimmer switches.
Innovative uses of materials or construction methods by Realty Restoration LLC:
➢ Each 1-1/2” x 3” block of reclaimed end-grain black walnut that makes up the center island chopping block was hand milled and built in the shop. It was designed to look substantial and proportional to the surrounding elements, executed by creating the 4 inch tall top with a solid wood chamfered edge band.
➢ The metal doors on either side of the vent hood were also custom designed for this project and built in the Realty Restoration LLC shop. They are made 1x2, 11-gauge mild steel with ribbed glass. Weighing 60 lbs a piece, heavy duty cabinet hinges were added to support the weight of the door and keep them from sagging.
➢ Under-cabinet receptacles were added along the range wall in order to have a clean, uninterrupted backsplash.
Design obstacles to overcome:
➢ Because we were removing the demising walls between the kitchen and living room, we had to find a way to plumb and vent the new island. We did this by tunneling through the slab (the slab had post tension cables which prevented us from just trenching) to run a new wet vent through a nearby structural wall. We pulled the existing hot and cold lines between upper floor joists and ran them down the structural wall as well and up through a conduit in the tunnel.
➢ Since we were converting from wall overs to a gas range it allowed us to utilize the 220 feed for the wall ovens to provide a new sub panel for all the new kitchen circuits
➢ Due to framing deficiencies inherited from the original build there was a 1-1/2” differential in the floor-to-ceiling height over a 20 foot span; by utilizing the process of cutting and furring coupled with the crown moulding details on the cabinet elevations we were able to mask the problem and provide seamless transitions between the cabinet components.
Evidence of superior craftsmanship:
➢ uniquely designed, one-of-a-kind metal “X” end panels on the large island. The end panels were custom made in the Realty Restoration LLC shop and fitted to the exact dimensions of the island. The welding seams are completely indistinguishable - the posts look like they are cut from a single sheet of metal
➢ square metal posts on the small island were also custom made and designed to compliment and carry through the metal element s throughout the kitchen
➢ the beautiful, oversized end panels on the pantry cabinets which give the breakfast nook a tailored look
➢ integrating a large format 5 piece Versailles tile pattern to seamlessly flow from the existing spaces into the new kitchen space
➢ By constructing a custom cabinet that jogged around a corner we could not remodel (housing the entry way coat closet) we were able to camouflage the adjacent wall offset within the upper and lower cabinets. By designing around the existing jog in the structural walls we accomplished a few things: we were able to find the space to house, and hide, the microwave and toaster oven yet still have a clean cohesive appearance from the kitchen side. Additionally, the owners were able to keep their much needed coat closet and we didn’t have to increase the budget with unnecessary structural work.
 Studio 1200
While most people in town considered this building a "tear-down", the new homeowners wanted to revive the property with an ambitions renovation and addition project. Two major challenges needed to be overcome on this project: the first was preserving the integrity of the original 200 year old barn; the second was designing a complementary structure that would co-exist on the site without looking like a 21st century addition.
In order to achieve these goals, our team studied how farm buildings evolve on a site over time. Additions are usually constructed based on need and function. With this protocol in mind, a grain silo was designed to act as our entry tower and buffer the intersection of the two buildings. The silo acts as our focal point and allowed us to construct very simple buildings to house the balance of the owner’s program. The team paid very close attention to scale, use of materials (many of which were recycled) and developed a vocabulary of modern interior detailing that would complement the original house.
Specific program requirements for the project included: large entertainment spaces, gourmet kitchen with adjacent family room, a squash court, multiple bedrooms and bathrooms, master suite, and plenty of storage space. In addition, since both adults work from home and receive clients in their offices, two offices needed to be created and it was critical to separate the work areas for the more private family spaces. The new silo, with central stair, became the element that allowed these different program needs to coexist effectively.
 Donato Architecture and Development Studio
Living room - contemporary living room idea in San Francisco

 Online Solutions
Technical Support Phone Numbers @ 1-855-999-8045 : AOL mail Technical Support Number, AOL mail Tech Support, AOL mail Tech Support Phone Number, AOL mail Support Center, AOL mail Technical Support Phone Number, AOL mail Tech Customer Support, AOL mail Technical Customer Service, AOL mail Technical Customer Helpline
Professional AOL mail® Technical Customer Service Helpline Number
AOL mail is a popular e-mail client program from Perion used worldwide in order to send and receive messages to friends and families with amazing features, including animated smileys, wallpapers, and icons .This email client for MS operating system allows all users an interactive experience. Moreover, AOL mail support taken from the right resources ensures that you will bring the best out of your mails with the help of stunning elements, such as e-mail backgrounds, emoticons, e-cards, sounds animations, and 3D effects.
Technical-support-phone-number 1855-999-8O45.com understands what issues and problems AOL mail users can experience while trying to get the best out of their email clients. We know how to use all AOL mail products: AOL mail Plus, Protection Center, Gold Gallery, Letter Creator, and Smile Box. We offer instant and user-friendly AOL mail technical support to overcome all sudden and unexpected issues that prevent you from getting the best out of your email clients.
Technical-support-phone-number.com offers you instant solutions for resolving all visible problems and issues with its AOL mail technical support. These include:
• AOL mail diagnostic and secure remote access.
• Fixation of all email clients and servers.
• Configuration of AOL mail email accounts.
• AOL mail crack-up utility issues mail archives.
• AOL mail configuration, set up, and update of the email client.
• AOL mail re-storage of corrupted email folders.
• AOL mail password settings and configuration.
• AOL mail data migration from one email client to another.
If you are facing severe mail related issues and are looking for instant expert help, then simply call us at our AOL mail technical support phone number and get rid of all issues and problems, such as installation and updating of mail software; AOL mail runtime error; AOL mail tray app non-functionality; AOL mail errors 535,10061,550,2738; AOL mail setting customization; and POP3 and SMTP configuration.
AOL mail Runtime Error
AOL mail Tray Application Stopped Working
Customizing the settings of AOL mail software as per your specifications
Installing and updating AOL mail software on your computer
AOL mail Errors 535,10061,550,2738
AOL mail Tray Application Stopped Working
Configuration of AOL mail Email Accounts
AOL mail Password Settings and Configuration.
Configuration of AOL mail Email Accounts
Fixation of all Email Clients and Servers
AOL mail Crack-Up Utility Issues Mail Archives
AOL mail Data Migration from One Email Client to Another
AOL mail re-storage of corrupted email folders
DISCLAIMER: - We are an independent organization working as online third party technical support company for business and personal computer software, printers and email support. We are not in partnership with any brand or any trademark term mentioned in the blog. We solely provide technical support to users of the brands mentioned in the blog.
AOL customer care helpline number,
AOL customer care toll free number,
AOL activation phone number,
AOL activation help number,
AOL activation help phone number,
AOL phone number,
AOL support phone number,
AOL activation number,
AOL helpline number AOL helpline phone number,
AOL Mail phone number,
AOL installation phone number,
AOL installation support number,
AOL installation support phone number,
AOL installation help number,
AOL installation help phone number,
AOL installation help telephone number,
phone number for AOL Mail customer service phone number, AOL Mail customer support phone number for AOL Mail technical support,
phone number for AOL Mail tech support,
AOL Mail phone number,
AOL Mail support number,
AOL Mail support phone number,
AOL Mail support telephone number,
AOL Mail tech support number,
AOL Mail tech support phone number,
AOL Mail tech support contact number,
AOL Mail tech support telephone number,
AOL Mail technical support number,
AOL Mail technical support phone number,
AOL Mail technical support contact number,
AOL Mail technical support telephone number,
AOL Mail customer support number,
AOL Mail customer support phone number,
AOL Mail customer support telephone number,
AOL Mail activation phone number,
www.AOL.com support number,
AOL (American Online) is one of the biggest brands in United States. The Company is offering its services to the industries including Media, web search engine, IT products, and manufacturing of various tech peripherals. The company is offering webmail service namely AOL mail for the users across the world. In the initial times, it was started as a premium email account, but when the other organizations like Microsoft Hotmail, Yahoo mail starts offering free email accounts the AOL decided to change the paid version to a completely free webmail platform. Alongside of making it as free webmail, the company changed its AOL mail customer support toll free number access only for the premium email users but it is offering many AOL mail technical support helpline.An overview regarding many features of AOL mail is given below:
AOL mail Customer Support to Solve AOL Issues
My AOL mail was compromised: There are many times before the same hacking issues reported on AOL mail. But, it’s a fact that 70% of its users didn’t know- What exactly comprises means in Internet? Most of the users think that if they face any log-in errors while attempting to access the account, then it will happened because of hacking attempt. Hacking is an occasional issue, it might usually happen on revenge basis. If you believe that your AOL account hacked, then report the issue to the AOL mail customer support. The customers can contact the AOL mail technical support through their Forum, social media sites and through the help center page.
My AOL mail down right now: Literally ‘Mail Server Down’ is one of the serious issue of AOL. Many times the AOL heard blaming for email outages. You can verify the current status of AOL mail server through the third party web pages like https://downtoday.co.uk/aol-mail/, http://www.isitdownrightnow.com/aol.com.html, etc. This is a server-end issue, which means this is not only the issue of you but it’s an issue of every AOL mail subscribers. AOL customer service technicians will resolve this issue instantly.
Problems sending and composing email: Mailing and messaging are the primary purposes of every web accounts. So if any sorts of issues encountered while sending and composing email then it certainly became a painstaking thing. Some common issues of Sending and Composing Email includes- images won’t showing in the forwarded message, message composing window didn’t opening, I am getting image challenge while trying to send mail, send mail bounces back to the inbox, etc. Find all the answers for your many such mailing issues of AOL mail in its help center page, furnished with the possible causes of issues and its best solution explanation.
How to Contact the AOL Mail Technical Support?
Those who need technical support of AOL mail can contact them through the ways as explained below: Help Center: This is the best way you follow to fix your AOL mailing issue. However, you can only fix the issue through this mode if you have sound technical knowledge. Otherwise leave it and choose any one of the two other methods shown below.
Support Phone Number, Email address: AOL Technical support available through the Phone Number, and Email address. You will get an opportunity to chat/Talk with the tech Support executives if you prefer this method.
Social Media: AOL mail support is available through its official twitter handle. Mention them by using @aolmailhelp/ @ aolsupporthelp/Or by using hash tag #AOLTechnicalSupport to let them know about the issues you've.

 Twelve Stones Designs, LLC
The owners of this kitchen had spent the money to upgrade the finishes in their kitchen upon building the home 12 years ago, but after living in the space for several years they realized how nonfunctional the layout really was. The (then) two preschool aged children had grown into busy, hungry teenagers with many friends who also liked to hang out at the house. So the family needed a more functional kitchen with better traffic flow, space for daily activities revolving around the kitchen at different times of day, and a kitchen that could accommodate cooking for and serving large groups. Furthermore, the dark, traditional finishes no longer reflected the homeowners’ style. They requested a brighter, more relaxed, coastal style that reflected their love of the seaside cities they like to visit.
Originally, the kitchen was U-shaped with a narrow island in the middle. The island created narrow aisles that bottle-necked at the dishwasher, refrigerator, and cooktop areas. There was a pass-through from the foyer into the kitchen, but the owners never liked that the pass-through was also located so close to the powder room. The awkward proximity was unappealing and made guests feel uncomfortable.
The kitchen’s storage was made up of lots of narrow cabinets, apothecary drawers, clipped corner units, and very few drawers. It lacked useful storage for the larger items the family used on a daily basis. And the kitchen’s only pantry was small closet that had only builder-grade, narrow shelving with no illumination to be able to see the contents inside.
Overall, the kitchen’s lighting plan was poorly executed. Only six recessed cans illuminated the entire kitchen and nook areas. The under cabinet lighting was not evenly distributed either. In fact, the builder had mis-placed the under cabinet lighting around the decorative pilasters which made for choppy, dark cubbies. Further, the builder didn’t include any lighting over the sink or the bar area, which meant whoever was doing the dishes was always in their own shadow. That, coupled with the steep overhang of the game room above made the bar area feel like a dim, cavernous space that wasn’t inviting or task oriented. The kitchen looked out into the main living space, but the raised bar and a narrow wall (which held the only large cabinet in the kitchen) created more of a barrier than a relationship to the living room or breakfast nook. In fact, one couldn’t even see the breakfast nook from the cooktop or sink areas due to its orientation. The raised bar top was too narrow to comfortably sit to either dine at or chat from due to the lack of knee space. The the homeowners confided that the kitchen felt more like a dark, dirty prison than place where the family, or their guests, wanted to gather and commune.
The clients' needs and desires were:
➢ to create a kitchen that would be a space the family loved to be in; to relate to the adjacent spaces all around, and to have better flow for entertaining large groups
➢ to remove the walls between the breakfast nook and living area and to be able to utilize the natural light from the windows in both those areas
➢ to incorporate a functional chopping block for prepping fresh food for home cooked meals, an island with a large sink and drain board, 2 pull out trash cans, and seating for at least the 2 teens to eat or do homework
➢ to design a kitchen and breakfast nook with an airy, coastal, relaxed vibe that blended with the rest of the house's coastal theme
➢ to integrate a layered lighting plan which would include ample general illumination, specific task lighting, decorative lighting, and lots of illuminated storage
➢ to design a kitchen with not only more storage for all the husband’s kitchen gadgets and collection of oils and spices, but smart storage, including a coffee/breakfast bar and a place to store and conceal the toaster oven and microwave
➢ to find a way to utilize the large open space between the kitchen, pantry area, and breakfast nook
Twelve Stones Designs achieved the owner's goals by:
➢ removing the walls between the kitchen and living room to allow the natural light to filter in from the adjacent rooms and to create a connection between the kitchen, nook, and living spaces for a sense of unity and communion
➢ removing the existing pantry and designing 3 large pantry style cabinets with LED tape lights and rollout drawers to house lots of kitchen appliances, gadgets, and tons of groceries. We also took the cabinets all the way up to the 9’ ceiling for additional storage for seasonal items and bulk storage.
➢ designing 2 islands - 1 with a gorgeous black walnut chopping block that houses a drawer for chopping and carving knives and a custom double pull out trash unit for point of use utilization - and 1 that houses the dishwasher, a large Blanco Gourmet sink with integrated drain board, woven baskets for fresh root vegetables and kitchen towels, plenty of drawer storage for kitchen items, and bar seating for up to 4 diners.
➢ closing off the space between the kitchen and the powder room to create a beautiful new private alcove for the powder room as well as adding some decorative storage. This also gave us space to include more tall storage near the new range for precision placement of the husband’s extensive oil and spice collection as well as a location for a combo-steam oven the wife wanted for baking and cooking healthy meals.
The project is enhanced functionally by:
➢ incorporated USB and standard receptacles for the kids’ laptops and phone charging in the large island
➢ designing the small island to include additional open shelving for items used on a daily basis such as a variety of bowls, plates, and colanders. This set up also works well for the husband who prefers to “plate” his dinners in restaurant-style fashion before presenting them to the table.
➢ the integration of specific storage units, such as double stacked cutlery drawers, a custom spice pull-out, a Kuerig coffee and tea pod drawer, and custom double stacked utensil drawers
➢ moving the refrigerator to the old oven location - this eliminated the bottle neck as well as created a better relationship to the eating table. It also utilizes the floor space between the pantry, nook, and kitchen
➢ creating a banquet style breakfast nook - this banquette seating not only doubles the amount of seating for large gatherings but it better utilizes the odd space between the kitchen and the previous nook area. It also helps to create a distinct pathway from the mudroom room through the pantry area, kitchen, nook, and living room.
➢ the coffee/breakfast bar area which includes the perfect location for the concealed microwave and toaster oven, convenient storage for the coffee pods and tea accoutrements. Roll-out drawers below also house the smoothie maker, hot water kettle, and a plethora of smoothie-making ingredients such as protein powders, smoothie additives, etc. Furthermore, the drawers below the Keurig house measuring utensil, cutlery, baking supplies and tupperware storage.
➢ incorporating lots of wide drawers and pullouts to accommodate large cookware.
➢ utilizing as much vertical space as possible by building storage to the ceiling which accommodates the family’s abundant amount of serving platters, baking sheets, bakeware, casserole dishes, and additional cutting boards.
The project is enhanced aesthetically by:
➢ new 5-piece Versailles pattern porcelain tile that now seamlessly joins the entire down stairs area together creating a bright, cohesiveness feeling instead of choppy separated spaces - it also adds a coastal feeling
➢ designing a cabinet to conceal the microwave and toaster oven
➢ the coastal influenced light fixtures over the nook table and island
➢ the sandy colors of the Langdon Cambria countertops. The swirling pattern and sparkling quartz pieces remind the homeowner of black-and-tan sandy beaches
➢ the striped banquet seating whose creamy white background and blue-green stripes were the inspiration for the cabinet and wall colors.
➢ All the interior doors were painted black to coordinate with the blacks and grays in the backsplash tile and countertop. This also adds a hint of tailored formality to an otherwise casual space.
➢ the use of WAC's Oculux small aperture LED units for the overhead lighting complimented with Diode LED strips for task lighting under the cabinets and inside the pantry and glass wall cabinets. All of the lighting applications are on separate dimmer switches.
Innovative uses of materials or construction methods by Realty Restoration LLC:
➢ Each 1-1/2” x 3” block of reclaimed end-grain black walnut that makes up the center island chopping block was hand milled and built in the shop. It was designed to look substantial and proportional to the surrounding elements, executed by creating the 4 inch tall top with a solid wood chamfered edge band.
➢ The metal doors on either side of the vent hood were also custom designed for this project and built in the Realty Restoration LLC shop. They are made 1x2, 11-gauge mild steel with ribbed glass. Weighing 60 lbs a piece, heavy duty cabinet hinges were added to support the weight of the door and keep them from sagging.
➢ Under-cabinet receptacles were added along the range wall in order to have a clean, uninterrupted backsplash.
Design obstacles to overcome:
➢ Because we were removing the demising walls between the kitchen and living room, we had to find a way to plumb and vent the new island. We did this by tunneling through the slab (the slab had post tension cables which prevented us from just trenching) to run a new wet vent through a nearby structural wall. We pulled the existing hot and cold lines between upper floor joists and ran them down the structural wall as well and up through a conduit in the tunnel.
➢ Since we were converting from wall overs to a gas range it allowed us to utilize the 220 feed for the wall ovens to provide a new sub panel for all the new kitchen circuits
➢ Due to framing deficiencies inherited from the original build there was a 1-1/2” differential in the floor-to-ceiling height over a 20 foot span; by utilizing the process of cutting and furring coupled with the crown moulding details on the cabinet elevations we were able to mask the problem and provide seamless transitions between the cabinet components.
Evidence of superior craftsmanship:
➢ uniquely designed, one-of-a-kind metal “X” end panels on the large island. The end panels were custom made in the Realty Restoration LLC shop and fitted to the exact dimensions of the island. The welding seams are completely indistinguishable - the posts look like they are cut from a single sheet of metal
➢ square metal posts on the small island were also custom made and designed to compliment and carry through the metal element s throughout the kitchen
➢ the beautiful, oversized end panels on the pantry cabinets which give the breakfast nook a tailored look
➢ integrating a large format 5 piece Versailles tile pattern to seamlessly flow from the existing spaces into the new kitchen space
➢ By constructing a custom cabinet that jogged around a corner we could not remodel (housing the entry way coat closet) we were able to camouflage the adjacent wall offset within the upper and lower cabinets. By designing around the existing jog in the structural walls we accomplished a few things: we were able to find the space to house, and hide, the microwave and toaster oven yet still have a clean cohesive appearance from the kitchen side. Additionally, the owners were able to keep their much needed coat closet and we didn’t have to increase the budget with unnecessary structural work.
 Beahm & Son, Ltd.
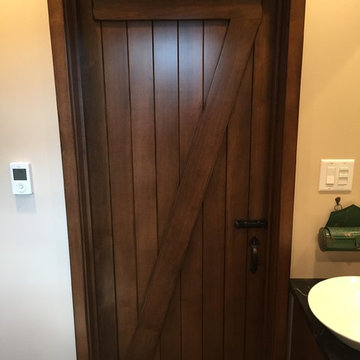
We were lucky enough to have the opportunity to help an older couple in our local community. They approached us with a project that they thought would be impossible. Turn a 6x6 first floor pantry into a fully functioning bathroom. Normally this space limitation would not be a problem but the plumbing presented a difficulty that already scared away 2 other contractors. We were able to overcome this obstacle with the help of our experienced staff who keep up to date on the newest devices and products in the remodeling industry.
We had a very enjoyable experience designing and remodeling this room. Even with the small space limitations we believe we came up with a very unique and rustic feel for their 1890's farm house. I must end on all the custom wood work that our employees made for this project. From the custom, two-sided, door to the little, wooden, wall shelf we made all of the wooden pieces you see in this project and most of them were unique creations specifically for this job.
 Studio 1200
While most people in town considered this building a "tear-down", the new homeowners wanted to revive the property with an ambitions renovation and addition project. Two major challenges needed to be overcome on this project: the first was preserving the integrity of the original 200 year old barn; the second was designing a complementary structure that would co-exist on the site without looking like a 21st century addition.
In order to achieve these goals, our team studied how farm buildings evolve on a site over time. Additions are usually constructed based on need and function. With this protocol in mind, a grain silo was designed to act as our entry tower and buffer the intersection of the two buildings. The silo acts as our focal point and allowed us to construct very simple buildings to house the balance of the owner’s program. The team paid very close attention to scale, use of materials (many of which were recycled) and developed a vocabulary of modern interior detailing that would complement the original house.
Specific program requirements for the project included: large entertainment spaces, gourmet kitchen with adjacent family room, a squash court, multiple bedrooms and bathrooms, master suite, and plenty of storage space. In addition, since both adults work from home and receive clients in their offices, two offices needed to be created and it was critical to separate the work areas for the more private family spaces. The new silo, with central stair, became the element that allowed these different program needs to coexist effectively.
 Beahm & Son, Ltd.
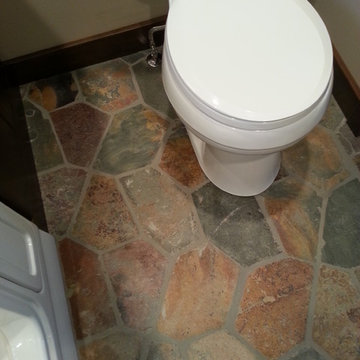
We were lucky enough to have the opportunity to help an older couple in our local community. They approached us with a project that they thought would be impossible. Turn a 6x6 first floor pantry into a fully functioning bathroom. Normally this space limitation would not be a problem but the plumbing presented a difficulty that already scared away 2 other contractors. We were able to overcome this obstacle with the help of our experienced staff who keep up to date on the newest devices and products in the remodeling industry.
We had a very enjoyable experience designing and remodeling this room. Even with the small space limitations we believe we came up with a very unique and rustic feel for their 1890's farm house. I must end on all the custom wood work that our employees made for this project. From the custom, two-sided, door to the little, wooden, wall shelf we made all of the wooden pieces you see in this project and most of them were unique creations specifically for this job.
 Studio 1200
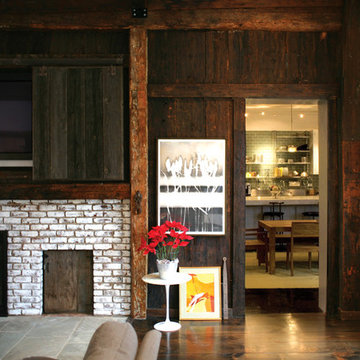
While most people in town considered this building a "tear-down", the new homeowners wanted to revive the property with an ambitions renovation and addition project. Two major challenges needed to be overcome on this project: the first was preserving the integrity of the original 200 year old barn; the second was designing a complementary structure that would co-exist on the site without looking like a 21st century addition.
In order to achieve these goals, our team studied how farm buildings evolve on a site over time. Additions are usually constructed based on need and function. With this protocol in mind, a grain silo was designed to act as our entry tower and buffer the intersection of the two buildings. The silo acts as our focal point and allowed us to construct very simple buildings to house the balance of the owner’s program. The team paid very close attention to scale, use of materials (many of which were recycled) and developed a vocabulary of modern interior detailing that would complement the original house.
Specific program requirements for the project included: large entertainment spaces, gourmet kitchen with adjacent family room, a squash court, multiple bedrooms and bathrooms, master suite, and plenty of storage space. In addition, since both adults work from home and receive clients in their offices, two offices needed to be created and it was critical to separate the work areas for the more private family spaces. The new silo, with central stair, became the element that allowed these different program needs to coexist effectively.
 Studio 1200
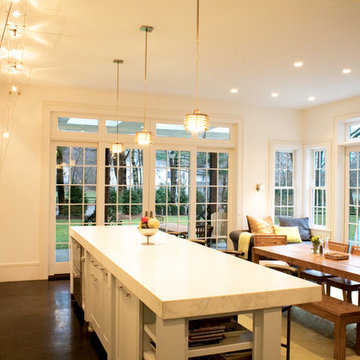
While most people in town considered this building a "tear-down", the new homeowners wanted to revive the property with an ambitions renovation and addition project. Two major challenges needed to be overcome on this project: the first was preserving the integrity of the original 200 year old barn; the second was designing a complementary structure that would co-exist on the site without looking like a 21st century addition.
In order to achieve these goals, our team studied how farm buildings evolve on a site over time. Additions are usually constructed based on need and function. With this protocol in mind, a grain silo was designed to act as our entry tower and buffer the intersection of the two buildings. The silo acts as our focal point and allowed us to construct very simple buildings to house the balance of the owner’s program. The team paid very close attention to scale, use of materials (many of which were recycled) and developed a vocabulary of modern interior detailing that would complement the original house.
Specific program requirements for the project included: large entertainment spaces, gourmet kitchen with adjacent family room, a squash court, multiple bedrooms and bathrooms, master suite, and plenty of storage space. In addition, since both adults work from home and receive clients in their offices, two offices needed to be created and it was critical to separate the work areas for the more private family spaces. The new silo, with central stair, became the element that allowed these different program needs to coexist effectively.
 Beahm & Son, Ltd.
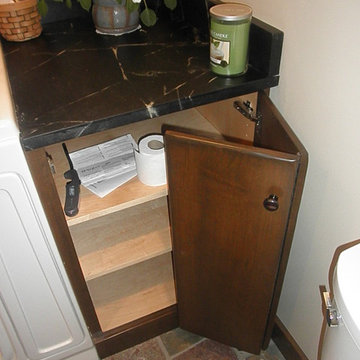
We were lucky enough to have the opportunity to help an older couple in our local community. They approached us with a project that they thought would be impossible. Turn a 6x6 first floor pantry into a fully functioning bathroom. Normally this space limitation would not be a problem but the plumbing presented a difficulty that already scared away 2 other contractors. We were able to overcome this obstacle with the help of our experienced staff who keep up to date on the newest devices and products in the remodeling industry.
We had a very enjoyable experience designing and remodeling this room. Even with the small space limitations we believe we came up with a very unique and rustic feel for their 1890's farm house. I must end on all the custom wood work that our employees made for this project. From the custom, two-sided, door to the little, wooden, wall shelf we made all of the wooden pieces you see in this project and most of them were unique creations specifically for this job.
2