
Search results for "Periodic performance" in Home Design Ideas
 JRP Design & Remodel
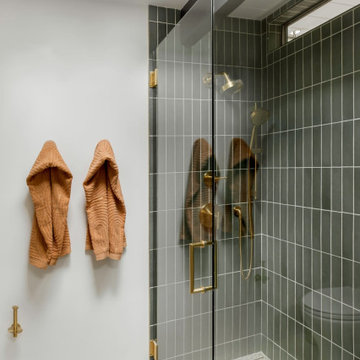
Eichler Orange is a stunning expression of mid-century modern architecture. The vision in modernizing this historic Eichler home with a 21st-century makeover was to honor the work of Joseph Eichler and restore it to the 1964 icon of California modernism it once was.
The clean aesthetics of this home features glass walls, post and beam, tongue and groove ceilings, and oversize porcelain tile floors throughout. The free-flowing indoor/outdoor floorplan is highlighted with a signature atrium, and all material selections were made to honor the time period. Custom cherry cabinets and warm slab walnut doors grace the interior.
This home had significant structural termite damage with three-quarters of the framing needing replacement. Additionally, the original house did not come close to meeting the current seismic codes. During reconstruction, we upgraded the post and beam structure with seismic hold-downs and concealed fasteners. The house lacked energy efficiency due to its flat roof and did not meet California’s current Title 24 energy-efficient standards. While honoring its era, this fully renovated residence is now updated with today’s energy efficiencies, including all-aluminum dual-glazed windows and doors, new spray foam insulation atop the flat roof, and tankless water heaters.
A new photovoltaic solar system was added. We abandoned the radiant floor heat and installed a new high-efficiency ductless heating and air units to each room. This increased the building’s performance and provided each room with its own thermostat and control. This system also allowed us to eliminate soffits and ductwork and maintain the exposed tongue and groove ceiling throughout the home.
The living space next to the family and dining room was repurposed to relocate the washer and dryer and allowed space to add a third bathroom. The primary bathroom was also reconfigured for a larger layout.
The sleek kitchen design includes frameless Crystal Cabinets, professional-grade Miele appliances, a large stainless steel Sub-Zero refrigerator/freezer, and a generous Caesarstone countertop workspace.
The outdoor backyard living space captures the natural beauty of Southern California and mid-century modern features, including drought-resistant landscaping with decomposed granite planter areas and all-new concrete hardscape. A new spa was added to the existing pool, along with a new BBQ area and firepit.
Photographer: Public 311 Design
 JRP Design & Remodel
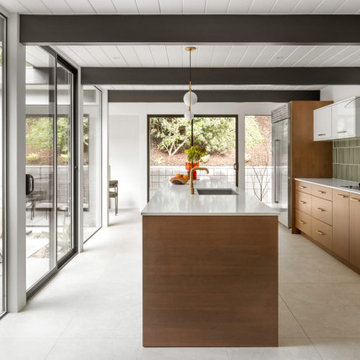
Eichler Orange is a stunning expression of mid-century modern architecture. The vision in modernizing this historic Eichler home with a 21st-century makeover was to honor the work of Joseph Eichler and restore it to the 1964 icon of California modernism it once was.
The clean aesthetics of this home features glass walls, post and beam, tongue and groove ceilings, and oversize porcelain tile floors throughout. The free-flowing indoor/outdoor floorplan is highlighted with a signature atrium, and all material selections were made to honor the time period. Custom cherry cabinets and warm slab walnut doors grace the interior.
This home had significant structural termite damage with three-quarters of the framing needing replacement. Additionally, the original house did not come close to meeting the current seismic codes. During reconstruction, we upgraded the post and beam structure with seismic hold-downs and concealed fasteners. The house lacked energy efficiency due to its flat roof and did not meet California’s current Title 24 energy-efficient standards. While honoring its era, this fully renovated residence is now updated with today’s energy efficiencies, including all-aluminum dual-glazed windows and doors, new spray foam insulation atop the flat roof, and tankless water heaters.
A new photovoltaic solar system was added. We abandoned the radiant floor heat and installed a new high-efficiency ductless heating and air units to each room. This increased the building’s performance and provided each room with its own thermostat and control. This system also allowed us to eliminate soffits and ductwork and maintain the exposed tongue and groove ceiling throughout the home.
The living space next to the family and dining room was repurposed to relocate the washer and dryer and allowed space to add a third bathroom. The primary bathroom was also reconfigured for a larger layout.
The sleek kitchen design includes frameless Crystal Cabinets, professional-grade Miele appliances, a large stainless steel Sub-Zero refrigerator/freezer, and a generous Caesarstone countertop workspace.
The outdoor backyard living space captures the natural beauty of Southern California and mid-century modern features, including drought-resistant landscaping with decomposed granite planter areas and all-new concrete hardscape. A new spa was added to the existing pool, along with a new BBQ area and firepit.
Photographer: Public 311 Design
 Progressive Design Build
Challenge
After living in their home for ten years, these Bonita Bay homeowners were ready to embark on a complete home makeover. They were not only ready to update the look and feel, but also the flow of the house.
Having lived in their house for an extended period of time, this couple had a clear idea of how they use their space, the shortcomings of their current layout and how they would like to improve it.
After interviewing four different contractors, they chose to retain Progressive Design Build’s design services. Already familiar with the design/build process having finished a renovation on a lakefront home in Canada, the couple chose Progressive Design Build wisely.
Progressive Design Build invested a lot of time during the design process to ensure the design concept was thorough and reflected the couple’s vision. Options were presented, giving these homeowners several alternatives and good ideas on how to realize their vision, while working within their budget. Progressive Design Build guided the couple all the way—through selections and finishes, saving valuable time and money.
Solution
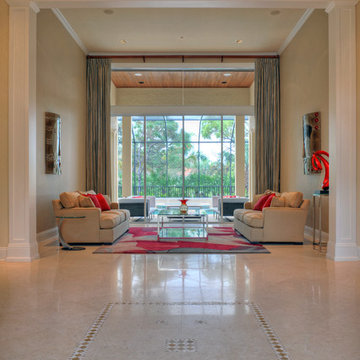
The interior remodel included a beautiful contemporary master bathroom with a stunning barrel-ceiling accent. The freestanding bathtub overlooks a private courtyard and a separate stone shower is visible through a beautiful frameless shower enclosure. Interior walls and ceilings in the common areas were designed to expose as much of the Southwest Florida view as possible, allowing natural light to spill through the house from front to back.
Progressive created a separate area for their Baby Grand Piano overlooking the front garden area. The kitchen was also remodeled as part of the project, complete with cherry cabinets and granite countertops. Both guest bathrooms and the pool bathroom were also renovated. A light limestone tile floor was installed throughout the house. All of the interior doors, crown mouldings and base mouldings were changed out to create a fresh, new look. Every surface of the interior of the house was repainted.
This whole house remodel also included a small addition and a stunning outdoor living area, which features a dining area, outdoor fireplace with a floor-to-ceiling slate finish, exterior grade cabinetry finished in a natural cypress wood stain, a stainless steel appliance package, and a black leather finish granite countertop. The grilling area includes a 54" multi-burner DCS and rotisserie grill surrounded by natural stone mosaic tile and stainless steel inserts.
This whole house renovation also included the pool and pool deck. In addition to procuring all new pool equipment, Progressive Design Build built the pool deck using natural gold travertine. The ceiling was designed with a select grade cypress in a dark rich finish and termination mouldings with wood accents on the fireplace wall to match.
During construction, Progressive Design Build identified areas of water intrusion and a failing roof system. The homeowners decided to install a new concrete tile roof under the management of Progressive Design Build. The entire exterior was also repainted as part of the project.
Results
Due to some permitting complications, the project took thirty days longer than expected. However, in the end, the project finished in eight months instead of seven, but still on budget.
This homeowner was so pleased with the work performed on this initial project that he hired Progressive Design Build four more times – to complete four additional remodeling projects in 4 years.
Find the right local pro for your project
 JRP Design & Remodel
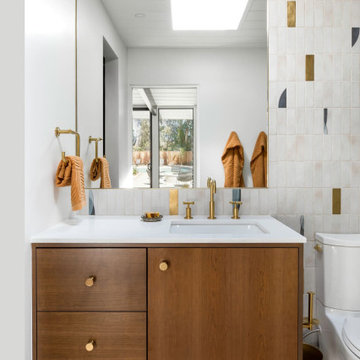
Eichler Orange is a stunning expression of mid-century modern architecture. The vision in modernizing this historic Eichler home with a 21st-century makeover was to honor the work of Joseph Eichler and restore it to the 1964 icon of California modernism it once was.
The clean aesthetics of this home features glass walls, post and beam, tongue and groove ceilings, and oversize porcelain tile floors throughout. The free-flowing indoor/outdoor floorplan is highlighted with a signature atrium, and all material selections were made to honor the time period. Custom cherry cabinets and warm slab walnut doors grace the interior.
This home had significant structural termite damage with three-quarters of the framing needing replacement. Additionally, the original house did not come close to meeting the current seismic codes. During reconstruction, we upgraded the post and beam structure with seismic hold-downs and concealed fasteners. The house lacked energy efficiency due to its flat roof and did not meet California’s current Title 24 energy-efficient standards. While honoring its era, this fully renovated residence is now updated with today’s energy efficiencies, including all-aluminum dual-glazed windows and doors, new spray foam insulation atop the flat roof, and tankless water heaters.
A new photovoltaic solar system was added. We abandoned the radiant floor heat and installed a new high-efficiency ductless heating and air units to each room. This increased the building’s performance and provided each room with its own thermostat and control. This system also allowed us to eliminate soffits and ductwork and maintain the exposed tongue and groove ceiling throughout the home.
The living space next to the family and dining room was repurposed to relocate the washer and dryer and allowed space to add a third bathroom. The primary bathroom was also reconfigured for a larger layout.
The sleek kitchen design includes frameless Crystal Cabinets, professional-grade Miele appliances, a large stainless steel Sub-Zero refrigerator/freezer, and a generous Caesarstone countertop workspace.
The outdoor backyard living space captures the natural beauty of Southern California and mid-century modern features, including drought-resistant landscaping with decomposed granite planter areas and all-new concrete hardscape. A new spa was added to the existing pool, along with a new BBQ area and firepit.
Photographer: Public 311 Design
 K&B Interiors
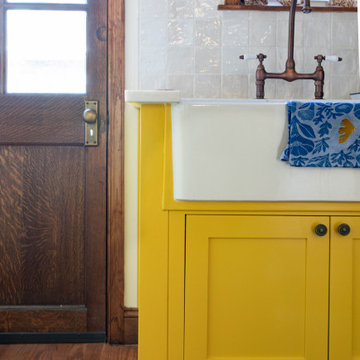
Located in Philadelphia’s Fairmount neighborhood, this 1930s-inspired kitchen remodel proves that small spaces can still live large. Working within just 80 square feet, the layout was reimagined from the inside out to maximize storage, function, and flow. By relocating the entryway to the center of the wall, removing the soffit, and thoughtfully closing off a window, we were able to extend custom cabinetry to full height and unlock valuable storage without sacrificing character.
A bold Gambol Gold cabinet palette anchors the space, balanced by warm, grounding elements that honor the home’s history: walnut-finished floors, a refurbished original 1930s walnut door, creamy zellige backsplash tiles, warm white walls, and traditional bronze cabinet hardware. A vintage-inspired bronze bridge faucet paired with a classic farmhouse sink reinforces the period feel, while a timeless Schoolhouse light fixture adds warmth and character overhead. High-end Fisher & Paykel appliances — including a sleek induction range — bring modern performance to the heart of the home. The result is a true revival: compact, storied, and designed to be lived in.
 JRP Design & Remodel
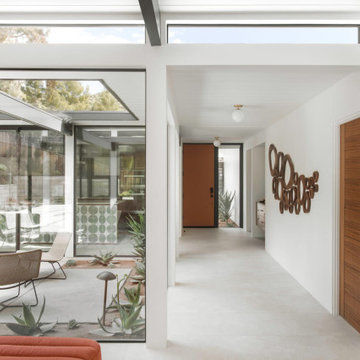
Eichler Orange is a stunning expression of mid-century modern architecture. The vision in modernizing this historic Eichler home with a 21st-century makeover was to honor the work of Joseph Eichler and restore it to the 1964 icon of California modernism it once was.
The clean aesthetics of this home features glass walls, post and beam, tongue and groove ceilings, and oversize porcelain tile floors throughout. The free-flowing indoor/outdoor floorplan is highlighted with a signature atrium, and all material selections were made to honor the time period. Custom cherry cabinets and warm slab walnut doors grace the interior.
This home had significant structural termite damage with three-quarters of the framing needing replacement. Additionally, the original house did not come close to meeting the current seismic codes. During reconstruction, we upgraded the post and beam structure with seismic hold-downs and concealed fasteners. The house lacked energy efficiency due to its flat roof and did not meet California’s current Title 24 energy-efficient standards. While honoring its era, this fully renovated residence is now updated with today’s energy efficiencies, including all-aluminum dual-glazed windows and doors, new spray foam insulation atop the flat roof, and tankless water heaters.
A new photovoltaic solar system was added. We abandoned the radiant floor heat and installed a new high-efficiency ductless heating and air units to each room. This increased the building’s performance and provided each room with its own thermostat and control. This system also allowed us to eliminate soffits and ductwork and maintain the exposed tongue and groove ceiling throughout the home.
The living space next to the family and dining room was repurposed to relocate the washer and dryer and allowed space to add a third bathroom. The primary bathroom was also reconfigured for a larger layout.
The sleek kitchen design includes frameless Crystal Cabinets, professional-grade Miele appliances, a large stainless steel Sub-Zero refrigerator/freezer, and a generous Caesarstone countertop workspace.
The outdoor backyard living space captures the natural beauty of Southern California and mid-century modern features, including drought-resistant landscaping with decomposed granite planter areas and all-new concrete hardscape. A new spa was added to the existing pool, along with a new BBQ area and firepit.
Photographer: Public 311 Design
 Mumford & Wood
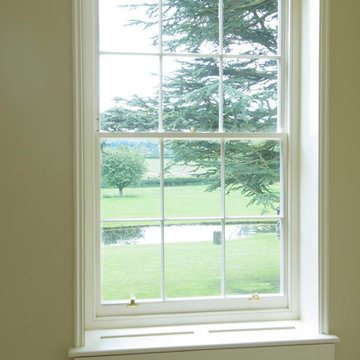
Bespoke single glazed window replacements from the Mumford & Wood Conservation™ historic box sash range have been installed throughout the three-storey home. Made from the very highest grade engineered timber they are designed to replicate original period windows in replacement projects, down to the very finest detail. Manufactured as single glazed frames, with hand-faced external putty, just as the originals would have been, the replacement windows and doors feature 4mm float glass or a choice of heritage-style glass to lend a more authentic, uneven finish. Each window is bespoke in size and pattern, with a profile choice of Georgian, Gothic, Victorian or Queen Anne ovolo to provide the perfect match.
 Zola European Windows
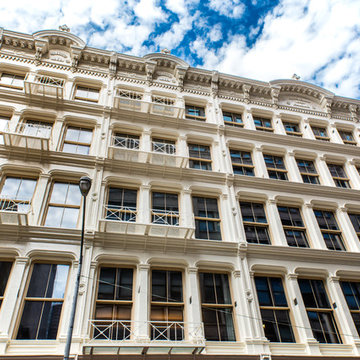
“This unique historic project was a great opportunity for Zola to push the limits of high-performance
window development. The project’s energy-efficiency requirements were extremely high, while at the same time it was very important to the developer that this historically significant building remain authentic and true to the aesthetic of the period. Zola spent many months going back and forth with designer and engineers on this window design, the result was quite ground breaking” says Florian Speier, Zola founder and head of product development.
Photographer: Nico Arellano

 Industrial Projects
Creating a comfortable outdoor living space is a priority for many homeowners and DIY enthusiasts. With rising summer temperatures, installing a shade tarp in your backyard offers an affordable and effective solution for sun protection. We’ve developed this detailed, step-by-step guide to help you confidently install a shade tarp that not only shields you from the sun but also adds aesthetic appeal to your outdoor area.
Benefits of Installing a Backyard Shade Tarp
Before diving into the installation process, let’s explore the key benefits of having a backyard shade tarp:
Provides UV Protection: Keeps your family and guests safe from harmful sun exposure.
Reduces Outdoor Temperatures: Creates a cooler, more enjoyable outdoor space.
Protects Outdoor Furniture: Extends the life of patio furniture by reducing sun damage.
Enhances Outdoor Aesthetics: Adds a modern, stylish look to your yard.
Budget-Friendly: More affordable compared to permanent structures like pergolas.
Materials and Tools You’ll Need
To begin your DIY backyard shade project, gather the following materials and tools:
Materials:
Shade tarp (UV-resistant and breathable)
Sturdy posts or existing structures (trees, fences, walls)
Mounting hardware (eye bolts, D-rings, turnbuckles, snap hooks)
Nylon or polyester rope, or stainless-steel wire
Concrete (if installing new posts)
Tools:
Power drill
Measuring tape
Level
Ladder
Wrench or adjustable spanner
Post hole digger (if installing new posts)
Step 1: Plan Your Shade Tarp Layout
The first step in installing your backyard shade tarp is careful planning. Take time to assess your outdoor area and answer these key questions:
Where is the sun’s path throughout the day?
What size and shape of tarp best suits your space?
Will you anchor the tarp to existing structures or install new posts?
What height do you want the tarp to sit at for maximum shade and airflow?
Pro Tip: Use string or garden hoses to visualize the tarp layout on the ground before making permanent decisions.
Step 2: Measure and Mark Anchor Points
Once you’ve determined the tarp’s location and orientation:
Measure the tarp dimensions.
Mark the exact points where each corner of the tarp will be anchored.
Ensure that the anchor points are at least 5–10% longer than the tarp size to allow for tensioning and slight adjustments.
Consider slope angles for water runoff. Aim for at least a 20-degree angle to prevent water pooling on the tarp.
Step 3: Install Support Posts (If Necessary)
If your backyard lacks existing anchor points like trees or fences, you’ll need to install sturdy support posts:
Dig post holes at least 24 inches deep and 8-12 inches wide for stability.
Set posts in concrete, making sure they remain plumb and level.
Allow the concrete to cure for at least 24–48 hours before applying tension from the tarp.
We recommend using pressure-treated wood, galvanized steel poles, or aluminum posts for longevity and strength.
Step 4: Install Mounting Hardware
With your anchor points ready, it’s time to install the necessary hardware:
Attach eye bolts or pad eyes securely into walls, posts, or other fixed structures.
For added flexibility and adjustability, install turnbuckles or tensioners to fine-tune the tarp’s tightness.
Connect snap hooks, D-rings, or carabiners to make assembly and disassembly easier.
Make sure all hardware is rated for outdoor use to prevent rust and corrosion.
Step 5: Attach and Tension the Shade Tarp
Now it’s time for the most satisfying part—mounting the shade tarp:
Begin by attaching one corner of the tarp to an anchor point.
Gradually attach the remaining corners, moving diagonally for even tension.
Adjust each connection point using your turnbuckles, ropes, or cables.
Pull the tarp tight enough to avoid sagging, but not so tight that it risks tearing.
Check that the tarp maintains the desired slope for rainwater runoff and adjust tension as needed.
Step 6: Final Adjustments and Safety Check
Before enjoying your new shaded area:
Inspect all anchor points and hardware for stability.
Test the tarp’s tension and make adjustments for even distribution.
Ensure that no sharp edges or loose connections remain that could damage the tarp or pose a safety hazard.
Confirm that the tarp is secure in windy conditions by giving it a gentle tug.
If you live in an area with frequent high winds, consider removing the tarp during storms to prevent damage.
Step 7: Enjoy Your Shaded Backyard Oasis
Once installed, your backyard shade tarp provides a comfortable and protective space for outdoor gatherings, relaxation, or family activities. You can decorate underneath with outdoor furniture, string lights, or potted plants to create a personalized outdoor retreat.
Maintenance Tips for Long-Lasting Shade Tarp Performance
To extend the life of your shade tarp, follow these maintenance guidelines:
Regularly check for wear and tear, especially around anchor points and seams.
Clean the tarp periodically with mild soap and water to prevent mildew buildup.
Store the tarp indoors during harsh weather seasons if it's not designed for year-round use.
Tighten hardware as needed to maintain proper tension and avoid sagging.
By following these simple care steps, your shade tarp will continue to deliver years of sun protection and outdoor comfort.
Conclusion: Upgrade Your Outdoor Space with a DIY Shade Tarp
Installing a shade tarp in your backyard is a cost-effective and rewarding DIY project. With careful planning, quality materials, and proper installation techniques, you’ll enjoy cool, shaded outdoor living all season long. This step-by-step guide ensures your project goes smoothly from start to finish.
 Williamsons Kitchens
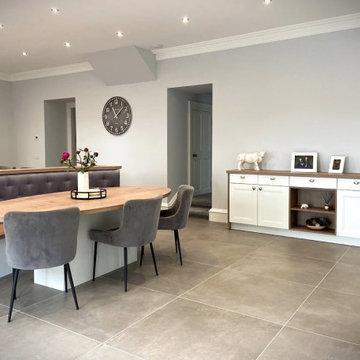
The client was in the midst of a substantial renovation of a period property and sought a kitchen that would complement the home's historic character. The challenge was to design a kitchen that not only preserved the traditional aesthetic but also incorporated modern conveniences. Key elements included a large island for both cooking and casual dining, as well as a curved booth seating bench and bespoke oval Nolte table for the eating area. Additional functional aspects, such as a breakfast unit for small appliances like a toaster and a sideboard for added storage, were to be integrated seamlessly, extending the kitchen's theme into the adjoining living space.
For a timeless appeal, we opted for the Nolte Windsor range. The choice of the oval knob handles on the 721 White furniture shade delivered a contemporary classic feel that effortlessly blended with the newly constructed living area.
A 30mm Silestone Blanco Rivers worktop was paired with Nolte’s 40mm Holm Oak, offering both durability and a chic aesthetic. The kitchen was equipped with top-tier Kitchen Aid appliances - including a single oven, combination microwave, warming drawer, induction hob, and downdraft extraction. Complementing these were a full-height NEFF fridge, a 70/30 fridge freezer, and a dishwasher.
Prioritising both functionality and style, we incorporated a Blanco Sona 1 ½ sink in Alumetallic and a Quooker Fusion Classic Chrome instant boiling water tap. These additions ensure daily kitchen tasks are performed with utmost efficiency without compromising on design.
Ready to transform your space into a modern haven? Reach out to us today.
 Williamsons Kitchens
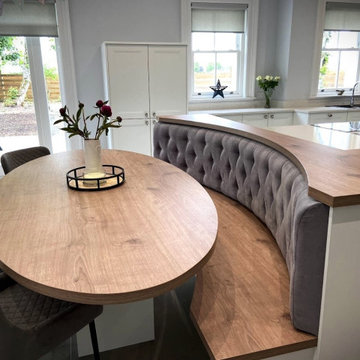
The client was in the midst of a substantial renovation of a period property and sought a kitchen that would complement the home's historic character. The challenge was to design a kitchen that not only preserved the traditional aesthetic but also incorporated modern conveniences. Key elements included a large island for both cooking and casual dining, as well as a curved booth seating bench and bespoke oval Nolte table for the eating area. Additional functional aspects, such as a breakfast unit for small appliances like a toaster and a sideboard for added storage, were to be integrated seamlessly, extending the kitchen's theme into the adjoining living space.
For a timeless appeal, we opted for the Nolte Windsor range. The choice of the oval knob handles on the 721 White furniture shade delivered a contemporary classic feel that effortlessly blended with the newly constructed living area.
A 30mm Silestone Blanco Rivers worktop was paired with Nolte’s 40mm Holm Oak, offering both durability and a chic aesthetic. The kitchen was equipped with top-tier Kitchen Aid appliances - including a single oven, combination microwave, warming drawer, induction hob, and downdraft extraction. Complementing these were a full-height NEFF fridge, a 70/30 fridge freezer, and a dishwasher.
Prioritising both functionality and style, we incorporated a Blanco Sona 1 ½ sink in Alumetallic and a Quooker Fusion Classic Chrome instant boiling water tap. These additions ensure daily kitchen tasks are performed with utmost efficiency without compromising on design.
Ready to transform your space into a modern haven? Reach out to us today.
 K&B Interiors
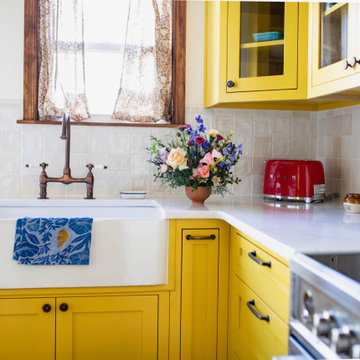
Located in Philadelphia’s Fairmount neighborhood, this 1930s-inspired kitchen remodel proves that small spaces can still live large. Working within just 80 square feet, the layout was reimagined from the inside out to maximize storage, function, and flow. By relocating the entryway to the center of the wall, removing the soffit, and thoughtfully closing off a window, we were able to extend custom cabinetry to full height and unlock valuable storage without sacrificing character.
A bold Gambol Gold cabinet palette anchors the space, balanced by warm, grounding elements that honor the home’s history: walnut-finished floors, a refurbished original 1930s walnut door, creamy zellige backsplash tiles, warm white walls, and traditional bronze cabinet hardware. A vintage-inspired bronze bridge faucet paired with a classic farmhouse sink reinforces the period feel, while a timeless Schoolhouse light fixture adds warmth and character overhead. High-end Fisher & Paykel appliances — including a sleek induction range — bring modern performance to the heart of the home. The result is a true revival: compact, storied, and designed to be lived in.
 Aurora Architects + Builders
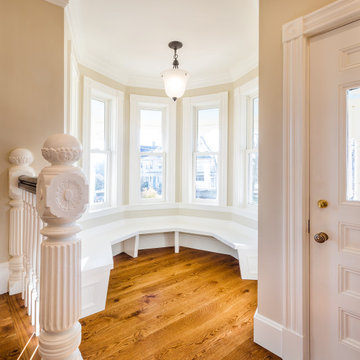
The entry hall and tower of this historic Queen Anne Victorian used to be drafty and cold. With new high-performance windows and modern air-sealing and insulation construction techniques, and a meticulously-crafted front door, this space and the whole house are cozy and energy efficient.
 JRP Design & Remodel
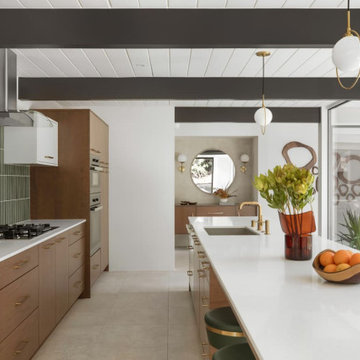
Eichler Orange is a stunning expression of mid-century modern architecture. The vision in modernizing this historic Eichler home with a 21st-century makeover was to honor the work of Joseph Eichler and restore it to the 1964 icon of California modernism it once was.
The clean aesthetics of this home features glass walls, post and beam, tongue and groove ceilings, and oversize porcelain tile floors throughout. The free-flowing indoor/outdoor floorplan is highlighted with a signature atrium, and all material selections were made to honor the time period. Custom cherry cabinets and warm slab walnut doors grace the interior.
This home had significant structural termite damage with three-quarters of the framing needing replacement. Additionally, the original house did not come close to meeting the current seismic codes. During reconstruction, we upgraded the post and beam structure with seismic hold-downs and concealed fasteners. The house lacked energy efficiency due to its flat roof and did not meet California’s current Title 24 energy-efficient standards. While honoring its era, this fully renovated residence is now updated with today’s energy efficiencies, including all-aluminum dual-glazed windows and doors, new spray foam insulation atop the flat roof, and tankless water heaters.
A new photovoltaic solar system was added. We abandoned the radiant floor heat and installed a new high-efficiency ductless heating and air units to each room. This increased the building’s performance and provided each room with its own thermostat and control. This system also allowed us to eliminate soffits and ductwork and maintain the exposed tongue and groove ceiling throughout the home.
The living space next to the family and dining room was repurposed to relocate the washer and dryer and allowed space to add a third bathroom. The primary bathroom was also reconfigured for a larger layout.
The sleek kitchen design includes frameless Crystal Cabinets, professional-grade Miele appliances, a large stainless steel Sub-Zero refrigerator/freezer, and a generous Caesarstone countertop workspace.
The outdoor backyard living space captures the natural beauty of Southern California and mid-century modern features, including drought-resistant landscaping with decomposed granite planter areas and all-new concrete hardscape. A new spa was added to the existing pool, along with a new BBQ area and firepit.
Photographer: Public 311 Design
14