
Search results for "Physical damage" in Home Design Ideas

 Chermac Builders Inc
Grohe Thermostatic shower valve and volume controls in Roll-in/Barrier Free shower.
Photo by: Chiemi Photography
Inspiration for a transitional bathroom remodel in Las Vegas
Inspiration for a transitional bathroom remodel in Las Vegas
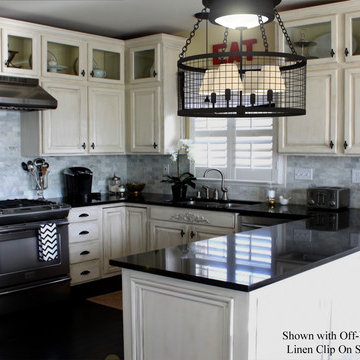
 Solar Luminance
Solar Luminance – Semi-Custom Daylight Light Fixture
Model#: DLF-151
Style: Semi-Flush Pendant
Finish: Powder Coat Matte Black
Shade(s): Clip-On Shades
*Note: Price does not include Daylight Tube Product and/or Installation
Semi-Custom Product Shipment Lead Time: 6-10 Weeks*
The Solar Luminance DLF-152, is an Architectural Element Transitional Semi Flush Pendant, designed to assist the home owner, retail location and/or office location, the ability to benefit from Natural Daylight available with Tubular Skylight systems, while also reflecting your custom interior design and décor theme and needs.
Natural Daylight provides incredible mental and physical health and wellness benefits that help the human body and mind maintain a sense of time, absorb natural vitamins, and work with the human eye to perceive color and definition in clarity and contrast to increase visual awareness. Our hope is that your friends, colleagues and guests will be “Inspired & Design” in a way that is both elegant and considerate of the impact we have on the earth and its resources.
The DLF-150 is a Semi-Custom Fixture. Full Custom Versions and Options are available for price quote. Please feel free to contact a Solar Luminance Design Assistant for Full Custom Options.
Product Specification (List Price based on the following)
Over All Dimensions:
Over All Height: 22”
Shade Dims: 10” H. X 24” Dia. – ¾” Metal Trim with 1” Opening Square Weld Metal Mesh
Drop Length: 12”
Column Sleeve Diameter: 11 3/4” Dia.
Center Wireway: (1) 3/8” Dia. Wireway
Hangers: (4) Medium Oval Standard Chain (3 and 4 Hanger Options Available) (Chain available in Various Size Options, pricing may vary)
Lamping Specification
Daylight Tube System*: 10” Dia. Daylight Tube System – Includes Dome, Flashing, 8’-0” Length of Tube Extension, Tube Manufacturer provided Installation, Product and Installation Warranty
10” Diameter Tube provides the Equivalent of (10) 100Watt White Lamps
Secondary Lamping
Canopy Lamping: (1) 1.8 Watts (Per Foot) - 48”L. - LED Flex Strip, 5,000K - 12 Volts DC (Lamp Life: 50,000 Hour Rating)
Candelabra Lamping: (4) 3.5Watt LED Candelabra Based Screw in Torpedo Warm White Bulbs, 120v 2700K (25Watt Equiv.) (Provided by Solar Luminance)
Finish Specification and Materials
Metal Finish: Powder Coat Matte Black (Available in other Color Options – Some Color Options may require a price adjustment)
Shades: Shown in Off-White Linen Clip-On Shades (Available in other Color Options – Some Color Options may require a price adjustment)
Glass Diffuser: Clear Glass (Sandblasted Interior) (Not Tempered)
Product Notes
Daylight Tubular Product is Supplied and Installed by Tube Product Manufacturer. Tube Product Manufacturer is responsible for all Product, Installation, Warranty, and Service of Tube Related issues. Solar Luminance is not responsible for any errors and/or omissions related the tube related issues that may arise. Solar Luminance will assist in sourcing a local and/or regional Daylight Tubular Product Supplier and Installer, to assist with Roof and Ceiling inspection and Tube supply and Installation. Solar Luminance is not responsible for the Tube Installers quality of work or service.
All Secondary Electrical must be performed by a Licensed and/or certified Electrician and/or General Contractor. Solar Luminance is not responsible for the Installation of the fixture. Solar Luminance is not responsible for any errors and/or omissions, damaged and or fault or injury caused by the general contractor.
Shipping and Payments
Shipping and/or Freight is the responsibility of the purchaser. Solar Luminance will supply a quote based on the fixture size, weight, crating method and delivery location, prior to commencement of fabrication and production. All Finishes and Semi-Custom Modifications must be Signed and Approved via the Solar Luminance Client Approval Drawings, in order for your Custom Daylight Light Fixture to begin Fabrication and Production. Any and all Price adjustments and shipping and/or freight must be paid in full prior to shipment of product.
Semi-Custom Product Shipment Lead Time is estimated at 6-10 Weeks, to begin upon receipt of all of the following:
• Receipt of full payment
• Receipt of signed & approved Client Approval Drawings
• Receipt and Confirmation of Approved Finish and Materials
• And Verification and Approval of All Price adjustments for Custom Modifications and Shipping and/or Freight Cost
Return Policy
Product must be inspected upon arrival and receipt of product, at the designated delivery location. Any damage must be reported to Solar Luminance in a written statement of reported damage, by email (Sales@SolarLuminance.com), along with dated and time stamped photo documentation of reported damage. Report of product damage must emailed within 24 hours of receipt of product. Solar Luminance will work with Purchaser and/or Purchasers Agents, to replace and/or fix any damaged and/or missing parts in a timely manner. If damage occurs and/or is reported beyond the 24 hour reporting period Solar Luminance maintains no liability and/or responsibility for the product and/or its condition. Solar Luminance does take pride in our work, craftsmanship, and product, so we do promise to provide exceptional support in remedying any situation that may arise related to your fixture. We do promise to do all that we can to make you happy with your Custom Solar Luminance Daylight Light Fixture.
Please feel free to contact us with any Questions or Concerns you may have.
Sales@SolarLuminance.com
(855) 687-6233
A California based company.
 Solar Luminance
Solar Luminance – Semi-Custom Daylight Light Fixture
Model#: DLF-149
Style: Semi-Flush Pendant
Finish: Brushed Nickel
*Note: Price does not include Daylight Tube Product and/or Installation
Semi-Custom Product Shipment Lead Time: 6-10 Weeks*
The Solar Luminance DLF-149, is an Architectural Element Transitional Semi Flush Pendant, designed to assist the home owner, retail location and/or office location, the ability to benefit from Natural Daylight available with Tubular Skylight systems, while also reflecting your custom interior design and décor theme and needs.
Natural Daylight provides incredible mental and physical health and wellness benefits that help the human body and mind maintain a sense of time, absorb natural vitamins, and work with the human eye to perceive color and definition in clarity and contrast to increase visual awareness. Our hope is that your friends, colleagues and guests will be “Inspired & Design” in a way that is both elegant and considerate of the impact we have on the earth and its resources.
The DLF-149 is a Semi-Custom Fixture. Full Custom Versions and Options are available for price quote. Please feel free to contact a Solar Luminance Design Assistant for Full Custom Options.
Product Specification (List Price based on the following)
Over All Dimensions:
Over All Height: 22”
Shade Dims: 10” H. X 24” Dia. – ¾” Metal Trim with 1” Opening Square Weld Metal Mesh
Drop Length: 12”
Column Sleeve Diameter: 11 3/4” Dia.
Center Wireway: (1) 3/8” Dia. Wireway
Hangers: (4) Medium Oval Standard Chain (3 and 4 Hanger Options Available) (Chain available in Various Size Options, pricing may vary)
Lamping Specification
Daylight Tube System*: 10” Dia. Daylight Tube System – Includes Dome, Flashing, 8’-0” Length of Tube Extension, Tube Manufacturer provided Installation, Product and Installation Warranty
10” Diameter Tube provides the Equivalent of (10) 100Watt White Lamps
Secondary Lamping
Canopy Lamping: (1) 1.8 Watts (Per Foot) - 48”L. - LED Flex Strip, 5,000K - 12 Volts DC (Lamp Life: 50,000 Hour Rating)
Candelabra Lamping: (6) 3.5Watt LED Candelabra Based Screw in Torpedo Warm White Bulbs, 120v 2700K (25Watt Equiv.) (Provided by Solar Luminance)
Finish Specification and Materials
Metal Finish: Brushed Nickel
(Available in other Color Options – Some Color Options may require a price adjustment)
Glass Diffuser: Clear Glass (Sandblasted Interior) (Not Tempered)
Product Notes
Daylight Tubular Product is Supplied and Installed by Tube Product Manufacturer. Tube Product Manufacturer is responsible for all Product, Installation, Warranty, and Service of Tube Related issues. Solar Luminance is not responsible for any errors and/or omissions related the tube related issues that may arise. Solar Luminance will assist in sourcing a local and/or regional Daylight Tubular Product Supplier and Installer, to assist with Roof and Ceiling inspection and Tube supply and Installation. Solar Luminance is not responsible for the Tube Installers quality of work or service.
All Secondary Electrical must be performed by a Licensed and/or certified Electrician and/or General Contractor. Solar Luminance is not responsible for the Installation of the fixture. Solar Luminance is not responsible for any errors and/or omissions, damaged and or fault or injury caused by the general contractor.
Shipping and Payments
Shipping and/or Freight is the responsibility of the purchaser. Solar Luminance will supply a quote based on the fixture size, weight, crating method and delivery location, prior to commencement of fabrication and production. All Finishes and Semi-Custom Modifications must be Signed and Approved via the Solar Luminance Client Approval Drawings, in order for your Custom Daylight Light Fixture to begin Fabrication and Production. Any and all Price adjustments and shipping and/or freight must be paid in full prior to shipment of product.
Semi-Custom Product Shipment Lead Time is estimated at 6-10 Weeks, to begin upon receipt of all of the following:
• Receipt of full payment
• Receipt of signed & approved Client Approval Drawings
• Receipt and Confirmation of Approved Finish and Materials
• And Verification and Approval of All Price adjustments for Custom Modifications and Shipping and/or Freight Cost
Return Policy
Product must be inspected upon arrival and receipt of product, at the designated delivery location. Any damage must be reported to Solar Luminance in a written statement of reported damage, by email (Sales@SolarLuminance.com), along with dated and time stamped photo documentation of reported damage. Report of product damage must emailed within 24 hours of receipt of product. Solar Luminance will work with Purchaser and/or Purchasers Agents, to replace and/or fix any damaged and/or missing parts in a timely manner. If damage occurs and/or is reported beyond the 24 hour reporting period Solar Luminance maintains no liability and/or responsibility for the product and/or its condition. Solar Luminance does take pride in our work, craftsmanship, and product, so we do promise to provide exceptional support in remedying any situation that may arise related to your fixture. We do promise to do all that we can to make you happy with your Custom Solar Luminance Daylight Light Fixture.
Please feel free to contact us with any Questions or Concerns you may have.
Sales@SolarLuminance.com
(855) 687-6233
A California based company.
Find the right local pro for your project

 Renovators Supply Manufacturing
LUXURIOUS BRASS WATERFALL FAUCET WITH CLEAR GLASS ROUND DISC
Renovators have best engineered bathroom sink faucets you can find with all the features found only in the most expensive Faucets.
HIGHLIGHTS -
Finest, precision-machined solid brass construction - Protective PVD physical vapour deposition finish - 12 in. H x 7 in. dia. disk x 7 in. H from disk bottom to countertop - Easy grab single lever - Single hole design - Perfect for recessed and above counter sinks - Drain sold separately
PACKAGE INCLUDES
Modern solid brass joystick style handle
Clear glass disc
Supply lines
Mounting hardware
BUILT WITH LOVE
Renovators Supply Manufacturing provides a variety of waterfall faucet replacement glass plates for you to play with. The sink is carefully wrapped and packed separately to avoid any damage during the transition. We offer you great value products for your money and a perfect way to spend wisely.

 Kingston
VRTRS593021 - AQUA EDEN 59" CONTEMPORARY SOLID SURFACE RESIN FREESTANDING FUSION TUB _ This spacious and elongated circular fusion freestanding bathtub from Aqua Eden will act as an amazing centerpiece to any bath setting. The surface of the bathtub is made from resin material made from a mixture of acrylic resin, aluminum powder and ground-up minerals. While the resin gives this bathtub a smooth surface, the material is uniform throughout the thickness of the tub, allowing easy repair of any blemishes or physical damage. Its 3" drain hole allows for quick and easy dispense of water.

 safe ZOnea
Staging a home for sale or for a major transition is a strange in-between state. You are still living in the space, but you are also preparing it to impress strangers, support showings, and remain functional until the final move-out day. That tension between “home” and “product” is where storage quietly becomes one of your smartest tools. Used well, storage lets you reduce clutter, protect important items, and create the kind of rooms that photograph beautifully and feel calm when buyers walk through the door.
A staged move is rarely just about shifting boxes from one address to another. It is about managing timing, presentation, and stress at the same time. When storage is built into the plan from day one, the entire process feels less rushed and more strategic. Rooms open up gradually, essentials stay accessible, and you never feel like you are drowning in half-packed chaos. Understanding how to use storage as a staging partner, not just a place to dump excess stuff, is what turns a messy transition into a controlled, professional-looking move.
Why Storage Is the Backbone of Every Staged Move
Visual space is emotional space. When every surface is covered, and every corner is full, buyers feel crowded before they have even evaluated the layout. Storage gives you a way to pull back without making drastic decisions about what to keep or donate. Seasonal décor, bulky furniture, duplicate items, archives, and personal collections can be moved out early, so the home reads cleaner and more open while still feeling lived-in. That balance between warmth and simplicity is exactly what good staging tries to achieve.
In more complex situations, such as live-work properties or home offices, storage becomes even more important. You may need to keep a business running while also presenting a polished environment to viewers. Partnering with local movers in Boston makes it easier to shift equipment, files, and nonessential pieces into storage in phases, so work can continue while the visible areas of the property stay controlled and presentable.
How Staging and Storage Work Together to Control Visual Impact
Staging works best when every object in a room has a clear purpose. A sofa frames a conversation. A table suggests gathering. A lamp softens the mood. Everything else that is not essential to that story competes for attention. Storage supports staging by giving you a clean staging bench off-site, where nonessential items can wait without being constantly shuffled between rooms or piled into overstuffed closets.
The art lies in deciding what stays and what goes. Family photos, extensive collections, excess seating, and rarely used appliances often move into storage first. What remains should be enough to show scale, comfort, and function without revealing the full weight of daily life. Commercial properties go through a similar filtering process. Extra desks, surplus equipment, outdated signage, and inactive files often move out early so the active workspace feels lean, efficient, and future-ready before a relocation supported by commercial movers takes place.
Strategic Timing of Storage before the Actual Move
The worst time to think about storage is when boxes are already stacked in the hallway. In a staged move, storage decisions ideally begin as soon as you know the property will be listed or the space will be transitioned. That might be a month or more before the main moving date. Starting early gives you time to sort, label, and prioritize instead of throwing things together in a panic.
An early storage phase also helps you test how the home feels with less in it. You may discover that removing a few large pieces transforms a cramped room into an open, inviting space. For commercial spaces, early storage lets operations continue with fewer interruptions. Departments can send nonessential items out in waves. When the main relocation comes, much of the excess is already safely stored, and what remains is easier for a commercial movers Boston team to handle with speed and care.
The Emotional Psychology behind Letting Storage Hold Your Belongings
Letting belongings leave the house ahead of you can feel unsettling. There is always a quiet fear that once something is out of sight, it will be forgotten, damaged, or harder to reclaim. That is why some people resist using storage even when they know it would make the staging process easier. Acknowledging that emotion instead of dismissing it helps you plan more honestly and avoids last-minute regret.
The reality is that good storage is not a black hole; it is a temporary pause. When items are packed thoughtfully, labeled clearly, and placed in an environment you trust, they become easier to manage than when they are tucked into random cupboards or stacked in spare rooms. For many people, living with fewer visible possessions during staging actually reduces tension. The home feels lighter and easier to maintain. Businesses notice the same effect when storage removes outdated equipment and clutter from the floor. The workspace looks more focused, and staff can concentrate on current tasks instead of navigating around accumulated history.
Protecting Assets While They Live in Storage
Sending belongings into storage is only a good idea if they come back in the same or better condition. That is where quality control matters. Furniture, textiles, electronics, files, and artwork each have different vulnerabilities. Moisture, temperature swings, dust, and rough handling can all damage them in ways that only become obvious later. Choosing the right type of storage and packing accordingly is central to the genius of using storage as part of a staged move rather than as a desperate overflow container.
Climate-controlled units, padded wrapping, elevated pallets, careful stacking, and clearly marked boxes all reduce risk. The goal is to handle items fewer times, not more. When storage is integrated into the move plan, belongings can travel directly from the home to storage and later from storage to the new address with minimal extra movement. Many owners coordinate those transfers through a well trusted movers in Boston, so the same team that moves items out early also manages their final delivery, preserving continuity and accountability.
How Storage Reduces Risk during Multi-Phase Moves
Few staged moves happen in a single clean step. There are often gaps between listing and selling, between selling and closing, between closing and final move-out. If renovations, inspections, or office reconfigurations are involved, the timeline becomes even more layered. Storage absorbs those gaps, so you are not forced to live among towers of boxes or stack equipment in hallways waiting for the next phase.
By treating storage as a flexible middle ground, you can move things out gradually while still having access when needed. For example, archived files can go first, followed by seasonal décor, then surplus furniture. As each stage ends, fewer items remain to be shifted on the final date. This phased approach reduces the risk of rushed, late-night packing sessions, careless stacking, and damaged items. It also makes it easier for commercial moving crews to work efficiently because they are handling a manageable volume of goods at each phase rather than everything at once.
Using Storage to Maintain Clean Show-Ready Conditions
One of the hardest parts of staging is keeping the property consistently show-ready. Every viewing becomes its own small event. Floors need to be cleared, surfaces wiped, and personal items tucked away. When too many belongings remain in the home, each showing takes a heavy amount of effort. Storage cuts that workload dramatically by taking nonessentials completely off the stage.
With fewer items to move and hide, maintaining a neutral, inviting look becomes much more realistic. You are not scrambling to stuff things into closets or push items under the bed. Instead, the home sits closer to show condition all the time, and the final touches before a viewing are minimal. In commercial environments, using storage helps maintain a professional appearance for clients and staff, even while the space is being prepared for a larger transition. Active tools and furniture stay in play, while inactive pieces quietly support the future from storage.
Storage as a Strategic Tool in Business Relocation Planning
For businesses, storage is more than a convenience; it is part of risk management. Office relocations and staged commercial moves have to juggle lease deadlines, equipment deliveries, IT cutovers, and staffing realities. Trying to shift everything in one move often results in downtime, lost files, and strained teams. Storage turns the move into a series of controlled steps instead of a single disruptive jump.
Unused furniture, archived documents, and non-critical inventory can be moved into storage weeks ahead of the main relocation. As the new space becomes ready, items can move out of storage and directly into position. This reduces double-handling and keeps the old and new locations from filling with half-unpacked material. A business that coordinates these flows with professional commercial movers in Boston usually experiences smoother transitions, because storage is treated as a working part of the operational plan rather than a leftover problem.
The Hidden Cost Benefits of Proper Storage Planning
On paper, storage looks like an extra expense. In reality, poorly managed moves cost far more. When everything is rushed into boxes at the last minute, items are damaged, misplaced, or transported multiple times. Extra labor hours, emergency packing supplies, replacement furniture, and extended timelines quickly outweigh the cost of well-used storage. Staging without storage also tends to keep homes and offices crowded longer, which can hurt impressions and, in the case of a sale, influence offers.
When storage is integrated from the beginning, you minimize waste. You handle items fewer times, you know where things are, and you avoid paying people to shift the same objects repeatedly. Staged homes that look better often sell faster or draw stronger interest, which helps recover investment on the back end. Businesses benefit from less downtime, safer handling of equipment, and predictable work schedules. Those gains are why many clients prefer partnering with a commercial moving company in Boston that understands storage as a cost-control tool, not just a place to park overflow.
Conclusion
The true genius of using storage during a staged home move is that it quietly rewrites the rules of transition. Instead of treating space as something that must absorb every box and belonging until the last possible moment, you treat storage as a flexible extension of the home or office. This shift in thinking opens rooms, clears sightlines, and makes every phase of the move more intentional. Staging becomes easier, maintenance becomes lighter, and the stress of living in a half-moved environment drops noticeably. When storage is chosen carefully, used early, and coordinated with the overall moving plan, it protects both physical assets and emotional energy. Buyers and visitors see a calm, collected space. You experience a less chaotic path from “here” to “there.” Whether you are selling a home, repositioning a business, or managing a complex phased relocation, storage can turn a disruptive event into a managed, almost elegant process.
For people who want that level of control and care during a staged move, Stairhopper movers have built a strong reputation by treating storage, timing, and transport as parts of one connected strategy. Their team is known for listening closely, planning around real-life constraints, and moving both residential and commercial clients through transitions with calm, steady execution. They approach every project as a partnership, aligning storage use, staging needs, and final delivery so that what matters most arrives safely, on schedule, and with as little disruption as possible.
Frequently Asked Questions
Q1. When should I arrange storage for a staged home move?
Ideally, four to six weeks before listing or transition, so clearing, packing, and staging can happen gradually without rushed decisions or last-minute stress.
Q2. Is climate-controlled storage necessary for staged moves?
It is highly recommended for wood furniture, electronics, artwork, and documents, since temperature and humidity swings can quietly damage materials over time.
Q3. How does storage help keep a home show-ready?
By moving nonessential items off-site, daily tidying becomes simpler, and each room can stay closer to a staged condition between viewings or inspections.
Q4. Can storage reduce the length of the final moving day?
Yes. When many items are moved into storage in advance, the final moving day focuses on essentials, which shortens timelines and reduces physical and mental strain.
Q5. Is storage useful for short-term business relocations?
Even in short relocations, storage helps prevent overcrowded offices and allows departments to move in phases without interrupting everyday operations.
Q6. How do I decide what should go into storage first?
Start with rarely used items, seasonal décor, surplus furniture, and archived materials, then work toward pieces that are visually distracting or make rooms feel cramped.
Q7. Will using storage make it harder to find things later?
Not if packing and labeling are done carefully. Clear categories, room-based labels, and simple inventories make stored items easier to locate than when scattered at home.
Q8. Does storage still make sense if my move happens in one day?
Yes, because staging and preparation begin well before that day. Storage keeps the home functional and attractive during the weeks leading up to the final move.
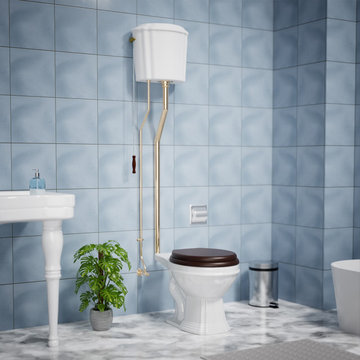 Renovators Supply Manufacturing
VICTORIAN HIGH TANK PULL CHAIN WHITE ROUND BOWL TOILET
The old is the trendy now. People have started placing these vintage toilets in their bathroom for a traditional charm. All the materials used to manufacture this toilet are of highest quality - The one that lasts long!
FEATURES
ADA and ANSI Compliant Toilet
Old Fashion Antique Gravity Flush Upscale Design
White Round Vitreous China High Tank and Toilet Bowl
Protective RENO-GLOSS finish resists stains
PERFECT-HEIGHT bowl reduces daily body strain
Includes mounting hardware, supply line and angle stop
Stainless Steel Rear Entry Pipes with Brass coloured PVD Physical Vapor Deposition Finish
Adjustable overall height 74 in. to 78 in. and Rough-in 12 in. to 15 in.
Wooden Toilet seat is sold separately
100% SATISFACTION GUARANTEE
These are carefully wrapped to avoid any scratches or damage in the transit process. Renovators Supply offers you great value products for your money and a perfect way to spend wisely. We also provide 60 days guarantee with no fee.
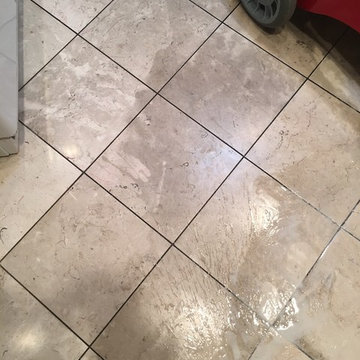
 Suva Tile
A full bottle of vinegar fell out of the refrigerator and the homeowner was not physically able to clean it up for hours, resulting in terrible etching and discoloration of the marble floor. I didn't take any before pictures, thinking even we would not be able to repair the damaged areas. Much to my surprise, not only did we get out all the etching but restored the original color as well! The floor is beautiful once again just like it never happened. We were able to save the homeowner thousands of $$$ in tearing up and replacing the marble kitchen floor.
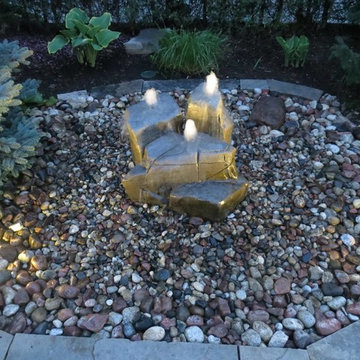
 Geert's Land & Waterscapes
Chickstone Boulders at dusk with 2 LED brass night lights of 3 Watts each on a photocell timer. Lights were installed inside a 8 inch sized custom core drilled granite rocks to camouflage and protect them from physical damage by the garden maintenance people.

 SUPERIOR CHIMNEY SERVICES CORPORATION
A friend noticed a damp, musty smell coming from her living room fireplace the week after a February thaw. When she called a masonry technician from Superior Chimney, to take a look, and found that water had been working its way behind the bricks for years. What started as a small crack now meant her chimney needed structural repairs before she could safely use it again.
Chimney repairs are any work done to restore the structural and weatherproof condition of a chimney. This can include mortar joint repair, brick replacement, crown repair, flue repair, and cap or flashing replacement. Most Chicagoland homeowners discover the need for chimney repairs often times after winter, when the freeze and thaw cycles have already done its damage. Uncovering the symptoms early is the best way to keep chimney repairs down. Let’s discuss how that can be done.
Why Chicagoland Weather Is Especially Hard on Chimneys
Chicagoland has some of the most polarized weather. One day it’s a blizzard and the next week hot, humid and 100 degrees. That swing in weather conditions and temperatures are the real reasons why chimney repairs are needed.
When moisture from humid and rainy days’ soak into brick and mortar and then freezes, it expands. As it begins to thaw, the materials contract. Repeat that cycle dozens of times in a single Illinois winter and even solid masonry in the chimney starts to crack, spall, and separate from the joints holding it together. This is called the freeze thaw cycle. We’ve talked about it many times over the years, and it continues to be the single biggest reason homes need chimney repairs more often than homes in milder climates.
The Chimney Safety Institute of America (CSIA), the leading nonprofit certifying body for chimney professionals in the United States, notes that water intrusion is one of the most damaging and most preventable problems. If the problem is left to mature, it affects more than the appearance. It compromises the structure itself.
What Do Chimney Repairs Involve?
Not every chimney problem requires the same fix. Chimney repairs generally fall into a few categories. Understanding the difference, helps homeowners have a more informed conversation with the expert technician.
Mortar joint repair or tuckpointing. This involves removing deteriorated mortar between bricks and replacing it with fresh mortar, matched to the original color and texture as closely as possible.
Brick replacement. When individual bricks have spalled, meaning the face has cracked or popped off from trapped moisture, those bricks are removed and replaced.
Crown and cap repair. The crown is the concrete slab at the very top of the chimney. Cracks both big and small let water directly into the chimney flue. Chimney crown repair is often one of the most urgent forms of chimney repairs.
Flashing repair. Flashing is the barrier where the chimney meets the roofline. Loose, damaged or poorly installed flashing is a common source for water leaks. The roof gets the blame as it is the largest piece that covers the house. However, it certainly can be the overlooked chimney.
Flue and liner repair. Cracked flue tiles or damaged liners affect how safely a chimney vents smoke and combustion gases.
When to Know a Chimney Needs Repair
Most chimney damage shows up as small, easy to dismiss way. Let’s take a look at the following list. Be sure to print this out and keep it handy so if/when something happens, you know what to look for.
• Water stains near the fireplace or on the ceiling
• A brownish stain on the wall around your fireplace, or a stain on the ceiling near an exterior chimney. This means water is getting in somewhere it should not.
• Crumbling or missing mortar
• If you can see gaps between bricks, or mortar that flakes off when you touch it
• A leaning or visibly shifting chimney
• A chimney that appears to pull away from the house, even slightly, could indicate a structural issue
• White staining on the brick (efflorescence)
• Chalky white residue left behind as water evaporates out of the masonry. It is a visible sign that moisture is moving through brick
• Rusted damper or firebox components
• Metal parts inside a fireplace that are rusting are a strong indicator that moisture is present
• Debris in the fireplace
• Small chunks of brick, mortar, or tile landing in the firebox
What are the Various Types of Chimney Repair?
This is a compiled list of chimney repairs so you can be aware of what to look for. If you have any questions, contact us directly at 877-244-6349.
Homeowners who schedule chimney repairs at the first sign of trouble typically spend far less than those who wait until water damage reaches the interior of the home. This is a great reason to contact Superior Chimney at 877-244-6349.
Why an Annual Inspection Matters More Than People Think
The CSIA and the National Fire Protection Association both recommend that chimneys, fireplaces, and vents be inspected at least once a year, whether or not the fireplace gets used. This recommendation exists because damage does not take a break just because a chimney sits without any use.
According to data stated by the CSIA, chimney related fires still contribute to tens of thousands of residential fires across the United States each year, and a large share of those incidents can be traced back to deferred maintenance. An annual chimney inspection is what catches the small mortar crack or the hairline crown crack before it turns into a repair bill.
Hiring the Right Company for Chimney Repairs
Not every company who offers chimney repair work has the certified training to diagnose a problem correctly. CSIA certification is the most widely recognized credential in the industry, and it requires technicians to study chimney physics, venting systems, and fire codes. After the studies, the new technician needs to pass an exam and agree to a professional code of ethics.
When you call, be sure to ask:
Are your technicians CSIA certified, and can I verify that certification?
Will you show me photos or video of the damage before starting work?
Does the estimate distinguish between cosmetic repair and structural repair?
At Superior Chimney, we welcome these and other of your questions.
How Chimney Repairs Affect Insurance and Resale
A chimney in poor condition can complicate a home sale or an insurance claim. Home inspectors routinely report on visible mortar loss, leaning chimneys, or missing chimney caps. Some insurers will request proof of repair before renewing a policy on an older home. Addressing chimney repairs proactively protects more than curb appeal. It protects the sale timeline and the claims history associated to the property.
Frequently Asked Questions
How often should a Chicago area chimney be inspected? At least once a year, per CSIA and NFPA guidance, regardless of how often the fireplace is used.
Can chimney repairs be done in winter? Some interior repairs can happen in cold weather, but most masonry repair requires temperatures consistently above freezing. Spring and fall are the most common repair times in the Chicago area.
Is tuckpointing the same thing as chimney repair? Tuckpointing is one type of chimney repair, focused on replacing deteriorated mortar joints.
Does homeowners insurance cover chimney repairs? It depends. Sudden damage from a storm may be covered, while gradual deterioration from lack of maintenance typically is not.
So Finally…
Taking care of your home includes a chimney. Just because you don’t see it every day, doesn’t mean things aren’t happening. Be sure to get a chimney inspection done once per year by a certified and credible company such as Superior Chimney to take care of the issues. Contact us today by calling 877-244-6349.
 Tile Doctor Ltd
Recently I was called to a house in the very small town of Marton in Warwickshire which is known for its proximity to the medieval “Marton Bridge”, which lies just to the north, crossing the River Leam.
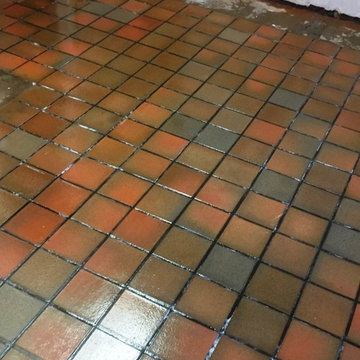
The entire downstairs flooring of my client’s house consisted of Quarry tiles apart from one room where the tiles had been covered by screed and then linoleum. Quarry tiles are a classic hard wearing tile used for both internal and external commercial and residential flooring due to its ability to withstand heavy usage. Reception areas, outdoor patios and porches, for example, are commonly tiled using Quarry.
My client wanted to restore the covered floor back to its original state so that it would match the rest of the downstairs. Realising that this would be a complex and physically demanding task, my client decided to call in Tile Doctor to carry out the restoration.
Removing the Linoleum covering was a relatively straightforward process, so I was able to do this relatively quickly. The main issue concerned removing the screed, which is far more difficult to remove, requiring a lot of physical scraping. Thus I opted to call in some extra manpower in the form of the Nottinghamshire Tile Doctor, Steve Carpenter. With the two of us armed with scrapers we set about removing the screed, taking extra care not to damage the Quarry tile underneath.
Once Steve and I had scraped off as much of the screed as physically possible, I applied a strong dilution of Tile Doctor Remove & Go, a stripper with cleaning properties that is particularly effective at breaking down coatings such as adhesives, plasters and sealers. The product was left to dwell for ten minutes before I worked it into the stone with a scrubbing pad.
After cleaning the tiles, I noticed a layer of grout haze on the surface of the exposed Quarry tiles, so I applied Tile Doctor Grout Clean-Up to remove it. Once the cleaning process was complete I gave the floor a thorough rinse with clean water, before soaking up the resulting residue with a wet-vac machine. The first day of work was a gruelling 12 hours long, but I was very pleased with the results and left the floor to dry overnight.
On day two I returned to finish the job by sealing the newly uncovered Quarry tiles, but not before using a damp meter to check that they were completely dry. Any excess moisture left on unsealed tiles can potentially effect the performance of any sealers that are applied. I sealed the tiles using Tile Doctor Colour Grow, an impregnating, colour-enhancing sealer which gave the surface an aesthetically pleasing shine, as well as durable protection against dirt and wear for the future.
After two long days of work the job was done and the transformation was fantastic and highly rewarding to see, the house now has a fantastic looking Quarry tiled floor running throughout the entirety of the lower level.
Mick Gayton
Warwickshire Tile Doctor
 Tile Doctor Ltd
Here’s a job I completed just before Christmas last year, at a house in Northampton which has a rich history and mix of architectural styles. The run up to Christmas is always popular as people try to get their household projects finished off in time for celebrating the festive season with family so this is always a busy time for Tile Doctor.
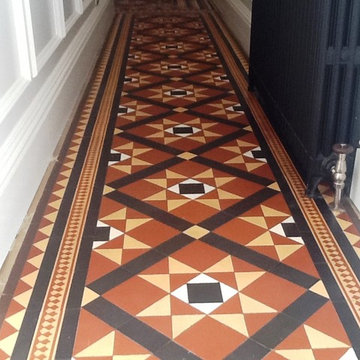
The photos below show a neglected Victorian Quarry tiled floor in need of repair, with cracked tiles along the edges. These were caused by somebody in the past using brute force to remove carpet gripper rods which had been glued to the tiles. These cracks were present around the edges of the entire hallway, however; this particular type of tile is very hard to get hold of. Furthermore, it is a costly process to replace the tiles as the skirting boards would have had to have been removed.
As well as the physical issues the floor had a dull appearance due to the build-up of builder’s dust and the general wearing down of the paintwork over time. I agreed with the client that the best course of action would be to fill the tiles, and paint the damaged tiles using a colour that matched as close as possible. Many of my Tile Doctor colleagues would disagree with this approach opting to source the correct tile and rebuild the damaged section however unfortunately in this case we didn’t have the time or the budget.
My first action was to use a brush and vacuum to remove as much loose debris and dust as possible. I followed this by agitating the tiles with a dilution of Tile Doctor Pro Clean which is a strong alkaline product and safe to use on tile and stone. I use a combination of a coarse burnishing pad fitted to a rotary machine and hand held brushes, in order to get the floor clean. The resulting slurry was then rinsed and removed using a wet vacuum. This process was repeated twice followed by a thorough rinse to ensure any trace of cleaning agent had been removed and the floor neutralised.
As this was such an old property, I then used a steamer to heat up the tiles in order to draw out any contaminants and assist with the drying process. I installed a fan to dry the floor before starting repairs, mixing up some coloured grout and filling all holes and cracks along the edges, including the doormat area.
I allowed the coloured grout to dry overnight, before hand painting the black and Terracotta tiles. These were then given time to dry (about a couple of hours). Following this, I carefully painted in the other colours: brown and cream. The overall effect was quite convincing and you had to look very closely to notice.
Due to the fact that there were other tradesmen working in the house at the time, the floors were sheeted up to protect from additional dust and muck. I then left the house for a week, allowing the floor ample time to dry completely in preparation for sealing.
Upon my return, I took damp meter readings, and once satisfied with the dryness of the tiles, I began the sealing process with the impregnating, colour-enhancing sealer Tile Doctor Colour Grow. The sealer provides both durable surface protection and an aesthetically pleasing matte finish.
The below photos show how the product has enriched the colours with the two coats applied.
The process of restoring this wonderful Victorian Quarry tiled floor was certainly time consuming, but very rewarding. I am exceptionally pleased with the results myself, and my client couldn’t have been happier and I’m sure the newly revitalised hallway will have been a talking point for all their visitors during the Christmas break.
Phil Vissian
Northamptonshire Tile Doctor

 Pro-Roofing
The standard duration of a roof is roughly many years. If the roof is under few years old yet you are having problems, it will probably be able to get repaired instead of being forced to put up a brand-new roof. Even so, if your roof exceeds this age it usually is recommended to put in a new roof. To complete both fixes and new installs, a roofing contractor should be employed. A roofing contractor will be able to perfectly put in or service roofing components to make certain a good quality end product.
Before employing a residential roofing Auckland contractor it's always a good idea to get recommendations from family or friends. No matter whether you have recommendations, acquire several bids prior to figuring out the roofing company to hire. A bid ought to be thorough and encompass the work to be conducted, expense, and time-frame to finish. Make certain clean up is included in the offered cost. If you would like save money, offer to complete the cleanup yourself.
Ask the roofer for how long they've been in business. Roofing contractors with numerous years experience are preferred. Additionally, make certain they have a physical address. Many roofing rip-offs are carried out by folks operating out of a truck without any legitimate business licenses or permanent street address. Obtain recommendations and verify them. Roofers should be properly insured. Request verification of insurance coverage to be certain you are shielded from any damage to your house.
The residential roofing Auckland repairs and new roofs may require particular building permits. Make sure the enterprise you deal with knows community building regulations and that they acquire the right licenses or permits. Many cities also need to have inspections during particular stages of construction and a final inspection when the work is complete. Examine your community building codes to be sure the roofer is adhering to all codes. You may be liable if this does not occur.
Before starting the task get a contract. This would include every detail of the project, period of time to finish, and cost. It needs to clearly define payment procedures and warranties. Furthermore, make certain the contract declares they are liable for clean up. Roof elements can be very messy and you should not need to clean up and dispose of waste yourself. However remember you can save a little money if you choose to take on the cleanup process yourself. Don't be rushed into choosing a residential roofing Auckland contractor. Take time to talk to prospective roofers and check out expertise and recommendations. Roof maintenance can be costly and a new roof is really a major investment. Protect your house through doing a bit of analysis. Hire the roofing contractor that has the best mix of expertise and expense and with which you feel most confident.
For More Info:- https://www.proroofing.co.nz/
https://classifiedsfree.nz/new-zealand-classifieds/www_9_208_710990/central-auckland-roofing
https://www.okidoki.co.nz/item/commercial-roofing-in-auckland/8598537/
https://www.directorytogoto.com/new-zealand/auckland/professional-services/pro-roofing
 Sosna Inc
ouble the bathroom trouble in this 1990’s home … solved with this Sosna renovation!
Our clients, empty-nesters desiring the peace and ease of retirement, were instead frustrated and exhausted with leaky bathroom plumbing from a previous renovation that would just not go away.
Their Shared Bathroom, renovated by their friend years ago, was not done correctly, causing repetitive leaking with damage to their Kitchen ceiling below. They had had enough of trying to fix it themselves. To say this couple was leery of hiring another renovator was an understatement.
But they also knew it was time to fix this problem and decided to update their Master Bathroom while they were at it.
Our initial plan included minimal demolition by re-organizing the walls between the 2 Bathrooms and keeping the existing plumbing rough-ins in place, while updating the fixtures.
However, unwelcome surprises are sometimes inevitable in renovations. Even though we conducted a thorough investigation during the planning stage, we were faced with plumbing in the Shared Bathroom that was not done correctly and may even have been illegal.
Because of this, relocating the rough-ins in the Shared Bathroom were necessary after all, which then meant re-planning the walls in between the 2 Bathrooms.
These are exactly the kinds of problems we love to solve. Why? Because we know that we’re not just fixing the physical problems that can be seen; we know we are also restoring this family’s faith in quality craftsmanship and good service, and that it’s possible to enjoy the renovation process.
This is why we don’t vary from our tried and true Renovating the Sosna Way™ process.
Because it works. For everyone.
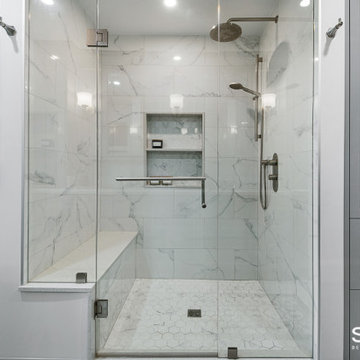
For the Masons, we ended up renovating two bathrooms and completing a number of smaller projects that were causing them great pain to find a renovator for.
At the end of the day, we have another happy client. The Masons have two new bathrooms that better fit their life stage and style, and the “Honey-Do” list is empty!
When you and your home are ready for an upgrade, we're the Renovator You Can Count On™. It's our promise. Contact us to get started!
 Sosna Inc
ouble the bathroom trouble in this 1990’s home … solved with this Sosna renovation!
Our clients, empty-nesters desiring the peace and ease of retirement, were instead frustrated and exhausted with leaky bathroom plumbing from a previous renovation that would just not go away.
Their Shared Bathroom, renovated by their friend years ago, was not done correctly, causing repetitive leaking with damage to their Kitchen ceiling below. They had had enough of trying to fix it themselves. To say this couple was leery of hiring another renovator was an understatement.
But they also knew it was time to fix this problem and decided to update their Master Bathroom while they were at it.
Our initial plan included minimal demolition by re-organizing the walls between the 2 Bathrooms and keeping the existing plumbing rough-ins in place, while updating the fixtures.
However, unwelcome surprises are sometimes inevitable in renovations. Even though we conducted a thorough investigation during the planning stage, we were faced with plumbing in the Shared Bathroom that was not done correctly and may even have been illegal.
Because of this, relocating the rough-ins in the Shared Bathroom were necessary after all, which then meant re-planning the walls in between the 2 Bathrooms.
These are exactly the kinds of problems we love to solve. Why? Because we know that we’re not just fixing the physical problems that can be seen; we know we are also restoring this family’s faith in quality craftsmanship and good service, and that it’s possible to enjoy the renovation process.
This is why we don’t vary from our tried and true Renovating the Sosna Way™ process.
Because it works. For everyone.
For the Masons, we ended up renovating two bathrooms and completing a number of smaller projects that were causing them great pain to find a renovator for.
At the end of the day, we have another happy client. The Masons have two new bathrooms that better fit their life stage and style, and the “Honey-Do” list is empty!
When you and your home are ready for an upgrade, we're the Renovator You Can Count On™. It's our promise. Contact us to get started!
 Sosna Inc
ouble the bathroom trouble in this 1990’s home … solved with this Sosna renovation!
Our clients, empty-nesters desiring the peace and ease of retirement, were instead frustrated and exhausted with leaky bathroom plumbing from a previous renovation that would just not go away.
Their Shared Bathroom, renovated by their friend years ago, was not done correctly, causing repetitive leaking with damage to their Kitchen ceiling below. They had had enough of trying to fix it themselves. To say this couple was leery of hiring another renovator was an understatement.
But they also knew it was time to fix this problem and decided to update their Master Bathroom while they were at it.
Our initial plan included minimal demolition by re-organizing the walls between the 2 Bathrooms and keeping the existing plumbing rough-ins in place, while updating the fixtures.
However, unwelcome surprises are sometimes inevitable in renovations. Even though we conducted a thorough investigation during the planning stage, we were faced with plumbing in the Shared Bathroom that was not done correctly and may even have been illegal.
Because of this, relocating the rough-ins in the Shared Bathroom were necessary after all, which then meant re-planning the walls in between the 2 Bathrooms.
These are exactly the kinds of problems we love to solve. Why? Because we know that we’re not just fixing the physical problems that can be seen; we know we are also restoring this family’s faith in quality craftsmanship and good service, and that it’s possible to enjoy the renovation process.
This is why we don’t vary from our tried and true Renovating the Sosna Way™ process.
Because it works. For everyone.
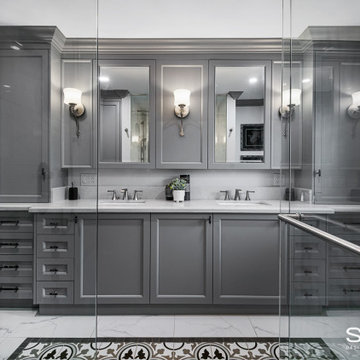
For the Masons, we ended up renovating two bathrooms and completing a number of smaller projects that were causing them great pain to find a renovator for.
At the end of the day, we have another happy client. The Masons have two new bathrooms that better fit their life stage and style, and the “Honey-Do” list is empty!
When you and your home are ready for an upgrade, we're the Renovator You Can Count On™. It's our promise. Contact us to get started!
 Sosna Inc
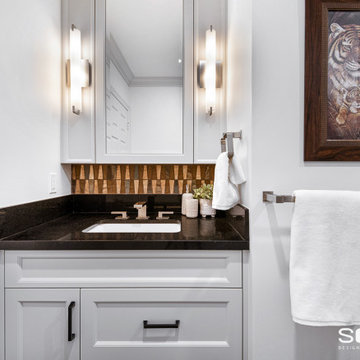
ouble the bathroom trouble in this 1990’s home … solved with this Sosna renovation!
Our clients, empty-nesters desiring the peace and ease of retirement, were instead frustrated and exhausted with leaky bathroom plumbing from a previous renovation that would just not go away.
Their Shared Bathroom, renovated by their friend years ago, was not done correctly, causing repetitive leaking with damage to their Kitchen ceiling below. They had had enough of trying to fix it themselves. To say this couple was leery of hiring another renovator was an understatement.
But they also knew it was time to fix this problem and decided to update their Master Bathroom while they were at it.
Our initial plan included minimal demolition by re-organizing the walls between the 2 Bathrooms and keeping the existing plumbing rough-ins in place, while updating the fixtures.
However, unwelcome surprises are sometimes inevitable in renovations. Even though we conducted a thorough investigation during the planning stage, we were faced with plumbing in the Shared Bathroom that was not done correctly and may even have been illegal.
Because of this, relocating the rough-ins in the Shared Bathroom were necessary after all, which then meant re-planning the walls in between the 2 Bathrooms.
These are exactly the kinds of problems we love to solve. Why? Because we know that we’re not just fixing the physical problems that can be seen; we know we are also restoring this family’s faith in quality craftsmanship and good service, and that it’s possible to enjoy the renovation process.
This is why we don’t vary from our tried and true Renovating the Sosna Way™ process.
Because it works. For everyone.
For the Masons, we ended up renovating two bathrooms and completing a number of smaller projects that were causing them great pain to find a renovator for.
At the end of the day, we have another happy client. The Masons have two new bathrooms that better fit their life stage and style, and the “Honey-Do” list is empty!
When you and your home are ready for an upgrade, we're the Renovator You Can Count On™. It's our promise. Contact us to get started!
 Tile Doctor Ltd
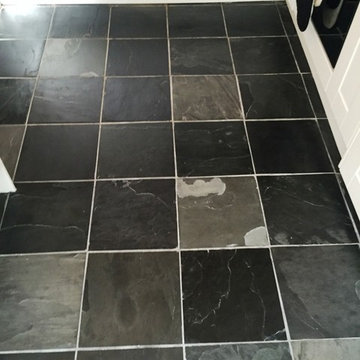
These Slate kitchen floor tiles at a property in Oxford were in good physical condition, but had become dull over time due to heavy usage, and upon close inspection the grout was stained. The customer contacted me as she was keen to get the tiles back to looking their best. This would require a thorough clean and the application of a fresh sealer.
While Slate floor tiles are reputed to be hard wearing and damage resistant – and are therefore a popular choice for high traffic areas like kitchens – this does not exclude them from needing regular maintenance.
To begin, I mixed a strong solution of Tile Doctor Pro Clean and water. Pro-Clean is a versatile cleaner that when used in a weak dilution can be used as a regular cleaner for most types of natural stone floor, including more sensitive stones such as Limestone and Marble.
The cleaning was then spread across the surface area of the floor, and left it to dwell for ten minutes to allow the solution to seep into the pores of the stone and lift the ingrained dirt to the surface. Pro-Clean in a strong dilution also functions as a stripping product, meaning it works to strip away any old and ineffectual sealer.
I then scrubbed the solution into the floor using a stiff scrubbing brush, paying particular attention to the grout in order to break down the visible staining. The tiles and grout lines came up really well during the cleaning process – this became clear once I had rinsed the floor and removed the residue using a wet vacuum.
With the customer eager to have the job completed quickly, I installed portable room dryers and utilised a heat gun to dry the floor, allowing me to seal it on the same day.
Once I had ensured the floor was completely dry, I commenced the sealing process by firstly applying a coat of Tile Doctor Stone Oil, a product which is designed to bring out all of the natural dark shades in the Slate.
When this was dry, I applied a single coat of Tile Doctor Colour Grow. This is an impregnating sealer, meaning that it soaks into pores of the stone to provide durable protection from within against ingrained dirt and stains. Colour Grow also enhances the natural colours in the stone even further.
The customer was amazed by just how big a difference could be made to the tiles in the space of just a day. Although the tiles were generally in very good nick, my main task was to be liven them up – judging by the before and after photos, I think this was achieved. And, now that they have been treated to a fresh seal, the tiles will be prevented from quickly becoming dull again.
Barry Woodward
Oxfordshire Tile Doctor
 Tile Doctor Ltd
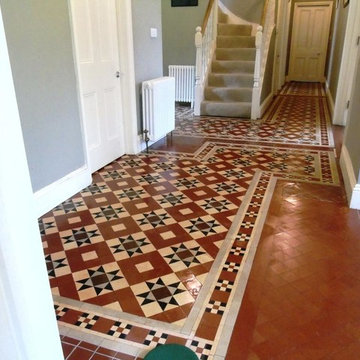
Victorian tiles are very hard-wearing and historically a popular choice for heavy traffic areas such as hallways. Still popular today they are nonetheless like most tiles and can become ingrained with dirt over time.
This particular floor, located in a property in the old market town of Tewkesbury is a good example of a floor that was in good physical condition, but heavily ingrained with dirt due to a lack of regular maintenance. At a loss for how to remedy the situation by themselves, the property owner asked me to pay a visit to restore the tiles back to their best possible condition.
In this particular scenario, I opted to mix and apply a solution of different cleaning products from our professional range, each serving a different purpose. These products were Tile Doctor Pro Clean, Tile Doctor Remove and Go, and Tile Doctor NanoTech HBU. Remove and Go serves the purpose of stripping away any old sealer on the tiles, while Pro Clean is an alkaline cleaner that reliably removes dirt and staining. NanoTech HBU is a particularly powerful cleaner which utilises nano-sized particles to penetrate deep into the pores of the stone, get underneath difficult stains and lift them out.
I spread this potent solution across the length and width of the tiled hallway and left it to soak for approximately 10 minutes, before using a black scrubbing pad fitted to my buffing machine to give the tiles a deep scrub. Next, I rinsed the soiled solution away and neutralised the chemicals with plain water, before extracting any residue using a wet vacuum. I repeated the cleaning process several times to achieve the best results possible, and I also employed the aid of a steam cleaner to spot clean any particularly stubborn marks.
Cleaning the floor took two days in total. At the end of the second day, I gave the floor a thorough and final rinse before leaving it to dry completely overnight. The next day, I returned to the property to seal the floor after checking the floor was dry. Ensuring before sealing that the floor is completely dry is crucial – even the smallest quantity of moisture remaining can potentially cloud the sealer and damage its performance.
My choice of sealer was Tile Doctor Colour Grow, an impregnating sealer that penetrates and fills the pores of the tile to prevent trapped dirt and makes regular cleaning much easier. Colour Grow is a great choice of sealer for Victorian tiles because it really enhances the colourful patterns which are characteristic of this type of tile.
My customer was very impressed with the service and remarked on the huge improvement to the appearance of the floor. You can see this for yourself – just take a look at the before and after photos!
Malcolm Crowther
Gloucester Tile Doctor
 Sosna Inc
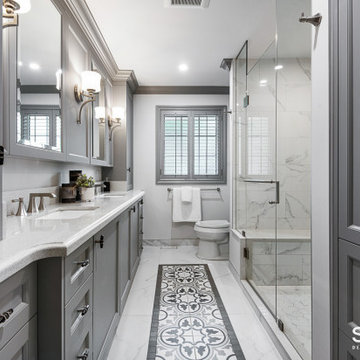
ouble the bathroom trouble in this 1990’s home … solved with this Sosna renovation!
Our clients, empty-nesters desiring the peace and ease of retirement, were instead frustrated and exhausted with leaky bathroom plumbing from a previous renovation that would just not go away.
Their Shared Bathroom, renovated by their friend years ago, was not done correctly, causing repetitive leaking with damage to their Kitchen ceiling below. They had had enough of trying to fix it themselves. To say this couple was leery of hiring another renovator was an understatement.
But they also knew it was time to fix this problem and decided to update their Master Bathroom while they were at it.
Our initial plan included minimal demolition by re-organizing the walls between the 2 Bathrooms and keeping the existing plumbing rough-ins in place, while updating the fixtures.
However, unwelcome surprises are sometimes inevitable in renovations. Even though we conducted a thorough investigation during the planning stage, we were faced with plumbing in the Shared Bathroom that was not done correctly and may even have been illegal.
Because of this, relocating the rough-ins in the Shared Bathroom were necessary after all, which then meant re-planning the walls in between the 2 Bathrooms.
These are exactly the kinds of problems we love to solve. Why? Because we know that we’re not just fixing the physical problems that can be seen; we know we are also restoring this family’s faith in quality craftsmanship and good service, and that it’s possible to enjoy the renovation process.
This is why we don’t vary from our tried and true Renovating the Sosna Way™ process.
Because it works. For everyone.
For the Masons, we ended up renovating two bathrooms and completing a number of smaller projects that were causing them great pain to find a renovator for.
At the end of the day, we have another happy client. The Masons have two new bathrooms that better fit their life stage and style, and the “Honey-Do” list is empty!
When you and your home are ready for an upgrade, we're the Renovator You Can Count On™. It's our promise. Contact us to get started!
2