
Search results for "Pipes installation" in Home Design Ideas
 User
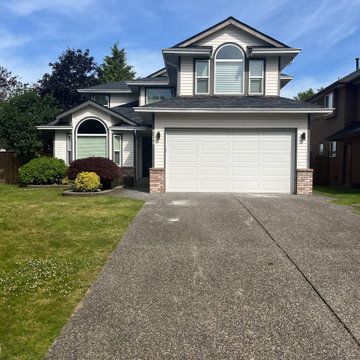
UserThe before of our current project which will be a complete interior remodel on the inside including removing a wall to open up the kitchen, add some HVAC work so that the new air conditioner to be installed will cool throughout the house. Each room will be down to the studs and include all new flooring and removal of textured ceilings. The Poly B piping will also be upgraded. The expansive backyard will have some deck repair with a new solarium, new hot tub install, artificial lawn and large children's play structure. The existing roof, gutter and shed will be repaired as well.
 Gappsi
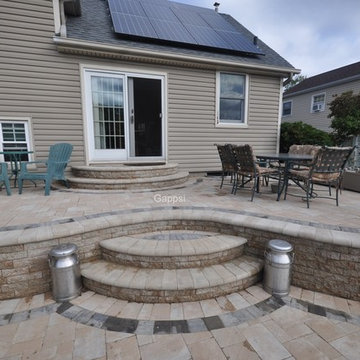
This 16’x32' freeform gunite swimming pool custom constructed in Massapequa NY. The pool shell consists of 10" concrete walls and an 8" concrete floor. The pool was shot with gunite cement, over 6" of over sized gravel base, 12 inches on center, 1/2” rebar metal cage and 6" apart center rods in any areas that the pool is deeper than 48”. All plumbing is done with 2" hard PVC schedule 40 piping. All of the equipment is Hayward including 400,000 BTU gas heater, a salt chlorine generator, ozone system, pumps, and cartridge filter. The pool is 46" to 66" deep which makes it a non-diving pool. In the deep end of the pool, there is a bench with special jets through which air and water are pushed at a higher speed to create a spa effect. Porcelain pool tiles were installed at the water line; the finish of the pool is cool blue diamond bright quartz. The steps and benches were highlighted with diamond shaped 2”x2” tiles. The coping patio and raised patio wall were created with Nicolock products. 6”x12" bullnose, ridge stone patio pavers with brown inlays and mini colonial walls and caps are all in travertine color. From design concept to finish execution Gappsi provides Nicolock pavers supply/installation, gunite swimming pools, and landscaping. For more information about design and installation in Massapequa NY, visit www.gappsi.com or call us at 631-543-1177 for a free estimate.
Video: https://www.youtube.com/watch?v=tQ_tYkMsYVg&t=5s
 Gappsi
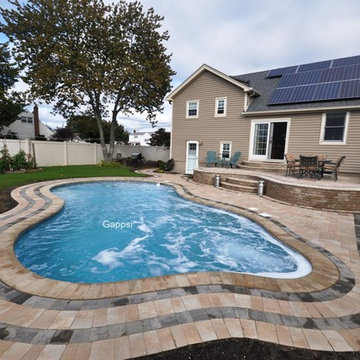
This 16’x32' freeform gunite swimming pool custom constructed in Massapequa NY. The pool shell consists of 10" concrete walls and an 8" concrete floor. The pool was shot with gunite cement, over 6" of over sized gravel base, 12 inches on center, 1/2” rebar metal cage and 6" apart center rods in any areas that the pool is deeper than 48”. All plumbing is done with 2" hard PVC schedule 40 piping. All of the equipment is Hayward including 400,000 BTU gas heater, a salt chlorine generator, ozone system, pumps, and cartridge filter. The pool is 46" to 66" deep which makes it a non-diving pool. In the deep end of the pool, there is a bench with special jets through which air and water are pushed at a higher speed to create a spa effect. Porcelain pool tiles were installed at the water line; the finish of the pool is cool blue diamond bright quartz. The steps and benches were highlighted with diamond shaped 2”x2” tiles. The coping patio and raised patio wall were created with Nicolock products. 6”x12" bullnose, ridge stone patio pavers with brown inlays and mini colonial walls and caps are all in travertine color. From design concept to finish execution Gappsi provides Nicolock pavers supply/installation, gunite swimming pools, and landscaping. For more information about design and installation in Massapequa NY, visit www.gappsi.com or call us at 631-543-1177 for a free estimate.
Video: https://www.youtube.com/watch?v=tQ_tYkMsYVg&t=5s
Find the right local pro for your project
 Gappsi
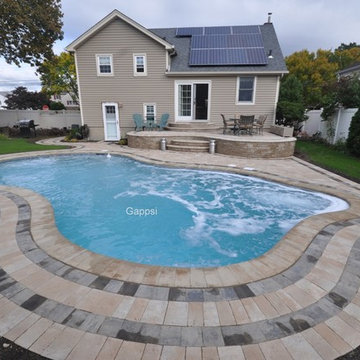
This 16’x32' freeform gunite swimming pool custom constructed in Massapequa NY. The pool shell consists of 10" concrete walls and an 8" concrete floor. The pool was shot with gunite cement, over 6" of over sized gravel base, 12 inches on center, 1/2” rebar metal cage and 6" apart center rods in any areas that the pool is deeper than 48”. All plumbing is done with 2" hard PVC schedule 40 piping. All of the equipment is Hayward including 400,000 BTU gas heater, a salt chlorine generator, ozone system, pumps, and cartridge filter. The pool is 46" to 66" deep which makes it a non-diving pool. In the deep end of the pool, there is a bench with special jets through which air and water are pushed at a higher speed to create a spa effect. Porcelain pool tiles were installed at the water line; the finish of the pool is cool blue diamond bright quartz. The steps and benches were highlighted with diamond shaped 2”x2” tiles. The coping patio and raised patio wall were created with Nicolock products. 6”x12" bullnose, ridge stone patio pavers with brown inlays and mini colonial walls and caps are all in travertine color. From design concept to finish execution Gappsi provides Nicolock pavers supply/installation, gunite swimming pools, and landscaping. For more information about design and installation in Massapequa NY, visit www.gappsi.com or call us at 631-543-1177 for a free estimate.
Video: https://www.youtube.com/watch?v=tQ_tYkMsYVg&t=5s
 Levite Construction Co
? New Project Alert from Levite Construction Co.! ?
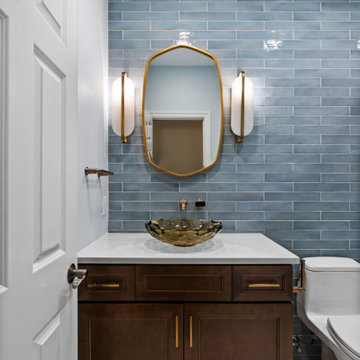
? We're excited to unveil our latest creation - a uniquely designed guest bathroom in Sammamish. This project wasn't just about renovation, but about crafting an oasis of comfort and style.
✨ Highlight Features ✨
- Tub Installation: Our team skillfully executed a precise tub installation, blending functionality with an eye-catching design.
- Precision Plumbing: Every pipe and fitting was meticulously installed, setting the stage for the elegant and innovative features in this bathroom.
- Fountain Faucet: The vanity sink is graced with a beautiful fountain faucet, a blend of modern design and timeless elegance.
- Color Harmony: A serene light blue tile covers the walls, perfectly complementing the crisp white floor tiles. The custom-made colors for the faucets add an extra touch of personalization.
- Custom Glass Shower Doors: Tailored to perfection, these doors add both beauty and practicality to the space.
- Innovative Lighting: We installed lights over a tiled wall, a design choice that elevates the ambiance of the bathroom.
? Levite's Touch ?
This project is a showcase of Levite Construction Co.’s dedication to detailed planning and creative design. From the rough phase to the final touches, every step was taken with precision and care.
? Kudos to Our Team ?
A huge shoutout to our design team, whose vision and expertise made this beautiful guest bathroom possible. Their impressive work is a testament to our commitment to excellence.
Book us now!
? (425) 998-8958 ? info@leviteconstruction.com
#LeviteConstruction #BathroomRemodel #SammamishHomes #LuxuryDesign #ModernBathroom #HomeRenovation #DesignExcellence #GuestBathroomTransformation #seattlehomedesign #remodelingbathroom #homerenovationspecialist #remodelingproject #residentialrenovation #seattlehome #housebuilder #bathroomdesigner #houseremodeling #seattlehomes #bathroomrenovations #bathroomremodeling #bathroomdesigns #bathroominterior #bathroomreno #homeremodeling #homeimprovements #bathroomremodel #homerenovation

 Pool & Hot Tub Alliance
Jutting out from the rock cliff, this high-end home has a breathtaking view at every angle of the valley below and surrounding mountains. A portion of the pool is suspended 400 in mid-air, presenting us with somewhat of a construction challenge. It was a requirement to drain the pool for winter and as such every pipe had to gravity drain into the surge tank below. Two-thirds of the pool water volume is stored in a cistern immediately below to be circulated during the winter. In order to have the option for use throughout the year the pool was covered with a Hydralux cover and heated during the winter months. This Hydralux cover had to be installed with extreme precision in the pool, as well as, the additional Hydralux installed for the whirlpool. As the pool infinity edge challenges the water levels the cover operates on, the levels need to be maintained at all times. Special water systems were installed in order to achieve this with a simple red light indicator for the home owners ease of use. In a high-end home such as this, all work must be done to a high level of precision including installing all the equipment in the mechanical room in a neat, organized and tidy manner. Even though the mechanical systems for the pool and whirlpool operations are complex it needed to have elements of simplicity for the owner and their caretakers to operate. To further enhance the customers enjoyment of this luxurious pool, a UV, Ozone and Chlorinator Sanitation System, as well as, a Turbo Clean System were included. The exterior lighting is all managed in order for the areas to be lit without drawing your attention to light fixtures. Black Interstyle glass tile throughout the pool and whirlpool interiors give the water elements of the home a mountain lake aspect while the geometric design maintains the modern look to the home. An oculus over the whirlpool allows natural light into the covered area, creating a spectacular effect. For the perfect resort feel, a tanning ledge was included in the pool and for that late night swim, a set of LED lights were added.
 C.E. Pontz Sons
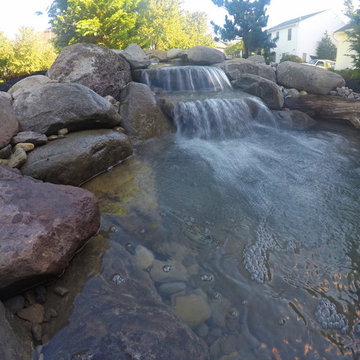
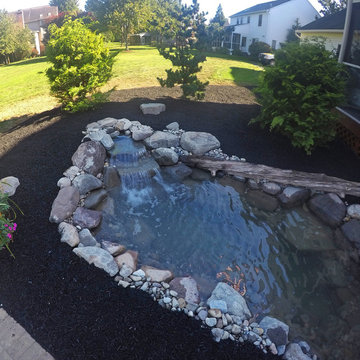
A small backyard pond is a great way to turn a drab backyard into a relaxing oasis. As you can see from this small backyard pond project installed in Lancater, PA. This backyard pond project included installation of a Aquascape Ecosystem 8’x11′ Pond. The pond installation included low voltage underwater lighting and automatic dosing system. Automatic dosing systems help to maintain optimum water quality in your pond. Existing landscaping were the pond was to be installed was transplanted and reinstalled after pond construction was complete.
The secret behind building a low maintenance water feature is to develop a working ecosystem in your pond. A mechanical skimmer filter on the left of this diagram holds your pump and skims the surface of debris. The pump then transfers the water through a flexible PVC pipe to the biological biofalls on the right. With the help of beneficial bacteria the biofalls will clean the water and return it to the pond via the waterfall. The plants and fish work together to control excessive algae blooms. The gravel unlike a smooth pond liner provide surface area for beneficial bacteria to break down organic waste on the pond floor.
 C.E. Pontz Sons
A small backyard pond is a great way to turn a drab backyard into a relaxing oasis. As you can see from this small backyard pond project installed in Lancater, PA. This backyard pond project included installation of a Aquascape Ecosystem 8’x11′ Pond. The pond installation included low voltage underwater lighting and automatic dosing system. Automatic dosing systems help to maintain optimum water quality in your pond. Existing landscaping were the pond was to be installed was transplanted and reinstalled after pond construction was complete.
The secret behind building a low maintenance water feature is to develop a working ecosystem in your pond. A mechanical skimmer filter on the left of this diagram holds your pump and skims the surface of debris. The pump then transfers the water through a flexible PVC pipe to the biological biofalls on the right. With the help of beneficial bacteria the biofalls will clean the water and return it to the pond via the waterfall. The plants and fish work together to control excessive algae blooms. The gravel unlike a smooth pond liner provide surface area for beneficial bacteria to break down organic waste on the pond floor.
 Bryant Fence Co
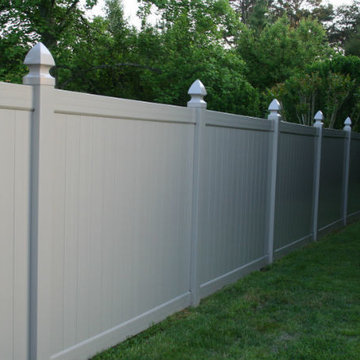
Strongest Vinyl Fencing, reinforced with galvanized steel pipe for the strongest vinyl fence. See our site for the installation video, minimal invasive installation. Two year installation warranty, and 5 year gate installation warranty, lifetime manufacturer warranty on vinyl and gate hardware. We are the vinyl factory
 Golden Hammer Construction
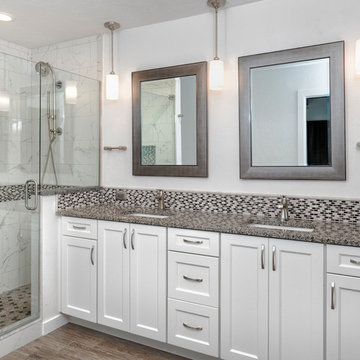
This is a recently completed master bathroom renovation we finished in the Gainesville Area. The customer wanted to update the look of their bathroom and convert the tub to a walk in shower. We gutted this master bathroom and closet down to the studs and started completely over. We framed in the old octagon window and fixed all the structural framing. We re-piped the supply and waste lines as well as updated all the electrical. We installed new insulation and covered it with new sheetrock and texture. Next we prepped for the tile installations and installed the Schluter Waterproofing system in the shower. New tile was installed throughout the bathroom and shower as well as a tile backsplash. New vanity, top and fixtures complete this bathroom renovation.
 highland
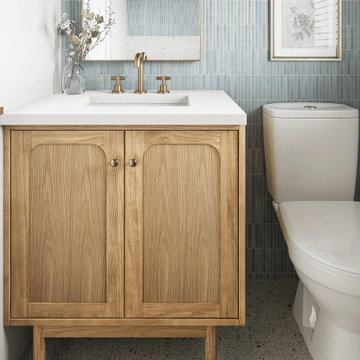
Renovating a bathroom is one of the most rewarding home improvement projects you can undertake. It adds immediate value to your property and elevates your daily routine. However, designing the perfect space requires balancing aesthetics with practical utility. At the heart of this balance is the vanity — it is the functional hub where you get ready each morning, a vital storage unit, and the visual centerpiece of the room.
To ensure you make the right investment, here is an in-depth look at choosing a bathroom vanity that blends style, longevity, and everyday functionality.
1. Assessing the Layout and Space Constraints
Before you fall in love with a specific design or finish, you must determine what your bathroom can physically handle. Scale is everything. A vanity that is too large disrupts traffic flow, while one that is too small gets lost visually and lacks adequate storage.
The next major step is determining the scale of your plumbing fixtures. Understanding how to choose a bathroom sink and vanity setup comes down to a simple choice: single or double sinks. Your choice will depend on who uses the bathroom and the overall footprint of the space.
Single Sink Vanities
Typically ranging from 20 to 48 inches (50–120 cm) in width, single vanities are the ideal choice for powder rooms, guest bathrooms, or small master suites. For very compact spaces, you can find narrower options starting around 16 inches (40 cm). The major advantage of a single-sink layout is that it provides more usable countertop space for cosmetics, toiletries, and decorative items. If you want to skip the guesswork and invest in a premium, beautifully handcrafted fixture, explore the luxury collections at Willow Bath and Vanity. From elegant single vanities to spacious double setups, their masterfully built furniture combines solid wood construction with elite styling to transform any bathroom into a spa-like retreat.
Double Sink Vanities
Usually starting at 48 inches (120 cm) and extending up to 72 inches (180 cm) or more, double vanities are a lifesaver for shared master bathrooms. They allow two people to get ready simultaneously without fighting for sink space. Keep in mind that a double vanity naturally reduces both cabinet storage space and countertop real estate since a second sink basin and plumbing lines take up substantial interior room.
Sink Types to Consider
The countertop is the workhorse of the bathroom. It regularly comes into contact with running water, toothpaste, soapy residue, and high-heat styling tools. Knowing how to choose a bathroom vanity top requires evaluating how much maintenance you are willing to perform against the look you want to achieve. Material Pros Cons Maintenance Level Quartz Highly durable, non-porous, stain and scratch-resistant. Offers the look of stone without the hassle. Premium pricing; can show seams on very large custom layouts. Low (No sealing required) Marble Timeless, elegant, and luxurious. Every slab features a completely unique veining pattern. Porous; prone to scratching, etching from acids, and water stains. Requires careful daily use. High (Requires regular sealing) Granite Naturally strong, heat-resistant, and chemically stable. Unique earthy patterns. Porous; can chip if subjected to heavy impacts. Medium (Requires occasional sealing) When coordinating your countertop, ensure it complements your bathroom’s floor tiles, shower surround, and plumbing hardware to maintain visual harmony.
4. Selecting the Core Vanity Style and Finish
Once the functional components are locked in, you can focus on the architectural style of the vanity base. The base dictates the design theme of the entire room.
Conclusion
Choosing the perfect vanity is a step-by-step process that combines precise measurements with your personal design taste. By taking careful measurements, choosing between a single- or double-sink setup, and picking a durable counter material like quartz or granite, you can transform your bathroom into a beautiful, organized retreat. Prioritize high-quality materials and smart craftsmanship, and your new vanity will look spectacular and serve your household reliably for years to come.
1. Assessing the Layout and Space Constraints
Before you fall in love with a specific design or finish, you must determine what your bathroom can physically handle. Scale is everything. A vanity that is too large disrupts traffic flow, while one that is too small gets lost visually and lacks adequate storage.
- Take Precise Measurements: measure the available width, depth, and height. Remember to account for surrounding fixtures.
- Check Clearance Zones: ensure there is enough clearance for the bathroom door to swing open, for shower glass doors to clear the vanity, and for drawers and cabinet doors to extend fully without hitting the toilet or walls.
-
Locate Existing Plumbing: moving pipes can significantly increase renovation costs. If you want a seamless installation, look for a vanity configuration that aligns easily with your current plumbing setup.
The next major step is determining the scale of your plumbing fixtures. Understanding how to choose a bathroom sink and vanity setup comes down to a simple choice: single or double sinks. Your choice will depend on who uses the bathroom and the overall footprint of the space.
Single Sink Vanities
Typically ranging from 20 to 48 inches (50–120 cm) in width, single vanities are the ideal choice for powder rooms, guest bathrooms, or small master suites. For very compact spaces, you can find narrower options starting around 16 inches (40 cm). The major advantage of a single-sink layout is that it provides more usable countertop space for cosmetics, toiletries, and decorative items. If you want to skip the guesswork and invest in a premium, beautifully handcrafted fixture, explore the luxury collections at Willow Bath and Vanity. From elegant single vanities to spacious double setups, their masterfully built furniture combines solid wood construction with elite styling to transform any bathroom into a spa-like retreat.
Double Sink Vanities
Usually starting at 48 inches (120 cm) and extending up to 72 inches (180 cm) or more, double vanities are a lifesaver for shared master bathrooms. They allow two people to get ready simultaneously without fighting for sink space. Keep in mind that a double vanity naturally reduces both cabinet storage space and countertop real estate since a second sink basin and plumbing lines take up substantial interior room.
Sink Types to Consider
- Undermount: installed beneath the counter for a smooth, seamless surface that is incredibly easy to wipe down.
- Vessel: sits atop the counter like a decorative bowl. It makes a bold style statement but raises the overall height of the counter surface.
- Drop-In: features a lip that rests on the counter cutout. It is easier to install, but its edges can catch dirt.
-
The countertop is the workhorse of the bathroom. It regularly comes into contact with running water, toothpaste, soapy residue, and high-heat styling tools. Knowing how to choose a bathroom vanity top requires evaluating how much maintenance you are willing to perform against the look you want to achieve. Material Pros Cons Maintenance Level Quartz Highly durable, non-porous, stain and scratch-resistant. Offers the look of stone without the hassle. Premium pricing; can show seams on very large custom layouts. Low (No sealing required) Marble Timeless, elegant, and luxurious. Every slab features a completely unique veining pattern. Porous; prone to scratching, etching from acids, and water stains. Requires careful daily use. High (Requires regular sealing) Granite Naturally strong, heat-resistant, and chemically stable. Unique earthy patterns. Porous; can chip if subjected to heavy impacts. Medium (Requires occasional sealing) When coordinating your countertop, ensure it complements your bathroom’s floor tiles, shower surround, and plumbing hardware to maintain visual harmony.
4. Selecting the Core Vanity Style and Finish
Once the functional components are locked in, you can focus on the architectural style of the vanity base. The base dictates the design theme of the entire room.
- Freestanding vanities: sit directly on the floor, supported by legs or a solid kickboard base. This is a traditional, stable configuration that offers the maximum hidden cabinet and drawer storage space.
- Wall-Mounted (Floating) vanities: anchored directly onto the wall studs, leaving the floor underneath completely clear. Floating vanities are staples of modern, minimalist design. They create an illusion of space, making small rooms look larger, and make cleaning the bathroom floor incredibly easy.
- Console vanities: feature an open shelving design supported by a metal or wood frame. It offers a light, airy look reminiscent of a boutique hotel, though it sacrifices hidden storage.
Conclusion
Choosing the perfect vanity is a step-by-step process that combines precise measurements with your personal design taste. By taking careful measurements, choosing between a single- or double-sink setup, and picking a durable counter material like quartz or granite, you can transform your bathroom into a beautiful, organized retreat. Prioritize high-quality materials and smart craftsmanship, and your new vanity will look spectacular and serve your household reliably for years to come.
 foster design farm
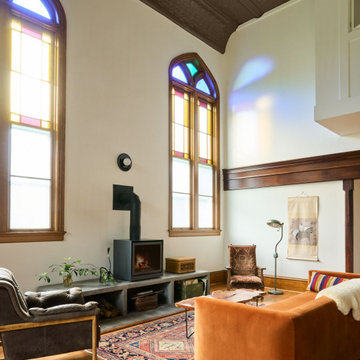
The main living area surrounds a wood burning stove atop a custom concrete bench.
Example of an eclectic living room design in Philadelphia
Example of an eclectic living room design in Philadelphia
 Total System Service
As a manager of a building or property, you quickly learn the art of mediation. One minute you may be working with a vendor to keep the building’s operating system running efficient and smooth; the next moment you may be calming a tenant down after finding the change in the system disrupted his office’s workflow. Give and take; it’s the only way to make sure every day runs perfectly.
Overall, you have two goals to strive for in everything you do.
1. Keep the building running properly, upgrading systems as appropriate, and striving to do all you can on a pre-established budget.
2. Keep the building occupants happy, with as little disruption as possible.
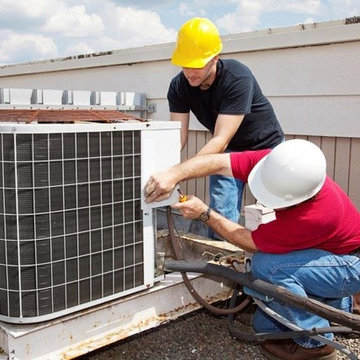
While some changes are minor, barely registering on a building occupant’s mind, with HVAC challenges, that’s rarely the case. If a HVAC contractor is replacing an air handler, for instance, and disconnects one and moves to the next unit, it may cause major disruptions to sensitive areas of a building. And if the occupant wasn’t prepared for the disruption, you can have a mighty unhappy customer on your hand.
Anytime you are working on HVAC projects throughout your building, there are strategies you can put into place to keep things running smooth.
Communicate with occupants
Communication is key to any good relationship, and as a property manager, this rule is a great place to start. If you will be working with the HVAC equipment, block out the timeframe for work to be done, and understand the potential consequences of the process. Then communicate this process with every point of contact you have throughout the building. The more detail you can provide, the less surprises you’ll have throughout the process. You can also work with your building’s occupants before the process begins, finding out if there are better timeframes than others.
Establish a realistic schedule
As a property manager, its easy to provide your expectations for the HVAC project at hand, and request that the proposal be written in such a way that work is completed on your timeframe. Unfortunately, many contractors want your business and will agree to anything upfront in order to win the bid, knowing full well the work will take longer than specified. Instead of projecting your timeframes into the proposal process, ask for HVAC project bids to establish realistic schedules of how long the process will take, and what areas of your property will be most effected throughout the schedule. This will help you avoid crises between you and the contractor, and you and your tenants.
Plan for the whole system
If one small piece of your HVAC system is weak, its easy to fix that one small piece. But how will that impact your overall system? Will it cause weak spots in different parts of the building – maybe a corner office will have reduced air flow, and therefore be colder in the winter and warmer in the summer? When retrofitting new pieces with older existing systems, its easy to reduce the efficiency of your entire system. Before agreeing to certain repairs, make sure you understand how it will impact your entire system overall. An easy way of handling this problem is by working with the same HVAC contractor again and again, He will understand your system’s potential, and know when to make repairs, and when to replace.
Have points of contact available for immediate assistance
In many cases, problems arise because connections can’t be made. Can the HVAC contractor get a hold or you or another person that can make decisions at a moments notice if a problem arises? Do you have access to decision makers throughout the building that may be impacted by this change? Many projects have been put on hold simply because a person in authority can’t be found to give the go-ahead to move forward. If you have access to these people during the time of the project, you’ll be able to complete the project in record time.
Test
Finally, if you can test things in stages, or test when the potential for problems is the smallest, you reduce the chances of bigger emergency issues falling into your lap. If you’ll be installing a new terminal unit, can you make the switch on a Saturday morning when the building is largely unoccupied? If you’re replacing a large system, can you replace and test in phases so the entire project isn’t released at once?
Most issues can be avoided with just a little strategy from the beginning. If you’ve never had a HVAC maintenance team to help you stay on track with your building’s heating and cooling, now may be the time to find out how easy a team approach makes the process.
 Electronic Design & Consulting, Inc.
This article is posted here with the consent of the author. The views and opinions expressed in this article are those of the author and do not necessarily reflect the official policy, position, view, or opinion of Crestron Electronics, Inc., or of any of its employees. Crestron Electronics is not responsible for, and does not verify the accuracy of, any of the information contained in this article.
By Jeff Singer
The “smart” revolution began several years ago with smartphones (a.k.a phones) and has extended in recent years to thermostats, doorbells, alarm systems, and kitchen appliances. Smart devices are so ubiquitous that the term “smart” is overused to the point that it is almost meaningless. Companies are eager to jump on the bandwagon and claim their products are “smart,” and consumers proudly claim they have a smart home because they have lighting control. Misconceptions about smart homes are prevalent and create confusion in the marketplace. This can have deleterious effects on businesses and underserve consumers. Here are seven of the most popular misconceptions about smart homes:
1. Apps are smart
Apps are convenient and easy to use. Yes, it seems there’s an app for everything. People expect to be able to download an app and do just about anything. App developers and many companies do not disavow consumers of this myth. On the contrary, they promote this idea with carefully worded descriptions. The promise of having the world at your fingertips for $1.99 is very enticing. Although it sounds too good to be true, it is also too good to pass up for many people. This leads to undervaluing home control and disappointment when the apps don’t work, which undermines confidence in our industry. The fact is that apps are not smart. They do not control anything. They must connect to and communicate with a control system or cloud service that processes, prioritizes, and executes commands. That’s the real magic and what most people do not understand.
2. Smart devices work together
With so many smart appliances and devices on the market today, it’s understandable that the average consumer might think that they actually communicate and work together. This is simply not the case. Smart devices are not that smart. They are designed and manufactured by different, often competing, companies. There are no national or industry standards governing these products. Even if they all operate using Wi-Fi® communications, that doesn’t mean they work together. Some companies promote a home control platform, which unites different devices from different companies – in theory. The platform is yet another third-party software totally dependent on other companies developing APIs and writing control modules for their hardware to run on that piece of software. The devices are not independently compatible. Also, when updates are made to either the hardware or the software, functionality may be affected for some period. That’s a nice way of saying the device or system won’t work and there’s no way of knowing for how long.
3. It’s a DIY project
Which brings us to the next myth, which is that the average person can do it themselves. Unless you are a skilled professional, I would not advise taking on a smart home project. You want to make a light turn on and off with your Alexa® or Google Assistant™ virtual assistant software, go for it. A smart home takes much more planning and expertise. I have no problem changing a light bulb or hanging a light fixture in my dining room; however, I am not going to rewire my house. I may change the flush valve in my toilet, but I’m not going to replace the pipes in my house. You get it. Integrating devices and systems, establishing different zones, creating scenes, designing the UI with a balance between control, feedback, and simplicity – all takes experience and skill.
4. Need a programmer to make changes
Early adopters may have experienced the pain of trying to make a simple change or update to their home control system. Years ago, if the cable provider changed the channel line-up, the homeowner would have to call the dealer or programmer to make an appointment for them to come out to the house to reprogram the system. The system wouldn’t work as expected until it was updated, which often took several days and beaucoup bucks. Not anymore. Technology has evolved so now it’s easy for system owners to change favorite channels, create scenes, rename buttons, update images, and more. While a professional is needed for the initial installation and setup, the system is easy to manage once it’s up and running. This makes life so much easier for both dealer and customer.
5. Tech becomes obsolete quickly
Similar to updating the UI, updating firmware or hardware used to be a stressful process. A smart home should be intelligent enough to update itself. Apps don’t become obsolete. Updates are constantly pushed out from the cloud, making them better all the time. The same is true for a good smart home system. New features, functions, and device support gets added in the background consistently, so the system you installed (or purchased) yesterday gets better over time. Swapping out decorative elements, such as keypads, dimmers, and touch screens is also seamless. When a new device is added, all the settings are pulled down from the cloud and it just works. No system interruptions. No sunk costs. No imposing house calls. No surprise bills.
6. Lighting control saves energy and money
Lighting control is one of the most popular smart systems, but it takes more than just one system to make a home smart. On the surface, it makes sense that if you dim the lights ten percent, then you save ten percent of energy costs. If the shades are raised during the day to take advantage of sunlight so the lights don’t need to be on (or at least not 100%), but that causes the room temperature to rise a few degrees, which triggers the air conditioner to run longer and more often, was energy usage (or cost) reduced? A smart home integrates all the various systems and technology to optimize comfort, convenience, safety, and sometimes energy.
7. Home technology is easy to hack
Security is at the forefront of people’s minds these days. Personal identities are stolen; email accounts hacked; private photos publicized; and more. A smart home must outsmart those who don’t respect privacy. Crestron control systems adhere to the strictest security standards. The same Crestron control system that goes into a home is also installed in secure government and military facilities, global banking institutions, hospitals, and other mission critical applications. When installed correctly by a trained professional, a Crestron smart home is the gold standard for security, comfort, and convenience.
 Penn Contractors Inc
Hub Wilson Photography, Allentown, PA
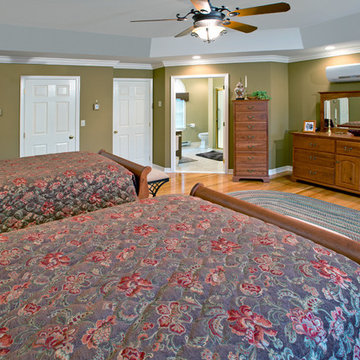
Inspiration for a mid-sized timeless master medium tone wood floor bedroom remodel in Philadelphia with brown walls and no fireplace
Inspiration for a mid-sized timeless master medium tone wood floor bedroom remodel in Philadelphia with brown walls and no fireplace
 C.E. Pontz Sons
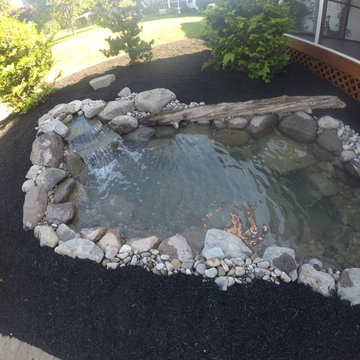
A small backyard pond is a great way to turn a drab backyard into a relaxing oasis. As you can see from this small backyard pond project installed in Lancater, PA. This backyard pond project included installation of a Aquascape Ecosystem 8’x11′ Pond. The pond installation included low voltage underwater lighting and automatic dosing system. Automatic dosing systems help to maintain optimum water quality in your pond. Existing landscaping were the pond was to be installed was transplanted and reinstalled after pond construction was complete.
The secret behind building a low maintenance water feature is to develop a working ecosystem in your pond. A mechanical skimmer filter on the left of this diagram holds your pump and skims the surface of debris. The pump then transfers the water through a flexible PVC pipe to the biological biofalls on the right. With the help of beneficial bacteria the biofalls will clean the water and return it to the pond via the waterfall. The plants and fish work together to control excessive algae blooms. The gravel unlike a smooth pond liner provide surface area for beneficial bacteria to break down organic waste on the pond floor.
 Handyman Jarell
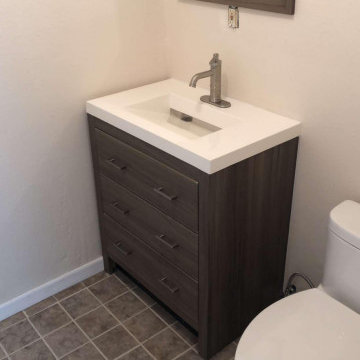
The client wanted a full bathroom remodel. The copper pipes were leaking behind the wall. I had change the copper to pex. Install new drywall, prime, paint, texture,
baseboard, tile, vanity, and toilet.
 Gappsi
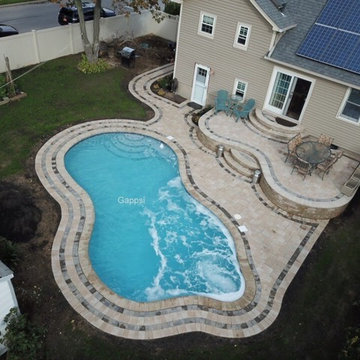
This 16’x32' freeform gunite swimming pool custom constructed in Massapequa NY. The pool shell consists of 10" concrete walls and an 8" concrete floor. The pool was shot with gunite cement, over 6" of over sized gravel base, 12 inches on center, 1/2” rebar metal cage and 6" apart center rods in any areas that the pool is deeper than 48”. All plumbing is done with 2" hard PVC schedule 40 piping. All of the equipment is Hayward including 400,000 BTU gas heater, a salt chlorine generator, ozone system, pumps, and cartridge filter. The pool is 46" to 66" deep which makes it a non-diving pool. In the deep end of the pool, there is a bench with special jets through which air and water are pushed at a higher speed to create a spa effect. Porcelain pool tiles were installed at the water line; the finish of the pool is cool blue diamond bright quartz. The steps and benches were highlighted with diamond shaped 2”x2” tiles. The coping patio and raised patio wall were created with Nicolock products. 6”x12" bullnose, ridge stone patio pavers with brown inlays and mini colonial walls and caps are all in travertine color. From design concept to finish execution Gappsi provides Nicolock pavers supply/installation, gunite swimming pools, and landscaping. For more information about design and installation in Massapequa NY, visit www.gappsi.com or call us at 631-543-1177 for a free estimate.
Video: https://www.youtube.com/watch?v=tQ_tYkMsYVg&t=5s

 Levite Construction Co
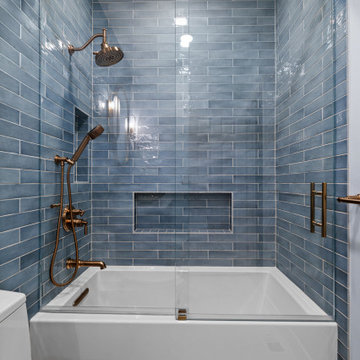
? New Project Alert from Levite Construction Co.! ?
? We're excited to unveil our latest creation - a uniquely designed guest bathroom in Sammamish. This project wasn't just about renovation, but about crafting an oasis of comfort and style.
✨ Highlight Features ✨
- Tub Installation: Our team skillfully executed a precise tub installation, blending functionality with an eye-catching design.
- Precision Plumbing: Every pipe and fitting was meticulously installed, setting the stage for the elegant and innovative features in this bathroom.
- Fountain Faucet: The vanity sink is graced with a beautiful fountain faucet, a blend of modern design and timeless elegance.
- Color Harmony: A serene light blue tile covers the walls, perfectly complementing the crisp white floor tiles. The custom-made colors for the faucets add an extra touch of personalization.
- Custom Glass Shower Doors: Tailored to perfection, these doors add both beauty and practicality to the space.
- Innovative Lighting: We installed lights over a tiled wall, a design choice that elevates the ambiance of the bathroom.
? Levite's Touch ?
This project is a showcase of Levite Construction Co.’s dedication to detailed planning and creative design. From the rough phase to the final touches, every step was taken with precision and care.
? Kudos to Our Team ?
A huge shoutout to our design team, whose vision and expertise made this beautiful guest bathroom possible. Their impressive work is a testament to our commitment to excellence.
Book us now!
? (425) 998-8958 ? info@leviteconstruction.com
#LeviteConstruction #BathroomRemodel #SammamishHomes #LuxuryDesign #ModernBathroom #HomeRenovation #DesignExcellence #GuestBathroomTransformation #seattlehomedesign #remodelingbathroom #homerenovationspecialist #remodelingproject #residentialrenovation #seattlehome #housebuilder #bathroomdesigner #houseremodeling #seattlehomes #bathroomrenovations #bathroomremodeling #bathroomdesigns #bathroominterior #bathroomreno #homeremodeling #homeimprovements #bathroomremodel #homerenovation
35