
Search results for "Pipework" in Home Design Ideas
 Inspired Interiors
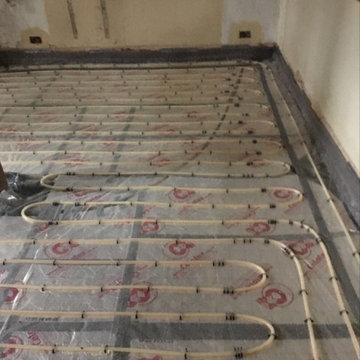
Over 400 years old, this Grade II listed thatched Cottage sprang a series of serious, under-floor leaks on the ground level – the result of poor under-floor heating pipework. All the central living area rooms were affected, making the cottage decidedly soggy and uninhabitable until fully repaired and restored.
New floor insulation and under floor heating.
 Inspired Interiors
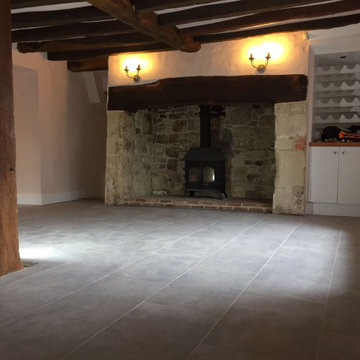
Over 400 years old, this Grade II listed thatched Cottage sprang a series of serious, under-floor leaks on the ground level – the result of poor under-floor heating pipework. All the central living area rooms were affected, making the cottage decidedly soggy and uninhabitable until fully repaired and restored.
Flooring and decorations complete. New Alcove wine rack and cupboard.

 H2O Kitchen & Bath Raleigh
Just what we've been waiting for...a designer to step beyond the rustic chic and just embrace vintage. Using classic black & white, Triangle area designer, Kate Nisbet, designed the floor as a focal point gracefully grounding the space. The wide horizontal paneling comfortably draws the eye upwards while adding a coziness and warmth to the space. This lav console with metal legs, keeps the floor open and uncluttered. Brilliant, beautiful, classic.
Find the right local pro for your project
 Verity & Beverley Ltd
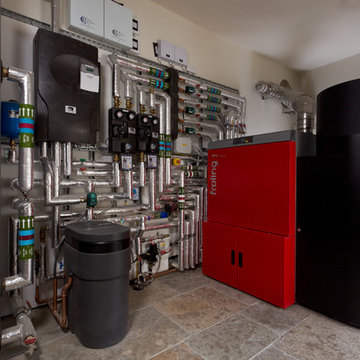
Refurbishment and extension to a Grade II Listed house in the Cotswolds. The extension to the rear benefits from a roof lantern and glazed doors to ensure plenty of natural light is brought into the newly-created open-plan kitchen living area. The project also included works to an adjacent barn, including the installation of solar slates to provide electricity. Other renewable technologies used in the property include a pellet boiler for heating and hot water.
 Matthew Bray Interiors
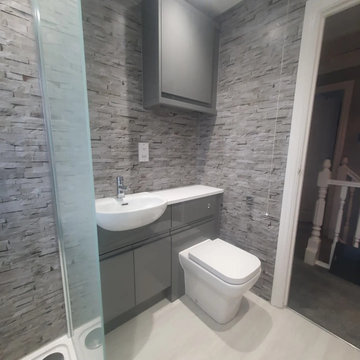
Our client asked for a contemporary fitted bathroom on a budget. The existing bath was removed and replaced with a shower tray fitted at floor level, and pipework that was once poorly boxed in behind the basin and EC is not hidden behind fitted grey gloss cabinets. Doors and handle-less Jayline design, all soft close.
Services Provided:
● Design & production of 3D visuals
● Removal and disposal of old bathroom, suite and flooring
● Manufacture and install of fitted cabinets and worktop
● Supply & fit of shower tray, basin, WC
● Supply & laying of LVT flooring with acoustic underlay
● Supply & installation of grey slate effect PVC wall panelling
● Supply & installation of glass screen
● Supply & installation of 4x LED downlights
 DIY Chelmsford
Looking for reliable Plumbing Supplies in Chelmsford? We provide a comprehensive range of premium plumbing products for homeowners, professional plumbers, builders, and contractors. Our collection includes pipework, fittings, valves, taps, radiators, boilers, water tanks, heating controls, pumps, and all essential accessories, providing plumbers, heating engineers and contractors with everything needed for residential, commercial and refurbishment projects. Check at https://www.chandlermaterials.co.uk/plumbing-heating Our commitment to quality means you receive durable products from trusted manufacturers at competitive prices. With excellent customer service, dependable stock availability, and fast local service, we make sourcing plumbing materials simple and hassle-free. Choose us for plumbing supplies that deliver long-lasting performance and outstanding value. Visit us https://www.chandlermaterials.co.uk/ today and discover why customers across Chelmsford trust us for all their plumbing supply needs.

 Tile Doctor Ltd
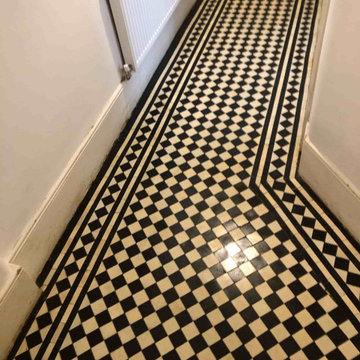
This property was in theLadbroke Grove area of West London near Kensington. The client had found an old and probably original black and white checkered pattern Victorian tiled floor under their cork tiled flooring. They also reported that it was badly damaged so I thought it would be best if I paid them a visit first to see how extensive the damage was and whether it was repairable. The floor was in a quite a state, the tiles were covered in glue from the cork and had several areas had been back filled with cement.
I reassured them that the damage could be rectified, and that it would be possible to completely restore the floor back to a good standard. I would have to remove the glue, remove the cement that had been used to level the floor and replace with reclaimed tiles to match. They were relieved to find out it could be done and happy with my quote I was instructed to go ahead with the work.
We started by taping up the skirting boards to protect the woodwork. With this done attention was turned to the glue which was softened using a strong dilution of Tile Doctor Remove and Go so it could be carefully scraped off. Multiple techniques and tools were needed to remove the glue including hand-held scrappers and a black pad fitted to a buffing machine. For the stubborn areas steam was applied to help lift the adhesive out the tile.
Once all the glue was removed the floor was rinsed and the alkaline cleaner neutralised with Tile Doctor Grout Clean Up which further cleaned the tiles and removed old traces of grout from the floor. Old floors like this generally don’t have a damp proof membrane underneath so the acids in the Grout Clean-up also counter any efflorescent salts trapped in the tile.
Once this was completed the slurry was removed with a wet vacuum and left to fully dry out overnight.
The following day focus turned to repairing the areas of the floor where the tiles were missing or broken. The main issue being the cemented areas, we see this a lot with Victorian Hallways and generally what happens is a heating engineer digs out the floor to install pipework. Not being tilers, your average plumber then repairs the floor with a self-levelling cement that brings the level up to the surface of the tile so it can be covered with lino, carpet of in this case cork.
The sub floor was then rebuilt with rapid setting self-levelling compound but this time to below the level of the tile.
Once the new base was dry it was a just a question of re-tiling with the replacement tiles to match the original checkered pattern. The replacement reproduction tiles were sourced from Original Features in Crouch End North London. After grouting we left the floor to dry out over the weekend.
When we returned to seal the floor our first step was to check the floor was dry using a moisture meter. This is critical as the sealant will not cure correctly if there is too much moisture in the floor. In this case the extra two days we had allowed had done its job and the test had confirmed it was ready to accept a sealer.
The client wanted the floor finish not to be too shiny once sealed so we opted to seal with two coats of Tile Doctor Seal and Go Extra. This is good choice for old Victorian floors such as this example as it’s special acrylic-based formula allows for moisture vapour transmission which as mentioned previously is a concern where no damp proof membrane has been installed.
I’m please to confirm my clients were delighted with the result, as you can see from the pictures the black and white floor restoration makes for a dramatic entrance well in keeping with the style of the property. For aftercare I recommended the use of Tile Doctor Neutral Tile Cleaner which will keep the tiles in good condition going forward without damaging the new sealer.
Jackson Davis
Central London Tile Doctor
 Tile Doctor Ltd
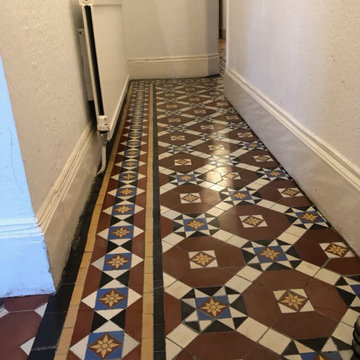
We received a request to renovate Victorian tiled hallway floor at a house in the London borough of Harlesden NW10. My client had modernised the heating system and this unfortunately required a section of the tiled flooring to be dug up so new pipework could be laid.
After speaking on the phone, I arranged an initial visit to the property so I could properly assess the work required and provide a price for restoring the floor. During my visit I could see there was another section of missing tiles at one of the door thresholds which would need attention. Except for the missing sections of floor I could see that the tiles themselves were in good condition for their age and would respond well to a deep clean and fresh seal.
I was confident on being able to source matching replacements for the missing tiles and reassured my client that we would be able not only repair the floor but also renovate it to a good standard. I gave them a price to do the restoration which they were happy to accept, and the work was booked.
After some research I managed to source replacement tiles from the Vintage Floor Tile Company in Kent; Victorian tiles are still popular so there a few companies that keep stock so we can usually find a match.
With the replacements in hand, work started by removing the cement and loose material from the missing sections of flooring and backfilling with self-levelling compound to bring the exposed base up to the right level for tiling.
The tiles were then cut to shape as required to match the existing patten and fixed into place with a quick setting adhesive and then grouted.
The floor was left to overnight to allow the adhesive to harden fully, and I returned the next day to deep clean the whole floor. To give the tiles are deep clean a strong dilution of Tile Doctor Remove and Go was sprayed onto the floor and left to soak in for ten minutes. It was then scrubbed into the floor using a rotary machine fitted with a with a black pad. This action lifted the dirt out of the tiles and the resulting slurry was removed with the wet vacuum.
It turned out that the pores of the tiles were holding a lot of dirt, so the process was repeated until I was satisfied. Due to the age of the property, there was no damp-proof membrane installed so I do try to minimise the amount of water I use in this process as there is always a chance of exacerbating any latent efflorescence issues.
Efflorescence occurs where moisture rises through the tile bringing with it salts from underneath the floor as it evaporates on the surface. This can lead to unsightly white marks appearing on the tile. To counteract this potential problem the cleaning was followed by an acid wash using Tile Doctor Acid Gel applied with a 100 then 200-grit pad, before finishing on a 400-grit burnishing pad. The floor was again rinsed with water after the application of each pad to remove the slurry and extracted with a wet vacuum.
Once I was satisfied the floor was as clean as possible, we left site and the area was left to dry over the weekend ready for application of a new sealer.
I returned on the Monday and started by taking a few moisture readings to check the floor was dry. The floor was in an acceptable range, so I applied the first of 4 coats of sealer. For this floor I chose Tile Doctor Seal and Go Extra which is specially formulated product that provides stain resistance with a hard wearing low-sheen finish.
This product is also breathable which is an important feature for old floors, anything that blocks moisture from rising through the tile will cause it to become trapped underneath where it will pool and eventually reach out to the walls and result in rising damp.
Once complete the floor looked brand new and I’m pleased to say with the deep clean and a fresh sealer applied it was impossible to tell the difference between the original and repaired sections of flooring.
For the aftercare of sealed Victorian tiled floors, I recommend Tile Doctor Neutral Cleaner, it’s a mild day to day cleaner with a neutral pH that won’t damage the sealer. Many of the tile cleaning products you find in supermarkets are simply too strong.
Andrew Newstead
North London Tile Doctor
3