
Search results for "Preventing common" in Home Design Ideas
 Free Lancing
Effective residential construction project management is crucial in today’s fast-moving building industry. It means overseeing every step of building a home, from planning to finishing, to ensure projects are completed time, within budget, and with high quality. Unlike commercial projects, residential projects require special attention to meet homeowners' unique needs and wishes, requiring a customized approach from the beginning to the end.
In 2025, the construction sector will use advanced technologies like AI and integrated project delivery (IPD) to streamline processes and improve stakeholder collaboration. However, project managers face significant challenges, including managing risks, maintaining quality control, and ensuring effective communication among team members.
A WIP Report (Work-in-Progress Report) is a key tool that helps track a project's budget, progress, and resource use. It provides clear insights, making managing costs easier, avoiding delays, and making informed decisions.
By adopting best practices and using modern construction management tools, project managers can overcome these challenges and deliver successful residential construction projects that meet client expectations and contribute to a sustainable future.
This article provides a brief overview of residential construction project management, highlights its importance, and touches on the challenges faced by project managers while incorporating the latest trends and technologies in the field.
Types of Residential Construction Management
Here are the different types of Residential Construction Management:
Single-Family Homes: These are standalone houses built for individual families. Managing these projects involves overseeing construction from planning to completion, ensuring that the home meets the owner's preferences and budget.
Multi-Family Housing: This includes apartments, condominiums, and townhouses. Projects of this type require managing multiple units, often with shared facilities, and ensuring compliance with local building codes.
Custom Home Building: This involves constructing homes tailored to specific client needs. Close collaboration with architects and designers is required to ensure the house reflects the owner's personality and preferences.
Home Renovation and Remodeling: These projects focus on updating or expanding existing homes. They often involve working with subcontractors for specialized tasks like electrical or plumbing work.
Components of Residential Construction Project Management
Managing a residential construction project requires carefully coordinating people, materials, and timelines. A well-structured approach ensures efficiency, cost control, and high-quality results.
Roles and Responsibilities
A project manager plays a vital role in residential construction. They oversee every step from planning to completion and ensure the project stays on schedule, within budget, and meets quality standards.
Project Manager’s Role in Home Construction
The project manager is responsible for organizing tasks, managing resources, and solving problems that arise during construction. They coordinate between different teams, track progress, and ensure safety regulations are followed.
Collaboration with Contractors, Architects, and Stakeholders
Successful residential construction requires teamwork. Project managers work closely with architects to bring designs to new heights, coordinate with contractors to manage labor and materials, and keep stakeholders (such as homeowners and investors) informed about project updates.
Client Communication and Expectations Management
Clear communication with clients is essential. The project manager keeps homeowners updated on timelines, changes, and challenges. Setting realistic expectations and providing regular updates, they help avoid misunderstandings and keep the project running smoothly.
Project Scope & Planning
Practical project planning sets the foundation for a successful residential construction project. It ensures clear goals, minimizes risks, and keeps the project on track.
Defining Project Objectives and Deliverables:
Clearly outlining what needs to be done and what the final result should look like is essential. This involves setting specific, measurable goals that align with the homeowner's vision and budget.
Managing Homeowner Expectations and Scope Creep:
Homeowners often have changing needs or ideas. Effective project managers must manage these expectations to prevent "scope creep," which can delay projects and increase costs. This involves open communication and setting clear boundaries.
Ensuring Compliance with Zoning Laws and Permits:
Before construction begins, it's crucial to ensure that all necessary permits are obtained and that the project complies with local zoning laws. This step avoids costly fines and delays, ensuring the project moves forward smoothly.
Budgeting & Cost Control
Proper budgeting is essential for keeping residential construction projects financially viable. Effective cost management prevents overspending and ensures profitability.
Accurate Cost Estimation for Residential Projects
A precise cost estimate considers labor, materials, permits, and unexpected expenses. Using historical data and Sage 300 CRE for financial management improves accuracy and helps set realistic budgets.
Budget Allocation and Tracking
Allocating funds efficiently ensures that each phase of the project receives the necessary resources. Tracking expenses through Construction & Financial Dashboards allows for real-time monitoring and early detection of budget deviations.
Preventing Budget Overruns
Uncontrolled costs can derail a project. Regular financial reviews, automated alerts for overspending, and contingency planning help keep expenses in check and prevent financial strain.
Scheduling & Timeline Management
Timely project completion is crucial in residential construction. Effective scheduling minimizes delays and ensures a smooth workflow.
Creating Detailed Project Schedules
A structured schedule outlines all tasks, deadlines, and dependencies. Breaking down the project into phases, planning, execution, and finishing, helps maintain order and clarity.
Preventing Delays & Meeting Deadlines
Delays can result from labor shortages, weather conditions, or supply chain issues. To avoid problems, it’s good to check for risks ahead of time, add extra time to schedules, and keep everyone on the same page.
Using Gantt Charts and Critical Path Methods
CPM for Construction helps identify critical activities that directly impact project completion, while Gantt charts provide a visual timeline of tasks. Both tools optimize scheduling and improve efficiency.
Residential Construction Project Management Phases
Managing a residential construction project effectively requires a structured approach through various phases. Each phase plays a critical role in ensuring the project's success, from initial planning to completion.
Pre-Construction Phase
The pre-construction phase sets the foundation for a smooth and efficient building process. Proper planning at this stage helps prevent costly changes and delays later.
Site Analysis & Approvals: A thorough site analysis assesses soil conditions, topography, and environmental factors. Feasibility studies evaluate project viability, including costs and regulatory compliance. Obtaining zoning approvals, permits, and other legal clearances is crucial before breaking ground.
Selecting Materials and Procurement Strategies: Choosing the right materials impacts durability, sustainability, and cost efficiency. A well-planned procurement strategy, including bulk purchasing and reliable supplier partnerships, ensures timely delivery and cost savings. Using Sage 300 CRE for procurement management helps streamline material sourcing and financial planning.
Construction Phase
The construction phase transforms plans into reality. Effective coordination and strict quality control ensure a successful build.
Resource Allocation and Workflow Coordination: Efficiently managing labor, equipment, and materials is key to maintaining progress. Using CPM for Construction, project managers can allocate resources strategically, prevent bottlenecks, and optimize workflows for timely completion.
Quality Control and Ensuring Compliance with Safety Regulations: Strict adherence to building codes and safety standards is non-negotiable. Regular inspections, worker training, and real-time quality monitoring ensure a structurally sound and legally compliant project. Proactive safety measures prevent accidents and project disruptions.
Project Closeout & Handover
The final phase of residential construction project management is crucial for ensuring a smooth transition from construction to occupancy. Proper closeout procedures guarantee quality, client satisfaction, and long-term project success.
Final Inspections and Quality Assurance: Before finishing the project, a final inspection checks that everything meets safety rules and quality standards. Any problems need to be fixed quickly. Using Procore helps make inspections and tracking issues easier, ensuring a high-quality final product.
Client Walkthrough and Support: A final check helps homeowners see the finished work, ask questions, and make sure it meets their expectations. This is also a chance to explain important home features and maintenance tips. Good communication here builds trust and strengthens relationships.
Warranty Management and Feedback: Efficient warranty management ensures clients get quick help for any issues after construction. A clear process for tracking requests and keeping in touch with homeowners boosts satisfaction. Collecting feedback helps improve future projects. Using S-Curve Forecasting tracks performance trends and refines management strategies.
Software for Residential Construction Project Management
The integration of technology in residential construction project management has revolutionized the way projects are planned, executed, and monitored. Digital tools streamline operations, reduce costs, and improve communication, making them essential for modern construction firms.
Importance of Digital Tools
Investing in digital tools is crucial for construction firms as it transforms the industry by enhancing efficiency, accuracy, and collaboration across the entire project lifecycle. They also improve project management by streamlining processes, automating tasks, and facilitating real-time stakeholder communication.
Top Construction Management Software for Residential Projects
Several software solutions are available for managing residential construction projects:
Procore: Known for its comprehensive project management features, including document management and collaboration tools.
Sage 300 CRE: Offers robust accounting and financial management capabilities, ideal for large-scale construction projects.
Buildertrend: Specializes in residential construction, providing tools for project scheduling, budgeting, and client communication.
CoConstruct: Focuses on custom home building and remodeling, offering features for estimating, scheduling, and project management.
WIP Reports: Useful for tracking work-in-progress and managing project finances effectively.
Features Comparison and Best Use Cases:
Procore: Best for large projects requiring extensive collaboration and document management.
Sage 300 CRE: Ideal for firms needing robust financial management.
Buildertrend: Suitable for residential builders focusing on client communication and project scheduling.
CoConstruct: Perfect for custom home builders who need detailed estimating and scheduling tools.
WIP Reports: Useful for firms needing to track project finances closely.
How Software Improves Project Efficiency
Construction management software significantly enhances project efficiency in several ways:
Automating Accounting and Job Costing: Software like Sage 300 CRE automates financial tasks, reducing manual errors and improving budget tracking.
Streamlining Document Management and Communication: Tools like Procore centralize documents and facilitate real-time communication among team members, reducing misunderstandings and delays.
Mobile-Friendly Solutions for Real-Time Tracking: Mobile apps from platforms like Buildertrend allow for on-site access to project data, enabling real-time tracking and decision-making.
These digital tools and software solutions are essential for modern residential construction project management, offering benefits such as improved efficiency, enhanced collaboration, and better financial control.
Challenges in Residential Construction Project Management
Residential construction projects face a variety of challenges that can impact their success. Here are some of the key issues project managers encounter:
Managing Subcontractors and Labor Shortages
One of the biggest challenges in residential construction is managing subcontractors and dealing with labor shortages. Subcontractors often have their own schedules and priorities, which can lead to delays if not coordinated properly. Additionally, labor shortages can slow down projects and increase costs due to the need for overtime or hiring temporary workers.
Budget Overruns and Unexpected Costs
Budget overruns are common in residential construction due to factors like material price fluctuations, unexpected site conditions, or changes in project scope. Effective budget management involves regularly monitoring expenses and having contingency plans for unexpected costs.
Changing Construction and Eco Rules
Construction and Eco Rules are always changing, so project managers need to keep up with the latest regulations. This involves following guidelines for saving energy, protecting the environment, and ensuring safety. Ignoring these rules can lead to fines, delays, or even stopping the project.
Best Practices
To ensure your residential construction projects run smoothly and successfully, follow these essential best practices:
Setting Clear Project Goals and Milestones
Clearly defining what you want to achieve is the first step to success. Set specific, measurable, achievable, relevant, and time-bound (SMART) goals. This helps everyone involved understand what needs to be done and by when. For example, instead of saying "build a house," say "build a house with three bedrooms and two bathrooms within the next nine months."
Stakeholder Collaboration
Good communication is key to keeping everyone on the same page. Regular meetings with contractors, suppliers, and homeowners help prevent misunderstandings and ensure that everyone knows what's happening and what's next. This open dialogue also helps resolve issues quickly, preventing small problems from becoming big delays.
Using Data-Driven Insights for Decision-Making
Making decisions based on facts rather than guesses is crucial. Use data and analytics to understand project progress, identify potential issues early, and make informed decisions. For instance, if data shows that a particular material is consistently causing delays, you can plan ahead to avoid those delays in the future.
Proactive Risk Management Strategies
Things don't always go as planned, so being prepared is essential. Identify potential risks early and have a plan to manage them. This might include having backup suppliers, planning for weather conditions, or setting aside extra funds for unexpected expenses. Being proactive can prevent small issues from turning into major problems.
Conclusion
Effective residential construction project management requires careful planning, clear communication, and the right digital tools. From single-family homes to multi-family housing and custom projects, managing timelines, budgets, and quality is essential for success.
By following best practices, using project management software, and staying ahead of industry trends, project managers can ensure smooth execution and client satisfaction despite challenges like labor shortages, budget overruns, and regulatory compliance; modern technology and strategic planning help mitigate risks.
Construction firms can improve efficiency, enhance collaboration, and maintain financial control by adopting advanced tools like Procore, Sage 300 CRE, and Buildertrend. A well-managed project delivers a quality home and builds trust and long-term success in the industry.
FAQs
What is residential construction project management?
It involves overseeing all aspects of building residential properties, from initial planning and design to construction and completion, ensuring projects are completed on time, within budget, and to the desired quality standards.
How can I prevent budget overruns in my construction project?
Accurate cost estimation, continuous budget tracking, and having contingency plans for unexpected expenses are key strategies to prevent budget overruns.
What are the main stages of a residential construction project?
The primary stages include design, pre-construction, procurement, and construction.
How does construction management software improve project efficiency?
It streamlines processes like scheduling, budgeting, and communication, providing real-time data access and collaboration among stakeholders, which enhances overall project efficiency.
How can I ensure my project complies with local building codes and regulations?
Engage professionals familiar with local laws, obtain all necessary permits before starting, and conduct regular inspections to ensure adherence to building codes and regulations.

 Gappsi
Mesh covers are the most common way to safeguard your pool during the winter. A winter cover has to be strong and made of good quality material. There are many manufactures of pool liners and mesh safety covers, and mesh covers can be ordered according to the initial pool liner measurements.
Gappsi can supply and install a mesh pool cover, we are authorized dealers and installers for every brand, from Loop-Loc, Merlin, Lathem, Vynall and many other others.
Manufactures make many grades of covers, the better the grade the more expensive to cover is. Tight thin mesh and strong fibers used to manufacture the covers will give your pool cover the quality to last for many years.
Swimming pool winter covers installed by Gappsi will give you all the protection, security, and safety you need for your family, pets, and neighbors. Winter pool covers are manufactured to let the water from the rain drain through. Also, it allows you to put your pump in the middle of the cover and allow the extra water in the pool to come through and get pumped out. Winter covers are manufactured in all mesh or solid rubber with a 24x24 mesh hole in the center to let water drain into the pool. Anchors are installed in the patio about 36 inches away from the swimming pool. The way they are installed is by drilling a hole in the patio, brass anchors are slid through, and the cover is then attached to the anchors. If the patio is not installed correctly, the cover may become loose and it will not be as safe as it should be.
The Gappsi way of installation starts with the proper installation of the patio. Four foot wide slabs with reinforced rebar are always installed around the swimming pool to prevent settling of the patio, then the finished paving material is installed over the concrete base. The Gappsi installation of the safety pool cover is then installed over the patio by drilling holes straight through the finished paving material all the way down into the concrete base. A sleeve is installed into the hole about 6 inches into the patio going through the 4 inches of concrete base and further in the ground, and a brass screw pin is then installed into the pipe. By unscrewing the brass screw pin; it comes up above the patio and allows for the cover ring hooks to attach to the brass screw. After this is all done for every strap of the cover, your Gappsi installed pool cover is safe to walk on with no chance of breaking.
 Mi Tile Installation Experts
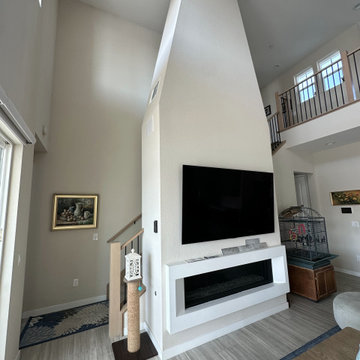
360° Fireplace Installation — Precision From Every Angle ?
Location: Bethel Island, CA
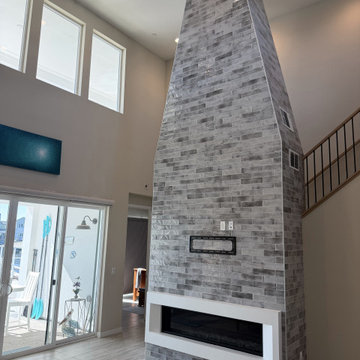
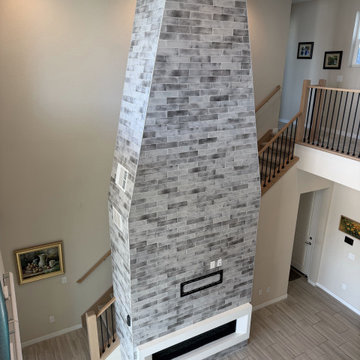
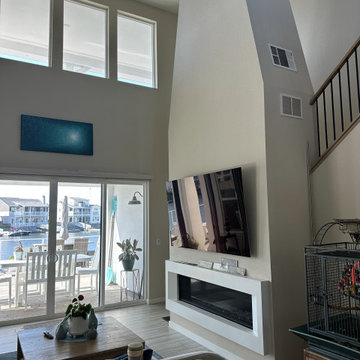
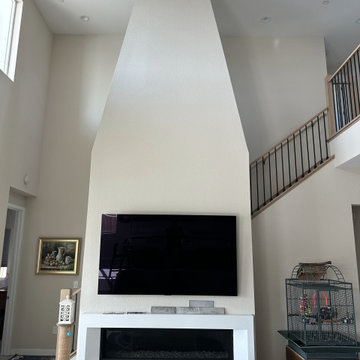
After completing a monumental 20-foot fireplace in this exclusive island community, another homeowner reached out to Mi Tile Installation Experts for an even more ambitious challenge — a four-sided fireplace with perfect symmetry and alignment from every angle.
This project required absolute precision — every corner, joint, and plane had to meet flawlessly across 360 degrees.
✨ Project Highlights:
? Custom geometric design for a striking centerpiece in the living area
? Tiling wrapped seamlessly around all four sides of the fireplace
? Floors fully protected with durable cardboard to prevent damage during setup and ladder work
? Perfect wall leveling before installation — ensuring clean lines and seamless joints
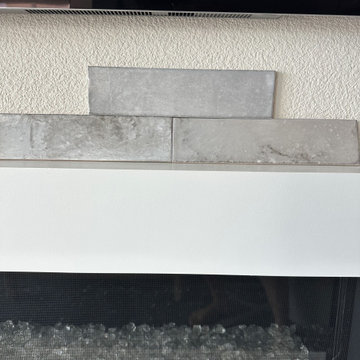
? High-grade stone-look tile for an elegant and timeless finish
The result: a fireplace that became the true focal point of the home — better than the design render itself — and a statement piece that leaves every guest speechless.
? Mikhailbelov37@gmail.com
? https://micatile.info
?️ Free Remodel Audit
Want to avoid hidden issues, costly delays, and budget surprises?
Comment “AUDIT” and we’ll provide a free expert review of your remodel — whether you’re just starting, already in progress, or recently completed.
We’ll help you:
✔️ Plan your project efficiently
✔️ Know what to expect
✔️ Identify common contractor shortcuts
✔️ Protect your investment from day one
? Exclusive Client Benefits
✨ Bonus Program — earn up to 15% back in bonus points to use toward your next project or gift to family/friends.
✨ Referral Program — get 10% cash back from every direct referral project, plus 3% from their referrals.
✨ Returning Client Discount — receive 10% off per sq ft on your second project.
Want full details? Comment BONUS and we’ll send you the complete guide.
#fireplacedesign #customtile #stonelooktile #luxuryremodel #mitileinstallationexperts #miauditmyremodel #bethelisland #oceanviewhome #homerenovation #contractor #precisioncraftsmanship #tiling #interiordesign #modernfireplace #beforeandafter #luxuryhomes #tileinstallation #tileinstallationexperts #tileexperts
Find the right local pro for your project
 Gappsi
Mesh covers are the most common way to safeguard your pool during the winter. A winter cover has to be strong and made of good quality material. There are many manufactures of pool liners and mesh safety covers, and mesh covers can be ordered according to the initial pool liner measurements.
Gappsi can supply and install a mesh pool cover, we are authorized dealers and installers for every brand, from Loop-Loc, Merlin, Lathem, Vynall and many other others.
Manufactures make many grades of covers, the better the grade the more expensive to cover is. Tight thin mesh and strong fibers used to manufacture the covers will give your pool cover the quality to last for many years.
Swimming pool winter covers installed by Gappsi will give you all the protection, security, and safety you need for your family, pets, and neighbors. Winter pool covers are manufactured to let the water from the rain drain through. Also, it allows you to put your pump in the middle of the cover and allow the extra water in the pool to come through and get pumped out. Winter covers are manufactured in all mesh or solid rubber with a 24x24 mesh hole in the center to let water drain into the pool. Anchors are installed in the patio about 36 inches away from the swimming pool. The way they are installed is by drilling a hole in the patio, brass anchors are slid through, and the cover is then attached to the anchors. If the patio is not installed correctly, the cover may become loose and it will not be as safe as it should be.
The Gappsi way of installation starts with the proper installation of the patio. Four foot wide slabs with reinforced rebar are always installed around the swimming pool to prevent settling of the patio, then the finished paving material is installed over the concrete base. The Gappsi installation of the safety pool cover is then installed over the patio by drilling holes straight through the finished paving material all the way down into the concrete base. A sleeve is installed into the hole about 6 inches into the patio going through the 4 inches of concrete base and further in the ground, and a brass screw pin is then installed into the pipe. By unscrewing the brass screw pin; it comes up above the patio and allows for the cover ring hooks to attach to the brass screw. After this is all done for every strap of the cover, your Gappsi installed pool cover is safe to walk on with no chance of breaking.
 Gappsi
Mesh covers are the most common way to safeguard your pool during the winter. A winter cover has to be strong and made of good quality material. There are many manufactures of pool liners and mesh safety covers, and mesh covers can be ordered according to the initial pool liner measurements.
Gappsi can supply and install a mesh pool cover, we are authorized dealers and installers for every brand, from Loop-Loc, Merlin, Lathem, Vynall and many other others.
Manufactures make many grades of covers, the better the grade the more expensive to cover is. Tight thin mesh and strong fibers used to manufacture the covers will give your pool cover the quality to last for many years.
Swimming pool winter covers installed by Gappsi will give you all the protection, security, and safety you need for your family, pets, and neighbors. Winter pool covers are manufactured to let the water from the rain drain through. Also, it allows you to put your pump in the middle of the cover and allow the extra water in the pool to come through and get pumped out. Winter covers are manufactured in all mesh or solid rubber with a 24x24 mesh hole in the center to let water drain into the pool. Anchors are installed in the patio about 36 inches away from the swimming pool. The way they are installed is by drilling a hole in the patio, brass anchors are slid through, and the cover is then attached to the anchors. If the patio is not installed correctly, the cover may become loose and it will not be as safe as it should be.
The Gappsi way of installation starts with the proper installation of the patio. Four foot wide slabs with reinforced rebar are always installed around the swimming pool to prevent settling of the patio, then the finished paving material is installed over the concrete base. The Gappsi installation of the safety pool cover is then installed over the patio by drilling holes straight through the finished paving material all the way down into the concrete base. A sleeve is installed into the hole about 6 inches into the patio going through the 4 inches of concrete base and further in the ground, and a brass screw pin is then installed into the pipe. By unscrewing the brass screw pin; it comes up above the patio and allows for the cover ring hooks to attach to the brass screw. After this is all done for every strap of the cover, your Gappsi installed pool cover is safe to walk on with no chance of breaking.
 Gappsi
Mesh covers are the most common way to safeguard your pool during the winter. A winter cover has to be strong and made of good quality material. There are many manufactures of pool liners and mesh safety covers, and mesh covers can be ordered according to the initial pool liner measurements.
Gappsi can supply and install a mesh pool cover, we are authorized dealers and installers for every brand, from Loop-Loc, Merlin, Lathem, Vynall and many other others.
Manufactures make many grades of covers, the better the grade the more expensive to cover is. Tight thin mesh and strong fibers used to manufacture the covers will give your pool cover the quality to last for many years.
Swimming pool winter covers installed by Gappsi will give you all the protection, security, and safety you need for your family, pets, and neighbors. Winter pool covers are manufactured to let the water from the rain drain through. Also, it allows you to put your pump in the middle of the cover and allow the extra water in the pool to come through and get pumped out. Winter covers are manufactured in all mesh or solid rubber with a 24x24 mesh hole in the center to let water drain into the pool. Anchors are installed in the patio about 36 inches away from the swimming pool. The way they are installed is by drilling a hole in the patio, brass anchors are slid through, and the cover is then attached to the anchors. If the patio is not installed correctly, the cover may become loose and it will not be as safe as it should be.
The Gappsi way of installation starts with the proper installation of the patio. Four foot wide slabs with reinforced rebar are always installed around the swimming pool to prevent settling of the patio, then the finished paving material is installed over the concrete base. The Gappsi installation of the safety pool cover is then installed over the patio by drilling holes straight through the finished paving material all the way down into the concrete base. A sleeve is installed into the hole about 6 inches into the patio going through the 4 inches of concrete base and further in the ground, and a brass screw pin is then installed into the pipe. By unscrewing the brass screw pin; it comes up above the patio and allows for the cover ring hooks to attach to the brass screw. After this is all done for every strap of the cover, your Gappsi installed pool cover is safe to walk on with no chance of breaking.
 Mi Tile Installation Experts
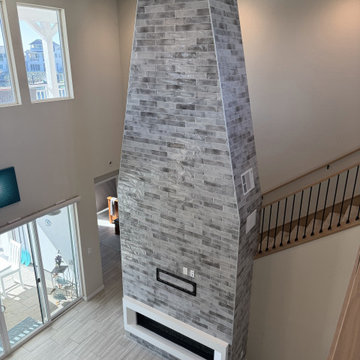
360° Fireplace Installation — Precision From Every Angle ?
Location: Bethel Island, CA
After completing a monumental 20-foot fireplace in this exclusive island community, another homeowner reached out to Mi Tile Installation Experts for an even more ambitious challenge — a four-sided fireplace with perfect symmetry and alignment from every angle.
This project required absolute precision — every corner, joint, and plane had to meet flawlessly across 360 degrees.
✨ Project Highlights:
? Custom geometric design for a striking centerpiece in the living area
? Tiling wrapped seamlessly around all four sides of the fireplace
? Floors fully protected with durable cardboard to prevent damage during setup and ladder work
? Perfect wall leveling before installation — ensuring clean lines and seamless joints
? High-grade stone-look tile for an elegant and timeless finish
The result: a fireplace that became the true focal point of the home — better than the design render itself — and a statement piece that leaves every guest speechless.
? Mikhailbelov37@gmail.com
? https://micatile.info
?️ Free Remodel Audit
Want to avoid hidden issues, costly delays, and budget surprises?
Comment “AUDIT” and we’ll provide a free expert review of your remodel — whether you’re just starting, already in progress, or recently completed.
We’ll help you:
✔️ Plan your project efficiently
✔️ Know what to expect
✔️ Identify common contractor shortcuts
✔️ Protect your investment from day one
? Exclusive Client Benefits
✨ Bonus Program — earn up to 15% back in bonus points to use toward your next project or gift to family/friends.
✨ Referral Program — get 10% cash back from every direct referral project, plus 3% from their referrals.
✨ Returning Client Discount — receive 10% off per sq ft on your second project.
Want full details? Comment BONUS and we’ll send you the complete guide.
#fireplacedesign #customtile #stonelooktile #luxuryremodel #mitileinstallationexperts #miauditmyremodel #bethelisland #oceanviewhome #homerenovation #contractor #precisioncraftsmanship #tiling #interiordesign #modernfireplace #beforeandafter #luxuryhomes #tileinstallation #tileinstallationexperts #tileexperts
Sponsored
Plain City, OH

The Creative Kitchen Company
Columbus Area Kitchen Remodeling and Refacing Professional
 Mi Tile Installation Experts
360° Fireplace Installation — Precision From Every Angle ?
Location: Bethel Island, CA
After completing a monumental 20-foot fireplace in this exclusive island community, another homeowner reached out to Mi Tile Installation Experts for an even more ambitious challenge — a four-sided fireplace with perfect symmetry and alignment from every angle.
This project required absolute precision — every corner, joint, and plane had to meet flawlessly across 360 degrees.
✨ Project Highlights:
? Custom geometric design for a striking centerpiece in the living area
? Tiling wrapped seamlessly around all four sides of the fireplace
? Floors fully protected with durable cardboard to prevent damage during setup and ladder work
? Perfect wall leveling before installation — ensuring clean lines and seamless joints
? High-grade stone-look tile for an elegant and timeless finish
The result: a fireplace that became the true focal point of the home — better than the design render itself — and a statement piece that leaves every guest speechless.
? Mikhailbelov37@gmail.com
? https://micatile.info
?️ Free Remodel Audit
Want to avoid hidden issues, costly delays, and budget surprises?
Comment “AUDIT” and we’ll provide a free expert review of your remodel — whether you’re just starting, already in progress, or recently completed.
We’ll help you:
✔️ Plan your project efficiently
✔️ Know what to expect
✔️ Identify common contractor shortcuts
✔️ Protect your investment from day one
? Exclusive Client Benefits
✨ Bonus Program — earn up to 15% back in bonus points to use toward your next project or gift to family/friends.
✨ Referral Program — get 10% cash back from every direct referral project, plus 3% from their referrals.
✨ Returning Client Discount — receive 10% off per sq ft on your second project.
Want full details? Comment BONUS and we’ll send you the complete guide.
#fireplacedesign #customtile #stonelooktile #luxuryremodel #mitileinstallationexperts #miauditmyremodel #bethelisland #oceanviewhome #homerenovation #contractor #precisioncraftsmanship #tiling #interiordesign #modernfireplace #beforeandafter #luxuryhomes #tileinstallation #tileinstallationexperts #tileexperts
 Mi Tile Installation Experts
360° Fireplace Installation — Precision From Every Angle ?
Location: Bethel Island, CA
After completing a monumental 20-foot fireplace in this exclusive island community, another homeowner reached out to Mi Tile Installation Experts for an even more ambitious challenge — a four-sided fireplace with perfect symmetry and alignment from every angle.
This project required absolute precision — every corner, joint, and plane had to meet flawlessly across 360 degrees.
✨ Project Highlights:
? Custom geometric design for a striking centerpiece in the living area
? Tiling wrapped seamlessly around all four sides of the fireplace
? Floors fully protected with durable cardboard to prevent damage during setup and ladder work
? Perfect wall leveling before installation — ensuring clean lines and seamless joints
? High-grade stone-look tile for an elegant and timeless finish
The result: a fireplace that became the true focal point of the home — better than the design render itself — and a statement piece that leaves every guest speechless.
? Mikhailbelov37@gmail.com
? https://micatile.info
?️ Free Remodel Audit
Want to avoid hidden issues, costly delays, and budget surprises?
Comment “AUDIT” and we’ll provide a free expert review of your remodel — whether you’re just starting, already in progress, or recently completed.
We’ll help you:
✔️ Plan your project efficiently
✔️ Know what to expect
✔️ Identify common contractor shortcuts
✔️ Protect your investment from day one
? Exclusive Client Benefits
✨ Bonus Program — earn up to 15% back in bonus points to use toward your next project or gift to family/friends.
✨ Referral Program — get 10% cash back from every direct referral project, plus 3% from their referrals.
✨ Returning Client Discount — receive 10% off per sq ft on your second project.
Want full details? Comment BONUS and we’ll send you the complete guide.
#fireplacedesign #customtile #stonelooktile #luxuryremodel #mitileinstallationexperts #miauditmyremodel #bethelisland #oceanviewhome #homerenovation #contractor #precisioncraftsmanship #tiling #interiordesign #modernfireplace #beforeandafter #luxuryhomes #tileinstallation #tileinstallationexperts #tileexperts
 Mi Tile Installation Experts
360° Fireplace Installation — Precision From Every Angle ?
Location: Bethel Island, CA
After completing a monumental 20-foot fireplace in this exclusive island community, another homeowner reached out to Mi Tile Installation Experts for an even more ambitious challenge — a four-sided fireplace with perfect symmetry and alignment from every angle.
This project required absolute precision — every corner, joint, and plane had to meet flawlessly across 360 degrees.
✨ Project Highlights:
? Custom geometric design for a striking centerpiece in the living area
? Tiling wrapped seamlessly around all four sides of the fireplace
? Floors fully protected with durable cardboard to prevent damage during setup and ladder work
? Perfect wall leveling before installation — ensuring clean lines and seamless joints
? High-grade stone-look tile for an elegant and timeless finish
The result: a fireplace that became the true focal point of the home — better than the design render itself — and a statement piece that leaves every guest speechless.
? Mikhailbelov37@gmail.com
? https://micatile.info
?️ Free Remodel Audit
Want to avoid hidden issues, costly delays, and budget surprises?
Comment “AUDIT” and we’ll provide a free expert review of your remodel — whether you’re just starting, already in progress, or recently completed.
We’ll help you:
✔️ Plan your project efficiently
✔️ Know what to expect
✔️ Identify common contractor shortcuts
✔️ Protect your investment from day one
? Exclusive Client Benefits
✨ Bonus Program — earn up to 15% back in bonus points to use toward your next project or gift to family/friends.
✨ Referral Program — get 10% cash back from every direct referral project, plus 3% from their referrals.
✨ Returning Client Discount — receive 10% off per sq ft on your second project.
Want full details? Comment BONUS and we’ll send you the complete guide.
#fireplacedesign #customtile #stonelooktile #luxuryremodel #mitileinstallationexperts #miauditmyremodel #bethelisland #oceanviewhome #homerenovation #contractor #precisioncraftsmanship #tiling #interiordesign #modernfireplace #beforeandafter #luxuryhomes #tileinstallation #tileinstallationexperts #tileexperts
 Mi Tile Installation Experts
360° Fireplace Installation — Precision From Every Angle ?
Location: Bethel Island, CA
After completing a monumental 20-foot fireplace in this exclusive island community, another homeowner reached out to Mi Tile Installation Experts for an even more ambitious challenge — a four-sided fireplace with perfect symmetry and alignment from every angle.
This project required absolute precision — every corner, joint, and plane had to meet flawlessly across 360 degrees.
✨ Project Highlights:
? Custom geometric design for a striking centerpiece in the living area
? Tiling wrapped seamlessly around all four sides of the fireplace
? Floors fully protected with durable cardboard to prevent damage during setup and ladder work
? Perfect wall leveling before installation — ensuring clean lines and seamless joints
? High-grade stone-look tile for an elegant and timeless finish
The result: a fireplace that became the true focal point of the home — better than the design render itself — and a statement piece that leaves every guest speechless.
? Mikhailbelov37@gmail.com
? https://micatile.info
?️ Free Remodel Audit
Want to avoid hidden issues, costly delays, and budget surprises?
Comment “AUDIT” and we’ll provide a free expert review of your remodel — whether you’re just starting, already in progress, or recently completed.
We’ll help you:
✔️ Plan your project efficiently
✔️ Know what to expect
✔️ Identify common contractor shortcuts
✔️ Protect your investment from day one
? Exclusive Client Benefits
✨ Bonus Program — earn up to 15% back in bonus points to use toward your next project or gift to family/friends.
✨ Referral Program — get 10% cash back from every direct referral project, plus 3% from their referrals.
✨ Returning Client Discount — receive 10% off per sq ft on your second project.
Want full details? Comment BONUS and we’ll send you the complete guide.
#fireplacedesign #customtile #stonelooktile #luxuryremodel #mitileinstallationexperts #miauditmyremodel #bethelisland #oceanviewhome #homerenovation #contractor #precisioncraftsmanship #tiling #interiordesign #modernfireplace #beforeandafter #luxuryhomes #tileinstallation #tileinstallationexperts #tileexperts
 Mi Tile Installation Experts
360° Fireplace Installation — Precision From Every Angle ?
Location: Bethel Island, CA
After completing a monumental 20-foot fireplace in this exclusive island community, another homeowner reached out to Mi Tile Installation Experts for an even more ambitious challenge — a four-sided fireplace with perfect symmetry and alignment from every angle.
This project required absolute precision — every corner, joint, and plane had to meet flawlessly across 360 degrees.
✨ Project Highlights:
? Custom geometric design for a striking centerpiece in the living area
? Tiling wrapped seamlessly around all four sides of the fireplace
? Floors fully protected with durable cardboard to prevent damage during setup and ladder work
? Perfect wall leveling before installation — ensuring clean lines and seamless joints
? High-grade stone-look tile for an elegant and timeless finish
The result: a fireplace that became the true focal point of the home — better than the design render itself — and a statement piece that leaves every guest speechless.
? Mikhailbelov37@gmail.com
? https://micatile.info
?️ Free Remodel Audit
Want to avoid hidden issues, costly delays, and budget surprises?
Comment “AUDIT” and we’ll provide a free expert review of your remodel — whether you’re just starting, already in progress, or recently completed.
We’ll help you:
✔️ Plan your project efficiently
✔️ Know what to expect
✔️ Identify common contractor shortcuts
✔️ Protect your investment from day one
? Exclusive Client Benefits
✨ Bonus Program — earn up to 15% back in bonus points to use toward your next project or gift to family/friends.
✨ Referral Program — get 10% cash back from every direct referral project, plus 3% from their referrals.
✨ Returning Client Discount — receive 10% off per sq ft on your second project.
Want full details? Comment BONUS and we’ll send you the complete guide.
#fireplacedesign #customtile #stonelooktile #luxuryremodel #mitileinstallationexperts #miauditmyremodel #bethelisland #oceanviewhome #homerenovation #contractor #precisioncraftsmanship #tiling #interiordesign #modernfireplace #beforeandafter #luxuryhomes #tileinstallation #tileinstallationexperts #tileexperts
 Lemon Remodeling & Services
Planning a Modern Kitchen Remodel
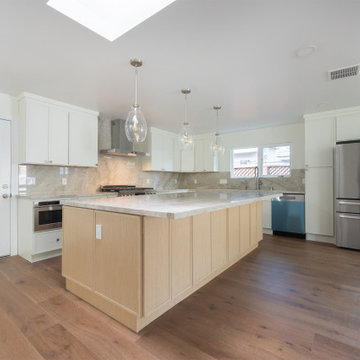
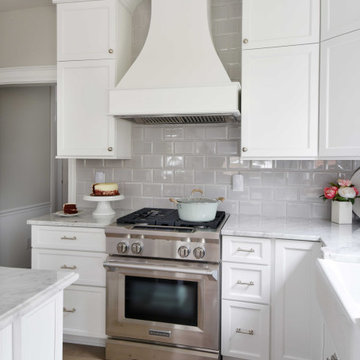
Every successful kitchen remodeling project begins with careful planning. Before construction starts, it is important to evaluate the existing layout, cabinet storage, lighting conditions, appliance placement, and how the kitchen connects to surrounding living spaces.
For this project, the primary design goals included:
Creating a brighter open concept kitchen
Improving functionality and circulation
Increasing pantry and cabinet storage
Maximizing natural light with skylight integration
Creating a clean and timeless design aesthetic
The final layout centered around a large kitchen island that functions as both a workspace and gathering area. Open concept kitchens remain highly desirable because they improve communication between living areas while helping the home feel larger and more connected.
Importance of Natural Light
Natural lighting plays a major role in modern kitchen remodeling. In this renovation, the skylight significantly improved brightness throughout the space and helped create a softer, more inviting atmosphere during the day.
Combined with recessed lighting and pendant fixtures above the island, the layered lighting design provides both functional task lighting and balanced ambient illumination.
Construction and Material Selection
Kitchen remodeling projects require coordination between multiple construction trades including demolition, framing, electrical, plumbing, drywall, flooring, cabinetry, countertops, and finish carpentry.
Bi-Color Kitchen Remodel Design
One of the standout features of this project is the bi-color kitchen remodel design. The warm natural wood island creates contrast against the surrounding white cabinetry while maintaining a clean and balanced appearance.
This approach helps:
Add visual depth to the kitchen
Create separation between functional zones
Prevent the space from feeling overly monochromatic
Introduce warmth into modern kitchen designs
The oversized island also provides additional storage, countertop workspace, and seating opportunities for everyday use and entertaining.
Countertops, Cabinetry, and Finishes
The kitchen includes:
Quartz countertops with waterfall-style edges
Custom shaker-style cabinetry
Stainless steel appliances
Modern pendant lighting
Wide plank engineered hardwood flooring
Full-height backsplash surfaces
The neutral color palette was selected to create a timeless appearance while allowing flexibility for future décor and furniture changes.
Pantry Kitchen Renovation
Storage planning is one of the most important aspects of kitchen remodeling. The pantry kitchen renovation focused on improving organization and accessibility while maximizing usable storage space.
Modern pantry systems help homeowners:
Reduce countertop clutter
Improve kitchen organization
Store small appliances more efficiently
Increase long-term functionality
Thoughtful storage design can significantly improve the daily usability of a kitchen without increasing square footage.
Real Estate Value and Long-Term Benefits
Kitchen remodeling remains one of the highest-value residential renovation projects in the Bay Area real estate market. A professionally designed open concept kitchen can improve buyer perception, increase property appeal, and modernize outdated layouts.
Features such as large islands, skylights, pantry storage, and bi-color cabinetry continue to remain highly desirable among homeowners and future buyers alike.
Common Kitchen Remodeling Mistakes
Some common mistakes homeowners should avoid include:
Insufficient lighting design
Poor circulation planning
Limited storage solutions
Choosing low-durability materials
Overcrowded layouts
Inadequate electrical preparation
Working with experienced remodeling professionals can help avoid costly design and construction issues later in the process.
Common Questions
How long does a kitchen remodel usually take?
Most kitchen remodeling projects take approximately 6–12 weeks depending on the project scope, inspections, material lead times, and structural modifications.
Do kitchen remodels require permits?
Permits are often required when plumbing, electrical, structural, or layout changes are involved. Requirements vary depending on the city and scope of work.
What is a bi-color kitchen remodel?
A bi-color kitchen remodel uses two cabinet finishes or tones to create visual contrast and a more customized design appearance.
Does an open concept kitchen increase home value?
Open concept kitchens are highly desirable because they improve functionality, natural lighting, and overall flow throughout the home.
Conclusion
A well-planned kitchen remodeling project combines thoughtful design, quality craftsmanship, and durable materials to create a space that is both functional and visually appealing. Features such as skylight integration, open concept layouts, pantry kitchen renovations, and bi-color cabinetry continue to remain popular among Bay Area homeowners seeking timeless and practical kitchen designs.
Careful planning, professional coordination, and attention to detail are essential for creating a kitchen that performs well aesthetically and functionally for many years.
------->
If you’re planning a kitchen remodeling project, consulting with an experienced contractor can help simplify the design and construction process while avoiding costly mistakes.
Book a consultation:
calendly.com/lemonremodeling
Sponsored
Plain City, OH
The Creative Kitchen Company
Columbus Area Kitchen Remodeling and Refacing Professional
 Mi Tile Installation Experts
360° Fireplace Installation — Precision From Every Angle ?
Location: Bethel Island, CA
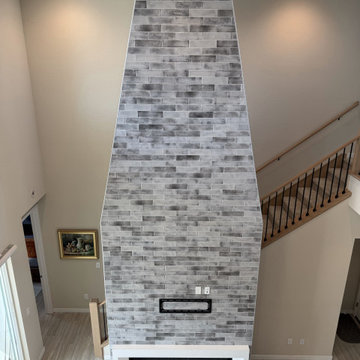
After completing a monumental 20-foot fireplace in this exclusive island community, another homeowner reached out to Mi Tile Installation Experts for an even more ambitious challenge — a four-sided fireplace with perfect symmetry and alignment from every angle.
This project required absolute precision — every corner, joint, and plane had to meet flawlessly across 360 degrees.
✨ Project Highlights:
? Custom geometric design for a striking centerpiece in the living area
? Tiling wrapped seamlessly around all four sides of the fireplace
? Floors fully protected with durable cardboard to prevent damage during setup and ladder work
? Perfect wall leveling before installation — ensuring clean lines and seamless joints
? High-grade stone-look tile for an elegant and timeless finish
The result: a fireplace that became the true focal point of the home — better than the design render itself — and a statement piece that leaves every guest speechless.
? Mikhailbelov37@gmail.com
? https://micatile.info
?️ Free Remodel Audit
Want to avoid hidden issues, costly delays, and budget surprises?
Comment “AUDIT” and we’ll provide a free expert review of your remodel — whether you’re just starting, already in progress, or recently completed.
We’ll help you:
✔️ Plan your project efficiently
✔️ Know what to expect
✔️ Identify common contractor shortcuts
✔️ Protect your investment from day one
? Exclusive Client Benefits
✨ Bonus Program — earn up to 15% back in bonus points to use toward your next project or gift to family/friends.
✨ Referral Program — get 10% cash back from every direct referral project, plus 3% from their referrals.
✨ Returning Client Discount — receive 10% off per sq ft on your second project.
Want full details? Comment BONUS and we’ll send you the complete guide.
#fireplacedesign #customtile #stonelooktile #luxuryremodel #mitileinstallationexperts #miauditmyremodel #bethelisland #oceanviewhome #homerenovation #contractor #precisioncraftsmanship #tiling #interiordesign #modernfireplace #beforeandafter #luxuryhomes #tileinstallation #tileinstallationexperts #tileexperts
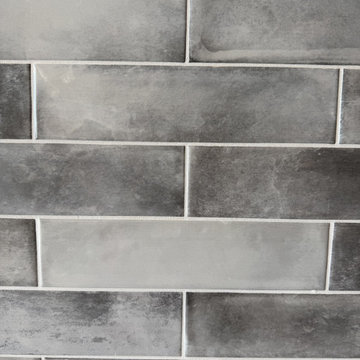 Mi Tile Installation Experts
360° Fireplace Installation — Precision From Every Angle ?
Location: Bethel Island, CA
After completing a monumental 20-foot fireplace in this exclusive island community, another homeowner reached out to Mi Tile Installation Experts for an even more ambitious challenge — a four-sided fireplace with perfect symmetry and alignment from every angle.
This project required absolute precision — every corner, joint, and plane had to meet flawlessly across 360 degrees.
✨ Project Highlights:
? Custom geometric design for a striking centerpiece in the living area
? Tiling wrapped seamlessly around all four sides of the fireplace
? Floors fully protected with durable cardboard to prevent damage during setup and ladder work
? Perfect wall leveling before installation — ensuring clean lines and seamless joints
? High-grade stone-look tile for an elegant and timeless finish
The result: a fireplace that became the true focal point of the home — better than the design render itself — and a statement piece that leaves every guest speechless.
? Mikhailbelov37@gmail.com
? https://micatile.info
?️ Free Remodel Audit
Want to avoid hidden issues, costly delays, and budget surprises?
Comment “AUDIT” and we’ll provide a free expert review of your remodel — whether you’re just starting, already in progress, or recently completed.
We’ll help you:
✔️ Plan your project efficiently
✔️ Know what to expect
✔️ Identify common contractor shortcuts
✔️ Protect your investment from day one
? Exclusive Client Benefits
✨ Bonus Program — earn up to 15% back in bonus points to use toward your next project or gift to family/friends.
✨ Referral Program — get 10% cash back from every direct referral project, plus 3% from their referrals.
✨ Returning Client Discount — receive 10% off per sq ft on your second project.
Want full details? Comment BONUS and we’ll send you the complete guide.
#fireplacedesign #customtile #stonelooktile #luxuryremodel #mitileinstallationexperts #miauditmyremodel #bethelisland #oceanviewhome #homerenovation #contractor #precisioncraftsmanship #tiling #interiordesign #modernfireplace #beforeandafter #luxuryhomes #tileinstallation #tileinstallationexperts #tileexperts
 Tile Doctor Ltd
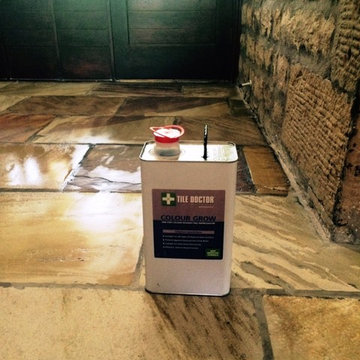
Here we have a six year old Indian Sandstone tiled floor located a property on the outskirts of Lancaster. Measuring 100 metres squared, the very large floor had under floor heating in the concrete sub base. The type of stone used inside the property is what we commonly refer to as ‘patio Sandstone’, a material which is usually used outside because of its very rough texture. It’s not particularly comfortable to walk across in bare feet, hence why many people consider it be impractical for internal flooring.
Nonetheless, the property owner was keen to make the rough textured floor as feet-friendly as possible for people walking over it. At Tile Doctor we have developed a process known as milling, which utilises diamond encrusted pads combined with a weighted rotary machine to smooth the rough surface, leaving it looking and feeling a lot nicer and more practical to live with. The milling process is only done once, but while the Sandstone will still need cleaning and sealing in the future, it won’t be nearly as difficult as when it was rough.
The job would take over two weeks to complete due to the fact that the existing grout needed to be removed and replaced with a flexible floor grout: a very time consuming process.
As mentioned, the surface of the Sandstone was very rough, and so needed to be milled down to make it a lot smoother to look after and make it easy to clean and seal. This was achieved by using Tile Doctor’s 50 Grit diamond encrusted burnishing pads, fitted to a weighed rotary machine and run along the entire surface area of the floor. Through this process the stone became much smoother and more aesthetic – completing one of our main objectives for the customer.
Next, we started breaking out the already loose and badly applied grout with our grout removal tools. The builder who had installed the floor had used a sand/cement-based grout which wasn’t flexible. As a result, it started to crumble and loosen quite quickly after exposure to the underfloor heating. We removed this and replaced it with a far more flexible grout.
Once the whole area had been successfully milled and the grout replaced, the Sandstone floor was left to dry out over the weekend. Upon our return to the property, we cleaned off any dust and resin left over from the milling and grouting processes, before leaving it to dry for a further 24 hours.
The next day we returned to seal the whole floor with two coats of our impregnating sealer Tile Doctor Colour Grow. The sealer fills the pores of the Sandstone to prevent ingrained dirt and stains, while also emphasising the natural colours in the stone. It also provides a robust matte finish, which is what the customer wished for.
It wasn’t the easiest of processes to get the Indian Sandstone into a condition where it would be both suitable for internal flooring and aesthetically pleasing, but the results proved to be very much worth the time and effort invested. The customer was very pleased with the transformation.
Russell Taylor
Lancashire Tile Doctor
 Tile Doctor Ltd
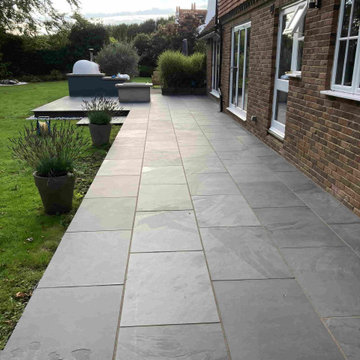
Our client in the villager of Pembury was feeling really deflated after having a Slate Patio laid adjacent to the full length of her house, however the builder had not applied the sealer correctly creating a mess which ruined the appearance of the stone.
Unfortunately, it is not that unusual to be contacted about this sort of situation, applying a sealer is not as easy as manufactures make out. There are lots of factors to consider, choosing the right sealer, is the stone damp, how do you know if you have applied too much, and it often catches tradesmen out. I was able to reassure them that with the right combination of products and equipment the problem could be rectified.
The first job was to strip off the old sealer which was done using a product called Tile Doctor Remove and Go. The name of this product pretty much says it all and once applied to the stone it is left to soak in for ten to twenty minutes before being scrubbed in with a rotary machine fitted with an abrasive burnishing pad.
Tile Doctor Remove and Go is a multi-purpose stripper which will remove most coatings and sealers, including epoxy grout haze which is another common problem we encounter when tradesmen have not cleaned up properly after grouting. It is also good for removing heavy build ups of grease. I used several burnishing pads of different grits going from coarse to smooth on this patio, rinsing and extracting the soil after each pad.
It was a large area, so this process took up most of the day on its own, fortunately I use a van mounted high pressure cleaning and extraction system to remove the soil which is very efficient and leaves the stone bright clean and reasonably dry afterwards. This ensures the process can be carried out with minimal mess.
It was a nice warm summers day and although cloudy we didn’t get any rain overnight, so after checking the forecast I was able to return the next day and apply a fresh sealer to the Slate.
My client wanted a natural look, so I used Tile Doctor Ultra Seal. This product is a no-sheen, natural-look, impregnating sealer which is formulated to provide maximum stain protection. These impregnating sealers work by penetrating the stone, occupying its pores, and thus preventing dirt from residing there.
The client was so happy and relieved to see the results on what a very expensive patio and commented she was eager to get the first barbecue of the season underway.
We recommended that a regular with the jet wash should keep the patio in good condition and in a few years time we could return to reapply the sealer for them.
Michael Conlon
South Kent Tile Doctor
 Wiler Fence Company
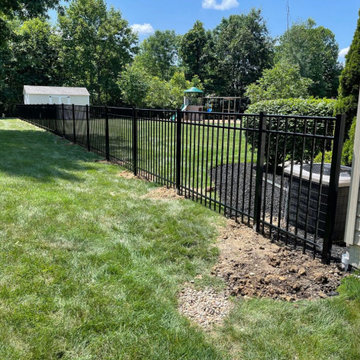
Elegant 4-Foot Black Ornamental Aluminum Fence by Wiler Fence Company – Elite EFF-20 Model Installed for a New Inground Pool in Medina, OhioWiler Fence Company recently completed a stunning 4-foot tall black ornamental aluminum fence installation in Medina, Ohio, perfectly complementing a brand-new inground swimming pool for a growing family. Manufactured by Elite Fence Products (a trusted American-made brand), the EFF-20 model delivers timeless wrought-iron style with modern durability and zero-maintenance appeal—making it an ideal choice for poolside safety, curb appeal, and long-term value.The EFF-20 is one of Elite's most popular residential-grade styles, featuring a clean, flat top rail with a subtle beveled edge for a sleek, contemporary look that mimics traditional wrought iron without the rust or upkeep. Key specifications include:Height: 4 feet (48 inches) – precisely meeting Medina's minimum 4-foot requirement for residential pool enclosures while keeping the yard feeling open and inviting.
Construction: Extruded aluminum panels with 1-1/8" x 1" horizontal rails (three rails total for strength and stability), 5/8" x 5/8" vertical pickets spaced approximately 3-13/16" apart (standard residential spacing that allows visibility while preventing small children or pets from slipping through).
Finish: Premium powder-coated black – a durable TGIC polyester coating that resists fading, chipping, and corrosion, backed by Elite's limited lifetime warranty. This rich matte-to-semi-gloss black finish enhances any home's exterior and blends beautifully with modern landscaping.
Strength: Residential-grade design supports up to 350 lbs of pressure on the top rail, ensuring it stands up to Ohio's weather extremes and everyday use.
Panels: Pre-assembled sections (typically 72.5" wide) for efficient, precise installation with minimal visible hardware (screws on one side only for a cleaner appearance from the street).
This installation was specifically chosen for the new inground pool to provide essential safety and code compliance. In Medina, Ohio, local regulations require pool fences to be at least 4 feet tall, with no more than 3 inches of ground clearance, self-closing/latching gates, and spacing that prevents a 4-inch sphere from passing through—standards the Elite EFF-20 easily satisfies (and often exceeds for pool applications). The open picket design maintains great sightlines for supervision while creating a secure barrier that deters unsupervised access.Wiler Fence Company's expert crew handled the full process seamlessly:Coordinated with the City of Medina for the required building permit and zoning certificate (including site plans and pool setback compliance—no front-yard placement, minimum distances from structures, etc.).
Called 811 for utility locates and prepared post holes to frost-line depth (typically 36-42 inches in Medina's soil) for rock-solid concrete footings.
Installed line, corner, and end posts (2" x 2" or 2-1/2" x 2-1/2" aluminum) with matching black powder coat.
Set pre-assembled EFF-20 panels level and plumb, then added self-closing, self-latching gates (with child-proof latches at least 54 inches high) for easy pool access.
Left the site spotless, with final walkthrough and city inspection passed on the first try.
The homeowners now enjoy a safe, elegant pool area that looks upscale and professional—enhancing their backyard oasis without the ongoing painting, rust worries, or sagging common with other materials. The black aluminum provides a sophisticated contrast against the pool's blue water and surrounding greenery, while the 4-foot height keeps the view open to the house and yard.At Wiler Fence Company, we're proud to bring Elite Fence Products' high-quality craftsmanship to Northeast Ohio homes. If you're adding an inground pool, upgrading your perimeter, or seeking low-maintenance elegance, the EFF-20 in black is a top performer for safety, style, and satisfaction.Ready for your own Elite aluminum fence project in Medina, Brunswick, or surrounding areas? Contact us for a free estimate today! (216) 714-3337
www.wiler.org
#WilerFenceCompany #EliteFence #OrnamentalAluminumFence #PoolFence #MedinaOhio #IngroundPool #BlackAluminumFence #NortheastOhioFencing

 Sans Soucie Art Glass
CUSTOMIZE YOUR INTERIOR GLASS DOOR! Interior glass doors ship for just $99 to most states, $159 to some East coast regions, custom packed and fully insured with a 1-4 day transit time. Available any size, as interior door glass insert only or pre-installed in an interior door frame, with 8 wood types available. ETA will vary 3-8 weeks depending on glass & door type.........Block the view, but brighten the look with a beautiful interior glass door featuring a custom frosted glass design by Sans Soucie! Select from dozens of sandblast etched obscure glass designs! Sans Soucie creates their interior glass door designs thru sandblasting the glass in different ways which create not only different levels of privacy, but different levels in price. Bathroom doors, laundry room doors and glass pantry doors with frosted glass designs by Sans Soucie become the conversation piece of any room. Choose from the highest quality and largest selection of frosted decorative glass interior doors available anywhere! The "same design, done different" - with no limit to design, there's something for every decor, regardless of style. Inside our fun, easy to use online Glass and Door Designer at sanssoucie.com, you'll get instant pricing on everything as YOU customize your door and the glass, just the way YOU want it, to compliment and coordinate with your decor. When you're all finished designing, you can place your order right there online! Glass and doors ship worldwide, custom packed in-house, fully insured via UPS Freight. Glass is sandblast frosted or etched and bathroom door designs are available in 3 effects: Solid frost, 2D surface etched or 3D carved. Visit our site to learn more!

 GS Construction
Example of a small classic 3/4 white tile and stone tile mosaic tile floor alcove shower design in Chicago with an undermount sink, recessed-panel cabinets, black cabinets, quartzite countertops, a two-piece toilet and gray walls
9