
Search results for "Preventive steps" in Home Design Ideas
 Prime Builders & Experts
Project Description:
3D Backyard Design
We created a 3D rendering to fully show our client the outcome of her backyard remodel project. You can see from the 3D renderings we literally brought her vision to life.
Complete Backyard Remodel
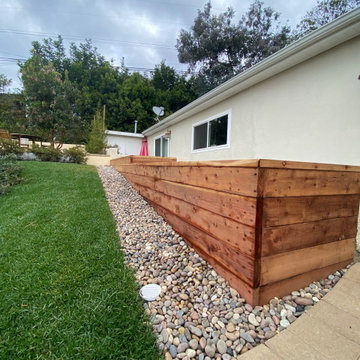
We installed new pavers for the large walkway that runs from the front to the back of the backyard. We built a large concrete wall with stucco all around for privacy. The new courtyard also has new pavers, grass sections, and a sprinkler system. We planted new trees and built a wood-raised vegetable bed. For decorative accents, we added new concrete steps, smart exterior lights, artificial turf installation, river rock installation, and new drain lines to prevent flooding. We also built a custom floating deck that sits in between trees.
 Diehl Concrete
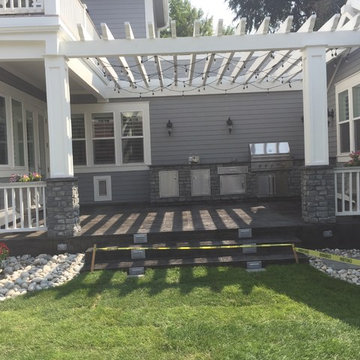
Diehl Concrete is a local Denver business that prides itself in quality decorative work such as custom stamped concrete patios. The owner, Ryan Diehl, plays a hands-on part throughout the entire process. With over 15 years of experience in creating beautiful outdoor spaces, along with his un-compromised integrity, Diehl Concrete is a wise choice for your project.
There are countless examples of his work throughout Colorado, including Denver, Aurora, Brighton, Boulder, and Evergreen. Call today and Ryan Diehl will personally evaluate your project, answer your questions, and provide a free quote.
Benefits of Stamped Concrete Patios:
Affordability: Stamped concrete patios are much more affordable when compared to brick pavers or natural stone. Fortunately, This lower cost doesn’t lack durability or beauty.
Longevity: Concrete typically lasts longer than alternative patio materials. To ensure durability, Diehl Concrete will take the extra steps to reduce cracking. We will take great care in preparing your concrete sub-grade with proper compaction, and road base as well as rebar reinforcement within the concrete. Finally, expansion joints will be strategically placed to minimize and prevent cracking.
Color and Pattern Options: The sky is truly the limit on color choices and patterns for stamped concrete patios.
Shape: Due to its versatility of the substance, concrete offers homeowners the ability to create any type of shape they would like. Would you like curves, planting beds, or even a fire pit incorporated into your stamped concrete patio? No problem.
Low Maintenance: To maintain the look and uphold the durability, a once yearly sealer may be applied. This is something you can do yourself, or we can seal your patio for you.
Increased home resale value. Decorative concrete adds curb appeal and aesthetic value to your home, allowing you to maximize the return on your investment.
 Tile Doctor Ltd
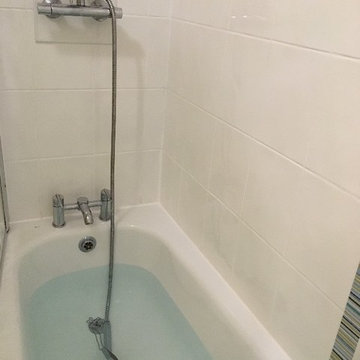
A client with a high-rise apartment in Manchester city centre contacted us in relation to the look of their bathroom tiles. The grout had become grubby and black with mould and it was clear from their message that they were considering have the grout replaced in order to freshen up the bathroom.
We discussed the problem over the telephone, and they emailed a picture of the bathroom across so I could get a better idea of what needed doing. It turns out that the apartment had been rented out previously and they needed the bathroom renovating so they could start letting it again. Clearly, they were keen to have the work completed as soon as possible. Fortunately, we are sometimes able to come out on short notice, especially for small jobs like this and so were able to do the work the following week
Re-grouting is a lot of work and very time consuming so I explained the benefits of Grout Colouring which is much quicker and results in a more practical finish as I will explain. There was a small issue with parking as one would expect from the city centre, but we were able to use one of the parking spaces of a neighbour in the basement of the building.
My first task was to get the grout as clean as possible before applying the colourant and given the amount of mould I decided to apply Tile Doctor Duo-Clean which is a Tile Cleaner/Mould Remover and ideal for use on ceramic tile and grout. The product was sprayed onto the tiles and grout and then scrubbed in by hand to get the grout as clean as possible. I also used a powerful steam cleaner to get the grout as clean as possible before rinsing the soil off with water. This process went well, and the grout looked much cleaner afterwards but was now a little patchy in places due to deep staining.
It’s worth noting that mould thrives in damp warm conditions and can easily be controlled by ensuring the bathroom has adequate ventilation. Some modern showers have a function that cool the bathroom down after use by running the shower on a cold setting. Improving cross-ventilation by leaving the bathroom door and a window open can also improve the situation and of course you can always apply Tile Doctor Duo-Clean on a regular basis.
Once the grout was dry and as clean as it could be, I applied a White Tile Doctor Grout Colourant along the grout lines with a small brush taking care to wipe off any excess from the tiles as I went. Only one bottle of colourant was needed, and I have found baby wipes work well when wiping off the excess.
The last step in the bathroom renovation was to strip out all the old mouldy silicone between the bath and the tiles and replace with new mould resistant silicone.
The cleaning and grout colour completely transformed the look of the bathroom leaving it looking fresh. The grout which was previously dark and patchy was now a consistent white colour giving the impression it had only been recently tiled. The colourant also forms an epoxy barrier over the grout that will prevent dirt from becoming ingrained in the grouts surface going forward, it’s also much easier to clean.
The customer was most impressed with the result and has informed us since that they will back in touch about renovating the grout in their own home! They left the following comment on the Tile Doctor website.
“Kamila made a wonderful job cleaning my grout and silicone. The bathroom looks like new. She was also easy to deal, very friendly and professional. Thank you!”
Alex Logozny
Greater Manchester Tile Doctor
Find the right local pro for your project
 Designed with Grace & Joy
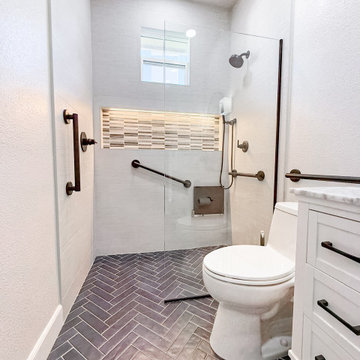
This bathroom remodel by Designed with Grace & Joy is a thoughtful blend of accessibility, comfort, and elevated design. Created with the homeowner’s long-term lifestyle in mind, this transformation proves that functional spaces can still feel luxurious and refined.
The layout was completely reimagined to feature a single-level floor with no shower threshold, ensuring seamless wheelchair accessibility and safe movement throughout the space. Strategically placed grab bars provide added stability without compromising the overall aesthetic. A drop-down shower seat and handheld shower fixture introduce flexibility and comfort, while the relocated shower controller prevents the shock of stepping into cold water.
To enhance both function and ambiance, a sleek lighted niche was integrated into the shower for practical storage and a soft glow. The removal of the dual-level ceiling visually expanded the room, creating an open, airy atmosphere that feels modern and inviting.
The result is a bathroom that balances smart universal design principles with timeless elegance — a space that supports everyday living while maintaining a clean, sophisticated look.
 Renovators Supply Manufacturing
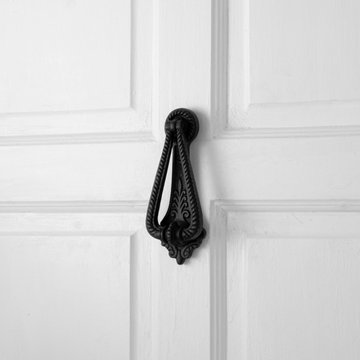
BLACK CAST IRON GEORGIAN STYLE VINTAGE DOOR KNOCKERS
Find beautiful and durable door knockers now in a variety of designs and finish that matches everyone's style. Step up your curb appeal and add value to your home entrance with the finishing touch of a door knocker. This black Georgian stye door knocker is made of 100% solid Cast Iron. Polished perfectly in our exclusive RSF to prevent rust. Make A STATEMENT with our unique bold, beautiful and functional door knockers. Add Outdoor Home Accents that make your Entry Way Front Door 'Pop'.
FEATURES
Made of heavy duty solid cast iron material
It measures 7 In. Height x 2.5 In. Width
Rust resistant black powder coat finish to increase life
Package includes complete mounting hardware
Easy and secure installation through the door via given thread bolts
 Tile Doctor Ltd
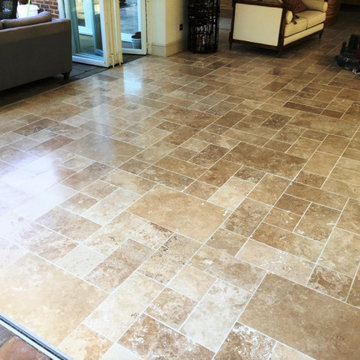
This property in Godalming had the whole downstairs floor tiled with Fired Earth Limestone tiles nine years prior and had never had it cleaned or maintained professionally. The once beautiful stone was now looking dull and the grout had turned black with dirt leaving the floor looking uninviting.
This is quite normal for stone floors as it is the sealer that protects the stone from dirt and enhances its look. Most sealers wear off after three to four years sealer and in this case after nine years it was well overdue a deep clean and reseal.
I visited the property to survey the floor. It was indeed looking in need of some attention and the kitchen was particularly bad. To restore the appearance of the Limestone tile and grout the floor would need to be stripped of what remains of the old sealer, then deep cleaned with attention to the grout, polished with burnishing pads and then finally resealed. I was confident I could get it restored to a nearly new finish and to prove it I completed a small demonstration clean which the homeowner was very happy with. They agreed to my quote and we scheduled in a couple of days to carry out the work.
On day one I started by cleaning the grout using a strong dilution of Tile Doctor Pro-Clean. its run along the grout line and then left to soak in for about ten minutes so it can get to work breaking down dirt and old sealer. The grout is then scrubbed using a grout brush which is then scrubbed backwards and forwards along the grout line until clean. The area is then rinsed with water and all the waste removed with a wet vacuum cleaner.
Next, I turned my attention to the Limestone tiles which needed stripping of any remaining sealer, cleaned and polished. I find the best way to do this is by apply a set of diamond encrusted Burnishing pads in sequence starting with a coarse 400-grit followed by 800, 1500 and finally finishing with an extra fine 3000 grit. Water is used to lubricate the burnishing process and the slurry is rinsed and extracted off the floor between pads. Each pad is run over the tiles three times, and it was a large floor so as you can imagine this process took most of the day.
I left the floor to dry out overnight and returned the next day to seal the Limestone. Before doing that, I reviewed my previous day’s work and I cleaned up any areas that needed further attention. Next step was to ensure the floor was dry as I don’t recommend applying a sealer to damp tile as you won’t get an even appearance, so before sealing a floor I tested for moisture using a damp meter.
To seal the floor, I applied two coats of Tile Doctor Ultra Seal which is an impregnating sealer that works by occupying the small pores in the stone to prevent dirt becoming ingrained there. Limestone is a light stone and most customers like that appearance so I find it best not to use a colour enhancing sealer as it can darken the stone. Ultra-Seal doesn’t contain any colour enhancer and leaves the floor with a natural finish whilst allowing the stone variations and patterns to show through.
Once the sealer was dry, I gave it a further polish with the 3000-grit pad which further brought out the natural beauty of the stone. My client was very happy with the floor, it really lifted the who area and the Kitchen in particular.
Rupert Mcleod
West Surrey Tile Doctor
 Southernwood Homes
Maddox Farm New Home Construction
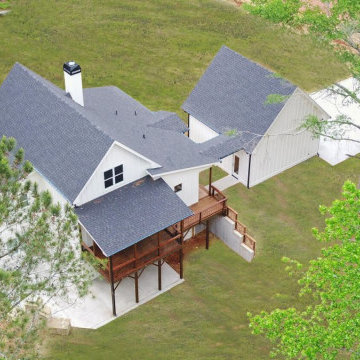
This white-sided Modern Farmhouse with detached garage was constructed in Winder GA by Southernwood Homes. The front entrance includes a covered rustic front porch with a wood inlaid ceiling. The family room was designed with a two-story stacked-stone fireplace rising up into the vaulted wood inlay ceiling that includes exposed beams. The family room flows right into the kitchen with a open concept layout. The kitchen features stainless steel appliances along with ample kitchen counter space and cabinetry, along with much natural lighting. There is hardwood flooring throughout the living space. The master bedroom features a large trey ceiling. The master bath has a walk-in shower with a separate stand-alone tub. There is finished basement with a large entertaining room and a functional kitchenette. The outdoor living space includes a large deck with a portion covered which was constructed wood inlaid ceiling. Below the deck is a large covered patio that flows to a outdoor stone fireplace with flanked stone seating.
Sponsored
Columbus, OH
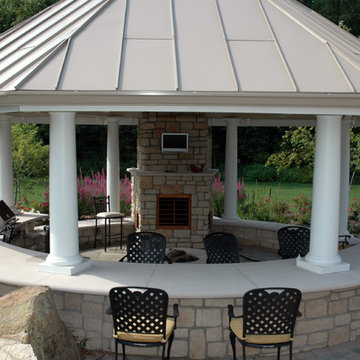
Free consultation for landscape design!

Peabody Landscape Group
Franklin County's Reliable Landscape Design & Contracting
 STARWOOD INDUSTRY CO.,LTD
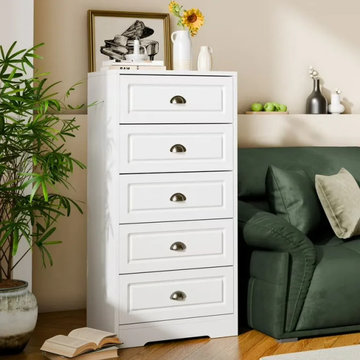
Smart Storage Ideas for Small Apartments with Flat-Pack Panel Furniture
Small apartments and rental homes often struggle with one thing: not enough storage. Clothes, books, luggage and daily items quickly fill every corner, and there is rarely space for bulky built-in furniture. With the right flat-pack panel furniture, you can still create a bright, organized home that feels calm instead of crowded.
Here are some practical ideas to make the most of every square meter using flat-pack wardrobes, beds and cabinets.
1. Build a Full-Height Storage Wall
When floor space is limited, think vertically. A full-height wardrobe or storage wall from floor to ceiling instantly adds a huge amount of hidden storage without taking more footprint.
Use tall cabinets around the bed or TV area. Closed doors keep the room looking clean, while a few open shelves in the middle can display books, plants or a TV. Slim handles and light wood tones help the design feel modern and not too heavy for a small room.
Flat-pack panel wardrobes are delivered in cartons and assembled on site, which makes them perfect for apartments with narrow stairs or elevators.
2. Turn the Bed Area into a Storage Zone
In small bedrooms, the bed is usually the largest piece of furniture. Instead of letting the space under and around it go to waste, transform it into extra storage:
A platform bed with drawers underneath is ideal for bedding, seasonal clothes or suitcases.
Steps leading up to a raised bed can hide additional drawers or cabinets.
A headboard with shelves and small cabinets keeps phones, books and chargers within easy reach while freeing up the bedside floor.
These designs work very well with panel furniture. Standard board sizes and hardware make it easy to customize length, depth and internal layout according to each room.
3. Combine Desk, Wardrobe and Shelving
Many people now work or study from home, even in small apartments. Instead of using several separate pieces, consider a combined unit that integrates wardrobe, open shelves and a desk.
A corner desk with wall-mounted cabinets above and a wardrobe next to it creates a compact “working wall”. Open shelves can hold files and décor, while closed cabinets hide everything else. Keeping the furniture off the floor visually opens the room and makes cleaning easier.
Flat-pack construction means these modular units can be shipped in flat panels and assembled in different layouts: left-hand or right-hand desk, longer or shorter wardrobe, more or fewer shelves.
4. Choose Light Colors and Warm Wood Textures
Color has a big impact on how large or small a room feels. For compact spaces, light neutrals are your best friend: white, light grey and soft beige make walls and cabinets visually recede. Warm woodgrain fronts or accents add comfort and prevent the room from feeling cold.
You can mix white cabinet doors with oak or light walnut panels to create a fresh, Scandinavian-inspired look. Using the same material for wardrobes, beds and shelves also creates a calm, unified feeling instead of a busy, mismatched room.
5. Enjoy the Practical Benefits of Flat-Pack Furniture
Flat-pack panel furniture is not only space-saving in the room, it is also efficient before it arrives:
Products are packed flat in cartons, so more pieces fit into one container or truck.
Cartons are easier to carry through narrow hallways and up staircases.
Most systems use cam locks and dowels, allowing for quick assembly and disassembly when moving.
For landlords, student housing and rental projects, this makes installation faster and replacement simpler. For online brands and retailers, flat-pack furniture reduces shipping costs and makes warehousing more flexible.
6. Behind the Scenes: How Quality Flat-Pack Furniture Is Made
A good small-space design also depends on precise manufacturing. Modern CNC cutting lines, edge-banding machines and drilling centers ensure that every panel fits perfectly, doors stay aligned and hardware works smoothly. Consistent quality is key when many apartments or rooms need to be furnished with the same design.
About Starwood
Starwood is an OEM & ODM manufacturer based in Guangdong with over 12 years of experience in panel materials and furniture. We supply decorative papers, MDF, particleboard, plywood and custom-designed flat-pack furniture, including wardrobes, storage beds, study units and kitchen cabinets.
If you are a retailer, online brand, interior designer or project client looking for small-space furniture solutions, feel free to contact us to develop your own flat-pack collection or apartment package.
 Drury Design
The original idea was to update the tile floor and the tub. That’s it.
A further discussion of wants and needs revealed intentions for an eventual larger shower and an improved vanity storage. It made sense to map out the possibilities and design our update with potential next steps in mind. The process was exciting, ultimately leading to the decision to do a full primary bath remodel.
Design Objectives:
-Maintain existing locations for all major bathroom functions
-Make the shower larger and more open
-Use luxurious materials throughout
-Improve vanity storage and define accessories for specific items
-Incorporate luxury shower fixtures
-Include the latest technology
Design Challenges
-Enlarging the shower in a typical rectangular shape would block the view and light from the alcove windows behind the tub
-Logical placement of the built-in shower caddy and all shower components in accordance with how and where they were to be used
-Keeping the long, back wall free from any shower modules to maintain the decorative tile design
-Combining the owner’s existing smart home system with a comprehensive shower system
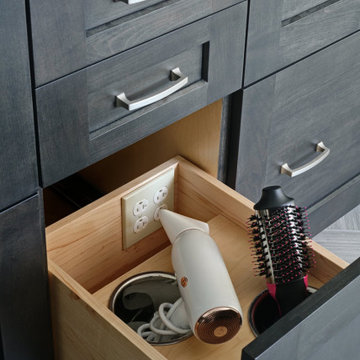
-Planning cabinetry for hidden storage and use for various small appliances and make-up
-Integrating expensive shower wall tile with less expensive wall tile for aesthetic and budget purposes
-Incorporating special design features to balance the highly decorative shower tile
Design solutions:
-A clipped corner was planned for the shower bench seat – this allowed for a larger glass wall. The glass wall at the angled bench also brought more natural light into the shower
-Thoughtful shower space design prevented the crowding of features – the shower caddy and handheld shower head were placed on the full-height wall by the shower bench, the regular shower head and body sprays remained on the opposite wall, and the rain head was placed in the center of the shower
-A multi-port DTV system was installed, providing control of all shower components, including chromotherapy and music inside and outside the shower
-The lavish water-jet stone and glass decorative tile was paired with a less-expensive glass tile found in the mosaic
-Pull-out grooming organizers and electrical docking stations were incorporated into the cabinetry
Additional storage was created in the lower corner cabinet
The homeowners are thrilled with their new primary bathroom. Clear goals and carefully evaluated materials informed a fun and functional design that is both thoughtful and sumptuous!
 Renovators Supply Manufacturing
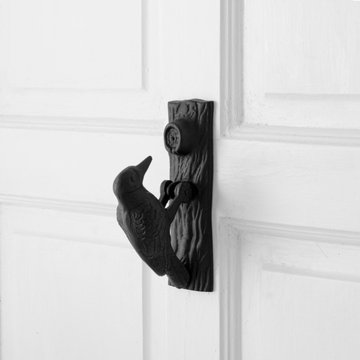
BLACK CAST IRON WOODPECKER SHAPED DOOR KNOCKERS
Find beautiful and durable door knockers now in a variety of designs and finish that matches everyone's style. Step up your curb appeal and add value to your home entrance with the finishing touch of a door knocker. This Black Bird Shaped Door Knocker made of 100% solid Cast Iron is definitely a knockout. Polished perfectly to prevent rust. Make A STATEMENT with our unique bold, beautiful and functional door knockers. Add Outdoor Home Accents that makes your Entry Way Front Door 'Pop'.
FEATURES
Made of heavy duty solid cast iron material
It measures 6.5 In. Height x 2 In. Width x 3.8 In. Projection
Rust resistant black powder coat finish to increase life
Classic Black Woodpecker bird shaped door knockers is an unique charm to own.
Package includes complete mounting hardware
Easy and secure installation through the door via given thread bolts
 Drury Design
The original idea was to update the tile floor and the tub. That’s it.
A further discussion of wants and needs revealed intentions for an eventual larger shower and an improved vanity storage. It made sense to map out the possibilities and design our update with potential next steps in mind. The process was exciting, ultimately leading to the decision to do a full primary bath remodel.
Design Objectives:
-Maintain existing locations for all major bathroom functions
-Make the shower larger and more open
-Use luxurious materials throughout
-Improve vanity storage and define accessories for specific items
-Incorporate luxury shower fixtures
-Include the latest technology
Design Challenges
-Enlarging the shower in a typical rectangular shape would block the view and light from the alcove windows behind the tub
-Logical placement of the built-in shower caddy and all shower components in accordance with how and where they were to be used
-Keeping the long, back wall free from any shower modules to maintain the decorative tile design
-Combining the owner’s existing smart home system with a comprehensive shower system
-Planning cabinetry for hidden storage and use for various small appliances and make-up
-Integrating expensive shower wall tile with less expensive wall tile for aesthetic and budget purposes
-Incorporating special design features to balance the highly decorative shower tile
Design solutions:
-A clipped corner was planned for the shower bench seat – this allowed for a larger glass wall. The glass wall at the angled bench also brought more natural light into the shower
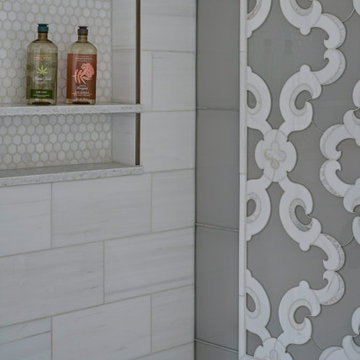
-Thoughtful shower space design prevented the crowding of features – the shower caddy and handheld shower head were placed on the full-height wall by the shower bench, the regular shower head and body sprays remained on the opposite wall, and the rain head was placed in the center of the shower
-A multi-port DTV system was installed, providing control of all shower components, including chromotherapy and music inside and outside the shower
-The lavish water-jet stone and glass decorative tile was paired with a less-expensive glass tile found in the mosaic
-Pull-out grooming organizers and electrical docking stations were incorporated into the cabinetry
Additional storage was created in the lower corner cabinet
The homeowners are thrilled with their new primary bathroom. Clear goals and carefully evaluated materials informed a fun and functional design that is both thoughtful and sumptuous!
 Luxury Outdoor Living, Inc.
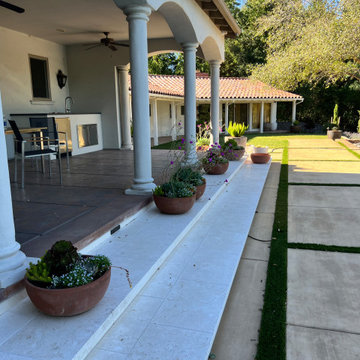
We used marble step treads to transitions between the two different concrete finishes and tied beautifully into the pool coping. All the pots have drains installed underneath each one to prevent staining and a dedicated drip circuit just for pots with drip lines going the the bottom of the pots so you don't see any of it.
 Remote Landscape
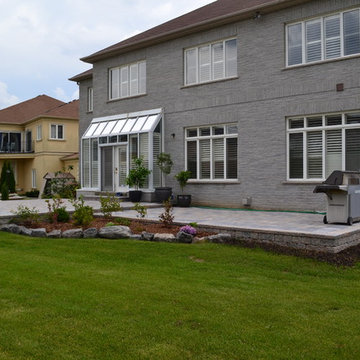
To prevent having patios at various heights we chose to raise the surface above the undulating slopes and grades of the property. This allowed us the freedom to create large and flat patio space.



35