
Search results for "Preventive steps" in Home Design Ideas
 MDB Design Group
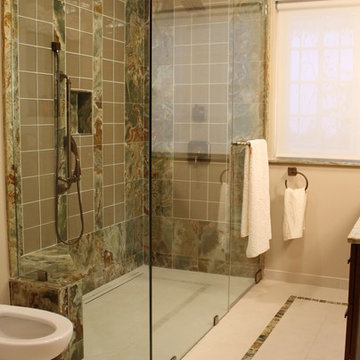
A home owner asked me to totally make over her traditional master bath. She wanted it to blend with the rest of her traditional home, but updated & fresh. We visited several showrooms to see natural stones, ceramic & porcelain tiles. She fell in love with this green onyx slab. With this as our starting point, the design was created to feature this beautiful material.
We removed everything down to the studs. A large recessed tub was replaced with a walk-in shower with a linear drain, seat, new plumbing fixtures and a frameless shower enclosure. This will provide ease of access for many years to come.
In the shower, the green onyx tiles are accented with glass tiles creating a beautiful focal wall. The onyx slab is the countertop and splash for the double sink vanity. The sink faucets have a sculptural design. The contemporary cabinet provides a generous amount of storage. A new mirror is accented with an artistic wall sconce of cream alabaster.
The flooring is porcelain throughout the room. An “area rug” in the green onyx separates the shower from the vanity. All the light fixtures are LED. She was over joyed with the final result.
Mary Broerman, CCIDC
 Tile Doctor Ltd
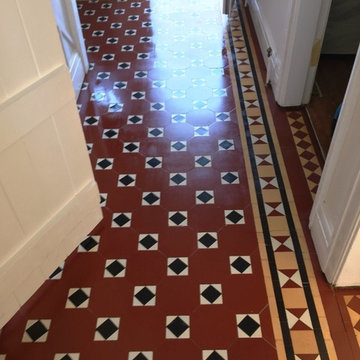
This Victorian tiled hallway was one of the most beautiful Victorian floors I have ever had the pleasure to work on. With the wide range of patterns and colours they are available in, it seems no two Victorian tiled floors are exactly the same, and this uniqueness is part of what makes them so appealing to property owners.
Unfortunately, this floor had been poorly maintained over the years, even suffering from a few loose and missing tiles. There was a thick coating of dust and dirt soiling its appearance, and the property owner was understandably keen to remedy the situation. Having realised that everyday household cleaners are not likely to achieve great results, she asked me to carry out a full professional restoration, including making some repairs where necessary. I was pleasantly surprised to find out that this property was situated in the town of Wyken, which is a few miles outside of Coventry city centre and in fact just down the road from where I live myself!
Before making a start on the cleaning process, it was first necessary to re-fix the small number of loose tiles and replace a single missing tile by the radiator. Fortunately, I’ve been working on these types of floors for some time and have built up a good collection of replacement Victorian tiles so I was able to find one that matched in nicely with the rest of the floor without too much problem.
To clean the tiles, I began by applying a layer of Tile Doctor Oxy-Gel directly into the floor with a small brush. This product is very similar to the popular Tile Doctor Pro Clean: both are strong alkaline cleaners, strippers and degreasers, with the main difference being that Oxy-Clean comes in a gel form, making it easier to control and therefore ideal for precise cleaning, or for application to vertical surfaces. Like Pro Clean and being an alkaline base it is suitable for use on all types of natural stone and tile. The Oxy-Gel was left to soak into the tiles for around ten minutes before being scrubbed in and then rinsed off carefully with water, I then used a wet vacuum to extract the now soiled cleaning solution off the floor.
The next step was to acid wash the floor using Tile Doctor Acid Gel; this served to break down alkaline mineral deposits inherent in the grout along with some excess grout that had been left on the untidily left on tile from installation. It is recommended not to use this product on acid-sensitive soon such as Marble and Limestone as it can cause irreparable etching but its fine on Victorian tiles as long as you don’t leave it on too long.
Finally, the floor was given a rinse with clean water to remove any trace of chemicals from the cleaning and to neutralise the area in preparation for sealing.
I left the floor for 48 hours to dry before returning to the property to seal the tiles. This allowed plenty of time for the floor to dry completely, which is important as any excess moisture can damage the ability of the sealer to protect against dirt and stains.
My choice of sealer for this floor was Tile Doctor High Shine; three coats in total were applied, providing – as the product name suggests – the high shine finish that the customer had requested. The sealer will provide durable surface protection going forward preventing dirt from becoming ingrained into the pores of the tile and ensuring it remains easy to clean and keeping its appearance for some time to come.
As a big fan of Victorian tiles, it was a great pleasure to restore this floor, and my customer was certainly pleased too. It’s amazing how far a little professional maintenance can go to improving the appearance of these fantastic types of floor.
Mick Gayton
Warwickshire Tile Doctor

Find the right local pro for your project
 Ginkgo Leaf Studio
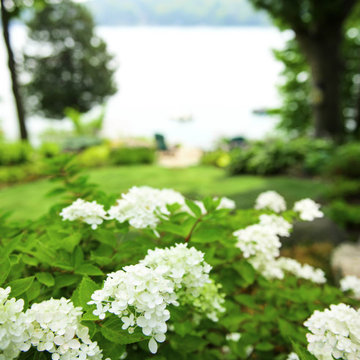
'Bobo' hydrangea were planted at the base of the existing patio. Their lower height prevents them from blocking the lake view.
Renn Kuhnen Photography
 Drury Design
The original idea was to update the tile floor and the tub. That’s it.
A further discussion of wants and needs revealed intentions for an eventual larger shower and an improved vanity storage. It made sense to map out the possibilities and design our update with potential next steps in mind. The process was exciting, ultimately leading to the decision to do a full primary bath remodel.
Design Objectives:
-Maintain existing locations for all major bathroom functions
-Make the shower larger and more open
-Use luxurious materials throughout
-Improve vanity storage and define accessories for specific items
-Incorporate luxury shower fixtures
-Include the latest technology
Design Challenges
-Enlarging the shower in a typical rectangular shape would block the view and light from the alcove windows behind the tub
-Logical placement of the built-in shower caddy and all shower components in accordance with how and where they were to be used
-Keeping the long, back wall free from any shower modules to maintain the decorative tile design
-Combining the owner’s existing smart home system with a comprehensive shower system
-Planning cabinetry for hidden storage and use for various small appliances and make-up
-Integrating expensive shower wall tile with less expensive wall tile for aesthetic and budget purposes
-Incorporating special design features to balance the highly decorative shower tile
Design solutions:
-A clipped corner was planned for the shower bench seat – this allowed for a larger glass wall. The glass wall at the angled bench also brought more natural light into the shower
-Thoughtful shower space design prevented the crowding of features – the shower caddy and handheld shower head were placed on the full-height wall by the shower bench, the regular shower head and body sprays remained on the opposite wall, and the rain head was placed in the center of the shower
-A multi-port DTV system was installed, providing control of all shower components, including chromotherapy and music inside and outside the shower
-The lavish water-jet stone and glass decorative tile was paired with a less-expensive glass tile found in the mosaic
-Pull-out grooming organizers and electrical docking stations were incorporated into the cabinetry
Additional storage was created in the lower corner cabinet
The homeowners are thrilled with their new primary bathroom. Clear goals and carefully evaluated materials informed a fun and functional design that is both thoughtful and sumptuous!

 Designed with Grace & Joy
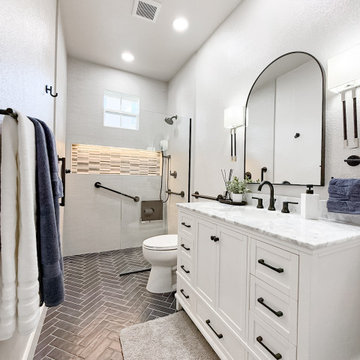
This bathroom remodel by Designed with Grace & Joy is a thoughtful blend of accessibility, comfort, and elevated design. Created with the homeowner’s long-term lifestyle in mind, this transformation proves that functional spaces can still feel luxurious and refined.
The layout was completely reimagined to feature a single-level floor with no shower threshold, ensuring seamless wheelchair accessibility and safe movement throughout the space. Strategically placed grab bars provide added stability without compromising the overall aesthetic. A drop-down shower seat and handheld shower fixture introduce flexibility and comfort, while the relocated shower controller prevents the shock of stepping into cold water.
To enhance both function and ambiance, a sleek lighted niche was integrated into the shower for practical storage and a soft glow. The removal of the dual-level ceiling visually expanded the room, creating an open, airy atmosphere that feels modern and inviting.
The result is a bathroom that balances smart universal design principles with timeless elegance — a space that supports everyday living while maintaining a clean, sophisticated look.


 Smart-Solutiions
The Science of Light and Learning
To understand the relationship between lighting and learning, it’s critical to grasp the concept of correlated colour temperature (CCT). CCT refers to the warmth or coolness of light, measured in Kelvin (K). Lower CCTs (around 3000K) provide a warm, cosy atmosphere, while higher CCTs (5000K or above) emit a cool, daylight-like glow. Studies have shown that cool white light, which mimics natural daylight, can increase alertness and mood, contributing to improved cognitive performance. LED lighting, with its ability to produce this desired CCT, makes an ideal choice for educational settings.
LED Lighting: Brightening the Future of Education
Energy Efficiency and Cost Effectiveness
One of the main advantages of LED lighting is its energy efficiency. Traditional lighting solutions like fluorescent and incandescent bulbs consume much more energy to produce the same amount of light as LEDs, which is not only environmentally harmful but also financially costly. Switching to LED lights can result in substantial cost savings for schools, enabling them to redirect funds to other critical areas of education.
Durability and Longevity
LED lights are renowned for their durability and longevity. They have a significantly longer lifespan compared to conventional lights, which means less frequent replacement and reduced maintenance costs. This durability also minimises disruptions caused by light failure, providing a consistent, well-lit learning environment.
Improved Visibility and Reduced Eye Strain
With their superior colour rendering index (CRI), LED lights render colours more accurately, leading to improved visibility. This is particularly beneficial in educational settings, where activities often require distinguishing fine details and colours. LED lights also emit less glare than traditional lighting solutions, reducing eye strain and fatigue. This can lead to better concentration and increased comfort for both students and teachers.
Incorporating LED Lighting in Classrooms: Practical Considerations
When transitioning to LED lighting in classrooms, a few key factors need to be taken into account. Firstly, the lighting design should ensure an even distribution of light, preventing shadowy or overly bright spots that could distract or discomfort students. Secondly, the integration of dimming capabilities can provide flexibility, allowing educators to adjust the lighting level based on the task at hand. Finally, lighting controls can be used to take advantage of natural light, automatically dimming or turning off the LEDs when sufficient daylight is present.
Conclusion: The Bright Promise of LED Lighting in Education
As education systems continue to evolve, it’s imperative to keep sight of the physical factors that significantly impact learning, one of which is lighting. LED technology, with its myriad benefits, offers an innovative and effective way to enhance the quality of lighting in classrooms. By prioritising investments in such improvements, we can take a significant step towards creating an optimised learning environment that nurtures the educational success of future generations.
 Nova Remodeling Inc
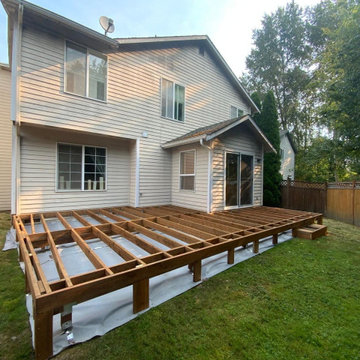
his Burien deck project transformed a basic backyard into a stunning outdoor living space.
We started by laying a solid foundation with pressure-treated framing to ensure structural stability. A weather-resistant barrier was installed beneath to prevent moisture damage and enhance longevity. The deck surface was crafted with high-performance composite decking, offering a sleek, modern appearance with minimal maintenance required.
A custom wrap-around design was integrated, expanding functionality and creating multiple entertaining zones. Sturdy steps and seamless edging provided a polished, finished look. The project was completed with a stylish planter box, blending natural elements into the design while maximizing outdoor comfort.
The result is a high-end deck built to withstand the elements while elevating the home’s curb appeal and usability. This Burien deck renovation showcases expert craftsmanship and high-quality materials, making it the perfect spot for relaxation and gatherings.
 Prime Builders & Experts
Project Description:
3D Backyard Design
We created a 3D rendering to fully show our client the outcome of her backyard remodel project. You can see from the 3D renderings we literally brought her vision to life.
Complete Backyard Remodel
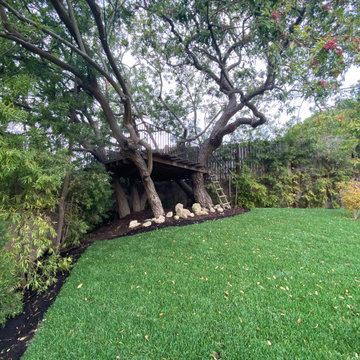
We installed new pavers for the large walkway that runs from the front to the back of the backyard. We built a large concrete wall with stucco all around for privacy. The new courtyard also has new pavers, grass sections, and a sprinkler system. We planted new trees and built a wood-raised vegetable bed. For decorative accents, we added new concrete steps, smart exterior lights, artificial turf installation, river rock installation, and new drain lines to prevent flooding. We also built a custom floating deck that sits in between trees.
 Houseplay Renovations LLC
It is a truth universally acknowledged that a homeowner in possession of a leaking roof must be in want of repairs.
And though it makes for a fun Jane Austen allusion, an unreliable roof is a serious problem. Water can cause a great deal of damage in a short time, so this homeowner wisely called us in to help.
The roof of this custom-designed home was leaking in myriad locations, so our team removed the existing roof decks to access and repair the exterior trouble spots.
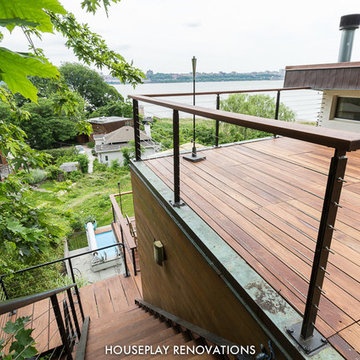
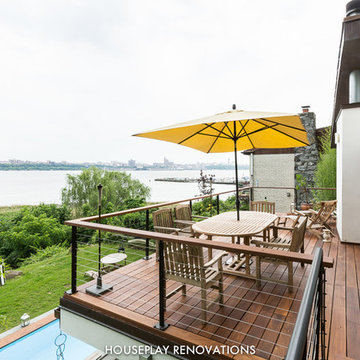
The new deck was constructed atop a Bison pedestal system; in fact, we custom-designed the deck in panels that can be lifted for seasonal roof sweeping and simpler maintenance.
The various roof decks were rebuilt with both reclaimed decking and new ipe decking. Our team also removed several faulty parapet walls and replaced them with a mixture of stainless steel cables and ipe railings.
Finally, we took steps to prevent future drainage problems by applying a sealcoat to the exterior stucco and creating a copper drip-edge too.
Leaking roofs are no laughing matter, but thanks to Houseplay, this story — like Austen’s Pride and Prejudice — had a happy ending.
Photo Credit: Anne Ruthmann Photography
 Nova Remodeling Inc
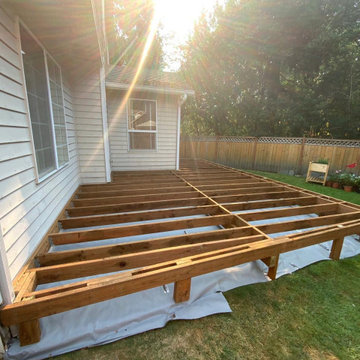
his Burien deck project transformed a basic backyard into a stunning outdoor living space.
We started by laying a solid foundation with pressure-treated framing to ensure structural stability. A weather-resistant barrier was installed beneath to prevent moisture damage and enhance longevity. The deck surface was crafted with high-performance composite decking, offering a sleek, modern appearance with minimal maintenance required.
A custom wrap-around design was integrated, expanding functionality and creating multiple entertaining zones. Sturdy steps and seamless edging provided a polished, finished look. The project was completed with a stylish planter box, blending natural elements into the design while maximizing outdoor comfort.
The result is a high-end deck built to withstand the elements while elevating the home’s curb appeal and usability. This Burien deck renovation showcases expert craftsmanship and high-quality materials, making it the perfect spot for relaxation and gatherings.
 Houseplay Renovations LLC
It is a truth universally acknowledged that a homeowner in possession of a leaking roof must be in want of repairs.
And though it makes for a fun Jane Austen allusion, an unreliable roof is a serious problem. Water can cause a great deal of damage in a short time, so this homeowner wisely called us in to help.
The roof of this custom-designed home was leaking in myriad locations, so our team removed the existing roof decks to access and repair the exterior trouble spots.
The new deck was constructed atop a Bison pedestal system; in fact, we custom-designed the deck in panels that can be lifted for seasonal roof sweeping and simpler maintenance.
The various roof decks were rebuilt with both reclaimed decking and new ipe decking. Our team also removed several faulty parapet walls and replaced them with a mixture of stainless steel cables and ipe railings.
Finally, we took steps to prevent future drainage problems by applying a sealcoat to the exterior stucco and creating a copper drip-edge too.
Leaking roofs are no laughing matter, but thanks to Houseplay, this story — like Austen’s Pride and Prejudice — had a happy ending.
Photo Credit: Anne Ruthmann Photography
 Integrated Home Improvement
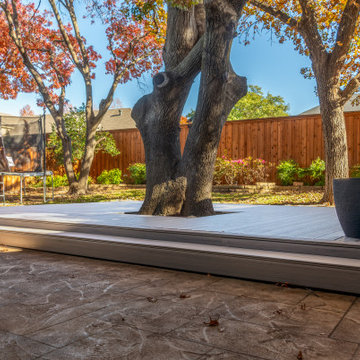
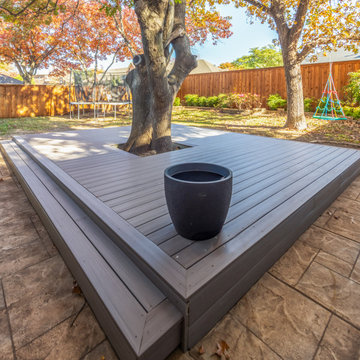
This new deck is made of grey composite material. A metal piece was added at the bottom to prevent animals from going down there. This grey composite material looks great and is going to last them a long time. We added a step, went around a tree enough to not get in the way of the roots, capped off some sprinklers, and also built in some hidden compartments that can be removed to access french drains.

 U.S. Wildlife Removal Service
As a 23 year professional in wildlife control, I see hundreds of situations every month with nuisance animals going into places that they don't belong. Some of those places are more common than others. I recently addressed a skunk infestation for a residence in Glen Ellyn, IL. The challenge involved a family of skunks that had taken residence under the front concrete stoop. Concrete and skunks are never a good mix because concrete is porous, when a skunk sprays the odors penetrate and will permeate for months and months as the weather gets warm or humidity rises.
My approach was methodical and focused on humane Glen Ellyn skunk removal.
The process began with the strategic placement of live traps near the stoop, ensuring minimal distress to the animals. These traps are industry standard, designed to safely contain the skunks without harm. Regular monitoring of these traps was a critical part of the process, ensuring the skunks were not confined for an extended period.
Upon successful capture, the skunks were removed and the animal proofing work was next on the list.
Skunk exclusion work, is a critical component in preventing future infestations of skunks, raccoons or opossums. This involved a thorough inspection and sealing of potential entry points with steel mesh buried underground at a specific depth and angle. Skunk-proofing is a vital step in ensuring long-term resolution to wildlife intrusions.
Once the skunks were gone and the area was sealed, we performed an ozone treatment to the basement with a special filter to sub the air, destroying the skunk spray's odor molecules from the air. Typically the reason people discover skunks under the stoop to begin with is because the odor from spraying.
For residents in and around Glen Ellyn experiencing similar issues, we offer humane, effective, and affordable wildlife control solutions. Expertise in skunk removal and exclusion is just a call away!
 Integrated Home Improvement
This new deck is made of grey composite material. A metal piece was added at the bottom to prevent animals from going down there. This grey composite material looks great and is going to last them a long time. We added a step, went around a tree enough to not get in the way of the roots, capped off some sprinklers, and also built in some hidden compartments that can be removed to access french drains.
 Windy City Painters
Iron Fence Painting Lincoln Park Chicago - Professional Metal Refinishing
Windy City Painters completed this comprehensive iron fence painting project for a beautiful Lincoln Park greystone property. Lincoln Park's historic architecture demands careful attention to detail, and furthermore, Chicago's harsh weather conditions require professional-grade materials and techniques for lasting protection.
We utilized premium Sherwin-Williams rust inhibiting primer and Benjamin Moore exterior metal paint for maximum durability. Additionally, our team employed specialized rust removal tools and surface preparation equipment to ensure optimal adhesion and longevity.
Our four-step process included complete rust removal and surface cleaning, minor repairs to damaged sections, premium primer application with proper curing time, and final topcoat application using spray and brush techniques for even coverage.
Chicago's unique challenges include extreme temperature fluctuations, salt exposure from winter treatments, and moisture from Lake Michigan. Moreover, older properties often have multiple paint layers requiring careful removal. Therefore, professional expertise ensures proper preparation and material selection.
The results exceeded client expectations with a smooth, durable finish that enhances the property's curb appeal. Subsequently, the fence now provides years of protection while complementing the neighborhood's architectural character perfectly.
Before starting similar projects, homeowners should understand that proper surface preparation accounts for 80% of project success. Additionally, weather conditions significantly impact application timing and results.
See more work and request free estimate at windypainters.com.
Frequently Asked Questions:
Q: How much does iron fence painting cost in Lincoln Park Chicago?
A: Iron fence painting costs vary based on fence size, existing condition, rust damage extent, and preparation requirements needed.
Q: What preparation is required for successful iron fence painting projects?
A: Iron fence painting requires thorough rust removal, surface cleaning, minor repairs, primer application, and proper weather conditions.
Q: How long does professional iron fence painting last in Chicago weather?
A: Professional iron fence painting typically lasts 8-12 years with quality materials, proper preparation, and regular maintenance.
Q: When is the best season for iron fence painting in Chicago?
A: Spring through early fall provides optimal conditions for iron fence painting with appropriate temperature and humidity levels.
Q: Can you match existing colors for iron fence painting restoration projects?
A: Yes, we provide custom color matching services for iron fence painting to complement existing architectural elements perfectly.
Q: Do you warranty iron fence painting work in Lincoln Park?
A: Windy City Painters provides comprehensive warranties on all iron fence painting projects ensuring quality and customer satisfaction.
Q: What makes professional iron fence painting worth the investment cost?
A: Professional iron fence painting ensures proper preparation, quality materials, expert application techniques, and significantly extended fence lifespan.
Q: How do you prevent rust from returning after iron fence painting?
A: Our iron fence painting process includes rust inhibiting primer, quality topcoats, and proper surface preparation for maximum protection.
Q: Can iron fence painting increase Lincoln Park property values significantly?
A: Professional iron fence painting enhances curb appeal, property aesthetics, and market value in desirable Lincoln Park neighborhood.
Q: What safety precautions are necessary during iron fence painting projects?
A: Iron fence painting requires proper ventilation, protective equipment, lead paint testing, and professional safety protocols throughout.
 FormLA Landscaping
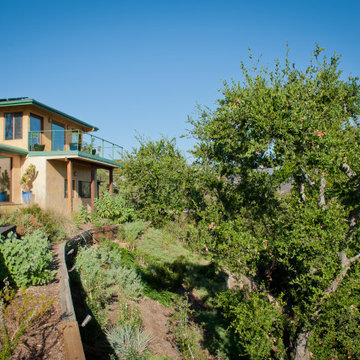
Several steps were taken to minimize the risk of the deck igniting. Embers like to collect under decks where they can use collected leaf litter as fuel to gain enough heat to burn wood. We prevent that by sealing off the under-side of the deck with concrete hardy board. Next, two layers of irrigated and compost-mulched native, hydration-holding foliage defends the deck from embers. The beautiful, dense oak tree canopy on the right of this photo is the deck's greatest defense, protecting both the top and under deck from flying embers. Photo: Lesly Hall Photography
 Naturescapes Landscape Specialists, Ltd
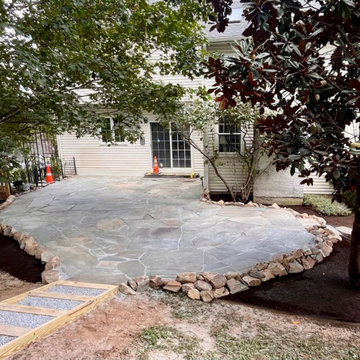
This project in Downingtown focused on refreshing a rear patio while preserving a natural, organic look that blends seamlessly with the surrounding landscape.
Building a Strong, Natural Foundation
We began by carefully grading and leveling the patio area to create a stable base for the installation. To reinforce the perimeter and maintain long-term durability, small boulders were tightly placed along the edges. This approach not only enhances the natural aesthetic but also helps prevent the loss of base material over time.
With the foundation prepared, we installed irregular flagstone, cutting and fitting each piece with precision. The result is a clean, tightly joined surface that resembles a natural stone puzzle, structured yet organic in appearance.
Bringing It All Together
To improve flow throughout the yard, stepping stone pathways were added on both sides of the patio. These pathways create smooth, intuitive transitions to other areas of the rear garden while maintaining the same natural design language.
To complete the project, we constructed a flagstone walkway connecting the driveway to the rear garden. This addition enhances accessibility and ties the entire outdoor space together, creating a cohesive, functional environment that feels both intentional and effortlessly natural.
If you’re looking to create a natural, beautifully crafted patio or walkway in Downingtown or anywhere around Chester County, our team is here to help. From thoughtful design to precise installation, we bring outdoor spaces to life with lasting quality and care. Contact us today to schedule a consultation and start planning your transformation.
 Aquatic Technology Pool and Spa
Paolo Benedetti, Aquatic Technology Pool and Spa, Aquatic Artist, Watershape Consultant, Expert Witness
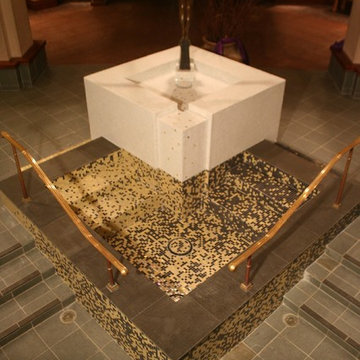
This font was reconstructed in a precise space, within the existing steps. The railings were relocated stop the curb to add stability and to prevent sitting on the edge.
The theology of the materials can be clearly seen in this overhead shot. Thin tiles of flamed granite were used to top the lower vessel, so that the elevations remained consistent.
The entire concept was researched and designed by Paolo Benedetti. Private chapels, baptismal fonts and Byzantine mosaics are specialties of this internationally renown designer and builder.
34