
Search results for "Proceeds" in Home Design Ideas
 ONE Design
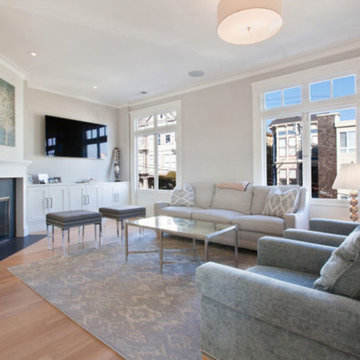
A diamond in the rough was polished to a new brilliance in this remodel. Moving the kitchen to be front and center of everything was the key to this remodel. Carrying the motif of less is more, this remodel emphasized the qualities this Parisian-styled home had with a modern open floor plan. Working through different design studies with the client, we identified the optimum layout and created space for an additional bedroom. Fusing old world details with contemporary living, we ensured the rehabilitation pays homage to its original detailing while expressing a bold narrative, delicately balanced within the original structural framework. Careful detailing of the structural elements ensured the work could proceed without affecting the unit below. Completed in 2014, this home now offers its young family the full urban experience of stylish San Francisco living.
 Simply Perfect
Advice on interior design is available everywhere—from TV shows and websites to books, magazines and apps.
We love seeing people become engaged in design and educated on the wide range of possibilities. But we hope you’ll proceed with caution.
It’s not that style errors are a matter of life and death. It’s just that it’s easy to choose designs that aren’t necessarily reflective of your own personality and character. And since you’re typically stuck with your interior design decisions for years, styles that don’t quite fit can tend to grate on you.
Interiors that give one person comfort may unleash chaos in someone else. This goes beyond favorite colors or hot trends, right to the heart of interior design, where you find questions of composition, balance, repetition, space and more.
The goal is to find that unique combination of design elements that gives you comfort, support and balance.
In one home, that perfect balance was struck through the use of symmetry. A pair of comfortable swivel chairs sit beneath matching indigo patterned paintings. Matching bookcases below the paintings contain similar, but not identical, arrangements of books, vases and bowls. Woods and bronzes help warm up the simple white bookcase shelving.
Two matching poufs in front of the fireplace provide additional seating. The sofa is accented with a pair of pillows with a blue pattern that echoes the artwork.
The effect of the symmetry is to achieve order and simplicity, which I promote at every opportunity. After all, your home interiors should be the setting or the backdrop of your life—not center stage.
Antique bronze and blue are complementary colors. Together, they offer a rich palette of richness and depth, which brings out the beauty of wood and stone.
In the home office, a unique, whitewash-stained wooden desk rests on metal, Sawhorse-inspired legs for a warm, rustic look. The black leather chair features a contemporary silhouette with an antique brass frame. An adjustable desk lamp has bronze accents.
The bookcase combines a sleek, black metal frame with concrete shelves, for another unusual pairing. It’s kept uncluttered for an orderly, peaceful look. Items on the shelves include a bronze-accented lamp and a pair
of high gloss-finished wooden bookends.
The elegant artwork behind the desk is a simple midnight-blue and bronze with mottled white. Deep blues are again picked up in the rug, which adds a stately vibe with a modern pattern and satisfying texture.
Within the framework of symmetry, the living room repeats the blue-and-bronze color scheme.
A large midcentury brass clock above the fireplace keeps the natural stone visible, rather than hidden behind a painting or television, while its straight lines and color create a beautiful contrast.
The sofa is a soft, neutral blue. The pattern on the round brass side table features echoes the darker blue-patterned rug, as well as the rug in the office, tying the rooms together.
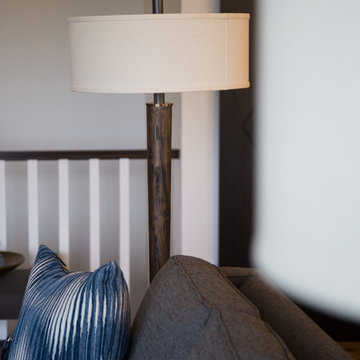
Indigo blue books adjacent to bronze vases on the shelves repeat the color scheme. The soapstone-topped coffee table echoes the shape of the fireplace. A pair of tall, matching floor lamps with long wooden bases, brass pulls and simple linen shades combine both the colors and symmetry found throughout the home.
 Tile Doctor Ltd
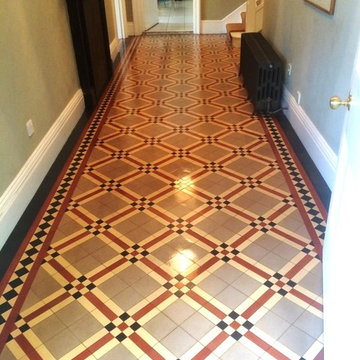
A client from the village of Heytesbury contacted me to see whether we could improve the look of her Victorian tiled hallway floor. It turns out that a competitor had previously cleaned and sealed it two years prior but she was disappointed with the result once she realised that the floor still had dirt ingrained in the tile. As per our normal practice we ran a test clean and she booked us in immediately.
We started by wetting the floor using a strong solution of Tile Doctor Pro-Clean and left it dwell for ten minutes. We then attached a black stripping pad to a rotary machine and slowly covered the whole area to remove ingrained dirt and any existing seals that may be evident. The dirty slurry was then removed with a wet vacuum and then floor rinsed with the aid of a deck brush and a wet vacuum.
Next we used a heavy duty scraper to remove paint splashes around the edges from years of decorating. Once we were satisfied we’d removed all evident dirt, seal and paint we rinsed the floor thoroughly several times to make sure all contaminants are removed again using the wet vacuum to remove the water.
We returned five days later to let the floor dry out thoroughly. Upon our return we tested with a damp meter which tested fine so we proceeded to seal the floor using six coats of Tile Doctor Seal & Go to provide protection and add a nice sheen to the floor which I think you will agree now looks amazing.
Stuart Ford
Wiltshire Tile Doctor
Find the right local pro for your project
 Division 9 Inc.
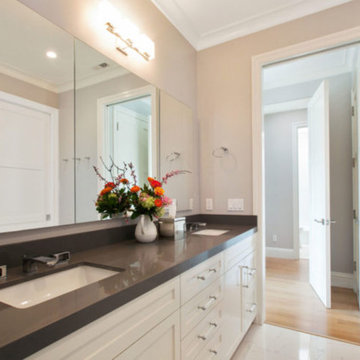
One of the top factors that can influence the value of a property is the Master Bathroom. During the complete makeover on this project, we proceeded with the complete demolition of the existing master bathroom, including floors, vanity, plumbing, lighting fixtures, toitel and tub.
In collaboration with the prestigious designer, Roberto Lugo, the D9 team worked on the layout for the Master Bathroom. With the plan of optimizing the space, we gave ample room to the vanity and the shower to allow them to include all the requested features from the homeowner.
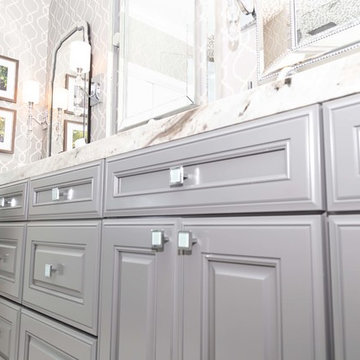
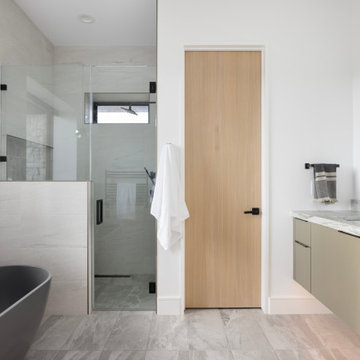
To create an inspiring and elegant atmosphere the combination of selected colors, textures and materials played a key role. The Master Bathroom was given elegance by the unique look of the gray toned Marble countertops, combined with the sophistication and detailed finish of the bathroom cabinets, and the neutral gray paint used to finish the raised-cabinets.
The shower enclosure presents a double shower with two Marble benches and four shower fixtures with hinged door.
 User
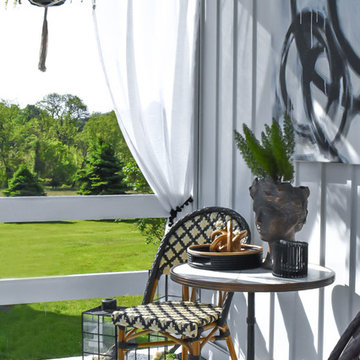
User44th Annual Bucks County Designer Showhouse + Gardens on historic Peppermint Farm. All proceeds benefit the Doylestown VIA.
Designed by Lotus + Lilac Design Studio
Items available for sale at Lotus + Lilac Shoppe- online designer furnishings + artisan made goods shoppe
Paint donated by Benjamin Moore
Outdoor sconce donated by Ferguson Lighting
 Beall's Nursery & Landscaping
Phase 3: Winter 2020
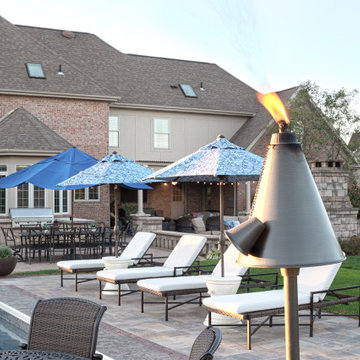
The homeowners contacted Beall’s and said they was ready to proceed with the pool installation. Our designers were excited to finish this amazing backyard and outdoor living space with a custom pool area and spa. A large, rectangular pool with an auto-cover was designed to include a spa which flowed into the pool. We utilized the same Unilock Brussels stone around the perimeter of the spa to compliment all of the other hardscape elements in the yard. A large bullnose limestone cap surrounded the top of the spa with undermount lighting to illuminate the perimeter in the evening. A shear descent waterfall was designed to appear as though the spa was spilling into the pool. In phase three, we also expanded the outdoor lighting in the backyard to compliment the new pool area.

 Gappsi
Excavation of this Gunite swimming pool in Roslyn, NY is started by marking up and laying out the pool according to town setbacks. We proceed with framing and establishing the pool shell’s rough height. Then the excavator will dig and shape the hole, preparing it for rebar installation. After the # 4 rebar is installed, creating a cage that outlines what will be the final shape of the Gunite swimming pool. The Gunite cement shell is installed by applying a mix of sand and Portland cement through a pump system which is pushed through a nozzle with the force of compressed air. As the cement comes out from the nozzle, water is sprayed simultaneously to create a bond between the sand and cement, forming the Gunite pool shell. In this particular pool, we also molded an autocover box on the deep end of the pool, and swim out bench with the same Gunite cement process. On the shallow end of the pool steps were also shaped in Gunite expanding across the width of the pool. At this stage the Gunite pool shell will be left to cure for 28 days, and water will be sprayed on the concrete shell daily to help the shell petrify. Stub plumbing is installed through the Gunite walls for future connection of plumbing pipes. The skimmers are also placed in the pool before Gunite is sprayed, which encases them in concrete. Plumbing for the bottom drains, and pressure relief valve are placed in the floor, in case in the future the pool needs to be emptied and ground hydraulic pressure is under the pool due to high water tables. On top of the pool shell, along the length of the pool a groove is left in the shell for future installation of the Auto Cover track. The pool shell was constructed 10″ wide for the wall and 8″ wide for the deep end bowl and shallow area floor. Gappsi provides Gunite, Vinyl, Fiberglass Swimming pools and Hot Tubs for Residential
and commercial application in Suffolk and Nassau County Long Island NY, http://gappsi.com/long-island-swimming-pool-companies-designs-builders-construction-ny.html
Gappsi also provideDesign and installation of Landscape and Masonry for all Suffolk and Nassau County Long Island NY. http://gappsi.com/landscape-design-long-island-ny-landscaping-companies.html
Gappsi also provides Home Remodeling Kitchens and Baths Roofing and siding for residence of Suffolk and Nassau County Long Island NY. http://gappsi.com/long-island-home-improvement-remodeling-general-contractor-ny.html
If in need of Lawn and garden irrigation, in Suffolk and Nassau Gappsi can provide these services http://gappsi.com/irrigation/ along with PVC, wood aluminum and lop-loc fences installation. http://gappsi.com/fences/
To preserve and beautify yournatural Paving stones in Suffolk and Nassau County Long Island NY Gappsi offers cleaning and sealing of patios Driveways and retaining walls. For commercial and residential Applications in Suffolk and Nassau County Long Island NY. http://gappsi.com/patio-cleaning-and-sealing/
Our Showroom displays the most unique Travertine, Porphyry, Granite, Marble, Limestone and Sandstone pavers along with pool copings and veneers. Ready to be picked up at our Yard at 1015 West Jericho Turnpike Smithtown NY or delivered to your Location in Suffolk and Nassau County Long Island NY http://pavingstoneselect.com/
To complete your landscapes outdoor Sports and recreations Gappsi offers Bocce Courts, Putting greens, Sports and Tennis Courts also supply and installation of Synthetic Turf. http://deckandpationaturalstones.com/artificial-grass-synthetic-turf-installation-long-island-ny.html+
 BURNETTE BUILDERS
This beautiful traditional hill country-style home highlighted with contemporary elements on a family plot bringing two generations closer together.
Approaching the home, you notice the traditional Texas hill country aesthetics of limestone paired with a metal roof, but these features change as you proceed to the back exterior elevation. The back of the home is composed mostly of glass and steel, to create a luminous harmonization with the outdoors and showcase an open staircase. Integrating these contemporary design elements required much attention to detail from the Burnette team.
 Progressive Design Build
The goal for this husband and wife team was to create a functional home for their family. Because they love to entertain, they wanted to see how they could accommodate guests and extended family—improving the layout and functionality of their Bonita Bay home of more than eight years.
Having worked with remodeling contractors in the past, they were reluctant to proceed. They had experienced a remodeling fiasco that drug on beyond their expected completion dates and went well over budget. This time, they hired a local architect, an interior designer, and Progressive Design Build as the general contractor. The three teams worked together to formulate a clear vision and plans for the renovation. Once this husband and wife team knew exactly what they wanted to achieve and had a design plan in hand, they set about creating a modern and functional outdoor living space. The three teams worked together to finalize the design and the budget—no headaches, not delays.
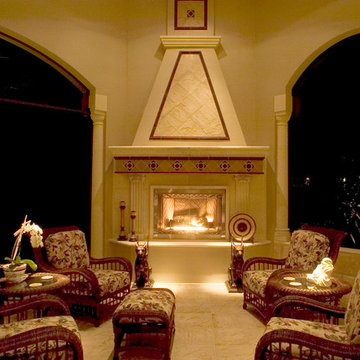
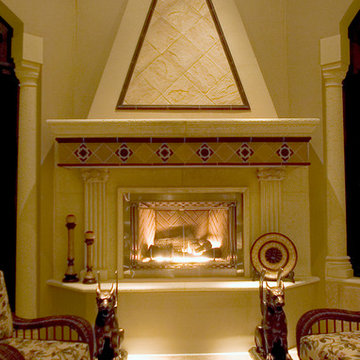
After six months (two months finalizing the design and budget, and four months to build), this project finished on time and on budget and resulted in a beautiful outdoor living space that consisted of a massive outdoor kitchen with a separate dining area and sitting area, 20-foot tall vaulted ceilings, a beautiful glass fireplace and cost stone balustrades. It was finished with cast stone columns, huge stucco arches, a high tech lighting system and porcelain tile floors.

 Progressive Design Build
The goal for this husband and wife team was to create a functional home for their family. Because they love to entertain, they wanted to see how they could accommodate guests and extended family—improving the layout and functionality of their Bonita Bay home of more than eight years.
Having worked with remodeling contractors in the past, they were reluctant to proceed. They had experienced a remodeling fiasco that drug on beyond their expected completion dates and went well over budget. This time, they hired a local architect, an interior designer, and Progressive Design Build as the general contractor. The three teams worked together to formulate a clear vision and plans for the renovation. Once this husband and wife team knew exactly what they wanted to achieve and had a design plan in hand, they set about creating a modern and functional outdoor living space. The three teams worked together to finalize the design and the budget—no headaches, not delays.
After six months (two months finalizing the design and budget, and four months to build), this project finished on time and on budget and resulted in a beautiful outdoor living space that consisted of a massive outdoor kitchen with a separate dining area and sitting area, 20-foot tall vaulted ceilings, a beautiful glass fireplace and cost stone balustrades. It was finished with cast stone columns, huge stucco arches, a high tech lighting system and porcelain tile floors.
 Nathan Allan Glass Studios Inc.
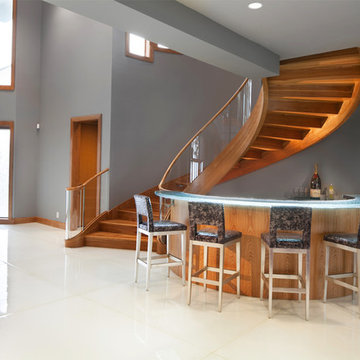
What surprises people most when entering and walking on the glowing white surface in this particular Private Residence (Williamsburg, VA) is when they find out they are walking on a sea of glass! Yes, GLASS! Not marble, not granite, but GLASS! Nathan Allan has created a very fresh, unique flooring surface, which is smooth to touch on the majority of the glass surface, yet has an almost invisible safety finish permanently embedded in the glass surface.
THE GLASS
Nathan Allan’s Glass Flooring incorporates features which are visually stunning, while also providing a safety finish which provides comfort to everyone walking on the glass. Our Sandstone texture is forged into the bottom surface of the glass, while our exclusive Glass Sandpaper safety finish is fused onto the walking surface. To enhance all features, we added a bright, sparkling, White Metallic color finish throughout each flooring panel.
SPECIFICATIONS
Each Glass Flooring panel is produced in 1/2″ (12mm) thick, Low Iron, tempered safety glass. Tempered glass provides added strength, insuring that the Glass Flooring can accept a heavy load. Panels vary in size and dimension, with most panels measured at a block size of 5’0 x 6’0 (1500mm x 1800mm). Perimeter Edge panels were carved and shaped to fit tightly against the curved walls. Glass Sandpaper, ASTM tested in labs with the highest slip-coefficient safety ratings, is fused onto the walking surface, to provide a very comfortable and effective safety feature.
Flooring Glass Details:
1/2″ (12mm) thick, Low iron tempered safety glass
Flat Polished Edges
Glass Sandpaper on walking surface
Sandstone texture on bottom surface
White Metallic color finish on bottom surface
Panels sizes up to 5’0 x 6’0
Approximately 800 square feet of glass flooring
Perimeter panels shape cut to fit
Almost overshadowed by the spectacular flooring is a 1.5” thick, Heavy Glasstop, Crescent shaped, with Nathan Allan’s Rocky Mountain texture.
DESIGN
A White Sea of Glass flooring is the finished result of combining a light Sandstone texture on the bottom glass surface, with the added touch of a sparkling White Metallic color finish. Combined with our Glass Sandpaper safety finish, and the natural and artificial light sources, our Glass Flooring shimmers within the entire entrance space.
INSTALLATION
Using very important installation techniques, Nathan Allan worked hand in hand with great team of professionals: Vicki Bristow, designer, W. M. Jordan Company, GC, and Pompei Inc, glass flooring installer. Templates were produced for all perimeter edge panels, and every shaped panel. All flooring panels are secured to the substrate with special adhesives, and joints are filled with matching color sealants.
“A beautiful project is always enhanced when working with quality, prestigious builders, and talented trade’s people. The tight organization and open communication by all the team members contributed greatly to a project proceeding seamlessly, with the incredible visual results to prove it.” Barry Allan – Director
Photo credit: Morgan Howarth
 Linda Edelwich Realtor
LAKE LIFE LUXURY AWAITS! Discover absolute move-in perfection in this meticulously renovated 3-bedroom, 2-full-bath one floor living RANCH HOME just a short stroll from pristine Andover Lake, where you'll simply bring your keys and kayaks to start living your dream. This exceptional property showcases designer upgrades throughout, including a brand-new kitchen with stunning granite countertops, completely renovated bathrooms, refinished hardwood floors, new boiler 2025 and a new roof installed Fall 2023. Architectural highlights include a distinctive hip roof, elegant brick facade, extra-large bay window in the fireplaced living room, and an attached 2-car garage complemented by a spacious basement offering tremendous expansion possibilities. Step outside to entertain on your new paver patio nestled on a beautifully private treed lot before taking the 2.7-mile walking path around the lake-a perfect daily exercise routine. ENJOY the tranquil Andover Lake lifestyle with optional membership granting access to swimming, sailing, kayaking, and year-round fishing in crystal-clear waters where motorboats are prohibited, preserving the lake's unspoiled serenity. This lake community cherishes lakefront living while offering surprising convenience to schools, shopping, dining, and major highways. Your lakeside sanctuary awaits in this turnkey property where every detail has been thoughtfully addressed for your immediate enjoyment. This is true 1 floor living.
 Gallery KBNY
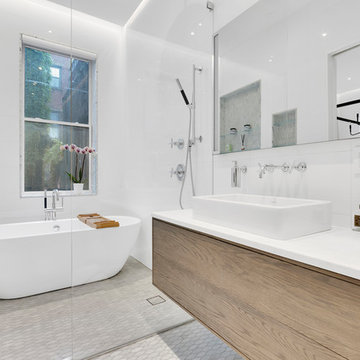
The owner of this historic and landmarked town-home renovation in Hudson Square, originally built in 1826, hired Gallery Kitchen and Bath to fully gut-renovate this 3-unit row-home. The scope of work included a full-scale renovation of the owners unit, including the renovation of the kitchen, one 4-piece master ensuite bathroom, one 3-piece bathroom with a walk-in steam shower, and a beautiful powder room. Additional work in the owners unit also included flooring, electrical upgrade, major plumbing work, new HVAC system, restoration of a fireplace, installation of a fully integrated smart home system and landmarked approved windows.
CELLAR RENOVATION IN NYC LANDMARKED TOWN-HOME
Rounding out the owners unit we renovated the cellar, which was converted into an entertainment space and featured a custom glass curtain wall, along with a custom staircase with an exposed brick wall. During the demolition phase of the cellar, our team discovered 56 wine jugs filled with wine from the prohibition era, leading us to name this project the prohibition house. For the two tenant units, Gallery Kitchen and Bath undertook the renovation of 2 kitchens, 4 bathrooms, new hardwood flooring throughout, along with detailed carpentry work in the entire home.
WHY GALLERY KITCHEN AND BATH
After interviewing multiple contractors, our client decided on Gallery Kitchen and Bath primarily because of our turnkey design, selection, and build process. In a renovation of this magnitude it is crucial to have a centralized full service contractor under one roof to handle all of the aspects and simultaneous moving parts of the project. Decentralizing the entire process by having multiple unaffiliated vendors handle various parts of the process can easily become chaotic, time consuming, and costly.
Because Gallery Kitchen and Bath undertook the entire process, from the design of the entire space to the selection and procurement of all finishes and fixtures, down to the procurement of all permits and LPC filings, it made a seemingly chaotic project a’lot more manageable.
PHASE 1: DESIGN, SELECTION, PROCUREMENT
Our client wanted the renovation to incorporate a fully modern design into his Hudson Square town-house. Being that this is a landmarked property, the exterior facade had to be restored and kept with the original aesthetic, the interior of the home however was a whole different story.
In keeping up with the modern aesthetic, our designers went to work to design a custom kitchen that included fully custom flat panel base cabinets in a white high gloss finish and an absolute matte black appliance/pantry wall. The kitchen design also included a white quartz countertop and backsplash with a waterfall edge island. To bring warmth to the modern kitchen, our designers incorporated a rifted and quartered select oak wood floor in a herringbone pattern, and custom blended stain with matte polyurethane finish. For continuity, the wood floor was also extended throughout the entire owners unit.
In the ensuite bathroom we created a “wet area” which houses a standalone soaking tub as well as a beautiful rainfall shower, completely leveled with the rest of the floor in the bathroom. Some highlights within this space include a tiled square drain, large niche cutouts with a carrera marble accents. Once again, to bring warmth to this modern bathroom, our designers incorporated a floating rustic oak vanity and carrera marble mosaic floor tile.
Last on the list on the owners unit floor was the cellar, which our client wanted to utilize as an entertainment space for his friends and family. During the design phase, we incorporated an open concept layout, wedding the indoor and outdoor space with a custom glass curtain wall. The design also included custom walnut built-ins that serve as a custom wet bar and storage piece.
With the design approved and selections made our office liaisons moved to procure all of the material selections and finishes.
PHASE 2: DEMO
Because this home is almost two centuries old, we had to take extra precaution during the interior demolition phase of the project. One specific area that we had to pay special attention to was the existing brick. Over time the mortar in old brick homes deteriorates and turns into dust – for this reason it was extremely important that a thorough and ongoing inspection of the exteriors and interior walls took place during the demolition of the space.
After 14 30-yard debris containers and 56 wine filled jugs from the prohibition era later , the demolition of this historic Hudson Square town-home came to an end. If you are wondering whether we tried the wine? After notifying the owner we agreed to open one of the jugs and try them together – nothing but vinegar.
PHASE 3: BUILD
One of the challenges in a renovation project of this scope is nailing down the logistics and delivery of fixtures and finish material. Adding to this challenge was a narrow entry door that required us to use a boom truck in order to deliver some of the larger materials on site. To ensure a succinct time schedule, we boomed all of the materials through the 3rd floor for the entire project and worked our renovation work from top floor to cellar. This technique also insured that any unexpected water issues during the renovation process would not damage a finished floor.
With all roughing and framing complete, the Gallery KBNY team proceeded to execute on the design plan.
THE REVEAL
From what was once a dilapidated town-home with nothing but potential, to a glamorous and luxurious modern interior space – the prohibition house was complete. Ready to speak with us about your renovation project? Contact us to schedule your free consultation and let Gallery KBNY show you why our all-inclusive approach to your renovation is the smartest way to renovating in NYC.
 Tile Doctor Ltd
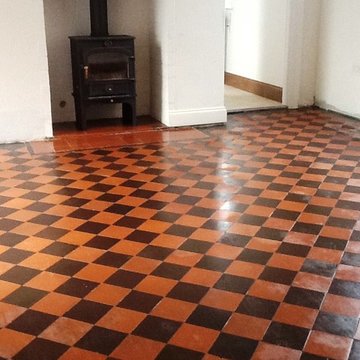
A customer called me out to take a look at restoring the Red and Black Victorian Quarry tiles floor they had discovered under linoleum In the kitchen of their house in the town of Rushden.
I carried out a patch test to see which products would have the best results and although most of the old sealants had worn of over time there was still glue from the lino and patches of sealer that would have to be dealt with. A quote was given and accepted and the work was booked in to the customer’s convenience.
After vacuuming and mopping the floor I decided my best course of action would be to spray Tile Doctor Remove and Go to 25% of the area, this was then scrubbed in by machine using a black stripping pad. This area was then rinsed off with an extraction machine and the process repeated over the rest of the floor. I then inspected the floor and noticed a few shiny patches where the sealant hadn’t been fully removed so I then tackled these stubborn areas by hand with a second application of Remove & Go. A final rinse to the whole floor was given to make sure no trace of cleaning product remained before sealing.
As much water as possible was removed using the extraction machine and a dehumidifier installed and left for seven days to assist the drying process.
On my return I confirmed the floor had dried thoroughly by taking took damp meter readings in different parts of the floor. All was well and so I proceeded to seal the tiles using multiple coats of Tile Doctor Seal and Go which matched the customers’ requirements of gloss finish.
As the pictures show there was a vast improvement in the floor and the customer was very pleased with the results. They were also given information on maintenance of this type of floor to keep it looking its best for years to come.
 De Young Properties
With overwhelming support by the community who dug deep and donated, the 2018 Central Valley St. Jude Dream Home Giveaway successfully raised $957,100 for St. Jude Children’s Research Hospital! Since 2007, De Young Properties has been a major donor and builder of 12 St. Jude Dream Homes, helping to raise $11,628,545 to help the kids of St. Jude fight cancer and other life-threatening childhood diseases. One hundred percent of the proceeds will be donated to St. Jude Children’s Research Hospital, which works around the clock to develop cures to save the lives of boys and girls, including children in the San Joaquin Valley.
“We strongly believe in our responsibility to help others, which is why the St. Jude’s Dream Home Giveaway is so important to us and our entire De Young team. We are grateful to our community’s continued support of our business – a community that has given so much to us, which is why we are so passionate about giving back. In fact, we are even more passionate today than we were in 2007 when we first partnered with St. Jude Children’s Research Hospital. We are honored to be a donor and builder of our 12th St. Jude Dream Home in this war against childhood cancer. St. Jude Children’s Research Hospital positively affects the lives of families across the country, in addition to giving us the opportunity to change the life of a local family,” said Paula De Young of De Young Properties. “This amazing pediatric research center, that not only treats life threatening cases in children, also freely gives guidance to doctors around the world and here in the Central Valley. We count ourselves fortunate to be able to help such an important cause”
The 2018 St. Jude Dream Home is one of the most popular De Young floorplans, the Residence 210 with a beautiful Cottage elevation, and will offer three bedrooms, two full bathrooms, a formal dining room, spacious den and an open-air courtyard with a gorgeous stone accented fireplace.
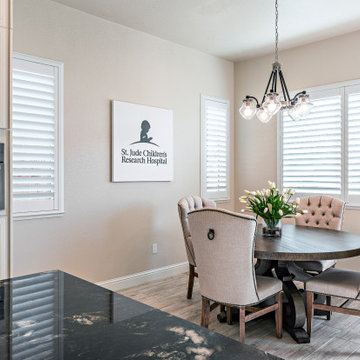
With celebrity designer, Michael Moloney, donating his design talent and resources once again as Design Ambassador for this year’s St. Jude Dream Home, the home boasts a long list of special features, including fashionable quartz and granite counters from Granite Mountain Stone Design, premium designer maple cabinetry and professional closet design from KraftMaid Cabinetry and stainless steel Bosch appliances with a gas range, washer, dryer and built-in refrigerator. In addition, premium-grade wood-look porcelain tile floors by Shaw Floors, spacious 10’ ceilings, professional and water efficient front and back yard landscaping, and Energy Star approved Eagle Brand Cool Roof Tile.
The prime Clovis location of the St. Jude Dream Home is in the De Young Trailside at Loma Vista community which is within walking distance to Reagan Educational Center and located within the greater 3,300-acre Loma Vista master-planned community designed by the City of Clovis. In addition, it is a short drive from Clovis Community Medical Center and a variety of entertainment and dining options including the Sierra Vista Mall, The Square at Campus Pointe, Old Town Clovis and even Wild Water Adventure Park. Easy access to Highway 168 and Herndon Avenue can provide a fast work commute during the week and a family outing to Shaver or Huntington lakes on the weekend and even more.
De Young Properties would like to once again thank everyone in the community who contributed their hard-earned dollars to this worthy cause. They are appreciative of everyone who donated, volunteered or purchased a ticket to win this year’s St. Jude Dream Home, and feel privileged to be able to help such an important cause.
 De Young Properties
With overwhelming support by the community who dug deep and donated, the 2017 Central Valley St. Jude Dream Home Giveaway successfully raised $961,100 for St. Jude Children’s Research Hospital! Since 2007, De Young Properties has been a major donor and builder of 11 St. Jude Dream Homes, helping to raise $10,671,445 to help the kids of St. Jude fight cancer and other life-threatening childhood diseases. One hundred percent of the proceeds will be donated to St. Jude Children’s Research Hospital, which works around the clock to develop cures to save the lives of boys and girls, including children in the San Joaquin Valley.
 ONE Design
A diamond in the rough was polished to a new brilliance in this remodel. Moving the kitchen to be front and center of everything was the key to this remodel. Carrying the motif of less is more, this remodel emphasized the qualities this Parisian-styled home had with a modern open floor plan. Working through different design studies with the client, we identified the optimum layout and created space for an additional bedroom. Fusing old world details with contemporary living, we ensured the rehabilitation pays homage to its original detailing while expressing a bold narrative, delicately balanced within the original structural framework. Careful detailing of the structural elements ensured the work could proceed without affecting the unit below. Completed in 2014, this home now offers its young family the full urban experience of stylish San Francisco living.
 United Home Experts
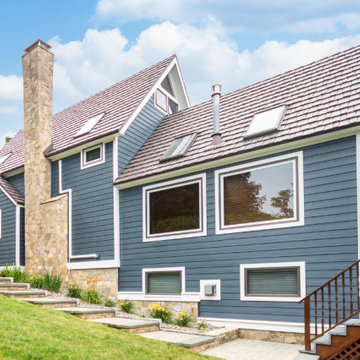
This beautiful, lakeside, colonial located in Hopkinton, MA underwent one of the most beautiful siding transformations of the year using our GorillaPlank™ Siding System.
Built in 1940, this lakeside home in Hopkinton, MA had old scalloped cedar shakes that had become old and worn out. The homeowners considered painting again, but did not want the costly expense of having to paint again, so they decided it was time to renovate and modernize their living space with a low-maintenance siding that closely resembled the appearance of wood.
Everlast Composite Siding was the siding of choice using our GorillaPlank™ Siding System.
Before installing the GorillaPlank™ Siding System, our expert team of installers went to work by stripping down the existing cedar shingles and clapboards down to the sheathing.
After verifying the underlying condition of the sheathing, our team went ahead and set staging to protect the beautiful metal roofs, then proceeded to install the moisture barrier to protect the sheathing, and then installed insulation for added protection and comfort.
Their house is now featuring Everlast Composite Siding in the 7” exposure of one of the newest colors, Blue Spruce!
 Envision Web
Stuart Wade, Envision Virtual Tours
Envision Virtual Tours and High Resolution Photography is your best choice to find just what you are looking for in the Ellijay, Ga. area .Ellijay, Georgia, known as the “Apple Capital” of Georgia, is located between the Ellijay and Cartecay Rivers where they join to make the Coosawattee River and is the county seat of Gilmer County, Georgia. The origin of the city’s name is not certain but thought to be the English derivative of an Indian word(s) meaning “many waters”, “place of green things” or “new ground”. Some histories say it may have been named for an Indian chief.
Inhabited for countless years by the Cherokee people indigenous to the North Georgia, the area was first mentioned as a village and trade center before the onslaught of white settlers inhabited the region. During the 1830’s both white settlers and Indians occupied Ellijay. During the original land lottery in 1832, Martin Scalf acquired the 160 acre lot where the town now stands. In 1833, Clemonds Quinland bought 10 acres from Scalf, retained one acre for himself and donated the rest of the purchase to the County. A plan for twenty town lots, streets and a public square was created and the streets were oriented to allow maximum sunlight exposure to the buildings.
Proceeds from lot sales were used to build a jail and courthouse and pay other city expenses. During this same year, Gilmer County was appropriated $800.00 from the State to build a school, and a three-acre lot was donated for the city cemetery. On December 29, l834, Ellijay was incorporated and designated as the County seat of Gilmer County. By 1837, the town had twenty dwellings, three stores and one attorney. Most of these early buildings were of log construction.
Many roads led to Ellijay by 1849. The population had grown to 150 by 1850 and the town at five stores. Some wood-frame buildings were being constructed at this time and in 1854, a new courthouse was built in the center of the square, replacing the earlier building. The County’s first newspaper was the Ellijay Courier, started in 1875, and during this time period, Ellijay was a stop on the stagecoach line. The railroad bridge over the Cartecay River was completed in 1884 and the town now had rail service.
With the arrival of the railroad and subsequent tracks to White Path, Ellijay began to grow much faster. Many hotels were constructed and land was donated for a depot east of town. More industries, such as a cheese factory and the Shippen Brothers Lumber Mill, located in Ellijay. By 1898, the city had expanded its limits in every direction and now included the depot.
By 1900, all the buildings on the town square were brick. This included the recently completed Hyatt Hotel. Most of the other buildings in town were still of log construction, but new wood-frame buildings were being built. The Shippen Brothers Lumber Company production was expanding and exporting their lumber to Europe. Within the next few decades, this company grew to be one of the largest employers in Ellijay, often with five to six million feet of lumber in the yard at one time.
The population of Ellijay grew to 659 by 1910, and began to acquire many new modern conveniences such as electric lights and power, a telephone company and many new businesses.
Then in 1912, a fire ravaged the city, destroying 23 buildings. As a result, many new buildings were constructed under new and stricter fire and safety guidelines. The population, however, decreased slightly at this time to 632 in 1920.
During the 1920’s the town’s population began to grow again and, by this time, apples were being shipped out of the county and new storage facilities were built. Chickens were also shipped to markets outside of Ellijay and Gilmer County.
From the mid 1930’s to 1950, Ellijay received much assistance from the Federal WPA Programs. The old courthouse was removed from the center of town square and the Hyatt Hotel was remodeled to be the new courthouse. A park was created on the site of the old courthouse and the streets around the square were paved. A new street was built at this time entering town from the northeast. Other new roads, bridges, sidewalks and gutters were constructed to improve the city. A school and gymnasium were also built and other structures improved.
This growth began to impact the city’s infrastructure and in the l950’s and l960’s, a period of upgrading water systems, roads, and power supplies began. New low-rent housing appeared in l960 and a new hospital was built in l957. Georgia Highway 5 was widened in l962, new buildings around the square replaced old ones and some were remodeled. In 1974, the hospital was enlarged.
Currently, Ellijay attracts tourists who love the small-town feel and friendly atmosphere. Hotels and restaurants, unique shops, antiques and art galleries lend their charms to those who visit. A new courthouse constructed to resemble the old one, new streetscaping, family-oriented downtown events and the beautification of the square have stepped up the social and economic activity and have made Ellijay a popular destination.
36