
Search results for "Proceeds" in Home Design Ideas
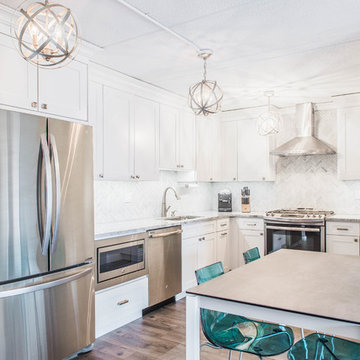
 RAJ Kitchen and Bath, LLC
 “Full apartment design”.
IF you have not yet seen this apartment conversion before, we strongly urge you to go to the bottom left of this page and click on the short 2-minutes video. It would put a lot of things into perspective when you come back and continue reading this.
It is true we were literally handed the keys and told a list of things that they wanted to have happen and we were to go into the apartment, look at the space and come up with a design that would satisfy all of that need. UNTIL we showed up! The unit had really seen some better days but we knew we had to look past that and come up with a concept that would work for them.
The immediate challenges were centered around 3 big ideas:
1. Adding a second bedroom to the already small footprint
2. Figuring out a way to make the kitchen bigger, better and brighter
3. Creating a master room walk in closet
It’s always difficult to add new rooms into existing footprint without expanding out or up and not incurring any opportunity cost. In this case, that was exactly what we had to do. Item one and two above had to be tackled as one. We went ahead and switched out the location of the dining room and eliminating an area where there was a “nook” type eat-in area. By doing so, we were able to cut right into that footprint and change the layout of the kitchen.
That one move allowed us to dig into the kitchen design because it was now the main focal point in the apartment. It was no longer an option to keep it in that tiny hole where it was, so we had to ensure that this design was functional and aesthetically pleasing at the same time. By adding the table into the space where an Island typically would go, we were able to both cut cost and still provide a dining experience. The Table serves as an Island as well when cooking.
We then proceeded to block in the existing doorway to the dining room. By doing this, we were able to create a full room which allowed us to put a door on the other side and called that room Bedroom #2. This was easier to do because all of the mechanicals were already in that space (light, heater and windows). By shifting things around, we also achieved a huge wall to wall closet from inside. PERFECT!
Then we moved into the Single bedroom. We thought it was a big room with a small closet, so by creatively adding an L shaped wall and steal some footprint into the bedroom side, we were able to put a door on that new room and design it for the walk-in closet. Even after this, the bedroom still holds a queen size bed with 2 night stands, a TV on the wall, a sitting chair and plenty of room to walk around. This was done by rethinking the location for the bed and night stands.
The bathroom was gutted to make sure there was no leaks and rebuild from the ground up. We kept all of the plumbing where it was, added a new vanity, medicine cabinet, tiles and lighting and it was done.
From there, the rest of the unit had new flooring all throughout, paint, and lighting. After completion and walk through, this project was handed over back to the clients.
Execution and collaboration between all the trades were: Reggie and his team from Premier Interiors and Rohan from RD Mechanical Services.
p.s. Please see our website to see the video.
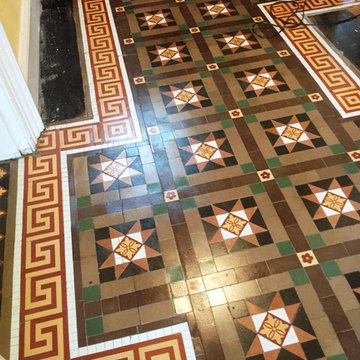
 Tile Doctor Ltd
As you can see from the photographs below this Victorian tiled hallway was in quite a state and not only needed a thorough clean and fresh seal but needed to be rebuilt in parts.
Leamington Spa or Royal Leamington Spa to give its full name is one of the original UK Spa towns where people would visit to bathe the waters which are supposed to have medicinal properties, the town has many regency period properties and so Victorian floors
A good 30% of the floor tiles were lose and it took three days to rebuild the screed levelling compound before refitting loose tiles and new ones had to be cut to size, fixed in place and then re-grouted.
On day 4 a 400 grit coarse burnishing pad was applied to clean up the whole floor.
This was followed by scrubbing the tile and grout with Tile Doctor Pro-clean mixed 50/50 with NanoTech HBU remover followed by Remove and Go and finally treated with Acid Gel to remove the grout haze. After that the White tiles were steam cleaned to get them as clean and white as possible.
The floor was thoroughly rinsed after each treatment and the slurry extracted using a wet vacuum.
I left the floor for 5 days so it could thoroughly dry out and settle following the numerous treatments and then came back to seal the tiles, I used a damp test meter first to verify the floor was dry and ready for sealing. Once happy I proceed to apply a couple of coats of Tile Doctor Colour Grow which is a colour enhancing sealer that soaks into the tile protecting it from within and leaves a matt finish.
A lot of work went into restoring this floor but I’m really pleased with the way it came out and as you can imagine the owner was really happy with the transformation that had taken place in their house.
Mick Gayton
Warwickshire Tile Doctor
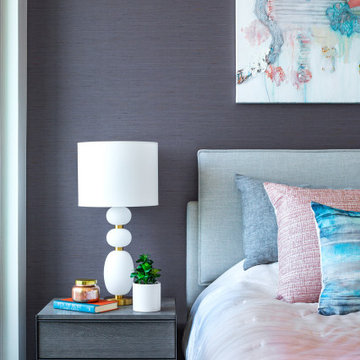
 Spaces Designed, Interior Design Studio, LLC
Cozy Chic - While the entire condo is under 1000 sq ft, there's no dearth of chicness. The ultra-modern kitchen has enough room to host an intimate gathering with a large island while it looks sharp with stainless appliances against a backdrop of a darker backsplash. The living room with its vibrant color palette, luxurious rug and comfortable seating continues the theme of intimate conversations in a chic setting.
The artwork in the living room and the bedroom reflects the playful personalities of the owners accompanied by hints of old fashioned charm. The glam bathroom adds a touch of royalty to the entire proceedings with hand-selected mirror, wall paper and sconce lights in the right shades of gold.
The project reflects Spaces Designed's philosophy of designing spaces to not only meet the needs of it's clients but also their personalities and sensibilities. Every space, small or large, has it's own purpose and character - our role is to identify that and meticulously craft the outcome.
Find the right local pro for your project
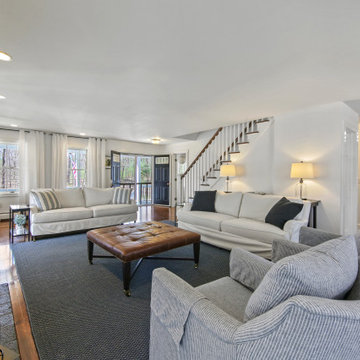
 Linda Edelwich Realtor
Nestled on 2.57 private acres in a highly sought-after neighborhood adjacent to Glastonbury line, this meticulously maintained custom home welcomes you through gracious double doors into a residence that emanates coastal charm. Richly toned floors contrast beautifully w/crisp neutral walls throughout, while the front-to-back living room serves as a stunning centerpiece w/its elegant gas-fireplace & French doors on either side opening to a screened porch-creating a delightful cross-breeze when open. No popcorn ceilings here! Open floor plan features a versatile home office with built-ins, flowing seamlessly into a gourmet kitchen showcasing a stylish island, custom cabinetry, & stainless-steel appliances adjacent to an expansive dining area w/stylish twin chandeliers. Practical luxury continues with a generous walk-in pantry & custom drop zone with shiplap detailing and shoe cubbies near the three-car garage with soaring ceilings. Upstairs, discover a sumptuous primary suite featuring a stylishly remodeled bathroom w/walk-in shower. Also complemented by a spacious walk-in closet & window flanked by custom built-ins, while two additional bedrooms share another beautifully updated bathroom & convenient 2nd-floor laundry. Additional space w/an unfinished walk-up attic & 880sf of finished extra living space in the walk-out lower level, complete with built in sauna, laminate flooring and ample storage-all crowned by the property's signature wrap-around porch. Roof '17
 T. Morgan Construction, Inc.
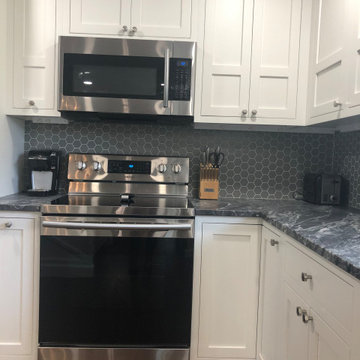
This first floor remodel was a GAME - CHANGER for this house. We took down more than 3 walls and installed a massive support beam. The first floor of this home went from cramped and disconnected to the perfect space for family gatherings. After the space was opened up, we proceeded with a gorgeous kitchen remodel with a modern geometric theme. The hardwood floors transition uniquely and beautifully into the hexagonal floor tile. The back splash is simple and lovely, also following the geometric theme with the hex tile. The last hexagonal touch to this kitchen is its unique hardware. This remodel had several modern touches, without overwhelming the "homey" feeling of a fireplace and hardwoods. All in all, this remodel created the perfect place for entertaining and raising a family.
 Hovick Design & Construction
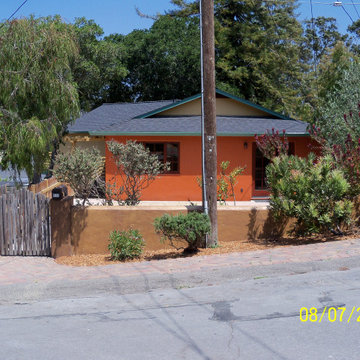
This began with repairing water damage that had leaked through the stucco at the rear of the house. We proceeded to renovate and improve the kitchen cabinets, redo two bathroom, install central heating, produce beautiful custom deck railings and other wood craft appointments (Patrick Moore). The colors were selected by a master (John Fisk of Fisk Paints).
 De Young Properties
With overwhelming support by the community who dug deep and donated, the 2018 Central Valley St. Jude Dream Home Giveaway successfully raised $957,100 for St. Jude Children’s Research Hospital! Since 2007, De Young Properties has been a major donor and builder of 12 St. Jude Dream Homes, helping to raise $11,628,545 to help the kids of St. Jude fight cancer and other life-threatening childhood diseases. One hundred percent of the proceeds will be donated to St. Jude Children’s Research Hospital, which works around the clock to develop cures to save the lives of boys and girls, including children in the San Joaquin Valley.
“We strongly believe in our responsibility to help others, which is why the St. Jude’s Dream Home Giveaway is so important to us and our entire De Young team. We are grateful to our community’s continued support of our business – a community that has given so much to us, which is why we are so passionate about giving back. In fact, we are even more passionate today than we were in 2007 when we first partnered with St. Jude Children’s Research Hospital. We are honored to be a donor and builder of our 12th St. Jude Dream Home in this war against childhood cancer. St. Jude Children’s Research Hospital positively affects the lives of families across the country, in addition to giving us the opportunity to change the life of a local family,” said Paula De Young of De Young Properties. “This amazing pediatric research center, that not only treats life threatening cases in children, also freely gives guidance to doctors around the world and here in the Central Valley. We count ourselves fortunate to be able to help such an important cause”
The 2018 St. Jude Dream Home is one of the most popular De Young floorplans, the Residence 210 with a beautiful Cottage elevation, and will offer three bedrooms, two full bathrooms, a formal dining room, spacious den and an open-air courtyard with a gorgeous stone accented fireplace.
With celebrity designer, Michael Moloney, donating his design talent and resources once again as Design Ambassador for this year’s St. Jude Dream Home, the home boasts a long list of special features, including fashionable quartz and granite counters from Granite Mountain Stone Design, premium designer maple cabinetry and professional closet design from KraftMaid Cabinetry and stainless steel Bosch appliances with a gas range, washer, dryer and built-in refrigerator. In addition, premium-grade wood-look porcelain tile floors by Shaw Floors, spacious 10’ ceilings, professional and water efficient front and back yard landscaping, and Energy Star approved Eagle Brand Cool Roof Tile.
The prime Clovis location of the St. Jude Dream Home is in the De Young Trailside at Loma Vista community which is within walking distance to Reagan Educational Center and located within the greater 3,300-acre Loma Vista master-planned community designed by the City of Clovis. In addition, it is a short drive from Clovis Community Medical Center and a variety of entertainment and dining options including the Sierra Vista Mall, The Square at Campus Pointe, Old Town Clovis and even Wild Water Adventure Park. Easy access to Highway 168 and Herndon Avenue can provide a fast work commute during the week and a family outing to Shaver or Huntington lakes on the weekend and even more.
De Young Properties would like to once again thank everyone in the community who contributed their hard-earned dollars to this worthy cause. They are appreciative of everyone who donated, volunteered or purchased a ticket to win this year’s St. Jude Dream Home, and feel privileged to be able to help such an important cause.
 Maria Deschamps Design
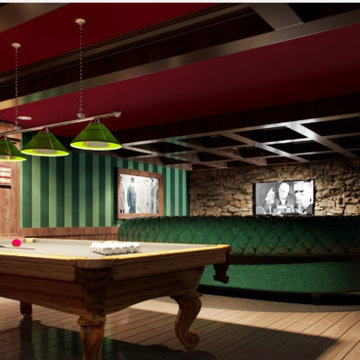
This is A 3D rendering of the space to show the design intent and proceed with the project....
My client for this man cave gave me inspiration to use from the Churchill era. It has reminders of an English pub and the British '40's-50's era. An antique pool taale fits perfectly in the space! A custom made 14' round forest green leather sofa, and a custom wood table / ottoman, with custom made brown leather recliners completes the overall look. Velvet striped green wallpaper and wood coffered ceiling beams with red paint in between give it character. The custom 16' round plush carpet pulls the seating area together.
 Measuredworks Architecture
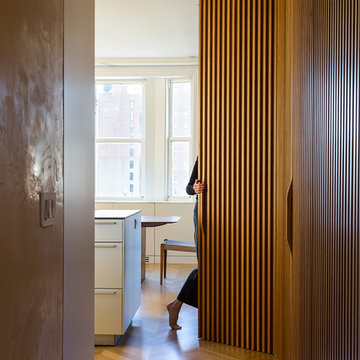
This gut renovation updates a 1,200 SF Classic 5 in an historic prewar building overlooking Gramercy Park. The design is organized around a spine of ribbed white oak proceeding from entry hall to living spaces with southwest views over the park. Concealed doors throughout the apartment provide access to storage, and a hidden door in the ribbed wall leads to the master suite.
Fran Parente
 De Young Properties
With overwhelming support by the community who dug deep and donated, the 2018 Central Valley St. Jude Dream Home Giveaway successfully raised $957,100 for St. Jude Children’s Research Hospital! Since 2007, De Young Properties has been a major donor and builder of 12 St. Jude Dream Homes, helping to raise $11,628,545 to help the kids of St. Jude fight cancer and other life-threatening childhood diseases. One hundred percent of the proceeds will be donated to St. Jude Children’s Research Hospital, which works around the clock to develop cures to save the lives of boys and girls, including children in the San Joaquin Valley.
“We strongly believe in our responsibility to help others, which is why the St. Jude’s Dream Home Giveaway is so important to us and our entire De Young team. We are grateful to our community’s continued support of our business – a community that has given so much to us, which is why we are so passionate about giving back. In fact, we are even more passionate today than we were in 2007 when we first partnered with St. Jude Children’s Research Hospital. We are honored to be a donor and builder of our 12th St. Jude Dream Home in this war against childhood cancer. St. Jude Children’s Research Hospital positively affects the lives of families across the country, in addition to giving us the opportunity to change the life of a local family,” said Paula De Young of De Young Properties. “This amazing pediatric research center, that not only treats life threatening cases in children, also freely gives guidance to doctors around the world and here in the Central Valley. We count ourselves fortunate to be able to help such an important cause”
The 2018 St. Jude Dream Home is one of the most popular De Young floorplans, the Residence 210 with a beautiful Cottage elevation, and will offer three bedrooms, two full bathrooms, a formal dining room, spacious den and an open-air courtyard with a gorgeous stone accented fireplace.
With celebrity designer, Michael Moloney, donating his design talent and resources once again as Design Ambassador for this year’s St. Jude Dream Home, the home boasts a long list of special features, including fashionable quartz and granite counters from Granite Mountain Stone Design, premium designer maple cabinetry and professional closet design from KraftMaid Cabinetry and stainless steel Bosch appliances with a gas range, washer, dryer and built-in refrigerator. In addition, premium-grade wood-look porcelain tile floors by Shaw Floors, spacious 10’ ceilings, professional and water efficient front and back yard landscaping, and Energy Star approved Eagle Brand Cool Roof Tile.
The prime Clovis location of the St. Jude Dream Home is in the De Young Trailside at Loma Vista community which is within walking distance to Reagan Educational Center and located within the greater 3,300-acre Loma Vista master-planned community designed by the City of Clovis. In addition, it is a short drive from Clovis Community Medical Center and a variety of entertainment and dining options including the Sierra Vista Mall, The Square at Campus Pointe, Old Town Clovis and even Wild Water Adventure Park. Easy access to Highway 168 and Herndon Avenue can provide a fast work commute during the week and a family outing to Shaver or Huntington lakes on the weekend and even more.
De Young Properties would like to once again thank everyone in the community who contributed their hard-earned dollars to this worthy cause. They are appreciative of everyone who donated, volunteered or purchased a ticket to win this year’s St. Jude Dream Home, and feel privileged to be able to help such an important cause.
 Tile Doctor Ltd
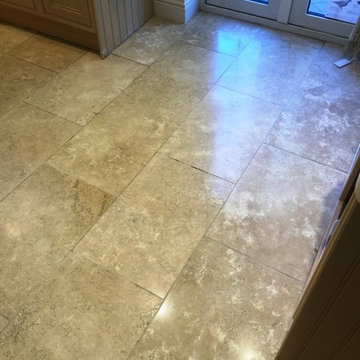
This customer, who lives in East Byfleet had been experiencing difficulties in keeping her fantastic Travertine tiled kitchen floor in good condition. Over the years it had suffered from a heavy build up of dirt and oily stains, not to mentioned a number of cracks and small holes. Needless to say, the customer was keen to restore the Travertine tiles to their former glory.
To begin the restoration, I applied Tile Doctor Remove and Go across the entirety of the large tiled area. This heavy duty remover breaks down any old sealers and other coatings, leaving the area ready to cleaned or, in this case, burnished.
Burnishing is a method for cleaning and polishing certain types of high-end stone, including Travertine, Marble, and Limestone. Our burnishing system involves the application of four diamond encrusted pads of varying grits. Firstly, I applied the Coarse grit pad, which helps to break down any dirt and stains on the surface of the tiles. Then, I worked my way through the Medium, Fine, and Very Fine pads, using a little water as lubricant, to gradually refine the polish on the Travertine. It was then rinsed and left to dry.
To round off the first day of work, I filled any cracks and holes using our two-part resin system which greatly improved the look of the tile.
The following day I returned to the property to seal the tiles checking first that the floor had dried. All was well so I proceeded to seal the floor using our colour intensifying impregnating sealer Tile Doctor Colour Grow. Once that was dry, I added the finishing touches by buffing the floor with a soft white buffing pad. As you can see from the photographs, the combination of a fresh seal and polish worked wonders.
We did such a good job with the floor that the customer asked if we could also improve the appearance of their natural stone fireplace which was suffering from bad rust and oil stains however I do a separate write up on that.
Wayne White
West Surrey Tile Doctor
 UpScapers: Landscape, Elevated
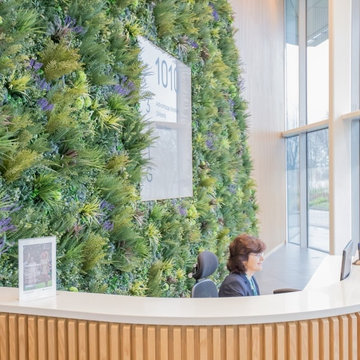
What better way for this company at the top of their industry to make a great first impression upon arriving staff and clients than to welcome them with a Vistafolia wall in reception.
The business park decided to proceed with our products for several reasons. Our team were able to show them exactly how the system worked, as well as showing them all the different customization options available. Another important factor was the best-in-class fire classification held by the product. Our Bs1d0 rating is designed to meet even the strictest of building control standards and leaves every customer with complete peace of mind. After all, no one should ever have to compromise on safety.
 Tile Doctor Ltd
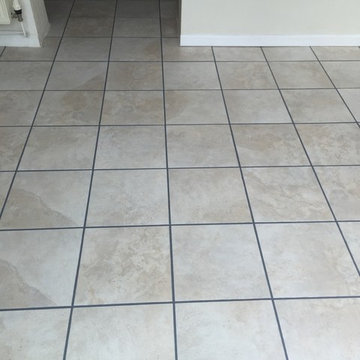
The task of keeping these white Ceramic Kitchen and Conservatory tiles clean was proving very challenging for this customer, who lives in the town of Somerton in Somerset. Somerton is known for its bustling market, which has supposedly been run on a weekly basis since the Middle Ages, and its famous ‘Market Cross’ at the centre of the beautiful marketplace is a popular tourist attraction for visitors to the West Country.
It probably comes as no surprise to anyone that white tiles are often more difficult to keep clean than others. However, in this case, rather than being badly marked or damaged, these Ceramic tiles had become dirty due to the surface being pitted rather than smooth which trapped ground in marks from spills and dirty footprints etc. The pitted rough surface is very characteristic and provides better grip however they do trap dirt are therefore more difficult to keep clean.
The grout had also suffered over the years, losing a lot of its colour in the process so as well as cleaning the tiles we agreed to give the grout a really deep clean and also to colour the grout to make it more uniform.
To clean the tiles, I firstly created a strong diluted of Tile Doctor Pro Clean and applied it liberally across the entire floor, leaving it to dwell and soak into the tile for a short period in order to soften the ingrained dirt. I then used my heavy weight rotary machine fitted with a black scrubbing pad to agitate the solution and break down the muck.
Once satisfied with the condition of the tiles I turned my attention to the grout lines, cleaning them carefully by hand using a stiff tile cleaning brush and the same solution of Pro Clean and water. This provided a deep, penetrating that clean that left the grout lines clean and free from the dirt and grease that had dulled their appearance for so long.
With some great results achieved through the cleaning, I rinsed the whole floor to wash away any leftover Pro-Clean and left it to dry fully overnight.
I returned to the property the next day to check on the floor and after ensuring the floor was completely dry, proceeded to recolour the grout lines using Tile Doctor’s Grout Colourant. Our Grout Colourants are a waterborne epoxy that recolours, seals and rejuvenates existing grout joints and is available in ten different colours ranging from white to dark greys. The scrubbing with Pro-Clean the day before would also ensure the surface of the grout was clean and would make a good surface for the colourant to bond with.
Since in the past the grout lines had undergone a number of repairs, the existing colour was a mix of different greys. It made most sense then that they picked our ‘Natural Grey’ Grout Colourant for me to use. I painted the Colourant on carefully and waited for 30 minutes before removing any excess, leaving the grout lines perfectly covered in a uniform colour.
The difference was really noticeable and the property owner was really happy with the results. As you can see from the photos, the new grey Colourant really made the grout lines stand out against the clean white Ceramic tiles. Another satisfied customer.
Dave Hurst
Somerset Tile Doctor
 Advance Design Studio, Ltd.
Mike and Anne of Barrington Hills desperately needed to update and renovate both their kid’s hall bath and guest bath, and in their 1980’s home each project presented a different set of unique challenges to overcome. When they set out to identify the right remodeling company to partner with, it was important to find a company that could help them to visualize design solutions for the bath renovations. When they came across Advance Design Studio’s website, they were immediately drawn to the solution-oriented remodeling process and the family friendly company.
They say they chose Advance Design because of the integrated approach of “Common Sense Remodeling”, making the design, project management and construction all happen in one place. When they met with Project Designer Michelle Lecinski, they knew they chose the right company. “Michelle’s excellent work on the initial designs made it easy to proceed with Advance Design Studio,” Mike said.
Like most homeowners anticipating a big renovation project, they had some healthy fears; with two bathrooms being remodeled at the same time they worried about timeframes and staying within budget. With the help of Michelle, and the “Common Sense” guidelines, they were confident that Advance Design would stay true, orchestrating all the moving parts to stay within both the estimated timeline and budget.
The guest bath offered the biggest design challenge. A dormer obstruction made the already cramped shower awkward to access. Mike and Anne also wanted the shower size to be expanded, making it more accommodating. Working with Advance’s construction expert DJ Yurik, Michelle relocated the shower concealing the original dormer and creating a larger, more comfortable and aesthetically pleasing guest shower.
The unsightly and not at all user-friendly closet was removed and replaced with elegant White Maple Dura Supreme cabinetry with much improved function featuring dual tall linen cabinets, a special makeup area and two sinks, providing a dual vanity which was extremely important for better guest use.
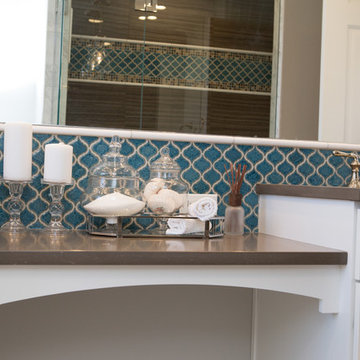
The Fossil Brown quartz countertop is in pleasing contrast to the white cabinetry, and coordinates nicely with the mocha porcelain tile gracing the shower for an accent. The decorative glazed turquoise tile backsplash, tile border, and bottle niche adds a taste of marine green to the room, while marble-looking porcelain tile makes guests feel they are staying in a 5-star hotel. Polished nickel Kohler plumbing fixtures were chosen to add a touch of sophistication. This renovated guest bath is comfortable and elegant, and Anne and Mike’s house guests may never want to leave!
“The end result was updated and restyled bathrooms that the client will enjoy and increase the value of their home,” Designer Michelle said.
The children’s hall bath had its own set of challenges. The current placement of the sink was not conducive to the best use of the existing space, nor did it allow for any visual interest, something Advance’s designers always work to achieve even within the tight confines of a small bath. Advance removed the linen closet and used the gain in wall space to create a dramatic focal point on the vanity wall. They also took additional space that wasn’t being used for new Storm Gray Dura Supreme tall built-in linen cabinets, creating functional storage space that the former bath lacked. A customized glass splash panel was created for the bath, and the high ceilings with skylights were accented with a custom-made track lighting fixture featuring industrial pipe and cage materials.
Authentic cement encaustic tile was used wall to wall surrounding the vanity to create a dramatic and interesting back drop for the new elegant and stately furniture-like double sink wall. Hand-made encaustic tile originated in Western Europe beginning in the 1850’s and reminded Mike and Anne of tile they had seen and loved from their travels overseas. Today, encaustic tile has made a re-appearance in today’s modern bath design with its wide array of appealing patterns and artistic use of color.
Oil rubbed bronze Kohler fixtures echo the black accents in the beautiful tile pattern and reflect the matte black of the unique lighting detail. Easy to maintain Blanca Arabescato Quartz countertops add practicality and natural beauty and compliments the warm wood porcelain tile floors. This handsome bath has generated praise from friends and family even before it’s complete unveiling as photos of the space leaked out on social media! It’s not only completely functional to use, but especially pretty to look at.
“Advance Design Studio did a terrific job for us. We really appreciated how easy it was to work with them on a complex project of the complete remodeling of two bathrooms. They very capably handled all the details from design, to project management, to construction. It is a great group of people to work with and we would welcome the opportunity to work with them again anytime,” Mike said.
 Maria Deschamps Design
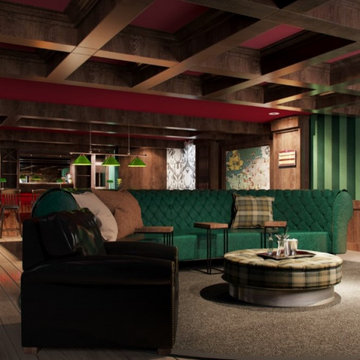
This is A 3D rendering of the space to show the design intent and proceed with the project....
My client for this man cave gave me inspiration to use from the Churchill era. It has reminders of an English pub and the British '40's-50's era. A custom made 14' round forest green leather sofa, and a custom wood table / ottoman, with custom made brown leather recliners completes the overall look. Velvet striped green wallpaper and wood coffered ceiling beams with red paint in between give it character. The custom 16' round plush carpet pulls the seating area together.
 Envision Web
Stuart Wade, Envision Virtual Tours
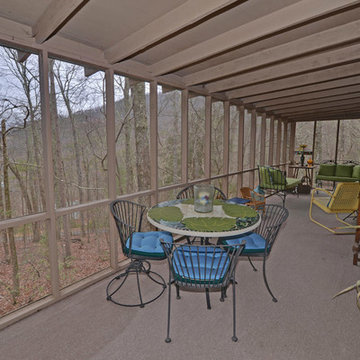
Envision Virtual Tours and High Resolution Photography is your best choice to find just what you are looking for in the Ellijay, Ga. area .Ellijay, Georgia, known as the “Apple Capital” of Georgia, is located between the Ellijay and Cartecay Rivers where they join to make the Coosawattee River and is the county seat of Gilmer County, Georgia. The origin of the city’s name is not certain but thought to be the English derivative of an Indian word(s) meaning “many waters”, “place of green things” or “new ground”. Some histories say it may have been named for an Indian chief.
Inhabited for countless years by the Cherokee people indigenous to the North Georgia, the area was first mentioned as a village and trade center before the onslaught of white settlers inhabited the region. During the 1830’s both white settlers and Indians occupied Ellijay. During the original land lottery in 1832, Martin Scalf acquired the 160 acre lot where the town now stands. In 1833, Clemonds Quinland bought 10 acres from Scalf, retained one acre for himself and donated the rest of the purchase to the County. A plan for twenty town lots, streets and a public square was created and the streets were oriented to allow maximum sunlight exposure to the buildings.
Proceeds from lot sales were used to build a jail and courthouse and pay other city expenses. During this same year, Gilmer County was appropriated $800.00 from the State to build a school, and a three-acre lot was donated for the city cemetery. On December 29, l834, Ellijay was incorporated and designated as the County seat of Gilmer County. By 1837, the town had twenty dwellings, three stores and one attorney. Most of these early buildings were of log construction.
Many roads led to Ellijay by 1849. The population had grown to 150 by 1850 and the town at five stores. Some wood-frame buildings were being constructed at this time and in 1854, a new courthouse was built in the center of the square, replacing the earlier building. The County’s first newspaper was the Ellijay Courier, started in 1875, and during this time period, Ellijay was a stop on the stagecoach line. The railroad bridge over the Cartecay River was completed in 1884 and the town now had rail service.
With the arrival of the railroad and subsequent tracks to White Path, Ellijay began to grow much faster. Many hotels were constructed and land was donated for a depot east of town. More industries, such as a cheese factory and the Shippen Brothers Lumber Mill, located in Ellijay. By 1898, the city had expanded its limits in every direction and now included the depot.
By 1900, all the buildings on the town square were brick. This included the recently completed Hyatt Hotel. Most of the other buildings in town were still of log construction, but new wood-frame buildings were being built. The Shippen Brothers Lumber Company production was expanding and exporting their lumber to Europe. Within the next few decades, this company grew to be one of the largest employers in Ellijay, often with five to six million feet of lumber in the yard at one time.
The population of Ellijay grew to 659 by 1910, and began to acquire many new modern conveniences such as electric lights and power, a telephone company and many new businesses.
Then in 1912, a fire ravaged the city, destroying 23 buildings. As a result, many new buildings were constructed under new and stricter fire and safety guidelines. The population, however, decreased slightly at this time to 632 in 1920.
During the 1920’s the town’s population began to grow again and, by this time, apples were being shipped out of the county and new storage facilities were built. Chickens were also shipped to markets outside of Ellijay and Gilmer County.
From the mid 1930’s to 1950, Ellijay received much assistance from the Federal WPA Programs. The old courthouse was removed from the center of town square and the Hyatt Hotel was remodeled to be the new courthouse. A park was created on the site of the old courthouse and the streets around the square were paved. A new street was built at this time entering town from the northeast. Other new roads, bridges, sidewalks and gutters were constructed to improve the city. A school and gymnasium were also built and other structures improved.
This growth began to impact the city’s infrastructure and in the l950’s and l960’s, a period of upgrading water systems, roads, and power supplies began. New low-rent housing appeared in l960 and a new hospital was built in l957. Georgia Highway 5 was widened in l962, new buildings around the square replaced old ones and some were remodeled. In 1974, the hospital was enlarged.
Currently, Ellijay attracts tourists who love the small-town feel and friendly atmosphere. Hotels and restaurants, unique shops, antiques and art galleries lend their charms to those who visit. A new courthouse constructed to resemble the old one, new streetscaping, family-oriented downtown events and the beautification of the square have stepped up the social and economic activity and have made Ellijay a popular destination.
 Artistic Hardwood Floors
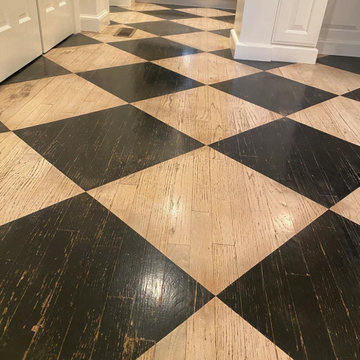
The client of this house wanted to restore the checkered pattern on the kitchen floor. We sanded the entire floor to have a fresh start and recreate the design. During the process, we bleached the red oak floors to eliminate the natural pinkish-red undertone it has. After that, we proceeded to create the checkered pattern with tape and then, stained it with Duraseal True Black and Country White. We finished the floors with three coats of Bona Traffic HD polyurethane. Although this particular polyurethane is ideal for commercial projects, it's an ideal protectant on floors with very low VOCs.
 Division 9 Inc.
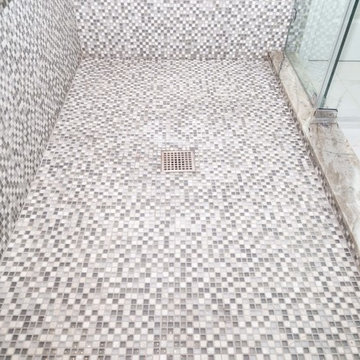
One of the top factors that can influence the value of a property is the Master Bathroom. During the complete makeover on this project, we proceeded with the complete demolition of the existing master bathroom, including floors, vanity, plumbing, lighting fixtures, toitel and tub.
In collaboration with the prestigious designer, Roberto Lugo, the D9 team worked on the layout for the Master Bathroom. With the plan of optimizing the space, we gave ample room to the vanity and the shower to allow them to include all the requested features from the homeowner.
To create an inspiring and elegant atmosphere the combination of selected colors, textures and materials played a key role. The Master Bathroom was given elegance by the unique look of the gray toned Marble countertops, combined with the sophistication and detailed finish of the bathroom cabinets, and the neutral gray paint used to finish the raised-cabinets.
The shower enclosure presents a double shower with two Marble benches and four shower fixtures with hinged door.
 De Young Properties
With overwhelming support by the community who dug deep and donated, the 2018 Central Valley St. Jude Dream Home Giveaway successfully raised $957,100 for St. Jude Children’s Research Hospital! Since 2007, De Young Properties has been a major donor and builder of 12 St. Jude Dream Homes, helping to raise $11,628,545 to help the kids of St. Jude fight cancer and other life-threatening childhood diseases. One hundred percent of the proceeds will be donated to St. Jude Children’s Research Hospital, which works around the clock to develop cures to save the lives of boys and girls, including children in the San Joaquin Valley.
“We strongly believe in our responsibility to help others, which is why the St. Jude’s Dream Home Giveaway is so important to us and our entire De Young team. We are grateful to our community’s continued support of our business – a community that has given so much to us, which is why we are so passionate about giving back. In fact, we are even more passionate today than we were in 2007 when we first partnered with St. Jude Children’s Research Hospital. We are honored to be a donor and builder of our 12th St. Jude Dream Home in this war against childhood cancer. St. Jude Children’s Research Hospital positively affects the lives of families across the country, in addition to giving us the opportunity to change the life of a local family,” said Paula De Young of De Young Properties. “This amazing pediatric research center, that not only treats life threatening cases in children, also freely gives guidance to doctors around the world and here in the Central Valley. We count ourselves fortunate to be able to help such an important cause”
The 2018 St. Jude Dream Home is one of the most popular De Young floorplans, the Residence 210 with a beautiful Cottage elevation, and will offer three bedrooms, two full bathrooms, a formal dining room, spacious den and an open-air courtyard with a gorgeous stone accented fireplace.
With celebrity designer, Michael Moloney, donating his design talent and resources once again as Design Ambassador for this year’s St. Jude Dream Home, the home boasts a long list of special features, including fashionable quartz and granite counters from Granite Mountain Stone Design, premium designer maple cabinetry and professional closet design from KraftMaid Cabinetry and stainless steel Bosch appliances with a gas range, washer, dryer and built-in refrigerator. In addition, premium-grade wood-look porcelain tile floors by Shaw Floors, spacious 10’ ceilings, professional and water efficient front and back yard landscaping, and Energy Star approved Eagle Brand Cool Roof Tile.
The prime Clovis location of the St. Jude Dream Home is in the De Young Trailside at Loma Vista community which is within walking distance to Reagan Educational Center and located within the greater 3,300-acre Loma Vista master-planned community designed by the City of Clovis. In addition, it is a short drive from Clovis Community Medical Center and a variety of entertainment and dining options including the Sierra Vista Mall, The Square at Campus Pointe, Old Town Clovis and even Wild Water Adventure Park. Easy access to Highway 168 and Herndon Avenue can provide a fast work commute during the week and a family outing to Shaver or Huntington lakes on the weekend and even more.
De Young Properties would like to once again thank everyone in the community who contributed their hard-earned dollars to this worthy cause. They are appreciative of everyone who donated, volunteered or purchased a ticket to win this year’s St. Jude Dream Home, and feel privileged to be able to help such an important cause.
 Precision Outdoors
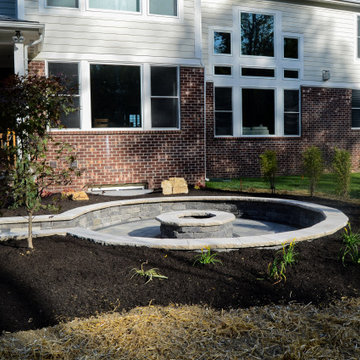
When the homeowners came to us, they had a desire to build out an outdoor space that would compliment their covered patio. Ideally, it would allow them to gather around and roast marshmallows in a cozy setting. When we inspected their property, it was fairly exposed to their neighbors; we proceeded to build out the space so it could have additional room for tables and chairs. Our team then worked to sink the fire pit patio area in, to add privacy with greenery to help create an intimate space to enjoy a fire and embrace family.
34