
Search results for "Project ahead" in Home Design Ideas

 Advance Design Studio, Ltd.
Chris and Sofia of Arlington Heights knew when they purchased their home that they would finish the basement. They needed a space for the kids to hang out, for family and friends to stay, and to have a better space for hosting holidays and parties. The dark unfinished space went mostly unused for three years, but once their kids reached the ideal age for use of a well-built basement, they moved ahead with their plan.
“The old basement was dark and cold, and the kids came down and played, but they didn’t like it. The new space is like a whole other house, so we have this space for family game nights and for watching games or Super Bowl parties,” Chris said.
The couple found Advance Design Studio through a friend who had their entire home renovated by the remodeling company. After the initial meeting and visiting the showroom, Chris and Sofia were positive that Advance Design was the company that could best turn their unfinished basement into a family friendly space for everyone to enjoy.
“We really liked the showroom, we liked being able to choose all of those finishes and meet with them in one place,” Chris said.
A Custom Space for a Family with Multiple Needs
The project began with a fireplace focal point complete with an amazing entertainment wall, a fantastic full kitchen complete with every amenity, and a brand new full bath. The new basement truly has a space for everyone. If the kids want to watch a movie and hang out on the couch they can, if family wants to play games and have a pizza party on the large island they can, and if guests want to stay over night on the pull-out sofa they can enjoy the entire private “suite” complete with a full bath. It is the true definition of a multifunctional basement.
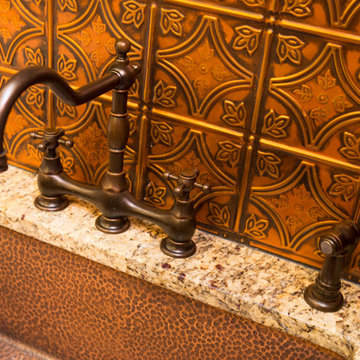
The stunning, full kitchen is the highlight of this now bright and airy basement. You walk down the stairs and are immediately impressed with the detailed metal tile work on the ceiling, bringing to mind the classic feel of a comfortable old pub. Cherry Merlot cabinets provide a rich contrast against the soft neutral walls and the contrasting copper tin ceiling tile and backsplash. Rich Santa Cecelia granite countertops pair nicely with timeless stonework on the outer walls.
The island is large enough to provide a more than adequate entertaining space, and provides plenty of both seating and storage. The well-appointed kitchen houses a regular size refrigerator, a full size oven for pizza parties and cookie baking anytime, a microwave oven as well as complete sink and trash set up. One could easily do without a home kitchen forever in this generously designed secondary space!
The fireplace and buffet wall seating area is the ideal place to watch movies or sporting events. The coordinating stonework on the fireplace flows throughout the basement, and a burnt orange accent wall brings color and warmth to otherwise ordinary basement space. The Elite Merlot media buffet compliments the kitchen as well as provides storage and a unique functional display option, giving this part of the basement a sophisticated, yet functional feel.
The full bath is complete with a unique furniture style cherry DuraSupreme vanity and matching custom designed mirror. The weathered look to the cabinets and mirror give the bathroom some earthy texture as does the stone floor in the walk-in shower. Soft blue makes the space a spa-like mini retreat, and the handsome wall to wall tile and granite speak luxury at every corner.
Advance Design added clever custom storage spaces to take advantage of otherwise wasted corners. They built a custom mudroom for the kids to house their sports equipment and a handy built in bench area with basket pull outs for a custom home gym. “They were able to custom fit this second mudroom with the lockers and the bench, they were able to custom build that, so the kids could store all of their equipment down here for the sports that they are in,” Chris said.
They Got The Amazing Space They Had Envisioned for Years!
The basement Chris and Sofia had envisioned had come to life in a few short months of planning, design and construction, just a perfect fit in the summer months. Advance Design Studio was able to design and build a custom, multifunctional space that the whole family can enjoy. “I would recommend Advance Design because of the showroom, because of the cleanliness on the jobsite and the professionalism, combined with Christine’s design side as well as Todd’s builder’s side - it’s nice to have it all together,” reminisced Chris after the project was complete.

 RAJ Kitchen and Bath, LLC
“Full apartment design”.
IF you have not yet seen this apartment conversion before, we strongly urge you to go to the bottom left of this page and click on the short 2-minutes video. It would put a lot of things into perspective when you come back and continue reading this.
It is true we were literally handed the keys and told a list of things that they wanted to have happen and we were to go into the apartment, look at the space and come up with a design that would satisfy all of that need. UNTIL we showed up! The unit had really seen some better days but we knew we had to look past that and come up with a concept that would work for them.
The immediate challenges were centered around 3 big ideas:
1. Adding a second bedroom to the already small footprint
2. Figuring out a way to make the kitchen bigger, better and brighter
3. Creating a master room walk in closet
It’s always difficult to add new rooms into existing footprint without expanding out or up and not incurring any opportunity cost. In this case, that was exactly what we had to do. Item one and two above had to be tackled as one. We went ahead and switched out the location of the dining room and eliminating an area where there was a “nook” type eat-in area. By doing so, we were able to cut right into that footprint and change the layout of the kitchen.
That one move allowed us to dig into the kitchen design because it was now the main focal point in the apartment. It was no longer an option to keep it in that tiny hole where it was, so we had to ensure that this design was functional and aesthetically pleasing at the same time. By adding the table into the space where an Island typically would go, we were able to both cut cost and still provide a dining experience. The Table serves as an Island as well when cooking.
We then proceeded to block in the existing doorway to the dining room. By doing this, we were able to create a full room which allowed us to put a door on the other side and called that room Bedroom #2. This was easier to do because all of the mechanicals were already in that space (light, heater and windows). By shifting things around, we also achieved a huge wall to wall closet from inside. PERFECT!
Then we moved into the Single bedroom. We thought it was a big room with a small closet, so by creatively adding an L shaped wall and steal some footprint into the bedroom side, we were able to put a door on that new room and design it for the walk-in closet. Even after this, the bedroom still holds a queen size bed with 2 night stands, a TV on the wall, a sitting chair and plenty of room to walk around. This was done by rethinking the location for the bed and night stands.
The bathroom was gutted to make sure there was no leaks and rebuild from the ground up. We kept all of the plumbing where it was, added a new vanity, medicine cabinet, tiles and lighting and it was done.
From there, the rest of the unit had new flooring all throughout, paint, and lighting. After completion and walk through, this project was handed over back to the clients.
Execution and collaboration between all the trades were: Reggie and his team from Premier Interiors and Rohan from RD Mechanical Services.
p.s. Please see our website to see the video.

 Ehrlich Yanai Rhee Chaney Architects
The ground floor volumes wrapped in an elongated hand-fired brick, emphasizing the horizontality of the architecture that lays solidly on the land.
(Photography by: Matthew Millman)
Find the right local pro for your project
 RAJ Kitchen and Bath, LLC
“Full apartment design”.
IF you have not yet seen this apartment conversion before, we strongly urge you to go to the bottom left of this page and click on the short 2-minutes video. It would put a lot of things into perspective when you come back and continue reading this.
It is true we were literally handed the keys and told a list of things that they wanted to have happen and we were to go into the apartment, look at the space and come up with a design that would satisfy all of that need. UNTIL we showed up! The unit had really seen some better days but we knew we had to look past that and come up with a concept that would work for them.
The immediate challenges were centered around 3 big ideas:
1. Adding a second bedroom to the already small footprint
2. Figuring out a way to make the kitchen bigger, better and brighter
3. Creating a master room walk in closet
It’s always difficult to add new rooms into existing footprint without expanding out or up and not incurring any opportunity cost. In this case, that was exactly what we had to do. Item one and two above had to be tackled as one. We went ahead and switched out the location of the dining room and eliminating an area where there was a “nook” type eat-in area. By doing so, we were able to cut right into that footprint and change the layout of the kitchen.
That one move allowed us to dig into the kitchen design because it was now the main focal point in the apartment. It was no longer an option to keep it in that tiny hole where it was, so we had to ensure that this design was functional and aesthetically pleasing at the same time. By adding the table into the space where an Island typically would go, we were able to both cut cost and still provide a dining experience. The Table serves as an Island as well when cooking.
We then proceeded to block in the existing doorway to the dining room. By doing this, we were able to create a full room which allowed us to put a door on the other side and called that room Bedroom #2. This was easier to do because all of the mechanicals were already in that space (light, heater and windows). By shifting things around, we also achieved a huge wall to wall closet from inside. PERFECT!
Then we moved into the Single bedroom. We thought it was a big room with a small closet, so by creatively adding an L shaped wall and steal some footprint into the bedroom side, we were able to put a door on that new room and design it for the walk-in closet. Even after this, the bedroom still holds a queen size bed with 2 night stands, a TV on the wall, a sitting chair and plenty of room to walk around. This was done by rethinking the location for the bed and night stands.
The bathroom was gutted to make sure there was no leaks and rebuild from the ground up. We kept all of the plumbing where it was, added a new vanity, medicine cabinet, tiles and lighting and it was done.
From there, the rest of the unit had new flooring all throughout, paint, and lighting. After completion and walk through, this project was handed over back to the clients.
Execution and collaboration between all the trades were: Reggie and his team from Premier Interiors and Rohan from RD Mechanical Services.
p.s. Please see our website to see the video.
 RAJ Kitchen and Bath, LLC
“Full apartment design”.
IF you have not yet seen this apartment conversion before, we strongly urge you to go to the bottom left of this page and click on the short 2-minutes video. It would put a lot of things into perspective when you come back and continue reading this.
It is true we were literally handed the keys and told a list of things that they wanted to have happen and we were to go into the apartment, look at the space and come up with a design that would satisfy all of that need. UNTIL we showed up! The unit had really seen some better days but we knew we had to look past that and come up with a concept that would work for them.
The immediate challenges were centered around 3 big ideas:
1. Adding a second bedroom to the already small footprint
2. Figuring out a way to make the kitchen bigger, better and brighter
3. Creating a master room walk in closet
It’s always difficult to add new rooms into existing footprint without expanding out or up and not incurring any opportunity cost. In this case, that was exactly what we had to do. Item one and two above had to be tackled as one. We went ahead and switched out the location of the dining room and eliminating an area where there was a “nook” type eat-in area. By doing so, we were able to cut right into that footprint and change the layout of the kitchen.
That one move allowed us to dig into the kitchen design because it was now the main focal point in the apartment. It was no longer an option to keep it in that tiny hole where it was, so we had to ensure that this design was functional and aesthetically pleasing at the same time. By adding the table into the space where an Island typically would go, we were able to both cut cost and still provide a dining experience. The Table serves as an Island as well when cooking.
We then proceeded to block in the existing doorway to the dining room. By doing this, we were able to create a full room which allowed us to put a door on the other side and called that room Bedroom #2. This was easier to do because all of the mechanicals were already in that space (light, heater and windows). By shifting things around, we also achieved a huge wall to wall closet from inside. PERFECT!
Then we moved into the Single bedroom. We thought it was a big room with a small closet, so by creatively adding an L shaped wall and steal some footprint into the bedroom side, we were able to put a door on that new room and design it for the walk-in closet. Even after this, the bedroom still holds a queen size bed with 2 night stands, a TV on the wall, a sitting chair and plenty of room to walk around. This was done by rethinking the location for the bed and night stands.
The bathroom was gutted to make sure there was no leaks and rebuild from the ground up. We kept all of the plumbing where it was, added a new vanity, medicine cabinet, tiles and lighting and it was done.
From there, the rest of the unit had new flooring all throughout, paint, and lighting. After completion and walk through, this project was handed over back to the clients.
Execution and collaboration between all the trades were: Reggie and his team from Premier Interiors and Rohan from RD Mechanical Services.
p.s. Please see our website to see the video.
 RAJ Kitchen and Bath, LLC
“Full apartment design”.
IF you have not yet seen this apartment conversion before, we strongly urge you to go to the bottom left of this page and click on the short 2-minutes video. It would put a lot of things into perspective when you come back and continue reading this.
It is true we were literally handed the keys and told a list of things that they wanted to have happen and we were to go into the apartment, look at the space and come up with a design that would satisfy all of that need. UNTIL we showed up! The unit had really seen some better days but we knew we had to look past that and come up with a concept that would work for them.
The immediate challenges were centered around 3 big ideas:
1. Adding a second bedroom to the already small footprint
2. Figuring out a way to make the kitchen bigger, better and brighter
3. Creating a master room walk in closet
It’s always difficult to add new rooms into existing footprint without expanding out or up and not incurring any opportunity cost. In this case, that was exactly what we had to do. Item one and two above had to be tackled as one. We went ahead and switched out the location of the dining room and eliminating an area where there was a “nook” type eat-in area. By doing so, we were able to cut right into that footprint and change the layout of the kitchen.
That one move allowed us to dig into the kitchen design because it was now the main focal point in the apartment. It was no longer an option to keep it in that tiny hole where it was, so we had to ensure that this design was functional and aesthetically pleasing at the same time. By adding the table into the space where an Island typically would go, we were able to both cut cost and still provide a dining experience. The Table serves as an Island as well when cooking.
We then proceeded to block in the existing doorway to the dining room. By doing this, we were able to create a full room which allowed us to put a door on the other side and called that room Bedroom #2. This was easier to do because all of the mechanicals were already in that space (light, heater and windows). By shifting things around, we also achieved a huge wall to wall closet from inside. PERFECT!
Then we moved into the Single bedroom. We thought it was a big room with a small closet, so by creatively adding an L shaped wall and steal some footprint into the bedroom side, we were able to put a door on that new room and design it for the walk-in closet. Even after this, the bedroom still holds a queen size bed with 2 night stands, a TV on the wall, a sitting chair and plenty of room to walk around. This was done by rethinking the location for the bed and night stands.
The bathroom was gutted to make sure there was no leaks and rebuild from the ground up. We kept all of the plumbing where it was, added a new vanity, medicine cabinet, tiles and lighting and it was done.
From there, the rest of the unit had new flooring all throughout, paint, and lighting. After completion and walk through, this project was handed over back to the clients.
Execution and collaboration between all the trades were: Reggie and his team from Premier Interiors and Rohan from RD Mechanical Services.
p.s. Please see our website to see the video.
 Advance Design Studio, Ltd.
Chris and Sofia of Arlington Heights knew when they purchased their home that they would finish the basement. They needed a space for the kids to hang out, for family and friends to stay, and to have a better space for hosting holidays and parties. The dark unfinished space went mostly unused for three years, but once their kids reached the ideal age for use of a well-built basement, they moved ahead with their plan.
“The old basement was dark and cold, and the kids came down and played, but they didn’t like it. The new space is like a whole other house, so we have this space for family game nights and for watching games or Super Bowl parties,” Chris said.
The couple found Advance Design Studio through a friend who had their entire home renovated by the remodeling company. After the initial meeting and visiting the showroom, Chris and Sofia were positive that Advance Design was the company that could best turn their unfinished basement into a family friendly space for everyone to enjoy.
“We really liked the showroom, we liked being able to choose all of those finishes and meet with them in one place,” Chris said.
A Custom Space for a Family with Multiple Needs
The project began with a fireplace focal point complete with an amazing entertainment wall, a fantastic full kitchen complete with every amenity, and a brand new full bath. The new basement truly has a space for everyone. If the kids want to watch a movie and hang out on the couch they can, if family wants to play games and have a pizza party on the large island they can, and if guests want to stay over night on the pull-out sofa they can enjoy the entire private “suite” complete with a full bath. It is the true definition of a multifunctional basement.
The stunning, full kitchen is the highlight of this now bright and airy basement. You walk down the stairs and are immediately impressed with the detailed metal tile work on the ceiling, bringing to mind the classic feel of a comfortable old pub. Cherry Merlot cabinets provide a rich contrast against the soft neutral walls and the contrasting copper tin ceiling tile and backsplash. Rich Santa Cecelia granite countertops pair nicely with timeless stonework on the outer walls.
The island is large enough to provide a more than adequate entertaining space, and provides plenty of both seating and storage. The well-appointed kitchen houses a regular size refrigerator, a full size oven for pizza parties and cookie baking anytime, a microwave oven as well as complete sink and trash set up. One could easily do without a home kitchen forever in this generously designed secondary space!
The fireplace and buffet wall seating area is the ideal place to watch movies or sporting events. The coordinating stonework on the fireplace flows throughout the basement, and a burnt orange accent wall brings color and warmth to otherwise ordinary basement space. The Elite Merlot media buffet compliments the kitchen as well as provides storage and a unique functional display option, giving this part of the basement a sophisticated, yet functional feel.
The full bath is complete with a unique furniture style cherry DuraSupreme vanity and matching custom designed mirror. The weathered look to the cabinets and mirror give the bathroom some earthy texture as does the stone floor in the walk-in shower. Soft blue makes the space a spa-like mini retreat, and the handsome wall to wall tile and granite speak luxury at every corner.
Advance Design added clever custom storage spaces to take advantage of otherwise wasted corners. They built a custom mudroom for the kids to house their sports equipment and a handy built in bench area with basket pull outs for a custom home gym. “They were able to custom fit this second mudroom with the lockers and the bench, they were able to custom build that, so the kids could store all of their equipment down here for the sports that they are in,” Chris said.
They Got The Amazing Space They Had Envisioned for Years!
The basement Chris and Sofia had envisioned had come to life in a few short months of planning, design and construction, just a perfect fit in the summer months. Advance Design Studio was able to design and build a custom, multifunctional space that the whole family can enjoy. “I would recommend Advance Design because of the showroom, because of the cleanliness on the jobsite and the professionalism, combined with Christine’s design side as well as Todd’s builder’s side - it’s nice to have it all together,” reminisced Chris after the project was complete.

 Advance Design Studio, Ltd.
Chris and Sofia of Arlington Heights knew when they purchased their home that they would finish the basement. They needed a space for the kids to hang out, for family and friends to stay, and to have a better space for hosting holidays and parties. The dark unfinished space went mostly unused for three years, but once their kids reached the ideal age for use of a well-built basement, they moved ahead with their plan.
“The old basement was dark and cold, and the kids came down and played, but they didn’t like it. The new space is like a whole other house, so we have this space for family game nights and for watching games or Super Bowl parties,” Chris said.
The couple found Advance Design Studio through a friend who had their entire home renovated by the remodeling company. After the initial meeting and visiting the showroom, Chris and Sofia were positive that Advance Design was the company that could best turn their unfinished basement into a family friendly space for everyone to enjoy.
“We really liked the showroom, we liked being able to choose all of those finishes and meet with them in one place,” Chris said.
A Custom Space for a Family with Multiple Needs
The project began with a fireplace focal point complete with an amazing entertainment wall, a fantastic full kitchen complete with every amenity, and a brand new full bath. The new basement truly has a space for everyone. If the kids want to watch a movie and hang out on the couch they can, if family wants to play games and have a pizza party on the large island they can, and if guests want to stay over night on the pull-out sofa they can enjoy the entire private “suite” complete with a full bath. It is the true definition of a multifunctional basement.
The stunning, full kitchen is the highlight of this now bright and airy basement. You walk down the stairs and are immediately impressed with the detailed metal tile work on the ceiling, bringing to mind the classic feel of a comfortable old pub. Cherry Merlot cabinets provide a rich contrast against the soft neutral walls and the contrasting copper tin ceiling tile and backsplash. Rich Santa Cecelia granite countertops pair nicely with timeless stonework on the outer walls.
The island is large enough to provide a more than adequate entertaining space, and provides plenty of both seating and storage. The well-appointed kitchen houses a regular size refrigerator, a full size oven for pizza parties and cookie baking anytime, a microwave oven as well as complete sink and trash set up. One could easily do without a home kitchen forever in this generously designed secondary space!
The fireplace and buffet wall seating area is the ideal place to watch movies or sporting events. The coordinating stonework on the fireplace flows throughout the basement, and a burnt orange accent wall brings color and warmth to otherwise ordinary basement space. The Elite Merlot media buffet compliments the kitchen as well as provides storage and a unique functional display option, giving this part of the basement a sophisticated, yet functional feel.
The full bath is complete with a unique furniture style cherry DuraSupreme vanity and matching custom designed mirror. The weathered look to the cabinets and mirror give the bathroom some earthy texture as does the stone floor in the walk-in shower. Soft blue makes the space a spa-like mini retreat, and the handsome wall to wall tile and granite speak luxury at every corner.
Advance Design added clever custom storage spaces to take advantage of otherwise wasted corners. They built a custom mudroom for the kids to house their sports equipment and a handy built in bench area with basket pull outs for a custom home gym. “They were able to custom fit this second mudroom with the lockers and the bench, they were able to custom build that, so the kids could store all of their equipment down here for the sports that they are in,” Chris said.
They Got The Amazing Space They Had Envisioned for Years!
The basement Chris and Sofia had envisioned had come to life in a few short months of planning, design and construction, just a perfect fit in the summer months. Advance Design Studio was able to design and build a custom, multifunctional space that the whole family can enjoy. “I would recommend Advance Design because of the showroom, because of the cleanliness on the jobsite and the professionalism, combined with Christine’s design side as well as Todd’s builder’s side - it’s nice to have it all together,” reminisced Chris after the project was complete.
 RAJ Kitchen and Bath, LLC
“Full apartment design”.
IF you have not yet seen this apartment conversion before, we strongly urge you to go to the bottom left of this page and click on the short 2-minutes video. It would put a lot of things into perspective when you come back and continue reading this.
It is true we were literally handed the keys and told a list of things that they wanted to have happen and we were to go into the apartment, look at the space and come up with a design that would satisfy all of that need. UNTIL we showed up! The unit had really seen some better days but we knew we had to look past that and come up with a concept that would work for them.
The immediate challenges were centered around 3 big ideas:
1. Adding a second bedroom to the already small footprint
2. Figuring out a way to make the kitchen bigger, better and brighter
3. Creating a master room walk in closet
It’s always difficult to add new rooms into existing footprint without expanding out or up and not incurring any opportunity cost. In this case, that was exactly what we had to do. Item one and two above had to be tackled as one. We went ahead and switched out the location of the dining room and eliminating an area where there was a “nook” type eat-in area. By doing so, we were able to cut right into that footprint and change the layout of the kitchen.
That one move allowed us to dig into the kitchen design because it was now the main focal point in the apartment. It was no longer an option to keep it in that tiny hole where it was, so we had to ensure that this design was functional and aesthetically pleasing at the same time. By adding the table into the space where an Island typically would go, we were able to both cut cost and still provide a dining experience. The Table serves as an Island as well when cooking.
We then proceeded to block in the existing doorway to the dining room. By doing this, we were able to create a full room which allowed us to put a door on the other side and called that room Bedroom #2. This was easier to do because all of the mechanicals were already in that space (light, heater and windows). By shifting things around, we also achieved a huge wall to wall closet from inside. PERFECT!
Then we moved into the Single bedroom. We thought it was a big room with a small closet, so by creatively adding an L shaped wall and steal some footprint into the bedroom side, we were able to put a door on that new room and design it for the walk-in closet. Even after this, the bedroom still holds a queen size bed with 2 night stands, a TV on the wall, a sitting chair and plenty of room to walk around. This was done by rethinking the location for the bed and night stands.
The bathroom was gutted to make sure there was no leaks and rebuild from the ground up. We kept all of the plumbing where it was, added a new vanity, medicine cabinet, tiles and lighting and it was done.
From there, the rest of the unit had new flooring all throughout, paint, and lighting. After completion and walk through, this project was handed over back to the clients.
Execution and collaboration between all the trades were: Reggie and his team from Premier Interiors and Rohan from RD Mechanical Services.
p.s. Please see our website to see the video.
 RAJ Kitchen and Bath, LLC
“Full apartment design”.
IF you have not yet seen this apartment conversion before, we strongly urge you to go to the bottom left of this page and click on the short 2-minutes video. It would put a lot of things into perspective when you come back and continue reading this.
It is true we were literally handed the keys and told a list of things that they wanted to have happen and we were to go into the apartment, look at the space and come up with a design that would satisfy all of that need. UNTIL we showed up! The unit had really seen some better days but we knew we had to look past that and come up with a concept that would work for them.
The immediate challenges were centered around 3 big ideas:
1. Adding a second bedroom to the already small footprint
2. Figuring out a way to make the kitchen bigger, better and brighter
3. Creating a master room walk in closet
It’s always difficult to add new rooms into existing footprint without expanding out or up and not incurring any opportunity cost. In this case, that was exactly what we had to do. Item one and two above had to be tackled as one. We went ahead and switched out the location of the dining room and eliminating an area where there was a “nook” type eat-in area. By doing so, we were able to cut right into that footprint and change the layout of the kitchen.
That one move allowed us to dig into the kitchen design because it was now the main focal point in the apartment. It was no longer an option to keep it in that tiny hole where it was, so we had to ensure that this design was functional and aesthetically pleasing at the same time. By adding the table into the space where an Island typically would go, we were able to both cut cost and still provide a dining experience. The Table serves as an Island as well when cooking.
We then proceeded to block in the existing doorway to the dining room. By doing this, we were able to create a full room which allowed us to put a door on the other side and called that room Bedroom #2. This was easier to do because all of the mechanicals were already in that space (light, heater and windows). By shifting things around, we also achieved a huge wall to wall closet from inside. PERFECT!
Then we moved into the Single bedroom. We thought it was a big room with a small closet, so by creatively adding an L shaped wall and steal some footprint into the bedroom side, we were able to put a door on that new room and design it for the walk-in closet. Even after this, the bedroom still holds a queen size bed with 2 night stands, a TV on the wall, a sitting chair and plenty of room to walk around. This was done by rethinking the location for the bed and night stands.
The bathroom was gutted to make sure there was no leaks and rebuild from the ground up. We kept all of the plumbing where it was, added a new vanity, medicine cabinet, tiles and lighting and it was done.
From there, the rest of the unit had new flooring all throughout, paint, and lighting. After completion and walk through, this project was handed over back to the clients.
Execution and collaboration between all the trades were: Reggie and his team from Premier Interiors and Rohan from RD Mechanical Services.
p.s. Please see our website to see the video.
 RAJ Kitchen and Bath, LLC
“Full apartment design”.
IF you have not yet seen this apartment conversion before, we strongly urge you to go to the bottom left of this page and click on the short 2-minutes video. It would put a lot of things into perspective when you come back and continue reading this.
It is true we were literally handed the keys and told a list of things that they wanted to have happen and we were to go into the apartment, look at the space and come up with a design that would satisfy all of that need. UNTIL we showed up! The unit had really seen some better days but we knew we had to look past that and come up with a concept that would work for them.
The immediate challenges were centered around 3 big ideas:
1. Adding a second bedroom to the already small footprint
2. Figuring out a way to make the kitchen bigger, better and brighter
3. Creating a master room walk in closet
It’s always difficult to add new rooms into existing footprint without expanding out or up and not incurring any opportunity cost. In this case, that was exactly what we had to do. Item one and two above had to be tackled as one. We went ahead and switched out the location of the dining room and eliminating an area where there was a “nook” type eat-in area. By doing so, we were able to cut right into that footprint and change the layout of the kitchen.
That one move allowed us to dig into the kitchen design because it was now the main focal point in the apartment. It was no longer an option to keep it in that tiny hole where it was, so we had to ensure that this design was functional and aesthetically pleasing at the same time. By adding the table into the space where an Island typically would go, we were able to both cut cost and still provide a dining experience. The Table serves as an Island as well when cooking.
We then proceeded to block in the existing doorway to the dining room. By doing this, we were able to create a full room which allowed us to put a door on the other side and called that room Bedroom #2. This was easier to do because all of the mechanicals were already in that space (light, heater and windows). By shifting things around, we also achieved a huge wall to wall closet from inside. PERFECT!
Then we moved into the Single bedroom. We thought it was a big room with a small closet, so by creatively adding an L shaped wall and steal some footprint into the bedroom side, we were able to put a door on that new room and design it for the walk-in closet. Even after this, the bedroom still holds a queen size bed with 2 night stands, a TV on the wall, a sitting chair and plenty of room to walk around. This was done by rethinking the location for the bed and night stands.
The bathroom was gutted to make sure there was no leaks and rebuild from the ground up. We kept all of the plumbing where it was, added a new vanity, medicine cabinet, tiles and lighting and it was done.
From there, the rest of the unit had new flooring all throughout, paint, and lighting. After completion and walk through, this project was handed over back to the clients.
Execution and collaboration between all the trades were: Reggie and his team from Premier Interiors and Rohan from RD Mechanical Services.
p.s. Please see our website to see the video.
 RAJ Kitchen and Bath, LLC
“Full apartment design”.
IF you have not yet seen this apartment conversion before, we strongly urge you to go to the bottom left of this page and click on the short 2-minutes video. It would put a lot of things into perspective when you come back and continue reading this.
It is true we were literally handed the keys and told a list of things that they wanted to have happen and we were to go into the apartment, look at the space and come up with a design that would satisfy all of that need. UNTIL we showed up! The unit had really seen some better days but we knew we had to look past that and come up with a concept that would work for them.
The immediate challenges were centered around 3 big ideas:
1. Adding a second bedroom to the already small footprint
2. Figuring out a way to make the kitchen bigger, better and brighter
3. Creating a master room walk in closet
It’s always difficult to add new rooms into existing footprint without expanding out or up and not incurring any opportunity cost. In this case, that was exactly what we had to do. Item one and two above had to be tackled as one. We went ahead and switched out the location of the dining room and eliminating an area where there was a “nook” type eat-in area. By doing so, we were able to cut right into that footprint and change the layout of the kitchen.
That one move allowed us to dig into the kitchen design because it was now the main focal point in the apartment. It was no longer an option to keep it in that tiny hole where it was, so we had to ensure that this design was functional and aesthetically pleasing at the same time. By adding the table into the space where an Island typically would go, we were able to both cut cost and still provide a dining experience. The Table serves as an Island as well when cooking.
We then proceeded to block in the existing doorway to the dining room. By doing this, we were able to create a full room which allowed us to put a door on the other side and called that room Bedroom #2. This was easier to do because all of the mechanicals were already in that space (light, heater and windows). By shifting things around, we also achieved a huge wall to wall closet from inside. PERFECT!
Then we moved into the Single bedroom. We thought it was a big room with a small closet, so by creatively adding an L shaped wall and steal some footprint into the bedroom side, we were able to put a door on that new room and design it for the walk-in closet. Even after this, the bedroom still holds a queen size bed with 2 night stands, a TV on the wall, a sitting chair and plenty of room to walk around. This was done by rethinking the location for the bed and night stands.
The bathroom was gutted to make sure there was no leaks and rebuild from the ground up. We kept all of the plumbing where it was, added a new vanity, medicine cabinet, tiles and lighting and it was done.
From there, the rest of the unit had new flooring all throughout, paint, and lighting. After completion and walk through, this project was handed over back to the clients.
Execution and collaboration between all the trades were: Reggie and his team from Premier Interiors and Rohan from RD Mechanical Services.
p.s. Please see our website to see the video.
 RAJ Kitchen and Bath, LLC
“Full apartment design”.
IF you have not yet seen this apartment conversion before, we strongly urge you to go to the bottom left of this page and click on the short 2-minutes video. It would put a lot of things into perspective when you come back and continue reading this.
It is true we were literally handed the keys and told a list of things that they wanted to have happen and we were to go into the apartment, look at the space and come up with a design that would satisfy all of that need. UNTIL we showed up! The unit had really seen some better days but we knew we had to look past that and come up with a concept that would work for them.
The immediate challenges were centered around 3 big ideas:
1. Adding a second bedroom to the already small footprint
2. Figuring out a way to make the kitchen bigger, better and brighter
3. Creating a master room walk in closet
It’s always difficult to add new rooms into existing footprint without expanding out or up and not incurring any opportunity cost. In this case, that was exactly what we had to do. Item one and two above had to be tackled as one. We went ahead and switched out the location of the dining room and eliminating an area where there was a “nook” type eat-in area. By doing so, we were able to cut right into that footprint and change the layout of the kitchen.
That one move allowed us to dig into the kitchen design because it was now the main focal point in the apartment. It was no longer an option to keep it in that tiny hole where it was, so we had to ensure that this design was functional and aesthetically pleasing at the same time. By adding the table into the space where an Island typically would go, we were able to both cut cost and still provide a dining experience. The Table serves as an Island as well when cooking.
We then proceeded to block in the existing doorway to the dining room. By doing this, we were able to create a full room which allowed us to put a door on the other side and called that room Bedroom #2. This was easier to do because all of the mechanicals were already in that space (light, heater and windows). By shifting things around, we also achieved a huge wall to wall closet from inside. PERFECT!
Then we moved into the Single bedroom. We thought it was a big room with a small closet, so by creatively adding an L shaped wall and steal some footprint into the bedroom side, we were able to put a door on that new room and design it for the walk-in closet. Even after this, the bedroom still holds a queen size bed with 2 night stands, a TV on the wall, a sitting chair and plenty of room to walk around. This was done by rethinking the location for the bed and night stands.
The bathroom was gutted to make sure there was no leaks and rebuild from the ground up. We kept all of the plumbing where it was, added a new vanity, medicine cabinet, tiles and lighting and it was done.
From there, the rest of the unit had new flooring all throughout, paint, and lighting. After completion and walk through, this project was handed over back to the clients.
Execution and collaboration between all the trades were: Reggie and his team from Premier Interiors and Rohan from RD Mechanical Services.
p.s. Please see our website to see the video.
Sponsored
Westerville, OH

Custom Home Works
Franklin County's Award-Winning Design, Build and Remodeling Expert
 RAJ Kitchen and Bath, LLC
“Full apartment design”.
IF you have not yet seen this apartment conversion before, we strongly urge you to go to the bottom left of this page and click on the short 2-minutes video. It would put a lot of things into perspective when you come back and continue reading this.
It is true we were literally handed the keys and told a list of things that they wanted to have happen and we were to go into the apartment, look at the space and come up with a design that would satisfy all of that need. UNTIL we showed up! The unit had really seen some better days but we knew we had to look past that and come up with a concept that would work for them.
The immediate challenges were centered around 3 big ideas:
1. Adding a second bedroom to the already small footprint
2. Figuring out a way to make the kitchen bigger, better and brighter
3. Creating a master room walk in closet
It’s always difficult to add new rooms into existing footprint without expanding out or up and not incurring any opportunity cost. In this case, that was exactly what we had to do. Item one and two above had to be tackled as one. We went ahead and switched out the location of the dining room and eliminating an area where there was a “nook” type eat-in area. By doing so, we were able to cut right into that footprint and change the layout of the kitchen.
That one move allowed us to dig into the kitchen design because it was now the main focal point in the apartment. It was no longer an option to keep it in that tiny hole where it was, so we had to ensure that this design was functional and aesthetically pleasing at the same time. By adding the table into the space where an Island typically would go, we were able to both cut cost and still provide a dining experience. The Table serves as an Island as well when cooking.
We then proceeded to block in the existing doorway to the dining room. By doing this, we were able to create a full room which allowed us to put a door on the other side and called that room Bedroom #2. This was easier to do because all of the mechanicals were already in that space (light, heater and windows). By shifting things around, we also achieved a huge wall to wall closet from inside. PERFECT!
Then we moved into the Single bedroom. We thought it was a big room with a small closet, so by creatively adding an L shaped wall and steal some footprint into the bedroom side, we were able to put a door on that new room and design it for the walk-in closet. Even after this, the bedroom still holds a queen size bed with 2 night stands, a TV on the wall, a sitting chair and plenty of room to walk around. This was done by rethinking the location for the bed and night stands.
The bathroom was gutted to make sure there was no leaks and rebuild from the ground up. We kept all of the plumbing where it was, added a new vanity, medicine cabinet, tiles and lighting and it was done.
From there, the rest of the unit had new flooring all throughout, paint, and lighting. After completion and walk through, this project was handed over back to the clients.
Execution and collaboration between all the trades were: Reggie and his team from Premier Interiors and Rohan from RD Mechanical Services.
p.s. Please see our website to see the video.
 Dimensions in Wood Inc
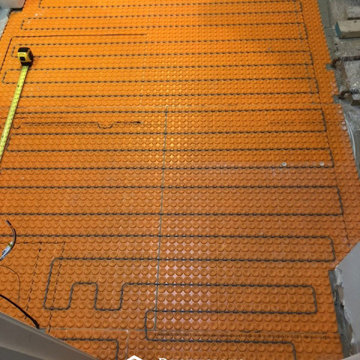
This Columbia, Missouri home’s master bathroom was a full gut remodel. Dimensions In Wood’s expert team handled everything including plumbing, electrical, tile work, cabinets, and more!
Electric, Heated Tile Floor
Starting at the bottom, this beautiful bathroom sports electrical radiant, in-floor heating beneath the wood styled non-slip tile. With the style of a hardwood and none of the drawbacks, this tile will always be warm, look beautiful, and be completely waterproof. The tile was also carried up onto the walls of the walk in shower.
Full Tile Low Profile Shower with all the comforts
A low profile Cloud Onyx shower base is very low maintenance and incredibly durable compared to plastic inserts. Running the full length of the wall is an Onyx shelf shower niche for shampoo bottles, soap and more. Inside a new shower system was installed including a shower head, hand sprayer, water controls, an in-shower safety grab bar for accessibility and a fold-down wooden bench seat.
Make-Up Cabinet
On your left upon entering this renovated bathroom a Make-Up Cabinet with seating makes getting ready easy. A full height mirror has light fixtures installed seamlessly for the best lighting possible. Finally, outlets were installed in the cabinets to hide away small appliances.
Every Master Bath needs a Dual Sink Vanity
The dual sink Onyx countertop vanity leaves plenty of space for two to get ready. The durable smooth finish is very easy to clean and will stand up to daily use without complaint. Two new faucets in black match the black hardware adorning Bridgewood factory cabinets.
Robern medicine cabinets were installed in both walls, providing additional mirrors and storage.
Contact Us Today to discuss Translating Your Master Bathroom Vision into a Reality.
 RAJ Kitchen and Bath, LLC
“Full apartment design”.
IF you have not yet seen this apartment conversion before, we strongly urge you to go to the bottom left of this page and click on the short 2-minutes video. It would put a lot of things into perspective when you come back and continue reading this.
It is true we were literally handed the keys and told a list of things that they wanted to have happen and we were to go into the apartment, look at the space and come up with a design that would satisfy all of that need. UNTIL we showed up! The unit had really seen some better days but we knew we had to look past that and come up with a concept that would work for them.
The immediate challenges were centered around 3 big ideas:
1. Adding a second bedroom to the already small footprint
2. Figuring out a way to make the kitchen bigger, better and brighter
3. Creating a master room walk in closet
It’s always difficult to add new rooms into existing footprint without expanding out or up and not incurring any opportunity cost. In this case, that was exactly what we had to do. Item one and two above had to be tackled as one. We went ahead and switched out the location of the dining room and eliminating an area where there was a “nook” type eat-in area. By doing so, we were able to cut right into that footprint and change the layout of the kitchen.
That one move allowed us to dig into the kitchen design because it was now the main focal point in the apartment. It was no longer an option to keep it in that tiny hole where it was, so we had to ensure that this design was functional and aesthetically pleasing at the same time. By adding the table into the space where an Island typically would go, we were able to both cut cost and still provide a dining experience. The Table serves as an Island as well when cooking.
We then proceeded to block in the existing doorway to the dining room. By doing this, we were able to create a full room which allowed us to put a door on the other side and called that room Bedroom #2. This was easier to do because all of the mechanicals were already in that space (light, heater and windows). By shifting things around, we also achieved a huge wall to wall closet from inside. PERFECT!
Then we moved into the Single bedroom. We thought it was a big room with a small closet, so by creatively adding an L shaped wall and steal some footprint into the bedroom side, we were able to put a door on that new room and design it for the walk-in closet. Even after this, the bedroom still holds a queen size bed with 2 night stands, a TV on the wall, a sitting chair and plenty of room to walk around. This was done by rethinking the location for the bed and night stands.
The bathroom was gutted to make sure there was no leaks and rebuild from the ground up. We kept all of the plumbing where it was, added a new vanity, medicine cabinet, tiles and lighting and it was done.
From there, the rest of the unit had new flooring all throughout, paint, and lighting. After completion and walk through, this project was handed over back to the clients.
Execution and collaboration between all the trades were: Reggie and his team from Premier Interiors and Rohan from RD Mechanical Services.
p.s. Please see our website to see the video.
 RAJ Kitchen and Bath, LLC
“Full apartment design”.
IF you have not yet seen this apartment conversion before, we strongly urge you to go to the bottom left of this page and click on the short 2-minutes video. It would put a lot of things into perspective when you come back and continue reading this.
It is true we were literally handed the keys and told a list of things that they wanted to have happen and we were to go into the apartment, look at the space and come up with a design that would satisfy all of that need. UNTIL we showed up! The unit had really seen some better days but we knew we had to look past that and come up with a concept that would work for them.
The immediate challenges were centered around 3 big ideas:
1. Adding a second bedroom to the already small footprint
2. Figuring out a way to make the kitchen bigger, better and brighter
3. Creating a master room walk in closet
It’s always difficult to add new rooms into existing footprint without expanding out or up and not incurring any opportunity cost. In this case, that was exactly what we had to do. Item one and two above had to be tackled as one. We went ahead and switched out the location of the dining room and eliminating an area where there was a “nook” type eat-in area. By doing so, we were able to cut right into that footprint and change the layout of the kitchen.
That one move allowed us to dig into the kitchen design because it was now the main focal point in the apartment. It was no longer an option to keep it in that tiny hole where it was, so we had to ensure that this design was functional and aesthetically pleasing at the same time. By adding the table into the space where an Island typically would go, we were able to both cut cost and still provide a dining experience. The Table serves as an Island as well when cooking.
We then proceeded to block in the existing doorway to the dining room. By doing this, we were able to create a full room which allowed us to put a door on the other side and called that room Bedroom #2. This was easier to do because all of the mechanicals were already in that space (light, heater and windows). By shifting things around, we also achieved a huge wall to wall closet from inside. PERFECT!
Then we moved into the Single bedroom. We thought it was a big room with a small closet, so by creatively adding an L shaped wall and steal some footprint into the bedroom side, we were able to put a door on that new room and design it for the walk-in closet. Even after this, the bedroom still holds a queen size bed with 2 night stands, a TV on the wall, a sitting chair and plenty of room to walk around. This was done by rethinking the location for the bed and night stands.
The bathroom was gutted to make sure there was no leaks and rebuild from the ground up. We kept all of the plumbing where it was, added a new vanity, medicine cabinet, tiles and lighting and it was done.
From there, the rest of the unit had new flooring all throughout, paint, and lighting. After completion and walk through, this project was handed over back to the clients.
Execution and collaboration between all the trades were: Reggie and his team from Premier Interiors and Rohan from RD Mechanical Services.
p.s. Please see our website to see the video.
 Advance Design Studio, Ltd.
Chris and Sofia of Arlington Heights knew when they purchased their home that they would finish the basement. They needed a space for the kids to hang out, for family and friends to stay, and to have a better space for hosting holidays and parties. The dark unfinished space went mostly unused for three years, but once their kids reached the ideal age for use of a well-built basement, they moved ahead with their plan.
“The old basement was dark and cold, and the kids came down and played, but they didn’t like it. The new space is like a whole other house, so we have this space for family game nights and for watching games or Super Bowl parties,” Chris said.
The couple found Advance Design Studio through a friend who had their entire home renovated by the remodeling company. After the initial meeting and visiting the showroom, Chris and Sofia were positive that Advance Design was the company that could best turn their unfinished basement into a family friendly space for everyone to enjoy.
“We really liked the showroom, we liked being able to choose all of those finishes and meet with them in one place,” Chris said.
A Custom Space for a Family with Multiple Needs
The project began with a fireplace focal point complete with an amazing entertainment wall, a fantastic full kitchen complete with every amenity, and a brand new full bath. The new basement truly has a space for everyone. If the kids want to watch a movie and hang out on the couch they can, if family wants to play games and have a pizza party on the large island they can, and if guests want to stay over night on the pull-out sofa they can enjoy the entire private “suite” complete with a full bath. It is the true definition of a multifunctional basement.
The stunning, full kitchen is the highlight of this now bright and airy basement. You walk down the stairs and are immediately impressed with the detailed metal tile work on the ceiling, bringing to mind the classic feel of a comfortable old pub. Cherry Merlot cabinets provide a rich contrast against the soft neutral walls and the contrasting copper tin ceiling tile and backsplash. Rich Santa Cecelia granite countertops pair nicely with timeless stonework on the outer walls.
The island is large enough to provide a more than adequate entertaining space, and provides plenty of both seating and storage. The well-appointed kitchen houses a regular size refrigerator, a full size oven for pizza parties and cookie baking anytime, a microwave oven as well as complete sink and trash set up. One could easily do without a home kitchen forever in this generously designed secondary space!
The fireplace and buffet wall seating area is the ideal place to watch movies or sporting events. The coordinating stonework on the fireplace flows throughout the basement, and a burnt orange accent wall brings color and warmth to otherwise ordinary basement space. The Elite Merlot media buffet compliments the kitchen as well as provides storage and a unique functional display option, giving this part of the basement a sophisticated, yet functional feel.
The full bath is complete with a unique furniture style cherry DuraSupreme vanity and matching custom designed mirror. The weathered look to the cabinets and mirror give the bathroom some earthy texture as does the stone floor in the walk-in shower. Soft blue makes the space a spa-like mini retreat, and the handsome wall to wall tile and granite speak luxury at every corner.
Advance Design added clever custom storage spaces to take advantage of otherwise wasted corners. They built a custom mudroom for the kids to house their sports equipment and a handy built in bench area with basket pull outs for a custom home gym. “They were able to custom fit this second mudroom with the lockers and the bench, they were able to custom build that, so the kids could store all of their equipment down here for the sports that they are in,” Chris said.
They Got The Amazing Space They Had Envisioned for Years!
The basement Chris and Sofia had envisioned had come to life in a few short months of planning, design and construction, just a perfect fit in the summer months. Advance Design Studio was able to design and build a custom, multifunctional space that the whole family can enjoy. “I would recommend Advance Design because of the showroom, because of the cleanliness on the jobsite and the professionalism, combined with Christine’s design side as well as Todd’s builder’s side - it’s nice to have it all together,” reminisced Chris after the project was complete.
 Advance Design Studio, Ltd.
Chris and Sofia of Arlington Heights knew when they purchased their home that they would finish the basement. They needed a space for the kids to hang out, for family and friends to stay, and to have a better space for hosting holidays and parties. The dark unfinished space went mostly unused for three years, but once their kids reached the ideal age for use of a well-built basement, they moved ahead with their plan.
“The old basement was dark and cold, and the kids came down and played, but they didn’t like it. The new space is like a whole other house, so we have this space for family game nights and for watching games or Super Bowl parties,” Chris said.
The couple found Advance Design Studio through a friend who had their entire home renovated by the remodeling company. After the initial meeting and visiting the showroom, Chris and Sofia were positive that Advance Design was the company that could best turn their unfinished basement into a family friendly space for everyone to enjoy.
“We really liked the showroom, we liked being able to choose all of those finishes and meet with them in one place,” Chris said.
A Custom Space for a Family with Multiple Needs
The project began with a fireplace focal point complete with an amazing entertainment wall, a fantastic full kitchen complete with every amenity, and a brand new full bath. The new basement truly has a space for everyone. If the kids want to watch a movie and hang out on the couch they can, if family wants to play games and have a pizza party on the large island they can, and if guests want to stay over night on the pull-out sofa they can enjoy the entire private “suite” complete with a full bath. It is the true definition of a multifunctional basement.
The stunning, full kitchen is the highlight of this now bright and airy basement. You walk down the stairs and are immediately impressed with the detailed metal tile work on the ceiling, bringing to mind the classic feel of a comfortable old pub. Cherry Merlot cabinets provide a rich contrast against the soft neutral walls and the contrasting copper tin ceiling tile and backsplash. Rich Santa Cecelia granite countertops pair nicely with timeless stonework on the outer walls.
The island is large enough to provide a more than adequate entertaining space, and provides plenty of both seating and storage. The well-appointed kitchen houses a regular size refrigerator, a full size oven for pizza parties and cookie baking anytime, a microwave oven as well as complete sink and trash set up. One could easily do without a home kitchen forever in this generously designed secondary space!
The fireplace and buffet wall seating area is the ideal place to watch movies or sporting events. The coordinating stonework on the fireplace flows throughout the basement, and a burnt orange accent wall brings color and warmth to otherwise ordinary basement space. The Elite Merlot media buffet compliments the kitchen as well as provides storage and a unique functional display option, giving this part of the basement a sophisticated, yet functional feel.
The full bath is complete with a unique furniture style cherry DuraSupreme vanity and matching custom designed mirror. The weathered look to the cabinets and mirror give the bathroom some earthy texture as does the stone floor in the walk-in shower. Soft blue makes the space a spa-like mini retreat, and the handsome wall to wall tile and granite speak luxury at every corner.
Advance Design added clever custom storage spaces to take advantage of otherwise wasted corners. They built a custom mudroom for the kids to house their sports equipment and a handy built in bench area with basket pull outs for a custom home gym. “They were able to custom fit this second mudroom with the lockers and the bench, they were able to custom build that, so the kids could store all of their equipment down here for the sports that they are in,” Chris said.
They Got The Amazing Space They Had Envisioned for Years!
The basement Chris and Sofia had envisioned had come to life in a few short months of planning, design and construction, just a perfect fit in the summer months. Advance Design Studio was able to design and build a custom, multifunctional space that the whole family can enjoy. “I would recommend Advance Design because of the showroom, because of the cleanliness on the jobsite and the professionalism, combined with Christine’s design side as well as Todd’s builder’s side - it’s nice to have it all together,” reminisced Chris after the project was complete.
 RAJ Kitchen and Bath, LLC
“Full apartment design”.
IF you have not yet seen this apartment conversion before, we strongly urge you to go to the bottom left of this page and click on the short 2-minutes video. It would put a lot of things into perspective when you come back and continue reading this.
It is true we were literally handed the keys and told a list of things that they wanted to have happen and we were to go into the apartment, look at the space and come up with a design that would satisfy all of that need. UNTIL we showed up! The unit had really seen some better days but we knew we had to look past that and come up with a concept that would work for them.
The immediate challenges were centered around 3 big ideas:
1. Adding a second bedroom to the already small footprint
2. Figuring out a way to make the kitchen bigger, better and brighter
3. Creating a master room walk in closet
It’s always difficult to add new rooms into existing footprint without expanding out or up and not incurring any opportunity cost. In this case, that was exactly what we had to do. Item one and two above had to be tackled as one. We went ahead and switched out the location of the dining room and eliminating an area where there was a “nook” type eat-in area. By doing so, we were able to cut right into that footprint and change the layout of the kitchen.
That one move allowed us to dig into the kitchen design because it was now the main focal point in the apartment. It was no longer an option to keep it in that tiny hole where it was, so we had to ensure that this design was functional and aesthetically pleasing at the same time. By adding the table into the space where an Island typically would go, we were able to both cut cost and still provide a dining experience. The Table serves as an Island as well when cooking.
We then proceeded to block in the existing doorway to the dining room. By doing this, we were able to create a full room which allowed us to put a door on the other side and called that room Bedroom #2. This was easier to do because all of the mechanicals were already in that space (light, heater and windows). By shifting things around, we also achieved a huge wall to wall closet from inside. PERFECT!
Then we moved into the Single bedroom. We thought it was a big room with a small closet, so by creatively adding an L shaped wall and steal some footprint into the bedroom side, we were able to put a door on that new room and design it for the walk-in closet. Even after this, the bedroom still holds a queen size bed with 2 night stands, a TV on the wall, a sitting chair and plenty of room to walk around. This was done by rethinking the location for the bed and night stands.
The bathroom was gutted to make sure there was no leaks and rebuild from the ground up. We kept all of the plumbing where it was, added a new vanity, medicine cabinet, tiles and lighting and it was done.
From there, the rest of the unit had new flooring all throughout, paint, and lighting. After completion and walk through, this project was handed over back to the clients.
Execution and collaboration between all the trades were: Reggie and his team from Premier Interiors and Rohan from RD Mechanical Services.
p.s. Please see our website to see the video.
30