
Search results for "Proper care" in Home Design Ideas
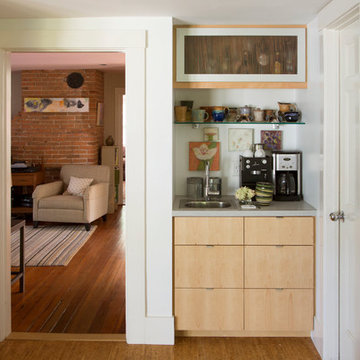
 Cummings Architecture + Interiors
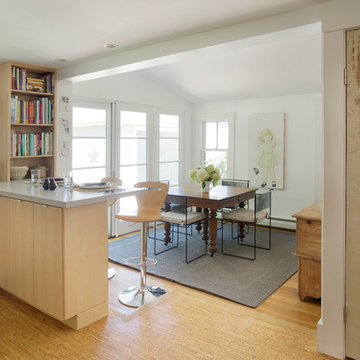
Blending contemporary and historic styles requires innovative design and a well-balanced aesthetic. That was the challenge we faced in creating a modern kitchen for this historic home in Lynnfield, MA. The final design retained the classically beautiful spatial and structural elements of the home while introducing a sleek sophistication. We mixed the two design palettes carefully. For instance, juxtaposing the warm, distressed wood of an original door with the smooth, brightness of non-paneled, maple cabinetry. A cork floor and accent cabinets of white metal add texture while a seated, step-down peninsula and built in bookcase create an open transition from the kitchen proper to an inviting dining space. This is truly a space where the past and present can coexist harmoniously.
Photo Credit: Eric Roth
 All Marble Tiles
Achieve a Royalty Look with Calacatta Gold Tiles
We all have that dream home we want to have. Better yet, some of us dream of a fantastic renovation of our homes; transforms them into glossy nests we can always be glad to perch in. For those of us who are already on the way to the dream house, you probably are shopping for material to use. So how about we introduce you to the good old Calacatta Gold marble?
If you are asking what that is, we can say it’s a unique way of inspiring royalty to your home using tiles. Calacatta Gold is a special stone tile mined in the hearts of Italy, on the Appian Mountains. Ever since it was discovered, it has been heavily used as a floor tile as well as wall tile, creating remarkable artistic visuals with a touch of natural gold in it. Calacatta gold tile also has one unique trait you won’t notice in most tiles; you can easily mix it with other slab colors, specifically gold extra, Calacatta Borghini, Crema and Super Extra.
Calacatta gold is also one of the few tiles with a unique pencil vein detail centering the white hue background and grey veins on the tile as well. This is the perfect choice for artistic walls and floors but be sure to use the right slab colors if you want to bring in more colors; if the slab and tile don’t match in color tones then it may affect the overall look of your walls/floors.
There are plenty of places in the house you can experiment with the pristine Calacatta gold tile. How about the living room wall that is a background for your TV and home theater system? Calacatta wall tile will create a covetable golden hue that will always shine before you. Moreover, you will definitely fall in love with your walls in the morning, when a streak of sunlight illuminates the golden yellows.
Installing the beautiful Calacatta gold tile is a pretty easy job as well. However you just need to be careful to use white thinset instead of grey. White thinsets will absorb the trowel lines whereas grey may leave behind ugly marks which may taint the exquisite nature of the tiles. If you also want your Calacatta floor tile or wall tile to last longer make sure it is properly sealed with grout.
You still have that dream home in mind? We already have you covered on the best tiles to you use. Just think Calacatta gold tile all the way, all your friends will definitely take selfies beside your shiny golden walls.
http://AllMarbleTiles.com
 Schoolhouse
David Tsay for STYLED by Emily Henderson
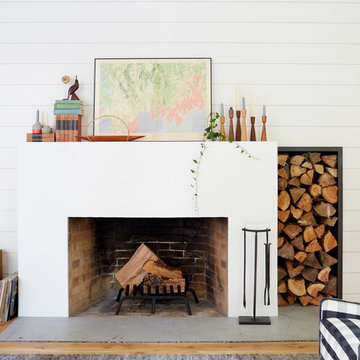
Example of a cottage living room design in Portland
Example of a cottage living room design in Portland
Find the right local pro for your project
 Thinkterior LLC
For a family who believes fitness is not only an essential part of life but also a fun opportunity for the whole family to connect, build and achieve greatness together there is nothing better than a custom designed obstacle course right in your back yard.
THEME
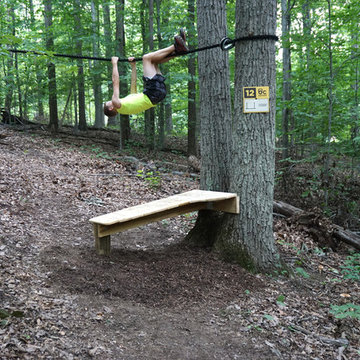
The theme of this half mile trail through the woods is evident in the fun, creative and all-inclusive obstacles hidden in the natural flow of the land around this amazing family home. The course was created with adults and children, advanced and beginner athletes, competitive and entertaining events all accounted for. Each of the 13 obstacles was designed to be challenging no matter the size, skill or ability of the athlete lucky enough to run the course.
FOCUS
The focus for this family was to create an outdoor adventure that could be an athletic, social and personal outlet for their entire family while maintaining the natural beauty of the landscape and without altering the sweeping views from the home. The large scale of the challenging obstacles is camouflaged within the landscape using the rolling hills and mature trees as a natural curtain in every season. The beauty of the course does not diminish the functional and demanding nature of the obstacles which are designed to focus on multiple strength, agility, and cardio fitness abilities and intensities.
STORAGE
The start of the trail includes a raised training area offering a dedicated space clear from the ground to place bags, mats and other equipment used during the run. A small all-terrain storage cart was provided for use with 6 yoga mats, 3 medicine balls of various weights, rings, sprinting cones, and a large digital timer to record laps.
GROWTH
The course was designed to provide an athletic and fun challenge for children, teens and adults no matter their experience or athletic prowess. This course offers competitive athletes a challenge and budding athletes an opportunity to experience and ignite their passion for physical activity. Initially the concept for the course was focused on the youngest of the family however as the design grew so did the obstacles and now it is a true family experience that will meet their adapting needs for years. Each obstacle is paired with an instructional sign directing the runners in proper use of the obstacle, adaptations for skill levels and tips on form. These signs are all customized for this course and are printed on metal to ensure they last for many years.
SAFETY
Safety is crucial for all physical activity and an obstacle course of this scale presents unique safety concerns. Children should always be supervised when participating in an adventure on the course however additional care was paid to details on the course to ensure everyone has a great time. All of the course obstacles have been created with pressure treated lumber that will withstand the seasonal poundings. All footer pilings that support obstacles have been placed into the ground between 3 to 4 feet (.9 to 1.2 meters) and each piling has 2 to 3 bags of concrete (totaling over 90 bags used throughout the course) ensuring stability of the structure and safety of the participants. Additionally, all obstacle lumber has been given rounded corners and sanded down offering less splintering and more time for everyone to enjoy the course.
This athletic and charismatic family strives to incorporate a healthy active lifestyle into their daily life and this obstacle course offers their family an opportunity to strengthen themselves and host some memorable and active events at their amazing home.

 NWC Construction
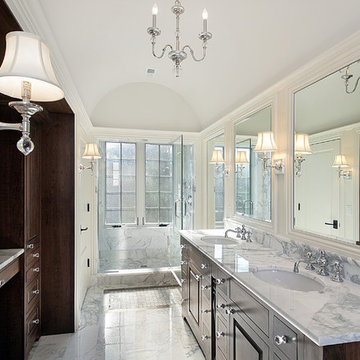
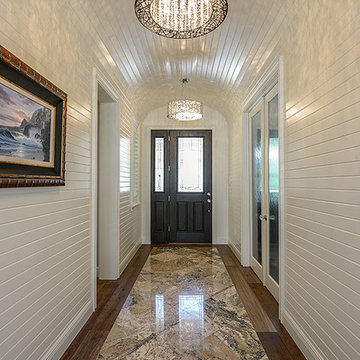
This is a one of a kind entry. You have seen barrel ceilings and you have seen tongue and groove walls and ceilings. We took both of these great looks and added them together. To frame out the room even more we used a marble/ onyx stone tile and bordered it with the hardwood we used on the home.
 Randy Angell Designs
The subtle changes begin as soon as you walk out the back door of the house. The existing decking had a lot of what we call "tweeners"; areas that are overly generous walkways, yet not large enough to house furniture. The awkwardly small bluestone patio was expanded to accommodate a generous seating area. This was done by pushing the step-down closer to the pool.
Our talented stone mason carefully married the new bluestone into the existing portion of the patio, resulting in an imperceptible difference between the two.
As you descend the new bluestone steps to the pool level, your bare feet will be thankful for the new smooth-finished, limestone-colored concrete, with a hand cut pattern carefully etched into it's surface.
The old red brick decking was so hot that the owners could not walk around the pool with their bare feet. The brick coping was also replaced with an eased edge, Pennsylvania Premier Stone which matches the new step treads throughout the project.
Between the house and the pool, a large raised planter was reconfigured, giving additional space to the pool deck for a shaded lounge chair area. Across the pool, a bank of rather tall painted brick retaining walls were cut down, shortened and moved. This lessened the visual impact of the walls (which were overwhelming in the space) and also opened up a new seating area, nestled under the arms of the massive Pecan tree at the back of the property.
Rather than continuing solid decking around the entire pool, the area near these walls has been transformed to large stone stepper pads set in a sea of beautiful St. Augustine lawn. This creates a visually softened area that is still suited to setting tables and chairs when the guest list calls for additional seating.
The spa area is possibly the most dramatic change on this project. Yet more raised planter walls divided this area into awkward spaces, unsuited for proper furniture placement. The planters were removed, new stone decks added, and once again expertly married into the existing decks, opening the area to house a large dining table and a newly built-in BBQ area.
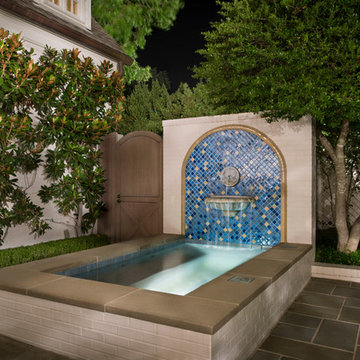
The spa itself was re-imagined with the bluestone coping and painted brick veneer. The most impressive addition though is the new handmade glazed tiles that surround the existing cast stone water feature. This water feature was almost unnoticeable against the painted brick wall, but now the dramatic arch and pop of color draw the eye to this quaint little corner of the property.
Originally designed by one of the most notable landscape architects in town, this once impressive project had faltered in recent years. The pool and spa still functioned well, and the client wanted to keep it intact. In addition, they wanted to keep as much of the existing landscape as possible. But, the surrounding decks, walls and steps were fair game.
At first glance, one might think that our changes were simple material changes. However, upon closer inspection, one can see the subtle-yet-transformative changes that came together to update this classic pool in a tasteful, timeless manner, as well as to improve the flow and usability of the deck areas, while softening the feel of this massive hardscape.
 Edgewater Design Group
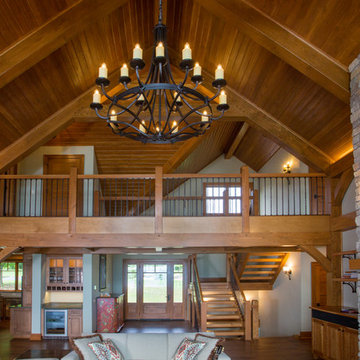
Our clients already had a cottage on Torch Lake that they loved to visit. It was a 1960s ranch that worked just fine for their needs. However, the lower level walkout became entirely unusable due to water issues. After purchasing the lot next door, they hired us to design a new cottage. Our first task was to situate the home in the center of the two parcels to maximize the view of the lake while also accommodating a yard area. Our second task was to take particular care to divert any future water issues. We took necessary precautions with design specifications to water proof properly, establish foundation and landscape drain tiles / stones, set the proper elevation of the home per ground water height and direct the water flow around the home from natural grade / drive. Our final task was to make appealing, comfortable, living spaces with future planning at the forefront. An example of this planning is placing a master suite on both the main level and the upper level. The ultimate goal of this home is for it to one day be at least a 3/4 of the year home and designed to be a multi-generational heirloom.
- Jacqueline Southby Photography
 Edgewater Design Group
Our clients already had a cottage on Torch Lake that they loved to visit. It was a 1960s ranch that worked just fine for their needs. However, the lower level walkout became entirely unusable due to water issues. After purchasing the lot next door, they hired us to design a new cottage. Our first task was to situate the home in the center of the two parcels to maximize the view of the lake while also accommodating a yard area. Our second task was to take particular care to divert any future water issues. We took necessary precautions with design specifications to water proof properly, establish foundation and landscape drain tiles / stones, set the proper elevation of the home per ground water height and direct the water flow around the home from natural grade / drive. Our final task was to make appealing, comfortable, living spaces with future planning at the forefront. An example of this planning is placing a master suite on both the main level and the upper level. The ultimate goal of this home is for it to one day be at least a 3/4 of the year home and designed to be a multi-generational heirloom.
- Jacqueline Southby Photography
 Edgewater Design Group
Our clients already had a cottage on Torch Lake that they loved to visit. It was a 1960s ranch that worked just fine for their needs. However, the lower level walkout became entirely unusable due to water issues. After purchasing the lot next door, they hired us to design a new cottage. Our first task was to situate the home in the center of the two parcels to maximize the view of the lake while also accommodating a yard area. Our second task was to take particular care to divert any future water issues. We took necessary precautions with design specifications to water proof properly, establish foundation and landscape drain tiles / stones, set the proper elevation of the home per ground water height and direct the water flow around the home from natural grade / drive. Our final task was to make appealing, comfortable, living spaces with future planning at the forefront. An example of this planning is placing a master suite on both the main level and the upper level. The ultimate goal of this home is for it to one day be at least a 3/4 of the year home and designed to be a multi-generational heirloom.
- Jacqueline Southby Photography

 Cummings Architecture + Interiors
Blending contemporary and historic styles requires innovative design and a well-balanced aesthetic. That was the challenge we faced in creating a modern kitchen for this historic home in Lynnfield, MA. The final design retained the classically beautiful spatial and structural elements of the home while introducing a sleek sophistication. We mixed the two design palettes carefully. For instance, juxtaposing the warm, distressed wood of an original door with the smooth, brightness of non-paneled, maple cabinetry. A cork floor and accent cabinets of white metal add texture while a seated, step-down peninsula and built in bookcase create an open transition from the kitchen proper to an inviting dining space. This is truly a space where the past and present can coexist harmoniously.
Photo Credit: Eric Roth
 Edgewater Design Group
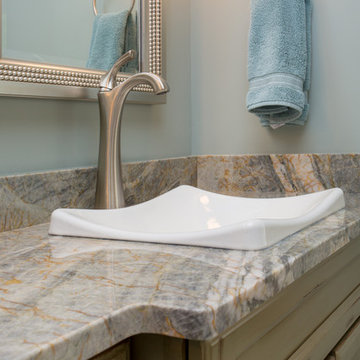
Our clients already had a cottage on Torch Lake that they loved to visit. It was a 1960s ranch that worked just fine for their needs. However, the lower level walkout became entirely unusable due to water issues. After purchasing the lot next door, they hired us to design a new cottage. Our first task was to situate the home in the center of the two parcels to maximize the view of the lake while also accommodating a yard area. Our second task was to take particular care to divert any future water issues. We took necessary precautions with design specifications to water proof properly, establish foundation and landscape drain tiles / stones, set the proper elevation of the home per ground water height and direct the water flow around the home from natural grade / drive. Our final task was to make appealing, comfortable, living spaces with future planning at the forefront. An example of this planning is placing a master suite on both the main level and the upper level. The ultimate goal of this home is for it to one day be at least a 3/4 of the year home and designed to be a multi-generational heirloom.
- Jacqueline Southby Photography
 Edgewater Design Group
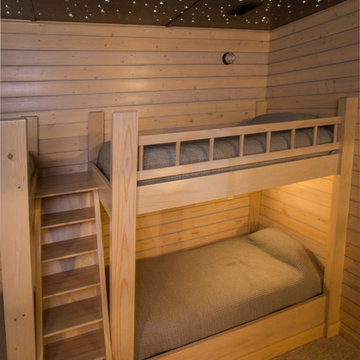
Our clients already had a cottage on Torch Lake that they loved to visit. It was a 1960s ranch that worked just fine for their needs. However, the lower level walkout became entirely unusable due to water issues. After purchasing the lot next door, they hired us to design a new cottage. Our first task was to situate the home in the center of the two parcels to maximize the view of the lake while also accommodating a yard area. Our second task was to take particular care to divert any future water issues. We took necessary precautions with design specifications to water proof properly, establish foundation and landscape drain tiles / stones, set the proper elevation of the home per ground water height and direct the water flow around the home from natural grade / drive. Our final task was to make appealing, comfortable, living spaces with future planning at the forefront. An example of this planning is placing a master suite on both the main level and the upper level. The ultimate goal of this home is for it to one day be at least a 3/4 of the year home and designed to be a multi-generational heirloom.
- Jacqueline Southby Photography
 Outdoor Creations Landscape & Design Inc.
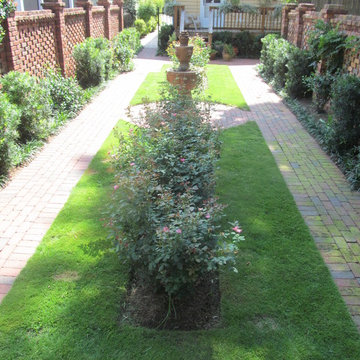
This is a few months after. Everything starting to grow. We utilized both, cultural or mechanical methods applied through best management practices. Recommended mowing heights on turf. Proper water practices. Proper fertilizer used based on soil analysis.
 Kathleen Jennison
An Arts & Crafts Bungalow is one of my favorite styles of homes. We have quite a few of them in our Stockton Mid-Town area. And when C&L called us to help them remodel their 1923 American Bungalow, I was beyond thrilled.
As per usual, when we get a new inquiry, we quickly Google the project location while we are talking to you on the phone. My excitement escalated when I saw the Google Earth Image of the sweet Sage Green bungalow in Mid-Town Stockton. "Yes, we would be interested in working with you," I said trying to keep my cool.
But what made it even better was meeting C&L and touring their home, because they are the nicest young couple, eager to make their home period perfect. Unfortunately, it had been slightly molested by some bad house-flippers, and we needed to bring the bathroom back to it "roots."
We knew we had to banish the hideous brown tile and cheap vanity quickly. But C&L complained about the condensation problems and the constant fight with mold. This immediately told me that improper remodeling had occurred and we needed to remedy that right away.
The Before: Frustrations with a Botched Remodel
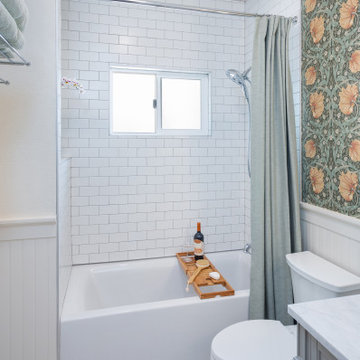
The bathroom needed to be brought back to period appropriate design with all the functionality of a modern bathroom. We thought of things like marble countertop, white mosaic floor tiles, white subway tile, board and batten molding, and of course a fabulous wallpaper.
This small (and only) bathroom on a tight budget required a little bit of design sleuthing to figure out how we could get the proper look and feel. Our goal was to determine where to splurge and where to economize and how to complete the remodel as quickly as possible because C&L would have to move out while construction was going on.
The Process: Hard Work to Remedy Design and Function
During our initial design study, (which included 2 hours in the owners’ home), we noticed framed images of William Morris Arts and Crafts textile patterns and knew this would be our design inspiration. We presented C&L with three options and they quickly selected the Pimpernel Design Concept.
We had originally selected the Black and Olive colors with a black vanity, mirror, and black and white floor tile. C&L liked it but weren’t quite sure about the black, We went back to the drawing board and decided the William & Co Pimpernel Wallpaper in Bayleaf and Manilla color with a softer gray painted vanity and mirror and white floor tile was more to their liking.
After the Design Concept was approved, we went to work securing the building permit, procuring all the elements, and scheduling our trusted tradesmen to perform the work.
We did uncover some shoddy work by the flippers such as live electrical wires hidden behind the wall, plumbing venting cut-off and buried in the walls (hence the constant dampness), the tub barely balancing on two fence boards across the floor joist, and no insulation on the exterior wall.
All of the previous blunders were fixed and the bathroom put back to its previous glory. We could feel the house thanking us for making it pretty again.
The After Reveal: Cohesive Design Decisions
We selected a simple white subway tile for the tub/shower. This is always classic and in keeping with the style of the house.
We selected a pre-fab vanity and mirror, but they look rich with the quartz countertop. There is much more storage in this small vanity than you would think.
The Transformation: A Period Perfect Refresh
We began the remodel just as the pandemic reared and stay-in-place orders went into effect. As C&L were already moved out and living with relatives, we got the go-ahead from city officials to get the work done (after all, how can you shelter in place without a bathroom?).
All our tradesmen were scheduled to work so that only one crew was on the job site at a time. We stayed on the original schedule with only a one week delay.
The end result is the sweetest little bathroom I've ever seen (and I can't wait to start work on C&L's kitchen next).
Thank you for joining me in this project transformation. I hope this inspired you to think about being creative with your design projects, determining what works best in keeping with the architecture of your space, and carefully assessing how you can have the best life in your home.
 ZeroEnergy Design
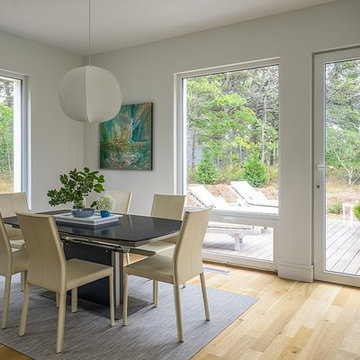
This modern green home offers both a vacation destination on Cape Cod near local family members and an opportunity for rental income.
FAMILY ROOTS. A West Coast couple living in the San Francisco Bay Area sought a permanent East Coast vacation home near family members living on Cape Cod. As academic professionals focused on sustainability, they sought a green, energy efficient home that was well-aligned with their values. With no green homes available for sale on Cape Cod, they decided to purchase land near their family and build their own.
SLOPED SITE. Comprised of a 3/4 acre lot nestled in the pines, the steeply sloping terrain called for a plan that embraced and took advantage of the slope. Of equal priority was optimizing solar exposure, preserving privacy from abutters, and creating outdoor living space. The design accomplished these goals with a simple, rectilinear form, offering living space on the both entry and lower/basement levels. The stepped foundation allows for a walk-out basement level with light-filled living space on the down-hill side of the home. The traditional basement on the eastern, up-hill side houses mechanical equipment and a home gym. The house welcomes natural light throughout, captures views of the forest, and delivers entertainment space that connects indoor living space to outdoor deck and dining patio.
MODERN VISION. The clean building form and uncomplicated finishes pay homage to the modern architectural legacy on the outer Cape. Durable and economical fiber cement panels, fixed with aluminum channels, clad the primary form. Cedar clapboards provide a visual accent at the south-facing living room, which extends a single roof plane to cover the entry porch.
SMART USE OF SPACE. On the entry level, the “L”-shaped living, dining, and kitchen space connects to the exterior living, dining, and grilling spaces to effectively double the home’s summertime entertainment area. Placed at the western end of the entry level (where it can retain privacy but still claim expansive downhill views) is the master suite with a built-in study. The lower level has two guest bedrooms, a second full bathroom, and laundry. The flexibility of the space—crucial in a house with a modest footprint—emerges in one of the guest bedrooms, which doubles as home office by opening the barn-style double doors to connect it to the bright, airy open stair leading up to the entry level. Thoughtful design, generous ceiling heights and large windows transform the modest 1,100 sf* footprint into a well-lit, spacious home. *(total finished space is 1800 sf)
RENTAL INCOME. The property works for its owners by netting rental income when the owners are home in San Francisco. The house especially caters to vacationers bound for nearby Mayo Beach and includes an outdoor shower adjacent to the lower level entry door. In contrast to the bare bones cottages that are typically available on the Cape, this home offers prospective tenants a modern aesthetic, paired with luxurious and green features. Durable finishes inside and out will ensure longevity with the heavier use that comes with a rental property.
COMFORT YEAR-ROUND. The home is super-insulated and air-tight, with mechanical ventilation to provide continuous fresh air from the outside. High performance triple-paned windows complement the building enclosure and maximize passive solar gain while ensuring a warm, draft-free winter, even when sitting close to the glass. A properly sized air source heat pump offers efficient heating & cooling, and includes a carefully designed the duct distribution system to provide even comfort throughout the house. The super-insulated envelope allows us to significantly reduce the equipment capacity, duct size, and airflow quantities, while maintaining unparalleled thermal comfort.
ENERGY EFFICIENT. The building’s shell and mechanical systems play instrumental roles in the home’s exceptional performance. The building enclosure reduces the most significant energy glutton: heating. Continuous super-insulation, thorough air sealing, triple-pane windows, and passive solar gain work together to yield a miniscule heating load. All active energy consumers are extremely efficient: an air source heat pump for heating and cooling, a heat pump hot water heater, LED lighting, energy recovery ventilation (ERV), and high efficiency appliances. The result is a home that uses 70% less energy than a similar new home built to code requirements.
OVERALL. The home embodies the owners’ goals and values while comprehensively enabling thermal comfort, energy efficiency, a vacation respite, and supplementary income.
PROJECT TEAM
ZeroEnergy Design - Architect & Mechanical Designer
A.F. Hultin & Co. - Contractor
Pamet Valley Landscape Design - Landscape & Masonry
Lisa Finch - Original Artwork
European Architectural Supply - Windows
Eric Roth Photography - Photography
 Windy City Painters
Painter Near Me Chicago - Professional Painting Services by Windy City Painters
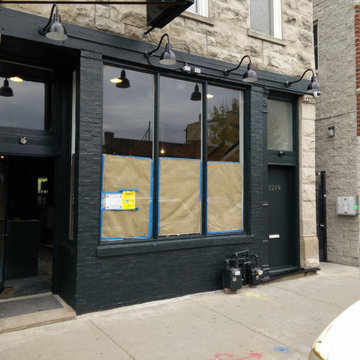
Finding a skilled painter near me in Chicago is easier when you know what to look for, and Windy City Painters delivers the craftsmanship Chicago homeowners trust for greystones, vintage two-flats, classic bungalows, and modern condos throughout the city.
Project Overview
This project showcases Windy City Painters completing professional interior and exterior painting services for a Chicago-area client. The building's vintage character called for careful color selection and precise application to honor original architectural details while refreshing every surface.
Materials and Products Used
Windy City Painters selects premium paints from trusted manufacturers including Sherwin-Williams and Benjamin Moore, chosen specifically for Chicago's climate demands. Primers, fillers, and caulks are all professional-grade for lasting adhesion and durability.
Our Step-by-Step Process
Step 1 - Prep and Repairs: All surfaces are cleaned, sanded, and patched. Cracks in plaster or drywall are filled and feathered smooth before any painting begins.
Step 2 - Priming: A quality primer is applied to ensure proper adhesion, uniform sheen, and long-term durability across all surfaces.
Step 3 - Paint Application: Multiple coats are applied using the right tools for each surface - brushes, rollers, and sprayers where appropriate.
Step 4 - Final Inspection: Windy City Painters conducts a detailed walkthrough with the homeowner to confirm every detail meets our high standard.
Chicago-Specific Challenges
Older Chicago homes present unique challenges including lead paint layers, aging horsehair plaster, moisture from harsh winters, and intricate vintage millwork. Windy City Painters is trained to handle all of these safely and professionally.
Results
Clients consistently report dramatic improvements in curb appeal, interior atmosphere, and overall home value after working with Windy City Painters.
Pro Tips Before You Start
Always test for lead paint in homes built before 1978. Budget for surface prep - it determines final quality. Choose paints rated for Chicago's freeze-thaw cycles for exterior projects.
See more work and request a free estimate at windypainters.com.
Frequently Asked Questions
Q: How do I find a reliable painter near me in Chicago? / A: Look for licensed, insured contractors with strong local reviews. Windy City Painters is a trusted painter near me in Chicago with a proven track record serving greystones, bungalows, and vintage buildings throughout the city.
Q: What surfaces can a painter near me in Chicago handle? / A: Windy City Painters handles drywall, plaster, wood trim, cabinets, brick, and metal surfaces, making us a comprehensive painter near me in Chicago for any project large or small.
Q: How important is surface preparation? / A: Proper preparation is the foundation of any quality paint job. As your painter near me in Chicago, Windy City Painters dedicates significant time to prep work ensuring flawless, long-lasting results every time.
Q: Do you handle lead paint safely in older Chicago homes? / A: Yes, Windy City Painters follows all safety protocols for lead paint in older homes, making us the responsible painter near me in Chicago for vintage and pre-1978 buildings.
Q: What paint brands does Windy City Painters recommend? / A: As a professional painter near me in Chicago, Windy City Painters recommends Sherwin-Williams and Benjamin Moore for their durability, color accuracy, and performance in Chicago's demanding climate.
Q: Can you paint exterior surfaces in Chicago winters? / A: Exterior painting requires temperatures above 50 degrees Fahrenheit. Windy City Painters, your painter near me in Chicago, schedules exterior projects during appropriate seasonal windows for best results.
Q: How many coats of paint are typically needed? / A: Most projects require two finish coats over primer. Your painter near me in Chicago at Windy City Painters assesses each surface individually to determine the right number of coats.
Q: Do you offer color consultation services? / A: Yes, Windy City Painters provides color guidance as part of our painter near me in Chicago service, helping you select shades that complement your home's architecture and style.
Q: Can Windy City Painters match existing paint colors? / A: Absolutely, as your skilled painter near me in Chicago, Windy City Painters uses professional color-matching technology to seamlessly blend new paint with existing finishes throughout your home.
Q: How do I get a free estimate from a painter near me in Chicago? / A: Simply visit windypainters.com or call us directly. Windy City Painters makes it easy to connect with a professional painter near me in Chicago for a no-obligation estimate.
 BMR BelMax Remodeling
Luxury Bathroom Remodeling in Langhorne, PA – A Stunning Transformation by BMR Belmax Remodeling
At BMR Belmax Remodeling, we take pride in transforming bathrooms into elegant, functional, and modern spaces. Our latest bathroom remodeling in Langhorne, PA is a testament to high-quality craftsmanship and attention to detail. This project was about creating a luxurious retreat, where aesthetics meet functionality. From a spacious walk-in shower to a sleek freestanding tub, black fixtures, and marble-inspired finishes, this bathroom is truly a piece of art.
The Challenge: A Bathroom in Need of Modernization
Our client in Langhorne, PA, wanted a bathroom renovation that would maximize space, enhance functionality, and create a modern, elegant atmosphere. The existing bathroom lacked the cohesive design and luxury finishes that the homeowner desired. They envisioned a spacious walk-in shower, stylish vanity, elegant tiling, and a freestanding bathtub that would bring a spa-like feel to their home.
BMR Belmax Remodeling was up to the challenge. We focused on layout optimization, high-end finishes, and sophisticated black fixtures to create a space that exudes timeless elegance and modern convenience.
The Transformation: A Spacious & Elegant Bathroom Design
Our remodeling team executed a complete renovation, incorporating top-tier materials, innovative design elements, and seamless craftsmanship. The result? A stunning, spa-like master bathroom that exceeds expectations.
1. Walk-In Shower with Premium Features
Built a spacious 68” x 36” walk-in shower, offering comfort and luxury.
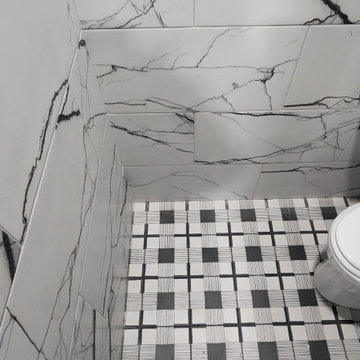
Installed beautiful marble-look tiles on the shower walls, adding a sophisticated and timeless aesthetic.
Used mosaic tiles for the shower base, enhancing texture, durability, and slip-resistance.
Integrated a sleek black shower fixture, creating a striking contrast with the light-colored tiles.
Installed a recessed shower light, ensuring proper illumination for a relaxing shower experience.
2. Stunning Marble-Effect Tile Work
The entire bathroom features marble-look tiles, creating a high-end and cohesive design.
Used white marble-look tiles for the bathroom floor, complementing the shower walls while enhancing the sense of space and brightness.
3. Elegant Freestanding Tub as the Centerpiece
Installed a modern black-and-white freestanding bathtub, adding a luxurious spa-like feel to the space.
Positioned the tub near the newly painted black-framed windows, creating a stunning visual contrast.
Added a sleek black floor-mounted tub filler, blending perfectly with the overall design.
4. Custom Wall-Mounted Double Vanity & Mirrors
Installed a double vanity, reconfiguring all plumbing to allow for a floating, wall-mounted design.
The wall-mounted vanity enhances floor space and gives the bathroom a modern, airy look.
Added matching lighted mirrors, providing both functionality and style.
5. Thoughtful Lighting & Black Accents
Installed recessed lighting throughout the bathroom, creating a bright and inviting atmosphere.
Added an additional light in the shower, ensuring proper visibility and ambiance.
Painted all bathroom doors black, complementing the black fixtures and window frames.
Installed all bathroom fixtures in black, creating a bold contrast against the marble-inspired tile work.
6. New Windows for a Balanced Aesthetic
Installed five new windows, painted black inside and white outside, enhancing both exterior curb appeal and interior elegance.
The black window frames create a striking contrast against the light-colored tile walls.
The Result: A Luxurious and Functional Bathroom Retreat
The completed bathroom renovation in Langhorne, PA, is a stunning masterpiece, blending modern sophistication with timeless luxury. The spacious walk-in shower, freestanding tub, and floating vanity contribute to an elegant, spa-like environment.
The combination of marble-look tiles, black fixtures, recessed lighting, and high-end finishes creates a harmonious and visually stunning space. Every design choice was carefully planned and executed to maximize comfort, elegance, and functionality.
Our client was extremely happy with the outcome, describing the bathroom as a true work of art. They particularly loved how the black fixtures and accents contrast beautifully with the marble-inspired tiles, giving the bathroom a sophisticated and high-end feel.
Why Choose BMR Belmax Remodeling?
This bathroom remodeling in Langhorne, PA reflects the quality, creativity, and dedication we bring to every project. Homeowners trust BMR Belmax Remodeling because we offer:
✅ High-End Custom Designs – Tailored solutions that meet unique preferences and styles.
✅ Premium Materials & Finishes – Using only the best materials for durability and beauty.
✅ Expert Craftsmanship – Attention to detail and quality workmanship in every aspect.
✅ Seamless Project Management – From planning to completion, we ensure a stress-free renovation experience.
✅ Client-Focused Service – We prioritize homeowner satisfaction and deliver beyond expectations.
Upgrade Your Bathroom with BMR Belmax Remodeling
If you’re considering a bathroom renovation in Langhorne, PA, trust BMR Belmax Remodeling to bring your dream bathroom to life. Whether you want a spacious walk-in shower, a freestanding bathtub, modern lighting, or custom fixtures, we have the expertise to deliver stunning results.
Contact us today to schedule a consultation and start transforming your bathroom into a luxurious retreat!
 Microworks Handyman
**Concrete Step Restoration & Your Entire To-Do List Done! ???️**
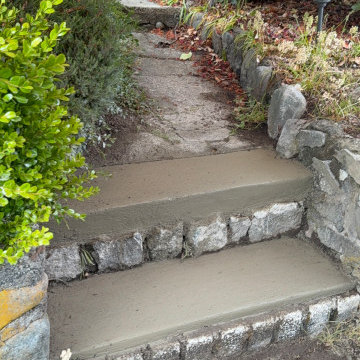
Start by fixing those crumbling, cracked, or settling concrete steps that have become an eyesore and a dangerous tripping hazard, and let us take care of the rest in one seamless visit. With our Ultimate Handyman Block, your professional will kick off the day with a quick property walkthrough to prioritize your exact needs. We will dive straight into carefully chipping away the loose debris, properly prepping the surface, and flawlessly applying high-strength concrete patch or resurfacer so your entryway or walkway is safe, rock-solid, and looks freshly poured. Once your concrete steps are perfectly restored, we will use the rest of your reserved session to tackle whatever else is weighing on your mind—from mounting heavy TVs and patching drywall to upgrading door hardware and repairing fences. Professional-grade consumables are fully included in the service, and if your project requires specialty masonry bonding agents, specific non-slip concrete sealers, or custom decorative caps, we source them for you and pass the items on with zero markup. It is the ultimate, stress-free way to finally catch up on those nagging repairs and get your property back to 100% in a single day.
.
.
.
.
.
Consumables Included:
High-strength concrete patch & resurfacer | Masonry bonding adhesive | Standard structural fasteners
#MicroworksHandyman #BurnabyHandyman #VancouverHandyman #NorthVancouverHandyman #WestVancouverHandyman #CoquitlamHandyman #ConcreteRepair #StepRestoration #HomeMaintenance #VancouverContractor #HandymanServices #PropertyMaintenance #HoneyDoList #HomeRepairs #MasonryRepair
22