
Search results for "Proper rest" in Home Design Ideas

 TOC design & construction inc.
DESIGNED BY TOC design
CONSTRUCTION BY TOC design & Construction inc.
PHOTOS BY : Tania Scardellato
I was fortunate to have a young family approach me in desperate need to renovate there only 3 piece bathroom. This space was In dire need of a remodel, with old brown wall to wall tiles and a dated bulky yellow brown single sink vanity.
Storage was a must, lighting a necessity, and proper accessibility to the shower bath area.
We had a tight budget to respect, but a full gut of this bathroom was required. And a good thing too, once we started doing the demolition we noticed that mildew and rotting floors and walls had accumulated throughout the years. Doing it right the first time is no joke when dealing with water and electrical issues.
We discarded all reminisce of old and built from scratch, new walls, new plumbing, new electrical ,new insulation and a new window, a new fan that actually exhausted outside ( I say this laughing as you would be amazed at how many fans are installed but don’t exhaust outside, and you the client would never know unless you go inside the attic space.
Once all the hard stuff was done, the rest is just a matter of smart design. If you have a small bathroom here are some tips to guide you.
10 tips for making a small bathroom feel larger
Is your tiny bathroom cramping your functionality and style, leaving you longing for the enormous bathrooms gracing the pages of design magazines? Even if your bathroom is a fraction of the size, all it takes is some design savvy to make the most of the space you have. Consider these 10 smart tips that will help your bathroom look, feel and function like those larger contenders.
1-Get creative with corners
Space is at a premium in small bathrooms, so it's important to maximize every inch. Corners, for example, provide extra space for shelving, storage units and even hooks. Get creative and install unique design solutions that are not only functional, but also eye-catching. If you love the airiness of floating cabinets, add baskets or decorative boxes under for extra storage. If you are installing floating cabinets insure that they are installed securely to studs or plywood at wall.
2- Let solid colors shine
Busy patterns have a shrinking effect and make small bathrooms seem even smaller. Conversely, light natural hues make a space feel more open. If you're itching to get creative with design, experiment with textures but keep overpowering patterns to a minimum. Tone on tone is the best to achieve this.
3 - Maximize your bathtub
A bathtub takes up a significant portion of the room, but modern, compact options with curved basins, can make the tub feel larger when in use, all while conserving space.
4 - Select a smaller faucet
A faucet is jewelry for the bathroom. And just as accessories can overpower an outfit, a big bulky faucet isn't flattering in a small bath. Single-handle designs conserve counter space, while a wall-mount installation frees it up all together and can create quite the wow-factor, if the budget can accommodate the required changes to plumbing behind the wall.
5 - Make vanity storage simple
If you're in a storage war with your small bathroom, you're not alone in the battle. Toiletries and personal supplies without a place to call home only add clutter and chaos. Store smart with a space-saving vanity, the dual sink vanity shown here, looks quite simple, but in reality it has 4 sets of full extension drawers, and the vanity tower adds extra storage without overpowering the use of space.
6 - Show off the shower
Shower curtains may be pretty, but they interrupt the visual flow of a bathing space and make it feel significantly smaller. In bathrooms with small footprints, opt for a clear glass sliding shower door that doesn't require the clearance of one with a hinged design. Or as shown in this design and for fraction less expensive a half hinged panel installed on a fixed tempered glass panel. If you're embarking on a big remodel, create the illusion of more space by using same tile in the shower that's used throughout; instead of seeing them as two separate zones, the eye will read them as one.
7 - Discover the treasure of hidden storage
Work with a contractor, and you just might find some serious storage potential hidden behind your walls. Whether it's utilizing space between the studs for shallow shelving or a creating a small linen closet by annexing space from an adjacent room, even small additions can make a big difference.
8 - Focal Point
Tile is a beautiful, durable addition to any bathroom. For dainty spaces, consider installing tile at a diagonal to accentuate the focal point or as in this bathroom I used an oversized textured pattern to bring depth to the space at the window wall.
9 - Choose the right lights
Strategically install light to reflect and brighten a small bathroom to make it appear larger. Recessed lighting is an affordable solution for tiny rooms, offering ample light while taking up little space. Wall sconces alongside a mirror also reflect off the walls and make a room feel bright and airy. I always recommend going with LED lighting at 2800 to 3000K.
10 – Accessorize
This is your time to shine in your decorating skills, have fun with your towels, you can change the color scheme daily just by adding pops of color in your accessories, make sure to get items that serve a dual purpose, like baskets, boxes they can always be used as hampers, storing of towels and even a nice display for your guest.
 TOC design & construction inc.
DESIGNED BY TOC design
CONSTRUCTION BY TOC design & Construction inc.
PHOTOS BY : Tania Scardellato
I was fortunate to have a young family approach me in desperate need to renovate there only 3 piece bathroom. This space was In dire need of a remodel, with old brown wall to wall tiles and a dated bulky yellow brown single sink vanity.
Storage was a must, lighting a necessity, and proper accessibility to the shower bath area.
We had a tight budget to respect, but a full gut of this bathroom was required. And a good thing too, once we started doing the demolition we noticed that mildew and rotting floors and walls had accumulated throughout the years. Doing it right the first time is no joke when dealing with water and electrical issues.
We discarded all reminisce of old and built from scratch, new walls, new plumbing, new electrical ,new insulation and a new window, a new fan that actually exhausted outside ( I say this laughing as you would be amazed at how many fans are installed but don’t exhaust outside, and you the client would never know unless you go inside the attic space.
Once all the hard stuff was done, the rest is just a matter of smart design. If you have a small bathroom here are some tips to guide you.
10 tips for making a small bathroom feel larger
Is your tiny bathroom cramping your functionality and style, leaving you longing for the enormous bathrooms gracing the pages of design magazines? Even if your bathroom is a fraction of the size, all it takes is some design savvy to make the most of the space you have. Consider these 10 smart tips that will help your bathroom look, feel and function like those larger contenders.
1-Get creative with corners
Space is at a premium in small bathrooms, so it's important to maximize every inch. Corners, for example, provide extra space for shelving, storage units and even hooks. Get creative and install unique design solutions that are not only functional, but also eye-catching. If you love the airiness of floating cabinets, add baskets or decorative boxes under for extra storage. If you are installing floating cabinets insure that they are installed securely to studs or plywood at wall.
2- Let solid colors shine
Busy patterns have a shrinking effect and make small bathrooms seem even smaller. Conversely, light natural hues make a space feel more open. If you're itching to get creative with design, experiment with textures but keep overpowering patterns to a minimum. Tone on tone is the best to achieve this.
3 - Maximize your bathtub
A bathtub takes up a significant portion of the room, but modern, compact options with curved basins, can make the tub feel larger when in use, all while conserving space.
4 - Select a smaller faucet
A faucet is jewelry for the bathroom. And just as accessories can overpower an outfit, a big bulky faucet isn't flattering in a small bath. Single-handle designs conserve counter space, while a wall-mount installation frees it up all together and can create quite the wow-factor, if the budget can accommodate the required changes to plumbing behind the wall.
5 - Make vanity storage simple
If you're in a storage war with your small bathroom, you're not alone in the battle. Toiletries and personal supplies without a place to call home only add clutter and chaos. Store smart with a space-saving vanity, the dual sink vanity shown here, looks quite simple, but in reality it has 4 sets of full extension drawers, and the vanity tower adds extra storage without overpowering the use of space.
6 - Show off the shower
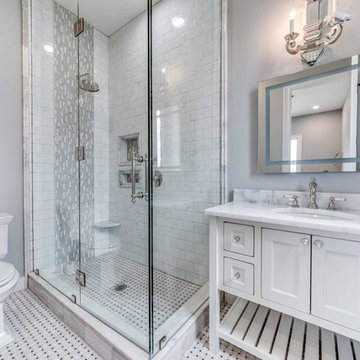
Shower curtains may be pretty, but they interrupt the visual flow of a bathing space and make it feel significantly smaller. In bathrooms with small footprints, opt for a clear glass sliding shower door that doesn't require the clearance of one with a hinged design. Or as shown in this design and for fraction less expensive a half hinged panel installed on a fixed tempered glass panel. If you're embarking on a big remodel, create the illusion of more space by using same tile in the shower that's used throughout; instead of seeing them as two separate zones, the eye will read them as one.
7 - Discover the treasure of hidden storage
Work with a contractor, and you just might find some serious storage potential hidden behind your walls. Whether it's utilizing space between the studs for shallow shelving or a creating a small linen closet by annexing space from an adjacent room, even small additions can make a big difference.
8 - Focal Point
Tile is a beautiful, durable addition to any bathroom. For dainty spaces, consider installing tile at a diagonal to accentuate the focal point or as in this bathroom I used an oversized textured pattern to bring depth to the space at the window wall.
9 - Choose the right lights
Strategically install light to reflect and brighten a small bathroom to make it appear larger. Recessed lighting is an affordable solution for tiny rooms, offering ample light while taking up little space. Wall sconces alongside a mirror also reflect off the walls and make a room feel bright and airy. I always recommend going with LED lighting at 2800 to 3000K.
10 – Accessorize
This is your time to shine in your decorating skills, have fun with your towels, you can change the color scheme daily just by adding pops of color in your accessories, make sure to get items that serve a dual purpose, like baskets, boxes they can always be used as hampers, storing of towels and even a nice display for your guest.
 TOC design & construction inc.
DESIGNED BY TOC design
CONSTRUCTION BY TOC design & Construction inc.
PHOTOS BY : Tania Scardellato
I was fortunate to have a young family approach me in desperate need to renovate there only 3 piece bathroom. This space was In dire need of a remodel, with old brown wall to wall tiles and a dated bulky yellow brown single sink vanity.
Storage was a must, lighting a necessity, and proper accessibility to the shower bath area.
We had a tight budget to respect, but a full gut of this bathroom was required. And a good thing too, once we started doing the demolition we noticed that mildew and rotting floors and walls had accumulated throughout the years. Doing it right the first time is no joke when dealing with water and electrical issues.
We discarded all reminisce of old and built from scratch, new walls, new plumbing, new electrical ,new insulation and a new window, a new fan that actually exhausted outside ( I say this laughing as you would be amazed at how many fans are installed but don’t exhaust outside, and you the client would never know unless you go inside the attic space.
Once all the hard stuff was done, the rest is just a matter of smart design. If you have a small bathroom here are some tips to guide you.
10 tips for making a small bathroom feel larger
Is your tiny bathroom cramping your functionality and style, leaving you longing for the enormous bathrooms gracing the pages of design magazines? Even if your bathroom is a fraction of the size, all it takes is some design savvy to make the most of the space you have. Consider these 10 smart tips that will help your bathroom look, feel and function like those larger contenders.
1-Get creative with corners
Space is at a premium in small bathrooms, so it's important to maximize every inch. Corners, for example, provide extra space for shelving, storage units and even hooks. Get creative and install unique design solutions that are not only functional, but also eye-catching. If you love the airiness of floating cabinets, add baskets or decorative boxes under for extra storage. If you are installing floating cabinets insure that they are installed securely to studs or plywood at wall.
2- Let solid colors shine
Busy patterns have a shrinking effect and make small bathrooms seem even smaller. Conversely, light natural hues make a space feel more open. If you're itching to get creative with design, experiment with textures but keep overpowering patterns to a minimum. Tone on tone is the best to achieve this.
3 - Maximize your bathtub
A bathtub takes up a significant portion of the room, but modern, compact options with curved basins, can make the tub feel larger when in use, all while conserving space.
4 - Select a smaller faucet
A faucet is jewelry for the bathroom. And just as accessories can overpower an outfit, a big bulky faucet isn't flattering in a small bath. Single-handle designs conserve counter space, while a wall-mount installation frees it up all together and can create quite the wow-factor, if the budget can accommodate the required changes to plumbing behind the wall.
5 - Make vanity storage simple
If you're in a storage war with your small bathroom, you're not alone in the battle. Toiletries and personal supplies without a place to call home only add clutter and chaos. Store smart with a space-saving vanity, the dual sink vanity shown here, looks quite simple, but in reality it has 4 sets of full extension drawers, and the vanity tower adds extra storage without overpowering the use of space.
6 - Show off the shower
Shower curtains may be pretty, but they interrupt the visual flow of a bathing space and make it feel significantly smaller. In bathrooms with small footprints, opt for a clear glass sliding shower door that doesn't require the clearance of one with a hinged design. Or as shown in this design and for fraction less expensive a half hinged panel installed on a fixed tempered glass panel. If you're embarking on a big remodel, create the illusion of more space by using same tile in the shower that's used throughout; instead of seeing them as two separate zones, the eye will read them as one.
7 - Discover the treasure of hidden storage
Work with a contractor, and you just might find some serious storage potential hidden behind your walls. Whether it's utilizing space between the studs for shallow shelving or a creating a small linen closet by annexing space from an adjacent room, even small additions can make a big difference.
8 - Focal Point
Tile is a beautiful, durable addition to any bathroom. For dainty spaces, consider installing tile at a diagonal to accentuate the focal point or as in this bathroom I used an oversized textured pattern to bring depth to the space at the window wall.
9 - Choose the right lights
Strategically install light to reflect and brighten a small bathroom to make it appear larger. Recessed lighting is an affordable solution for tiny rooms, offering ample light while taking up little space. Wall sconces alongside a mirror also reflect off the walls and make a room feel bright and airy. I always recommend going with LED lighting at 2800 to 3000K.
10 – Accessorize
This is your time to shine in your decorating skills, have fun with your towels, you can change the color scheme daily just by adding pops of color in your accessories, make sure to get items that serve a dual purpose, like baskets, boxes they can always be used as hampers, storing of towels and even a nice display for your guest.
Find the right local pro for your project

 Microworks Handyman
Wood Bottom Rail Replacement & Your Entire To-Do List Done! ??️
Start by fixing that rotting, sagging, or split wood bottom rail that compromises the strength and safety of your fence or deck railing, and let us take care of the rest in one seamless visit. With our Ultimate Handyman Block, your professional will kick off the day with a quick property walkthrough to prioritize your exact needs. We will dive straight into carefully removing the decayed wood, securing a fresh, sturdy replacement rail between your existing posts, and properly reattaching your pickets or balusters so your railing is rock-solid and visually seamless again. Once your bottom rail is perfectly restored, we will use the rest of your reserved session to tackle whatever else is weighing on your mind—from mounting heavy TVs and patching drywall to upgrading door hardware and fixing gates. Professional-grade consumables are fully included in the service, and if your project requires specialty milled railing profiles, specific pressure-treated lumber, or custom heavy-duty brackets, we source them for you and pass the items on with zero markup. It is the ultimate, stress-free way to finally catch up on those nagging repairs and get your property back to 100% in a single day.
 CRS Renovation & Design
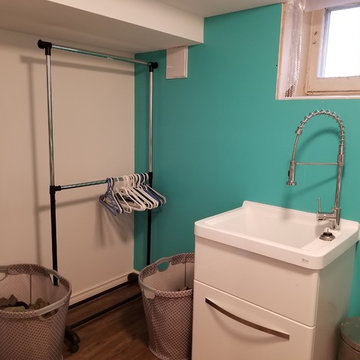
Once CRS was brought in to finish the basement, the previous work was corrected and the rest of the space followed suit.
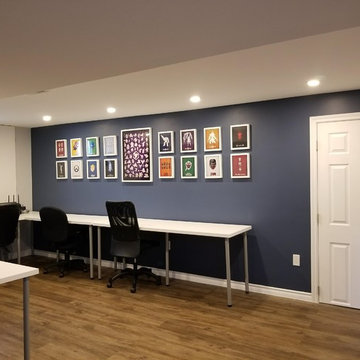
The majority of the basement was designed to have an open concept with a small living room and a large office space. A small utility room was created with additional storage and a small fridge, separated from the rest of the basement by a sliding barn door. Additional power outlets and new pot lights in the ceiling required a pony box to be installed, providing enough power for the new additions.
New stairs and proper support for the basement landing made the basement safe for everyone to enjoy and doors were added to hide the workspaces from the main living area. The laundry room had it’s original concrete sink demolished and removed to allow for a sleek modern replacement with storage. The layout of the laundry machines was also altered to create a better flow and functionality to the room.
The homeowners requested the window boxes remain unfinished throughout the basement to allow more flexibility in the future when the windows are replaced.
 CRS Renovation & Design
Once CRS was brought in to finish the basement, the previous work was corrected and the rest of the space followed suit.
The majority of the basement was designed to have an open concept with a small living room and a large office space. A small utility room was created with additional storage and a small fridge, separated from the rest of the basement by a sliding barn door. Additional power outlets and new pot lights in the ceiling required a pony box to be installed, providing enough power for the new additions.
New stairs and proper support for the basement landing made the basement safe for everyone to enjoy and doors were added to hide the workspaces from the main living area. The laundry room had it’s original concrete sink demolished and removed to allow for a sleek modern replacement with storage. The layout of the laundry machines was also altered to create a better flow and functionality to the room.
The homeowners requested the window boxes remain unfinished throughout the basement to allow more flexibility in the future when the windows are replaced.
 Microworks Handyman
Wood Bottom Rail Replacement & Your Entire To-Do List Done! ??️
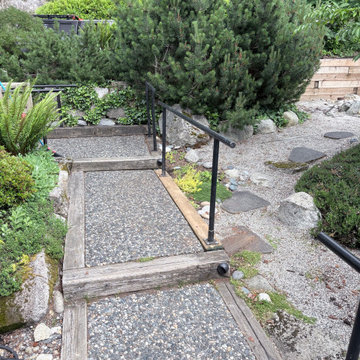
Start by fixing that rotting, sagging, or split wood bottom rail that compromises the strength and safety of your fence or deck railing, and let us take care of the rest in one seamless visit. With our Ultimate Handyman Block, your professional will kick off the day with a quick property walkthrough to prioritize your exact needs. We will dive straight into carefully removing the decayed wood, securing a fresh, sturdy replacement rail between your existing posts, and properly reattaching your pickets or balusters so your railing is rock-solid and visually seamless again. Once your bottom rail is perfectly restored, we will use the rest of your reserved session to tackle whatever else is weighing on your mind—from mounting heavy TVs and patching drywall to upgrading door hardware and fixing gates. Professional-grade consumables are fully included in the service, and if your project requires specialty milled railing profiles, specific pressure-treated lumber, or custom heavy-duty brackets, we source them for you and pass the items on with zero markup. It is the ultimate, stress-free way to finally catch up on those nagging repairs and get your property back to 100% in a single day.
Sponsored
Fredericksburg, OH

High Point Cabinets
Columbus' Experienced Custom Cabinet Builder | 4x Best of Houzz Winner
 CRS Renovation & Design
Once CRS was brought in to finish the basement, the previous work was corrected and the rest of the space followed suit.
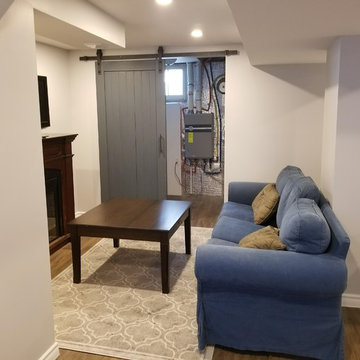
The majority of the basement was designed to have an open concept with a small living room and a large office space. A small utility room was created with additional storage and a small fridge, separated from the rest of the basement by a sliding barn door. Additional power outlets and new pot lights in the ceiling required a pony box to be installed, providing enough power for the new additions.
New stairs and proper support for the basement landing made the basement safe for everyone to enjoy and doors were added to hide the workspaces from the main living area. The laundry room had it’s original concrete sink demolished and removed to allow for a sleek modern replacement with storage. The layout of the laundry machines was also altered to create a better flow and functionality to the room.
The homeowners requested the window boxes remain unfinished throughout the basement to allow more flexibility in the future when the windows are replaced.
 CRS Renovation & Design
Once CRS was brought in to finish the basement, the previous work was corrected and the rest of the space followed suit.
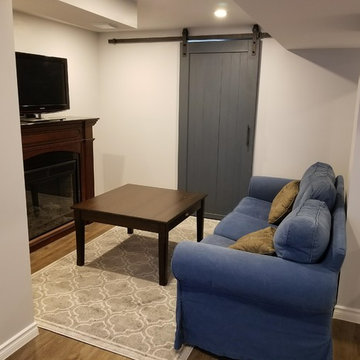
The majority of the basement was designed to have an open concept with a small living room and a large office space. A small utility room was created with additional storage and a small fridge, separated from the rest of the basement by a sliding barn door. Additional power outlets and new pot lights in the ceiling required a pony box to be installed, providing enough power for the new additions.
New stairs and proper support for the basement landing made the basement safe for everyone to enjoy and doors were added to hide the workspaces from the main living area. The laundry room had it’s original concrete sink demolished and removed to allow for a sleek modern replacement with storage. The layout of the laundry machines was also altered to create a better flow and functionality to the room.
The homeowners requested the window boxes remain unfinished throughout the basement to allow more flexibility in the future when the windows are replaced.
 My Kitchen And Bath
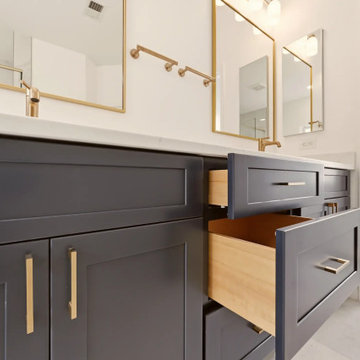
A complete primary bathroom remodel in Springfield, Virginia, designed around three priorities our clients came in with: a real walk-in shower, a freestanding tub by the windows, and a proper double vanity with storage that actually worked.
The original layout had everything in the wrong place. The tub sat against an interior wall away from the natural light. A small stall shower took up real estate across the room. The vanity was squeezed into whatever space was left over. Three windows on the back wall were doing nothing for the room because the layout was fighting them. Our solution involved knocking down the dividing wall between the old shower and vanity area, relocating plumbing for both the tub and the new vanities, and placing the freestanding tub directly under the bay of windows so morning light became part of the experience.
Design Approach
We anchored the room around contrast: deep navy cabinetry against soft white walls, warm brushed gold against cool marble tile, sharp Shaker lines against the curved silhouette of the freestanding tub. Navy was the design decision the rest of the room was built around — the clients knew they wanted color but didn't want anything that would feel dated in five years. Navy reads bold without being loud, pairs with virtually any metal finish, and has staying power that trendier choices don't.
We used Fabuwood Galaxy Indigo for the vanities — all-plywood construction with solid wood doors and drawer fronts, soft close throughout. Shaker-style flat panels keep the navy from feeling heavy. The brushed gold (Jeffrey Alexander 635-96SBZ in satin bronze) shows up across hardware, faucets, lighting, the tub filler, and the shower trim, creating a quiet continuity throughout the room.
The Shower
Removing the wall between the old shower and old vanity area created room for a proper walk-in. We tiled the entire shower floor to ceiling in Decovita Calacatta Suave 24x48" porcelain — large format installed in a 50% offset horizontal pattern, with cement board and redgard underneath. The marble-look porcelain gives the visual depth of natural marble without the maintenance.
A built-in shower bench, custom-built into the corner, is wrapped in the same wall tile on the front with a quartz top matching the vanity counter. The shower niche is detailed with MSI Arabescato Carrara 2" honed hex mosaic at the back, the same tile used on the shower floor. All tile edges are finished with Schluter in satin bronze to match the room's metal finishes. The shower door is custom frameless 3/8" tempered glass with a satin bronze pull — no metal frame interrupting the sight line.
The Vanities and Countertops
The new double vanity gives both clients their own space for morning routines. Counter tops are MSI Calacatta Miraggio Cielo quartz with pencil edging and a 4" backsplash — a soft white with subtle gray veining that reads like real Calacatta marble without the porosity issues. Two undermount square porcelain sinks finish the surface cleanly.
The Tub
A 60" freestanding soaker tub sits under the bay of three windows. The floor-mounted tub filler is satin bronze with a handheld sprayer. We relocated the drain and supply lines to make the centered placement work. The tub is the room's quietest feature and its strongest — clients tell us they use this bathroom differently than they used the old one.
Flooring
MSI Sande Ivory 12x24" matte porcelain runs throughout the bathroom floor in a 50% offset pattern parallel to the vanity wall. Cement board underneath, 4" white wood baseboard, Whisper Grey grout that handles daily use without showing wear.
Paint and Lighting
Walls are Benjamin Moore Chantilly Lace 2121-70 in satin — a true crisp white that doesn't lean cool or warm. The ceiling uses Benjamin Moore Aura Bath and Spa White, which is formulated to resist mildew in high-humidity spaces. Lighting is layered: three new 6" LED recessed lights on a dimmer, two satin bronze vanity sconces above the mirrors, and the existing three windows providing the daytime ambient light.
Project Specs
Location: Springfield, Virginia
Project type: Full primary bathroom remodel
Project duration: Approximately 5 weeks
Style: Modern, Transitional
Color palette: Navy, white, brushed gold, marble
Materials
Cabinetry: Fabuwood Galaxy Indigo, Shaker-style flat panel maple, all-plywood construction
Cabinet hardware: Jeffrey Alexander 635-96SBZ Satin Bronze pulls
Vanity counter and bench top: MSI Calacatta Miraggio Cielo Quartz, pencil edge with 4" backsplash
Sinks: Undermount white porcelain BR-202 square (x2)
Wall tile: Decovita Calacatta Suave 24x48" porcelain
Floor tile: MSI Sande Ivory 12x24" matte porcelain
Shower floor + niche back: MSI Arabescato Carrara 2" honed hex mosaic marble
Edge trim: Schluter satin bronze
Shower door: Custom frameless 3/8" tempered glass
Tub: 60" freestanding acrylic soaker (Ferguson)
Tub filler: Floor-mounted satin bronze (Ferguson)
Vanity faucets, mirrors, sconces, toilet: Satin bronze coordinated finishes (Ferguson)
Wall paint: Benjamin Moore Chantilly Lace 2121-70 Satin
Ceiling paint: Benjamin Moore Aura Bath and Spa White
Grout: Whisper Grey (floor), Standard White (walls and shower)
Designed and built by My Kitchen and Bath out of our Alexandria showroom at 5710 General Washington Drive. We've been designing and building kitchens, bathrooms, and full home renovations across Northern Virginia and the DMV since 1994.
 Kitchen Solvers of Spring Hill
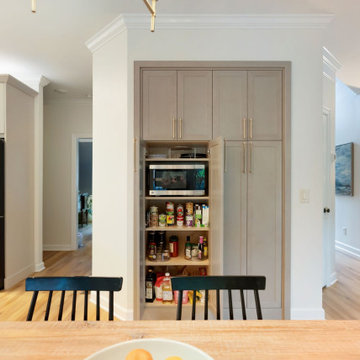
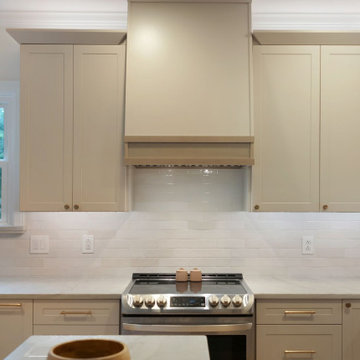
This family has hated their kitchen for years and it had gotten to the point of starting to fall apart. This is their forever home, so it was time to make it finally fit their lifestyle and the rest of their home. Though they had a cute makeshift island by clipping the corner by the pantry it opened up enough space to have a proper island. We also, removed the wall next to the fridge to a more open and roomier space and opened up the doorway into the living room! Now the flow matches with the rest of the house and seems almost twice as big! The closet pantry was retro fitted to be two double door pantries where they can hide their countertop microwave. Another special feature is the custom matching quartzite windowsill. The stain and paint create a monochromatic look but with depth and dimension that pairs so beautifully with the gold tone hardware bring this kitchen to a gorgeous level of perfection!
 Kitchen Solvers of Spring Hill
This family has hated their kitchen for years and it had gotten to the point of starting to fall apart. This is their forever home, so it was time to make it finally fit their lifestyle and the rest of their home. Though they had a cute makeshift island by clipping the corner by the pantry it opened up enough space to have a proper island. We also, removed the wall next to the fridge to a more open and roomier space and opened up the doorway into the living room! Now the flow matches with the rest of the house and seems almost twice as big! The closet pantry was retro fitted to be two double door pantries where they can hide their countertop microwave. Another special feature is the custom matching quartzite windowsill. The stain and paint create a monochromatic look but with depth and dimension that pairs so beautifully with the gold tone hardware bring this kitchen to a gorgeous level of perfection!
 TOC design & construction inc.
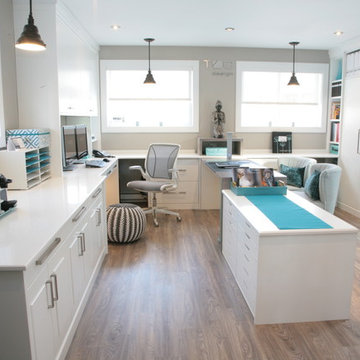
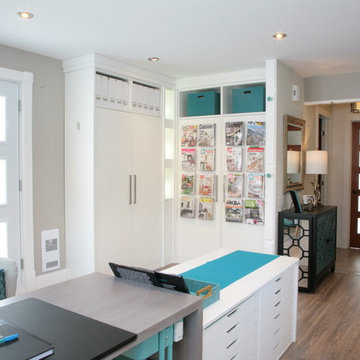
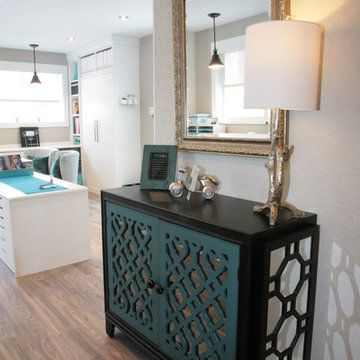
The importance of a properly designed home office ( especially when the space is also used as a meeting-place/showroom ) entails the comfort & positive experience of your customer in the following manner:
1. Exclusive office space with its own entrance separate from rest of home.
2. Ergonomic customer seating and ample presentation surfaces.
3. Dedicated customer computer screen(s) detailing CAD drawings & presentation in a show and tell manner.
4. Proper lighting ( LED lighting has come a long way )
5. Practical design touches ( hooks for purses, coats, umbrella stand, refreshments area, guest WIFI, etc...)
One of the greatest benefits of a home office is the freedom to design it with a distinct identity. In other words, we shouldn’t blend the workplace with the rest of our personal space, aka home.
 TOC design & construction inc.
The importance of a properly designed home office ( especially when the space is also used as a meeting-place/showroom ) entails the comfort & positive experience of your customer in the following manner:
1. Exclusive office space with its own entrance separate from rest of home.
2. Ergonomic customer seating and ample presentation surfaces.
3. Dedicated customer computer screen(s) detailing CAD drawings & presentation in a show and tell manner.
4. Proper lighting ( LED lighting has come a long way )
5. Practical design touches ( hooks for purses, coats, umbrella stand, refreshments area, guest WIFI, etc...)
One of the greatest benefits of a home office is the freedom to design it with a distinct identity. In other words, we shouldn’t blend the workplace with the rest of our personal space, aka home.
 TOC design & construction inc.
The importance of a properly designed home office ( especially when the space is also used as a meeting-place/showroom ) entails the comfort & positive experience of your customer in the following manner:
1. Exclusive office space with its own entrance separate from rest of home.
2. Ergonomic customer seating and ample presentation surfaces.
3. Dedicated customer computer screen(s) detailing CAD drawings & presentation in a show and tell manner.
4. Proper lighting ( LED lighting has come a long way )
5. Practical design touches ( hooks for purses, coats, umbrella stand, refreshments area, guest WIFI, etc...)
One of the greatest benefits of a home office is the freedom to design it with a distinct identity. In other words, we shouldn’t blend the workplace with the rest of our personal space, aka home.
 TOC design & construction inc.
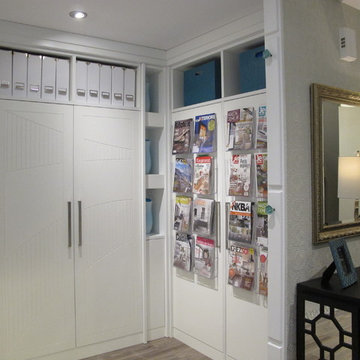
The importance of a properly designed home office ( especially when the space is also used as a meeting-place/showroom ) entails the comfort & positive experience of your customer in the following manner:
1. Exclusive office space with its own entrance separate from rest of home.
2. Ergonomic customer seating and ample presentation surfaces.
3. Dedicated customer computer screen(s) detailing CAD drawings & presentation in a show and tell manner.
4. Proper lighting ( LED lighting has come a long way )
5. Practical design touches ( hooks for purses, coats, umbrella stand, refreshments area, guest WIFI, etc...)
One of the greatest benefits of a home office is the freedom to design it with a distinct identity. In other words, we shouldn’t blend the workplace with the rest of our personal space, aka home.
 TOC design & construction inc.
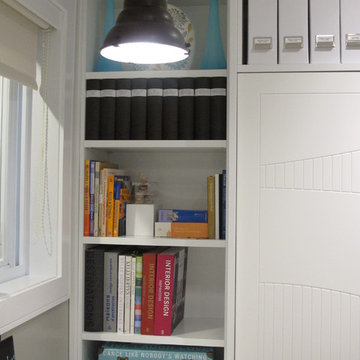
The importance of a properly designed home office ( especially when the space is also used as a meeting-place/showroom ) entails the comfort & positive experience of your customer in the following manner:
1. Exclusive office space with its own entrance separate from rest of home.
2. Ergonomic customer seating and ample presentation surfaces.
3. Dedicated customer computer screen(s) detailing CAD drawings & presentation in a show and tell manner.
4. Proper lighting ( LED lighting has come a long way )
5. Practical design touches ( hooks for purses, coats, umbrella stand, refreshments area, guest WIFI, etc...)
One of the greatest benefits of a home office is the freedom to design it with a distinct identity. In other words, we shouldn’t blend the workplace with the rest of our personal space, aka home.
 TOC design & construction inc.
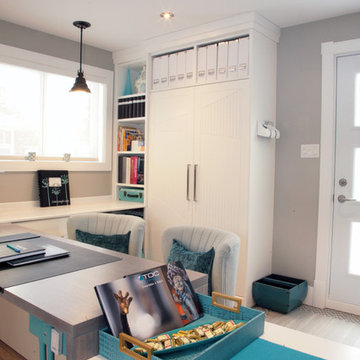
The importance of a properly designed home office ( especially when the space is also used as a meeting-place/showroom ) entails the comfort & positive experience of your customer in the following manner:
1. Exclusive office space with its own entrance separate from rest of home.
2. Ergonomic customer seating and ample presentation surfaces.
3. Dedicated customer computer screen(s) detailing CAD drawings & presentation in a show and tell manner.
4. Proper lighting ( LED lighting has come a long way )
5. Practical design touches ( hooks for purses, coats, umbrella stand, refreshments area, guest WIFI, etc...)
One of the greatest benefits of a home office is the freedom to design it with a distinct identity. In other words, we shouldn’t blend the workplace with the rest of our personal space, aka home.
 TOC design & construction inc.
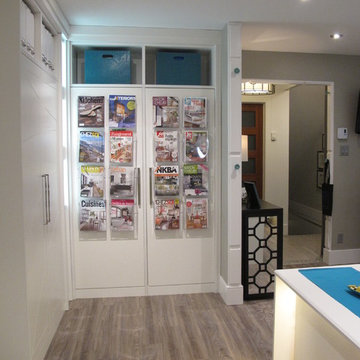
The importance of a properly designed home office ( especially when the space is also used as a meeting-place/showroom ) entails the comfort & positive experience of your customer in the following manner:
1. Exclusive office space with its own entrance separate from rest of home.
2. Ergonomic customer seating and ample presentation surfaces.
3. Dedicated customer computer screen(s) detailing CAD drawings & presentation in a show and tell manner.
4. Proper lighting ( LED lighting has come a long way )
5. Practical design touches ( hooks for purses, coats, umbrella stand, refreshments area, guest WIFI, etc...)
One of the greatest benefits of a home office is the freedom to design it with a distinct identity. In other words, we shouldn’t blend the workplace with the rest of our personal space, aka home.
 TOC design & construction inc.
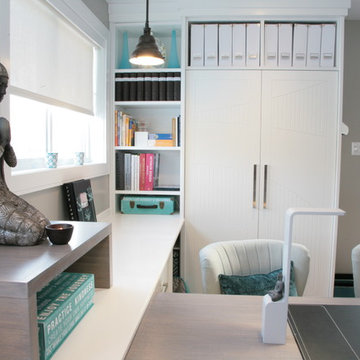
The importance of a properly designed home office ( especially when the space is also used as a meeting-place/showroom ) entails the comfort & positive experience of your customer in the following manner:
1. Exclusive office space with its own entrance separate from rest of home.
2. Ergonomic customer seating and ample presentation surfaces.
3. Dedicated customer computer screen(s) detailing CAD drawings & presentation in a show and tell manner.
4. Proper lighting ( LED lighting has come a long way )
5. Practical design touches ( hooks for purses, coats, umbrella stand, refreshments area, guest WIFI, etc...)
One of the greatest benefits of a home office is the freedom to design it with a distinct identity. In other words, we shouldn’t blend the workplace with the rest of our personal space, aka home.
8