
Search results for "Protected trips" in Home Design Ideas
 Studio Steinbomer
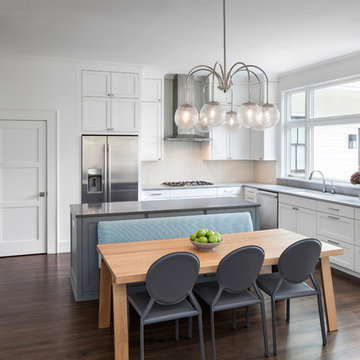
Kitchen after the renovation.
Construction by RisherMartin Fine Homes
Interior Design by Alison Mountain Interior Design
Landscape by David Wilson Garden Design
Photography by Andrea Calo

 Lena Lalvani, Custom Closet Designer
Custom Designed Plexi-glass frame to protect vintage tapestry above bed
Inspiration for an eclectic master dark wood floor bedroom remodel in New York
Inspiration for an eclectic master dark wood floor bedroom remodel in New York

 Best Electrical Company
For home renovations and remodeling projects, Best Electrical Company is the Orange County electrical contractor you can count on to help you with your interior lighting project. Whether you are looking for modern light fixtures, recessed lighting, track lighting, or ceiling fan installation, our expert Orange County lighting contractors will provide you with Service At Its Best.
Our team of expert Anaheim lighting technicians will help integrate a beautiful and functional lighting design that will bring light and life to your home. We are available for electrical safety inspections, electrical wiring installation and lighting installation for new houses and home additions as well, ensuring the whole project comes together smoothly. Contact BEC today to discuss your interior lighting design, and allow us to install your lights and ceiling fans with precision and ease.
Find the right local pro for your project

 Progressive Design Build
Challenge
This 2001 riverfront home was purchased by the owners in 2015 and immediately renovated. Progressive Design Build was hired at that time to remodel the interior, with tentative plans to remodel their outdoor living space as a second phase design/build remodel. True to their word, after completing the interior remodel, this young family turned to Progressive Design Build in 2017 to address known zoning regulations and restrictions in their backyard and build an outdoor living space that was fit for entertaining and everyday use.
The homeowners wanted a pool and spa, outdoor living room, kitchen, fireplace and covered patio. They also wanted to stay true to their home’s Old Florida style architecture while also adding a Jamaican influence to the ceiling detail, which held sentimental value to the homeowners who honeymooned in Jamaica.
Solution
To tackle the known zoning regulations and restrictions in the backyard, the homeowners researched and applied for a variance. With the variance in hand, Progressive Design Build sat down with the homeowners to review several design options. These options included:
Option 1) Modifications to the original pool design, changing it to be longer and narrower and comply with an existing drainage easement
Option 2) Two different layouts of the outdoor living area
Option 3) Two different height elevations and options for the fire pit area
Option 4) A proposed breezeway connecting the new area with the existing home
After reviewing the options, the homeowners chose the design that placed the pool on the backside of the house and the outdoor living area on the west side of the home (Option 1).
It was important to build a patio structure that could sustain a hurricane (a Southwest Florida necessity), and provide substantial sun protection. The new covered area was supported by structural columns and designed as an open-air porch (with no screens) to allow for an unimpeded view of the Caloosahatchee River. The open porch design also made the area feel larger, and the roof extension was built with substantial strength to survive severe weather conditions.
The pool and spa were connected to the adjoining patio area, designed to flow seamlessly into the next. The pool deck was designed intentionally in a 3-color blend of concrete brick with freeform edge detail to mimic the natural river setting. Bringing the outdoors inside, the pool and fire pit were slightly elevated to create a small separation of space.
Result
All of the desirable amenities of a screened porch were built into an open porch, including electrical outlets, a ceiling fan/light kit, TV, audio speakers, and a fireplace. The outdoor living area was finished off with additional storage for cushions, ample lighting, an outdoor dining area, a smoker, a grill, a double-side burner, an under cabinet refrigerator, a major ventilation system, and water supply plumbing that delivers hot and cold water to the sinks.
Because the porch is under a roof, we had the option to use classy woods that would give the structure a natural look and feel. We chose a dark cypress ceiling with a gloss finish, replicating the same detail that the homeowners experienced in Jamaica. This created a deep visceral and emotional reaction from the homeowners to their new backyard.
The family now spends more time outdoors enjoying the sights, sounds and smells of nature. Their professional lives allow them to take a trip to paradise right in their backyard—stealing moments that reflect on the past, but are also enjoyed in the present.
 Four Brothers Design + Build
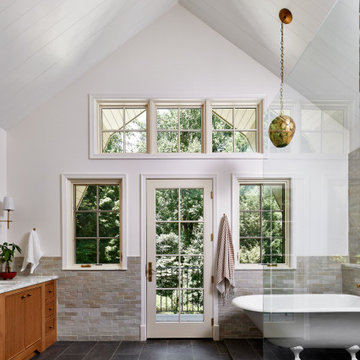
Large transitional master gray tile and ceramic tile cement tile floor, gray floor and double-sink bathroom photo in DC Metro with furniture-like cabinets, brown cabinets, white walls, a drop-in sink, marble countertops, white countertops and a built-in vanity
 Progressive Design Build
Challenge
This 2001 riverfront home was purchased by the owners in 2015 and immediately renovated. Progressive Design Build was hired at that time to remodel the interior, with tentative plans to remodel their outdoor living space as a second phase design/build remodel. True to their word, after completing the interior remodel, this young family turned to Progressive Design Build in 2017 to address known zoning regulations and restrictions in their backyard and build an outdoor living space that was fit for entertaining and everyday use.
The homeowners wanted a pool and spa, outdoor living room, kitchen, fireplace and covered patio. They also wanted to stay true to their home’s Old Florida style architecture while also adding a Jamaican influence to the ceiling detail, which held sentimental value to the homeowners who honeymooned in Jamaica.
Solution
To tackle the known zoning regulations and restrictions in the backyard, the homeowners researched and applied for a variance. With the variance in hand, Progressive Design Build sat down with the homeowners to review several design options. These options included:
Option 1) Modifications to the original pool design, changing it to be longer and narrower and comply with an existing drainage easement
Option 2) Two different layouts of the outdoor living area
Option 3) Two different height elevations and options for the fire pit area
Option 4) A proposed breezeway connecting the new area with the existing home
After reviewing the options, the homeowners chose the design that placed the pool on the backside of the house and the outdoor living area on the west side of the home (Option 1).
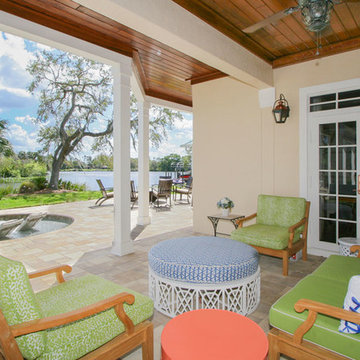
It was important to build a patio structure that could sustain a hurricane (a Southwest Florida necessity), and provide substantial sun protection. The new covered area was supported by structural columns and designed as an open-air porch (with no screens) to allow for an unimpeded view of the Caloosahatchee River. The open porch design also made the area feel larger, and the roof extension was built with substantial strength to survive severe weather conditions.
The pool and spa were connected to the adjoining patio area, designed to flow seamlessly into the next. The pool deck was designed intentionally in a 3-color blend of concrete brick with freeform edge detail to mimic the natural river setting. Bringing the outdoors inside, the pool and fire pit were slightly elevated to create a small separation of space.
Result
All of the desirable amenities of a screened porch were built into an open porch, including electrical outlets, a ceiling fan/light kit, TV, audio speakers, and a fireplace. The outdoor living area was finished off with additional storage for cushions, ample lighting, an outdoor dining area, a smoker, a grill, a double-side burner, an under cabinet refrigerator, a major ventilation system, and water supply plumbing that delivers hot and cold water to the sinks.
Because the porch is under a roof, we had the option to use classy woods that would give the structure a natural look and feel. We chose a dark cypress ceiling with a gloss finish, replicating the same detail that the homeowners experienced in Jamaica. This created a deep visceral and emotional reaction from the homeowners to their new backyard.
The family now spends more time outdoors enjoying the sights, sounds and smells of nature. Their professional lives allow them to take a trip to paradise right in their backyard—stealing moments that reflect on the past, but are also enjoyed in the present.
 Milanese Remodeling
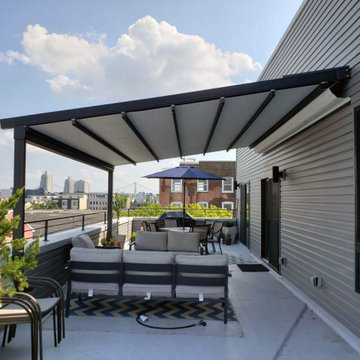
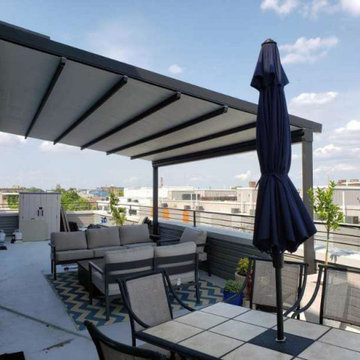
We recently took a trip into Philadelphia to install a GENNIUS retractable awning system onto a rooftop penthouse patio. Normally people think that awnings are just for suburban backyards, but that’s not the case!
This retractable, pergola-style awning provides on-demand protection from sun & rain with a 55 mph wind rating. Now, this roof deck has a great view of the city with added shade, ensuring that these homeowners can spend more time outside comfortably.
Sponsored
Sunbury, OH

J.Holderby - Renovations
Franklin County's Leading General Contractors - 2X Best of Houzz!
 Pro-Painting & Drywall, Inc.
Pro-Painting & Drywall, Inc.
Trim and baseboards
Purpose and Protection
Trim and baseboards help protect both you and your flooring as they cover edges, joints, and gaps in flooring. This includes transitions between flooring types and levels. When your new flooring meets carpet in a doorway, you can use an end cap to connect the two and prevent exposed edges. Or, if you find a small height difference between your new laminate floor and your kitchen tiles, T-molding covers the gap to prevent tripping or damage to either floor. For these sometimes-tricky situations, our range of T-molds, reducers, overlap reducers, and threshold moldings offer straightforward solutions.
Trim and baseboards also protect your walls from the stains, dents, and water damage that comes with everyday living. This includes water from wet mopping, dents from vacuum cleaners, and scuffs from shoes, toys, and furniture.
Call today 904-731-6471
 Milanese Remodeling
We recently took a trip into Philadelphia to install a GENNIUS retractable awning system onto a rooftop penthouse patio. Normally people think that awnings are just for suburban backyards, but that’s not the case!
This retractable, pergola-style awning provides on-demand protection from sun & rain with a 55 mph wind rating. Now, this roof deck has a great view of the city with added shade, ensuring that these homeowners can spend more time outside comfortably.

 Universal Appliance and Kitchen Center
TOTO UltraMax® II 1G™ One-Piece Toilet
MS604114CUFG
The UltraMax II 1G employs the Double-Cyclone® flushing system to achieve a balanced flush and full rim wash with a mere gallon of water. The Sanagloss glaze protects the surface from mold and debris, ensuring long-life durability and making the UltraMax II 1G a wise investment.
• Double Cyclone flushing system,
• ultra high-efficiency (1.0GPF/3.8LPF)
• SanaGloss® ceramic glaze
• ADA Compliant
• Universal Height
• Decorative one-piece design with high-profile tank
• Elongated front bowl with SoftClose® seat (SS114)
• 12” rough-in, less supply
• Chrome trip lever
• Meets WaterSense® efficiency and performance standards
Available at Universal Appliance and Kitchen Center.

 CertaPro Painters of Mountainside, NJ
This 1840's home has stood the test of time, and we wanted to make sure that it would continue to do so for many years to come. It really needed some extensive surface preparation, but is now fully protected and beautiful. The traditional color scheme seen here, red with white trip, really helps to bring out the unique architectural features of this house. The black shutters help to accent some of the windows as well.
 Milanese Remodeling
We recently took a trip into Philadelphia to install a GENNIUS retractable awning system onto a rooftop penthouse patio. Normally people think that awnings are just for suburban backyards, but that’s not the case!
This retractable, pergola-style awning provides on-demand protection from sun & rain with a 55 mph wind rating. Now, this roof deck has a great view of the city with added shade, ensuring that these homeowners can spend more time outside comfortably.

 safe ZOnea
Every year, the same thing happens. The first real snowfall arrives, demand for de-icing materials spikes overnight, and the businesses that waited too long find themselves scrambling for supply at the worst possible moment. Facility managers, property owners, contractors, and municipalities all depend on a steady supply of salt and ice melt to keep their properties safe and operational through winter. The ones who plan ahead sail through. The ones who don't pay more, wait longer, and take on real risk.
Sourcing de-icing materials well is not complicated, but it does require thinking ahead and understanding the options. The choices you make about what to buy, how to buy it, and who to buy it from have a direct effect on your costs, your reliability, and your ability to keep people safe when conditions turn dangerous. This article lays out what matters.
Why Your Choice of Supplier Matters More Than You Think
It is easy to treat de-icing material as a commodity, something you grab whenever you need it without much thought about where it comes from. That works fine until the moment it doesn't, usually in the middle of a storm when everyone needs supply at once and the casual sources have run dry. At that point, the relationships you built before the season become the difference between staying stocked and being stuck.
Reliable supply is the whole game in winter operations. A property that runs out of ice melt during a storm faces safety hazards, liability exposure, and disruption, none of which can wait for a back-ordered shipment. This is why establishing relationships with dependable rock salt suppliers before the season starts is one of the smartest moves a facility manager or contractor can make. It locks in supply, often locks in better pricing, and removes a major source of mid-winter stress.
The lesson here is to treat sourcing as a planning decision rather than a last-minute errand. The businesses that come through winter smoothly are almost always the ones that secured their supply chain early, chose suppliers who could actually deliver when it counted, and never had to gamble on finding material during a shortage. Reliability bought in advance is far cheaper than scarcity paid for in a crisis.
Bagged or Bulk: Matching the Material to the Job
One of the first practical decisions is whether to buy de-icing material in bags or in bulk, and the right answer depends entirely on the operation. Each format has clear advantages, and many operations end up using both for different purposes.
Bagged material offers convenience, control, and easy storage. It is simple to handle, easy to distribute to different locations or crews, straightforward to store without special equipment, and convenient for spot application by hand. It suits smaller properties, businesses without bulk storage, and situations where portion control and tidiness matter. Bulk material, on the other hand, tends to make sense for large operations that go through high volumes, where buying in quantity lowers the per-unit cost and the operation has the equipment and space to store and handle it. The tradeoff is between the convenience and flexibility of bags and the volume economics of bulk.
For many operations, the right approach is a mix: bulk for the high-volume core of the work and bags for flexibility, spot treatment, and locations where bulk handling is impractical. The key is to match the format to how the material will actually be stored, moved, and applied, rather than defaulting to one or the other out of habit. Thinking this through in advance avoids both the waste of over-buying bulk you can't handle and the expense of relying entirely on bags for a large operation.
Rock Salt Is Not Your Only Option
Rock salt, or sodium chloride, is the workhorse of winter de-icing for good reason. It is effective, widely available, and cost-efficient, which makes it the default choice for most operations most of the time. But it has limits, and understanding the alternatives helps you choose the right material for the conditions you actually face.
The most important limitation is temperature. Rock salt becomes less effective as temperatures drop, and in genuinely cold conditions it can struggle to do the job at all. This is where alternatives come in. Calcium chloride, for instance, works at much lower temperatures than rock salt and acts quickly, which makes it valuable when conditions are severe or when fast melting matters. Operations that face hard freezes or need dependable performance in extreme cold often keep calcium chloride for sale on hand for exactly those situations, using it alongside rock salt rather than instead of it.
The practical approach is to understand the conditions your property faces and stock accordingly. For many operations, rock salt handles the bulk of the work while a faster, colder-rated material like calcium chloride covers the extreme days when ordinary salt falls short. Matching the material to the temperature and the urgency of the situation is what separates an operation that stays ahead of winter from one that is constantly reacting to it.
Securing Your Supply Before the Season
Knowing what to buy is only half the equation. The other half is making sure you can actually get it when you need it, which means securing your supply before winter arrives rather than after it has already started. Timing is one of the most underrated factors in winter operations.
The logic is simple. Demand for de-icing materials is highly seasonal and spikes sharply during storms, when everyone needs supply simultaneously. Prices and availability both move against the buyer at exactly those moments. By contrast, planning ahead, estimating your needs and arranging supply before the season, puts you in a far stronger position. Working with established rock salt suppliers ahead of time means your material is accounted for before the rush, often at better pricing and with the confidence that it will be there when the first storm hits.
This kind of planning also lets you think clearly rather than react under pressure. You can estimate your seasonal needs based on your property and past winters, decide on the right mix of materials and formats, and arrange storage in advance. Operations that do this consistently spend less, worry less, and never find themselves making frantic calls during a storm. The effort of planning ahead is modest, and the payoff in reliability and cost savings is substantial.
Storing and Handling What You Buy
Securing supply is not much use if the material degrades before you can use it, which makes proper storage and handling an important and often overlooked part of the equation. De-icing materials are sensitive to moisture, and poor storage can turn a good supply into a clumped, hardened mess that is difficult to apply.
The fundamentals are straightforward. Keep material dry and protected from moisture, since salt and ice melt readily absorb water and can harden if exposed. Store it in a way that suits the format, whether that means a proper bulk storage area or a dry space for stacked bags. Keep it accessible, so crews can get to it quickly when a storm hits and time is short. And handle it with the right equipment for the format and volume, which protects both the material and the people working with it. None of this is complicated, but neglecting it can undermine even a well-planned supply.
Good storage practices protect the investment you made in securing supply early. There is little point in arranging your materials ahead of the season only to have them degrade before use. Treating storage and handling as part of the overall plan, rather than an afterthought, ensures that the material you secured is actually usable when the moment comes. It is the final link in a supply chain built to perform under winter conditions.
Estimating How Much You Actually Need
One question trips up operations of every size: how much de-icing material to buy. Order too little and you risk running short during a storm. Order too much and you tie up money and storage space in material you may not use. Getting the estimate reasonably right is a meaningful part of sourcing well.
Several factors shape the answer. The size and type of the areas you treat, sidewalks, lots, entrances, and drive lanes, set the baseline for how much material each application consumes. The local climate matters too, since colder regions and those with frequent snowfall go through far more material than milder ones. Application frequency depends on how often storms hit and how quickly surfaces need to be cleared, which varies with the kind of property and the expectations of the people who use it. And the type of material plays a role, since different products are applied at different rates.
Past experience is often the best guide. Operations that track what they used in previous winters, adjusted for the size of the property and the severity of the season, can estimate their needs with reasonable confidence. For newer operations without that history, it helps to plan conservatively and to work with a supplier who can replenish stock reliably, so that a low estimate does not turn into a mid-storm shortage.
The goal is not perfect precision but a sound, slightly cautious estimate paired with a dependable supply relationship. That combination lets an operation keep enough material on hand to handle the season without over-committing to volume it cannot store or use. Thinking this through before winter, rather than guessing during it, is one more way that planning ahead pays off when the snow starts to fall.
The Bottom Line
Sourcing de-icing materials well comes down to a few straightforward principles: plan ahead, choose reliable suppliers before the season, match your materials and formats to your actual needs and conditions, and store what you buy properly. The operations that follow these principles move through winter with confidence, while those that improvise pay more and take on needless risk.
Winter is predictable in one respect: it arrives every year, and demand for de-icing material spikes the moment it does. The businesses that prepare for that reality, rather than being surprised by it, are the ones that keep their properties safe, their costs controlled, and their operations running no matter what the season throws at them. A little foresight before the first snowfall pays off through every storm that follows.
Sponsored
Sunbury, OH
J.Holderby - Renovations
Franklin County's Leading General Contractors - 2X Best of Houzz!
 Tile Doctor Ltd
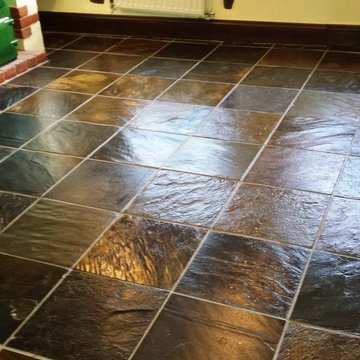
I recently made a trip down to South Molton, a small town which sits on the River Mole. The river, actually a tributary of the River Taw, gets its name from the two small towns it runs by, North Molton and South Molton. Anyway I digress, my client asked me to take a look at a Chinese Slate floor in her house, as it was in dire need of a good clean due to the original sealer having worn off over time allowing the dirt to become ingrained in the tile.
As this particular type of floor is naturally quite rough, I advised my client to have the Slate milled flat. This would not only make the floor easier to clean on a regular basis, but also it would reduce the hazard of people tripping over the exposed edges. However, the milling procedure is expensive due to the need to use a special grinding disc formed of diamond segments, which is then attached to a rotary machine and used on the stone. My client decided against this, instead opting for a thorough clean and seal. This would be the first time the floor had ever received a proper clean – it had not even been cleaned when the tilers first fitted it!
My choice of product for the cleaning was Tile Doctor Pro-Clean, a high alkaline cleaner which, along with Slate, is suitable for use on other natural stone floors such as Limestone, Granite and Travertine. The product, diluted with clean water, was applied evenly to the floor using a Polybrush, as well as a rotary machine fitted with a buffing pad. This also helped to remove any remaining old sealer although, as aforementioned, the vast majority of the old sealer had already worn away.
Following this, I cleaned the grout using Tile Doctor Grout Clean-Up and a long-handled stiff grout brush. Grout Clean-Up penetrates below the surface of the grout to lift out grout haze and general dirt. After completing the cleaning I rinsed the floor several times with clean water to remove any trace of cleaning product. The floor was then left to dry completely before sealing, as any moisture left over on the floor could have impacted on the sealer.
When I returned to seal the floor I opted to use Tile Doctor High Shine Sealer, which is suitable for use on textured natural stone floors, as well as textured ceramic, textured porcelain, and a range of others. Five coats of High Shine Sealer were applied, providing the floor with durable surface protection and a nice high-sheen finish. This dramatically improved the appearance of the floor to the point that it is hard to believe this is the first time it has been treated to a proper clean and seal!
Both myself and my client were very pleased with the results. Chinese Slate is one of the most beautiful and characterful types of stone for tiled floors, so it was very rewarding to be able to make such a difference here.
 Tile Doctor Ltd
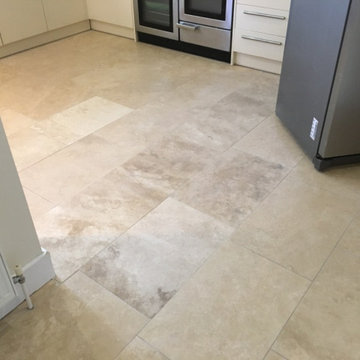
This client from Cobham contacted me in despair, she was quite concerned about her Travertine tiled floor which was cracking. She had the Kitchen and Dining room tiled with Travertine six years ago and recently several cracks had begun to appear in a long line crossing five tiles.
Several holes had also begun to appear and across the threshold to the kitchen from the dining area a serious lip had formed where a tile had risen above its neighbour causing a trip hazard.
After removing a tile from an unobtrusive area, I began to see where the issues lay. The tiler had dabbed the adhesive. This mean that instead of spreading the adhesive equally across the tile and floor they had splurged four lumps in each corner then set the tile down. This is poor working practice that will sooner or later become apparent. It means the areas were no adhesive was applied are eventually compromised resulting in cracking. This could take years or weeks to surface.
After some discussion we decided that I would remove and replace six tiles in total. The client was happy for me to go ahead and agreed a cost for the works to be done.
Returning the following week, firstly I had to remove the grout. This was done with a handheld Fein tool fitted with an oscillating blade. I thought this would be good experience from my son during the holidays, so I took him along and whilst I was working on the grout, he was able to gather the dust in a vacuum cleaner.
Next, I started to remove the cracked tiles with a chisel, starting from the cracks where the tiles would be weakest. This was noisy and messy work which required ear defenders and safety goggles. The process took several hours with the help of my son on general assistance duties. Once the tiles were removed this just left the remaining adhesive attached to the floor to get removed. This was the hardest part of the job, a lot of hammer and chisel work with as much dust gathered as possible to try and contain the mess. I had warned the customer that a considerable amount of mess would be produced and request that she should remove as much items as possible and to tape up her cupboards. Finally, I filled several holes in the sub floor so I would have a flat surface to lay the new tiles on. I left it there for the night to solidify.
Returning the next day, I began laying the replacement tiles down. Colour matching replacement tiles is a difficult task as Travertine is a natural product and colours vary greatly so these were a pretty good match.
Once the adhesive had set, I grouted in the newly laid tiles and once that was dry set about applying a sealer. For this I used two coats of Tile Doctor Ultra Seal which is an impregnating sealer that doesn’t alter the colour of the stone. This would ensure they were nicely protected and hopefully the client will not experience any further issues.
She was very happy with the result and was pleased the floor no long looked unsightly or posed a tripping hazard.
Rupert Mcleod
West Surrey Tile Doctor

 Pacifica Landscape Works Inc.
A limited edition archival U/V protected Metal Art Print by Michael Bjorge Fine Art. Michael's print's work great for exterior applications, or steam rooms, spa's, saunas, etc., where the moisture will damage conventional art installations. Michael prints are floating and do not require additional glass or frames.
 wood mgmt furniture + interior spaces
Governors Island Welcome Center by Office III
The pavilion is the first-ever welcome centre for Governors Island, and was added to help tourists better navigate the small island in the city's harbour. It lies just 800 yards (732 metres) from Manhattan's southern-most tip, and reachable by ferry from both there or downtown Brooklyn.
Governors Island Welcome Center by Office III
The Friends of Governors Island asked Office III to design the wooden structure, but with a few constraints: it had to be prefabricated, temporary and portable, and pitched to them just six weeks later.
Governors Island Welcome Center by Office III
The studio – founded by Stephanie Lin, Ryan Golenberg, and Sean Canty from Harvard's Graduate School of Design – looked to the island's Georgian Revival-style barracks and two military forts for subtle references.
Governors Island Welcome Center by Office III
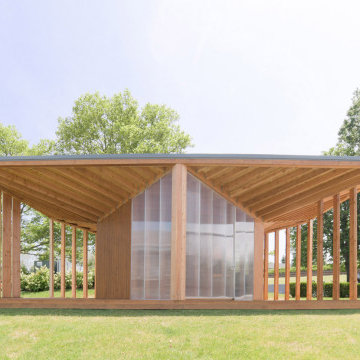
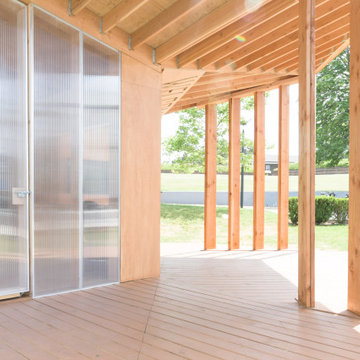
A butterfly roof covers an 800-square-foot (74-square-metre) wooden deck to protect visitors from the sun, while remaining open to the grassy lawn.
Governors Island Welcome Center by Office III
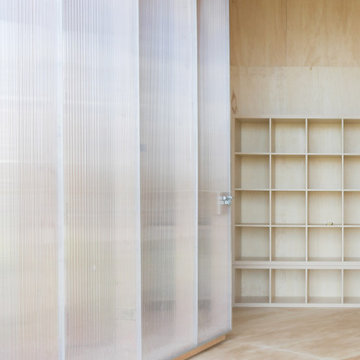
Underneath, an information kiosk is the only fully enclosed structure. Polycarbonate windows and slatted wood serve as semi-walls, which create triangular nooks and lounging areas.
Governors Island Welcome Center by Office III
Office III collaborated with Laufs Engineering Design for structural engineering. The team chose timber louvres to resist the vertical loads of the roof, while a pentagon-shaped core supports the floor deck.
Governors Island Welcome Center by Office III
Marine-grade plywood lines the interior, while cedar planks cover the exterior. Both materials are resilient to New York's infamous summer rainstorms.
Governors Island Welcome Center by Office III
The centre's "Welcome" sign showcases the same lettering used around the island. Design agency Pentagram created the custom typeface, titled Guppy Sans, for Governors Island in 2014.
The Hills on Governor's Island by West 8
Related story
West 8 creates artificial hills on New York's Governors Island
Only open in the summer months, Governors Island is a popular day-trip destination. Citygoers ferry over to see the Statue of Liberty from a recently completed hilly park by the Dutch architecture firm West 8, or for enjoying music festivals and seasonal installations, like last year's City of Dreams Pavilion by Folio.
 Tile Doctor Ltd
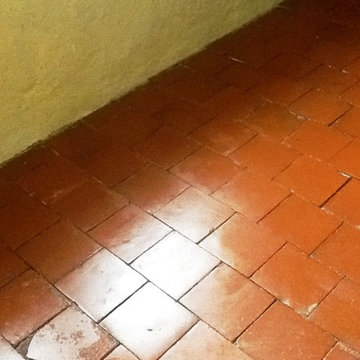
Here’s an interesting work I recently completed on a red Quarry tiled floor at a house in the town of Abington, Northampton. In post-war Britain (more specifically in the 1940s and 1950s), many new homes were built with Quarry tiled hallways and kitchens, so quite a popular feature back then. These floors are typically quite hard wearing and therefore ideal for such high traffic areas; additionally they don’t need a great deal of maintenance but their appearance will degrade over time.
In this particular house, the Quarry tiled floor had been covered with linoleum for many years, causing significant patches of visible black mould. The floor also had a loose tile (which I promptly reset to mitigate the potential tripping hazard) and splashes of paint due to a lack of precaution while the house was being renovated. Needless to say, the floor needed a lot of work.
Before beginning the cleaning I made sure to vacuum up all of the loose debris from the floor. I then applied Tile Doctor Remove & Go to the tiles, left it to dwell for a short period, and then agitated the area with a black stripping pad, adding water to aid the process. This helped to break down any old and ineffectual sealer, along with the paint splashes marking the tiles, leaving a much cleaner and more refined appearance.
I followed this up with Tile Doctor Grout Clean-Up to eliminate the odd speck of cement and grout haze dating back to when the floor was first installed; Gout Clean-up has an acid base so it’s not advised to leave it on the tiles for too long, consequently as soon as I was happy it had done the job I rinsed it off with water and give the floor a thorough wash down.
I used a wet-vacuum machine to extract as much water as possible and gave the floor a once over with steam cleaner which improves the evaporation of any remaining moisture by heating up the tiles.
After completing the cleaning process, I left the house to allow time for the floor to dry completely. Upon my return, I conducted a damp test which showed the floor needed to dry further before sealing so I left an industrial fan in place for a couple of hours to help speed things up.
Once I was satisfied that the floor was dry enough to take the sealant, I sealed the floor using Tile Doctor Colour Grow which is an interesting product that will not only provide durable stain protection but also improves the natural colours of the tile.
While the floor required a lot of time and work to restore, I think you will agree the results were certainly worth waiting for.
Phil Vissian
Northamptonshire Tile Doctor
 wood mgmt furniture + interior spaces
Governors Island Welcome Center by Office III
The pavilion is the first-ever welcome centre for Governors Island, and was added to help tourists better navigate the small island in the city's harbour. It lies just 800 yards (732 metres) from Manhattan's southern-most tip, and reachable by ferry from both there or downtown Brooklyn.
Governors Island Welcome Center by Office III
The Friends of Governors Island asked Office III to design the wooden structure, but with a few constraints: it had to be prefabricated, temporary and portable, and pitched to them just six weeks later.
Governors Island Welcome Center by Office III
The studio – founded by Stephanie Lin, Ryan Golenberg, and Sean Canty from Harvard's Graduate School of Design – looked to the island's Georgian Revival-style barracks and two military forts for subtle references.
Governors Island Welcome Center by Office III
A butterfly roof covers an 800-square-foot (74-square-metre) wooden deck to protect visitors from the sun, while remaining open to the grassy lawn.
Governors Island Welcome Center by Office III
Underneath, an information kiosk is the only fully enclosed structure. Polycarbonate windows and slatted wood serve as semi-walls, which create triangular nooks and lounging areas.
Governors Island Welcome Center by Office III
Office III collaborated with Laufs Engineering Design for structural engineering. The team chose timber louvres to resist the vertical loads of the roof, while a pentagon-shaped core supports the floor deck.
Governors Island Welcome Center by Office III
Marine-grade plywood lines the interior, while cedar planks cover the exterior. Both materials are resilient to New York's infamous summer rainstorms.
Governors Island Welcome Center by Office III
The centre's "Welcome" sign showcases the same lettering used around the island. Design agency Pentagram created the custom typeface, titled Guppy Sans, for Governors Island in 2014.
The Hills on Governor's Island by West 8
Related story
West 8 creates artificial hills on New York's Governors Island
Only open in the summer months, Governors Island is a popular day-trip destination. Citygoers ferry over to see the Statue of Liberty from a recently completed hilly park by the Dutch architecture firm West 8, or for enjoying music festivals and seasonal installations, like last year's City of Dreams Pavilion by Folio.
 wood mgmt furniture + interior spaces
Governors Island Welcome Center by Office III
The pavilion is the first-ever welcome centre for Governors Island, and was added to help tourists better navigate the small island in the city's harbour. It lies just 800 yards (732 metres) from Manhattan's southern-most tip, and reachable by ferry from both there or downtown Brooklyn.
Governors Island Welcome Center by Office III
The Friends of Governors Island asked Office III to design the wooden structure, but with a few constraints: it had to be prefabricated, temporary and portable, and pitched to them just six weeks later.
Governors Island Welcome Center by Office III
The studio – founded by Stephanie Lin, Ryan Golenberg, and Sean Canty from Harvard's Graduate School of Design – looked to the island's Georgian Revival-style barracks and two military forts for subtle references.
Governors Island Welcome Center by Office III
A butterfly roof covers an 800-square-foot (74-square-metre) wooden deck to protect visitors from the sun, while remaining open to the grassy lawn.
Governors Island Welcome Center by Office III
Underneath, an information kiosk is the only fully enclosed structure. Polycarbonate windows and slatted wood serve as semi-walls, which create triangular nooks and lounging areas.
Governors Island Welcome Center by Office III
Office III collaborated with Laufs Engineering Design for structural engineering. The team chose timber louvres to resist the vertical loads of the roof, while a pentagon-shaped core supports the floor deck.
Governors Island Welcome Center by Office III
Marine-grade plywood lines the interior, while cedar planks cover the exterior. Both materials are resilient to New York's infamous summer rainstorms.
Governors Island Welcome Center by Office III
The centre's "Welcome" sign showcases the same lettering used around the island. Design agency Pentagram created the custom typeface, titled Guppy Sans, for Governors Island in 2014.
The Hills on Governor's Island by West 8
Related story
West 8 creates artificial hills on New York's Governors Island
Only open in the summer months, Governors Island is a popular day-trip destination. Citygoers ferry over to see the Statue of Liberty from a recently completed hilly park by the Dutch architecture firm West 8, or for enjoying music festivals and seasonal installations, like last year's City of Dreams Pavilion by Folio.
3