
Search results for "Protective machine learning" in Home Design Ideas

 Accent Window Fashions LLC
HUNTER DOUGLAS DESIGNER SCREEN SHADES
Hunter Douglas Designer Screen Shades are Made to Shade
For excellent UV protection while maintaining your view of the outdoors, Hunter Douglas Designer Screen Shades are available in sturdy and easy-to-clean fabrics—perfect for your patio or sunroom.
Hunter Douglas Designer Screen Shades are an innovative combination of sheer beauty and functional technology, offering visibility of the outdoors while protecting valuable furnishings from harmful UV rays indoors.
Headrail Option UPGRADE YOUR LOOK
Choose to upgrade to a variety of top treatments that conceal the fabric roll and clutch for a clean, attractive look. Complement or match your shade with a separate fabric for the top.
Bottom Treatments DESIGN FLEXIBILITY
Create a finished look with a wide choice of bottom treatment options.
UV protection SUNSCREEN FOR YOUR VALUABLES
Protect your furniture, flooring and artwork from fading with at least 75% protection from harmful UV rays.
Platinum™ Technology CONTROL FROM YOUR PHONE OR TABLET
Controlling your window treatments with a mobile device means you can set your blinds to movie mode, work mode, or 8 a.m. mode with the touch of a button, without leaving your seat. It’s effortless, fun and smart—with perfectly smooth operation.
Lifetime Guarantee FOR LIFE
Hunter Douglas products are designed and custom-assembled in the U.S. with the highest level of quality. But just in case, every window treatment from Hunter Douglas is covered by our lifetime limited guarantee. Read the Hunter Douglas Warranty to learn more.
Sizes Available:
Width: 12" to 192"
Height: 12" to 144"
Material/Color Options:
232 Combinations
Available from Accent Window Fashions LLC (715) 355-0772
Hunter Douglas Designer Screen Roller Shades with Clutch Operated Continuous Cord Loop
Material: Exotic Hues 3%
Color: Terena Arrowhead
Operating Systems: Clutch Operated Continuous Cord Loop
Room: Living Room
Room Styles: Contemporary, Eclectic
Hunter Douglas Showcase Priority Dealer
Hunter Douglas Certified Installer
Hunter Douglas Certified Professional Dealer
#Hunter_Douglas #Designer #Screen_Shades #Roller_Shades #Shades #Remote_Control #Continuous_Cord_Loop #Contemporary #Eclectic #Living_Room #Living_Rooms #Living_Room_Ideas #Window_Treatments #HunterDouglas #Accent_Window_Fashions
Copyright 2001-2014 Hunter Douglas, Inc. All rights reserved.
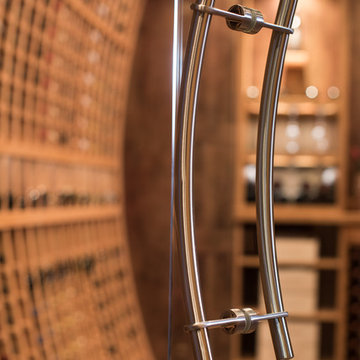
 Revival House
The perfect space to showcase and protect fine wines. A complete custom design maximizes every inch of space. Mirroring the curves and soft edges of the bottles this room holds - the cellar has been created for lingering, admiring and preserving this clients passion for wine!
Scott Amundson Photography
Learn more about our showroom and kitchen and bath design: http://www.mingleteam.com

 Joselyn Rendon Interiors
Black and White Bathroom Interior Design Project
Bathroom - traditional bathroom idea in Los Angeles
Bathroom - traditional bathroom idea in Los Angeles
Find the right local pro for your project
 Tile Doctor Ltd
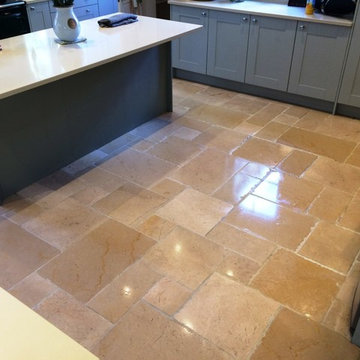
Earlier this year I was contacted by a lady in Icklesham which is a small village near Hastings. My client requested a deep clean for her Limestone tiled kitchen floor which had, over time, become quite dirty, with the grout in particular being very much worse for wear. Limestone is a popular choice for tiled floors however it needs to be sealed to ensure dirt doesn’t get into the pores of the stone otherwise it becomes difficult to clean and if the sealer is not maintained it will wear down and the floor will lose its protection especially in high traffic areas such as kitchens.
Cleaning a Limestone tiled kitchen floor
My product of choice for cleaning this floor was Tile Doctor Pro-Clean, which I found to be particularly effective in lifting ingrained dirt out of the grout. I used a stiff grout brush to work the solution of Pro-Clean diluted with warm water to work the cleaner deep into the grout. I also used a buffing machine fitted with a scrubbing pad and more Pro-Clean to lift the dirt out of the Limestone tiles. It wasn’t long before the dirty grout lines began to disappear, and the floor was well on its way to looking great again.
Once I’d also cleaned the nearby utility room, bathroom and cloakroom in a similar manner, I gave the floor a thorough rinse with fresh water before using a wet-dry vac machine to remove the soiled water from the surface of the tiles. I removed as much moisture from the Limestone tile and grout as possible to speed up the drying process as it’s important to ensure a stone floor is bone dry before sealing it as any excess moisture will compromise the sealer.
Applying Tile Doctor Colour Grow sealer to Limestone tiles
I left the floor for three days to dry before returning and used a damp meter on my return to confirm the floor was in-deed dry, spring had arrived and the sunshine really helped. My choice of sealer for the Limestone tiles was Tile Doctor Colour Grow, a product which soaks into the pores of the stone to enhance the colour of tiles whilst also providing durable protection. In this case two coats of Colour Grow were applied and as you can see from the photographs this really did bring out the fantastic natural colours in the Limestone and exaggerate the shading. At the same time, the added surface protection will help the floor stay looking great for longer, even with a lot of usage.
When she returned from dog walking, my client was so pleased with the final result that she almost screamed the house down! She was so pleased, in fact, that she promised to have me return every year to ensure her floor was maintained to a high standard. I was also really happy with my work, particularly in terms of getting the grout into far better condition than it had been before.
 Tile Doctor Ltd
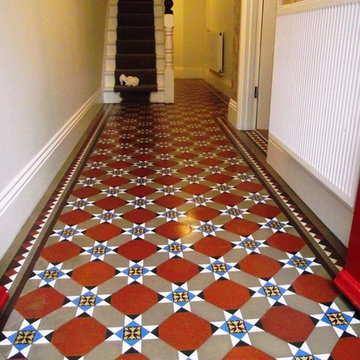
These Victorian hallway tiles were cleaned at a residence in the historic town of Bideford. As you can see from the photograph below the tiles were dull and had lost their vitality due to ingrained dirt, clearly it had been some time since they were given a good deep clean.
Cleaning a Victorian Floor
The first job was to protect the skirting with tape and then vacuum to remove any loose debris and grit. The next step was to cover the entire floor with a strong dilution of Tile Doctor Remove and Go which is a powerful cleaning and coating remover that is safe to use on tile and stone. It was left to dwell on the floor for twenty minutes so it could soak into the tile and make the job of removing any remaining sealer and ingrained dirt easier.
The solution was scrubbed into the tile using a black scrubbing pad fitted to a rotary machine and then the soiled cleaning solution rinsed off using a wet vacuum. This process was repeated a number of times until I was satisfied with the condition of the floor and followed with a final rinse with clean water to remove any trace of cleaning product. The water was extracted with the wet vacuum to get the floor as dry as possible before leaving for the day.
Sealing a Victorian Floor Sealing
The tiles were left to dry for 24 hours and I came back to seal the tiles using eight to nine coats of Tile Doctor Seal and Go which is an ideal sealer for Victorian Tiles as it leaves a nice sheen and provides excellent stain protection.
I think you will agree the hallway floor came up really well and now been given a new lease of life.

 Margaret Volney Designs, LLC
Who said a Laundry Room had to be dull and boring? This colorful laundry room is loaded with storage both in its custom cabinetry and also in its 3 large closets for winter/spring clothing. The black and white 20x20 floor tile gives a nod to retro and is topped off with apple green walls and an organic free-form backsplash tile! This room serves as a doggy mud-room, eating center and luxury doggy bathing spa area as well. The organic wall tile was designed for visual interest as well as for function. The tall and wide backsplash provides wall protection behind the doggy bathing station. The bath center is equipped with a multifunction hand-held faucet with a metal hose for ease while giving the dogs a bath. The shelf underneath the sink is a pull-out doggy eating station and the food is located in a pull-out trash bin.
 Accent Window Fashions LLC
HUNTER DOUGLAS DESIGNER ROLLER SHADES
Designer fabrics keep harmful UV rays at bay
Hunter Douglas Designer Roller Shades combine the ease and simplicity of a roller shade with hundreds of fabric choices—sheers to opaques, and floral patterns to traditional solid colors.
Headrail Option UPGRADE YOUR LOOK
Choose to upgrade to a variety of top treatments that conceal the fabric roll and clutch for a clean, attractive look. Complement or match your shade with a separate fabric for the top.
Bottom Treatment DESIGN FLEXIBILITY
Create a finished look with a wide choice of bottom treatment options.
UV Protection SUNSCREEN FOR YOUR VALUABLES
Protect your furniture, flooring and artwork from fading with at least 75% protection from harmful UV rays.
Platinum™ Technology CONTROL FROM YOUR PHONE OR TABLET
Controlling your window treatments with a mobile device means you can set your blinds to movie mode, work mode, or 8 a.m. mode with the touch of a button, without leaving your seat. It’s effortless, fun and smart—with perfectly smooth operation.
Lifetime Guarantee FOR LIFE
Hunter Douglas products are designed and custom-assembled in the U.S. with the highest level of quality. But just in case, every window treatment from Hunter Douglas is covered by our lifetime limited guarantee. Read the Hunter Douglas Warranty to learn more.
Hunter Douglas Designer Roller Shades PowerRise® 2.1 with Platinum™ Technology
Designer Roller Shades
Fabric/Material: Terra Falls
Color: Mineral Grey
Hunter Douglas | Designer Roller Shades
Designer Roller Shades
Fabric/Material Fiji BlackoutColor Balina Sands
Operating Systems: PowerRise 2.1 with Platinum Technology
Room: Den
Room Styles: Casual, Contemporary
Available from Accent Window Fashions LLC
Hunter Douglas Showcase Priority Dealer
Hunter Douglas Certified Installer
Hunter Douglas Certified Professional Dealer
#Hunter_Douglas #Roller_Shades #PowerRise #Platinum #Technology #Den #Den_Ideas #Casual #Contemporary #Window_Treatments #HunterDouglas #Accent_Window_Fashions
Copyright 2001-2014 Hunter Douglas, Inc. All rights reserved.
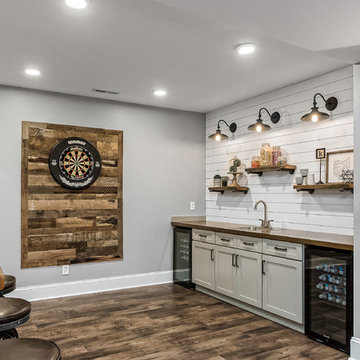
Sponsored
Sunbury, OH

J.Holderby - Renovations
Franklin County's Leading General Contractors - 2X Best of Houzz!

 Treebeard
Anise Swallowtail butterfly (Papilio zelicaon) on Mexican Sunflower (Tithonia rotundifolia) which is not a native plant to California. Photo by Treebeard
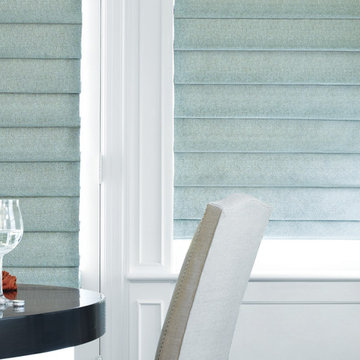 Accent Window Fashions LLC
DESIGN STUDIO™
For the love of customization
Design Studio™ Roman shades come in a wide variety of timeless fabrics like cotton, silk and linen. Available in four distinct styles. Customize even further with tapes, trims and complementary valances.
Features & Benefits
Design Inspiration EXCLUSIVE FABRICS, TAPES AND TRIMS
Our sophisticated fabrics, tapes and trims turn ordinary rooms into ones of beauty and distinction.
Optional Lining FOR COMPLETE LIGHT CONTROL
Superior linings in two opacities provide light control and energy-saving insulation. Both opacities are available in white, cream or latte colors.
Fabric by the Yard MATCH FOR YOUR ROOM DECOR
Fabrics, tapes, linings and trims are available by the yard, so you can create decorative, matching accents for any room.
Valance Options UPGRADE YOUR LOOK
Several valance options are available that can also be used with any Hunter Douglas window fashion.
UV Protection SUNSCREEN FOR YOUR VALUABLES
Protect your furniture, flooring and artwork from fading with at least 75% protection from harmful UV rays.
Lifetime Guarantee FOR LIFE
Hunter Douglas products are designed and custom-assembled in the U.S. with the highest level of quality. But just in case, every window treatment from Hunter Douglas is covered by our lifetime limited guarantee. Read the Hunter Warranty to learn more.
Hunter Douglas Design Studio™ Roman Shades with Cordlock
Hunter Douglas Design Studio™ Roman Shades Hobble Style with Cordlock
Fabric: Dreamweaver
Color: Fountain
Operating Systems: Cordlock
Room: Dining Room
Room Styles: Transitional, Formal
Available from Accent Window Fashions LLC
Hunter Douglas Showcase Priority Dealer
Hunter Douglas Certified Installer
Hunter Douglas Certified Professional Dealer
#Hunter_Douglas #Design_Studio #Roman_Shades #Cordlock #Transitional #Formal #Dining_Room #Dining_Room_Ideas #Window_Shadings #Window_Treatments #HunterDouglas #Accent_Window_Fashions
Copyright 2001-2014 Hunter Douglas, Inc. All rights reserved.

 Patio Productions
Create an outdoor seating area with sophisticated style on your patio with the 5 Pc. Coronado Wicker Sofa Set by Sunset West (2101-23-5Pc). Featuring unique driftwood colored wicker made from high quality resin wicker that is fade and split resistant, this set has great durability to go along with an attractive design. Feel free to expand upon or customize your sofa set with the options available from the drop down menus. The cushions in the set are made with your choice of many Sunbrella brand fabrics, which offer unmatched comfort, lifespan, and protection against the elements.
This Sectional Set Includes: a sofa, love seat, two club chairs, and a coffee table. If you decide you need more than what's offered in the base set, use the drop-down menu options above to add products, or scroll down to the bottom of this page for other related products to finish off your collection.
Features at a Glance
Premium resin wicker in our new Driftwood color
Cushion fabric treated to be resistant to stains, water, and oil
UV Ray protection on wicker for increased longevity
Pictured cushions are included

 Dynamic Garage Door
Los Angeles, CA - Corten steel garage doors are the perfect complementing architectural element that can improve the curb appeal of an eclectic style home or even a modern style home. The beauty of Cor-Ten steel garage doors is that they are not only architecturally appealing but they are maintenance free. The corrosion of the steel's surface yields a unique color variation that looks warm and inviting. Over the years the surface layer of rust forms a protective barrier that protects the steel paneling from further decay. It's almost like bark on a tree.
We can create a custom corten steel garage door design for you, modify our existing garage door designs or create something completely from scratch as in this case. Our in-house designers created a one-of-a-kind cor-ten steel garage door design that would complement the home's Japanese architectural style!
Contact us today and learn what we can do for you. Our garage door designers enjoy taking up a challenge and welcome authentic projects that will require outside of the box thinking.
Design Center: (855) 343-3667
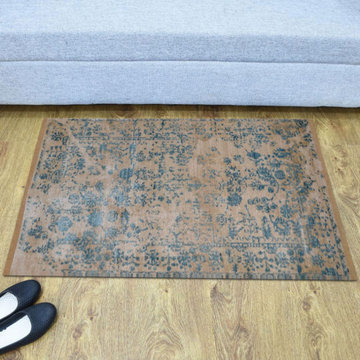
 Get My Rugs LLC
Bath mats are vital elements in bathroom decor, beautifully blending style and functionality. These bath rugs offer essential moisture protection, ensuring your floors remain dry while providing slip prevention for safety. When choosing a bath mat, prioritize quality; look for options that are absorbent, comfortable, and add warmth to your space.
Consider the size and proportion of the bath mat in relation to your tub and vanity. If you have a double vanity, you can select individual rugs for each sink or opt for a long runner rug for a cohesive appearance. Always measure your bathroom area to ensure a perfect fit, allowing enough space for doors to open freely.
Durability is another crucial factor. Since bath mats frequently encounter water and foot traffic, choose rugs with a nonslip surface and rubber backing to enhance safety on wet floors. Many options are crafted from high-quality cotton, providing a soft texture and easy maintenance, as most are machine washable. However, some may require professional cleaning, so checking care instructions is advisable.
The choice of bath mat size largely depends on the area you want to cover and the dimensions of your bathroom. Look for a shower mat that is appropriately sized for your tub and vanity, ensuring it provides adequate coverage. If your bathroom features a double vanity, you can opt for either individual rugs for each sink or a long runner rug for a cohesive appearance. Before shopping, take measurements of the spaces to ensure a perfect fit. In smaller bathrooms, remember to leave enough space for the door to swing open without obstructing the rug.
Durability should be a top consideration when selecting a bath mat. Since shower mats are frequently exposed to water and heavy foot traffic, it’s important to prioritize quality. Look for options with a nonslip surface and rubber backing to reduce the risk of slipping when the floor or mat is wet. Additionally, pay attention to the cleaning instructions. Most mats are crafted from cotton or chenille and can be machine washed, but some may require professional cleaning, so it’s best to verify before making a purchase.
moisture and helping prevent slips. When choosing a bath mat, quality is just as essential as aesthetics; you'll want one that not only looks appealing and is absorbent but also feels comfortable underfoot. As you search for the ideal bath rug, consider these helpful tips to guide your decision.
The choice of bath mat size largely depends on the area you want to cover and the dimensions of your bathroom. Look for a shower mat that is appropriately sized for your tub and vanity, ensuring it provides adequate coverage. If your bathroom features a double vanity, you can opt for either individual rugs for each sink or a long runner rug for a cohesive appearance. Before shopping, take measurements of the spaces to ensure a perfect fit. In smaller bathrooms, remember to leave enough space for the door to swing open without obstructing the rug.
Durability should be a top consideration when selecting a bath mat. Since shower mats are frequently exposed to water and heavy foot traffic, it’s important to prioritize quality. Look for options with a nonslip surface and rubber backing to reduce the risk of slipping when the floor or mat is wet. Additionally, pay attention to the cleaning instructions. Most mats are crafted from cotton or chenille and can be machine washed, but some may require professional cleaning, so it’s best to verify before making a purchase.
Having a bubbly pink color, this polyester footmat from Turkey ensures that it gets noticed by one and all. Its oriental patterns follow a definite sense of standard geometry. Buy it for your house and it will become an inseparable part of it for sure.

 Joy Street Design
A gorgeous kitchen showcasing a brand new color palette of gray and bold blue! As this was the client’s childhood home, we wanted to preserve her memories while still refreshing the interior and bringing it up-to-date. We started with a new spatial layout and increased the size of wall openings to create the sense of an open plan without removing all the walls. By adding a more functional layout and pops of color throughout the space, we were able to achieve a youthful update to a cherished space without losing all the character and memories that the homeowner loved.
Designed by Joy Street Design serving Oakland, Berkeley, San Francisco, and the whole of the East Bay.
For more about Joy Street Design, click here: https://www.joystreetdesign.com/
To learn more about this project, click here: https://www.joystreetdesign.com/portfolio/randolph-street
Sponsored
Sunbury, OH
J.Holderby - Renovations
Franklin County's Leading General Contractors - 2X Best of Houzz!
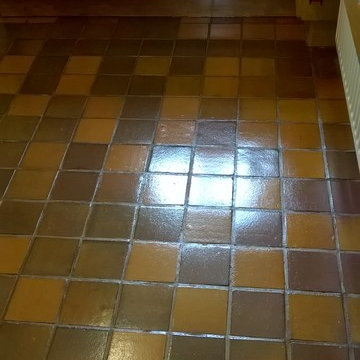 Tile Doctor Ltd
This Quarry tiled kitchen floor was in very good condition, with no cracked or broken tiles. However, my customer, who lives in the town of Tutbury, near Burton-on-Trent, was keen to boost the condition of the tiles further through professional maintenance, including a deep clean and a fresh seal to restore the sheen to the Quarry. NB, did you know it’s estimated that Tutbury has actually been inhabited for 3000 years, having once been the site of an Iron Age hill fort, this house of course was a lot more recent.
To clean the tiles, I chose to use our tried and trusted alkaline cleaner, Tile Doctor Pro Clean. We use Pro Clean on most types of natural stone floor, including Quarry, Slate, and Victorian. I applied Pro Clean liberally across the floor and left it to dwell for a short period, giving it time to seep into the tile to get underneath and lift out any ingrained dirt. The cleaner was then agitated using a scrubbing pad fitted to a rotary machine to remove the dirt and other general muck.
I then rinsed the floor with cold water and soaked up the resulting slurry with a wet-vac machine. Some areas of the floor proved to be quite stubborn to clean, so in these areas the cleaning process was repeated until satisfactory results were achieved. Finally, the floor was given another rinse and left to dry off overnight.
The next day I returned to the property and checked that the floor was ready to seal by running several damp tests, with the results indicating that was no excess moisture remaining on the tiles. We carry out these tests before sealing because moisture can cloud the sealer and prevent it from properly protecting the tiles.
My choice of sealer was Tile Doctor Seal & Go, a cost effective topical sealer that builds up a robust layer of protection on the surface of the floor and provides a durable sheen finish that, as you can see from the photographs, really lifts the appearance of the tiles.
It’s a fact that any sealed tiled floor will need to be regularly maintained as sealers do wear off over time, especially in the high traffic areas, and this is when the floor starts to lose its appearance as dirt becomes trapped in the pores of the stone. The life of the sealer can be extended however by ensuring you only clean the floor with a PH Neutral cleaner.
Trevor Preeece
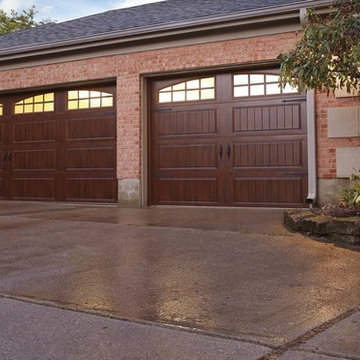
 Paradise Garage Door Services, Inc
When you’re looking for carriage house garage doors with the durability of steel, choose the GALLERY® collection by Clopay®. Whether your vision for your home’s exterior is elegant, sleek, unique, or somewhere in between, the versatile design of the GALLERY® collection can provide just the look you need to rejuvenate your home’s exterior.
CONSTRUCTION OVERVIEW
Available in 3, 2 or 1-layer construction options.Insulation options include 2" or 1-3/8" Intellicore® polyurethane, 2" or 1-3/8" polystyrene or 1-5/16" vinyl backed polystyrene. Insulated door R-values range from 6.3 to 18.4.The steel skins are protected by the use of a tough, layered coating system, which includes a hot-dipped galvanized layer and baked-on primer and top coat.WINDCODE® reinforcement product available for high wind load applications. (Click for details)Learn more about GALLERY® collection construction.DESIGN OVERVIEW
Grooved-panel steel carriage house designs available in short- and long-panel options. 12 factory finish paint colors available, including almond, black, Ultra-Grain® Oak Walnut Finish and more. Multiple glass options available including acrylic, insulated, frosted, seeded, rain and obscure options.Window grilles for easy cleaning. Comes complete with spade lift handles and step plates. Additional decorative hardware options available.Learn more about GALLERY® collection design.
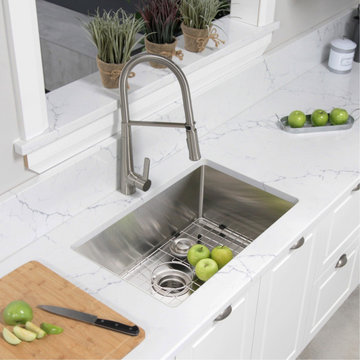
 Stylish
This 32” x 19” handmade stainless steel single basin undermount kitchen sink combines functionality, quality, and affordability. Perfect for any kitchen space, this undermount sink is made of surgical grade 16 gauge SUS 304 stainless steel, with an optimized 18pct chromium and 10pct nickel content to provide excellent strength and hardness. The specially chosen satin finish will hide water spots and maintain a uniform patina finish as the sink ages. The extra-deep basin accommodates pots and pans easily, but it also hides dirty dishes in the sink basin and under the countertop line. The tight-0.4" radius corners are perfectly blended through an automated machine buffing system, and careful hand polished, for a luxurious finish. This beautiful stainless steel undermount sink comes with a bottom grid to protect your sink from dents and scratches. The bottom grid is cushioned by soft protective bumper. This single bowl undermount kitchen sink is equipped with soundproofing system including a protective stone guard coating and extra thick rubber pads to create overall a very quiet sink. This coat is sprayed underneath the sink to prevent water condensation as well. This single basin kitchen sink comes with a luxury basket drain strainer, which is deeper and much more functional for catching food scraps than the regular strainers. These kitchen sinks are Canadian designed and meet the highest plumbing standards for North America. For added functionality, the stainless steel kitchen sink has a drain towards the rear, for better utilization of the space under the sink cabinet. Also, sink basins have drain grooves for optimal drainage. Very easy to install, this kitchen sink come with a template and mounting brackets. Experience the luxury and functionality of this amazing stainless steel undermount single basin kitchen sink, perfect fit for any kitchen environment.
 Tile Doctor Ltd
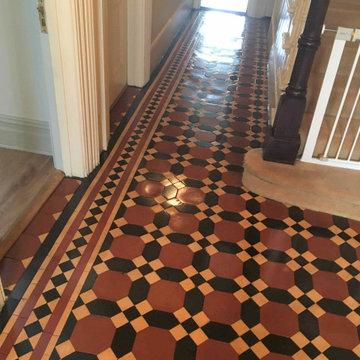
This Victorian tiled hallway floor at a property in Twickenham was in great physical condition considering its age but just hadn’t been cleaned or sealed in quite a few years. Over the years the protective sealer has worn away and dirt tracked in from outside had sunk deep into the pores of the tile. The floor looked dull, and my customer was finding it hard to clean and maintain effectively.
To remove the ground in dirt from within the pores of the tile I needed to apply a strong cleaning product that would breakdown the dirt and deal with any remaining sealer left on the floor. Usually, I find the sealer down the center of the hallway is worn away with use, but you still find traces towards the wall. To do the renovation effectively I would need to remove all the sealer during cleaning otherwise you risk an uneven appearance.
The best sealer stripper and cleaner for the job is a product called Tile Doctor Remove and Go so I mopped a strong dilution onto the floor and then left it to soak in for around fifteen minutes. To get the best from this product it’s advised to give it a long dwell time thereby allowing it to break down old sealer and dissolve the dirt and contaminants.
The floor was then scrubbed with a rotary floor machine to work the product into the pores of the tile and release the trapped dirt. After the first pass the floor was rinsed with a little water and the soil extracted using a machine. After inspecting the floor some areas were re-treated using the same process to ensure all the sealer and dirt had been removed.
After a final inspection I left the tiles to dry off overnight.
The following day I returned and started by taking moisture readings from different parts of the floor. Its not a good idea to apply a sealer to a damp tile and damp areas should be dried out with a heat gun first.
My client was keen to have a classic shiny appearance, so I chose Tile Doctor Seal and Go to add protection to the tiles. The sealer will prevent dirt becoming ingrained in the tile and protect the floor from staining caused by spillages whilst making it very easy for our customer to maintain in the future. As you can see from the pictures, it also gives a nice sheen finish to add lustre to the floor as requested by my customer.
Before leaving we had a quick chat about maintaining the floor and a warning about the use of strong floor cleaning products which can be over strong and prematurely strip the sealer away over time. For this floor I recommend Tile Doctor Neutral cleaner which is an effective cleaner but as its name suggests is pH neutral and mild enough not to harm the sealer.
Jonathan Oldham
South Middlesex Tile Doctor

 Weidmann Remodeling
Home office - contemporary freestanding desk medium tone wood floor and brown floor home office idea in Atlanta with blue walls

 Advance Design Studio, Ltd.
Jennifer and Dan have lived in their Deer Park Illinois home for 15 years, slowly making minor fixes like painting and decorating; but they had a new plan for their kitchen the entire time. An awkwardly placed garage door, and an island cooktop with a terrible downdraft made a full-scale kitchen remodel an absolute must. Jennifer had many ideas in mind and wanted to work with a company that could provide high-end work, while partnering with a designer that would tailor the kitchen to her ideas.
She was intrigued by the phrase “Common Sense Remodeling” in Advance Design’s feature she discovered while perusing an issue of the community’s Quintessential Barrington Magazine. Doing further research on the company’s website, as she looked through project profiles and read about Advance Design’s “Common Sense Remodeling” philosophy, she promptly scheduled an appointment to see if the people and ideas she read about were truly who they said they were. The more she read, the more she knew that the “Common Sense” approach to remodeling they described was exactly the type of company she was looking for.
The partnership was sealed after an initial consultation with Owner Todd Jurs and Project Designer Michelle Lecinski. They displayed a combination of friendliness, professionalism and respect that was unmatched by any of the other companies Jennifer talked to. She knew that with Advance Design, she would be able to retain the vision that she had in mind with high-quality craftsmanship.
“I reached out to Advance Design because of the ‘Common Sense Remodeling’ tagline,” Jennifer said. “That’s what lingered for me”. “Advance Design was the most respectful- of the house and of my design ideas, and the most professional of the handful of companies that looked at my project”.
Soon after the meeting Jennifer began working with Michelle on the project design. They quickly developed chemistry. Jennifer loved how Michelle researched and located every detail that Jennifer wanted for the kitchen. Between the two of them, every concept and idea was worked through and perfected. “Jennifer had definite ideas about what she wanted the new kitchen to look like, she just didn’t know how to bring it all together. We worked together really well to make her ideas into the practical reality necessary for a well-functioning kitchen, with the look and feel that she had envisioned”, says Michelle.
“Michelle was wonderful in using the CAD system she would show me new drawings every time we changed the layout while working through the design,” Jennifer said. “She was a really wonderful partner in execution, she made sure everything happened quickly and easily.”
The finished design drew out elements of Jennifer’s style and personality. The pair call the look “sophisticated farmhouse” to describe the kitchen renovation to family and friends. The result was a beautifully crafted, authentic-feeling space that satisfied Jennifer’s dreams 15 years in the making. The whole project consisted of a kitchen remodel, mudroom upgrade with powder room, and garage entry relocation. “The projects I personally like the best, are the ones that put the client’s dreams on display,” Project Designer Michelle said. “And this is one of those projects.”
The main focal point of the kitchen is custom zinc and brass ventilation hood with a vintage sheen, which was hand made to order by a small company in Indiana named Vogler Metalworking. “It’s like sculpture, a true work of art”, says Jennifer. Your eye is immediately drawn towards this elegant yet practical hood that eliminated the home’s downdraft problem and added a striking conversation piece at the same time. The carpenters had to use special gloves when transporting and installing it, so they didn’t smudge it with fingerprints. The beautiful hood centers proudly over the stunning black enamel and brass LaCornue Range. “I had a friend who had a LaCornue range and after learning how easy it was to cook perfect meals, I was convinced I wanted to have one”, says Jennifer. This unique, breathtaking combination anchors the entire kitchen and is apparent immediately as you walk into the great room the surrounds the space.
DuraSupreme Crestwood cabinets with a Kendall Panel add function and sophistication. A custom gray paint color paired with a storm blue was developed so that the new kitchen looked like it belonged to the existing space. Unlacquered brass faucets and hardware were important to Jennifer because she wanted the living finishes to age over time. Remarkable brass diamond mesh cabinet door inserts imported from the UK continue to add this one-of-a-kind kitchen renovation; giving it a “you won’t see this everywhere” quality. The use of old railcar flooring for the coffee bar countertop and reclaimed oak for the open shelving gives an authenticity to the space uncommon in kitchens today.
Jennifer and Michelle fell in love with the Limestone Grey Stone while they were investigating unique island countertop ideas. They liked the fact that the limestone as a living finish will age and change over time. Calcutta Miel Quartz countertops made for an excellent pairing around the perimeter, as it’s durable and perfect for cooking preparations. A textured white subway tile backsplash that runs to the ceiling keeps your eye moving towards the open shelving, and to the main focal point of the stunning range hood combination.
“The kitchen functions beautifully, and it’s gorgeous,” beams Jennifer as she gestures with both hands while smiling ear to ear. “The most important thing was I wanted a kitchen that had a wonderful flow, cooked beautiful meals and was a great gathering place for family and friends, and this space does that perfectly! Beauty wise, it turned out exactly how I had envisioned. I felt the function part was the hardest part, and that was nailed”!
Relocating the garage entry to the new mudroom was a huge priority and has finally separated the family’s arriving home functions from their kitchen. Now coats and shoes and bags have their own area for dropping once members arrive home. Matching gray DuraSupreme cabinetry helped create gorgeous, purposeful lockers for the family. A reclaimed vintage sink and custom wall paper were added to the tiny powder room to beautify the once previously only functional space. Advance Design was even able to create a custom space for their dog to sleep while the family is away.
“It was unbelievable that a project of this size was completed in such a short time, and I think that’s because of the large amount of planning and preparation that went into it,” Jennifer marveled, “When we started, we were ready, and everything was prepared”.
When it came to execution, Project Manager Justin Davis and his crew were quick, accessible, and organized. Projects like this kitchen are typically completed in as little as 8-10 weeks. Jennifer’s kitchen however despite the relocation of some challenging HVAC in a soffit and moving of an exterior door was completed remarkably fast in part because the team was working with an existing tile floor that ran throughout the first floor that the client really loved.
“You get to know these people really well because they’re living in your house while you’re living in your house. They were so fast and really good, it didn’t take as long as even planned” reported Jennifer. “I would text Justin and he always responded almost immediately. I got to know all the guys who were working in our house and they were all wonderful people”.
Details in a customized kitchen like this one require skill and care from the people who install it. “All the guys on the job were skilled at what the did. I wanted small details like little feet to look like furniture, that is where their carpentry skill came in to make these all perfect”, said Jennifer. “The tile guys were wonderful. They even let me determine how I wanted the texture with the grout to appear for a salt and pepper look; now that is a very skilled trade person making it custom”.
In Jennifer’s interview, she continued to reference Advance Design’s “Common Sense Remodeling”, so I took a minute to ask her exactly what that phrase meant to her and how it played out in her experience with her project and the Advance Design team. Here is what she said: “I was intrigued about Common Sense Remodeling and in my head that there would be clear costs and prices, great communication between the design team, the execution team and me”, said Jennifer. They did deliver on that, it was so clear about the cost breakdown, what I could expect from everyone who came to my house, and everything that we had ordered. That to me is the Common Sense”!
It’s great to see a client take literally our assertion that a well-planned remodeling project is simply “Common Sense”! She anticipated each step of the way would be clear, concise, and predictable, all the while protecting the outcome due to the careful upfront planning. “Advance Design delivered on their ‘Common Sense Remodeling’ promise,” Jennifer said. “From the design team, to the execution team - everything was straight forward like I imagined. The project turned out exactly how I envisioned, I enjoyed this process and absolutely would recommend Advance Design Studio to anyone.”
 Tile Doctor Ltd
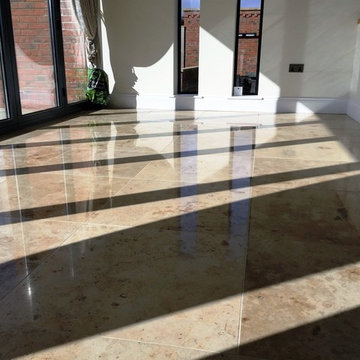
These Marble tiles were installed at a lovely property in North Ferriby by another tile company who although has done a great job laying the floor had neglected to provide the owner with any kind of post-installation maintenance.
Thus the tiles, which covered a large kitchen and hallway area, appeared dull and certainly not up to the standard that could be achieved with the right methods. Funnily enough, the tile company had told the property owner that the stone would need to be sealed, but did not offer to carry out the process themselves.
After conducting their own research, the property owner contacted her local Tile Doctor to see what could be done. I came round to inspect the floor and recommended the floor was polished through a process known as burnishing, followed by the application of a sealer to provide durable protection for the stone.
Burnishing involves the application of diamond encrusted pads with different levels of grit. At Tile Doctor we work with a four pad system that allows us to gradually refine the polish on suitable tiled floors, including Marble and Limestone.
I started the process by applying a Coarse grit burnishing pad across the entire floor lubricated with a little water, the 17 inch pads fit a rotary floor buffing machine and so are relatively straight forward to use but do take time. Following this, I worked my way through the burnishing system, repeating the process with Medium, Fine and Very Fine grit burnishing pads to achieve a brilliant, consistent shine. The floor is given a quick rinse between pads in-order to remove the resultant slurry before starting with the next pad.
The second part of the restoration was to seal the floor to protect the stone against future dirt, stains and damage, which is more common in busy areas of a house like the kitchen. I opted to seal the Marble tiles with two coats of Tile Doctor Ultra Seal.
This is a premium, no-sheen sealer that leaves the Marble with a more natural looking polished appearance. As a solvent-based, penetrating sealer it gets deep into the pores of the stone to protect against stains and ingrained dirt, especially in food preparation areas. To finish off I used the very fine diamond pad just to guarantee the brilliant shine you can see in the photos.
The property owners were exceptionally pleased with the results achieved and will undoubtedly be glad that their lovely Marble tiled flooring is now protected for long-term use. Another satisfied client.
Ronnie Phipps
East Yorkshire Tile Doctor
19