
Search results for "Quick vacuum" in Home Design Ideas
 Tile Doctor Ltd
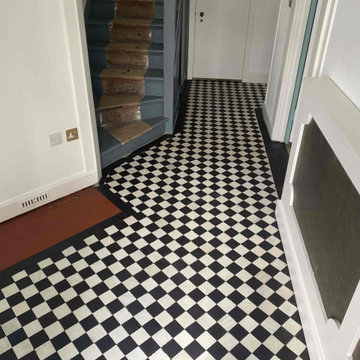
This client from North London had recently bought a property in Highgate N6 and during renovation had discovered an original Victorian tiled floor in the hallway. The floor was laid in a classic black and white diamond pattern but unfortunately a large section was missing and had been filled with concrete. Furthermore, most of the remaining floor had been covered in cement and glue.
I carried out a survey of the floor to determine the main issues and was then able to email over a quote later that day that included rebuilding the missing section of flooring. I suspect the floor had been excavated at some point in the past to install central heating and then rather than have the excavated section restored it was simply back filled and then levelled with a cement screed before finally gluing down a carpet on top.
Once the quote was accepted, I sourced replacement tiles from the Vintage Floor Tile company. Situated in Kent they are a reclamation yard that specialises in supplying original geometric and encaustic tiles including the major historical makers such as Minton and Craven Dunnill.
Armed with replacement tiles I started by removing the concrete that had been used to backfill the missing section and prepare a new surface for tiling with quick drying cement. When ready I was able to carefully build back the original pattern using the replacements. The tiles were secured with tile adhesive and once that had gone off, they were grouted.
The floor was left to set fully overnight and then the next day I was able to return and clean the whole floor using a strong dilution of Tile Doctor Remove and Go. As usual this was left to soak into the tiles for a good ten minutes before being scrubbed into the tiles using a black scrubbing pad. The Tile Doctor Remove and Go did a good job of cleaning the floor and the cleaning solution soon turned black with dirt during the scrubbing. The floor was rinsed with water and the soil extracted with a wet vacuum. After inspecting the floor any areas that needed further work were hand scrubbed and rinsed again until I was happy the floor was clean.
The last part of the cleaning process was to give the tiles an acid wash using Tile Doctor Acid Gel which further cleans the floor by removing old cement residue and grout haze. It also neutralises efflorescent salts in the tiles which are a common issue with floors of this age with no damp proof membrane. After another rinse and extraction, the floor was given a final rinse and then dried as much as possible using the wet vacuum.
I left the floor to dry out for a couple of days before returning to apply a protective sealer. Tile and Stone should be dry before sealing so I use a damp meter first to double check. All was well so to seal the tiles I proceeded to apply the first of what would be three coats of sealer. I used Tile Doctor Colour Grow for this, it works by impregnating the tile occupying the pores and thereby preventing dirt from becoming ingrained there. This product also enhances the black and white colour of the tiles and makes the floor much easier to clean.
Once done the floor was transformed and needless to say my customer was very pleased with the result. For the aftercare of Victorian Tiled floors, I recommend the use of a ph neural tile cleaner such as Tile Doctor Neutral Cleaner; most supermarket tile cleaners are simply too strong for use on sealed floors and can strip off the sealer prematurely.
Andrew Newstead
North London Tile Doctor
 Tile Doctor Ltd
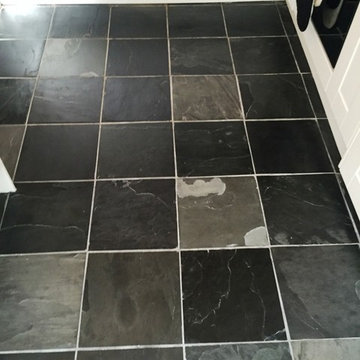
These Slate kitchen floor tiles at a property in Oxford were in good physical condition, but had become dull over time due to heavy usage, and upon close inspection the grout was stained. The customer contacted me as she was keen to get the tiles back to looking their best. This would require a thorough clean and the application of a fresh sealer.
While Slate floor tiles are reputed to be hard wearing and damage resistant – and are therefore a popular choice for high traffic areas like kitchens – this does not exclude them from needing regular maintenance.
To begin, I mixed a strong solution of Tile Doctor Pro Clean and water. Pro-Clean is a versatile cleaner that when used in a weak dilution can be used as a regular cleaner for most types of natural stone floor, including more sensitive stones such as Limestone and Marble.
The cleaning was then spread across the surface area of the floor, and left it to dwell for ten minutes to allow the solution to seep into the pores of the stone and lift the ingrained dirt to the surface. Pro-Clean in a strong dilution also functions as a stripping product, meaning it works to strip away any old and ineffectual sealer.
I then scrubbed the solution into the floor using a stiff scrubbing brush, paying particular attention to the grout in order to break down the visible staining. The tiles and grout lines came up really well during the cleaning process – this became clear once I had rinsed the floor and removed the residue using a wet vacuum.
With the customer eager to have the job completed quickly, I installed portable room dryers and utilised a heat gun to dry the floor, allowing me to seal it on the same day.
Once I had ensured the floor was completely dry, I commenced the sealing process by firstly applying a coat of Tile Doctor Stone Oil, a product which is designed to bring out all of the natural dark shades in the Slate.
When this was dry, I applied a single coat of Tile Doctor Colour Grow. This is an impregnating sealer, meaning that it soaks into pores of the stone to provide durable protection from within against ingrained dirt and stains. Colour Grow also enhances the natural colours in the stone even further.
The customer was amazed by just how big a difference could be made to the tiles in the space of just a day. Although the tiles were generally in very good nick, my main task was to be liven them up – judging by the before and after photos, I think this was achieved. And, now that they have been treated to a fresh seal, the tiles will be prevented from quickly becoming dull again.
Barry Woodward
Oxfordshire Tile Doctor
 Tile Doctor Ltd
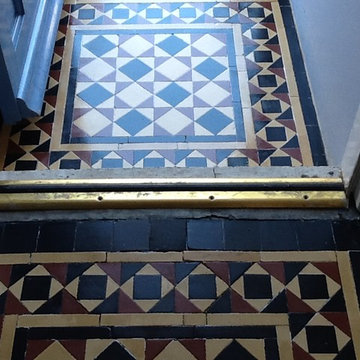
We received a request to renovate Victorian tiled hallway floor at a house in the London borough of Harlesden NW10. My client had modernised the heating system and this unfortunately required a section of the tiled flooring to be dug up so new pipework could be laid.
After speaking on the phone, I arranged an initial visit to the property so I could properly assess the work required and provide a price for restoring the floor. During my visit I could see there was another section of missing tiles at one of the door thresholds which would need attention. Except for the missing sections of floor I could see that the tiles themselves were in good condition for their age and would respond well to a deep clean and fresh seal.
I was confident on being able to source matching replacements for the missing tiles and reassured my client that we would be able not only repair the floor but also renovate it to a good standard. I gave them a price to do the restoration which they were happy to accept, and the work was booked.
After some research I managed to source replacement tiles from the Vintage Floor Tile Company in Kent; Victorian tiles are still popular so there a few companies that keep stock so we can usually find a match.
With the replacements in hand, work started by removing the cement and loose material from the missing sections of flooring and backfilling with self-levelling compound to bring the exposed base up to the right level for tiling.
The tiles were then cut to shape as required to match the existing patten and fixed into place with a quick setting adhesive and then grouted.
The floor was left to overnight to allow the adhesive to harden fully, and I returned the next day to deep clean the whole floor. To give the tiles are deep clean a strong dilution of Tile Doctor Remove and Go was sprayed onto the floor and left to soak in for ten minutes. It was then scrubbed into the floor using a rotary machine fitted with a with a black pad. This action lifted the dirt out of the tiles and the resulting slurry was removed with the wet vacuum.
It turned out that the pores of the tiles were holding a lot of dirt, so the process was repeated until I was satisfied. Due to the age of the property, there was no damp-proof membrane installed so I do try to minimise the amount of water I use in this process as there is always a chance of exacerbating any latent efflorescence issues.
Efflorescence occurs where moisture rises through the tile bringing with it salts from underneath the floor as it evaporates on the surface. This can lead to unsightly white marks appearing on the tile. To counteract this potential problem the cleaning was followed by an acid wash using Tile Doctor Acid Gel applied with a 100 then 200-grit pad, before finishing on a 400-grit burnishing pad. The floor was again rinsed with water after the application of each pad to remove the slurry and extracted with a wet vacuum.
Once I was satisfied the floor was as clean as possible, we left site and the area was left to dry over the weekend ready for application of a new sealer.
I returned on the Monday and started by taking a few moisture readings to check the floor was dry. The floor was in an acceptable range, so I applied the first of 4 coats of sealer. For this floor I chose Tile Doctor Seal and Go Extra which is specially formulated product that provides stain resistance with a hard wearing low-sheen finish.
This product is also breathable which is an important feature for old floors, anything that blocks moisture from rising through the tile will cause it to become trapped underneath where it will pool and eventually reach out to the walls and result in rising damp.
Once complete the floor looked brand new and I’m pleased to say with the deep clean and a fresh sealer applied it was impossible to tell the difference between the original and repaired sections of flooring.
For the aftercare of sealed Victorian tiled floors, I recommend Tile Doctor Neutral Cleaner, it’s a mild day to day cleaner with a neutral pH that won’t damage the sealer. Many of the tile cleaning products you find in supermarkets are simply too strong.
Andrew Newstead
North London Tile Doctor
Find the right local pro for your project
 Tile Doctor Ltd
My client had recently moved into a bungalow in Godalming where they inherited the Limestone tiled kitchen floor pictured below. The previous owner had not looked after the floor very well and by the time they moved in it was pretty filthy. Limestone is a natural but porous stone where, unless sealed, attracts dirt into its tiny holes and as you would expect Cream Limestone shows the dirt easily. The protective seal had long since worn off this floor and was now ingrained with dirt it was now looking permanently dirty.
Before quoting I conducted a small test clean to work out the best method to renovate the stone and this also gives the client a good idea of how the floor will look after its finished. They were delighted with the initial result and happy with my quote gave me the go ahead.
On arrival first I helped the customer remove his tables and chairs and I then set about tapping up the plinths in the kitchen and the skirtings to protect them from cleaning solutions and equipment. The cleaning equipment I have invested in works more efficiently in open spaces, so it’s worth spending time at the beginning preparing the area first.
Next, I used a deck brush to apply a mixture of water and Tile Doctor Pro-Clean to the dirtiest tiles. Tile Doctor Pro-Clean works well when left to dwell for ten minutes or so. I also applied the same product to the grout over half the room so it could get a head start breaking down the dirt. Then using a stiff brush, I scrubbed the grout clean. Once it was worked loose, I extracted the now dirty solution with a wet vacuum.
With the grout clean I turned my attention back to the tiles with where the Pro-Clean had been left to soak in. Giving them a quick brush, I noted that what appeared to be permanently ingrained dirt had now come loose. To get the tiles really clean I used a 17″ rotary machine fitted with diamond encrusted buffer pads. This removes the tiny dots of dirt on the stone and with it comes any existing sealer and dirt.
A set of four burnishing pads were used, starting with a 400-grit, and finishing with a 3000-grit pad. The first 400-grit pad is coarse, and the grits become smoother as you work through the set. Water is used to lubricate the process and the released dirt is extracted in-between using the wet vacuum mentioned earlier. This process does take time but by the end of day one the floor was looking a lot better.
The next step is sealing however the floor needs to be bone dry for that, so I left a couple of industrial fans in place and left the Limestone to dry off overnight.
Returning the following day my first job was to ensure the floor was dry by taking multiple moisture readings with a damp meter. The readings were good, so I was able to make a start applying the sealer which for this floor was Tile Doctor Ultra Seal.
Ultra-Seal is an impregnating sealer that soaks into those small holes in the stone I mentioned earlier, I occupies the pores thus preventing dirt from becoming ingrained. The other feature of this sealer is it doesn’t change the appearance or colour of the stone leaving it with a very natural finish. Two coats of sealer were applied, leaving the seal to dry between each coat.
After the final coat was dried, I gave it a final polish with a soft nylon pad and the floor was finished. Before leaving we discussed after care which for this floor, I recommended Tile Doctor Stone Soap and I requested that the customer to stay out of the kitchen for a couple of hours while the sealer cured. They were over the moon with the new floor and could not believe the difference it had made to their kitchen.
Rupert Mcleod
West Surrey Tile Doctor
 Tile Doctor Ltd
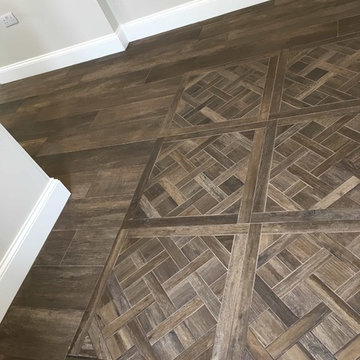
Grout haze or grout smears as it is often called can be a huge problem when laying tiles. Grout haze is basically grout that has been left to dry on the surface of the tile after installation. It’s a common problem which is exacerbated by the use of quick drying products. Take for example this interesting Wood Effect Ceramic Tile installation at a house in Guildford following installation by a builder.
I was a bit slow in following up on the initial enquiry as we had been very busy so by the time, I got in touch I was told they had employed someone else to carry out the work. I apologised for my late response and said to call me if he needed help in the future. Three days later I got a call so we arranged a visit so that I could carry out a test and quote a price.
As it turns out the builder had returned and failed to remove the grout haze and so had a rival firm that seemed more interested in selling unnecessary sealer than fixing the problem. I was astonished to see what a state the builder had left his floor. Grout was all over the floor with footprints walked across thresholds and more. I could understand it if there was some grout was missed after installation but not to this level!
I carried out a successful test and confirmed to the customer that there was absolutely no need to rip and replace his £2k floor. We agreed a date to resolve the problem and to say he was relieved was an understatement!
The builders had used Mapei grout which contains polymers. Polymers offer better flexibility and adhesion, however in order to remove the grout haze we would first need to break down the polymers in the grout first and this is why the rival firm failed.
With that in mind, my first action was to apply Tile Doctor Remove and Go to the floor and leave it to dwell for five to ten minutes. I then worked it into the tile using a scrubbing pad fitted to a rotary machine.
After washing the soil away with warm water and extracting with a wet vacuum I applied Tile Doctor Grout Clean-up to treat the grout. Grout Clean-up is an acid-based product that breaks down the grout so it can be rinsed away and extracted as before. Afterwards I rinsed the floor with warm water and extracted again to remove any trace of product and neutralise the floor. After removing as much moisture as possible with the wet vacuum I speed dried the tiles with a blower.
Ceramic tiles won’t accept a sealer so once the floor had dried the job was finished and it took less than a day.
The customer was over the moon with the difference. While his floor was in such a state, he has been unable to bring in new furniture as the serious possibility of removing the tiles was hanging over him.
Relieved that the problem was now resolved he kindly left the following review:
“I had a floor that had just been laid with very heavy grout haze. I had already had advice from two other professional floor cleaners who had advised me that the floor was irreparable and would need to be pulled up. As soon as I spoke with Rupert, it was clear he was extremely knowledgeable. He asked questions none of the other companies had. By understanding the specific nature of the problem, he was able to solve it by first removing the grout polymers and then applying an acid wash. The floor came up brilliantly. Rupert was the only person I spoke to that could fix this, everyone else told me I needed to replace my floor! Superbly knowledgeable, professional and did an excellent job. Don’t bother speaking to anyone else, just call Rupert! “
Rupert Mcleod
West Surrey Tile Doctor
 Tile Doctor Ltd
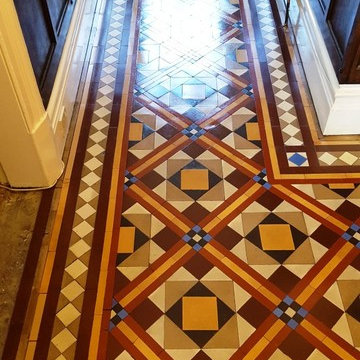
When you discover an old Victorian tiled floor underneath carpet, the first question that will probably pop into your mind is: can it be restored?
The answer, in the majority of cases, is yes. In fact, Tile Doctor has completed hundreds of Victorian tiled floor restorations. Victorian tiles have a timeless quality about them and are still popular for residential use even in the twenty first century.
What you can usually expect upon lifting your carpet is for the tiles to be covered in carpet adhesives and grippers, as was the case with this particular example of a Victorian Tiles hallway floor at a property in Bedford. Sometimes you might also find paint splashes or other staining left over from decoration work. And, of course, the tiles will be dirty and in much need of a deep clean. These issues spoil the original appearance of the tiles, but with the right methods and products, a complete restoration can be achieved quickly and cost-effectively.
My first task upon arriving at the proper was to carry out a site survey to address the condition of the tiles, before running a quick test clean on a small area of the floor. The result was good and so I was confident that I could achieve a high-quality restoration for the client.
A quote was issued and accepted, and the work was booked in at a date that was convenient for the customer.
Returning to the property, my first course of action was to mix a strong dilution of Tile Doctor Pro Clean, which is a powerful alkaline cleaner safe to use on natural stone, with hot water. This cleaning solution was sprayed along all edges of the floor loosen the glue securing the carpet grippers. I then successfully removed the adhesive carefully using handheld tools to avoid damaging any tiles.
Once this was done, I applied Tile Doctor Remove and Go, scrubbing it into the tiles with a rotary machine. This product is designed to remove heavy soiling, paint splashes and old waxes and sealers. The soiled solution was then extracted using a wet vacuum and stubborn areas re-treated until I was satisfied the floor was clean.
The entire floor was then given a thorough rinse with water to remove any trace of cleaning products and extracted using a wet vax machine.
The floor was allowed to dry for several days before I was able to return to seal the tiles. It’s always important to leave significant time for the floor to dry because any moisture left over can impact the performance of the sealer.
The choice of sealer was Tile Doctor Seal and Go Extra, which provides robust protection against dirt and stains, with a light sheen finish. I chose this sealer not only because the customer wanted a light sheen finish, but also because this particular sealer is fully breathable. Dampness can sometimes be an issue with old Victorian and Quarry tiles which were installed before damp proof membranes became standard.
The transformation achieved within the space of a week was quite incredible and the colours in the tile have really come through.
Another satisfied customer!
David Vissian
Bedfordshire Tile Doctor
 Tile Doctor Ltd
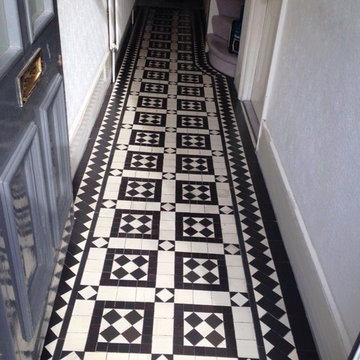
The colourful and diverse geometric patterns of a Victorian tiled floor can give a property a regal, elegant and timeless feel, making it a popular choice even in the 21st century. However, as time passes without regular care and maintenance, Victorian tiles can quickly lose their colour and appear deadened by the buildup of dirt and dust over several months (and sometimes years).
This property owner in Hebden a very small village in North Yorkshire of less than 300 people, had this common problem. Her Victorian tiled hallway had not been adequately maintained and was now more difficult to keep clean than ever. To add to the problem, most of the tiles along the edges were either broken, cracked, or filled with holes, probably I suspect from the installation of carpet grippers at some point in the past.
At this point, the property owner turned to Tile Doctor to see what could be done.
Before beginning a deep clean of the entire length of the hallway, it was first necessary to source and install replacement tiles for those that had been broken and damaged. I also relaid any that were loose.
When finished, I left the tiles to set and returned the next day to start the clean. My choice of cleaner in this situation was Tile Doctor Pro Clean, which was scrubbed into the floor with a special pad fitted to a rotary machine to break down ingrained dirt and stains. Pro Clean does this very effectively on all types of tile, including natural stone and of course Victorian tiles.
The floor was then rinsed with water and the soiled cleaning solution extracted from the floor using a vet vacuum. Stubborn areas were re-treated with more Pro Clean, and when I was satisfied with the condition of the tiles the floor was given a final but thorough rinse to remove any trace of cleaning product.
The floor was then left to dry completely overnight to ensure all excess moisture had disappeared, leaving it fresh to be sealed. I returned in the morning for a third day of work to seal the Victorian tiles with four coats of Tile Doctor Seal and Go, a topical sealer which provides a rich satin finish to really add depth to the colours in the tile while protecting it against dirt and stains.
The customer was delighted with the restoration and couldn’t quite believe the huge improvement in the appearance of the tiles, especially in regards to the enhancement in the different colours. Another satisfied customer!
Nigel Stoker
North West Yorkshire Tile Doctor
 Tile Doctor Ltd
The photographs below are from a Victorian tiled hallway floor at a property in Stoke Newington in London. The floor was in need of repair with a large area very uneven and partly sunk in the middle of the pattern. The repairs were made using as many existing tiles as possible.
The first task was to set about cleaning the tiles using Tile Doctor Pro-Clean and Remove & Go on the stubborn areas. Both products were applied in the same way using black scrubbing pads to work the products into the tile to release the dirt. Hand brushes were used to clean up the grout lines and the floor was rinsed and soil removed using a wet vacuum.
At this point the large loose area of tiles were removed to be cleaned of grout/adhesive for use later and the sunken area that was revealed was levelled in line with the rest of the floor base. Once the new cement base had set and the tiles useable again they were re-laid and set in position to fit the matching pattern of the remaining floor.
Once the tile adhesive had set the last thing to do was to re-grout the repaired area making the hallway whole again and left to go off.
When we returned the whole floor was ready to be sealed and for this we used five coats of Tile Doctor Seal and Go which adds a nice shine to the floor as well as providing a surface seal that will help protect the tiles from stains going forward.
A lot of effort went into the restoration but what a transformation and well worth the work, certainly the customer was pleased and left the following testimonial.
Rob Voyce responded very quickly to my request for a quote, and was able to complete the work to a very good standard in the agreed time. The work caused minimum disruption to the household and everything was left clean and tidy at the end of each day. I would certainly recommend the services of the Tile Doctor and I am very happy with the work that has been done on old tiles in my Victorian hallway.
Nigel Voyce
North London Tile Doctor
 Tile Doctor Ltd
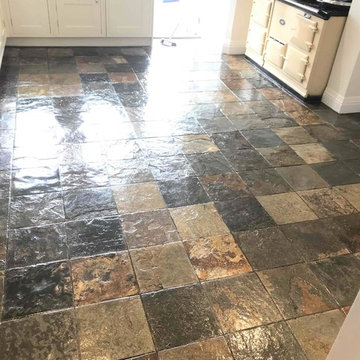
I recently completed the renovation of a Multi-Coloured Slate tiled kitchen floor in Sutton Coldfield. I was actually at the property before Christmas to survey the floor and quote for the work however the owners had planned to have a new kitchen installed in the new year, so we decided it was best for me to wait until after the installation to complete the work.
The slate was in good condition but like any stone floor you do need to maintain the sealer to prevent dirt becoming ingrained in the stone. Sealer do wear off overtime especially in the high foot traffic areas such as Kitchens and within a few years the tiles become dull and difficult to clean effectively.
The kitchen was installed on schedule and I got the call to arrange a visit to deep clean and reseal the floor which would take to two days, one to clean and one to seal.
To begin the restoration, I soaked the slate in a strong dilution of Tile Doctor Pro-Clean and left it to soak in for about ten minutes re-applying extra solution where it dried. Pro-Clean is a powerful tile cleaner that will strip old sealers when applied in concentrated form. I agitated the product using a black pad fitted to a rotary buffing machine. I paid particular attention to the grout which the customer had trouble keeping clean. The rotary pad struggles to reach into the recesses of the grout lines so I also made sure to scrub the solution into the grout with a grout brush.
Once I was satisfied that the Slate and the Grout was clean and clear of old sealers, I gave the whole floor a thorough rinse with water using a wet vacuum to extract the soil and get the floor as dry as possible. The floor was then left to dry off fully overnight.
Returning to the property the next day, I ran some quick damp tests to check for any excess moisture that might have prevented me from sealing the floor. We will always do this as excess moisture can affect the sealer curing.
The customer was very happy with the clean and the floor was dry, so we discussed sealer options to find out their preference for Matt or Satin finish. With the decision made to go with a Satin finish I began the application of the Tile Doctor Seal and Go which enhances the look of the stone with an aesthetically pleasing low-sheen finish, as well as providing on-going protection against ingrained dirt and staining.
A total of four coats of Seal and Go were needed to seal the Slate tiles and as you can see from the photos the sealer really put the life back into the floor.
Trevor Preece
Staffordshire Tile Doctor
 Tile Doctor Ltd
This detailed Victorian tiled hallway at a property in Camden was overdue some much-needed repair and maintenance. The owners of the property appreciated that original period features like this add a lot of value to a property and asked me to visit the property to quote for renovating it. The property was in a terrace of similar properties most of which appeared to have retained their Victorian character.
I inspected the floor and found there were a couple of loose, cracked, worn and broken tiles that needed to be replaced. In addition, the floor tiles needed a deep clean and then seal to bring back the wow factor. I was confident we could renovate the floor but at that point unsure if we would be able to find exact match replacements for the damaged tiles. Fortunately, Victorian tiles are still in demand and I knew of several companies I could check with so I was confident they could be found.
We discussed how long the work would take and assuming I could source the replacements agreed a price for the full restoration of the floor. After doing some research I managed to find suitable replacements with a company called Original Style and the work was scheduled for the following month.
Firstly, we prepared all areas with protective tapes to threshold edges and skirting.
This was followed by spaying the tiles with a strong dilution of Tile Doctor Remove & Go which is product designed to remove old sealers and coatings. After about ten minutes the tiles were scrubbed with black scrubbing pads and scrubbing brushes. Fresh water was used to rinse the floor and the slurry was extracted using a wet vacuum.
The floor was inspected and then a second clean carried out, this time using Tile Doctor Pro-Clean which is a Tile and Grout cleaning agent. The same process of application was used and after rinsing and extracting the dirt the tiles were given a steam clean. This ensured all the dirt was lifted out of the pores of the tile and the floor was now as clean as it possible could be.
The next step was the remove the loose and cracked tiles using the reclaimed tiles we had sourced earlier. Some cuts were necessary to get the replacements to match the originals but overall the plan worked. A quick drying adhesive was used to secure the tiles so we could apply the grout shortly after. The whole floor was then re-grouted and cleaned off to ensure a good match. The floor was left to dry off overnight, and you could already see it was now looking considerably improved.
Returning the next morning we checked the floor was dry using a moisture meter, this is important as to apply a sealer to damp tiles will lead to a patchy experience. All was well so we were ready to apply the sealer.
To start a single base coat of Tile Doctor Colour Grow sealer was applied to the floor and left to dry. This sealer is an impregnator that protects from within by occupying the pores in the clay tile improving colour in the process. This sealer does leave a matt finish however and the client wanted a subtle shine so one dry it was followed by four coats of Tile Doctor Seal & Go. The combination of the two sealers works really well to add long lasting protection to the tiles and provide the desired finish to the floor.
The floor was much improved, and the client was delighted. The detailed pattern and colours were now much more prominent, and the hallway looked much more inviting for both the owner and their guests. For the aftercare of Victorian tiles, I recommended the use of Tile Doctor Neutral Cleaner which is pH neutral and won’t prematurely erode the life of the sealer.
Nigel Voyce
North London Tile Doctor
 Chervin Kitchen & Bath Inc.
Cleaning is a breeze with the under-cabinet kitchen floor vacuum. Sweep up crumbs quickly and effortlessly.
Minimalist home design photo in Toronto
Minimalist home design photo in Toronto
 Tile Doctor Ltd
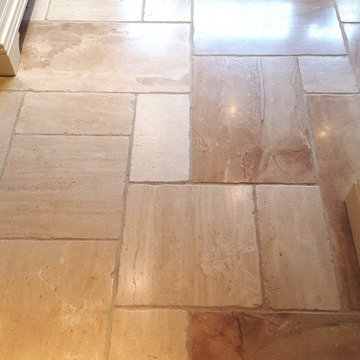
I was recently at a property in the North Yorkshire town of Harrogate, undertaking what I initially thought would be the cleaning and polishing of a Cream Limestone tiled kitchen. However, as I began the cleaning process I quickly discovered that under the dirty grout lines someone had taken a lot of effort to paint with a small brush directly onto the grout using varnish!
In a normal situation, I would have covered the whole floor with Tile Doctor Remove & Go to solve the problem, however compared to, say, adhesive or paint staining, varnish is very difficult to remove. So instead I opted for the long, yet necessary process of cleaning the grout manually with several thin wire brushes. Over the course of two days I managed to remove approximately 90% of the stubborn varnish – and could finally move onto cleaning and polishing the Limestone as originally planned.
The polish had been lost from the Limestone kitchen tiles over time, so I set about restoring it using a type of polishing known as burnishing. This involves the application of diamond encrusted pads of varying grit to the floor to gradually buff the stone and achieve an aesthetic and durable shine. Burnishing is most commonly used on high-end stone such as Marble, Travertine and, of course, Limestone.
At Tile Doctor, our burnishing system comprises four burnishing pads, ranging from a Coarse grit to a Very Fine grit. After applying the first three pads (Coarse, Medium and Fine), I gave the tiles a further clean with Tile a Doctor Pro Clean, which is our alkaline cleaner, to remove any residue from the burnishing process. I then rinsed the floor with clean water and soaked up the residue with a wet vacuum, before leaving it to dry.
The floor was then polished to a satin finish using the fourth and final Extra Fine burnishing pad. I sealed it using a couple of coats of Tile Doctor Ultra-Seal, an impregnating sealer designed to provide maximum protection against dirt and stains.
The combination of burnishing and sealing always makes a huge difference to Limestone tiles. Here, the finished result was almost like a new floor! The customer was both amazed and very pleased with the transformation.
Nigel Stoker
North West Yorkshire Tile Doctor
 TruDeal Stores Stores Limited
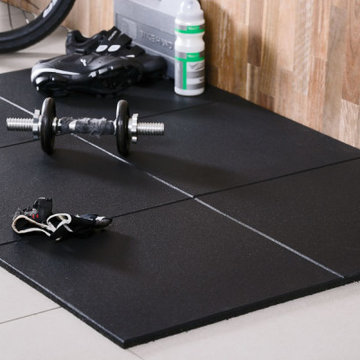
Transform your workout space with high-performance rubber gym flooring mats, designed to provide unmatched durability, shock absorption, and comfort. Ideal for home gyms, fitness studios, commercial gyms, and recreational facilities.
Key Features:
✅ Impact-Resistant & Shock Absorbing – Protect your floors and joints with thick, resilient rubber designed to handle intense workouts and heavy equipment.
✅ Non-Slip Surface – Stay safe with superior grip and traction, even during high-intensity training.
✅ Noise & Vibration Reduction – Reduce workout noise and vibrations for a quieter, more focused gym experience.
✅ Easy Installation & Maintenance – Interlocking tiles or straight-edge mats make setup quick and effortless. Cleaning is as easy as sweep, mop, or vacuum.
✅ Eco-Friendly & Odor-Free – Made from high-quality recycled rubber, safe for indoor use without unpleasant smells.
Available in various thicknesses and surface textures to suit your specific training needs—whether it's weightlifting, cardio, CrossFit, or yoga.
? Contact us today to explore options and pricing.
? Available for delivery and pickup in Nairobi & beyond.
? Upgrade your gym flooring with a professional, long-lasting solution that supports your fitness journey from the ground up.
 Tile Doctor Ltd
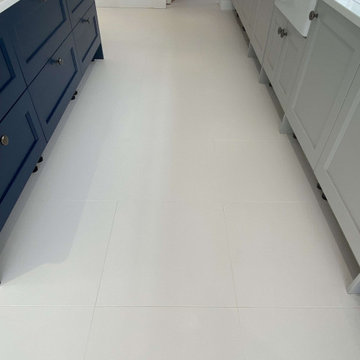
I was called out to clean a Porcelain tiled floor at a newly built property in Winwick near Huntingdon. The tiles were heavily marked with grout and dirt and were impossible to get clean. To make things worse the tiles were pale, almost white, in colour which made the staining more obvious. It was clear to me that the builder had not managed to polish off all the grout after tiling and this had now set hard on the surface.
This is a very common problem known as Grout Haze and fortunately there is a solution, in that it can be removed by giving the tiles a rinse with an acidic tile cleaner called Tile Doctor Grout Clean-up. To prove the point, I carried out a quick demonstration so the new owners could appreciate the difference.
I always like to test porcelain tiles for a reaction to acid prior to commencing work as acidic cleaners can have a negative effect on some types of polished porcelain however this one had a textured feel to it so there was no issue.
The test went well so having got the go head I began by first cleaning the tiles with a medium dilution of Tile Doctor Pro-Clean, this was left for about ten minutes before being worked into the tile with a black scrubbing pad fitted to a rotary machine. I also used a stiff brush along the grout lines to make sure the grout was as clean as the tile.
This process generates a lot of soiling which was then extracted using a truck mount machine. By Truck Mount I’m referring to a powerful cleaning machine that’s fitted into my van, it blasts the floor with hot water and then immediately extracts it using an equally powerful vacuum to grey tank in the vehicle, it’s incredibly effective and leaves very little water on the floor afterwards.
The next step was to tackle the grout haze and this is done as before by Acid Washing the floor using a dilution of Tile Doctor Grout Clean-up and scrubbing into the tile as before. Again, the resultant soils were extracted as before using the truck mount.
The floor was then speed dried using Dripods which are small horizontal fans designed to blow air downwards and ideal for drying carpets and hard floors. Once dry, a coat of Tile Doctor Ultra-Seal was applied, left to dry and any excess buffed away with a White pad.
The work was completed in one day and completely transformed the floor much to the delight of my customer who left the following message in a subsequent email:
“Thank you very much indeed, we are delighted with the floor.”
I’m pleased to say I have since returned to the neighbourhood and completed another identical grout removal job at a neighbour’s property who had the same issue with builder.
Tom Conlon
Cambridge Tile Doctor
 Tile Doctor Ltd
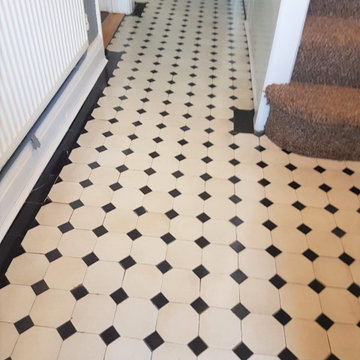
This enquiry from Neath came from an elderly gentleman who was moving into a care home in the near future and wanted his Victorian tiled hallway renovated before the property went on the market. He mentioned he didn’t think it was that dirty however it could do with a clean and reseal.
We arranged to call in one morning and take a look at the tiles and whilst there we completed a test clean so we could provide an accurate price for renovating the floor. For the clean I applied Tile Doctor Pro-Clean, the purpose of this was to see whether and how fast the dirt would shift and also to get an idea of the condition of the floor beneath the layer of dirt.
The test clean went well and the owner was happy to accept our price and suggested that as we had already made a start we might as well continue. Fortunately, there were two of us that day and I only had a couple of other quotes in the area, so I was able to crack on. I should mention this work was done at the beginning of 2020 before the COVID-19 lockdown.
All sorts of detritus gets walked into hallways so we began by using a hand held scraper to take off any anything that sat upon/above the floors surface. This also makes the cleaning process that little bit easier for us. The earlier test clean had enabled us to establish which cleaning methods and products would work best on the floor so it was just a question of putting the plan into action.
The process involved applying a strong dilution of Tile Doctor Pro-Clean to the floor, leaving it to soak in for ten minutes and then working it with a coarse 400-grit diamond pad fitted to a rotary buffer. More water was applied for lubrication where required and the soil produced afterwards was rinsed off and extracted with a wet vacuum. The pad is encrusted with industrial diamonds and cuts into the tile and removes a very thin layer leaving the tile very clean.
After extracting the soil, the floor was inspected, and we noticed that there were a few tiles throughout the floor that needed more work. To deal with these we used hand-held diamond blocks of varying grits to remove the ingrained dirt and bring the tiles back to life.
The client was over the moon with the results of the cleaning and we scheduled a date of the following week to come back and seal the tiles. We also discussed sealers and he had asked if we could leave the floor with a shiny finish. With that in mind we recommended Tile Doctors Seal and Go which works really well on Victorian tiles. It is also water based and so doesn’t produce a smell as it dries.
On our return the floor was given a quick wipe down and once dry sealed with four coats of Tile Doctor Seal and Go which will add protection and make them easy to keep clean.
Once complete the floor looked great and very welcoming, just what you need when selling a property as initial impressions always count.
Adrian Iacono
Swansea Tile Doctor
 Tile Doctor Ltd
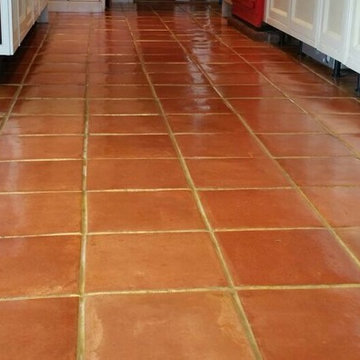
Here’s an interesting job I completed recently in the town of Lymington which is a lovely costal town within the New Forest and on the west side of the Solent. This Terracotta tiled floor was installed in the kitchen and was suffering from an efflorescence issue due to an ongoing leak which resulted in the salts in the water becoming deposited on the surface of the tiles as the water evaporated leaving a white bloom on the surface.
This process is more commonly known as efflorescence and is particularly common in old properties which have no damp proof membrane under the floor and white staining by the cupboards is especially visible in the below photograph.
My client was eager to have the problem fixed, and so enlisted Tile Doctor to get the job done.
To remove the efflorescence, the Terracotta tiled floor was acid washed using a mild dilution of Tile Doctor Grout Clean-Up which is primarily sold to remove grout smears but is equally effective at removing mineral deposits such as the white salts left behind by efflorescence.
The solution was scrubbed into the tiles using a stiff scrubbing brush and was successful at removing the white staining. Naturally it’s not advised to leave acid too long on any surface so the floor was treated in sections and then rinsed off with water and the residue removed using a wet-vacuum.
Following this, the floor was power-scrubbed in combination with a diluted solution of Tile Doctor Pro-Clean. Pro-Clean is a versatile cleaner that also contains stripping properties, allowing it to break down and remove old sealers, it also does a nice job getting the grout clean.
With the efflorescence treated and the floor now clean I was now happy with the condition of the tiles and give them a final rinse under pressure to ensure the floor was neutralised and any trace of products removed.
The Terracotta tiled floor was then left to dry overnight and I came back to seal the floor the next day. To seal the tiles I used three coats of Tile Doctor Seal & Go Extra, which provides a robust surface seal, and is recommended for internal floors with the damp issues.
Hopefully this quick report has offered some useful advice on how to treat efflorescence which is quite a common problem; naturally if you have further questions Tile Doctor does offer a free advice service so do get in touch.
Charles Okwechime
Hampshire Tile Doctor
 Tile Doctor Ltd
Yorkstone is a variety of Sandstone unique to Yorkshire, and is known for its hard wearing and durable qualities. It was first manufactured during medieval times, but is still used for a range of building and construction purposes including, of course, tiled floors in houses. Yorkstone comes in a variety of natural colours, depending on the mineral makeup of the stone, and means that the tiled floors often have a unique look to them.
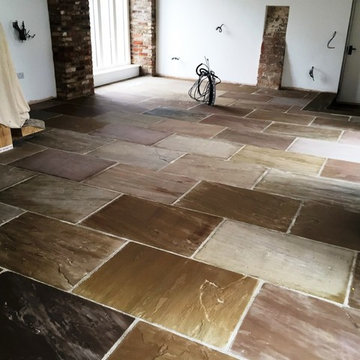
This customer, living in the small Yorkshire town of Driffield is the lucky owner of a fantastic new Yorkstone tiled living room floor. Unfortunately, the floor had been installed by an independent builder, as opposed to a professional tiling company, and had been left with no sealer to ensure it would stay looking great for a long time to come. Over time, the lack of a sealer has allowed the dirt to become ingrained in the stone, making it increasingly difficult for the customer to keep the tiles clean. I was called in to bring completion to what was an unfinished job!
As you can see from the photographs, the entire floor was quite dusty and dull looking following the recent installation. To get the tiles clean, I mixed a strong 60-40 mix of Tile Doctor Pro Clean and clean water. Pro Clean is a reliable alkaline cleaner suitable for use on most natural stone floors, including Sandstone, Quarry, and Slate.
The cleaning solution was applied to the floor and left to dwell for 20 minutes, allowing it time to penetrate the stone. Then, using my 17” rotary machine fitted with a black scrubbing pad, I proceeded to deep clean the tiles, leaving them looking immediately cleaner and more vibrant. Any resulting cleaning residue was promptly soaked up using a wet vacuum.
The process was repeated in the more stubborn areas, and I gave the floor a final rinse with water and left it to dry. Typically, we would leave a 12 to 24 hour drying period, depending on whether there is a damp proof membrane installed. However, this floor had underfloor heating and so dried really quickly, allowing me to seal it on the same day.
The customer wished to have a matt, natural finish for the Yorkstone tiled living room, so I applied two coats of Tile Doctor Colour Grow, our impregnating sealer which offers a natural, no-sheen look for textured floors, while providing durable protection against ingrained dirt and stains.
As the name of the product suggests, Colour Grow contains colour intensifying properties which really helped to accentuate the rich variety of colours in the customer’s Yorkstone tiles. The results were fantastic and you can see from the water test we performed after the sealer dried how water now bubbles up on the surface of the stone.
Ronnie Phipps
East Yorkshire Tile Doctor
 Tile Doctor Ltd
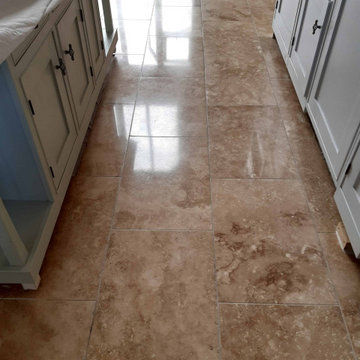
Located in Burgh Castle West of Great Yarmouth, this Travertine stone floor was a classic example of an incomplete installation. By incomplete I mean the tiler had done a fine job of laying and grouting the tiles but had left it at that and not sealed the stone. Natural stone like Travertine is porous and needs a sealer to stop dirt becoming ingrained in its pores, a sealer will also improve its appearance.
Without a sealer this floor now looked very dull, pale, rather damaged with pitting and heavily soiled with ingrained dirt. Pitting in stone like this is a natural feature of Travertine however it can be exacerbated with the use of acid cleaning products. This was a floor in urgent need of a face lift, and I was confident it could be transformed into a very beautiful floor.
I think it is true to say that most tilers will skilfully lay a floor for you but usually don’t have the knowledge, experience or equipment to finish the surface properly and when it comes to sealing many will recommend a product and suggest you take care of it yourself. Naturally if your find yourself in that position don’t insist the tiler does it, better to give us a call and have it done properly.
Our first job was to backfill the larger pits in the stone which as I mentioned are a natural feature of travertine material, but they can trap dirt and so its best if they are plugged with a suitably rigid filler. Also, if left alone the larger holes can quickly become larger as their edges crumble and break up leading to the entire tile becoming unstable. Replacing a tile in a floor like this is possible however its an extremely awkward job to do and it can be difficult to find an exact match for replacement.
Filling was done using a two-part, neutral cream-coloured polyester compound which gels in about fifteen minutes after addition of the catalyst. After this initial period, the excess product is trimmed off level with the surface of the tile before it sets harder than the stone itself in around sixty minutes. The fully cured compound can then be cut and machined as though it were part of the stone structure.
Our second job was to remove deep scratches caused by the unprotected feet of workmen’s ladders. This was done using Tile Doctor 50-grit and 100-grit diamond hand burnishing pads with a little water as a cutting medium. Shallower scratching present across the rest of the floor was removed using a Tile Doctor 200-grit soft milling pad driven by our Klindex 17″ rotary machine.
This abrasive action produces a fine slurry which was then rinsed with water and extracted using our 400psi Ninja machine in preparation for the next stage of the refinishing process. These machines were an expensive investment for our business however they are very robust and effective producing a good result that saves time.
Next task was to restore the polished appearance of the Travertine which was done using the application of a set of Tile Doctor burnishing pads. The process starts by applying a coarse 400-grit diamond pad, again fitted to the Klindex rotary machine. This cleans the tile and improves the matt finish left by the milling pad; again, the slurry was rinse-extracted before moving on to the next pad in the set. Next came the finer diamond polishing stages of 800 grit and 1500 grit, slurry being removed as before between the grades. By this time, all the scratches had been removed and the Travertine floor had visually pleasing even sheen across the whole surface. The last pad in the set is applied dry with a little water sprayed onto the tile so we left the area to dry out thoroughly overnight with the assistance of our large capacity dehumidifier.
Returning the following morning, we found that the floor had dried out perfectly and was ready to be vacuumed and spray burnished with the last pad in the set which is a 3000-grit very fine pad applied using a small amount of water sprayed from a trigger bottle resulting in a deep, rich shine across the floor surface.
Last step in the face lift was to seal the floor with a generous coat of Tile Doctor Ultra-Seal, a premium grade penetrating sealer recommended for use in Kitchens and food preparation areas. Having left the floor to soak up as much of the Tile Doctor Ultra-Seal as it could, the excess product was removed and the whole area allowed to dry completely with the assistance of our industrial air moving fan. Finally, the floor was spray buffed to a deep shine using a white maintenance pad.
The client was extremely pleased with our results and was amazed at the variation of colours within the stone which had never been visible previously.
Nick White
Norfolk Tile Doctor
 Tile Doctor Ltd
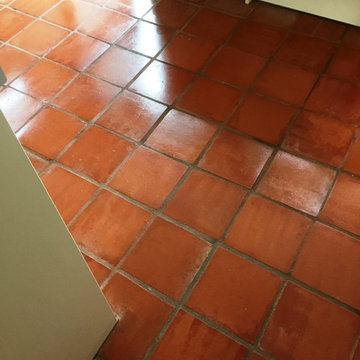
Newly built properties are not without their problems and often take a while to resolve all the snagging which occasionally extends to resolving problems with newly laid tiled floors. At this new property in the village of Malvern, and overlooked by the Malvern hills, the builders had left the Terracotta tiled kitchen floor covered in grout smears (also known as Grout Haze) following installation. They had also neglected to seal the tiles, which was actually quite fortunate in this case as they would have sealed in the grout haze, making it more difficult to remove.
Naturally, the property owner wanted the problem to be resolved as soon as possible, and for me to make the tiles easy to keep clean in future, which can be achieved by sealing the tile.
Before starting work, I made sure to fully protect any exposed woodwork with a plastic sheet covering to protect them from potential damage. I then proceeded to give the floor a thorough clean, using Tile Doctor Remove and Go to clean the floor and eradicate some stains that had been left behind as a result of the building work.
Next, I paid special attention to the grout, where the very visible problem of grout haze had arisen. To neutralise these smears I used Tile Doctor Grout Clean Up, a concentrated phosphoric acid cleaner that can also remove alkaline mineral deposits and efflorescence. Grout Clean Up is only to be used on acid resistant stone, as sensitive stone can suffer from irreparable etching if it comes into contact with the product.
Once completely clean and free of grout smears the floor was thoroughly rinsed with water to remove any trace of product and then dried as much as possible with a wet vacuum, afterwards an air mover was installed to speed up the drying process.
Later that afternoon the floor was dry and I was able to apply a sealer. To do this I opted to use several coats of Tile Doctor Seal and Go Extra, a topical, fully breathable sealer that works really well on Terracotta.
The sealer builds up a layer of protection on the surface of the tiles, protecting against ingrained dirt and stains. Seal and Go Extra also provides a high quality sheen finish which really did well to enhance the look of the Terracotta.
The property owner was exceptionally pleased with the results, and to have this problem dealt with quickly and efficiently, additionally the sealer will ensure the Kitchen floor is easy to keep clean in the future.
 Tile Doctor Ltd
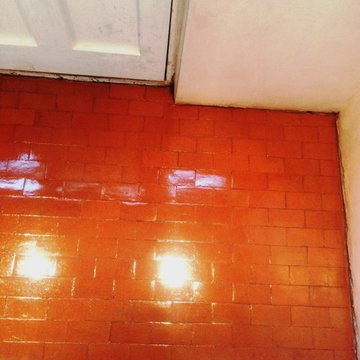
Here’s a quick job I completed in the coastal town of Eastbourne in East Sussex. While more commonly I am asked to work on entire floors, this customer was specifically interested in restoring a small doorway-like area with Quarry tiled flooring, the reason being that it had been covered for a long time by an old wardrobe and dog basket. As a result, the area had not been properly cared for, becoming very dusty and dirty. Also revealed were some unsightly splashes of white paint from previous decoration work.
The customer was keen to finally give this area of the floor the attention it needed, and so asked me to come in to provide a thorough clean and lay down some fresh sealer.
My first task was actually to relocate the old wardrobe and dog basket to the garage to get the area ready for cleaning. Then, to begin the cleaning process, I stripped away any old existing sealer and the white paint splashes by using Tile Doctor Remove & Go stripper in combination with a wire brush. Remove & Go is a versatile product that can also be used to break down glues and other adhesives.
I then washed the area down with water and promptly vacuumed up any moisture, before sitting down with a heat gun for an hour to dry the tiles. Usually a floor should be left for up to 48 hours to dry completely before sealing, but in this case the area was so small that I was able to dry it in the space of an hour.
Nonetheless, I opted to install a fan and leave the floor for an extra hour over lunch to ensure any excess moisture was removed. This is really important to do before sealing, as any remaining moisture can cloud the sealer and damage its performance.
To complete the restoration, I sealed the tiles using nine coats of the topical, water-based sealer Seal & Go, which is suitable for building up surface protection against dirt and stains on internal unsealed porous surfaces such as Victorian, Quarry and Sandstone tiles. The Quarry tiles were quite porous, which is not uncommon for Quarry Tiles and really soaked up the sealer.
As the photographs show, the results of the restoration were very good, with smiles all round – including from the slightly bemused family dog!
Rupert Mcleod
East Sussex Tile Doctor
7