
Search results for "Quitting process" in Home Design Ideas


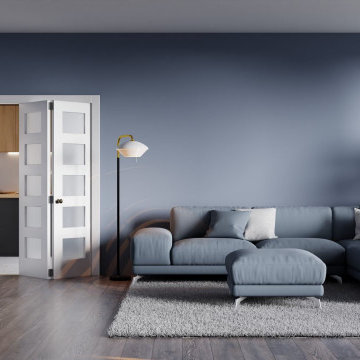
 Almesedoors
FINISH: PRIMED
The advantages of this approach – of this type of interior door finish – are fairly obvious. Pick a color, any color that suits your projects best. Mix and apply. Re- coat whenever you feel it is necessary to do so. Touch it up. It gives you, the proud owner of these interior doors, complete freedom of choice, and the significant savings, especially where it comes to bulk orders, can be a true source of joy.
As Kurt Vonnegut mentions in one of his novels (Bluebeard, unless I’m mistaken … check it out when you get a chance), the thrill of laying on colors is a large part of the artist’s professional satisfaction. In other words, a keen pleasure.
When back in the remote past visual arts became a field dominated by professionals rather than hobbyists, the main problem of “just laying on paint” became obvious: you can’t.
The medium of choice back then was egg tempera, a permanent, fast-drying substance consisting of colored pigments mixed with a water-soluble binder medium, usually glutinous material such as egg yolk. Portraits and ornaments were executed in this medium, and the wood panel was the surface of choice. One of tempera’s interesting features is that it is not as easily absorbed by wood as other mediums. Some sort of primer was necessary, of course, but pretty much any substance that dried evenly could be used.
The drawbacks of tempera, or pintura al temple, as the Spanish call it, only became obvious with the advent of the Renaissance, when the leading representatives of the trade turned to oil (and interior doors suddenly became a great deal less crude, but that’s a story for another day).
Oil painting is the process of “painting with pigments with a medium of drying oil as the binder.” Commonly used types include linseed (highly preferable in art, though not necessarily in interior doors, mind you), poppy seed, walnut, and safflower.
Today, five hundred years later, it is safe to say that oil is more versatile than pintura al temple – by orders of magnitude. Specifically, the contrasts achieved through the former are much greater, the darks are far deeper, and three- dimensional, highly realistic images are much easier to achieve. Next time you visit a museum, take a closer look at pintura al temple portraits. All of them, without exception, come off as a bit “flat” as opposed to their latter-day counterparts.
Also, where glazing is concerned …
Glazing: a painting technique in which a transparent layer, with just a touch of pigment, is laid over a previously painted surface, allowing light to travel through the glaze and be reflected back off of the opaque layer below. Gentle shadows, subtle changes of color, smooth transitions – all these can be achieved through glazing, which was used by all artists up until the middle of the Nineteenth Century, when artist tubes were invented, revolutionizing the field, and other techniques began to be explored.
Tempera enthusiasts (it takes all kinds to make a world) will assure you that glazing is not just possible in pintura al temple but is actually the basis of the whole enterprise. Well, what are you going to do? They’re enthusiasts.
Anyway, la peinture à l'huile, as the French call it, re-introduced the ancient problem of most surface’s propensity to absorb dipingere, as the Italians call the stuff. Wood or canvas, it is all the same: you’re not going to get very far without a good primer.
Experiments were conducted, and soon rabbit skin glue emerged as the least expensive and most effective solution. It was easy to apply. It dried evenly. It made the application of the l’huile stuff on top of it a walk in the park.
There were drawbacks. Today, rabbit skin glue is considered to be a major cause of cracking by most modern conservators. (Remember, when you visited the Metropolitan Museum of Art – and did you see those interior doors? … some of them are quite something … - most “old masters” pictures are completely covered with a cobweb of cracks? There you go). Because the glue is hygroscopic, it continually absorbs moisture from the atmosphere, causing the glue to swell and shrink as ambient humidity levels change. Over many humidity cycles, this repeated flexing causes the brittle oily layers to crack.
To combat this problem, modern primers are made of acrylic materials which are guaranteed not to cause any damage to the dipingere. No bubbling, no cracks. Your interior doors are safe.
Find the right local pro for your project
 Tile Doctor Ltd
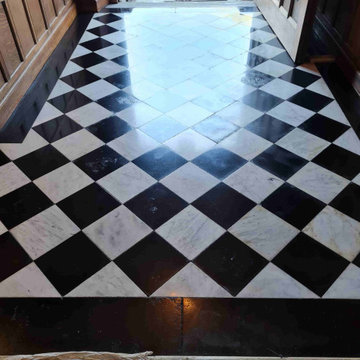
This Black and White Marble tiled hallway floor at a Grade II listed property in the village of Tattenhall has quite a history. The building was constructed in 1865 and at one time it has been the home to the high sheriff of Cheshire, and the family home of Edith Wignall the daughter of Sir Henry Tate the founder of the sugar company Tate and Lyle.
In more recent years the property had been used as a council building and even a nursing home for the elderly. After a long history of decline it has now been restored to a lavish family mansion however the marble floor had suffered over the years and still need attention. The current owner had been in touch as they wanted it restoring and basically brought back to life.
As it turns out I had already planned to go to Tattenhall the following week to work on another listed building which was formerly the village bank. After discussing the Marble floor over the phone, I agreed a date and time to pop over from the bank and inspect the floor in detail. I can provide a rough quote from photographs, which has been especially useful recently, but it’s far better for all concerned if I’m able to properly survey the floor first.
The Marble floor consisted of Black and White Mable tiles laid in a diamond pattern, it wasn’t a very large area perhaps 9 square metres in total. The tiles were well worn as described but also stained and scratched. I would see they would need a deep burnish and polish to bring them back to life and then protected with a fresh sealer. Following on from that visit I was able to provide an accurate quote which was accepted, and a date agreed for my return.
The first job was to protect the surrounding heavy wooden panelling with masking film. The floor was very heavily stained yellow with deep scratches, to remove these I would have to grind the marble back until a clean fresh tile was left. To start I used a 200-grit coarse pad fitted to a weighted buffing machine, the abrasive action of the pad was lubricated with water. After inspection I found that the staining and scratches were still there, so I needed to use stronger pads, so I worked my way through a set of very coarse milling pads starting at a 50, 100 and finishing with a 200-grit pad. Again, water was used to lubricate, and the resultant slurry was removed by a powerful wet vacuum and washed down between each pad.
The milling pads had the desired effect, and I was then able to bring back the polished appearance of the Marble surface using a set of finer burnishing pads with the same process. The 400 and 800-grit pads helped to clean and remove the fine scratches left by the milling pads and then the next 1500-grit pad started to build the shine back on the marble tile.
After finishing with 1500-grit pad I washed the Marble with Tile Doctor Stone Soap and vacuumed up the residue with the wet vacuum. I left an industrial blower in place overnight to dry out the floor ready for the next morning when it would be sealed.
The next morning, I used the last of the four burnishing pads which is a very fine 3000-grit to polish the floor further. This last pad is applied dry with just a spray of water to create a high gloss finish.
When I was happy, I sealed the floor with two coats of Tile Doctor Colour Grow which is an impregnating sealer that soaks into the fine pores of the Marble to protect it from within. This product also improves colour and after application it was left to soak into the tile for five minutes before polishing off and then leaving it to dry.
The last step was to I buff the floor with a white pad. The finish was impressive, and the family were very happy with the work we had carried out. For aftercare I recommended they use Stone Soap as its designed for the regular cleaning of sealed and polished stone, as well as cleaning it also helps build the patina.
Alastair Robb
West Cheshire TIle Doctor

 User
Detail of Iridescent Venetian plaster finish on all walls in Living Room by Christianson Lee Studios
Example of a transitional home design design in New York
Example of a transitional home design design in New York

 threshold interiors
Location: New York, NY, United States
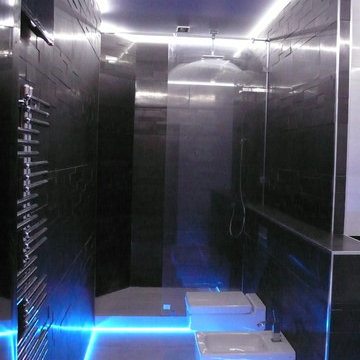
This Loft was tastefully renovated back in the '90s, but was due for an update and an expansion of the kitchen and dining areas to accommodate the client's cooking skills and entertaining needs. EnlargIing the island and adding cabinetry to delineate the office, bar and dining areas was a priority. The bathroom was updated to feel like a tranquil spa with beautiful new tile, plumbing fixtures and cabinets. Our biggest challenge was coordinating the entire renovation while our client was out of town for the Summer!
Photographed by: James Salomon
 User
DECO Window Fashions
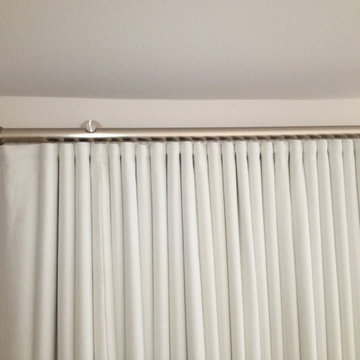
Sheer pleated custom made drapes, ceiling mount metal rod.
Trendy bedroom photo in Austin
Trendy bedroom photo in Austin
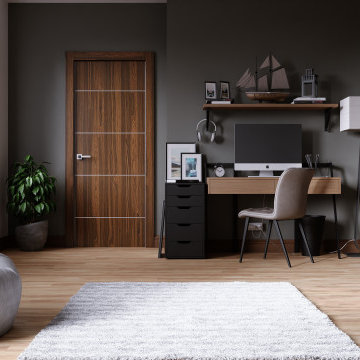 Almesedoors
THE DOOR NAME ORIGIN - "ALLUMINIO ELIVIA VERTICAL WOOD GRAIN 4HS"
Of all the interior door models in the Elivia collection, this one is perhaps the most unapologetically elegant. Why? Hmm … That which is self-evident can be the most difficult to explain. Is it because it is built using the latest breakthroughs in interior door making technology? Look at the finish: the process of applying it utilizes something called “stretching” by professionals, which is to say that instead of simply slapping the finish on top of the interior door’s surface, our company fuses (for lack of a better word) the materials (on molecular level, no less), the result being that the finished product is more warp-resistant, scratch-resistant, and fade-proof than any interior door put together in the past. This is especially important in climates known for their high humidity levels. Yes, but this has more to do with engineering than aesthetics, right? Okay, so, is this interior door super-elegant because ... Show more!
FINISH: WALNUT
When it comes to interior door finishes, walnut may not be king per se, since “different folk have different views,” as the poet said, and it behooves a proper collection of finishes to be thoroughly democratic; but, but … you could view walnut as an important majority leader descended from royalty – like, say, Louis Napoleon back when he was still an elected official and not, as he eventually came to style himself, Napoleon III.
Strictly speaking, a walnut is the seed of a drupaceous nut, and not a true nut in the botanical sense. It is native to Persia (walnut oil is a staple in Iranian cuisine to this day) and North America, even though approximately one half of the world’s production today is done in China.
That said, one of its more historically curious uses would be the production of ink and dyes. Those are made, or used to be made, at least, from the husk surrounding the nut. The ink could be used to produce drawings – or darken paper to make it look older. It has (as it turned out by the by) excellent archival properties. It was used liberally by many capable and honest artists in the past.
A keen observer of the human condition, a Florentine named Leonardo da Vinci never left his house (which featured some pretty interesting interior doors, but that’s a story for another day) … never left it without a vial – and a sketch book.
As he took leisurely strolls around the streets and piazzas, he observed folks – socializing, arguing, fighting, striking bargains, and gossiping. Let us mention in passing – and this is merely an opinion, mind you – that his sketches seem to be a great deal livelier than his portraits, which for the most part adhere to the epoch’s somewhat mawkish standards and the algebraic, rather than harmonious, approach to depicting humans. The perpetual beguiling mystery of Mona Lisa’s smile is undoubtedly magnificent, but it is the Tuscan polymath’s quick yet amazingly insightful drawings that give us an idea – oftentimes a very comprehensive one – of what everyday life was truly like in Florence in the Sixteenth Century. An old man gloating at someone’s misfortune, two passionate merchants arguing over the price of some highly important delivery, a young woman lamenting the lack of decent men whom a reasonable person could view as husband material, and on and on – it’s all there in Leonardo’s sketches characterized by masterful lines and elegant shading despite the obvious – and necessary – impetuosity of each sketch. So precious and brilliant are those casual masterpieces that, had the scientifically inclined fellow eliminated the need for outdoor sketching by inventing photography, it would have been an historian’s immeasurable gain, certainly, but also an art lover’s great loss.
The idea behind our Walnut Finish is to invoke in the interior door owner a feeling of timeless historicity. Some things change, but others are forever. Stability is an important quality in an interior door, is it not?
Rembrandt van Rijn, who also used walnut ink extensively, was a studio artist, with only a few outdoor paintings in his legacy. Truth be told, he was a better draftsman than Leonardo, at least as far as technique goes (don’t let this get around). Well. He lived a century later and had the benefit of all the development art had undergone since the great Italian master. Just like these interior doors – your interior doors – are a huge improvement on anything that was available only twenty years ago, never mind a hundred years ago.
The “oscillation” of Rembrandt’s line, the delightful shift from the descriptive to the aesthetic stroke, makes his production in that category quite unique. Upon reaching artistic maturity, the stubborn Dutch master began to shun the unbroken contour line, which caused a lot of trouble for his drawings a century later, when dealers and collectors who wished to “update” his sketches to fit the current fashion had the audacity to “complete” Rembrandt’s pen-and-inks. Fortunately, some of the sketches escaped this sorry fate and have been preserved in their original glorious state to this day. Rembrandt’s mastery is yet another thing this interior door finish might remind you of each time you look at your doors.

 Dordevic Architecture + Construction
Chilipics Photography
Large minimalist wooden l-shaped staircase photo in Atlanta with wooden risers
Large minimalist wooden l-shaped staircase photo in Atlanta with wooden risers


 Tile Doctor Ltd
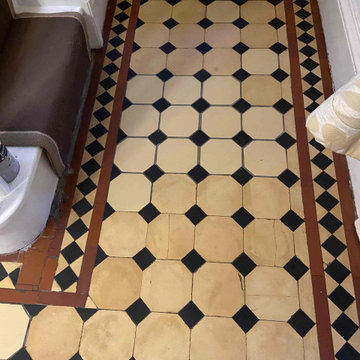
Detailed below is the restoration of a Victorian tiled hallway floor that we started back in June in Preston. Although we started in June there was so much damage to the subfloor and the tiles it took some time to complete, additionally, the client did not like the colour samples of the replacement tiles we had brought along and so decided to source their own which took some time.
Three months later with replacement tiles now sourced we were given the go ahead to start the restoration. The first day’s focus was cleaning the original floor using very coarse 100-grit and 200-grit Diamond pads fitted to a rotary buffer machine and applied to the floor using a strong dilution of Tile Doctor Remove and Go to add extra cleaning power. Tile edges were given special attention using a flex machine fitted with small diamond grit pads.
The floor was rinsed with water to remove the soil generated and this was followed up with an acid rinse using a 1:3 dilution of Tile Doctor Grout Clean Up. This last step in the cleaning process is especially recommend for old floors like this which don’t have a damp proof membrane and can suffer from efflorescence issues.
The next stage focused on repairing the floor and started by carefully knocking out all the broken and chipped tiles. We had previously estimated over 30 tiles needed replacing and so the client had bought two boxes, meaning I had plenty of spares to work with.
Before tiling however, the subfloor had suffered over the years and needed attention first. To deal with this the damaged areas were raked out, cleaned up and then back filled with rapid setting self-levelling screed from Mapie adhesives. Once the sub-base was fixed then we put the new tiles back in, they were not an exact match, about 5mm too short and lighter in tone, but the colour was pretty close.
Tiling an old Victorian floor like this can be a bit like dominoes as you move one out of place 2 decent ones come loose and then they also need refixing. Some of the tiles had hair line cracks in them and once they were loose, they just cracked in half. As such the 20 spare tiles that I thought were spare came into good use and I actually ended up using all of them. I could have done with a few more so it was decided to reset the last four broken tiles and grout them in. Luckily for me the client was very understanding about the nature of tile restoration and had accepted that there would be some imperfections and they were not expecting a new floor.
The Tiles were fixed down using Ultralite Rapid Flex (another product from Mapie) and then grouted using the same adhesive (not a grout, as they did not have grout back in the day, just cement and screed).
The floor was left this to cure overnight, and we came back the next day to finish the clean using a 200-grit diamond pad fitted to a buffing machine and lubricated with water, then one last acid rinse to get the tiles as clean as possible and remove any lingering grout haze. This last clean helps to blend the new tiles in with the original.
Before applying a protective sealer, the floor was left to dry for a couple of days, the tiles need to be thoroughly dry before sealing or you can end up with a patchy appearance.
For this floor with no damp proof membrane, it was important to use a fully breathable sealer that will allow moisture to rise through the tile and evaporate at the surface, so Tile Doctor Colour Grow was chosen. This is a good choice for old floors like this as its fully breathable, head wearing, and it contains a colour enhancer that improves the overall appearance of the tile.
Three coats of Tile Doctor Colour Grow which is a fully breathable, colour enhancing sealer hat works by soaking into the pores of the tile protecting it from within. It has a matt finish, and it works really well with all clay tiles and is ideal for these types of floors.
You can probably spot the lighter coloured tiles in the after photos on this page, however it’s a very subtle difference and I think they have blended in quite well with the original. Certainly, my client was very pleased with the newly restored floor, its completely transformed from when we first visited the client, and the floor has now gained character and history. For aftercare we recommend Tile Doctor Neutral Cleaner, its an effective pH neutral product that is compatible with the new sealer.
Russell Taylor
Lancashire Tile Doctor

 User
DECO Window Fashions.
Ripple Fold Draperies
Home design - contemporary home design idea in Austin
Home design - contemporary home design idea in Austin

 Taylor Made Cabinets, Leominster MA
Angela Taylor, Taylor Made Cabinets of Leominster MA
Kitchen pantry - mid-sized transitional l-shaped light wood floor kitchen pantry idea in Boston with recessed-panel cabinets, white cabinets, granite countertops, stainless steel appliances and an island
Kitchen pantry - mid-sized transitional l-shaped light wood floor kitchen pantry idea in Boston with recessed-panel cabinets, white cabinets, granite countertops, stainless steel appliances and an island


 Tile Trends, Inc.
Subway Tile-Herringbone
Inspiration for a mid-sized rustic l-shaped dark wood floor and brown floor eat-in kitchen remodel with a farmhouse sink, raised-panel cabinets, dark wood cabinets, quartz countertops, white backsplash, subway tile backsplash, stainless steel appliances, an island and beige countertops
Inspiration for a mid-sized rustic l-shaped dark wood floor and brown floor eat-in kitchen remodel with a farmhouse sink, raised-panel cabinets, dark wood cabinets, quartz countertops, white backsplash, subway tile backsplash, stainless steel appliances, an island and beige countertops


 Story Barns
Inspiration for a mid-sized rustic carpeted straight cable railing staircase remodel in Denver with carpeted risers
26