
Search results for "Reduce attractive" in Home Design Ideas
 Griffith Indoor & Outdoor Living
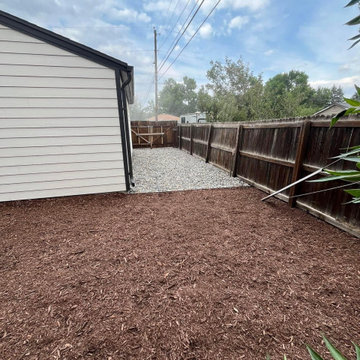
This Colorado Springs backyard refresh transformed a tired outdoor area into a clean, welcoming and practical space designed for everyday enjoyment. Griffith Designs created a simple landscape plan that focused on the homeowner’s priorities while making the most of the available project budget.
A new patio provides a functional outdoor living area for relaxing, dining and entertaining. The patio was integrated into the overall landscape design to create a natural connection between the home, lawn and surrounding planting beds.
New full-sod installation established a healthy, attractive lawn and immediately refreshed the backyard. Defined beds filled with mulch created a polished border around the new grass while helping retain soil moisture, reduce weeds and simplify ongoing maintenance. Hardy plants selected for Colorado Springs growing conditions added color, texture and lasting natural interest.
The completed backyard renovation demonstrates how thoughtful planning and carefully selected improvements can make a meaningful impact without an excessive scope or budget. The result is a fresh, functional Colorado Springs landscape featuring a new patio, full lawn, durable plantings and an uncluttered design personalized for the homeowner.

 TN Nursery
Homesteads are about function as much as beauty, and button bush delivers on both fronts. Its willingness to grow in wet areas makes it perfect for landscape spots that other plants avoid. Those damp corners aren’t wasted space when you plant button bush — they become intentional, lively parts of your yard.
The shrub’s dense form also doubles as a natural screen or border. Planted in groups, button bush makes a soft edge against lawns, gardens, or pathways. Its rounded shape and textured blooms maintain structure without feeling overly formal. That’s especially nice in landscapes that lean toward natural design.
But function doesn’t end there. In wetter areas, button bush helps reduce erosion and standing water. Its roots absorb moisture and give soil something to cling to, which makes it a practical choice in drainage swales or near water features. Pollinators and wildlife find value here too — that’s an added bonus that makes landscapes feel balanced and alive.
If your homestead includes gardens, fields, or natural plantings, button bush fits right in. It holds space well, supports life, and brings seasonal interest without demanding constant care — qualities that make it a smart, functional choice.
Get button bush here:
https://www.tnnursery.net/products/button-bush
https://treenurseryco.com/button-bush-shrub
https://www.onlineplantnursery.com/products/button-bush-live-stakes
https://www.wholesalenurseryco.com/products/button-bush
https://www.tennesseewholesalenursery.com/products/button-bush

 Mottram Architecture
Timber frame homes offer unique challenges during a remodel. What often makes them beautiful and attractive to most homeowners, also makes them challenging for space requirements.
Context: The lovely couple that owned this home were struggling with some interesting floor plan challenges that just didn't work for their family. The loved the beautiful timbers and woodwork of their home, but the dramatically sloping ceilings on the second floor, particularly in the bathroom, just didn't work for this 1 1/2 bath home. Needing to use the skylight to approach the toilet was a less then ideal scenario. Although the bathroom footprint was more then adequate, the sloped ceiling only made half of the space useable. Check out the Before/After post on our blog to see the photos of the house pre-renovation. As much as they loved all the wood features in their home, another challenge they had was light. The wood ceiling made everything inside the house darker, even with a fantastic array of south facing windows, there were spaces in the home that felt dark and small. When they contacted us they wanted to know how could they make their brighter and more inviting, were there solutions to the 2nd floor sloped ceiling issues, and if they were going to do all of this work, how could they make their home more comfortable and efficient. A nagging water leak in the upstairs bathroom spurred them into action and here is how we solved their dilemma.
Conclusion: First, we added a little dormer to the rear of the house so we could get full headroom in nearly all of the upstairs bathroom! Then we decided to extend that dormer one more timber bay over to create a walk in closet with natural light and plenty of space. Since we were contemplating energy efficiency, we resolved a nagging issue that is present in a lot of timber frame construction, air tightness. Commonly found in timber frame construction, fiberglass insulation is installed in the rafter bays and board ceilings are installed over top. Unfortunately, board ceilings are anything but air tight, and fiberglass insulation needs to be in an airtight cavity for maximum effectiveness. So we were able to solve two issues at the same time for this homeowner. We removed the board ceiling and fiberglass insulation, we dense packed the rafter bays with cellulose insulation, and installed sheetrock in place of the boards. The boards were salvaged for re-use by the homeowner, and the space and light quality was dramatically improved. Some may think that losing the board ceiling took something away from the space, but what you'll see in the pictures is that it highly accentuates the heavy timbers and really makes them stand out in a beautiful way. Now with this added airtightness, better insulation, and brighter space, the homeowner hardly runs their wood stove, and it's so quiet in the space, an added bonus from changing the insulation. It became necessary to also add a sheetrock ceiling to the living room to hide the plumbing from the new bathroom layout above. Changing this ceiling gave the homeowner some real quality lighting that was lacking in the living room before. The brighter ceiling and new lighting layout completely transforms the living room into a space you want to hang out, even though the layout didn't change at all. When the homeowner saw the finished spaces she said "I can't believe this is my house, I want to live in this house"
Energy Efficiency: I touched a little on the efficiency above, but like all projects done with Mottram Architecture, we always want to leave you with a little extra. Timber frame construction with board ceilings and fiberglass insulation are notoriously leaky! If you want to know what we think about fiberglass insulation, check our our blog post on Why Fiberglass Insulation Sucks. By installing cellulose insulation and covering it with sheetrock we were able to greatly reduce the heat flowing out of this home. It not only improves cashflow it improves the comfort level in the space. Who wants to sit in their living room and feel a draft? Let us remind you, we are not saying cellulose insulation is an air barrier, we use the sheetrock to help with that, but it does significantly reduce the air flow over fiberglass insulation. And when we reduce the airflow, we reduce the heat flow. And when we reduce the heat flow, we reduce the need to re-heat that drafty air from outside. When it comes to energy efficiency the first and best place to start is air infiltration. We greatly reduced the air infiltration with the new insulation, but we also added a hat and warm boots. What I mean by that is, we improved the insulation in the roof, and we installed insulation in the basement. Maybe it's a silly analogy, but when you think about keeping warm, we always start with the hat and boots! With sustainability in mind, the next project will be to add a deck to the front of this house with rain catchment barrels from the metal roof. They are planning to plant a garden in the spring and the rain catchment system will help to irrigate the new garden.
Builder: East Shore Builders
Photographer: Michael Eric Berube
Find the right local pro for your project
 Mottram Architecture
Timber frame homes offer unique challenges during a remodel. What often makes them beautiful and attractive to most homeowners, also makes them challenging for space requirements.
Context: The lovely couple that owned this home were struggling with some interesting floor plan challenges that just didn't work for their family. The loved the beautiful timbers and woodwork of their home, but the dramatically sloping ceilings on the second floor, particularly in the bathroom, just didn't work for this 1 1/2 bath home. Needing to use the skylight to approach the toilet was a less then ideal scenario. Although the bathroom footprint was more then adequate, the sloped ceiling only made half of the space useable. Check out the Before/After post on our blog to see the photos of the house pre-renovation. As much as they loved all the wood features in their home, another challenge they had was light. The wood ceiling made everything inside the house darker, even with a fantastic array of south facing windows, there were spaces in the home that felt dark and small. When they contacted us they wanted to know how could they make their brighter and more inviting, were there solutions to the 2nd floor sloped ceiling issues, and if they were going to do all of this work, how could they make their home more comfortable and efficient. A nagging water leak in the upstairs bathroom spurred them into action and here is how we solved their dilemma.
Conclusion: First, we added a little dormer to the rear of the house so we could get full headroom in nearly all of the upstairs bathroom! Then we decided to extend that dormer one more timber bay over to create a walk in closet with natural light and plenty of space. Since we were contemplating energy efficiency, we resolved a nagging issue that is present in a lot of timber frame construction, air tightness. Commonly found in timber frame construction, fiberglass insulation is installed in the rafter bays and board ceilings are installed over top. Unfortunately, board ceilings are anything but air tight, and fiberglass insulation needs to be in an airtight cavity for maximum effectiveness. So we were able to solve two issues at the same time for this homeowner. We removed the board ceiling and fiberglass insulation, we dense packed the rafter bays with cellulose insulation, and installed sheetrock in place of the boards. The boards were salvaged for re-use by the homeowner, and the space and light quality was dramatically improved. Some may think that losing the board ceiling took something away from the space, but what you'll see in the pictures is that it highly accentuates the heavy timbers and really makes them stand out in a beautiful way. Now with this added airtightness, better insulation, and brighter space, the homeowner hardly runs their wood stove, and it's so quiet in the space, an added bonus from changing the insulation. It became necessary to also add a sheetrock ceiling to the living room to hide the plumbing from the new bathroom layout above. Changing this ceiling gave the homeowner some real quality lighting that was lacking in the living room before. The brighter ceiling and new lighting layout completely transforms the living room into a space you want to hang out, even though the layout didn't change at all. When the homeowner saw the finished spaces she said "I can't believe this is my house, I want to live in this house"
Energy Efficiency: I touched a little on the efficiency above, but like all projects done with Mottram Architecture, we always want to leave you with a little extra. Timber frame construction with board ceilings and fiberglass insulation are notoriously leaky! If you want to know what we think about fiberglass insulation, check our our blog post on Why Fiberglass Insulation Sucks. By installing cellulose insulation and covering it with sheetrock we were able to greatly reduce the heat flowing out of this home. It not only improves cashflow it improves the comfort level in the space. Who wants to sit in their living room and feel a draft? Let us remind you, we are not saying cellulose insulation is an air barrier, we use the sheetrock to help with that, but it does significantly reduce the air flow over fiberglass insulation. And when we reduce the airflow, we reduce the heat flow. And when we reduce the heat flow, we reduce the need to re-heat that drafty air from outside. When it comes to energy efficiency the first and best place to start is air infiltration. We greatly reduced the air infiltration with the new insulation, but we also added a hat and warm boots. What I mean by that is, we improved the insulation in the roof, and we installed insulation in the basement. Maybe it's a silly analogy, but when you think about keeping warm, we always start with the hat and boots! With sustainability in mind, the next project will be to add a deck to the front of this house with rain catchment barrels from the metal roof. They are planning to plant a garden in the spring and the rain catchment system will help to irrigate the new garden.
Builder: East Shore Builders
Photographer: Michael Eric Berube
 Griffith Indoor & Outdoor Living
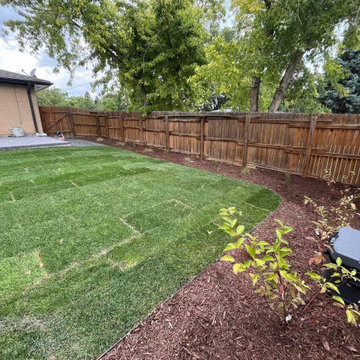
This Colorado Springs backyard refresh transformed a tired outdoor area into a clean, welcoming and practical space designed for everyday enjoyment. Griffith Designs created a simple landscape plan that focused on the homeowner’s priorities while making the most of the available project budget.
A new patio provides a functional outdoor living area for relaxing, dining and entertaining. The patio was integrated into the overall landscape design to create a natural connection between the home, lawn and surrounding planting beds.
New full-sod installation established a healthy, attractive lawn and immediately refreshed the backyard. Defined beds filled with mulch created a polished border around the new grass while helping retain soil moisture, reduce weeds and simplify ongoing maintenance. Hardy plants selected for Colorado Springs growing conditions added color, texture and lasting natural interest.
The completed backyard renovation demonstrates how thoughtful planning and carefully selected improvements can make a meaningful impact without an excessive scope or budget. The result is a fresh, functional Colorado Springs landscape featuring a new patio, full lawn, durable plantings and an uncluttered design personalized for the homeowner.
 Griffith Indoor & Outdoor Living
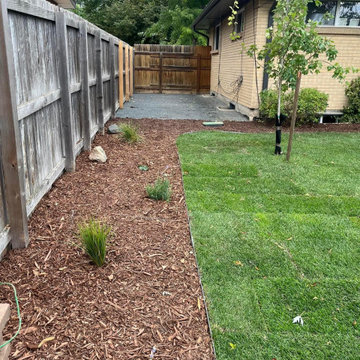
This Colorado Springs backyard refresh transformed a tired outdoor area into a clean, welcoming and practical space designed for everyday enjoyment. Griffith Designs created a simple landscape plan that focused on the homeowner’s priorities while making the most of the available project budget.
A new patio provides a functional outdoor living area for relaxing, dining and entertaining. The patio was integrated into the overall landscape design to create a natural connection between the home, lawn and surrounding planting beds.
New full-sod installation established a healthy, attractive lawn and immediately refreshed the backyard. Defined beds filled with mulch created a polished border around the new grass while helping retain soil moisture, reduce weeds and simplify ongoing maintenance. Hardy plants selected for Colorado Springs growing conditions added color, texture and lasting natural interest.
The completed backyard renovation demonstrates how thoughtful planning and carefully selected improvements can make a meaningful impact without an excessive scope or budget. The result is a fresh, functional Colorado Springs landscape featuring a new patio, full lawn, durable plantings and an uncluttered design personalized for the homeowner.
 Mottram Architecture
Timber frame homes offer unique challenges during a remodel. What often makes them beautiful and attractive to most homeowners, also makes them challenging for space requirements.
Context: The lovely couple that owned this home were struggling with some interesting floor plan challenges that just didn't work for their family. The loved the beautiful timbers and woodwork of their home, but the dramatically sloping ceilings on the second floor, particularly in the bathroom, just didn't work for this 1 1/2 bath home. Needing to use the skylight to approach the toilet was a less then ideal scenario. Although the bathroom footprint was more then adequate, the sloped ceiling only made half of the space useable. Check out the Before/After post on our blog to see the photos of the house pre-renovation. As much as they loved all the wood features in their home, another challenge they had was light. The wood ceiling made everything inside the house darker, even with a fantastic array of south facing windows, there were spaces in the home that felt dark and small. When they contacted us they wanted to know how could they make their brighter and more inviting, were there solutions to the 2nd floor sloped ceiling issues, and if they were going to do all of this work, how could they make their home more comfortable and efficient. A nagging water leak in the upstairs bathroom spurred them into action and here is how we solved their dilemma.
Conclusion: First, we added a little dormer to the rear of the house so we could get full headroom in nearly all of the upstairs bathroom! Then we decided to extend that dormer one more timber bay over to create a walk in closet with natural light and plenty of space. Since we were contemplating energy efficiency, we resolved a nagging issue that is present in a lot of timber frame construction, air tightness. Commonly found in timber frame construction, fiberglass insulation is installed in the rafter bays and board ceilings are installed over top. Unfortunately, board ceilings are anything but air tight, and fiberglass insulation needs to be in an airtight cavity for maximum effectiveness. So we were able to solve two issues at the same time for this homeowner. We removed the board ceiling and fiberglass insulation, we dense packed the rafter bays with cellulose insulation, and installed sheetrock in place of the boards. The boards were salvaged for re-use by the homeowner, and the space and light quality was dramatically improved. Some may think that losing the board ceiling took something away from the space, but what you'll see in the pictures is that it highly accentuates the heavy timbers and really makes them stand out in a beautiful way. Now with this added airtightness, better insulation, and brighter space, the homeowner hardly runs their wood stove, and it's so quiet in the space, an added bonus from changing the insulation. It became necessary to also add a sheetrock ceiling to the living room to hide the plumbing from the new bathroom layout above. Changing this ceiling gave the homeowner some real quality lighting that was lacking in the living room before. The brighter ceiling and new lighting layout completely transforms the living room into a space you want to hang out, even though the layout didn't change at all. When the homeowner saw the finished spaces she said "I can't believe this is my house, I want to live in this house"
Energy Efficiency: I touched a little on the efficiency above, but like all projects done with Mottram Architecture, we always want to leave you with a little extra. Timber frame construction with board ceilings and fiberglass insulation are notoriously leaky! If you want to know what we think about fiberglass insulation, check our our blog post on Why Fiberglass Insulation Sucks. By installing cellulose insulation and covering it with sheetrock we were able to greatly reduce the heat flowing out of this home. It not only improves cashflow it improves the comfort level in the space. Who wants to sit in their living room and feel a draft? Let us remind you, we are not saying cellulose insulation is an air barrier, we use the sheetrock to help with that, but it does significantly reduce the air flow over fiberglass insulation. And when we reduce the airflow, we reduce the heat flow. And when we reduce the heat flow, we reduce the need to re-heat that drafty air from outside. When it comes to energy efficiency the first and best place to start is air infiltration. We greatly reduced the air infiltration with the new insulation, but we also added a hat and warm boots. What I mean by that is, we improved the insulation in the roof, and we installed insulation in the basement. Maybe it's a silly analogy, but when you think about keeping warm, we always start with the hat and boots! With sustainability in mind, the next project will be to add a deck to the front of this house with rain catchment barrels from the metal roof. They are planning to plant a garden in the spring and the rain catchment system will help to irrigate the new garden.
Builder: East Shore Builders
Photographer: Michael Eric Berube
 Mottram Architecture
Timber frame homes offer unique challenges during a remodel. What often makes them beautiful and attractive to most homeowners, also makes them challenging for space requirements.
Context: The lovely couple that owned this home were struggling with some interesting floor plan challenges that just didn't work for their family. The loved the beautiful timbers and woodwork of their home, but the dramatically sloping ceilings on the second floor, particularly in the bathroom, just didn't work for this 1 1/2 bath home. Needing to use the skylight to approach the toilet was a less then ideal scenario. Although the bathroom footprint was more then adequate, the sloped ceiling only made half of the space useable. Check out the Before/After post on our blog to see the photos of the house pre-renovation. As much as they loved all the wood features in their home, another challenge they had was light. The wood ceiling made everything inside the house darker, even with a fantastic array of south facing windows, there were spaces in the home that felt dark and small. When they contacted us they wanted to know how could they make their brighter and more inviting, were there solutions to the 2nd floor sloped ceiling issues, and if they were going to do all of this work, how could they make their home more comfortable and efficient. A nagging water leak in the upstairs bathroom spurred them into action and here is how we solved their dilemma.
Conclusion: First, we added a little dormer to the rear of the house so we could get full headroom in nearly all of the upstairs bathroom! Then we decided to extend that dormer one more timber bay over to create a walk in closet with natural light and plenty of space. Since we were contemplating energy efficiency, we resolved a nagging issue that is present in a lot of timber frame construction, air tightness. Commonly found in timber frame construction, fiberglass insulation is installed in the rafter bays and board ceilings are installed over top. Unfortunately, board ceilings are anything but air tight, and fiberglass insulation needs to be in an airtight cavity for maximum effectiveness. So we were able to solve two issues at the same time for this homeowner. We removed the board ceiling and fiberglass insulation, we dense packed the rafter bays with cellulose insulation, and installed sheetrock in place of the boards. The boards were salvaged for re-use by the homeowner, and the space and light quality was dramatically improved. Some may think that losing the board ceiling took something away from the space, but what you'll see in the pictures is that it highly accentuates the heavy timbers and really makes them stand out in a beautiful way. Now with this added airtightness, better insulation, and brighter space, the homeowner hardly runs their wood stove, and it's so quiet in the space, an added bonus from changing the insulation. It became necessary to also add a sheetrock ceiling to the living room to hide the plumbing from the new bathroom layout above. Changing this ceiling gave the homeowner some real quality lighting that was lacking in the living room before. The brighter ceiling and new lighting layout completely transforms the living room into a space you want to hang out, even though the layout didn't change at all. When the homeowner saw the finished spaces she said "I can't believe this is my house, I want to live in this house"
Energy Efficiency: I touched a little on the efficiency above, but like all projects done with Mottram Architecture, we always want to leave you with a little extra. Timber frame construction with board ceilings and fiberglass insulation are notoriously leaky! If you want to know what we think about fiberglass insulation, check our our blog post on Why Fiberglass Insulation Sucks. By installing cellulose insulation and covering it with sheetrock we were able to greatly reduce the heat flowing out of this home. It not only improves cashflow it improves the comfort level in the space. Who wants to sit in their living room and feel a draft? Let us remind you, we are not saying cellulose insulation is an air barrier, we use the sheetrock to help with that, but it does significantly reduce the air flow over fiberglass insulation. And when we reduce the airflow, we reduce the heat flow. And when we reduce the heat flow, we reduce the need to re-heat that drafty air from outside. When it comes to energy efficiency the first and best place to start is air infiltration. We greatly reduced the air infiltration with the new insulation, but we also added a hat and warm boots. What I mean by that is, we improved the insulation in the roof, and we installed insulation in the basement. Maybe it's a silly analogy, but when you think about keeping warm, we always start with the hat and boots! With sustainability in mind, the next project will be to add a deck to the front of this house with rain catchment barrels from the metal roof. They are planning to plant a garden in the spring and the rain catchment system will help to irrigate the new garden.
Builder: East Shore Builders
Photographer: Michael Eric Berube
 Mottram Architecture
Timber frame homes offer unique challenges during a remodel. What often makes them beautiful and attractive to most homeowners, also makes them challenging for space requirements.
Context: The lovely couple that owned this home were struggling with some interesting floor plan challenges that just didn't work for their family. The loved the beautiful timbers and woodwork of their home, but the dramatically sloping ceilings on the second floor, particularly in the bathroom, just didn't work for this 1 1/2 bath home. Needing to use the skylight to approach the toilet was a less then ideal scenario. Although the bathroom footprint was more then adequate, the sloped ceiling only made half of the space useable. Check out the Before/After post on our blog to see the photos of the house pre-renovation. As much as they loved all the wood features in their home, another challenge they had was light. The wood ceiling made everything inside the house darker, even with a fantastic array of south facing windows, there were spaces in the home that felt dark and small. When they contacted us they wanted to know how could they make their brighter and more inviting, were there solutions to the 2nd floor sloped ceiling issues, and if they were going to do all of this work, how could they make their home more comfortable and efficient. A nagging water leak in the upstairs bathroom spurred them into action and here is how we solved their dilemma.
Conclusion: First, we added a little dormer to the rear of the house so we could get full headroom in nearly all of the upstairs bathroom! Then we decided to extend that dormer one more timber bay over to create a walk in closet with natural light and plenty of space. Since we were contemplating energy efficiency, we resolved a nagging issue that is present in a lot of timber frame construction, air tightness. Commonly found in timber frame construction, fiberglass insulation is installed in the rafter bays and board ceilings are installed over top. Unfortunately, board ceilings are anything but air tight, and fiberglass insulation needs to be in an airtight cavity for maximum effectiveness. So we were able to solve two issues at the same time for this homeowner. We removed the board ceiling and fiberglass insulation, we dense packed the rafter bays with cellulose insulation, and installed sheetrock in place of the boards. The boards were salvaged for re-use by the homeowner, and the space and light quality was dramatically improved. Some may think that losing the board ceiling took something away from the space, but what you'll see in the pictures is that it highly accentuates the heavy timbers and really makes them stand out in a beautiful way. Now with this added airtightness, better insulation, and brighter space, the homeowner hardly runs their wood stove, and it's so quiet in the space, an added bonus from changing the insulation. It became necessary to also add a sheetrock ceiling to the living room to hide the plumbing from the new bathroom layout above. Changing this ceiling gave the homeowner some real quality lighting that was lacking in the living room before. The brighter ceiling and new lighting layout completely transforms the living room into a space you want to hang out, even though the layout didn't change at all. When the homeowner saw the finished spaces she said "I can't believe this is my house, I want to live in this house"
Energy Efficiency: I touched a little on the efficiency above, but like all projects done with Mottram Architecture, we always want to leave you with a little extra. Timber frame construction with board ceilings and fiberglass insulation are notoriously leaky! If you want to know what we think about fiberglass insulation, check our our blog post on Why Fiberglass Insulation Sucks. By installing cellulose insulation and covering it with sheetrock we were able to greatly reduce the heat flowing out of this home. It not only improves cashflow it improves the comfort level in the space. Who wants to sit in their living room and feel a draft? Let us remind you, we are not saying cellulose insulation is an air barrier, we use the sheetrock to help with that, but it does significantly reduce the air flow over fiberglass insulation. And when we reduce the airflow, we reduce the heat flow. And when we reduce the heat flow, we reduce the need to re-heat that drafty air from outside. When it comes to energy efficiency the first and best place to start is air infiltration. We greatly reduced the air infiltration with the new insulation, but we also added a hat and warm boots. What I mean by that is, we improved the insulation in the roof, and we installed insulation in the basement. Maybe it's a silly analogy, but when you think about keeping warm, we always start with the hat and boots! With sustainability in mind, the next project will be to add a deck to the front of this house with rain catchment barrels from the metal roof. They are planning to plant a garden in the spring and the rain catchment system will help to irrigate the new garden.
Builder: East Shore Builders
Photographer: Michael Eric Berube
Michael Eric Berube, Maine Virtual Home Tours

 THE EDEN GROUP
The Rancho Estate provides a level of luxury that sets it apart from any residence in Los Angeles, breaking the record for the most expensive home ever sold in the Encino area. The Eden Group worked with the client to achieve all their development goals by providing integrated design and engineering services which developed concurrently achieving project milestones while staying within the construction budget. Our residential design team used modern aesthetics which entailed of design elements tailored to provide spacious and unparalleled views of the San Fernando Valley. Attracting a dream buyer is the most important aspect in the eyes of any real estate developer and that is why we chose two words to describe the amenities we incorporated into the design: Vast & Spectacular. The estate allows you to swim with infinite views, get your work out on at the indoor gym, shoot hoops with your friends in the indoor basketball court, go for a round of bowling with your child, chomp on popcorn in your theater, get a massage after the steam room at your private spa, putt a couple hole-in-ones, and if you get bored you can always choose to go for a ride from the collection inside your 16-car garage. Majestic high ceilings mixed wide span openings created a challenge for our engineers given the strict rules in the Baseline Hillside Ordinance and the California Building Code. Our structural engineers prepared innovative design plans which entailed of 150 deep pile foundations mixed with steel and laminated timber framing members. We also used permanent shoring techniques to reduce construction cost by eliminating the need for temporary shoring plans for both the structure foundation and on-site retaining walls. Given that California has some of the strictest stormwater management requirements and the total amount of non-permeable areas on this project, the client was required to construct a 35,000-gallon rain harvesting tank per the Low Impact Development Plan Best Management Practice (BMP’s) standards. Our specialized drainage design team captured all on-site stormwater through trench drains, area drains, and downspouts which routed water to a mechanical sump pump that connected to the storage tank for irrigation use later. Innovative design engineering techniques used on this project allowed for increased safety and sustainability making the Rancho Estate a masterpiece of contemporary construction.
 THE EDEN GROUP
The Rancho Estate provides a level of luxury that sets it apart from any residence in Los Angeles, breaking the record for the most expensive home ever sold in the Encino area. The Eden Group worked with the client to achieve all their development goals by providing integrated design and engineering services which developed concurrently achieving project milestones while staying within the construction budget. Our residential design team used modern aesthetics which entailed of design elements tailored to provide spacious and unparalleled views of the San Fernando Valley. Attracting a dream buyer is the most important aspect in the eyes of any real estate developer and that is why we chose two words to describe the amenities we incorporated into the design: Vast & Spectacular. The estate allows you to swim with infinite views, get your work out on at the indoor gym, shoot hoops with your friends in the indoor basketball court, go for a round of bowling with your child, chomp on popcorn in your theater, get a massage after the steam room at your private spa, putt a couple hole-in-ones, and if you get bored you can always choose to go for a ride from the collection inside your 16-car garage. Majestic high ceilings mixed wide span openings created a challenge for our engineers given the strict rules in the Baseline Hillside Ordinance and the California Building Code. Our structural engineers prepared innovative design plans which entailed of 150 deep pile foundations mixed with steel and laminated timber framing members. We also used permanent shoring techniques to reduce construction cost by eliminating the need for temporary shoring plans for both the structure foundation and on-site retaining walls. Given that California has some of the strictest stormwater management requirements and the total amount of non-permeable areas on this project, the client was required to construct a 35,000-gallon rain harvesting tank per the Low Impact Development Plan Best Management Practice (BMP’s) standards. Our specialized drainage design team captured all on-site stormwater through trench drains, area drains, and downspouts which routed water to a mechanical sump pump that connected to the storage tank for irrigation use later. Innovative design engineering techniques used on this project allowed for increased safety and sustainability making the Rancho Estate a masterpiece of contemporary construction.

 14+CO Design Studio
Julie Florio Photography
Living room - mid-sized contemporary open concept light wood floor and beige floor living room idea in New York with white walls, a standard fireplace, a brick fireplace and a media wall
Living room - mid-sized contemporary open concept light wood floor and beige floor living room idea in New York with white walls, a standard fireplace, a brick fireplace and a media wall

 Inchoate
Photos by Brian Reitz, Creative Vision Studios
Example of a small trendy gray one-story stucco house exterior design in Los Angeles with a shed roof
Example of a small trendy gray one-story stucco house exterior design in Los Angeles with a shed roof

 Jordana Nicholson
Photo: Jordana Nicholson © 2016 Houzz
Inspiration for a country bathroom remodel in Nashville
Inspiration for a country bathroom remodel in Nashville
 Griffith Indoor & Outdoor Living
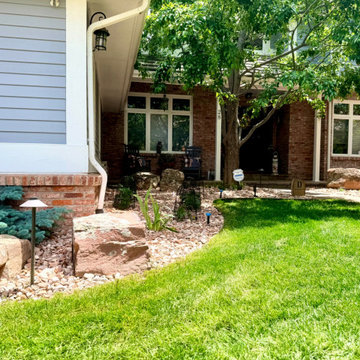
This colorful, water-wise landscape renovation refreshed a Ken Caryl North Ranch property backing to open space. Griffith Designs developed a personalized landscape solution that balanced the homeowners’ love of color with the need for resilient, low-maintenance plantings suited to foothills weather, challenging soil, open-space exposure and frequent wildlife—all within budget.
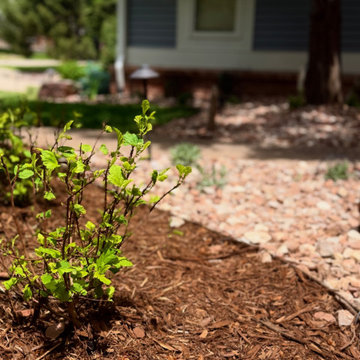
The side and backyard garden beds were cleaned out and simplified by removing difficult or unwanted plants. Refreshed rock and new irrigation created a stronger foundation for colorful, drought-tolerant and deer-resistant perennials and seasonal shrubs. In the front yard, struggling sod was reduced and replaced with new hardscape, plantings and large landscape boulders that add structure and natural Colorado character.
The project also restored existing hardscape by resetting loose pavers along the front walkway and patio and installing new polymeric sand. Expanded outdoor landscape lighting complements the home’s existing lighting, improving visibility while highlighting the renewed planting areas and hardscape after sunset.
Important irrigation repairs and upgrades were completed throughout the property, including locating leaks, replacing sprinkler valves and updating the control box, backflow and system components. Irrigation was then adjusted and extended to serve the new landscape areas. The finished design gives this Ken Caryl North Ranch home a colorful, water-conscious landscape that is attractive, functional and better prepared for Colorado’s demanding foothills environment.
 Griffith Indoor & Outdoor Living
This colorful, water-wise landscape renovation refreshed a Ken Caryl North Ranch property backing to open space. Griffith Designs developed a personalized landscape solution that balanced the homeowners’ love of color with the need for resilient, low-maintenance plantings suited to foothills weather, challenging soil, open-space exposure and frequent wildlife—all within budget.
The side and backyard garden beds were cleaned out and simplified by removing difficult or unwanted plants. Refreshed rock and new irrigation created a stronger foundation for colorful, drought-tolerant and deer-resistant perennials and seasonal shrubs. In the front yard, struggling sod was reduced and replaced with new hardscape, plantings and large landscape boulders that add structure and natural Colorado character.
The project also restored existing hardscape by resetting loose pavers along the front walkway and patio and installing new polymeric sand. Expanded outdoor landscape lighting complements the home’s existing lighting, improving visibility while highlighting the renewed planting areas and hardscape after sunset.
Important irrigation repairs and upgrades were completed throughout the property, including locating leaks, replacing sprinkler valves and updating the control box, backflow and system components. Irrigation was then adjusted and extended to serve the new landscape areas. The finished design gives this Ken Caryl North Ranch home a colorful, water-conscious landscape that is attractive, functional and better prepared for Colorado’s demanding foothills environment.
 Griffith Indoor & Outdoor Living
This colorful, water-wise landscape renovation refreshed a Ken Caryl North Ranch property backing to open space. Griffith Designs developed a personalized landscape solution that balanced the homeowners’ love of color with the need for resilient, low-maintenance plantings suited to foothills weather, challenging soil, open-space exposure and frequent wildlife—all within budget.
The side and backyard garden beds were cleaned out and simplified by removing difficult or unwanted plants. Refreshed rock and new irrigation created a stronger foundation for colorful, drought-tolerant and deer-resistant perennials and seasonal shrubs. In the front yard, struggling sod was reduced and replaced with new hardscape, plantings and large landscape boulders that add structure and natural Colorado character.
The project also restored existing hardscape by resetting loose pavers along the front walkway and patio and installing new polymeric sand. Expanded outdoor landscape lighting complements the home’s existing lighting, improving visibility while highlighting the renewed planting areas and hardscape after sunset.
Important irrigation repairs and upgrades were completed throughout the property, including locating leaks, replacing sprinkler valves and updating the control box, backflow and system components. Irrigation was then adjusted and extended to serve the new landscape areas. The finished design gives this Ken Caryl North Ranch home a colorful, water-conscious landscape that is attractive, functional and better prepared for Colorado’s demanding foothills environment.
 Griffith Indoor & Outdoor Living
This colorful, water-wise landscape renovation refreshed a Ken Caryl North Ranch property backing to open space. Griffith Designs developed a personalized landscape solution that balanced the homeowners’ love of color with the need for resilient, low-maintenance plantings suited to foothills weather, challenging soil, open-space exposure and frequent wildlife—all within budget.
The side and backyard garden beds were cleaned out and simplified by removing difficult or unwanted plants. Refreshed rock and new irrigation created a stronger foundation for colorful, drought-tolerant and deer-resistant perennials and seasonal shrubs. In the front yard, struggling sod was reduced and replaced with new hardscape, plantings and large landscape boulders that add structure and natural Colorado character.
The project also restored existing hardscape by resetting loose pavers along the front walkway and patio and installing new polymeric sand. Expanded outdoor landscape lighting complements the home’s existing lighting, improving visibility while highlighting the renewed planting areas and hardscape after sunset.
Important irrigation repairs and upgrades were completed throughout the property, including locating leaks, replacing sprinkler valves and updating the control box, backflow and system components. Irrigation was then adjusted and extended to serve the new landscape areas. The finished design gives this Ken Caryl North Ranch home a colorful, water-conscious landscape that is attractive, functional and better prepared for Colorado’s demanding foothills environment.
 Griffith Indoor & Outdoor Living
This colorful, water-wise landscape renovation refreshed a Ken Caryl North Ranch property backing to open space. Griffith Designs developed a personalized landscape solution that balanced the homeowners’ love of color with the need for resilient, low-maintenance plantings suited to foothills weather, challenging soil, open-space exposure and frequent wildlife—all within budget.
The side and backyard garden beds were cleaned out and simplified by removing difficult or unwanted plants. Refreshed rock and new irrigation created a stronger foundation for colorful, drought-tolerant and deer-resistant perennials and seasonal shrubs. In the front yard, struggling sod was reduced and replaced with new hardscape, plantings and large landscape boulders that add structure and natural Colorado character.
The project also restored existing hardscape by resetting loose pavers along the front walkway and patio and installing new polymeric sand. Expanded outdoor landscape lighting complements the home’s existing lighting, improving visibility while highlighting the renewed planting areas and hardscape after sunset.
Important irrigation repairs and upgrades were completed throughout the property, including locating leaks, replacing sprinkler valves and updating the control box, backflow and system components. Irrigation was then adjusted and extended to serve the new landscape areas. The finished design gives this Ken Caryl North Ranch home a colorful, water-conscious landscape that is attractive, functional and better prepared for Colorado’s demanding foothills environment.
 Griffith Indoor & Outdoor Living
This colorful, water-wise landscape renovation refreshed a Ken Caryl North Ranch property backing to open space. Griffith Designs developed a personalized landscape solution that balanced the homeowners’ love of color with the need for resilient, low-maintenance plantings suited to foothills weather, challenging soil, open-space exposure and frequent wildlife—all within budget.
The side and backyard garden beds were cleaned out and simplified by removing difficult or unwanted plants. Refreshed rock and new irrigation created a stronger foundation for colorful, drought-tolerant and deer-resistant perennials and seasonal shrubs. In the front yard, struggling sod was reduced and replaced with new hardscape, plantings and large landscape boulders that add structure and natural Colorado character.
The project also restored existing hardscape by resetting loose pavers along the front walkway and patio and installing new polymeric sand. Expanded outdoor landscape lighting complements the home’s existing lighting, improving visibility while highlighting the renewed planting areas and hardscape after sunset.
Important irrigation repairs and upgrades were completed throughout the property, including locating leaks, replacing sprinkler valves and updating the control box, backflow and system components. Irrigation was then adjusted and extended to serve the new landscape areas. The finished design gives this Ken Caryl North Ranch home a colorful, water-conscious landscape that is attractive, functional and better prepared for Colorado’s demanding foothills environment.
11