
Search results for "Reduce decided" in Home Design Ideas
 Stairworks
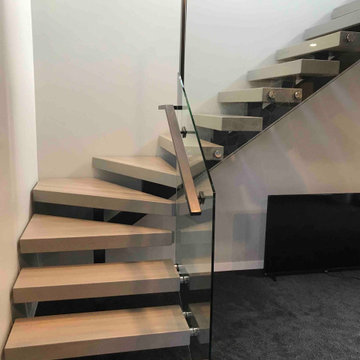
We were asked by a house builder to build a steel staircase as the centrepiece for their new show home in Auckland. Although they had already decided on the central mono-stringer style staircase (also known as a floating staircase), with solid oak treads and glass balustrades, when we met with them we also made some suggestions. This was in order to help nest the stairs in their desired location, which included having to change the layout to avoid clashing with the existing structure.
The stairs lead from a reception area up to a bedroom, so one of our first suggestions, was to have the glass balustrade on the side of the staircase finishing, and finish at the underside of the ground-floor ceiling, and then building an independent balustrade in the bedroom. The intention behind this was to give some separation between the living and sleeping areas, whilst maximising the full width of the opening for the stairs. Additionally, this also helps hide the staircase from inside the bedroom, as you don’t see the balustrade coming up from the floor below.
We also recommended the glass on the first floor was face fixed directly to the boundary beam, and the fixings covered with a painted fascia panel. This was in order to avoid using a large floor fixed glazing channel or reduce the opening width with stand-off pin fixings.

 Green Jay Landscape Design
This project is entitled 'Bringing Nature Home'; Where the Coyotes Run. While initially meeting with the client on a sunny afternoon a coyote ran across the lawn.
This indicated good fortune was waiting. From a Feng Shui perspective...powerful, positive energy.
An excerpt from the design concept is...Flowering ornamental grasses colorful perennials with large boulders will accent your new, native plant garden.

 Tiffany Brooks, HGTV Host & Interior Designer
Inquire About Our Design Services
What we did:
I started with a floor plan. I knew the success of this design rested in how the space was mapped out.
Lisa and Charles love modern furniture, but they couldn’t seem give each room the warmth they were looking for with modern furnishings, despite their best efforts. I was inspired by photos that they gave me and certain elements in the home that they LOVED.
One thing they mentioned was the fireplace and its color. I decided that the fireplace had to be the starting point of the room design, and based the color palette off of that beautiful, earthy orange color.
Here’s the highlights of the rest of the project:
Charted out the furniture plan for each room.
Created blueprints for shelving above Cabinet Storage area. Lisa is an avid reader and my home girl needs a library!
Custom designed the sofas, chairs, and an ottoman for the living area.
Selected all furnishings, accessories, and art.
Created storage for the kids. They are now able to stash their toys when they’re not using them, reducing clutter and keeping the space nice and open.
What I love:
They gave me the green light to have fun with the fabrics and patterns in the family room. I had a ton of fun with the sofas!
That AH-mazing coffee table. It is very unique, and I cannot lie… I secretly wanted it for myself.
The art in their living room (very dramatic). With the scale of the room, I knew it was either go big or go home!
Total time - 12.5 months
Find the right local pro for your project
 Stairworks
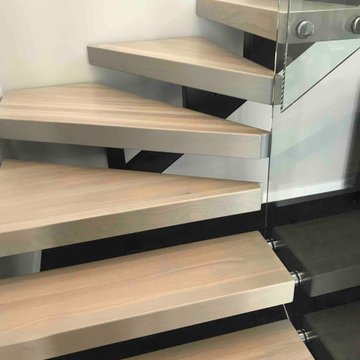
We were asked by a house builder to build a steel staircase as the centrepiece for their new show home in Auckland. Although they had already decided on the central mono-stringer style staircase (also known as a floating staircase), with solid oak treads and glass balustrades, when we met with them we also made some suggestions. This was in order to help nest the stairs in their desired location, which included having to change the layout to avoid clashing with the existing structure.
The stairs lead from a reception area up to a bedroom, so one of our first suggestions, was to have the glass balustrade on the side of the staircase finishing, and finish at the underside of the ground-floor ceiling, and then building an independent balustrade in the bedroom. The intention behind this was to give some separation between the living and sleeping areas, whilst maximising the full width of the opening for the stairs. Additionally, this also helps hide the staircase from inside the bedroom, as you don’t see the balustrade coming up from the floor below.
We also recommended the glass on the first floor was face fixed directly to the boundary beam, and the fixings covered with a painted fascia panel. This was in order to avoid using a large floor fixed glazing channel or reduce the opening width with stand-off pin fixings.

 MAAX Bath Inc.
The Adaptable Safe & Sound Door - MAAX’s latest innovations bring quiet and peace of mind to bathrooms with its versatile Kameleon line of stylish yet durable semi-frameless doors for showers and tub showers.
Kameleon doors glide with a silky whisper as our superior design secures frame and panels to prevent rattling and reduce impact. The optional SOFT CLOSE by MAAX feature eliminates accidental slams and pinched fingers forever. Multiple dimensions, frame finishes and style options make Kameleon true to its namesake by blending into nearly any bathroom environment.
 Stairworks
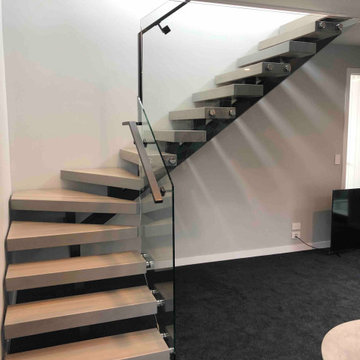
We were asked by a house builder to build a steel staircase as the centrepiece for their new show home in Auckland. Although they had already decided on the central mono-stringer style staircase (also known as a floating staircase), with solid oak treads and glass balustrades, when we met with them we also made some suggestions. This was in order to help nest the stairs in their desired location, which included having to change the layout to avoid clashing with the existing structure.
The stairs lead from a reception area up to a bedroom, so one of our first suggestions, was to have the glass balustrade on the side of the staircase finishing, and finish at the underside of the ground-floor ceiling, and then building an independent balustrade in the bedroom. The intention behind this was to give some separation between the living and sleeping areas, whilst maximising the full width of the opening for the stairs. Additionally, this also helps hide the staircase from inside the bedroom, as you don’t see the balustrade coming up from the floor below.
We also recommended the glass on the first floor was face fixed directly to the boundary beam, and the fixings covered with a painted fascia panel. This was in order to avoid using a large floor fixed glazing channel or reduce the opening width with stand-off pin fixings.
 Stairworks
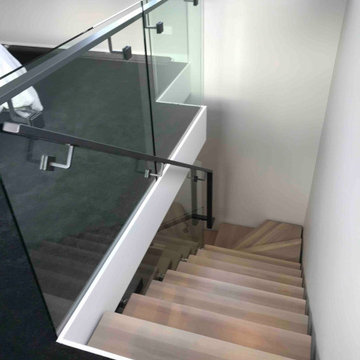
We were asked by a house builder to build a steel staircase as the centrepiece for their new show home in Auckland. Although they had already decided on the central mono-stringer style staircase (also known as a floating staircase), with solid oak treads and glass balustrades, when we met with them we also made some suggestions. This was in order to help nest the stairs in their desired location, which included having to change the layout to avoid clashing with the existing structure.
The stairs lead from a reception area up to a bedroom, so one of our first suggestions, was to have the glass balustrade on the side of the staircase finishing, and finish at the underside of the ground-floor ceiling, and then building an independent balustrade in the bedroom. The intention behind this was to give some separation between the living and sleeping areas, whilst maximising the full width of the opening for the stairs. Additionally, this also helps hide the staircase from inside the bedroom, as you don’t see the balustrade coming up from the floor below.
We also recommended the glass on the first floor was face fixed directly to the boundary beam, and the fixings covered with a painted fascia panel. This was in order to avoid using a large floor fixed glazing channel or reduce the opening width with stand-off pin fixings.
Sponsored
Columbus, OH

Hope Restoration & General Contracting
Columbus Design-Build, Kitchen & Bath Remodeling, Historic Renovations
 Stairworks
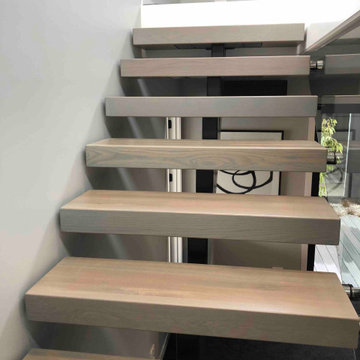
We were asked by a house builder to build a steel staircase as the centrepiece for their new show home in Auckland. Although they had already decided on the central mono-stringer style staircase (also known as a floating staircase), with solid oak treads and glass balustrades, when we met with them we also made some suggestions. This was in order to help nest the stairs in their desired location, which included having to change the layout to avoid clashing with the existing structure.
The stairs lead from a reception area up to a bedroom, so one of our first suggestions, was to have the glass balustrade on the side of the staircase finishing, and finish at the underside of the ground-floor ceiling, and then building an independent balustrade in the bedroom. The intention behind this was to give some separation between the living and sleeping areas, whilst maximising the full width of the opening for the stairs. Additionally, this also helps hide the staircase from inside the bedroom, as you don’t see the balustrade coming up from the floor below.
We also recommended the glass on the first floor was face fixed directly to the boundary beam, and the fixings covered with a painted fascia panel. This was in order to avoid using a large floor fixed glazing channel or reduce the opening width with stand-off pin fixings.
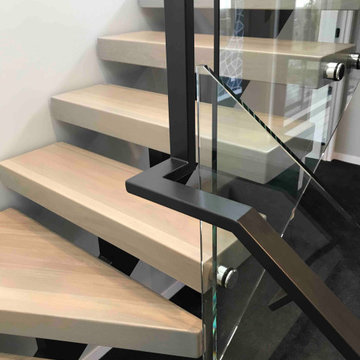 Stairworks
We were asked by a house builder to build a steel staircase as the centrepiece for their new show home in Auckland. Although they had already decided on the central mono-stringer style staircase (also known as a floating staircase), with solid oak treads and glass balustrades, when we met with them we also made some suggestions. This was in order to help nest the stairs in their desired location, which included having to change the layout to avoid clashing with the existing structure.
The stairs lead from a reception area up to a bedroom, so one of our first suggestions, was to have the glass balustrade on the side of the staircase finishing, and finish at the underside of the ground-floor ceiling, and then building an independent balustrade in the bedroom. The intention behind this was to give some separation between the living and sleeping areas, whilst maximising the full width of the opening for the stairs. Additionally, this also helps hide the staircase from inside the bedroom, as you don’t see the balustrade coming up from the floor below.
We also recommended the glass on the first floor was face fixed directly to the boundary beam, and the fixings covered with a painted fascia panel. This was in order to avoid using a large floor fixed glazing channel or reduce the opening width with stand-off pin fixings.
 Stairworks
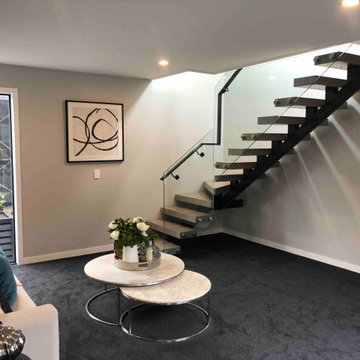
We were asked by a house builder to build a steel staircase as the centrepiece for their new show home in Auckland. Although they had already decided on the central mono-stringer style staircase (also known as a floating staircase), with solid oak treads and glass balustrades, when we met with them we also made some suggestions. This was in order to help nest the stairs in their desired location, which included having to change the layout to avoid clashing with the existing structure.
The stairs lead from a reception area up to a bedroom, so one of our first suggestions, was to have the glass balustrade on the side of the staircase finishing, and finish at the underside of the ground-floor ceiling, and then building an independent balustrade in the bedroom. The intention behind this was to give some separation between the living and sleeping areas, whilst maximising the full width of the opening for the stairs. Additionally, this also helps hide the staircase from inside the bedroom, as you don’t see the balustrade coming up from the floor below.
We also recommended the glass on the first floor was face fixed directly to the boundary beam, and the fixings covered with a painted fascia panel. This was in order to avoid using a large floor fixed glazing channel or reduce the opening width with stand-off pin fixings.
 Tiffany Brooks, HGTV Host & Interior Designer
Inquire About Our Design Services
What we did:
I started with a floor plan. I knew the success of this design rested in how the space was mapped out.
Lisa and Charles love modern furniture, but they couldn’t seem give each room the warmth they were looking for with modern furnishings, despite their best efforts. I was inspired by photos that they gave me and certain elements in the home that they LOVED.
One thing they mentioned was the fireplace and its color. I decided that the fireplace had to be the starting point of the room design, and based the color palette off of that beautiful, earthy orange color.
Here’s the highlights of the rest of the project:
Charted out the furniture plan for each room.
Created blueprints for shelving above Cabinet Storage area. Lisa is an avid reader and my home girl needs a library!
Custom designed the sofas, chairs, and an ottoman for the living area.
Selected all furnishings, accessories, and art.
Created storage for the kids. They are now able to stash their toys when they’re not using them, reducing clutter and keeping the space nice and open.
What I love:
They gave me the green light to have fun with the fabrics and patterns in the family room. I had a ton of fun with the sofas!
That AH-mazing coffee table. It is very unique, and I cannot lie… I secretly wanted it for myself.
The art in their living room (very dramatic). With the scale of the room, I knew it was either go big or go home!
Total time - 12.5 months
 Stairworks
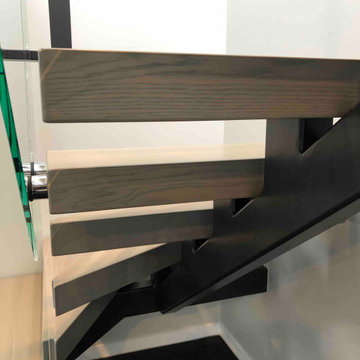
We were asked by a house builder to build a steel staircase as the centrepiece for their new show home in Auckland. Although they had already decided on the central mono-stringer style staircase (also known as a floating staircase), with solid oak treads and glass balustrades, when we met with them we also made some suggestions. This was in order to help nest the stairs in their desired location, which included having to change the layout to avoid clashing with the existing structure.
The stairs lead from a reception area up to a bedroom, so one of our first suggestions, was to have the glass balustrade on the side of the staircase finishing, and finish at the underside of the ground-floor ceiling, and then building an independent balustrade in the bedroom. The intention behind this was to give some separation between the living and sleeping areas, whilst maximising the full width of the opening for the stairs. Additionally, this also helps hide the staircase from inside the bedroom, as you don’t see the balustrade coming up from the floor below.
We also recommended the glass on the first floor was face fixed directly to the boundary beam, and the fixings covered with a painted fascia panel. This was in order to avoid using a large floor fixed glazing channel or reduce the opening width with stand-off pin fixings.
 Green Home Systems
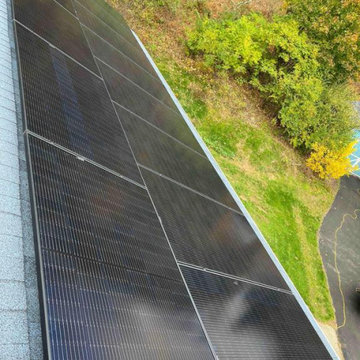
Green Home Systems recently completed a successful solar project in Bloomsburg, PA for Eric M. The project was completed in a few months and consisted of 5.04 kW of solar panels installed on the flat roof of Eric’s home.
Eric chose Green Home Systems for their competitive pricing and wide selection of solar panels. He was also impressed with their warranty and customer service. After researching online, Eric decided to go solar to reduce his utility bill, increase the value of his home, and take advantage of the easy payment terms offered by Green Home Systems.
The installation process began with an inspection of the roof to ensure it was suitable for mounting the solar panels. The inspections revealed that some minor repairs were needed before installation could begin. Green Home Systems team quickly repaired any damage to the roof and got to work installing the panels.
Once the installation was complete, Eric quickly noticed a reduction in his monthly utility bills as well as an increase in the value of his home due to having clean energy sources available. He also was very pleased with how quickly and efficiently Green Home Systems completed the project.
The team at Green Home Systems is dedicated to providing customers with top-notch service and quality products at competitive prices. We strive to make your transition from traditional energy sources to renewable energy sources as smooth as possible by providing support throughout every step of the process. If you're looking for a reliable and cost-effective way to generate clean energy for your home or business, contact us today!
Sponsored
Columbus, OH
Hope Restoration & General Contracting
Columbus Design-Build, Kitchen & Bath Remodeling, Historic Renovations
 Stairworks
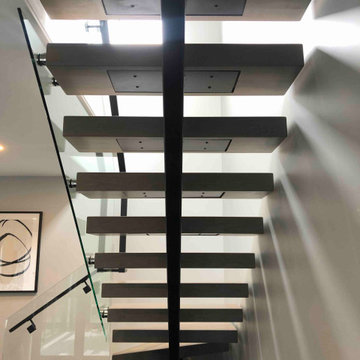
We were asked by a house builder to build a steel staircase as the centrepiece for their new show home in Auckland. Although they had already decided on the central mono-stringer style staircase (also known as a floating staircase), with solid oak treads and glass balustrades, when we met with them we also made some suggestions. This was in order to help nest the stairs in their desired location, which included having to change the layout to avoid clashing with the existing structure.
The stairs lead from a reception area up to a bedroom, so one of our first suggestions, was to have the glass balustrade on the side of the staircase finishing, and finish at the underside of the ground-floor ceiling, and then building an independent balustrade in the bedroom. The intention behind this was to give some separation between the living and sleeping areas, whilst maximising the full width of the opening for the stairs. Additionally, this also helps hide the staircase from inside the bedroom, as you don’t see the balustrade coming up from the floor below.
We also recommended the glass on the first floor was face fixed directly to the boundary beam, and the fixings covered with a painted fascia panel. This was in order to avoid using a large floor fixed glazing channel or reduce the opening width with stand-off pin fixings.
 Green Home Systems
Green Home Systems recently completed a successful solar project in Bloomsburg, PA for Eric M. The project was completed in a few months and consisted of 5.04 kW of solar panels installed on the flat roof of Eric’s home.
Eric chose Green Home Systems for their competitive pricing and wide selection of solar panels. He was also impressed with their warranty and customer service. After researching online, Eric decided to go solar to reduce his utility bill, increase the value of his home, and take advantage of the easy payment terms offered by Green Home Systems.
The installation process began with an inspection of the roof to ensure it was suitable for mounting the solar panels. The inspections revealed that some minor repairs were needed before installation could begin. Green Home Systems team quickly repaired any damage to the roof and got to work installing the panels.
Once the installation was complete, Eric quickly noticed a reduction in his monthly utility bills as well as an increase in the value of his home due to having clean energy sources available. He also was very pleased with how quickly and efficiently Green Home Systems completed the project.
The team at Green Home Systems is dedicated to providing customers with top-notch service and quality products at competitive prices. We strive to make your transition from traditional energy sources to renewable energy sources as smooth as possible by providing support throughout every step of the process. If you're looking for a reliable and cost-effective way to generate clean energy for your home or business, contact us today!

 Pro Dunk Hoops
Tom has created a wonderful area off the back of his house... "Enjoy my very clever way to reduce concrete costs while enjoying a full 3 point arc playing area! Here’s your pitch = the money saved allows your future customers to upgrade their model!!! I looked at every option out there before deciding on Pro Dunk. Your product is top notch! Your quality is unsurpassed… Friendly, knowledgeable, & trustworthy customer service. Excellent delivery process. Easy and very clear do-it-yourself." This is a Pro Dunk Platinum Basketball System that was purchased in March of 2012. It was installed on a 46 ft wide by a 30 ft deep playing area in Rogers, MN. Browse all of Tom B's photos navigate to: http://www.produnkhoops.com/photos/albums/tom-46x30-pro-dunk-platinum-basketball-system-83/

 Mottram Architecture
Timber frame homes offer unique challenges during a remodel. What often makes them beautiful and attractive to most homeowners, also makes them challenging for space requirements.
Context: The lovely couple that owned this home were struggling with some interesting floor plan challenges that just didn't work for their family. The loved the beautiful timbers and woodwork of their home, but the dramatically sloping ceilings on the second floor, particularly in the bathroom, just didn't work for this 1 1/2 bath home. Needing to use the skylight to approach the toilet was a less then ideal scenario. Although the bathroom footprint was more then adequate, the sloped ceiling only made half of the space useable. Check out the Before/After post on our blog to see the photos of the house pre-renovation. As much as they loved all the wood features in their home, another challenge they had was light. The wood ceiling made everything inside the house darker, even with a fantastic array of south facing windows, there were spaces in the home that felt dark and small. When they contacted us they wanted to know how could they make their brighter and more inviting, were there solutions to the 2nd floor sloped ceiling issues, and if they were going to do all of this work, how could they make their home more comfortable and efficient. A nagging water leak in the upstairs bathroom spurred them into action and here is how we solved their dilemma.
Conclusion: First, we added a little dormer to the rear of the house so we could get full headroom in nearly all of the upstairs bathroom! Then we decided to extend that dormer one more timber bay over to create a walk in closet with natural light and plenty of space. Since we were contemplating energy efficiency, we resolved a nagging issue that is present in a lot of timber frame construction, air tightness. Commonly found in timber frame construction, fiberglass insulation is installed in the rafter bays and board ceilings are installed over top. Unfortunately, board ceilings are anything but air tight, and fiberglass insulation needs to be in an airtight cavity for maximum effectiveness. So we were able to solve two issues at the same time for this homeowner. We removed the board ceiling and fiberglass insulation, we dense packed the rafter bays with cellulose insulation, and installed sheetrock in place of the boards. The boards were salvaged for re-use by the homeowner, and the space and light quality was dramatically improved. Some may think that losing the board ceiling took something away from the space, but what you'll see in the pictures is that it highly accentuates the heavy timbers and really makes them stand out in a beautiful way. Now with this added airtightness, better insulation, and brighter space, the homeowner hardly runs their wood stove, and it's so quiet in the space, an added bonus from changing the insulation. It became necessary to also add a sheetrock ceiling to the living room to hide the plumbing from the new bathroom layout above. Changing this ceiling gave the homeowner some real quality lighting that was lacking in the living room before. The brighter ceiling and new lighting layout completely transforms the living room into a space you want to hang out, even though the layout didn't change at all. When the homeowner saw the finished spaces she said "I can't believe this is my house, I want to live in this house"
Energy Efficiency: I touched a little on the efficiency above, but like all projects done with Mottram Architecture, we always want to leave you with a little extra. Timber frame construction with board ceilings and fiberglass insulation are notoriously leaky! If you want to know what we think about fiberglass insulation, check our our blog post on Why Fiberglass Insulation Sucks. By installing cellulose insulation and covering it with sheetrock we were able to greatly reduce the heat flowing out of this home. It not only improves cashflow it improves the comfort level in the space. Who wants to sit in their living room and feel a draft? Let us remind you, we are not saying cellulose insulation is an air barrier, we use the sheetrock to help with that, but it does significantly reduce the air flow over fiberglass insulation. And when we reduce the airflow, we reduce the heat flow. And when we reduce the heat flow, we reduce the need to re-heat that drafty air from outside. When it comes to energy efficiency the first and best place to start is air infiltration. We greatly reduced the air infiltration with the new insulation, but we also added a hat and warm boots. What I mean by that is, we improved the insulation in the roof, and we installed insulation in the basement. Maybe it's a silly analogy, but when you think about keeping warm, we always start with the hat and boots! With sustainability in mind, the next project will be to add a deck to the front of this house with rain catchment barrels from the metal roof. They are planning to plant a garden in the spring and the rain catchment system will help to irrigate the new garden.
Builder: East Shore Builders
Photographer: Michael Eric Berube


 Mottram Architecture
Timber frame homes offer unique challenges during a remodel. What often makes them beautiful and attractive to most homeowners, also makes them challenging for space requirements.
Context: The lovely couple that owned this home were struggling with some interesting floor plan challenges that just didn't work for their family. The loved the beautiful timbers and woodwork of their home, but the dramatically sloping ceilings on the second floor, particularly in the bathroom, just didn't work for this 1 1/2 bath home. Needing to use the skylight to approach the toilet was a less then ideal scenario. Although the bathroom footprint was more then adequate, the sloped ceiling only made half of the space useable. Check out the Before/After post on our blog to see the photos of the house pre-renovation. As much as they loved all the wood features in their home, another challenge they had was light. The wood ceiling made everything inside the house darker, even with a fantastic array of south facing windows, there were spaces in the home that felt dark and small. When they contacted us they wanted to know how could they make their brighter and more inviting, were there solutions to the 2nd floor sloped ceiling issues, and if they were going to do all of this work, how could they make their home more comfortable and efficient. A nagging water leak in the upstairs bathroom spurred them into action and here is how we solved their dilemma.
Conclusion: First, we added a little dormer to the rear of the house so we could get full headroom in nearly all of the upstairs bathroom! Then we decided to extend that dormer one more timber bay over to create a walk in closet with natural light and plenty of space. Since we were contemplating energy efficiency, we resolved a nagging issue that is present in a lot of timber frame construction, air tightness. Commonly found in timber frame construction, fiberglass insulation is installed in the rafter bays and board ceilings are installed over top. Unfortunately, board ceilings are anything but air tight, and fiberglass insulation needs to be in an airtight cavity for maximum effectiveness. So we were able to solve two issues at the same time for this homeowner. We removed the board ceiling and fiberglass insulation, we dense packed the rafter bays with cellulose insulation, and installed sheetrock in place of the boards. The boards were salvaged for re-use by the homeowner, and the space and light quality was dramatically improved. Some may think that losing the board ceiling took something away from the space, but what you'll see in the pictures is that it highly accentuates the heavy timbers and really makes them stand out in a beautiful way. Now with this added airtightness, better insulation, and brighter space, the homeowner hardly runs their wood stove, and it's so quiet in the space, an added bonus from changing the insulation. It became necessary to also add a sheetrock ceiling to the living room to hide the plumbing from the new bathroom layout above. Changing this ceiling gave the homeowner some real quality lighting that was lacking in the living room before. The brighter ceiling and new lighting layout completely transforms the living room into a space you want to hang out, even though the layout didn't change at all. When the homeowner saw the finished spaces she said "I can't believe this is my house, I want to live in this house"
Energy Efficiency: I touched a little on the efficiency above, but like all projects done with Mottram Architecture, we always want to leave you with a little extra. Timber frame construction with board ceilings and fiberglass insulation are notoriously leaky! If you want to know what we think about fiberglass insulation, check our our blog post on Why Fiberglass Insulation Sucks. By installing cellulose insulation and covering it with sheetrock we were able to greatly reduce the heat flowing out of this home. It not only improves cashflow it improves the comfort level in the space. Who wants to sit in their living room and feel a draft? Let us remind you, we are not saying cellulose insulation is an air barrier, we use the sheetrock to help with that, but it does significantly reduce the air flow over fiberglass insulation. And when we reduce the airflow, we reduce the heat flow. And when we reduce the heat flow, we reduce the need to re-heat that drafty air from outside. When it comes to energy efficiency the first and best place to start is air infiltration. We greatly reduced the air infiltration with the new insulation, but we also added a hat and warm boots. What I mean by that is, we improved the insulation in the roof, and we installed insulation in the basement. Maybe it's a silly analogy, but when you think about keeping warm, we always start with the hat and boots! With sustainability in mind, the next project will be to add a deck to the front of this house with rain catchment barrels from the metal roof. They are planning to plant a garden in the spring and the rain catchment system will help to irrigate the new garden.
Builder: East Shore Builders
Photographer: Michael Eric Berube
 Tiffany Brooks, HGTV Host & Interior Designer
Inquire About Our Design Services
What we did:
I started with a floor plan. I knew the success of this design rested in how the space was mapped out.
Lisa and Charles love modern furniture, but they couldn’t seem give each room the warmth they were looking for with modern furnishings, despite their best efforts. I was inspired by photos that they gave me and certain elements in the home that they LOVED.
One thing they mentioned was the fireplace and its color. I decided that the fireplace had to be the starting point of the room design, and based the color palette off of that beautiful, earthy orange color.
Here’s the highlights of the rest of the project:
Charted out the furniture plan for each room.
Created blueprints for shelving above Cabinet Storage area. Lisa is an avid reader and my home girl needs a library!
Custom designed the sofas, chairs, and an ottoman for the living area.
Selected all furnishings, accessories, and art.
Created storage for the kids. They are now able to stash their toys when they’re not using them, reducing clutter and keeping the space nice and open.
What I love:
They gave me the green light to have fun with the fabrics and patterns in the family room. I had a ton of fun with the sofas!
That AH-mazing coffee table. It is very unique, and I cannot lie… I secretly wanted it for myself.
The art in their living room (very dramatic). With the scale of the room, I knew it was either go big or go home!
Total time - 12.5 months
9