
Search results for "Reduce measures" in Home Design Ideas

 Xpand Inc. | Homes of Xcellence
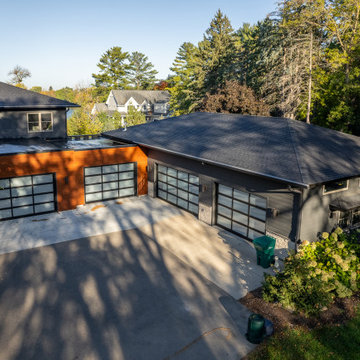
At the outset, this project began with the transformation of a 2-car attached garage. The goal was to create a mudroom, an exercise room, and a breezeway to seamlessly connect the spacious detached garage with the main part of the house. Additionally, the project involved partial roof removal and the addition of a new front entry.
But then came an unexpected twist – scope creep.
We found ourselves veering away from the initial client-supplied architectural plans. After numerous consultations with the clients and several iterations of the design, we arrived at a significantly improved plan for the remodel and addition.
Our journey commenced with the demolition of almost the entire former 2-car garage, making space for a new, oversized 3-car garage measuring 40′ x 28′. This garage was strategically placed between the existing house and the large detached garage. We introduced a custom low-sloped flat roof, designed to address historical drainage issues.
To mitigate water pooling, we created a custom concrete step at the back corner of the garage, equipped with a sturdy metal grate that sits flush with the step. We also installed a PVC drainage system, commencing at the step and running beneath a newly designed patio, ultimately draining into the yard. These measures have significantly reduced water accumulation around the house.
The new garage boasts several features, including Longboard aluminum siding, custom full glass garage doors, interior drywall finished to a level 4, an abundance of can lights, an epoxy floor coating, vinyl base trim, a new forced air garage heater, and more.
The clients also requested a designated space for their three kids and their friends to enjoy, thus giving birth to the “Kid Zone.” We partitioned a section of the existing oversized garage, resulting in a space measuring approximately 22′ x 32′, brimming with entertainment possibilities. To enhance control over the temperature in the Kid Zone, we collaborated with our licensed HVAC partner to install a cold weather mini-split system.
One of the most significant challenges was the modernization and consolidation of the home’s main electrical systems. We reconfigured and combined 6-7 different electrical panels into just two. One panel serves the main house, while the second is dedicated to backup power from a generator. These panels, along with the boiler for the in-floor heating system, are housed in a newly constructed mechanical room within the Kid Zone.
Inside the main house, we completed various tasks, such as removing the ceiling in the hallway from the new garage to address prior water damage, improve insulation, and rework electrical and HVAC systems. We also replaced the ceiling from the front door to the base of the stairs, adding new can lighting and enhancing insulation. Skilled drywall specialists then installed and finished new drywall to a level 5 standard.
The exterior of the house underwent a complete overhaul. Before installing new roofing on the entire house and garage, we modified an existing flat roof by adding custom lumber and plywood to enhance the pitch, preventing future ice dams. A new rubber roof was expertly installed on the oversized 3-car garage, and the flat roof section we re-framed.
Our meticulous exterior team removed old white aluminum soffit, fascia, and gutters, replacing them with new framing to accommodate Longboard soffit material. This task was particularly challenging due to the age of the house and the non-standard wall and roof framing. Our skilled exterior subcontractors ensured a perfect fit.
Near the pool area, we discovered severe rot and decay from years of water intrusion. After informing the homeowners, we ordered and installed five new commercial-style block framed windows and a custom 8′ high Anderson patio door. This involved careful removal and replacement of window headers from the outside to avoid disturbing the finished part of the house. We reframed the large openings to fit the new windows, and our skilled trim carpenters installed new walnut casing, base, and window sills.
In total, we replaced around 900 lineal feet of soffit and installed approximately 32 squares of aluminum siding. The entire house was meticulously prepped, repaired, and painted according to the client’s chosen color.
Throughout the project, we incorporated numerous custom touches and unique design elements, some of which you can see in the pictures. Our team also addressed various unforeseen challenges, from soil issues to rot and decay repair, roof leaks, drainage problems, electrical and HVAC complexities, and much more.
At Xpand Inc., we take pride in making it all happen, turning your remodeling and renovation dreams into reality.

 Industrial Projects
Creating a comfortable outdoor living space is a priority for many homeowners and DIY enthusiasts. With rising summer temperatures, installing a shade tarp in your backyard offers an affordable and effective solution for sun protection. We’ve developed this detailed, step-by-step guide to help you confidently install a shade tarp that not only shields you from the sun but also adds aesthetic appeal to your outdoor area.
Benefits of Installing a Backyard Shade Tarp
Before diving into the installation process, let’s explore the key benefits of having a backyard shade tarp:
Provides UV Protection: Keeps your family and guests safe from harmful sun exposure.
Reduces Outdoor Temperatures: Creates a cooler, more enjoyable outdoor space.
Protects Outdoor Furniture: Extends the life of patio furniture by reducing sun damage.
Enhances Outdoor Aesthetics: Adds a modern, stylish look to your yard.
Budget-Friendly: More affordable compared to permanent structures like pergolas.
Materials and Tools You’ll Need
To begin your DIY backyard shade project, gather the following materials and tools:
Materials:
Shade tarp (UV-resistant and breathable)
Sturdy posts or existing structures (trees, fences, walls)
Mounting hardware (eye bolts, D-rings, turnbuckles, snap hooks)
Nylon or polyester rope, or stainless-steel wire
Concrete (if installing new posts)
Tools:
Power drill
Measuring tape
Level
Ladder
Wrench or adjustable spanner
Post hole digger (if installing new posts)
Step 1: Plan Your Shade Tarp Layout
The first step in installing your backyard shade tarp is careful planning. Take time to assess your outdoor area and answer these key questions:
Where is the sun’s path throughout the day?
What size and shape of tarp best suits your space?
Will you anchor the tarp to existing structures or install new posts?
What height do you want the tarp to sit at for maximum shade and airflow?
Pro Tip: Use string or garden hoses to visualize the tarp layout on the ground before making permanent decisions.
Step 2: Measure and Mark Anchor Points
Once you’ve determined the tarp’s location and orientation:
Measure the tarp dimensions.
Mark the exact points where each corner of the tarp will be anchored.
Ensure that the anchor points are at least 5–10% longer than the tarp size to allow for tensioning and slight adjustments.
Consider slope angles for water runoff. Aim for at least a 20-degree angle to prevent water pooling on the tarp.
Step 3: Install Support Posts (If Necessary)
If your backyard lacks existing anchor points like trees or fences, you’ll need to install sturdy support posts:
Dig post holes at least 24 inches deep and 8-12 inches wide for stability.
Set posts in concrete, making sure they remain plumb and level.
Allow the concrete to cure for at least 24–48 hours before applying tension from the tarp.
We recommend using pressure-treated wood, galvanized steel poles, or aluminum posts for longevity and strength.
Step 4: Install Mounting Hardware
With your anchor points ready, it’s time to install the necessary hardware:
Attach eye bolts or pad eyes securely into walls, posts, or other fixed structures.
For added flexibility and adjustability, install turnbuckles or tensioners to fine-tune the tarp’s tightness.
Connect snap hooks, D-rings, or carabiners to make assembly and disassembly easier.
Make sure all hardware is rated for outdoor use to prevent rust and corrosion.
Step 5: Attach and Tension the Shade Tarp
Now it’s time for the most satisfying part—mounting the shade tarp:
Begin by attaching one corner of the tarp to an anchor point.
Gradually attach the remaining corners, moving diagonally for even tension.
Adjust each connection point using your turnbuckles, ropes, or cables.
Pull the tarp tight enough to avoid sagging, but not so tight that it risks tearing.
Check that the tarp maintains the desired slope for rainwater runoff and adjust tension as needed.
Step 6: Final Adjustments and Safety Check
Before enjoying your new shaded area:
Inspect all anchor points and hardware for stability.
Test the tarp’s tension and make adjustments for even distribution.
Ensure that no sharp edges or loose connections remain that could damage the tarp or pose a safety hazard.
Confirm that the tarp is secure in windy conditions by giving it a gentle tug.
If you live in an area with frequent high winds, consider removing the tarp during storms to prevent damage.
Step 7: Enjoy Your Shaded Backyard Oasis
Once installed, your backyard shade tarp provides a comfortable and protective space for outdoor gatherings, relaxation, or family activities. You can decorate underneath with outdoor furniture, string lights, or potted plants to create a personalized outdoor retreat.
Maintenance Tips for Long-Lasting Shade Tarp Performance
To extend the life of your shade tarp, follow these maintenance guidelines:
Regularly check for wear and tear, especially around anchor points and seams.
Clean the tarp periodically with mild soap and water to prevent mildew buildup.
Store the tarp indoors during harsh weather seasons if it's not designed for year-round use.
Tighten hardware as needed to maintain proper tension and avoid sagging.
By following these simple care steps, your shade tarp will continue to deliver years of sun protection and outdoor comfort.
Conclusion: Upgrade Your Outdoor Space with a DIY Shade Tarp
Installing a shade tarp in your backyard is a cost-effective and rewarding DIY project. With careful planning, quality materials, and proper installation techniques, you’ll enjoy cool, shaded outdoor living all season long. This step-by-step guide ensures your project goes smoothly from start to finish.
Find the right local pro for your project

 The Rinfret Group
Example of a mid-sized transitional freestanding desk dark wood floor and brown floor study room design in New York with beige walls and no fireplace
 Brooks + Scarpa Architects
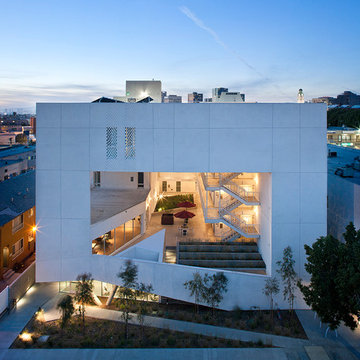
The SIX is a 52-unit affordable housing project provides a home, support services and rehabilitation for disabled veterans. It is located in the MacArthur Park area of Los Angeles. McArthur Park has one of the highest densities in the USA with over 38,000 people per square mile and a total population of 120,000 people in 2.72 square miles.
Offering shelter and comfort, the SIX breaks the prescriptive mold of the traditional shelter by creating public and private "zones" in which private space is deemphasized, in favor of large public areas. The organization of the space is intended to transform the way people live-away from a reclusive, isolating layout towards a community-oriented, interactive space.
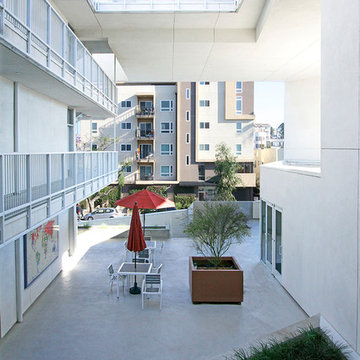
The ground level contains offices, support spaces for the veterans, bike storage and parking while the second level has a large public courtyard. Surrounded by four levels of housing units with balconies wrapped with a wood screen made from recycle planking the courtyard has large openings with green roofs that visually connects the space to the street on the lower level beyond. This allows the tenants to enjoy a secured open space while still connecting to the larger community.
The uppermost level has a green roof, large public patio and edible garden with panoramic views of the area.
The SIX distinguishes itself from most conventionally developed projects in that it incorporates energy efficient measures that exceed standard practice, optimize building performance, and ensure reduced energy use during all phases of construction and occupancy. The planning and design emerged from close consideration and employment of passive design strategies. These strategies include: locating and orienting the building to control solar cooling loads; shaping and orienting the building for exposure to prevailing winds; shaping the building to induce buoyancy for natural ventilation; designing windows to maximize day lighting; shading south facing windows and minimizing west-facing glazing; designing windows to maximize natural ventilation; utilizing low flow fixtures and storm water management; shaping and planning the interior to enhance daylight and natural air flow distribution. These passive strategies alone make this building 50% more efficient than a conventionally designed structure.
 Brooks + Scarpa Architects
The SIX is a 52-unit affordable housing project provides a home, support services and rehabilitation for disabled veterans. It is located in the MacArthur Park area of Los Angeles. McArthur Park has one of the highest densities in the USA with over 38,000 people per square mile and a total population of 120,000 people in 2.72 square miles.
Offering shelter and comfort, the SIX breaks the prescriptive mold of the traditional shelter by creating public and private "zones" in which private space is deemphasized, in favor of large public areas. The organization of the space is intended to transform the way people live-away from a reclusive, isolating layout towards a community-oriented, interactive space.
The ground level contains offices, support spaces for the veterans, bike storage and parking while the second level has a large public courtyard. Surrounded by four levels of housing units with balconies wrapped with a wood screen made from recycle planking the courtyard has large openings with green roofs that visually connects the space to the street on the lower level beyond. This allows the tenants to enjoy a secured open space while still connecting to the larger community.
The uppermost level has a green roof, large public patio and edible garden with panoramic views of the area.
The SIX distinguishes itself from most conventionally developed projects in that it incorporates energy efficient measures that exceed standard practice, optimize building performance, and ensure reduced energy use during all phases of construction and occupancy. The planning and design emerged from close consideration and employment of passive design strategies. These strategies include: locating and orienting the building to control solar cooling loads; shaping and orienting the building for exposure to prevailing winds; shaping the building to induce buoyancy for natural ventilation; designing windows to maximize day lighting; shading south facing windows and minimizing west-facing glazing; designing windows to maximize natural ventilation; utilizing low flow fixtures and storm water management; shaping and planning the interior to enhance daylight and natural air flow distribution. These passive strategies alone make this building 50% more efficient than a conventionally designed structure.
 Brooks + Scarpa Architects
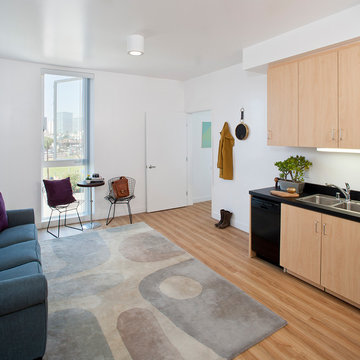
The SIX is a 52-unit affordable housing project provides a home, support services and rehabilitation for disabled veterans. It is located in the MacArthur Park area of Los Angeles. McArthur Park has one of the highest densities in the USA with over 38,000 people per square mile and a total population of 120,000 people in 2.72 square miles.
Offering shelter and comfort, the SIX breaks the prescriptive mold of the traditional shelter by creating public and private "zones" in which private space is deemphasized, in favor of large public areas. The organization of the space is intended to transform the way people live-away from a reclusive, isolating layout towards a community-oriented, interactive space.
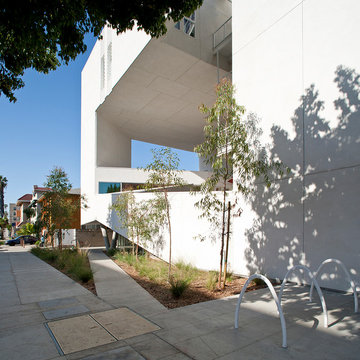
The ground level contains offices, support spaces for the veterans, bike storage and parking while the second level has a large public courtyard. Surrounded by four levels of housing units with balconies wrapped with a wood screen made from recycle planking the courtyard has large openings with green roofs that visually connects the space to the street on the lower level beyond. This allows the tenants to enjoy a secured open space while still connecting to the larger community.
The uppermost level has a green roof, large public patio and edible garden with panoramic views of the area.
The SIX distinguishes itself from most conventionally developed projects in that it incorporates energy efficient measures that exceed standard practice, optimize building performance, and ensure reduced energy use during all phases of construction and occupancy. The planning and design emerged from close consideration and employment of passive design strategies. These strategies include: locating and orienting the building to control solar cooling loads; shaping and orienting the building for exposure to prevailing winds; shaping the building to induce buoyancy for natural ventilation; designing windows to maximize day lighting; shading south facing windows and minimizing west-facing glazing; designing windows to maximize natural ventilation; utilizing low flow fixtures and storm water management; shaping and planning the interior to enhance daylight and natural air flow distribution. These passive strategies alone make this building 50% more efficient than a conventionally designed structure.

Sponsored
Delaware, OH

Buckeye Basements, Inc.
Central Ohio's Basement Finishing ExpertsBest Of Houzz '13-'21

 Citrine® Quartz Stone, Inc
You say you don’t know what color can match your kitchen or bath decor, because your floor is beige or black or some other color that no one match, your cabinets are dark brown or who knows what and your appliance are stainless steel or you have a kaleidoscope of colors and you are all confused because nothing looks good, Don’t despair, Introducing Kashmir White, Stock # PW-987 comes in 119” X 56“ Citrine® Quartz Stone, Inc. and it is more affordable then you think.
As you already may know, quartz is one of the hardest materials on earth, making it more durable than granite, marble or soapstone. Only diamond, sapphire, and topaz are stronger than quartz. However, since no counter tops are made from those elements, quartz is the king of the counter top because of its durability luminescence and elegance. Citrine® Quartz is 94% natural quartz and only 6% resin it will never require any sanding, sealing or polishing, and unlike granite or marble they do not accumulate molds or soap scum when property maintained. They are sure to always remain just as glossy and smooth as the first day they were installed, and we back it up with a LIFETIME WARRANTY.
Citrine® Quartz Stone has drastically risen in popularity and has even began to supplant the natural stones. Consumer Reports rates it as “The best counter tops material”. Citrine® quartz is the ideal option for a stress-free counter top, if you are remodeling your kitchen, bathroom, office or even building a new one.
We can also fabricate if you provide the drawings with measurements to our email; quartz@citrineus.com our estimator will contact you with a preliminary estimate.
Citrine® Quartz tip # 002 Our Master Quartz installers use miter joints, which reduces the use of grout or caulk by about 80% and gives the aesthetics of one continuous flowing slab.
Customer’s tip # 138 Use Hope’s Perfect Granite Spray it is 100% streak free and will give your luminous Quartz a mirror like finish.
Customer’s tip # 150 Use Isopropyl alcohol to remove ink marks by rubbing on the affected area with a cloth. No cleaning required after removal.
 Brooks + Scarpa Architects
The SIX is a 52-unit affordable housing project provides a home, support services and rehabilitation for disabled veterans. It is located in the MacArthur Park area of Los Angeles. McArthur Park has one of the highest densities in the USA with over 38,000 people per square mile and a total population of 120,000 people in 2.72 square miles.
Offering shelter and comfort, the SIX breaks the prescriptive mold of the traditional shelter by creating public and private "zones" in which private space is deemphasized, in favor of large public areas. The organization of the space is intended to transform the way people live-away from a reclusive, isolating layout towards a community-oriented, interactive space.
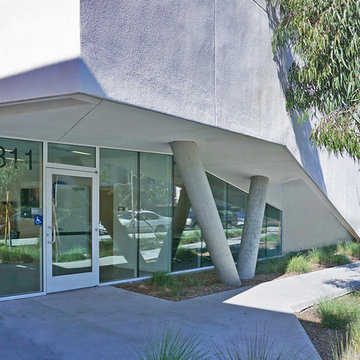
The ground level contains offices, support spaces for the veterans, bike storage and parking while the second level has a large public courtyard. Surrounded by four levels of housing units with balconies wrapped with a wood screen made from recycle planking the courtyard has large openings with green roofs that visually connects the space to the street on the lower level beyond. This allows the tenants to enjoy a secured open space while still connecting to the larger community.
The uppermost level has a green roof, large public patio and edible garden with panoramic views of the area.
The SIX distinguishes itself from most conventionally developed projects in that it incorporates energy efficient measures that exceed standard practice, optimize building performance, and ensure reduced energy use during all phases of construction and occupancy. The planning and design emerged from close consideration and employment of passive design strategies. These strategies include: locating and orienting the building to control solar cooling loads; shaping and orienting the building for exposure to prevailing winds; shaping the building to induce buoyancy for natural ventilation; designing windows to maximize day lighting; shading south facing windows and minimizing west-facing glazing; designing windows to maximize natural ventilation; utilizing low flow fixtures and storm water management; shaping and planning the interior to enhance daylight and natural air flow distribution. These passive strategies alone make this building 50% more efficient than a conventionally designed structure.
 Brooks + Scarpa Architects
The SIX is a 52-unit affordable housing project provides a home, support services and rehabilitation for disabled veterans. It is located in the MacArthur Park area of Los Angeles. McArthur Park has one of the highest densities in the USA with over 38,000 people per square mile and a total population of 120,000 people in 2.72 square miles.
Offering shelter and comfort, the SIX breaks the prescriptive mold of the traditional shelter by creating public and private "zones" in which private space is deemphasized, in favor of large public areas. The organization of the space is intended to transform the way people live-away from a reclusive, isolating layout towards a community-oriented, interactive space.
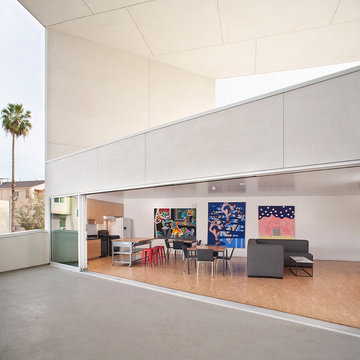
The ground level contains offices, support spaces for the veterans, bike storage and parking while the second level has a large public courtyard. Surrounded by four levels of housing units with balconies wrapped with a wood screen made from recycle planking the courtyard has large openings with green roofs that visually connects the space to the street on the lower level beyond. This allows the tenants to enjoy a secured open space while still connecting to the larger community.
The uppermost level has a green roof, large public patio and edible garden with panoramic views of the area.
The SIX distinguishes itself from most conventionally developed projects in that it incorporates energy efficient measures that exceed standard practice, optimize building performance, and ensure reduced energy use during all phases of construction and occupancy. The planning and design emerged from close consideration and employment of passive design strategies. These strategies include: locating and orienting the building to control solar cooling loads; shaping and orienting the building for exposure to prevailing winds; shaping the building to induce buoyancy for natural ventilation; designing windows to maximize day lighting; shading south facing windows and minimizing west-facing glazing; designing windows to maximize natural ventilation; utilizing low flow fixtures and storm water management; shaping and planning the interior to enhance daylight and natural air flow distribution. These passive strategies alone make this building 50% more efficient than a conventionally designed structure.
 Brooks + Scarpa Architects
The SIX is a 52-unit affordable housing project provides a home, support services and rehabilitation for disabled veterans. It is located in the MacArthur Park area of Los Angeles. McArthur Park has one of the highest densities in the USA with over 38,000 people per square mile and a total population of 120,000 people in 2.72 square miles.
Offering shelter and comfort, the SIX breaks the prescriptive mold of the traditional shelter by creating public and private "zones" in which private space is deemphasized, in favor of large public areas. The organization of the space is intended to transform the way people live-away from a reclusive, isolating layout towards a community-oriented, interactive space.
The ground level contains offices, support spaces for the veterans, bike storage and parking while the second level has a large public courtyard. Surrounded by four levels of housing units with balconies wrapped with a wood screen made from recycle planking the courtyard has large openings with green roofs that visually connects the space to the street on the lower level beyond. This allows the tenants to enjoy a secured open space while still connecting to the larger community.
The uppermost level has a green roof, large public patio and edible garden with panoramic views of the area.
The SIX distinguishes itself from most conventionally developed projects in that it incorporates energy efficient measures that exceed standard practice, optimize building performance, and ensure reduced energy use during all phases of construction and occupancy. The planning and design emerged from close consideration and employment of passive design strategies. These strategies include: locating and orienting the building to control solar cooling loads; shaping and orienting the building for exposure to prevailing winds; shaping the building to induce buoyancy for natural ventilation; designing windows to maximize day lighting; shading south facing windows and minimizing west-facing glazing; designing windows to maximize natural ventilation; utilizing low flow fixtures and storm water management; shaping and planning the interior to enhance daylight and natural air flow distribution. These passive strategies alone make this building 50% more efficient than a conventionally designed structure.
 Brooks + Scarpa Architects
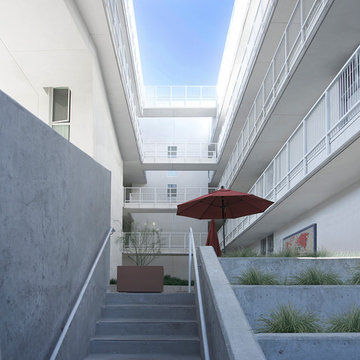
The SIX is a 52-unit affordable housing project provides a home, support services and rehabilitation for disabled veterans. It is located in the MacArthur Park area of Los Angeles. McArthur Park has one of the highest densities in the USA with over 38,000 people per square mile and a total population of 120,000 people in 2.72 square miles.
Offering shelter and comfort, the SIX breaks the prescriptive mold of the traditional shelter by creating public and private "zones" in which private space is deemphasized, in favor of large public areas. The organization of the space is intended to transform the way people live-away from a reclusive, isolating layout towards a community-oriented, interactive space.
The ground level contains offices, support spaces for the veterans, bike storage and parking while the second level has a large public courtyard. Surrounded by four levels of housing units with balconies wrapped with a wood screen made from recycle planking the courtyard has large openings with green roofs that visually connects the space to the street on the lower level beyond. This allows the tenants to enjoy a secured open space while still connecting to the larger community.
The uppermost level has a green roof, large public patio and edible garden with panoramic views of the area.
The SIX distinguishes itself from most conventionally developed projects in that it incorporates energy efficient measures that exceed standard practice, optimize building performance, and ensure reduced energy use during all phases of construction and occupancy. The planning and design emerged from close consideration and employment of passive design strategies. These strategies include: locating and orienting the building to control solar cooling loads; shaping and orienting the building for exposure to prevailing winds; shaping the building to induce buoyancy for natural ventilation; designing windows to maximize day lighting; shading south facing windows and minimizing west-facing glazing; designing windows to maximize natural ventilation; utilizing low flow fixtures and storm water management; shaping and planning the interior to enhance daylight and natural air flow distribution. These passive strategies alone make this building 50% more efficient than a conventionally designed structure.
 Brooks + Scarpa Architects
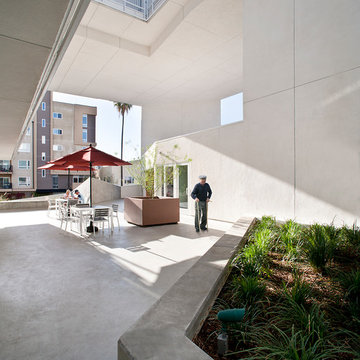
The SIX is a 52-unit affordable housing project provides a home, support services and rehabilitation for disabled veterans. It is located in the MacArthur Park area of Los Angeles. McArthur Park has one of the highest densities in the USA with over 38,000 people per square mile and a total population of 120,000 people in 2.72 square miles.
Offering shelter and comfort, the SIX breaks the prescriptive mold of the traditional shelter by creating public and private "zones" in which private space is deemphasized, in favor of large public areas. The organization of the space is intended to transform the way people live-away from a reclusive, isolating layout towards a community-oriented, interactive space.
The ground level contains offices, support spaces for the veterans, bike storage and parking while the second level has a large public courtyard. Surrounded by four levels of housing units with balconies wrapped with a wood screen made from recycle planking the courtyard has large openings with green roofs that visually connects the space to the street on the lower level beyond. This allows the tenants to enjoy a secured open space while still connecting to the larger community.
The uppermost level has a green roof, large public patio and edible garden with panoramic views of the area.
The SIX distinguishes itself from most conventionally developed projects in that it incorporates energy efficient measures that exceed standard practice, optimize building performance, and ensure reduced energy use during all phases of construction and occupancy. The planning and design emerged from close consideration and employment of passive design strategies. These strategies include: locating and orienting the building to control solar cooling loads; shaping and orienting the building for exposure to prevailing winds; shaping the building to induce buoyancy for natural ventilation; designing windows to maximize day lighting; shading south facing windows and minimizing west-facing glazing; designing windows to maximize natural ventilation; utilizing low flow fixtures and storm water management; shaping and planning the interior to enhance daylight and natural air flow distribution. These passive strategies alone make this building 50% more efficient than a conventionally designed structure.
 Brooks + Scarpa Architects
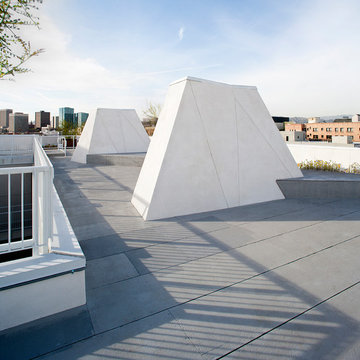
The SIX is a 52-unit affordable housing project provides a home, support services and rehabilitation for disabled veterans. It is located in the MacArthur Park area of Los Angeles. McArthur Park has one of the highest densities in the USA with over 38,000 people per square mile and a total population of 120,000 people in 2.72 square miles.
Offering shelter and comfort, the SIX breaks the prescriptive mold of the traditional shelter by creating public and private "zones" in which private space is deemphasized, in favor of large public areas. The organization of the space is intended to transform the way people live-away from a reclusive, isolating layout towards a community-oriented, interactive space.
The ground level contains offices, support spaces for the veterans, bike storage and parking while the second level has a large public courtyard. Surrounded by four levels of housing units with balconies wrapped with a wood screen made from recycle planking the courtyard has large openings with green roofs that visually connects the space to the street on the lower level beyond. This allows the tenants to enjoy a secured open space while still connecting to the larger community.
The uppermost level has a green roof, large public patio and edible garden with panoramic views of the area.
The SIX distinguishes itself from most conventionally developed projects in that it incorporates energy efficient measures that exceed standard practice, optimize building performance, and ensure reduced energy use during all phases of construction and occupancy. The planning and design emerged from close consideration and employment of passive design strategies. These strategies include: locating and orienting the building to control solar cooling loads; shaping and orienting the building for exposure to prevailing winds; shaping the building to induce buoyancy for natural ventilation; designing windows to maximize day lighting; shading south facing windows and minimizing west-facing glazing; designing windows to maximize natural ventilation; utilizing low flow fixtures and storm water management; shaping and planning the interior to enhance daylight and natural air flow distribution. These passive strategies alone make this building 50% more efficient than a conventionally designed structure.
 Xpand Inc. | Homes of Xcellence
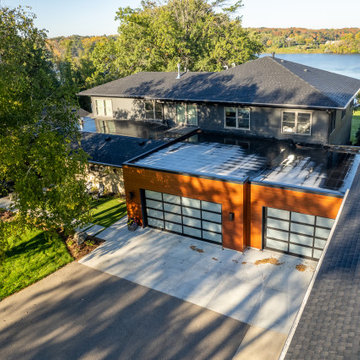
At the outset, this project began with the transformation of a 2-car attached garage. The goal was to create a mudroom, an exercise room, and a breezeway to seamlessly connect the spacious detached garage with the main part of the house. Additionally, the project involved partial roof removal and the addition of a new front entry.
But then came an unexpected twist – scope creep.
We found ourselves veering away from the initial client-supplied architectural plans. After numerous consultations with the clients and several iterations of the design, we arrived at a significantly improved plan for the remodel and addition.
Our journey commenced with the demolition of almost the entire former 2-car garage, making space for a new, oversized 3-car garage measuring 40′ x 28′. This garage was strategically placed between the existing house and the large detached garage. We introduced a custom low-sloped flat roof, designed to address historical drainage issues.
To mitigate water pooling, we created a custom concrete step at the back corner of the garage, equipped with a sturdy metal grate that sits flush with the step. We also installed a PVC drainage system, commencing at the step and running beneath a newly designed patio, ultimately draining into the yard. These measures have significantly reduced water accumulation around the house.
The new garage boasts several features, including Longboard aluminum siding, custom full glass garage doors, interior drywall finished to a level 4, an abundance of can lights, an epoxy floor coating, vinyl base trim, a new forced air garage heater, and more.
The clients also requested a designated space for their three kids and their friends to enjoy, thus giving birth to the “Kid Zone.” We partitioned a section of the existing oversized garage, resulting in a space measuring approximately 22′ x 32′, brimming with entertainment possibilities. To enhance control over the temperature in the Kid Zone, we collaborated with our licensed HVAC partner to install a cold weather mini-split system.
One of the most significant challenges was the modernization and consolidation of the home’s main electrical systems. We reconfigured and combined 6-7 different electrical panels into just two. One panel serves the main house, while the second is dedicated to backup power from a generator. These panels, along with the boiler for the in-floor heating system, are housed in a newly constructed mechanical room within the Kid Zone.
Inside the main house, we completed various tasks, such as removing the ceiling in the hallway from the new garage to address prior water damage, improve insulation, and rework electrical and HVAC systems. We also replaced the ceiling from the front door to the base of the stairs, adding new can lighting and enhancing insulation. Skilled drywall specialists then installed and finished new drywall to a level 5 standard.
The exterior of the house underwent a complete overhaul. Before installing new roofing on the entire house and garage, we modified an existing flat roof by adding custom lumber and plywood to enhance the pitch, preventing future ice dams. A new rubber roof was expertly installed on the oversized 3-car garage, and the flat roof section we re-framed.
Our meticulous exterior team removed old white aluminum soffit, fascia, and gutters, replacing them with new framing to accommodate Longboard soffit material. This task was particularly challenging due to the age of the house and the non-standard wall and roof framing. Our skilled exterior subcontractors ensured a perfect fit.
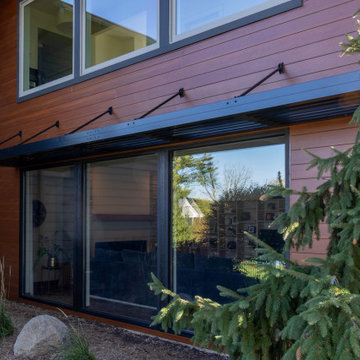
Near the pool area, we discovered severe rot and decay from years of water intrusion. After informing the homeowners, we ordered and installed five new commercial-style block framed windows and a custom 8′ high Anderson patio door. This involved careful removal and replacement of window headers from the outside to avoid disturbing the finished part of the house. We reframed the large openings to fit the new windows, and our skilled trim carpenters installed new walnut casing, base, and window sills.
In total, we replaced around 900 lineal feet of soffit and installed approximately 32 squares of aluminum siding. The entire house was meticulously prepped, repaired, and painted according to the client’s chosen color.
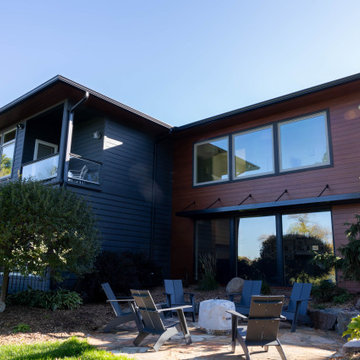
Throughout the project, we incorporated numerous custom touches and unique design elements, some of which you can see in the pictures. Our team also addressed various unforeseen challenges, from soil issues to rot and decay repair, roof leaks, drainage problems, electrical and HVAC complexities, and much more.
At Xpand Inc., we take pride in making it all happen, turning your remodeling and renovation dreams into reality.


 Xpand Inc. | Homes of Xcellence
At the outset, this project began with the transformation of a 2-car attached garage. The goal was to create a mudroom, an exercise room, and a breezeway to seamlessly connect the spacious detached garage with the main part of the house. Additionally, the project involved partial roof removal and the addition of a new front entry.
But then came an unexpected twist – scope creep.
We found ourselves veering away from the initial client-supplied architectural plans. After numerous consultations with the clients and several iterations of the design, we arrived at a significantly improved plan for the remodel and addition.
Our journey commenced with the demolition of almost the entire former 2-car garage, making space for a new, oversized 3-car garage measuring 40′ x 28′. This garage was strategically placed between the existing house and the large detached garage. We introduced a custom low-sloped flat roof, designed to address historical drainage issues.
To mitigate water pooling, we created a custom concrete step at the back corner of the garage, equipped with a sturdy metal grate that sits flush with the step. We also installed a PVC drainage system, commencing at the step and running beneath a newly designed patio, ultimately draining into the yard. These measures have significantly reduced water accumulation around the house.
The new garage boasts several features, including Longboard aluminum siding, custom full glass garage doors, interior drywall finished to a level 4, an abundance of can lights, an epoxy floor coating, vinyl base trim, a new forced air garage heater, and more.
The clients also requested a designated space for their three kids and their friends to enjoy, thus giving birth to the “Kid Zone.” We partitioned a section of the existing oversized garage, resulting in a space measuring approximately 22′ x 32′, brimming with entertainment possibilities. To enhance control over the temperature in the Kid Zone, we collaborated with our licensed HVAC partner to install a cold weather mini-split system.
One of the most significant challenges was the modernization and consolidation of the home’s main electrical systems. We reconfigured and combined 6-7 different electrical panels into just two. One panel serves the main house, while the second is dedicated to backup power from a generator. These panels, along with the boiler for the in-floor heating system, are housed in a newly constructed mechanical room within the Kid Zone.
Inside the main house, we completed various tasks, such as removing the ceiling in the hallway from the new garage to address prior water damage, improve insulation, and rework electrical and HVAC systems. We also replaced the ceiling from the front door to the base of the stairs, adding new can lighting and enhancing insulation. Skilled drywall specialists then installed and finished new drywall to a level 5 standard.
The exterior of the house underwent a complete overhaul. Before installing new roofing on the entire house and garage, we modified an existing flat roof by adding custom lumber and plywood to enhance the pitch, preventing future ice dams. A new rubber roof was expertly installed on the oversized 3-car garage, and the flat roof section we re-framed.
Our meticulous exterior team removed old white aluminum soffit, fascia, and gutters, replacing them with new framing to accommodate Longboard soffit material. This task was particularly challenging due to the age of the house and the non-standard wall and roof framing. Our skilled exterior subcontractors ensured a perfect fit.
Near the pool area, we discovered severe rot and decay from years of water intrusion. After informing the homeowners, we ordered and installed five new commercial-style block framed windows and a custom 8′ high Anderson patio door. This involved careful removal and replacement of window headers from the outside to avoid disturbing the finished part of the house. We reframed the large openings to fit the new windows, and our skilled trim carpenters installed new walnut casing, base, and window sills.
In total, we replaced around 900 lineal feet of soffit and installed approximately 32 squares of aluminum siding. The entire house was meticulously prepped, repaired, and painted according to the client’s chosen color.
Throughout the project, we incorporated numerous custom touches and unique design elements, some of which you can see in the pictures. Our team also addressed various unforeseen challenges, from soil issues to rot and decay repair, roof leaks, drainage problems, electrical and HVAC complexities, and much more.
At Xpand Inc., we take pride in making it all happen, turning your remodeling and renovation dreams into reality.
 Xpand Inc. | Homes of Xcellence
At the outset, this project began with the transformation of a 2-car attached garage. The goal was to create a mudroom, an exercise room, and a breezeway to seamlessly connect the spacious detached garage with the main part of the house. Additionally, the project involved partial roof removal and the addition of a new front entry.
But then came an unexpected twist – scope creep.
We found ourselves veering away from the initial client-supplied architectural plans. After numerous consultations with the clients and several iterations of the design, we arrived at a significantly improved plan for the remodel and addition.
Our journey commenced with the demolition of almost the entire former 2-car garage, making space for a new, oversized 3-car garage measuring 40′ x 28′. This garage was strategically placed between the existing house and the large detached garage. We introduced a custom low-sloped flat roof, designed to address historical drainage issues.
To mitigate water pooling, we created a custom concrete step at the back corner of the garage, equipped with a sturdy metal grate that sits flush with the step. We also installed a PVC drainage system, commencing at the step and running beneath a newly designed patio, ultimately draining into the yard. These measures have significantly reduced water accumulation around the house.
The new garage boasts several features, including Longboard aluminum siding, custom full glass garage doors, interior drywall finished to a level 4, an abundance of can lights, an epoxy floor coating, vinyl base trim, a new forced air garage heater, and more.
The clients also requested a designated space for their three kids and their friends to enjoy, thus giving birth to the “Kid Zone.” We partitioned a section of the existing oversized garage, resulting in a space measuring approximately 22′ x 32′, brimming with entertainment possibilities. To enhance control over the temperature in the Kid Zone, we collaborated with our licensed HVAC partner to install a cold weather mini-split system.
One of the most significant challenges was the modernization and consolidation of the home’s main electrical systems. We reconfigured and combined 6-7 different electrical panels into just two. One panel serves the main house, while the second is dedicated to backup power from a generator. These panels, along with the boiler for the in-floor heating system, are housed in a newly constructed mechanical room within the Kid Zone.
Inside the main house, we completed various tasks, such as removing the ceiling in the hallway from the new garage to address prior water damage, improve insulation, and rework electrical and HVAC systems. We also replaced the ceiling from the front door to the base of the stairs, adding new can lighting and enhancing insulation. Skilled drywall specialists then installed and finished new drywall to a level 5 standard.
The exterior of the house underwent a complete overhaul. Before installing new roofing on the entire house and garage, we modified an existing flat roof by adding custom lumber and plywood to enhance the pitch, preventing future ice dams. A new rubber roof was expertly installed on the oversized 3-car garage, and the flat roof section we re-framed.
Our meticulous exterior team removed old white aluminum soffit, fascia, and gutters, replacing them with new framing to accommodate Longboard soffit material. This task was particularly challenging due to the age of the house and the non-standard wall and roof framing. Our skilled exterior subcontractors ensured a perfect fit.
Near the pool area, we discovered severe rot and decay from years of water intrusion. After informing the homeowners, we ordered and installed five new commercial-style block framed windows and a custom 8′ high Anderson patio door. This involved careful removal and replacement of window headers from the outside to avoid disturbing the finished part of the house. We reframed the large openings to fit the new windows, and our skilled trim carpenters installed new walnut casing, base, and window sills.
In total, we replaced around 900 lineal feet of soffit and installed approximately 32 squares of aluminum siding. The entire house was meticulously prepped, repaired, and painted according to the client’s chosen color.
Throughout the project, we incorporated numerous custom touches and unique design elements, some of which you can see in the pictures. Our team also addressed various unforeseen challenges, from soil issues to rot and decay repair, roof leaks, drainage problems, electrical and HVAC complexities, and much more.
At Xpand Inc., we take pride in making it all happen, turning your remodeling and renovation dreams into reality.
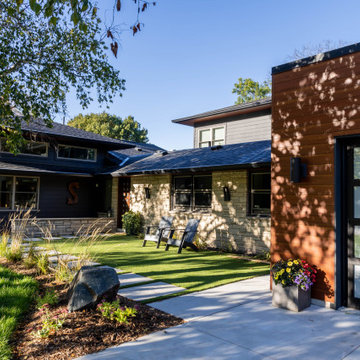 Xpand Inc. | Homes of Xcellence
At the outset, this project began with the transformation of a 2-car attached garage. The goal was to create a mudroom, an exercise room, and a breezeway to seamlessly connect the spacious detached garage with the main part of the house. Additionally, the project involved partial roof removal and the addition of a new front entry.
But then came an unexpected twist – scope creep.
We found ourselves veering away from the initial client-supplied architectural plans. After numerous consultations with the clients and several iterations of the design, we arrived at a significantly improved plan for the remodel and addition.
Our journey commenced with the demolition of almost the entire former 2-car garage, making space for a new, oversized 3-car garage measuring 40′ x 28′. This garage was strategically placed between the existing house and the large detached garage. We introduced a custom low-sloped flat roof, designed to address historical drainage issues.
To mitigate water pooling, we created a custom concrete step at the back corner of the garage, equipped with a sturdy metal grate that sits flush with the step. We also installed a PVC drainage system, commencing at the step and running beneath a newly designed patio, ultimately draining into the yard. These measures have significantly reduced water accumulation around the house.
The new garage boasts several features, including Longboard aluminum siding, custom full glass garage doors, interior drywall finished to a level 4, an abundance of can lights, an epoxy floor coating, vinyl base trim, a new forced air garage heater, and more.
The clients also requested a designated space for their three kids and their friends to enjoy, thus giving birth to the “Kid Zone.” We partitioned a section of the existing oversized garage, resulting in a space measuring approximately 22′ x 32′, brimming with entertainment possibilities. To enhance control over the temperature in the Kid Zone, we collaborated with our licensed HVAC partner to install a cold weather mini-split system.
One of the most significant challenges was the modernization and consolidation of the home’s main electrical systems. We reconfigured and combined 6-7 different electrical panels into just two. One panel serves the main house, while the second is dedicated to backup power from a generator. These panels, along with the boiler for the in-floor heating system, are housed in a newly constructed mechanical room within the Kid Zone.
Inside the main house, we completed various tasks, such as removing the ceiling in the hallway from the new garage to address prior water damage, improve insulation, and rework electrical and HVAC systems. We also replaced the ceiling from the front door to the base of the stairs, adding new can lighting and enhancing insulation. Skilled drywall specialists then installed and finished new drywall to a level 5 standard.
The exterior of the house underwent a complete overhaul. Before installing new roofing on the entire house and garage, we modified an existing flat roof by adding custom lumber and plywood to enhance the pitch, preventing future ice dams. A new rubber roof was expertly installed on the oversized 3-car garage, and the flat roof section we re-framed.
Our meticulous exterior team removed old white aluminum soffit, fascia, and gutters, replacing them with new framing to accommodate Longboard soffit material. This task was particularly challenging due to the age of the house and the non-standard wall and roof framing. Our skilled exterior subcontractors ensured a perfect fit.
Near the pool area, we discovered severe rot and decay from years of water intrusion. After informing the homeowners, we ordered and installed five new commercial-style block framed windows and a custom 8′ high Anderson patio door. This involved careful removal and replacement of window headers from the outside to avoid disturbing the finished part of the house. We reframed the large openings to fit the new windows, and our skilled trim carpenters installed new walnut casing, base, and window sills.
In total, we replaced around 900 lineal feet of soffit and installed approximately 32 squares of aluminum siding. The entire house was meticulously prepped, repaired, and painted according to the client’s chosen color.
Throughout the project, we incorporated numerous custom touches and unique design elements, some of which you can see in the pictures. Our team also addressed various unforeseen challenges, from soil issues to rot and decay repair, roof leaks, drainage problems, electrical and HVAC complexities, and much more.
At Xpand Inc., we take pride in making it all happen, turning your remodeling and renovation dreams into reality.


9