
Search results for "Reduce proper" in Home Design Ideas

 SENCE ARCHITECTS
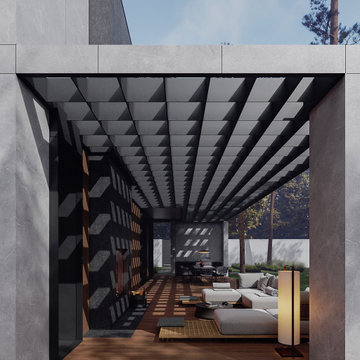
The Bunker House is a two-story house with a bomb shelter in the basement.
A bunker house is a two-story residential building with a basement bomb shelter. In a short time, we had to equip the basement, master the "two walls" principle and properly seal the windows to protect ourselves and our family from the impact of the shock wave. Our priorities have changed when choosing a home - proximity to the city center or transportation hubs no longer matters.
Moreover, SENCE ARCHITECTS also took care of other safety aspects. According to the rules, the storage has two distributed exits outside, each with light "hints" of the direction of evacuation. The basement area is sealed and equipped with a double ventilation system. This is a zone of guaranteed protection against missile attacks, poisonous or radioactive substances, combustion products, and bacteriological weapons. The first mode works on air recovery, providing a fresh flow of it in the absence of heat loss. The second is carried out by a filter ventilation unit — it cleans the outside air, and then distributes it to the compartments and creates excess pressure.
Thus, contaminated air will not penetrate inside even through small cracks in protective structures.
CONCEPTUAL SOLUTION
The structures of the building itself are made of strong reinforced concrete — this way SENCE ARCHITECTS suggests abandoning "glass" facades. The number of windows has also been reduced: they will have a protective anti-shock film, and in case of an explosive wave, they will be closed with reinforced shutters made of fire-resistant plywood. At the entrance to the house and bomb shelter, armored doors are installed.
Water is supplied from its own artesian well, electricity — from its own diesel power plant. This means that possible damage to infrastructure facilities will not affect the lives of residents in any way. The house is equipped with modern types of radio- and telephone communication, and satellite Internet, which will work even in the bomb shelter. The signaling and air-raid alert systems are to be installed too. The systems are powered autonomously and have backup channels. Overall, given its specificity, the house is designed for a family of 4-5 people.
Size / 733 sq.m.
Year / 2022
 SENCE ARCHITECTS
The Bunker House is a two-story house with a bomb shelter in the basement.
A bunker house is a two-story residential building with a basement bomb shelter. In a short time, we had to equip the basement, master the "two walls" principle and properly seal the windows to protect ourselves and our family from the impact of the shock wave. Our priorities have changed when choosing a home - proximity to the city center or transportation hubs no longer matters.
Moreover, SENCE ARCHITECTS also took care of other safety aspects. According to the rules, the storage has two distributed exits outside, each with light "hints" of the direction of evacuation. The basement area is sealed and equipped with a double ventilation system. This is a zone of guaranteed protection against missile attacks, poisonous or radioactive substances, combustion products, and bacteriological weapons. The first mode works on air recovery, providing a fresh flow of it in the absence of heat loss. The second is carried out by a filter ventilation unit — it cleans the outside air, and then distributes it to the compartments and creates excess pressure.
Thus, contaminated air will not penetrate inside even through small cracks in protective structures.
CONCEPTUAL SOLUTION
The structures of the building itself are made of strong reinforced concrete — this way SENCE ARCHITECTS suggests abandoning "glass" facades. The number of windows has also been reduced: they will have a protective anti-shock film, and in case of an explosive wave, they will be closed with reinforced shutters made of fire-resistant plywood. At the entrance to the house and bomb shelter, armored doors are installed.
Water is supplied from its own artesian well, electricity — from its own diesel power plant. This means that possible damage to infrastructure facilities will not affect the lives of residents in any way. The house is equipped with modern types of radio- and telephone communication, and satellite Internet, which will work even in the bomb shelter. The signaling and air-raid alert systems are to be installed too. The systems are powered autonomously and have backup channels. Overall, given its specificity, the house is designed for a family of 4-5 people.
Size / 733 sq.m.
Year / 2022
 SENCE ARCHITECTS
The Bunker House is a two-story house with a bomb shelter in the basement.
A bunker house is a two-story residential building with a basement bomb shelter. In a short time, we had to equip the basement, master the "two walls" principle and properly seal the windows to protect ourselves and our family from the impact of the shock wave. Our priorities have changed when choosing a home - proximity to the city center or transportation hubs no longer matters.
Moreover, SENCE ARCHITECTS also took care of other safety aspects. According to the rules, the storage has two distributed exits outside, each with light "hints" of the direction of evacuation. The basement area is sealed and equipped with a double ventilation system. This is a zone of guaranteed protection against missile attacks, poisonous or radioactive substances, combustion products, and bacteriological weapons. The first mode works on air recovery, providing a fresh flow of it in the absence of heat loss. The second is carried out by a filter ventilation unit — it cleans the outside air, and then distributes it to the compartments and creates excess pressure.
Thus, contaminated air will not penetrate inside even through small cracks in protective structures.
CONCEPTUAL SOLUTION
The structures of the building itself are made of strong reinforced concrete — this way SENCE ARCHITECTS suggests abandoning "glass" facades. The number of windows has also been reduced: they will have a protective anti-shock film, and in case of an explosive wave, they will be closed with reinforced shutters made of fire-resistant plywood. At the entrance to the house and bomb shelter, armored doors are installed.
Water is supplied from its own artesian well, electricity — from its own diesel power plant. This means that possible damage to infrastructure facilities will not affect the lives of residents in any way. The house is equipped with modern types of radio- and telephone communication, and satellite Internet, which will work even in the bomb shelter. The signaling and air-raid alert systems are to be installed too. The systems are powered autonomously and have backup channels. Overall, given its specificity, the house is designed for a family of 4-5 people.
Size / 733 sq.m.
Year / 2022
Find the right local pro for your project
 SENCE ARCHITECTS
The Bunker House is a two-story house with a bomb shelter in the basement.
A bunker house is a two-story residential building with a basement bomb shelter. In a short time, we had to equip the basement, master the "two walls" principle and properly seal the windows to protect ourselves and our family from the impact of the shock wave. Our priorities have changed when choosing a home - proximity to the city center or transportation hubs no longer matters.
Moreover, SENCE ARCHITECTS also took care of other safety aspects. According to the rules, the storage has two distributed exits outside, each with light "hints" of the direction of evacuation. The basement area is sealed and equipped with a double ventilation system. This is a zone of guaranteed protection against missile attacks, poisonous or radioactive substances, combustion products, and bacteriological weapons. The first mode works on air recovery, providing a fresh flow of it in the absence of heat loss. The second is carried out by a filter ventilation unit — it cleans the outside air, and then distributes it to the compartments and creates excess pressure.
Thus, contaminated air will not penetrate inside even through small cracks in protective structures.
CONCEPTUAL SOLUTION
The structures of the building itself are made of strong reinforced concrete — this way SENCE ARCHITECTS suggests abandoning "glass" facades. The number of windows has also been reduced: they will have a protective anti-shock film, and in case of an explosive wave, they will be closed with reinforced shutters made of fire-resistant plywood. At the entrance to the house and bomb shelter, armored doors are installed.
Water is supplied from its own artesian well, electricity — from its own diesel power plant. This means that possible damage to infrastructure facilities will not affect the lives of residents in any way. The house is equipped with modern types of radio- and telephone communication, and satellite Internet, which will work even in the bomb shelter. The signaling and air-raid alert systems are to be installed too. The systems are powered autonomously and have backup channels. Overall, given its specificity, the house is designed for a family of 4-5 people.
Size / 733 sq.m.
Year / 2022
 Wiler Fence Company
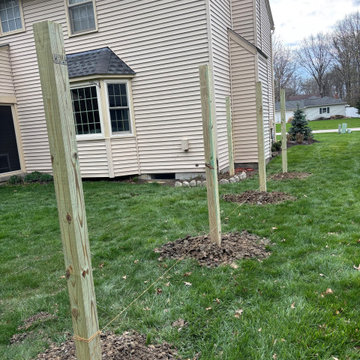
Building a Shadowbox Wood Privacy Fence in Avon Lake, Ohio | Step-by-Step Installation | Wiler Fence CompanyWatch us build a classic shadowbox style wood privacy fence from start to finish in beautiful Avon Lake, Ohio (Lorain County).This 6-foot tall privacy fence provides excellent screening while allowing gentle airflow, making it a perfect choice for Northeast Ohio backyards. In this time-lapse and step-by-step video, you’ll see the entire professional installation process: Phase 1: Installing the 4x4 Posts
We begin by carefully laying out the fence line, digging precise post holes, and setting heavy-duty 4x4 pressure-treated posts in concrete. Each post is plumbed and braced to ensure a rock-solid foundation that will stand up to Ohio’s freeze-thaw cycles for years to come. Phase 2: Installing the 2x4 Framing
Once the posts are set and cured, we attach the top and bottom 2x4 rails, followed by the middle rail. This strong framing system creates the backbone of the fence and ensures the structure stays straight and sturdy. Phase 3: Installing the Shadowbox Pickets
The final step is attaching the privacy pickets in the classic shadowbox pattern — alternating boards on the front and back sides of the rails. This design gives you near-complete privacy from both sides while still allowing air circulation to reduce wind load and prevent warping.The result is a beautiful, durable wood privacy fence that blends naturally with the neighborhood and gives the homeowners the private backyard they’ve been wanting.Project Location: Avon Lake, Ohio – Lorain County
Fence Style: 6ft Shadowbox Wood Privacy Fence
Materials: Pressure-treated pine with protective stainAt Wiler Fence Company, we take pride in every detail — from proper post depth and concrete setting to clean, professional picket installation.Ready for your own wood privacy fence in Avon Lake, Lorain County, or anywhere in Northeast Ohio?
Call us for a free estimate: (216) 714-3337
wiler.org
 Total System Service
As a manager of a building or property, you quickly learn the art of mediation. One minute you may be working with a vendor to keep the building’s operating system running efficient and smooth; the next moment you may be calming a tenant down after finding the change in the system disrupted his office’s workflow. Give and take; it’s the only way to make sure every day runs perfectly.
Overall, you have two goals to strive for in everything you do.
1. Keep the building running properly, upgrading systems as appropriate, and striving to do all you can on a pre-established budget.
2. Keep the building occupants happy, with as little disruption as possible.
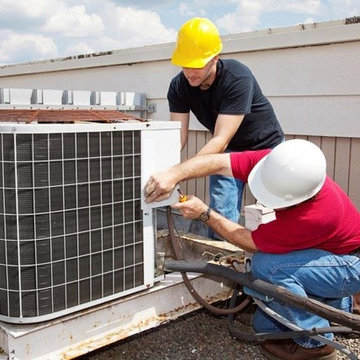
While some changes are minor, barely registering on a building occupant’s mind, with HVAC challenges, that’s rarely the case. If a HVAC contractor is replacing an air handler, for instance, and disconnects one and moves to the next unit, it may cause major disruptions to sensitive areas of a building. And if the occupant wasn’t prepared for the disruption, you can have a mighty unhappy customer on your hand.
Anytime you are working on HVAC projects throughout your building, there are strategies you can put into place to keep things running smooth.
Communicate with occupants
Communication is key to any good relationship, and as a property manager, this rule is a great place to start. If you will be working with the HVAC equipment, block out the timeframe for work to be done, and understand the potential consequences of the process. Then communicate this process with every point of contact you have throughout the building. The more detail you can provide, the less surprises you’ll have throughout the process. You can also work with your building’s occupants before the process begins, finding out if there are better timeframes than others.
Establish a realistic schedule
As a property manager, its easy to provide your expectations for the HVAC project at hand, and request that the proposal be written in such a way that work is completed on your timeframe. Unfortunately, many contractors want your business and will agree to anything upfront in order to win the bid, knowing full well the work will take longer than specified. Instead of projecting your timeframes into the proposal process, ask for HVAC project bids to establish realistic schedules of how long the process will take, and what areas of your property will be most effected throughout the schedule. This will help you avoid crises between you and the contractor, and you and your tenants.
Plan for the whole system
If one small piece of your HVAC system is weak, its easy to fix that one small piece. But how will that impact your overall system? Will it cause weak spots in different parts of the building – maybe a corner office will have reduced air flow, and therefore be colder in the winter and warmer in the summer? When retrofitting new pieces with older existing systems, its easy to reduce the efficiency of your entire system. Before agreeing to certain repairs, make sure you understand how it will impact your entire system overall. An easy way of handling this problem is by working with the same HVAC contractor again and again, He will understand your system’s potential, and know when to make repairs, and when to replace.
Have points of contact available for immediate assistance
In many cases, problems arise because connections can’t be made. Can the HVAC contractor get a hold or you or another person that can make decisions at a moments notice if a problem arises? Do you have access to decision makers throughout the building that may be impacted by this change? Many projects have been put on hold simply because a person in authority can’t be found to give the go-ahead to move forward. If you have access to these people during the time of the project, you’ll be able to complete the project in record time.
Test
Finally, if you can test things in stages, or test when the potential for problems is the smallest, you reduce the chances of bigger emergency issues falling into your lap. If you’ll be installing a new terminal unit, can you make the switch on a Saturday morning when the building is largely unoccupied? If you’re replacing a large system, can you replace and test in phases so the entire project isn’t released at once?
Most issues can be avoided with just a little strategy from the beginning. If you’ve never had a HVAC maintenance team to help you stay on track with your building’s heating and cooling, now may be the time to find out how easy a team approach makes the process.
 User
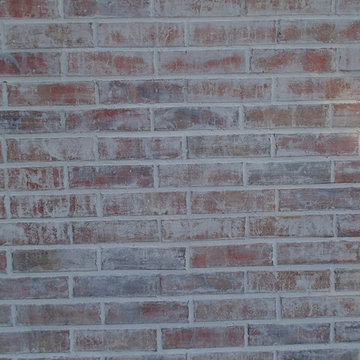
UserThis is an organic Lime Wash done with a true lime wash product as opposed to a brick mortar or concrete that is often seen on new houses. This product can be applied as a solid coating making the surface completely white, or can be applied and "washed off" in many artistic ways, as seen here. If you hate your brick or just want something unique this is a great option!
Photo credit: Jeff Murrey

 SabaRehman Abdulrehman
Phoenix's food scene is vibrant and thriving, but also one of the most closely watched in the country. Health inspectors in Maricopa County are strict, and customers expect spotless dining spaces.
To stay competitive, restaurant owners and food vendors must stay on top of evolving health codes, sanitation protocols, and food safety benchmarks. That starts with a firm grip on restaurant cleaning safety standards. Ignoring sanitation rules risks more than bad reviews. It invites citations, customer complaints, and operational shutdowns.
Whether you're operating a food truck or a restaurant, following these Phoenix cleaning standards helps you stay compliant, pass health inspections, and build customer trust.
Importance of a Clean Phoenix Restaurant that Follows Food Health and Safety Standards
The restaurant industry in Phoenix operates under strict oversight. The Maricopa County Environmental Services Department conducts regular inspections, and violations can result in fines or closures. In this climate, restaurant cleaning is not just a hygiene standard. It is a business-critical measure.
Proper food handling and establishment cleaning protocols reduce the risk of foodborne illnesses, control pests, protect equipment, and keep your staff safe. Inconsistent practices, on the other hand, can quickly become liabilities.
Start With the Food Code
Phoenix food vendors must comply with the 2017 FDA Food Code as adopted by Maricopa County. This includes rules on:
- Sanitizing food-contact surfaces after each use
- Maintaining proper water temperatures for dishwashing
- Cleaning restrooms frequently and keeping them stocked
- Storing cleaning chemicals away from prep areas
- Daily: Wipe prep tables, mop floors, clean grills, sanitize cutting boards
- Weekly: Deep clean kitchen hoods, polish cooking equipment, disinfect drains
- Monthly: Check pest control measures, clean freezer coils, and inspect HVAC filters
- Using the right sanitizers and PPE
- Logging cleaning times and who performed the task
- Identifying signs of mold, grease buildup, or rodent activity
- Conducting thorough surface cleaning to ensure all food-contact surfaces are sanitized regularly
- Food-safe and non-corrosive
- Effective against norovirus, salmonella, and E. coli
- Clearly labeled and stored in original containers
- Seal gaps around doors and pipes
- Store dry goods in sealed, elevated containers
- Keep outdoor waste bins locked and distanced from entry points
- Record cleaning completion in real time
- Alert managers when tasks are missed
- Keep a historical record for inspections
- Is certified and understands the Arizona food codes
- Provides documented service reports
- Offers customized cleaning plans
- Offers flexible scheduling around your operating hours
- Cross-contamination prevention: Regularly clean food prep surfaces and tools, and use separate equipment for raw meats, vegetables, and ready-to-eat foods. Proper cleaning prevents any contact with food that could lead to cross-contamination and affects food quality.
- Temperature monitoring: While not directly related to cleaning, maintaining proper food temperature is essential. Hot foods should be stored above 140°F, and cold foods below 40°F. Regularly monitor temperatures and clean temperature gauges to ensure accuracy.
- Proper storage: Use clean storage containers and shelving for food storage, keeping items off the floor. Ensure all food is sealed and labeled to avoid contamination risks and comply with food safety standards.

 Industrial Projects
Creating a comfortable outdoor living space is a priority for many homeowners and DIY enthusiasts. With rising summer temperatures, installing a shade tarp in your backyard offers an affordable and effective solution for sun protection. We’ve developed this detailed, step-by-step guide to help you confidently install a shade tarp that not only shields you from the sun but also adds aesthetic appeal to your outdoor area.
Benefits of Installing a Backyard Shade Tarp
Before diving into the installation process, let’s explore the key benefits of having a backyard shade tarp:
Provides UV Protection: Keeps your family and guests safe from harmful sun exposure.
Reduces Outdoor Temperatures: Creates a cooler, more enjoyable outdoor space.
Protects Outdoor Furniture: Extends the life of patio furniture by reducing sun damage.
Enhances Outdoor Aesthetics: Adds a modern, stylish look to your yard.
Budget-Friendly: More affordable compared to permanent structures like pergolas.
Materials and Tools You’ll Need
To begin your DIY backyard shade project, gather the following materials and tools:
Materials:
Shade tarp (UV-resistant and breathable)
Sturdy posts or existing structures (trees, fences, walls)
Mounting hardware (eye bolts, D-rings, turnbuckles, snap hooks)
Nylon or polyester rope, or stainless-steel wire
Concrete (if installing new posts)
Tools:
Power drill
Measuring tape
Level
Ladder
Wrench or adjustable spanner
Post hole digger (if installing new posts)
Step 1: Plan Your Shade Tarp Layout
The first step in installing your backyard shade tarp is careful planning. Take time to assess your outdoor area and answer these key questions:
Where is the sun’s path throughout the day?
What size and shape of tarp best suits your space?
Will you anchor the tarp to existing structures or install new posts?
What height do you want the tarp to sit at for maximum shade and airflow?
Pro Tip: Use string or garden hoses to visualize the tarp layout on the ground before making permanent decisions.
Step 2: Measure and Mark Anchor Points
Once you’ve determined the tarp’s location and orientation:
Measure the tarp dimensions.
Mark the exact points where each corner of the tarp will be anchored.
Ensure that the anchor points are at least 5–10% longer than the tarp size to allow for tensioning and slight adjustments.
Consider slope angles for water runoff. Aim for at least a 20-degree angle to prevent water pooling on the tarp.
Step 3: Install Support Posts (If Necessary)
If your backyard lacks existing anchor points like trees or fences, you’ll need to install sturdy support posts:
Dig post holes at least 24 inches deep and 8-12 inches wide for stability.
Set posts in concrete, making sure they remain plumb and level.
Allow the concrete to cure for at least 24–48 hours before applying tension from the tarp.
We recommend using pressure-treated wood, galvanized steel poles, or aluminum posts for longevity and strength.
Step 4: Install Mounting Hardware
With your anchor points ready, it’s time to install the necessary hardware:
Attach eye bolts or pad eyes securely into walls, posts, or other fixed structures.
For added flexibility and adjustability, install turnbuckles or tensioners to fine-tune the tarp’s tightness.
Connect snap hooks, D-rings, or carabiners to make assembly and disassembly easier.
Make sure all hardware is rated for outdoor use to prevent rust and corrosion.
Step 5: Attach and Tension the Shade Tarp
Now it’s time for the most satisfying part—mounting the shade tarp:
Begin by attaching one corner of the tarp to an anchor point.
Gradually attach the remaining corners, moving diagonally for even tension.
Adjust each connection point using your turnbuckles, ropes, or cables.
Pull the tarp tight enough to avoid sagging, but not so tight that it risks tearing.
Check that the tarp maintains the desired slope for rainwater runoff and adjust tension as needed.
Step 6: Final Adjustments and Safety Check
Before enjoying your new shaded area:
Inspect all anchor points and hardware for stability.
Test the tarp’s tension and make adjustments for even distribution.
Ensure that no sharp edges or loose connections remain that could damage the tarp or pose a safety hazard.
Confirm that the tarp is secure in windy conditions by giving it a gentle tug.
If you live in an area with frequent high winds, consider removing the tarp during storms to prevent damage.
Step 7: Enjoy Your Shaded Backyard Oasis
Once installed, your backyard shade tarp provides a comfortable and protective space for outdoor gatherings, relaxation, or family activities. You can decorate underneath with outdoor furniture, string lights, or potted plants to create a personalized outdoor retreat.
Maintenance Tips for Long-Lasting Shade Tarp Performance
To extend the life of your shade tarp, follow these maintenance guidelines:
Regularly check for wear and tear, especially around anchor points and seams.
Clean the tarp periodically with mild soap and water to prevent mildew buildup.
Store the tarp indoors during harsh weather seasons if it's not designed for year-round use.
Tighten hardware as needed to maintain proper tension and avoid sagging.
By following these simple care steps, your shade tarp will continue to deliver years of sun protection and outdoor comfort.
Conclusion: Upgrade Your Outdoor Space with a DIY Shade Tarp
Installing a shade tarp in your backyard is a cost-effective and rewarding DIY project. With careful planning, quality materials, and proper installation techniques, you’ll enjoy cool, shaded outdoor living all season long. This step-by-step guide ensures your project goes smoothly from start to finish.
 House Doctors of Scotch Plains-Fanwood, NJ
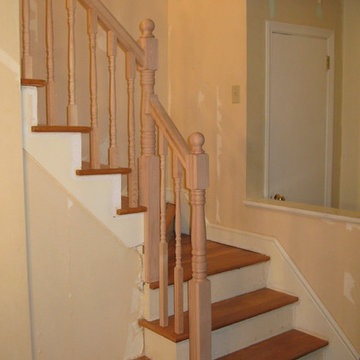
Stairways that have a baluster add beauty to a home. However, if the baluster is broken, then this can cause the stairs to look bad. Fortunately, it is not that difficult to replace a broken baluster. Below are some of the steps you will need to take:
Remove The End Cap
It is important to be very careful when you are replacing the baluster. You will need to keep the baluster intact so that a wood turner will be able to make an exact copy of it. You will most likely need to remove the end cap from the stairs. Break the seal that is between the tread and the end cap using a sturdy knife or pry bar.
Breaking The Baluster
If you do not want to salvage the baluster, then you do have other options. You can use a hammer to loosen the nails at the top of the baluster. Make sure that you do not damage the adjacent balusters or handrail. You can use your hands to loosen the bottom half of the baluster. Make sure you use gentle force.
Create A New Baluster
Unless you are fortunate enough to have the same baluster at a local home center, you are going to need a wood turner to make a new baluster. Make sure you tell your wood turner the specific type of wood you need. If you are not concerned about the original color, then you will need to select the wood that is the hardest. Ask the wood turner to leave the spindles intact. This may make it harder for you to fit the baluster into the staircase. However, this reduces the chances of getting a misfit from the wood turner.
Prepare The Stairs
It will likely take one or two weeks to turn a baluster. You can prepare the stairs during this time. Clean up the area around the stairs. Put the end cap back on the stair tread. Measure the tread to where the new baluster and handrail will meet on the upstairs side.
Prepare The Baluster
You can prepare the baluster by sanding it smooth. Measure from the bottom of the baluster to the bottom of the tenon joint. Cut the top end of the baluster so that it matches the handrail's slope. Hold a T-Bevel against the handrail's underside where the new baluster will go. Mark the angle with a pencil.
Install The Bottom Of The Baluster
Insert the tenon inside of the mortise. After that, position the top of it in the middle of the handrail's underside.
Install The Top Of The Baluster
Make sure the tenon is straight by using a carpenter's level. Have someone hold it in place in order to ensure that it matches the angle of the other balusters. Place one nail into the baluster's upstairs side. You most likely will not need more than two finishing nails. Remove dust by wiping off the baluster. Use painter's tape to mask off the handrail and stair tread. Stain or paint the new baluster.
Since this project involves a lot of work, you can save a lot of time and stress by contacting House Doctors to help. Thanks to our highly experienced team, you can depend on us to get the work done promptly and properly.
by Ken Benedetto, Owner of House Doctors of Scotch Plains - Fanwood

 The Masons Co and Dionysian Artificers Landscape
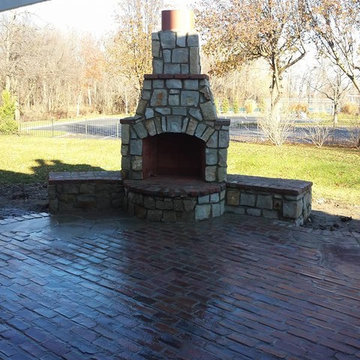
Brick patio Kansas City or paver patios Kansas City are the best investment for improving the landscape and outlook of your yard. Careful selection of the brick pattern and color while keeping in mind the matching backgrounds in your surroundings is very important but it may go waste unless the patio is installed carefully. Though not tough and complicated, ignorance of basics in installation can ruin the patterns besides reducing the life of the patio.
Building a paver patio or remodeling an existing one is an exciting process for any homeowners. The most fun and important decision is choosing a color and shape that meets not only your aesthetic needs but your lifestyle needs as well.
Kansas City Paver Patios and Paver stone installations Kansas City are very popular because of their beauty and ability to enhance any landscape. Paver stones are incredibly versatile and can be designed in any configuration and size to create patios, outdoor kitchens, pool decks, courtyards and walkways to meet client needs and the needs of the landscape. With the wide variety of materials, sizes, colors and patterns available our landscape design experts will help you create the desert oasis of your dreams.
In addition to being an affordable and aesthetically beautiful option, they are quite durable and incredibly low maintenance. A wooden deck needs to be maintained seasonally and may need constant repairs due to damage from weather. With paver patios or paver stone installations, there is almost no maintenance and they are very easy to repair as needed. The advantages of paver patios or paver stone installations are numerous and there are really no drawbacks. Paver patios and paver stone installations are beautiful, versatile, affordable, low maintenance, and enhance the value of your home.
 Green Home Systems
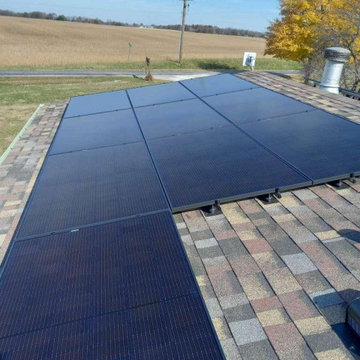
Green Home Systems provides reliable solar power solutions to residential and commercial customers all over the country. Recently, we had the opportunity to work with Bruce D. in Jacksonville, IL to provide a 19kW solar system for his home. We were able to complete this job quickly and efficiently, delivering a high quality product at an affordable price.
At Green Home Systems, our mission is to provide our customers with the best customer service in the industry as well as unparalleled solar solutions at the most economical price. We understand that not everyone can afford large upfront costs associated with installing solar systems and we are proud to offer competitive financing options that make it easier for our customers to go solar without breaking the bank. This was certainly true for Bruce D., who took advantage of our financing options and was able to have his new solar system installed within a couple of weeks time.
Our team worked hard to ensure everything went smoothly when installing Bruce’s new system. We began by inspecting his roof to determine if it was suitable for installation and if there were any potential problems that needed addressing before beginning work. Once we determined everything was in order we then moved on to designing and installing the system itself. Our team of experienced professionals worked diligently to ensure each component was installed properly and securely so that it would be able to withstand years of exposure to the elements without issue.
We also made sure that Bruce was aware of all the financial benefits associated with having a photovoltaic system installed on his home. He was now able to take advantage of numerous tax credits available in Illinois as well as decreased utility bills due to reduced consumption from his local electricity provider. Additionally, he will be able to increase the value of his home by having a solar power system installed which will make it more attractive should he decide he wants to sell it down the line.
In conclusion, we are proud of our work with Bruce D. in Jacksonville, IL and were happy to provide him with an efficient and cost-effective way to add renewable energy sources into his home’s power grid. Our team worked diligently throughout every stage of this project from design through installation until completion and we are thrilled with the results. We look forward to continuing our work throughout Illinois providing reliable solar solutions at competitive prices so that more people can benefit from this clean source of energy!
 Outwater Industries Inc
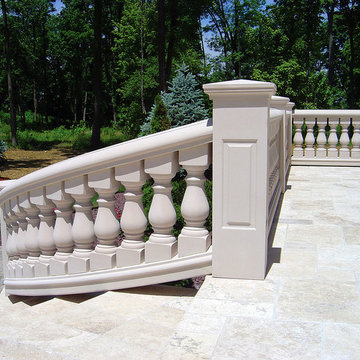
Encompassing a range of baluster rails, newel posts and complementary decorative accessories, Outwater's new, maintenance free Cast Stone Balustrade System is manufactured utilizing a unique process that combines a mixture of resins with crushed limestone and impregnated fade resistant textured colors to create balustrades that look and feel just like authentic limestone balusters at less than half of their cost and weight.
Intended for indoor or outdoor applications, which can be assembled by laypeople using traditional carpentry tools without the need for masonry, Outwater's Cast Stone Balustrade System meets the 4-inch sphere code when properly set up, and can be placed on sized dimensional lumber without the need for steel supports.
Moreover, unlike lesser quality balustrade systems, which use regular screws to attach their components, also taking into account that the screws' imminent corrosion renders them as an unsafe means by which to attach baluster rails, Outwater's Cast Stone Balustrade System employs a unique incorporated pipe system, connector pins and spacers to increase the Balustrade System's stability while allowing for a more secure and professional installation with barely perceptible seams.
Offered in 34-in. and 48-in. overall heights with a nominal 7-in rail width, baluster rails are sold by the foot up to 16-ft. long to accommodate most any installation.
100% mold resistant, non-porous and unaffected by the harshest elements, Outwater's Cast Stone Balustrade System does not require priming, painting or even occasional touch ups, further enhancing its appeal.
Product Features:
• Create balustrades that look and feel just like authentic stone balusters at less than half of their cost and weight
• Intended for indoor or outdoor use
• Can be installed by laypeople using traditional carpentry tools without the need for masonry
• Meets the 4-inch sphere code when properly set up, and can be placed on sized dimensional lumber without the need for steel supports
• Employs a unique incorporated pipe system, connector pins and spacers to increase stability while allowing for a more secure and professional installation
• Offered in 34-in. and 48-in. overall heights with a nominal 7-in rail width, baluster rails are sold by the foot up to 16-ft. long
• 100% mold resistant, non-porous and unaffected by the harshest elements. Does not require priming, painting or even occasional touch ups
Contact:
Architectural Products by Outwater
Sales & Product Information (USA & Canada):
1-800-631-8375 / 1-201-498-8750
Fax (USA & Canada): 1-800-888-3315 / 1-201-498-8751
Sales & Product Information (Outside of the USA & Canada):
1-201-498-8750
Fax (Outside of the USA & Canada): 1-201-498-8751
Email: info@outwaterplastics.com
Web: www.outwater.com
Visit us!
East Coast:
24 River Road
Bogota, NJ 07603
1-201-498-8750
West Coast:
4720 West Van Buren
Phoenix, AZ 85043
1-602-447-0936
About Architectural Products by Outwater:
It really is easy to shop with us!
Relied upon by more than 1,000,000 builders, renovators, architects designers, woodworkers, cabinet and furniture manufacturers, OEM's and retail consumers since 1972, Architectural Products by Outwater is an international manufacturer and distributor of more than 65,000 innovative and traditional Decorative Building Products that you possibly never knew existed or for which you simply could not find a reliable source. This is where Outwater truly shines!
“Now you can design, buy, build and dream like the Pros…”
Outwater’s products are, to say the least, very competitively priced and include interior and exterior architectural mouldings and millwork; columns and capitals; LED lighting and lighting accessories; balustrading; faux stone panels; faux wood beams; genuine stone tiles; decorative wood carvings; wrought iron components; stamped steel and polymer ceiling panels and backsplashes; wainscoting; wall coverings; fireplace surrounds and mantels; plastic "glass" block; period and contemporary hardware; home organization systems; kitchen and bath accessories; kitchen and bath cabinetry; bath vanities; furniture & cabinet components; knobs & pulls; casters; laminates; brass tubing & fittings; surfacing materials… and so much more!
In addition, with warehouse and distribution facilities in New Jersey and Arizona totaling over 300,000 square feet, Outwater facilitates purchases with reduced lead times and shipping costs, enabling us to fulfill and ship over 98% of our orders from stock within one to two business days!
At a time when many companies appear to have rapidly transitioned away from personalized customer service, having replaced their knowledgeable and immensely valuable human sales representatives with inanimate online marketing channels, which can be helpful to you if you were to know exactly what you might need and were not to encounter difficulties in placing your order, here at Outwater, we still believe that human interaction with a live, well versed, non-commissioned sales representative will undoubtedly better serve your needs in the long run. Even though you can always shop with us at www.outwater.com, you can also always deal directly with our extremely well versed and friendly sales and customer service representatives for their unparalleled support and assistance, most of whom have worked at Outwater for more than 15 years.
Whether you have been one of our loyal customers over the years or this is your first time in doing business with us, we would like to thank you for your expressed interest in our company and the products that we carry.
Please feel free to contact us with any questions at 1-800-631-8375 or visit us online at www.outwater.com
We look forward to serving you in the near future.
 Green Home Systems
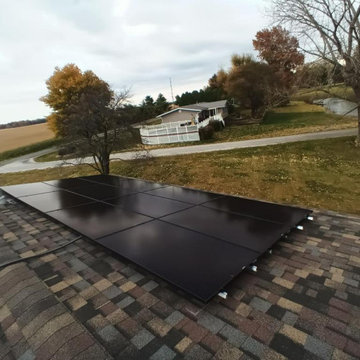
Green Home Systems provides reliable solar power solutions to residential and commercial customers all over the country. Recently, we had the opportunity to work with Bruce D. in Jacksonville, IL to provide a 19kW solar system for his home. We were able to complete this job quickly and efficiently, delivering a high quality product at an affordable price.
At Green Home Systems, our mission is to provide our customers with the best customer service in the industry as well as unparalleled solar solutions at the most economical price. We understand that not everyone can afford large upfront costs associated with installing solar systems and we are proud to offer competitive financing options that make it easier for our customers to go solar without breaking the bank. This was certainly true for Bruce D., who took advantage of our financing options and was able to have his new solar system installed within a couple of weeks time.
Our team worked hard to ensure everything went smoothly when installing Bruce’s new system. We began by inspecting his roof to determine if it was suitable for installation and if there were any potential problems that needed addressing before beginning work. Once we determined everything was in order we then moved on to designing and installing the system itself. Our team of experienced professionals worked diligently to ensure each component was installed properly and securely so that it would be able to withstand years of exposure to the elements without issue.
We also made sure that Bruce was aware of all the financial benefits associated with having a photovoltaic system installed on his home. He was now able to take advantage of numerous tax credits available in Illinois as well as decreased utility bills due to reduced consumption from his local electricity provider. Additionally, he will be able to increase the value of his home by having a solar power system installed which will make it more attractive should he decide he wants to sell it down the line.
In conclusion, we are proud of our work with Bruce D. in Jacksonville, IL and were happy to provide him with an efficient and cost-effective way to add renewable energy sources into his home’s power grid. Our team worked diligently throughout every stage of this project from design through installation until completion and we are thrilled with the results. We look forward to continuing our work throughout Illinois providing reliable solar solutions at competitive prices so that more people can benefit from this clean source of energy!
 Green Home Systems
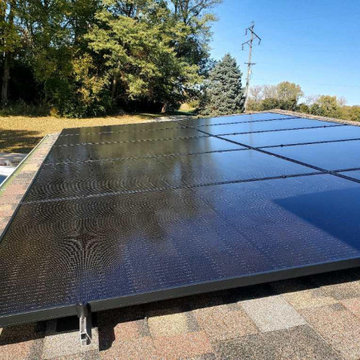
Green Home Systems provides reliable solar power solutions to residential and commercial customers all over the country. Recently, we had the opportunity to work with Bruce D. in Jacksonville, IL to provide a 19kW solar system for his home. We were able to complete this job quickly and efficiently, delivering a high quality product at an affordable price.
At Green Home Systems, our mission is to provide our customers with the best customer service in the industry as well as unparalleled solar solutions at the most economical price. We understand that not everyone can afford large upfront costs associated with installing solar systems and we are proud to offer competitive financing options that make it easier for our customers to go solar without breaking the bank. This was certainly true for Bruce D., who took advantage of our financing options and was able to have his new solar system installed within a couple of weeks time.
Our team worked hard to ensure everything went smoothly when installing Bruce’s new system. We began by inspecting his roof to determine if it was suitable for installation and if there were any potential problems that needed addressing before beginning work. Once we determined everything was in order we then moved on to designing and installing the system itself. Our team of experienced professionals worked diligently to ensure each component was installed properly and securely so that it would be able to withstand years of exposure to the elements without issue.
We also made sure that Bruce was aware of all the financial benefits associated with having a photovoltaic system installed on his home. He was now able to take advantage of numerous tax credits available in Illinois as well as decreased utility bills due to reduced consumption from his local electricity provider. Additionally, he will be able to increase the value of his home by having a solar power system installed which will make it more attractive should he decide he wants to sell it down the line.
In conclusion, we are proud of our work with Bruce D. in Jacksonville, IL and were happy to provide him with an efficient and cost-effective way to add renewable energy sources into his home’s power grid. Our team worked diligently throughout every stage of this project from design through installation until completion and we are thrilled with the results. We look forward to continuing our work throughout Illinois providing reliable solar solutions at competitive prices so that more people can benefit from this clean source of energy!
 Green Home Systems
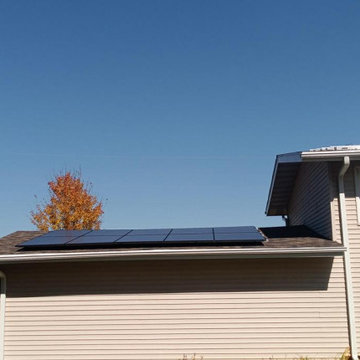
Green Home Systems provides reliable solar power solutions to residential and commercial customers all over the country. Recently, we had the opportunity to work with Bruce D. in Jacksonville, IL to provide a 19kW solar system for his home. We were able to complete this job quickly and efficiently, delivering a high quality product at an affordable price.
At Green Home Systems, our mission is to provide our customers with the best customer service in the industry as well as unparalleled solar solutions at the most economical price. We understand that not everyone can afford large upfront costs associated with installing solar systems and we are proud to offer competitive financing options that make it easier for our customers to go solar without breaking the bank. This was certainly true for Bruce D., who took advantage of our financing options and was able to have his new solar system installed within a couple of weeks time.
Our team worked hard to ensure everything went smoothly when installing Bruce’s new system. We began by inspecting his roof to determine if it was suitable for installation and if there were any potential problems that needed addressing before beginning work. Once we determined everything was in order we then moved on to designing and installing the system itself. Our team of experienced professionals worked diligently to ensure each component was installed properly and securely so that it would be able to withstand years of exposure to the elements without issue.
We also made sure that Bruce was aware of all the financial benefits associated with having a photovoltaic system installed on his home. He was now able to take advantage of numerous tax credits available in Illinois as well as decreased utility bills due to reduced consumption from his local electricity provider. Additionally, he will be able to increase the value of his home by having a solar power system installed which will make it more attractive should he decide he wants to sell it down the line.
In conclusion, we are proud of our work with Bruce D. in Jacksonville, IL and were happy to provide him with an efficient and cost-effective way to add renewable energy sources into his home’s power grid. Our team worked diligently throughout every stage of this project from design through installation until completion and we are thrilled with the results. We look forward to continuing our work throughout Illinois providing reliable solar solutions at competitive prices so that more people can benefit from this clean source of energy!

 John
JohnCoco coir is a versatile and sustainable growing medium that is gaining popularity among gardeners. Made from the fibrous husk of coconuts, it’s an eco-friendly alternative to peat moss and can greatly enhance the quality of your soil. In gardening, it is often utilized in systems like Coco Coir Hydroponic, where it helps create an efficient water and nutrient delivery system.
What is Coco Coir?
Coco coir is a natural fiber extracted from coconut husks. It has a neutral pH, excellent water retention, and is reusable, making it a favorite among gardeners who prefer organic and sustainable practices. It is available in different forms such as blocks, bricks, or loose coir, each requiring some preparation before use in gardening.
Benefits of Using Coco Coir in Gardening
Coco coir offers several advantages for gardening. Here are the benefits of using coco coir in gardening:
Holds up to 10 times its weight in water, ensuring plants have consistent moisture.
Promotes oxygen flow to plant roots, leading to healthier root systems.
Coco coir is a renewable and eco-friendly alternative to peat moss.
It can be washed, rehydrated, and reused, reducing waste.
Naturally pH neutral, making it suitable for various plants without major adjustments.
Enhances the texture and moisture retention of garden soil.
How to Prepare Coco Coir for Planting
Preparing coco coir for planting involves a few essential steps. First, you need to hydrate the coir block, as it typically comes in a compressed form. Place the block in a large container and add warm water, allowing the block to expand and absorb the water. Once fully expanded, the coir should be fluffed up by breaking it apart with your hands or a tool to ensure it becomes loose and airy. After the coir has been fluffed, it is important to drain any excess water, as overly wet coir can lead to root suffocation. Finally, since coco coir is inert and does not contain nutrients, it’s a good idea to add organic compost or liquid fertilizer to enrich the coir before planting.
Do You Need to Soak Coco Coir Before Planting?
Yes, soaking coco coir before planting is necessary. Since it comes in a compressed form, it needs to be broken down and hydrated for proper use. The soaking process allows the coir to expand and release the fibers, making it usable as a growing medium. After soaking, the coir should be fluffed to ensure the water is evenly distributed. Draining any excess water is crucial because overly wet coir may impede plant root health.
How to Prepare Coco Peat for Planting
Coco peat, a fine, powdery form of coco coir, is highly beneficial for seed starting and improving water retention in soil. To prepare coco peat, it first needs to be hydrated, similar to how you prepare coir blocks. Slowly add water to the peat in a container and allow it to absorb and fluff up. Once hydrated, coco peat can be used on its own or mixed with other growing media such as perlite or vermiculite for added aeration and drainage. It is advisable to check the pH level of your final mix, as coco peat generally has a neutral pH, but adjustments may be necessary depending on the plants being grown.
Can You Use Just Coco Coir for Plants?
Yes, coco coir can be used by itself to grow plants, especially in hydroponic systems or as a seed-starting medium. However, because coco coir does not naturally contain nutrients, you will need to provide regular fertilizer to support plant growth. This makes it particularly suitable for plants grown in controlled environments, such as hydroponics, where nutrient solutions can be carefully managed. In traditional soil-based gardening, mixing coco coir with other organic materials like compost is recommended to provide essential nutrients and improve the overall soil structure.
How to Use Coco Coir in Hydroponics
Coco coir is widely used in hydroponic systems due to its water retention and aeration properties. To use coco coir in hydroponics, it first needs to be soaked and hydrated, as discussed earlier. Once the coir is fully prepared, it can be placed in the hydroponic system. Since coco coir does not contain natural nutrients, you will need to supply a balanced nutrient solution tailored for hydroponic plants. Regular monitoring of water and nutrient levels is essential to prevent nutrient imbalances or root rot. One of the benefits of coco coir in hydroponics is its reusability. After completing a growing cycle, the coir can be washed, rehydrated, and used again in future plantings.
Using Coco Coir as a Soil Amendment
Coco coir is also an excellent soil amendment, as it improves the texture and moisture retention of garden soil. To use coco coir in this way, mix loose coir with your existing garden soil at a ratio of one part coco coir to two parts soil. This will help retain moisture without compacting the soil, improving both water drainage and root growth. For optimal results, you can also add organic compost to the mix, ensuring that the nutrient levels are sufficient for plant growth. Coco coir works particularly well in raised beds, where it helps maintain proper soil structure over time.
Advantages of Using Coco Coir Over Peat Moss
While peat moss has been traditionally used as a growing medium, coco coir offers several advantages over it. Coco coir is a renewable resource, as it is a byproduct of coconut processing, while peat moss is harvested from peat bogs that take centuries to regenerate. Coco coir is also more durable, as it can be reused multiple times without breaking down, while peat moss disintegrates after a single use. Another key benefit is its neutral pH, whereas peat moss is more acidic and may require balancing to meet the needs of specific plants.
Conclusion
Coco coir is a highly versatile and sustainable growing medium that benefits both novice and experienced gardeners alike. Whether you are using it for hydroponics, as a soil amendment, or as a standalone medium for growing plants, knowing how to properly prepare and use it is key to maximizing its benefits. By following the steps detailed above, you can improve water retention, aeration, and overall plant health in your garden, all while contributing to eco-friendly gardening practices.
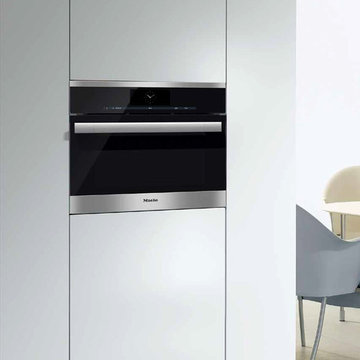
 Universal Appliance and Kitchen Center
Features:
• M Touch innovative and revolutionary controls are both easy-to-operate and navigate. An intuitive swipe of the screen will quickly lead you to your desired selection
• MultiSteam technology delivers powerful steam generation and optimum steam distribution via 6 inlet ports
• Plumbed water supply and drainage
• Wired roast probe for perfect roasting
• 3-in-1 appliance
• True European convection oven
• Steam oven
• Combination of steam and convection oven
• MasterChef and MasterChef Gourmet menus offer over 150 food types to cook to perfection
• XL stainless steel cavity
• Lift up control panel conceals water and condensate container (both containers are dishwasher-safe)
• ComfortSwivel handle moves with the motion of your wrist, creating a more ergonomic feel when opening and closing the oven door
Dimensions:
Overall Unit Width - Excluding Fascia Dimension 219/16” (548mm)
Overall Height - Excluding Fascia Dimension 1711/16” (449mm)
Overall Unit Depth - Excluding Fascia Dimension 215/8” (550mm)
Oven Door Clearance 13” (330mm)
Depth with door open 3411/16” (898mm)
Overall Fascia Dimensions:
237/16” (595mm) W x 18” (455.5mm) H x 7/8” (22mm) D
Built-In Dimensions:
Minimum Cabinet Width 221/16” — 223/8” (560 - 568mm)
Minimum Cabinet Depth 217/8” (555mm)
Minimum Cabinet Opening Height 1711/16” — 1713/16” (450 — 452mm)
Minimum Base Support 60 lbs
Additional Cut-outs Required - Venting and plumbing cut-out required 1911/16” x 19/16” (500 x 40 mm)
Water Supply Requirements:
Connect to a cold water supply only. Must be connected to a shut-off valve. The water shut-off valve must be accessible after installation. The water pressure must be between 14.5 psi (1 bar) and may not exceed 87.02 psi (6 bar). If the pressure is higher than 87.02 psi (6 bar), a pressure reducing valve must be installed. The
supplied hose has a length of 59” (1500mm). The hose must not be shortened. The entire hose length must not exceed 24’7” (7.5m).
Drainage Requirements:
Drain hose loop may be positioned at or above the flood level of the sink or drain board to which it is connect to provide the proper air gap. The top of end the drain hose must not be higher than 1911/16” (500mm) to where it connects to the drain trap. The drain hose must not be shortened. The entire hose length must not exceed 24’7” (7.5m). See installation manual for additional information.
 Outwater Industries Inc
Encompassing a range of baluster rails, newel posts and complementary decorative accessories, Outwater's new, maintenance free Cast Stone Balustrade System is manufactured utilizing a unique process that combines a mixture of resins with crushed limestone and impregnated fade resistant textured colors to create balustrades that look and feel just like authentic limestone balusters at less than half of their cost and weight.
Intended for indoor or outdoor applications, which can be assembled by laypeople using traditional carpentry tools without the need for masonry, Outwater's Cast Stone Balustrade System meets the 4-inch sphere code when properly set up, and can be placed on sized dimensional lumber without the need for steel supports.
Moreover, unlike lesser quality balustrade systems, which use regular screws to attach their components, also taking into account that the screws' imminent corrosion renders them as an unsafe means by which to attach baluster rails, Outwater's Cast Stone Balustrade System employs a unique incorporated pipe system, connector pins and spacers to increase the Balustrade System's stability while allowing for a more secure and professional installation with barely perceptible seams.
Offered in 34-in. and 48-in. overall heights with a nominal 7-in rail width, baluster rails are sold by the foot up to 16-ft. long to accommodate most any installation.
100% mold resistant, non-porous and unaffected by the harshest elements, Outwater's Cast Stone Balustrade System does not require priming, painting or even occasional touch ups, further enhancing its appeal.
Product Features:
• Create balustrades that look and feel just like authentic stone balusters at less than half of their cost and weight
• Intended for indoor or outdoor use
• Can be installed by laypeople using traditional carpentry tools without the need for masonry
• Meets the 4-inch sphere code when properly set up, and can be placed on sized dimensional lumber without the need for steel supports
• Employs a unique incorporated pipe system, connector pins and spacers to increase stability while allowing for a more secure and professional installation
• Offered in 34-in. and 48-in. overall heights with a nominal 7-in rail width, baluster rails are sold by the foot up to 16-ft. long
• 100% mold resistant, non-porous and unaffected by the harshest elements. Does not require priming, painting or even occasional touch ups
Contact:
Architectural Products by Outwater
Sales & Product Information (USA & Canada):
1-800-631-8375 / 1-201-498-8750
Fax (USA & Canada): 1-800-888-3315 / 1-201-498-8751
Sales & Product Information (Outside of the USA & Canada):
1-201-498-8750
Fax (Outside of the USA & Canada): 1-201-498-8751
Email: info@outwaterplastics.com
Web: www.outwater.com
Visit us!
East Coast:
24 River Road
Bogota, NJ 07603
1-201-498-8750
West Coast:
4720 West Van Buren
Phoenix, AZ 85043
1-602-447-0936
About Architectural Products by Outwater:
It really is easy to shop with us!
Relied upon by more than 1,000,000 builders, renovators, architects designers, woodworkers, cabinet and furniture manufacturers, OEM's and retail consumers since 1972, Architectural Products by Outwater is an international manufacturer and distributor of more than 65,000 innovative and traditional Decorative Building Products that you possibly never knew existed or for which you simply could not find a reliable source. This is where Outwater truly shines!
“Now you can design, buy, build and dream like the Pros…”
Outwater’s products are, to say the least, very competitively priced and include interior and exterior architectural mouldings and millwork; columns and capitals; LED lighting and lighting accessories; balustrading; faux stone panels; faux wood beams; genuine stone tiles; decorative wood carvings; wrought iron components; stamped steel and polymer ceiling panels and backsplashes; wainscoting; wall coverings; fireplace surrounds and mantels; plastic "glass" block; period and contemporary hardware; home organization systems; kitchen and bath accessories; kitchen and bath cabinetry; bath vanities; furniture & cabinet components; knobs & pulls; casters; laminates; brass tubing & fittings; surfacing materials… and so much more!
In addition, with warehouse and distribution facilities in New Jersey and Arizona totaling over 300,000 square feet, Outwater facilitates purchases with reduced lead times and shipping costs, enabling us to fulfill and ship over 98% of our orders from stock within one to two business days!
At a time when many companies appear to have rapidly transitioned away from personalized customer service, having replaced their knowledgeable and immensely valuable human sales representatives with inanimate online marketing channels, which can be helpful to you if you were to know exactly what you might need and were not to encounter difficulties in placing your order, here at Outwater, we still believe that human interaction with a live, well versed, non-commissioned sales representative will undoubtedly better serve your needs in the long run. Even though you can always shop with us at www.outwater.com, you can also always deal directly with our extremely well versed and friendly sales and customer service representatives for their unparalleled support and assistance, most of whom have worked at Outwater for more than 15 years.
Whether you have been one of our loyal customers over the years or this is your first time in doing business with us, we would like to thank you for your expressed interest in our company and the products that we carry.
Please feel free to contact us with any questions at 1-800-631-8375 or visit us online at www.outwater.com
We look forward to serving you in the near future.
9