
Search results for "Reference tool" in Home Design Ideas

 Alexandra Crafton
Photo: Alexandra Crafton © 2016 Houzz
Example of an eclectic home office design in Boston
Example of an eclectic home office design in Boston


 NC Shed Builders
The Garden Shed provides a comfortable work space for any home garden. Built with aesthetics in mind, this shed will complement the beauty of your home and garden and provide great storage space for your gardening tools and supplies.
The Garden Shed comes with an 8/12 pitched roof with a 6" boxed overhang, transom windows over the doors, and an 18" x 27" window with flower box. It has solid framing built with treated material, ¾” floor decking, and 7’ sidewalls.
The doors are solid and made to last, built from the same material as the shed. They come with sturdy piano hinges and a keyed lock. Leveling blocks and roofing paper are included.
This shed is available with vinyl siding, HardiPlank or SmartSide.
Find the right local pro for your project

 CRES Builders Corp.
This customer was referred to us by a local real estate agent who was familiar with our work and trusted us to deliver an amazing finished product.
Initially, the customer was interested in doing a simple face lift on their master bath; however, their focus shifted during the design phase and they decided to go with a complete master bath remodel.
To help with the design process, the customer came to us with a design they discovered on Houzz.com, the use of which we fully encourage for all of our customers because it serves as a great tool to help homeowners settle upon the perfect style and theme.
Once a final design was chosen, we created several rough draft estimates to fine-tune the scope of the project and began the process of getting the necessary materials on site, which plays a vital role in avoiding delays. Once all of the materials arrived, we began work on the three-week remodel.
In the end, this particular customer wanted an elegant and simple, yet functional and clean line master bathroom - something modern with a sense of traditional class. Upon completion, the finished product was not only stylish, but incredibly beautiful, leaving the customer extremely happy with our work.

 Kansas City Landscape
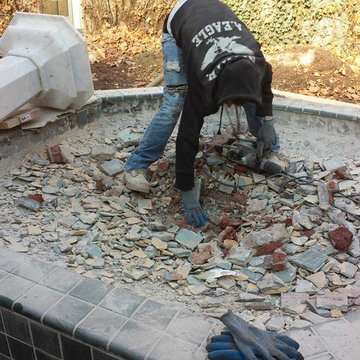
The Masons Co/ Historic fountain restoration and renovation Arkansas, Historic fountain restoration and renovation Denver Co, Historic fountain restoration and renovation Nebraska , Historic fountain restoration and renovation Memphis TN, Historic fountain restoration and renovation Nashville TN, Historic fountain restoration and renovation Springfield IL , is a professional endeavor that seeks to preserve, conserve, revive, and protect fountains and water features, and associated ornamental objects, landscapes or other artifacts of historic significance. Thru history we have seen the design and construction of fountains and water features move in two diametrically opposed directions. From the aesthetic side fountain have become much more simple and have far less architectural and artistic features, alternately we have seen fountains develop as objects of spectacle thru the use of technology and the application of advanced systems, engineering, and components. Architectural fountain conservation describes the process through which the material, historical, and design integrity of a fountain is prolonged through carefully planned interventions. The individual engaged in this pursuit is known as an architectural fountain conservator. The decisions of when and how to engage in an restoration intervention are critical to the ultimate conservation of the object. Ultimately, the decision is value based: a combination of artistic, contextual, and informational values is normally considered. In some cases, a decision to not intervene may be the most appropriate choice. The Masons Co and Dionysian Artificers deals with issues of prolonging the life and integrity of architectural fountains character and integrity, such as form and style, and/or its constituent materials, such as stone, brick, glass, metal, concrete, and systems . In this sense, the term refers to the professional use of a combination of science, art, craft, and technology as a preservation tool, and is allied with its parent fields, of historic environment conservation and art conservation
Sponsored
Columbus, OH

Hope Restoration & General Contracting
Columbus Design-Build, Kitchen & Bath Remodeling, Historic Renovations

 safe ZOnea
If you’re active on GardenWeb sharing plant photos, asking for advice, tracking seasonal progress you already understand how much detail goes into gardening. Soil pH, rainfall, emerging leaves, bloom counts, fertilizer schedules it adds up fast. But all that rich information often remains buried in posts, lists or memory. What if you could visualize that data and turn it into clear quick insights? That’s where a graph maker becomes a game-changer for your gardening workflow.
1. Why garden data belongs on a graph
On GardenWeb, you’ll find forums for everything from perennial care, vegetable gardening, patios, herbs, even cooking and craft projects. While plant lovers share observations and ask questions, many track progress manually in spreadsheets or memory. A graph maker flips that around:
Instead of a list of numbers (e.g., “Soil test: pH 6.4 in May, 6.1 in October”), you get a line graph showing the decline over time.
Instead of guessing which plant bloomed most, you see a bar chart comparing counts across plants.
Instead of manually calculating average rainfall effect, you plot scatter points of bloom count vs. rainfall.
By turning your data into visuals, you’re not just recording—you’re analysing, learning and improving. For GardenWeb users this means smarter decisions: Which fertilizer actually improves bloom count? Which shady spot recovers slower? A graph maker gives clarity.
2. What is a graph maker and how to use one
A graph maker is a web tool or software that lets you input raw data (numbers, dates, categories) and output visual charts like line graphs, bar charts, scatter plots, etc. It might allow you to import a spreadsheet, select chart type, customize colours, label axes, and export the image for your blog, forum post or personal log.
Here’s how you could apply it for gardening:
Log blooms per week for each rose plant.
Using the graph maker, choose line graph to track changes over weeks.
Label your y-axis “Number of Blooms”, x-axis “Week of Year”.
Add colour lines for each plant for easy comparison.
Export as PNG and embed it in a GardenWeb forum post: “See bloom trend for my ‘Peace’ vs ‘Knock Out’ roses”.
This isn’t just pretty-to-look-at: it makes the trend obvious, invites discussion (“Hey, your ‘Knock Out’ line dips after week 28—what changed?”) and helps you refine your routine.
3. Use these specific scenarios on GardenWeb
A. Soil pH and plant health tracking
After multiple tests you have pH values over time and bloom results. Upload both datasets into the graph maker, produce a dual-axis line graph: soil pH on one axis, bloom count on the other. Post your findings in the “Soil, Fertility & Nutrients” forum and get feedback.
B. Seasonal pest or disease appearance
Record number of aphids spotted each month and whether you used treatment. A bar chart via the graph maker can show pre- and post-treatment figures. Then ask the “Insect & Disease Control” forum for advice based on your visual data.
C. Yield comparison between varieties
You grow two zucchini varieties. You keep weekly yield in pounds. Use the graph maker for a side-by-side bar chart. Share in the “Vegetable Gardening” forum: “Which was better this year? See the chart”.
D. Rainfall vs growth rate
You log weekly rainfall and growth (in cm) of your tomato plants. Use scatter plot in graph maker. If a pattern emerges, you’re ready to post: “Is my growth plateau due to drought? Chart shows a clear correlation.”
4. Why this elevates your GardenWeb contributions
When you post with a chart made by a graph maker, you’re doing more than asking or showing off. You’re investigating. You’re analysing. You invite the community to give feedback on data, not just anecdotes. That elevates the discussion. Instead of “My plant died, any ideas?” you post “See this graph of pH drop and bloom count—what might be the limiting factor?” High-quality visuals raise your post’s value and garner more thoughtful responses.
Plus, your posts become useful references for others: someone else can say, “Cool graphic, can you share your data sheet?” You build credibility and help the forum become a learning hub—not just a Q&A board.
5. Tips for using a graph maker effectively in the GardenWeb context
Keep it simple: One chart, one insight. Don’t overcrowd.
Label clearly: Titles, axis labels, units (e.g., cm/week, mg/L, °F).
Use readable colours: Avoid faint tones that vanish on mobile.
Annotate when needed: Add notes like “Fertiliser switched week 12” or “Shade cloth added”.
Provide context in your post: Don’t leave the chart alone—write a few sentences explaining what it shows and what you’re seeking.
Embed carefully: Make sure your image displays properly in GardenWeb; check mobile view.
Share raw data: If possible link to your spreadsheet so others can replicate or comment.
Be open to feedback: The chart invites questions; embrace them.
6. Possible pitfalls and how to avoid them
Bad data = bad chart: If your measurements aren’t consistent, your graph will mislead. Use standardized data collection.
Too much complexity: Multi-axis charts, too many variables—confusing. Stick to one or two variables.
Overlooking mobile viewers: Many GardenWeb users browse via phones. Use large fonts and simple visuals.
Ignoring the narrative: Chart alone won’t answer. Explain what it means and what you need.
Outdated charts: If you update your data annually, keep your visuals current or label them clearly as “2024 data”.
7. Final thoughts
On GardenWeb you’ll find a vibrant community of gardeners, DIYers, cooks and design lovers.Using a graph maker for your posts and progress turns your experience from casual hobby-logging into smart data-driven gardening. You’ll not only learn more—your peers will learn more, too.
So next time you log your plant growth, record your yield, test your soil or track pests—don’t just note it. Plot it. Use a graph maker. Share it in the forum. Let your garden tell the story, and let the community help you write the next chapter.

 Kuarki
With our decorative Wall decals, it is easy to create a new look and change the style of any room in a matter of minutes.
They can be used on almost any flat surfaces (walls, mirrors, windows, furniture, etc.) and also on slightly textured walls.
==============================
SIZES
==============================
XL: 173.75 x 120 cm | 68.40 x 47.24 inches
L: 120 X 82.87 cm | 47.24 x 32.62 inches
All of our decals can be customized. Contact us for pricing!
Note: Picture may not be an actual representation of the size. Please refer to above measurements.
==============================
VINYL COLORS
==============================
You may check the available colors in our Color Chart
Note: Colors may vary slightly due to individual monitor settings.
Important: White for non white surfaces
==============================
PRODUCTION & DELIVERY
==============================
Please allow 1-3 business days for production of your decal plus 3-5 business days for delivery.
Please inform us your telephone number after ordering, without this information the courier may not be able to contact you and deliver the order.
==============================
INCLUDED IN YOUR PURCHASE
==============================
• Your amazing new wall decal
• Application tool
• EASY Step-by-step detailed instructions
==============================
ADDITIONAL INFORMATION
==============================
• All of our decals can be customized. Contact us for pricing!
• We use commercial grade high quality MATTE vinyl that looks like paint once applied to the wall.
• Our decals can be used on slightly textured walls. If you have any questions just contact us!
• You can easy remove our decals from the wall without damaging the paint.(you cannot reuse them)
• We only do EXPRESS SHIPPING so you will get your items FAST!
• Please see our shop policies for more information about our vinyl decals.
2018 © Artwork is copyright of LX LAB - Vinyl Wall Art.
 Tile Doctor Ltd
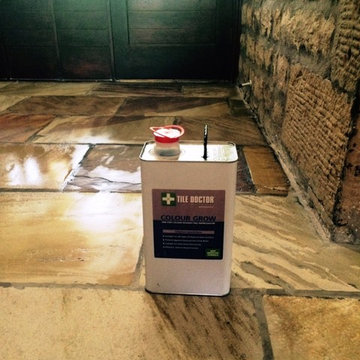
Here we have a six year old Indian Sandstone tiled floor located a property on the outskirts of Lancaster. Measuring 100 metres squared, the very large floor had under floor heating in the concrete sub base. The type of stone used inside the property is what we commonly refer to as ‘patio Sandstone’, a material which is usually used outside because of its very rough texture. It’s not particularly comfortable to walk across in bare feet, hence why many people consider it be impractical for internal flooring.
Nonetheless, the property owner was keen to make the rough textured floor as feet-friendly as possible for people walking over it. At Tile Doctor we have developed a process known as milling, which utilises diamond encrusted pads combined with a weighted rotary machine to smooth the rough surface, leaving it looking and feeling a lot nicer and more practical to live with. The milling process is only done once, but while the Sandstone will still need cleaning and sealing in the future, it won’t be nearly as difficult as when it was rough.
The job would take over two weeks to complete due to the fact that the existing grout needed to be removed and replaced with a flexible floor grout: a very time consuming process.
As mentioned, the surface of the Sandstone was very rough, and so needed to be milled down to make it a lot smoother to look after and make it easy to clean and seal. This was achieved by using Tile Doctor’s 50 Grit diamond encrusted burnishing pads, fitted to a weighed rotary machine and run along the entire surface area of the floor. Through this process the stone became much smoother and more aesthetic – completing one of our main objectives for the customer.
Next, we started breaking out the already loose and badly applied grout with our grout removal tools. The builder who had installed the floor had used a sand/cement-based grout which wasn’t flexible. As a result, it started to crumble and loosen quite quickly after exposure to the underfloor heating. We removed this and replaced it with a far more flexible grout.
Once the whole area had been successfully milled and the grout replaced, the Sandstone floor was left to dry out over the weekend. Upon our return to the property, we cleaned off any dust and resin left over from the milling and grouting processes, before leaving it to dry for a further 24 hours.
The next day we returned to seal the whole floor with two coats of our impregnating sealer Tile Doctor Colour Grow. The sealer fills the pores of the Sandstone to prevent ingrained dirt and stains, while also emphasising the natural colours in the stone. It also provides a robust matte finish, which is what the customer wished for.
It wasn’t the easiest of processes to get the Indian Sandstone into a condition where it would be both suitable for internal flooring and aesthetically pleasing, but the results proved to be very much worth the time and effort invested. The customer was very pleased with the transformation.
Russell Taylor
Lancashire Tile Doctor


5