
Search results for "Regular maintenance" in Home Design Ideas
 Tile Doctor Ltd
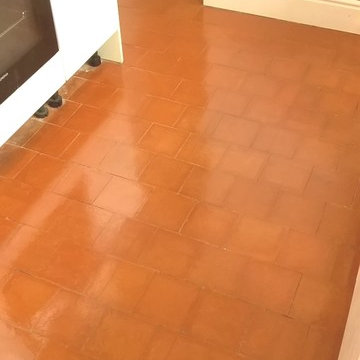
Here’s a job I recently completed in the heartland of the English pottery industry, Stoke-on-Trent. In this particular instance I was commissioned by my client to restore the appearance of the Quarry tiled floor in her kitchen which as you can see from the photo below was far from looking it’s best. Quarry tiles are typically a very hard wearing stone, but in high traffic areas like a kitchen, even this type of tile will require regular maintenance.
My first task, before beginning the restoration, was to remove the kickboards from around the bottom of the kitchen units, to prevent them from being damaged during the process. The next step was to acid wash the tiles using Tile Doctor Grout Clean-Up which was scrubbed into the tiles to remove old grout and plaster that had become stuck to the surface of the tiles at some point in the past. Once this had done its job I rinsed the entire floor with water washing away the excess soiled residue and any trace of acid.
The next step was to give the tiles a good clean using Tile Doctor Pro Clean, which is a high alkaline cleaner suitable for use on a range of natural stone floors. This was left to dwell on the tiles for ten minutes, allowing it time to seep into the stone to get underneath – and lift out – the ingrained dirt. I then agitated the solution with a scrubbing brush to remove the muck from the surface of the tiles. The floor was then given another rinse with water, and this was extracted using a wet vacuum.
I left the floor to dry after cleaning for more than 24 hours, making sure that it would be ready for sealing the next day. Upon my return to the house I checked the floor was dry and then sealed the floor using four coats of Tile Doctor Seal & Go, which provides a robust surface seal and a durable low-sheen finish. The product is suitable for use on internal, unsealed, porous surfaces.
The photographs above bears witness to the massive improvement which has been made to the quarry tiles, which has not only completely transformed the look of the tiles but also the appearance of the kitchen.
Trevor Preece
Staffordshire Tile Doctor
 Brooklyn City Furniture
Dimensions: 128 "L x 39" D x 24" H Sectional Area: 64 " D
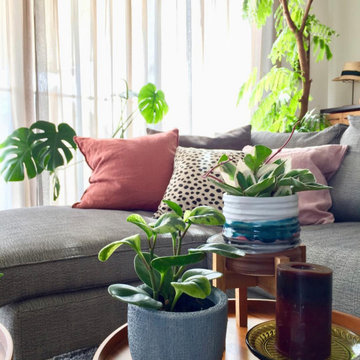
The Baseline sofa is in stock in the US for quick delivery at 128" x 63" with chaise in Gravel 26 and Tangent 16. Includes: Head Roll 6 3/4"dia x 23 1/2"w and three Back Cushions 21 3/4" x 25 1/2 x 2 3/4". Find fabric images Nueva, Bakar, Bubble II, Gravel, Plindy, Tangent, Desert, Herring and Nature, all available for special order with promotional pricing. Inquire for more info. Fabric samples are available upon request.
Comes in Left Facing or Right Facing
By Eilersen: Solid-wood frame with Nozag-spring seat-base, covered with polyurethane foam in a 600 g pre-compressed, fibre-fill wrap. Back cushion and neck-roll filling is 100% down and small duck feathers sewn into a ribbed, feather-proof cambric casing. To retain the feather cushion’s appearance and shape, regular fluffing-up and airing are recommended. 3 cushions and 1 bolster included.
Born a classic. Named after its expression. Clean lines and uncomplicated elegance make Baseline an obvious starting point for the interior decoration of your living room. Baseline is the epitome of quality, comfort, and classic design. Plus double the flexibility. With its stylistically consistent simplicity, Baseline glides effortlessly into any interior. Moreover, we have produced it in a varied series of corners, centre elements, stools and chaise-lounge which provide almost unlimited possibilities for individual combinations. Build the modules in systems - or choose them as free-standing furniture.
Both the seat and back are upholstered with a super flexible layer of pre-compressed fiberfill which optimizes sitting comfort and gives a soft, rounded look. You can easily purchase movable neckroll pillows and large down pillows, 55 x 65 cm, so Baseline invites even more relaxed enjoyment. The 25 cm broad armrest gives a balanced finish and also lifts the sofa which seems to float freely in the air on its legs of black-stained wood that are only a few centimetres high.
You can choose your cover from Eilersen's large fabric collection. The cover is removable and fitted with velcro so you can easily take it off and clean it (follow the care and maintenance instructions of the fabric). Under the cover, the sofa is further protected by a base cover in 100% cotton.
 Longjin Craft
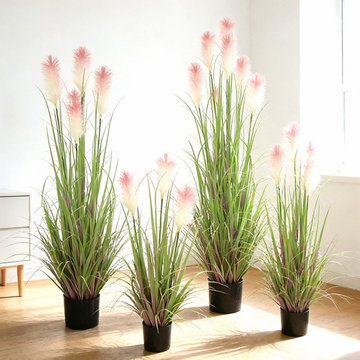
Bringing Nature Indoors Potted grasses are an excellent way to infuse a touch of nature into your home decor. Unlike live plants, artificial potted grass requires minimal maintenance while still providing vibrant greenery. They can easily enhance any room, turning a bare corner into a lively focal point. With designs like artificial pampas grass, brands such as Longjin Craft offer a range of options that mimic the ethereal beauty of natural flora. These faux plants not only look stunning but also stand the test of time, ensuring your home remains beautiful without the hassle of regular care. Versatile Home Decor Options One of the most appealing aspects of indoor artificial potted grasses is their versatility. Whether you’re aiming for a modern aesthetic or a more rustic vibe, there’s a fake potted grass option suitable for every taste. Tall grasses can add height to your decor, while shorter versions fit perfectly on shelves or tabletops. The aesthetic possibilities are endless; you can mix different types of artificial grasses for a more textured look. This creative freedom allows you to personalize your decor in a way that might be harder to achieve with live plants, which often come with their own growth limitations. Ideal for Any Environment Artificial potted grass is perfect for various settings, from homes to offices. In workspaces, they can provide an element of tranquility amidst busy schedules. Moreover, they are an excellent choice for individuals who may have allergies or pets that could interact poorly with natural plants. Longjin Craft’s artificial varieties are designed to withstand various indoor conditions and maintain their allure without fading over time. This makes them an ideal choice for those seeking stylish yet practical decor solutions. Whether you’re hosting a gathering or enjoying a quiet evening at home, these faux plants charm any space effortlessly. This article is sourced from Longjin Craft Artificial Potted Grass (longjincraft.com).
Find the right local pro for your project
 Brooklyn City Furniture
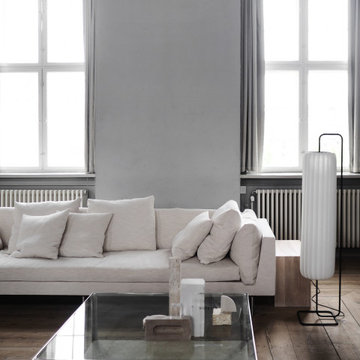
Dimensions: 128 "L x 39" D x 24" H Sectional Area: 64 " D
The Baseline sofa is in stock in the US for quick delivery at 128" x 63" with chaise in Gravel 26 and Tangent 16. Includes: Head Roll 6 3/4"dia x 23 1/2"w and three Back Cushions 21 3/4" x 25 1/2 x 2 3/4". Find fabric images Nueva, Bakar, Bubble II, Gravel, Plindy, Tangent, Desert, Herring and Nature, all available for special order with promotional pricing. Inquire for more info. Fabric samples are available upon request.
Comes in Left Facing or Right Facing
By Eilersen: Solid-wood frame with Nozag-spring seat-base, covered with polyurethane foam in a 600 g pre-compressed, fibre-fill wrap. Back cushion and neck-roll filling is 100% down and small duck feathers sewn into a ribbed, feather-proof cambric casing. To retain the feather cushion’s appearance and shape, regular fluffing-up and airing are recommended. 3 cushions and 1 bolster included.
Born a classic. Named after its expression. Clean lines and uncomplicated elegance make Baseline an obvious starting point for the interior decoration of your living room. Baseline is the epitome of quality, comfort, and classic design. Plus double the flexibility. With its stylistically consistent simplicity, Baseline glides effortlessly into any interior. Moreover, we have produced it in a varied series of corners, centre elements, stools and chaise-lounge which provide almost unlimited possibilities for individual combinations. Build the modules in systems - or choose them as free-standing furniture.
Both the seat and back are upholstered with a super flexible layer of pre-compressed fiberfill which optimizes sitting comfort and gives a soft, rounded look. You can easily purchase movable neckroll pillows and large down pillows, 55 x 65 cm, so Baseline invites even more relaxed enjoyment. The 25 cm broad armrest gives a balanced finish and also lifts the sofa which seems to float freely in the air on its legs of black-stained wood that are only a few centimetres high.
You can choose your cover from Eilersen's large fabric collection. The cover is removable and fitted with velcro so you can easily take it off and clean it (follow the care and maintenance instructions of the fabric). Under the cover, the sofa is further protected by a base cover in 100% cotton.
 Rocky Tops Granite & Marble LLC
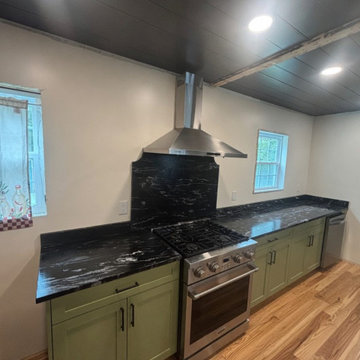
We fabricated and installed Black Forest Leather granite in a kitchen out in St. Matthews, and this is one of those stones that changes the whole feel of a room the second it goes in. It's a granite, but with a leathered finish instead of polished, so the surface has texture you can actually feel under your hand. That leathering knocks the shine down and brings out the depth of the stone, the blacks and dark grays shifting as the light moves across the counters through the day.
Black Forest works in a kitchen because it's granite through and through, hard, dense, and about as tough a countertop material as you're going to find. Heat off a pan straight from the stove isn't going to bother it. Knives, hot pots, everyday kitchen abuse, it shrugs all that off. The leathered texture actually helps hide the small stuff too, fingerprints and water spots don't show up the way they would on a polished slab, which matters in a kitchen that's getting used every single day.
Getting a leathered finish right takes some care in the shop. You can't rush the process or you end up with a surface that feels inconsistent from one section to the next. We templated the kitchen carefully, cut it to fit tight against the cabinets, and set the seams where they'd be least noticeable, matching the movement in the stone across the joints so it reads like one continuous surface instead of pieced-together slabs. We kept the edge eased, clean and simple, which is the right call on a stone with this much character. You don't need a fussy edge competing with what the granite's already doing.
Day to day, this countertop is going to hold up. Granite like this doesn't scratch easily, and with a leathered finish there's less concern about micro-scratching showing over time compared to a high polish. A sealer keeps it easy to wipe down and keeps stains from setting in, and beyond that it's low maintenance, just regular cleaning and it'll look the way it does now for years.
It's good to see stone like this going into a kitchen in St. Matthews. We do a lot of work across the Midlands, and every job's a little different, but a granite with this much texture and depth always makes an impression walking into the room.


 Inhabit | Space
Whon Photography
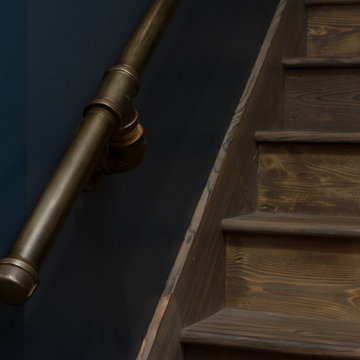
Large urban underground carpeted staircase photo in Indianapolis with gray walls and no fireplace
Large urban underground carpeted staircase photo in Indianapolis with gray walls and no fireplace

Sponsored
Columbus, OH
Free consultation for landscape design!

Peabody Landscape Group
Columbus' Reliable Landscape Design & Contracting

 Five Star Tree Care
There are a few reasons why it is critical that your trees have a regular schedule for pruning and maintenance. Pruning helps trees to maintain a tree’s health as well as form it to a pleasing aesthetic shape. Furthermore, pests and diseases are also controlled by regular pruning and care. When pruning is properly performed, your trees will be healthy and attractive all year long. Five Star Tree Services has put together a list of seven things you should keep in mind regarding your tree pruning.
Tree Inspection
Before any tree pruning job, the tree should be properly inspected. This will allow you or our tree care service team to determine which branches should be cut. It will also allow any diseases or pests to be identified and dealt with.
Remove Dead, Weak & Crossed Branches
Dead and weak branches are a hazard to your property and those who happen to walk or lounge under the tree. They also suck vital nutrients away from healthy branches and the tree trunk. Removing them will prevent accidents and allow your tree to thrive. Crossed branches can also cause problems later down the line. They affect the airflow to the crown and can also prevent sunlight from passing through the tree.
Pay Attention to Spacing
It’s important to pay attention to branch spacing when pruning your tree. Lateral branches should be spaced evenly, especially when pruning trees that have yet to mature.
Follow the Basic Pruning Rules
It’s important that the 1/4th and 1/3rd rules of pruning are followed. This means that you should never cut more than a third of the total height of the tree. This length is measured from the bottom up. You should also only cut 1/4th or less of a tree’s crown when you prune at any one time.
Get Your Tools Ready
The tools you use to prune should be ready well before you make the first cut. You should start your project equipped with a pole pruner, pruning saws, hedge shears, loppers, and pruning shears. They also need to be properly sharpened before you start your pruning project. Each of these tools will allow you to reach different parts of the tree and prune them in a safe manner. If your tools are dull, they can damage the tree or even cause accidents when you attempt to cut.
Prune on Schedule
There are schedules for pruning that should be followed according to the type of tree you are caring for. Summer blooming trees should be pruned in early spring while evergreens and hedges should be taken care of in the early part of summer. Fruit-bearing trees should be pruned late in winter ahead of the frost. If there is damage to your tree, it doesn’t matter what time of year it may be, correct the problem as soon as possible.
Avoid Protecting Post-Pruning
Pruning leaves behind wounds, but they will heal. Though they may be unsightly for a while, the marks will heal and return back to its natural beauty. Don’t paint the pruning wounds to protect the tree, it actually has no effect on decay prevention. Painting may even trigger diseases or encourage pests to take up residence.
How We Can Help
Tree pruning is a complication job, but with our tips, you can do it right. It is always a good idea to leave the job to the professionals here at Five Star Tree Services instead. Our Toronto tree care experts have the tools, experience, and skills to get the job done right the first time. Get in touch with us at (416) 990-3355 today for more information.
 Tile Doctor Ltd
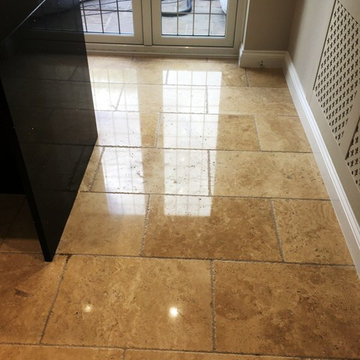
This Tumbled Travertine tiled floor at a beautiful house in Horley had been poorly maintained through the years using the wrong type of sealer which quickly wore down allowing dirt to become ingrained in the stone. The owner had become concerned about the state of the tiles and decided it was time to call in an expert that could restore the tiles to a condition that complimented the environment in which it was situated.
Travertine is known for being very distinctive in character and very durable, making it a very popular choice for tiled flooring in properties worldwide. However, the stone does require regular professional maintenance and polishing to keep it looking it top shape and home owners rarely realise this when they decide to have it installed. Fortunately, in the UK at least you can rely on your local tile doctor to maintain it for you.
The first part of the job involved giving the floor a thorough clean to remove what was left of old sealers and any polishing compounds that remained on the floor. Before beginning that however I brought in all my equipment and products into the house and then prepped the area by taping up the woodwork to protect it during the renovation process.
To remove what was left of the old sealers and other coatings still present on the floor a strong solution of Tile Doctor Remove and Go was applied to the floor and left to soak in for about ten minutes before being actively worked in with a rotary machine fitted with a black scrubbing pad. The solution turned black with the soil as it was lifted out of the pores of the stone and it was then rinsed off with water and extracted with a wet vacuum.
Following this, we moved on to a process we know as burnishing that hones the stone and brings up the polished appearance. Working in sections due to the size of the floor It involves the application of a series of diamond encrusted burnishing pads from coarse through to very fine.
The coarse 400-grit pad fitted to the rotary floor buffer and run over the floor using only water for lubrication. The water turns into a slurry as the pad does its job removing dirt and this has to be rinsed off the floor and extracted with the wet vacuum before applying the next pad. The process was then repeated with medium 800 grit pad for an initial polish followed by the Fine 1500 grit pad for the second polish using water for lubrication and rinsing and extracting in between each pad.
The last pad is a very fine 3000 grit pad for the final polish and is applied with only a little water sprayed onto the floor using a technique we call a Spray Burnish. This last pad really brings up the polished appearance of the stone.
To bring up the appearance of the stone even further and add a really durable polish Tile Doctor Shine Powder was applied. This is a crystallising powder sealer that ensures a very high shine and a tough, durable finish. This powder is applied directly to the tiles in combination with approximately ½ a litre of water and a soft white buffing pad.
Last step was to add to the protection provided by the Shine Powder with two coats of Tile Doctor Ultra-Seal which is a natural look sealer that doesn’t change the look of the stone and is applied to the stone and grout. This sealer works by seeping into the stone, occupying the pores and preventing dirt from becoming ingrained.
The customer was ecstatic with the results, being particularly pleased that she got the floor looking the way she originally wanted without significant expense, not to mention stress.
Michael Conlon
East Surrey Tile Doctor

 TREX COMPANY INC
Trex Transcend® decking now comes in Rainier, an airy mountain grey inspired by nature. Trex Transcend® Lineage™ features a refined grain pattern with subtle streaking and tranquil tones, offering a clean canvas for your outdoor space.
 Live your home - Interior Design
First own apartment
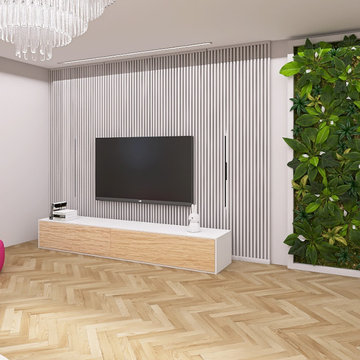
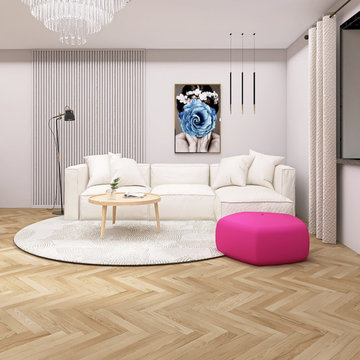
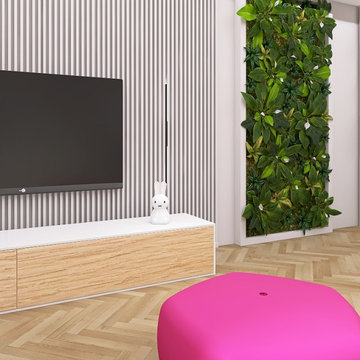
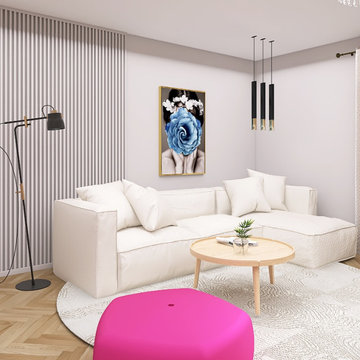
In this interior design project, we focused on a 2-bedroom apartment. It was the client's first own apartment as she recently moved to Vienna. She desired a feminine and minimalist interior design that was far from boring. Since it was a rental apartment, certain elements were predetermined, and we aimed to create a design that could easily be taken along in case of a move. For example, we incorporated natural white acoustic panels as accents behind the sofa and TV, providing texture without introducing color into the space.
We drew inspiration from the Pantone Color of the Year 2023, "Viva Magenta," for the accent color. Thus, we chose dining chairs and a pouf in shades from this color palette.
The kitchenette remained unchanged, but we added a beautiful floral wallpaper as an accent to the backsplash. However, the highlight of the design is undoubtedly the living plant wall. It creates a green focal point in the middle of the room. We decided against adding more plants since our client is often away for days, and regular care couldn't be guaranteed. The living wall requires less maintenance and is more manageable in this regard.
----
Erste eigene Wohnung in Wien
In diesem Einrichtungsprojekte ging es um eine 2-Zimmer-Wohnung. Es ist die erste eigene Wohnung der Kundin, die eben nach Wien gezogen ist. Sie wünschte sich ein feminines, schlichtes, jedoch nicht langweiliges Interiordesign. Da es sich um eine Mietwohnung handelt, waren einige Dinge gegeben und wir haben uns bemüht, alles so zu gestalten, dass es bei einem Umzug leicht mitgenommen werden kann. Wie z.B. die naturweißen Akustikpaneele, die als Akzent hinter dem Sofa sowie hinter dem TV angebracht wurden. Diese bieten Struktur, ohne Farbe in den Raum zu bringen.
Bei der Akzentfarbe wollten wir uns nämlich von der Pantone-Farbe 2023 “Viva Magenta” inspirieren lassen und haben somit die Esszimmer-Stühle sowie den Pouf farblich aus dieser Palette gewählt.
Die Küchenzeile blieb unverändert, jedoch haben wir der Rückwand mit einer hübschen Blüten-Tapete einen Akzent verliehen. Wahrscheinlich aber DAS Highlight ist die lebende Pflanzenwand. Diese bietet einen grünen Blickpunkt mitten im Raum. Auf weitere Pflanzen wurde verzichtet, da unsere Kunden oft tagelang nicht zuhause ist und die Pflege daher nicht garantiert wäre. Diese “Living wall” ist da weniger anspruchsvoll.
 Live your home - Interior Design
First own apartment
In this interior design project, we focused on a 2-bedroom apartment. It was the client's first own apartment as she recently moved to Vienna. She desired a feminine and minimalist interior design that was far from boring. Since it was a rental apartment, certain elements were predetermined, and we aimed to create a design that could easily be taken along in case of a move. For example, we incorporated natural white acoustic panels as accents behind the sofa and TV, providing texture without introducing color into the space.
We drew inspiration from the Pantone Color of the Year 2023, "Viva Magenta," for the accent color. Thus, we chose dining chairs and a pouf in shades from this color palette.
The kitchenette remained unchanged, but we added a beautiful floral wallpaper as an accent to the backsplash. However, the highlight of the design is undoubtedly the living plant wall. It creates a green focal point in the middle of the room. We decided against adding more plants since our client is often away for days, and regular care couldn't be guaranteed. The living wall requires less maintenance and is more manageable in this regard.
----
Erste eigene Wohnung in Wien
In diesem Einrichtungsprojekte ging es um eine 2-Zimmer-Wohnung. Es ist die erste eigene Wohnung der Kundin, die eben nach Wien gezogen ist. Sie wünschte sich ein feminines, schlichtes, jedoch nicht langweiliges Interiordesign. Da es sich um eine Mietwohnung handelt, waren einige Dinge gegeben und wir haben uns bemüht, alles so zu gestalten, dass es bei einem Umzug leicht mitgenommen werden kann. Wie z.B. die naturweißen Akustikpaneele, die als Akzent hinter dem Sofa sowie hinter dem TV angebracht wurden. Diese bieten Struktur, ohne Farbe in den Raum zu bringen.
Bei der Akzentfarbe wollten wir uns nämlich von der Pantone-Farbe 2023 “Viva Magenta” inspirieren lassen und haben somit die Esszimmer-Stühle sowie den Pouf farblich aus dieser Palette gewählt.
Die Küchenzeile blieb unverändert, jedoch haben wir der Rückwand mit einer hübschen Blüten-Tapete einen Akzent verliehen. Wahrscheinlich aber DAS Highlight ist die lebende Pflanzenwand. Diese bietet einen grünen Blickpunkt mitten im Raum. Auf weitere Pflanzen wurde verzichtet, da unsere Kunden oft tagelang nicht zuhause ist und die Pflege daher nicht garantiert wäre. Diese “Living wall” ist da weniger anspruchsvoll.
 Live your home - Interior Design
First own apartment
In this interior design project, we focused on a 2-bedroom apartment. It was the client's first own apartment as she recently moved to Vienna. She desired a feminine and minimalist interior design that was far from boring. Since it was a rental apartment, certain elements were predetermined, and we aimed to create a design that could easily be taken along in case of a move. For example, we incorporated natural white acoustic panels as accents behind the sofa and TV, providing texture without introducing color into the space.
We drew inspiration from the Pantone Color of the Year 2023, "Viva Magenta," for the accent color. Thus, we chose dining chairs and a pouf in shades from this color palette.
The kitchenette remained unchanged, but we added a beautiful floral wallpaper as an accent to the backsplash. However, the highlight of the design is undoubtedly the living plant wall. It creates a green focal point in the middle of the room. We decided against adding more plants since our client is often away for days, and regular care couldn't be guaranteed. The living wall requires less maintenance and is more manageable in this regard.
----
Erste eigene Wohnung in Wien
In diesem Einrichtungsprojekte ging es um eine 2-Zimmer-Wohnung. Es ist die erste eigene Wohnung der Kundin, die eben nach Wien gezogen ist. Sie wünschte sich ein feminines, schlichtes, jedoch nicht langweiliges Interiordesign. Da es sich um eine Mietwohnung handelt, waren einige Dinge gegeben und wir haben uns bemüht, alles so zu gestalten, dass es bei einem Umzug leicht mitgenommen werden kann. Wie z.B. die naturweißen Akustikpaneele, die als Akzent hinter dem Sofa sowie hinter dem TV angebracht wurden. Diese bieten Struktur, ohne Farbe in den Raum zu bringen.
Bei der Akzentfarbe wollten wir uns nämlich von der Pantone-Farbe 2023 “Viva Magenta” inspirieren lassen und haben somit die Esszimmer-Stühle sowie den Pouf farblich aus dieser Palette gewählt.
Die Küchenzeile blieb unverändert, jedoch haben wir der Rückwand mit einer hübschen Blüten-Tapete einen Akzent verliehen. Wahrscheinlich aber DAS Highlight ist die lebende Pflanzenwand. Diese bietet einen grünen Blickpunkt mitten im Raum. Auf weitere Pflanzen wurde verzichtet, da unsere Kunden oft tagelang nicht zuhause ist und die Pflege daher nicht garantiert wäre. Diese “Living wall” ist da weniger anspruchsvoll.
Sponsored
Columbus, OH
Free consultation for landscape design!
Peabody Landscape Group
Columbus' Reliable Landscape Design & Contracting
 Tile Doctor Ltd
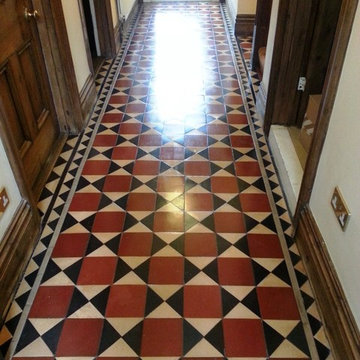
Recently I was contacted by a man in the town of Bedford who was worried that he had damaged his Victorian tiled hallway as a result of dragging a piano across the floor. I went round to the property to get a better look at the problem and, on closer inspection, realised that the tiles were actually fine; however, the piano had torn through the old surface seal.
The 150-year old tiles, dating back – as the name suggests – to the reign of Queen Victoria, had been poorly sealed and additionally had not been maintained correctly with the appropriate cleaning products. I was commissioned to remove the old sealer, clean and re-seal in order to restore this fantastic floor to its former glory.
My first task was to mix a solution of Tile Doctor Pro-Clean and water, which was then spread across the floor. Pro-Clean is a high alkaline cleaner which also contains stripping properties and this helped to break down the old, damaged sealer. The solution was left to dwell for approximately 20 minutes, giving it time to seep into the stone to get underneath, and lift out, any ingrained dirt. Pro-Clean was worked into the tiles using a heavy low speed rotary machine fitted with a black pad.
Once cleaned and stripped, we rinsed the floor using plain, clean water to neutralise the high alkaline Pro-Clean and the removed the resulting slurry using a wet-vac machine.
At this point I noticed that the white/magnolia tiles were particularly well worn and still very dirty and in need of further cleaning. Around this time Tile Doctor had also been discussing the successful use of Burnishing Pads (normally used on polished stone) on Victorian Tiles so I hand burnished the most stained tiles with a small 6 inch diamond encrusted burnishing pad with a little water to help lubricate the process. Following this, I rinsed the entire floor once again.
After leaving the floor to dry for four days, I returned to the house to seal the tiles opting to apply a single coat of Tile Doctor Colour Grow impregnating sealer first followed up with four coats of Tile Doctor Seal & Go. This combination of sealers provides a durable internal and surface stain protection whilst lifting the colours and adding a nice subtle sheen finish.
Once dried and cured, the floor was buffed using micro-fibre clothes to further enhance the appearance of the tiles further. My client was very pleased with the results, and couldn’t believe it was possible to get a floor that was so old appear brand new! The floor will dull with wear so I advised my client on the benefits of a regular maintenance plan going forward to ensure this great flooring feature remains in top condition.
Andrew Evans
Bedfordshire Tile Doctor
 Live your home - Interior Design
First own apartment
In this interior design project, we focused on a 2-bedroom apartment. It was the client's first own apartment as she recently moved to Vienna. She desired a feminine and minimalist interior design that was far from boring. Since it was a rental apartment, certain elements were predetermined, and we aimed to create a design that could easily be taken along in case of a move. For example, we incorporated natural white acoustic panels as accents behind the sofa and TV, providing texture without introducing color into the space.
We drew inspiration from the Pantone Color of the Year 2023, "Viva Magenta," for the accent color. Thus, we chose dining chairs and a pouf in shades from this color palette.
The kitchenette remained unchanged, but we added a beautiful floral wallpaper as an accent to the backsplash. However, the highlight of the design is undoubtedly the living plant wall. It creates a green focal point in the middle of the room. We decided against adding more plants since our client is often away for days, and regular care couldn't be guaranteed. The living wall requires less maintenance and is more manageable in this regard.
----
Erste eigene Wohnung in Wien
In diesem Einrichtungsprojekte ging es um eine 2-Zimmer-Wohnung. Es ist die erste eigene Wohnung der Kundin, die eben nach Wien gezogen ist. Sie wünschte sich ein feminines, schlichtes, jedoch nicht langweiliges Interiordesign. Da es sich um eine Mietwohnung handelt, waren einige Dinge gegeben und wir haben uns bemüht, alles so zu gestalten, dass es bei einem Umzug leicht mitgenommen werden kann. Wie z.B. die naturweißen Akustikpaneele, die als Akzent hinter dem Sofa sowie hinter dem TV angebracht wurden. Diese bieten Struktur, ohne Farbe in den Raum zu bringen.
Bei der Akzentfarbe wollten wir uns nämlich von der Pantone-Farbe 2023 “Viva Magenta” inspirieren lassen und haben somit die Esszimmer-Stühle sowie den Pouf farblich aus dieser Palette gewählt.
Die Küchenzeile blieb unverändert, jedoch haben wir der Rückwand mit einer hübschen Blüten-Tapete einen Akzent verliehen. Wahrscheinlich aber DAS Highlight ist die lebende Pflanzenwand. Diese bietet einen grünen Blickpunkt mitten im Raum. Auf weitere Pflanzen wurde verzichtet, da unsere Kunden oft tagelang nicht zuhause ist und die Pflege daher nicht garantiert wäre. Diese “Living wall” ist da weniger anspruchsvoll.
 Tile Doctor Ltd
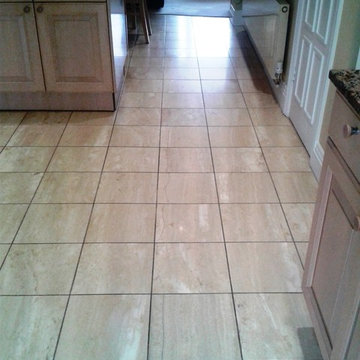
Every now and again, I get a call from a client located on the small peninsula of Sandbanks, Poole. Sandbanks, sometimes referred to as ‘Britain’s Palm Beach’, is known for its fantastic beach and high value property. My client asked me to take a look at a Travertine floor in his kitchen which was, in fact, more highly polished than he had wanted. The polished finish had worn off the travertine tiles where they had been walked on, leaving a dull trackway running down the centre of the kitchen. With its distinct characteristics, travertine is a popular choice for kitchen flooring, although it is also quite often used in bathrooms. In any case Travertine tiles will need regular maintenance to keep them looking their best.
Unfortunately, the kitchen floor must have experienced some sort of settlement or shrinkage as a long crack has appeared, which ran along the same line as the dull trackway. It is not uncommon for Travertine tiles to crack due to wear over time, or even bad fitting in some cases. While the exact cause of the crack was unclear, the homeowner concluded that the floor was certainly in need of restoration.
Repairing a crack in a Travertine tiled floor
Replacing the Travertine tiles was not an option due to a lack of spare tiles, so I opted instead to fill the crack in the floor using Harbro Stone Filler, an epoxy stone filler, matching the colour of the tile as closely as possible. I left this to set, before sanding down the excess filler.
My next action was to use a set of Tile Doctor Diamond burnishing pads to sand out any scratches and restore a more even shine to the floor, as per the client’s request. For polished stone, I recommend using a set of four burnishing pads applied in order: Coarse, Medium, Fine, and Very Fine. I used these one after the other with a little water to lubricate and restore the surface polish to the desired level.
Sealing a Travertine tiled floor
The next day, I returned to seal the floor with a couple of coats of Tile Doctor Colour Grow sealer. Colour Grow is a colour enhancing, impregnating sealer which penetrates deeply into the pores of the stone, thereby preventing dirt from becoming ingrained within. This particular sealer also enhances the natural colours within the Travertine tile, whilst also providing long term durable protection.
Although the crack could not be made to disappear completely, its appearance was much improved. The customer was also very pleased with the long-lasting lower sheen provided, describing it as “the finish I had wanted in the first place when the tiles were fitted”.
 Live your home - Interior Design
First own apartment
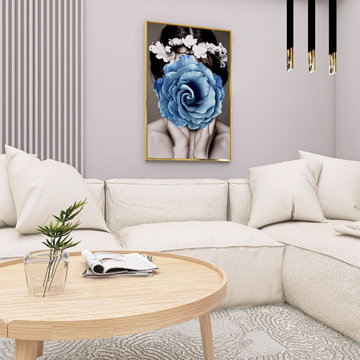
In this interior design project, we focused on a 2-bedroom apartment. It was the client's first own apartment as she recently moved to Vienna. She desired a feminine and minimalist interior design that was far from boring. Since it was a rental apartment, certain elements were predetermined, and we aimed to create a design that could easily be taken along in case of a move. For example, we incorporated natural white acoustic panels as accents behind the sofa and TV, providing texture without introducing color into the space.
We drew inspiration from the Pantone Color of the Year 2023, "Viva Magenta," for the accent color. Thus, we chose dining chairs and a pouf in shades from this color palette.
The kitchenette remained unchanged, but we added a beautiful floral wallpaper as an accent to the backsplash. However, the highlight of the design is undoubtedly the living plant wall. It creates a green focal point in the middle of the room. We decided against adding more plants since our client is often away for days, and regular care couldn't be guaranteed. The living wall requires less maintenance and is more manageable in this regard.
----
Erste eigene Wohnung in Wien
In diesem Einrichtungsprojekte ging es um eine 2-Zimmer-Wohnung. Es ist die erste eigene Wohnung der Kundin, die eben nach Wien gezogen ist. Sie wünschte sich ein feminines, schlichtes, jedoch nicht langweiliges Interiordesign. Da es sich um eine Mietwohnung handelt, waren einige Dinge gegeben und wir haben uns bemüht, alles so zu gestalten, dass es bei einem Umzug leicht mitgenommen werden kann. Wie z.B. die naturweißen Akustikpaneele, die als Akzent hinter dem Sofa sowie hinter dem TV angebracht wurden. Diese bieten Struktur, ohne Farbe in den Raum zu bringen.
Bei der Akzentfarbe wollten wir uns nämlich von der Pantone-Farbe 2023 “Viva Magenta” inspirieren lassen und haben somit die Esszimmer-Stühle sowie den Pouf farblich aus dieser Palette gewählt.
Die Küchenzeile blieb unverändert, jedoch haben wir der Rückwand mit einer hübschen Blüten-Tapete einen Akzent verliehen. Wahrscheinlich aber DAS Highlight ist die lebende Pflanzenwand. Diese bietet einen grünen Blickpunkt mitten im Raum. Auf weitere Pflanzen wurde verzichtet, da unsere Kunden oft tagelang nicht zuhause ist und die Pflege daher nicht garantiert wäre. Diese “Living wall” ist da weniger anspruchsvoll.
 highland
Renovating a home can completely transform the way a space looks, feels, and functions, but successful improvements require thoughtful planning rather than rushing into expensive changes. These renovation tips and tricks house ideas can help homeowners organize projects, control costs, select practical materials, and create rooms that remain useful for years. Start by identifying what genuinely needs improvement, such as outdated finishes, poor lighting, inefficient storage, damaged surfaces, or an inconvenient layout. Create a realistic budget that includes materials, labor, permits where applicable, and a contingency amount for unexpected issues. Taking measurements, collecting inspiration, and deciding priorities before work begins can prevent unnecessary purchases and make the renovation process much easier to manage.
One of the most useful renovation tips and tricks house projects can benefit from is improving the layout before focusing on decoration. A beautiful room will still feel inconvenient if furniture blocks walkways or storage is insufficient. Consider how people actually use each space and whether doors, windows, lighting, electrical outlets, and storage are positioned effectively. In kitchens, for example, practical work zones and accessible storage can make everyday tasks easier. In bedrooms and living rooms, built-in shelving, multifunctional furniture, and organized storage can reduce clutter without making the space feel crowded. Whenever possible, repair or improve the existing structure before replacing everything, because thoughtful upgrades can deliver significant results without creating unnecessary renovation costs.
Choosing materials carefully is another important part of renovation tips and tricks house planning. Look beyond appearance and consider durability, maintenance, safety, and suitability for the room. High-moisture areas require materials that can handle regular exposure to water, while frequently used floors and work surfaces should be selected for durability. Neutral foundations can also provide flexibility because wall colors, textiles, artwork, and accessories can be changed later without another major renovation. Lighting deserves equal attention: combine general illumination with task and accent lighting to make rooms more functional and visually comfortable. Energy-efficient lighting, improved insulation, weather sealing, and efficient fixtures may also contribute to better long-term household performance.
Before beginning major work, divide the project into manageable stages. A useful approach is to complete structural or repair work first, followed by electrical or plumbing updates when necessary, then walls, flooring, cabinetry, fixtures, and finally decorative details. This order can reduce the chance of damaging newly finished surfaces. Keep a record of measurements, product specifications, receipts, and important project decisions so replacements or future repairs are easier. For specialized work involving structural changes, electrical systems, plumbing, gas, or other regulated areas, consult appropriately qualified professionals and follow local requirements. Among the most practical renovation tips and tricks house owners can follow is to avoid changing too many things simultaneously; completing priority areas systematically makes budgets, timelines, and quality easier to control.
Finally, focus on improvements that combine appearance with everyday usefulness. Fresh paint, updated hardware, better organization, improved lighting, refreshed flooring, and carefully selected fixtures can make a noticeable difference without requiring a complete transformation. Outdoor areas can also benefit from simple maintenance, improved lighting, seating, planting, or repaired surfaces that extend the usable living space. Before declaring the project finished, inspect each room for functionality, storage, lighting, ventilation, safety, and finishing quality. The best renovation tips and tricks house approach is not necessarily about spending more it is about making informed choices that solve real problems and create a home that feels comfortable, practical, and personal.
One of the most useful renovation tips and tricks house projects can benefit from is improving the layout before focusing on decoration. A beautiful room will still feel inconvenient if furniture blocks walkways or storage is insufficient. Consider how people actually use each space and whether doors, windows, lighting, electrical outlets, and storage are positioned effectively. In kitchens, for example, practical work zones and accessible storage can make everyday tasks easier. In bedrooms and living rooms, built-in shelving, multifunctional furniture, and organized storage can reduce clutter without making the space feel crowded. Whenever possible, repair or improve the existing structure before replacing everything, because thoughtful upgrades can deliver significant results without creating unnecessary renovation costs.
Choosing materials carefully is another important part of renovation tips and tricks house planning. Look beyond appearance and consider durability, maintenance, safety, and suitability for the room. High-moisture areas require materials that can handle regular exposure to water, while frequently used floors and work surfaces should be selected for durability. Neutral foundations can also provide flexibility because wall colors, textiles, artwork, and accessories can be changed later without another major renovation. Lighting deserves equal attention: combine general illumination with task and accent lighting to make rooms more functional and visually comfortable. Energy-efficient lighting, improved insulation, weather sealing, and efficient fixtures may also contribute to better long-term household performance.
Before beginning major work, divide the project into manageable stages. A useful approach is to complete structural or repair work first, followed by electrical or plumbing updates when necessary, then walls, flooring, cabinetry, fixtures, and finally decorative details. This order can reduce the chance of damaging newly finished surfaces. Keep a record of measurements, product specifications, receipts, and important project decisions so replacements or future repairs are easier. For specialized work involving structural changes, electrical systems, plumbing, gas, or other regulated areas, consult appropriately qualified professionals and follow local requirements. Among the most practical renovation tips and tricks house owners can follow is to avoid changing too many things simultaneously; completing priority areas systematically makes budgets, timelines, and quality easier to control.
Finally, focus on improvements that combine appearance with everyday usefulness. Fresh paint, updated hardware, better organization, improved lighting, refreshed flooring, and carefully selected fixtures can make a noticeable difference without requiring a complete transformation. Outdoor areas can also benefit from simple maintenance, improved lighting, seating, planting, or repaired surfaces that extend the usable living space. Before declaring the project finished, inspect each room for functionality, storage, lighting, ventilation, safety, and finishing quality. The best renovation tips and tricks house approach is not necessarily about spending more it is about making informed choices that solve real problems and create a home that feels comfortable, practical, and personal.

 safe ZOnea
Maintaining a pest-free home requires attention throughout the year. Seasonal changes affect pest behavior, and understanding these patterns can save homeowners from costly damage and health hazards. In this guide, we will explore practical strategies for spring pest prevention tips, ensuring your property stays protected through every season. From spotting early signs to implementing proactive measures, these steps empower homeowners to take control before infestations occur.
Understanding Seasonal Pest Patterns
Pests adapt to changing weather, and knowing their patterns helps prevent infestations effectively.
Spring: Awakening Pests
Spring signals the end of winter dormancy for many pests. Rodents, ants, and termites start seeking food and warmth. Effective spring pest prevention tips include:
● Cleaning gutters and removing debris
● Sealing cracks and gaps in exterior walls
● Inspecting wood piles and compost areas
● Monitoring early signs of termite activity
Pro Tip: Conduct a termite inspection or a professional evaluation to catch infestations early before they spread.
Summer: Peak Pest Season
Warm temperatures accelerate pest breeding cycles. For a comprehensive summer pest prevention guide:
● Maintain lawns and trim vegetation away from homes
● Check window and door screens for tears
● Store food in sealed containers
● Inspect water sources that attract mosquitoes
Do You Know? Mosquitoes can lay eggs in a teaspoon of water. Eliminating stagnant water is crucial to reducing their population.
Fall: Preparing for Winter
As temperatures drop, pests search for warm indoor spaces. Key actions include:
● Inspecting for winter rodent entry points
● Sealing attic vents, crawl spaces, and foundation gaps
● Cleaning storage areas to minimize hiding spots
● Checking chimney and fireplace openings
Quick Fact: Rodents can enter homes through openings as small as ¼ inch.
Seasonal Pest Checklist for Homeowners
Creating a structured seasonal pest checklist simplifies preventive measures and ensures nothing is overlooked.
Season
Key Actions
Spring
Inspect for termites, seal exterior gaps, clean gutters, and check compost
Summer
Repair screens, trim vegetation, remove standing water, and secure food
Fall
Seal entry points, inspect attic/crawlspace, clear debris, and prepare storage
Winter
Monitor indoor activity, keep firewood away from walls, and maintain traps
Inspection & Maintenance Tips
● Schedule annual pest inspections by professional Virginia pest control consultation to detect hidden problems
● Keep a log of pest sightings and treatment dates
● Regularly replace weather stripping and caulk cracks
Note: Even small preventive steps, when consistently applied, drastically reduce infestations.
Common Pests and Their Seasonal Behaviors
Understanding how different pests behave each season helps homeowners take timely action to protect their property.
● Ants and Termites: Ants emerge in spring seeking food, while termites become active and can damage wood unnoticed. Early detection is critical.
● Rodents and Mice: Fall and winter increase rodent intrusions. Block all entry points and keep food sealed.
● Mosquitoes and Flies: Summer creates the ideal breeding environment for mosquitoes. Eliminate standing water and use physical barriers like nets.
● Spiders and Other Insects: Seasonal shifts cause spiders to move indoors. Regular vacuuming and decluttering reduce hiding spots.
Eco-Friendly Prevention Methods
● Use natural repellents like peppermint oil or diatomaceous earth
● Encourage beneficial insects, such as ladybugs, to reduce pest populations
● Plant pest-deterring plants near home boundaries, like marigolds or lavender
Integrated Pest Management (IPM)
Adopt an IPM approach by combining physical barriers, monitoring, and environmentally safe treatments. This minimizes chemical use while maintaining a pest-free home.
Quote: “Prevention is the most effective form of pest control.” – National Pest Management Association
Seasonal Pest Prevention Tools
● Snap traps and humane rodent traps
● Sticky traps for insects
● Outdoor perimeter sprays (eco-friendly)
● Moisture meters to detect early termite or mold problems
Pro Tip: Keep tools organized and accessible to act quickly when pest activity is noticed.
Planning: Annual Pest Calendar
Month
Recommended Action
March-April
Spring pest prevention tips: Inspect, seal, clean gutters
June-July
Summer pest prevention guide: Screens, standing water, food storage
September
Seasonal pest checklist: Seal entries, declutter, prep storage
November
Winter rodent entry points: Monitor indoors, maintain traps
Key Takeaways
● Seasonal awareness prevents infestations and property damage
● Consistent inspections and maintenance are essential
● Simple eco-friendly measures can significantly reduce pests
● Use a structured checklist and calendar for effective prevention
Conclusion
Homeowners who stay proactive and follow spring pest prevention tips, along with year-round monitoring, ensure their properties remain safe and comfortable. Using a summer pest prevention guide, checking winter rodent entry points, and maintaining a seasonal pest checklist ensure your home remains safe and comfortable. Remember to combine inspections, physical barriers, and environmentally friendly methods for the best results.
FAQs
Q1: How often should I perform a termite inspection?
A1: Conduct inspections annually, especially in spring, to detect early signs of termite activity and prevent extensive damage.
Q2: Can pests enter my home during winter?
A2: Yes, rodents and insects seek warmth and shelter indoors. Sealing entry points and monitoring for activity is crucial.
Q3: What is the most effective eco-friendly method for pest prevention?
A3: Using natural repellents, encouraging beneficial insects, and eliminating water sources effectively reduces pest populations without chemicals.
Ensure your home is ready for every season. Schedule a professional Virginia pest control consultation or a termite inspection in Suffolk, VA, today and stay ahead of potential infestations.
 highland
Renovating a bathroom is one of the most rewarding home improvement projects you can undertake. It adds immediate value to your property and elevates your daily routine. However, designing the perfect space requires balancing aesthetics with practical utility. At the heart of this balance is the vanity — it is the functional hub where you get ready each morning, a vital storage unit, and the visual centerpiece of the room.
To ensure you make the right investment, here is an in-depth look at choosing a bathroom vanity that blends style, longevity, and everyday functionality.
1. Assessing the Layout and Space Constraints
Before you fall in love with a specific design or finish, you must determine what your bathroom can physically handle. Scale is everything. A vanity that is too large disrupts traffic flow, while one that is too small gets lost visually and lacks adequate storage.
The next major step is determining the scale of your plumbing fixtures. Understanding how to choose a bathroom sink and vanity setup comes down to a simple choice: single or double sinks. Your choice will depend on who uses the bathroom and the overall footprint of the space.
Single Sink Vanities
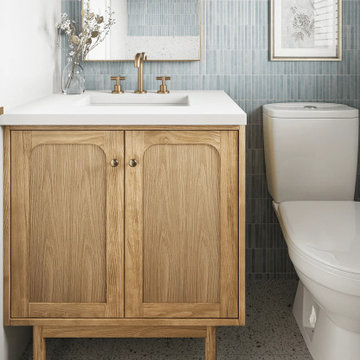
Typically ranging from 20 to 48 inches (50–120 cm) in width, single vanities are the ideal choice for powder rooms, guest bathrooms, or small master suites. For very compact spaces, you can find narrower options starting around 16 inches (40 cm). The major advantage of a single-sink layout is that it provides more usable countertop space for cosmetics, toiletries, and decorative items. If you want to skip the guesswork and invest in a premium, beautifully handcrafted fixture, explore the luxury collections at Willow Bath and Vanity. From elegant single vanities to spacious double setups, their masterfully built furniture combines solid wood construction with elite styling to transform any bathroom into a spa-like retreat.
Double Sink Vanities
Usually starting at 48 inches (120 cm) and extending up to 72 inches (180 cm) or more, double vanities are a lifesaver for shared master bathrooms. They allow two people to get ready simultaneously without fighting for sink space. Keep in mind that a double vanity naturally reduces both cabinet storage space and countertop real estate since a second sink basin and plumbing lines take up substantial interior room.
Sink Types to Consider
The countertop is the workhorse of the bathroom. It regularly comes into contact with running water, toothpaste, soapy residue, and high-heat styling tools. Knowing how to choose a bathroom vanity top requires evaluating how much maintenance you are willing to perform against the look you want to achieve. Material Pros Cons Maintenance Level Quartz Highly durable, non-porous, stain and scratch-resistant. Offers the look of stone without the hassle. Premium pricing; can show seams on very large custom layouts. Low (No sealing required) Marble Timeless, elegant, and luxurious. Every slab features a completely unique veining pattern. Porous; prone to scratching, etching from acids, and water stains. Requires careful daily use. High (Requires regular sealing) Granite Naturally strong, heat-resistant, and chemically stable. Unique earthy patterns. Porous; can chip if subjected to heavy impacts. Medium (Requires occasional sealing) When coordinating your countertop, ensure it complements your bathroom’s floor tiles, shower surround, and plumbing hardware to maintain visual harmony.
4. Selecting the Core Vanity Style and Finish
Once the functional components are locked in, you can focus on the architectural style of the vanity base. The base dictates the design theme of the entire room.
Conclusion
Choosing the perfect vanity is a step-by-step process that combines precise measurements with your personal design taste. By taking careful measurements, choosing between a single- or double-sink setup, and picking a durable counter material like quartz or granite, you can transform your bathroom into a beautiful, organized retreat. Prioritize high-quality materials and smart craftsmanship, and your new vanity will look spectacular and serve your household reliably for years to come.
1. Assessing the Layout and Space Constraints
Before you fall in love with a specific design or finish, you must determine what your bathroom can physically handle. Scale is everything. A vanity that is too large disrupts traffic flow, while one that is too small gets lost visually and lacks adequate storage.
- Take Precise Measurements: measure the available width, depth, and height. Remember to account for surrounding fixtures.
- Check Clearance Zones: ensure there is enough clearance for the bathroom door to swing open, for shower glass doors to clear the vanity, and for drawers and cabinet doors to extend fully without hitting the toilet or walls.
-
Locate Existing Plumbing: moving pipes can significantly increase renovation costs. If you want a seamless installation, look for a vanity configuration that aligns easily with your current plumbing setup.
The next major step is determining the scale of your plumbing fixtures. Understanding how to choose a bathroom sink and vanity setup comes down to a simple choice: single or double sinks. Your choice will depend on who uses the bathroom and the overall footprint of the space.
Single Sink Vanities
Typically ranging from 20 to 48 inches (50–120 cm) in width, single vanities are the ideal choice for powder rooms, guest bathrooms, or small master suites. For very compact spaces, you can find narrower options starting around 16 inches (40 cm). The major advantage of a single-sink layout is that it provides more usable countertop space for cosmetics, toiletries, and decorative items. If you want to skip the guesswork and invest in a premium, beautifully handcrafted fixture, explore the luxury collections at Willow Bath and Vanity. From elegant single vanities to spacious double setups, their masterfully built furniture combines solid wood construction with elite styling to transform any bathroom into a spa-like retreat.
Double Sink Vanities
Usually starting at 48 inches (120 cm) and extending up to 72 inches (180 cm) or more, double vanities are a lifesaver for shared master bathrooms. They allow two people to get ready simultaneously without fighting for sink space. Keep in mind that a double vanity naturally reduces both cabinet storage space and countertop real estate since a second sink basin and plumbing lines take up substantial interior room.
Sink Types to Consider
- Undermount: installed beneath the counter for a smooth, seamless surface that is incredibly easy to wipe down.
- Vessel: sits atop the counter like a decorative bowl. It makes a bold style statement but raises the overall height of the counter surface.
- Drop-In: features a lip that rests on the counter cutout. It is easier to install, but its edges can catch dirt.
-
The countertop is the workhorse of the bathroom. It regularly comes into contact with running water, toothpaste, soapy residue, and high-heat styling tools. Knowing how to choose a bathroom vanity top requires evaluating how much maintenance you are willing to perform against the look you want to achieve. Material Pros Cons Maintenance Level Quartz Highly durable, non-porous, stain and scratch-resistant. Offers the look of stone without the hassle. Premium pricing; can show seams on very large custom layouts. Low (No sealing required) Marble Timeless, elegant, and luxurious. Every slab features a completely unique veining pattern. Porous; prone to scratching, etching from acids, and water stains. Requires careful daily use. High (Requires regular sealing) Granite Naturally strong, heat-resistant, and chemically stable. Unique earthy patterns. Porous; can chip if subjected to heavy impacts. Medium (Requires occasional sealing) When coordinating your countertop, ensure it complements your bathroom’s floor tiles, shower surround, and plumbing hardware to maintain visual harmony.
4. Selecting the Core Vanity Style and Finish
Once the functional components are locked in, you can focus on the architectural style of the vanity base. The base dictates the design theme of the entire room.
- Freestanding vanities: sit directly on the floor, supported by legs or a solid kickboard base. This is a traditional, stable configuration that offers the maximum hidden cabinet and drawer storage space.
- Wall-Mounted (Floating) vanities: anchored directly onto the wall studs, leaving the floor underneath completely clear. Floating vanities are staples of modern, minimalist design. They create an illusion of space, making small rooms look larger, and make cleaning the bathroom floor incredibly easy.
- Console vanities: feature an open shelving design supported by a metal or wood frame. It offers a light, airy look reminiscent of a boutique hotel, though it sacrifices hidden storage.
Conclusion
Choosing the perfect vanity is a step-by-step process that combines precise measurements with your personal design taste. By taking careful measurements, choosing between a single- or double-sink setup, and picking a durable counter material like quartz or granite, you can transform your bathroom into a beautiful, organized retreat. Prioritize high-quality materials and smart craftsmanship, and your new vanity will look spectacular and serve your household reliably for years to come.
30