
Search results for "Remove excess" in Home Design Ideas
 Tile Doctor Ltd
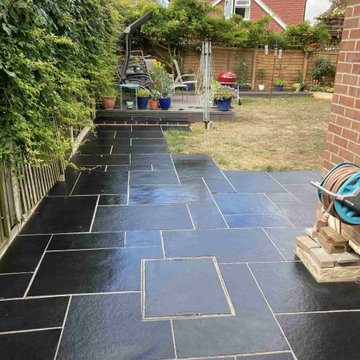
We were called out to look at this new Black Limestone patio in Ashford which was not looking as it should. The client had laid it himself but unfortunately had not managed to polish off all the grout from the surface of the Limestone thereby degrading the appearance of the stone.
Grout Smearing or Grout Haze is a common problem when it comes to tiling and this problem seems to be on the increase due to new grout formula’s which are tougher but dry a lot faster. Usually, the excess grout can be removed using a mild acid however it is not possible to do that on Limestone as this Stone is acid sensitive and as well as etching the stone can cause it to turn white. I know Tile Doctor has resolved a few jobs like this in the past for builders who do not always understand the unique characteristics of the stone.
I discussed with the client how Tile Doctor could help and gave him a quote for the work to be carried out. He was happy to go ahead so having consulted the weather forecast for a couple of dry days we agreed a date to return.
To remove the Grout Haze and clean the appearance of the Limestone I applied a Tile Doctor Brick and Patio Cleaner and worked it in with a coarse 400 grit diamond encrusted burnishing pad. The coarse pad does leave the stone looking a little rough, so the surface was then renovated using the finer burnishing pads of 800 and 1500 grit using water for lubrication. By using the pads in sequence, it gradually smooths the surface of the stone. Once done the tiles were rinsed with water and the soil removed with an industrial wet vacuum. The patio was looking good, the day was nice and bright, so we left the patio for a few hours to dry in the sun.
Once the stone was dry the patio was sealed with single coat of Tile Doctor Stone Oil which is an impregnating sealer that improves strength and restores colour to the stone.
Once dry the Stone Oil was followed by a coat of Tile Doctor Colour Grow sealer which like the Stone Oil penetrates the pores of the stone improving colour and adding protection. The treatment and combination of products transformed the appearance of the patio and provided the client with exactly the look he required.
As you can see from the after pictures the patio had a rich black colour and looked as it should. The client was over the moon with the result and was thankful that we had managed to rescue his work. Lesson learned for any future project he might take on, beware of grout haze!
Michael Conlon
South Kent Tile Doctor
 Tile Doctor Ltd
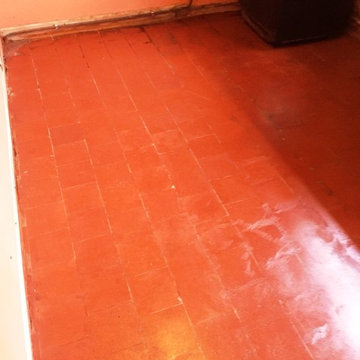
It’s been my experience that it’s not un-common to discover fantastic tiled floors hidden underneath an additional layer of flooring usually carpet or linoleum. This was the case with this property, situated in the town of Canley, Coventry, where the owner had found a Quarry tiled floor underneath Vinyl tiles which had been stuck down using an adhesive.
Quarry tiles are typically hard wearing and very durable and a sensible choice for flooring in high traffic areas of both residential and commercial properties, a tiled floor is of course a difficult to remove so it’s not surprising that tiles do get covered over rather than replaced during redecoration.
Taste’s change and like most property owners who unearth hidden tiled floors, my client was keen to restore them as an original feature. Despite the amount of adhesive and the poor state of the Quarry tiles, I was confident that the floor could be restored to new, so we agreed a date for me to come back to the property and complete the work.
The process of cleaning the Quarry tiled floor – including remove large amounts of adhesive – took a total of two days to complete.
I started by carefully removing the Vinyl tiles using a hand scraper which as you can imagine was a lot of manual effort and the adhesive proved quite difficult to remove. In the end I had to use a combination of a very coarse 50 grit pad fitted to a heavy rotary machine lubricated with water, to clear the area completely of the substance.
The resulting slurry was rinsed away, and the floor was then given a thorough acid rinse with Tile Doctor Grout Clean-Up. Grout Clean-Up is a cleaner which contains concentrated phosphoric acid, and is designed to dissolve minerals such as salts and cement left on the surface of the tile.
This was followed by a final thorough rinse with water, and the excess moisture was soaked up with a wet-vac machine.
After the cleaning process was complete, I left the floor to dry off completely for 24 hours. Upon my return to the house the next day, I checked for any dampness that could have damaged the performance of the sealer, thankfully, the floor was dry and ready to seal, and so I proceeded to apply several coats of Tile Doctor Seal & Go Extra.
Seal & Go Extra is a fully breathable sealer that provides for effective moisture transmission. It provides durable surface protection against dirt and stains, and is suitable for most kinds of internal, natural stone tiled floors, including Quarry, Victorian and Flagstone.
As you can see from the photographs the Quarry tiles came out really well and it’s hard to believe that this is the same floor.
Mick Gayton
Warwickshire Tile Doctor
 KOZAK Hauling and Junk Removal
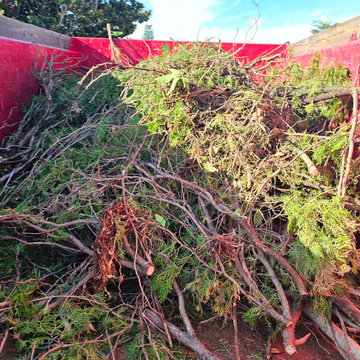
#1 JUNK REMOVAL KOZAK Hauling and Junk Removal is The Best New Port Richey Junk Removal Service! KOZAK Hauling and Junk Removal Is your local junk removal expert! Operating in the New Port Richey area, we are ready to help you reclaim your space! KOZAK Hauling and Junk Removal is a full-service junk removal company helping residential & commercial clients remove whatever type of junk you may have. Whether its junk removal, scrap metal recycling, mattress disposal, trash removal, electronics recycling, furniture disposal or a full office cleanout, whatever you call it, if you don't need it, we can take it! We do our very best to recycle and donate to local charities, keeping as much junk out of our landfills as possible. 727-455-5144
Find the right local pro for your project

 Woodling Landscape Design
Large, historic home from the 1930's overlooking downtown Santa Cruz. My clients are self-described "plantaholics" and tend to buy many plants, only to have them die. They have an extensive gardening area and low water budget. Our main goal was to make the overall design cohesive between various areas of the garden while utilizing interesting and unusual plant selections - a very fun project for me! We removed over 3,000 square feet of traditional grass and replaced it with several lawn alternatives. The first is a walkable groundcover that uses a fraction of the water of regular grass (and can be seen here in several seasons, one of which has tiny flowers); The second is a California native grass that grows long (or can be kept short) and can tolerate some shade. Both of these are excellent choices for clients with children or dogs who want a green patch without using excessive water. My clients love plants from Australia and South Africa so plants from the Proteacea and other Southern Hemisphere beauties are used predominantly throughout the project. Clean, flowing water is so important for wildlife and the beautiful stone fountain is a constant gathering spot for birds and other animals. My clients are beyond thrilled with their gorgeous, nature-filled garden and ever-expanding plant knowledge.

 Gappsi
Patio, walkway, and front steps were built by Gappsi in Wyandanch Long Island, NY in Suffolk County. The stone used is over-sized ridge brick and ridge circle pavers in a golden brown blend. The pavers are mixed randomly in square and rectangular sizes. This stone has a textured riven surface and slightly chamfered edges. The sealing process begins with pressure washing the entire patio, removing all dirt and debris from the stone surface and in between the joints. Next, Nexgel Techniseal synthetic sand is applied in between the pavers joints and vibrated with a mechanical plate compactor. The plate compactor has rubber rollers to prevent the stones from cracking or scratching. This vibrating process allows the sand to fall in between the joints to densify. Then, we clean the pavers with brooms and landscape blowers, to clean the excess sand from the pavers surface and to evenly spread the sand in between the pavers joints. The next step is to wash the pavers by misting water to penetrate the synthetic sand into the paver joints all the way down below the pavers. The sand and water activate a chemical reaction of the pollen that's in the sand to cause the sand to harden. Finally, the application of the sealer. A two parts components urethane dealer, specially formulated for Gappsi, is applied to the pavers surface and the sand joints to prevent stones from staining, extend their life cycle and further enhance their texture, color, and surface.
https://www.youtube.com/watch?v=Z2t3swbuYXo
 Tile Doctor Ltd
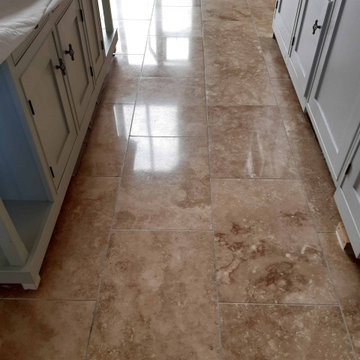
Located in Burgh Castle West of Great Yarmouth, this Travertine stone floor was a classic example of an incomplete installation. By incomplete I mean the tiler had done a fine job of laying and grouting the tiles but had left it at that and not sealed the stone. Natural stone like Travertine is porous and needs a sealer to stop dirt becoming ingrained in its pores, a sealer will also improve its appearance.
Without a sealer this floor now looked very dull, pale, rather damaged with pitting and heavily soiled with ingrained dirt. Pitting in stone like this is a natural feature of Travertine however it can be exacerbated with the use of acid cleaning products. This was a floor in urgent need of a face lift, and I was confident it could be transformed into a very beautiful floor.
I think it is true to say that most tilers will skilfully lay a floor for you but usually don’t have the knowledge, experience or equipment to finish the surface properly and when it comes to sealing many will recommend a product and suggest you take care of it yourself. Naturally if your find yourself in that position don’t insist the tiler does it, better to give us a call and have it done properly.
Our first job was to backfill the larger pits in the stone which as I mentioned are a natural feature of travertine material, but they can trap dirt and so its best if they are plugged with a suitably rigid filler. Also, if left alone the larger holes can quickly become larger as their edges crumble and break up leading to the entire tile becoming unstable. Replacing a tile in a floor like this is possible however its an extremely awkward job to do and it can be difficult to find an exact match for replacement.
Filling was done using a two-part, neutral cream-coloured polyester compound which gels in about fifteen minutes after addition of the catalyst. After this initial period, the excess product is trimmed off level with the surface of the tile before it sets harder than the stone itself in around sixty minutes. The fully cured compound can then be cut and machined as though it were part of the stone structure.
Our second job was to remove deep scratches caused by the unprotected feet of workmen’s ladders. This was done using Tile Doctor 50-grit and 100-grit diamond hand burnishing pads with a little water as a cutting medium. Shallower scratching present across the rest of the floor was removed using a Tile Doctor 200-grit soft milling pad driven by our Klindex 17″ rotary machine.
This abrasive action produces a fine slurry which was then rinsed with water and extracted using our 400psi Ninja machine in preparation for the next stage of the refinishing process. These machines were an expensive investment for our business however they are very robust and effective producing a good result that saves time.
Next task was to restore the polished appearance of the Travertine which was done using the application of a set of Tile Doctor burnishing pads. The process starts by applying a coarse 400-grit diamond pad, again fitted to the Klindex rotary machine. This cleans the tile and improves the matt finish left by the milling pad; again, the slurry was rinse-extracted before moving on to the next pad in the set. Next came the finer diamond polishing stages of 800 grit and 1500 grit, slurry being removed as before between the grades. By this time, all the scratches had been removed and the Travertine floor had visually pleasing even sheen across the whole surface. The last pad in the set is applied dry with a little water sprayed onto the tile so we left the area to dry out thoroughly overnight with the assistance of our large capacity dehumidifier.
Returning the following morning, we found that the floor had dried out perfectly and was ready to be vacuumed and spray burnished with the last pad in the set which is a 3000-grit very fine pad applied using a small amount of water sprayed from a trigger bottle resulting in a deep, rich shine across the floor surface.
Last step in the face lift was to seal the floor with a generous coat of Tile Doctor Ultra-Seal, a premium grade penetrating sealer recommended for use in Kitchens and food preparation areas. Having left the floor to soak up as much of the Tile Doctor Ultra-Seal as it could, the excess product was removed and the whole area allowed to dry completely with the assistance of our industrial air moving fan. Finally, the floor was spray buffed to a deep shine using a white maintenance pad.
The client was extremely pleased with our results and was amazed at the variation of colours within the stone which had never been visible previously.
Nick White
Norfolk Tile Doctor
 Woodling Landscape Design
Large, historic home from the 1930's overlooking downtown Santa Cruz. My clients are self-described "plantaholics" and tend to buy many plants, only to have them die. They have an extensive gardening area and low water budget. Our main goal was to make the overall design cohesive between various areas of the garden while utilizing interesting and unusual plant selections - a very fun project for me! We removed over 3,000 square feet of traditional grass and replaced it with several lawn alternatives. The first is a walkable groundcover that uses a fraction of the water of regular grass (and can be seen here in several seasons, one of which has tiny flowers); The second is a California native grass that grows long (or can be kept short) and can tolerate some shade. Both of these are excellent choices for clients with children or dogs who want a green patch without using excessive water. My clients love plants from Australia and South Africa so plants from the Proteacea and other Southern Hemisphere beauties are used predominantly throughout the project. Clean, flowing water is so important for wildlife and the beautiful stone fountain is a constant gathering spot for birds and other animals. My clients are beyond thrilled with their gorgeous, nature-filled garden and ever-expanding plant knowledge.


 Gappsi
Nicolock oyster ridge stone pavers being sealed in Patchogue NY 11772. The sealing process begins with pressure washing the entire patio, removing all dirt/debris from the stone surface and in between the joints. Next, Nexgel Techniseal synthetic sand is applied in between the pavers joints and vibrated with a mechanical plate compactor. The plate compactor has rubber rollers to prevent the stones from cracking or scratching. This vibrating process allows the sand to fall in between the joints and density. Then, we clean the pavers with brooms and landscape blowers, to clean the excess sand from the pavers surface and to evenly spread the sand in between the pavers joints. The next step is to wash the pavers by misting water to penetrate the synthetic sand into the pavers joints all the way down below the pavers. The sand and water activate a chemical reaction of the pollen that’s in the sand to cause the sand to harden. Finally, the application of the sealer, two parts components urethane dealer, specially formulated for Gappsi, is applied to the pavers surface and the sand joints to prevent stones from staining, extend their life cycle and further enhance their texture, color, and surface. Call Gappsi at 631-543-1177 for any cleaning, sealing, paver driveways/patio restoration and repairs in Patchogue 11772 NY.
 Gappsi
Patio, walkway, and front steps were built by Gappsi in Wyandanch Long Island, NY in Suffolk County. The stone used is over-sized ridge brick and ridge circle pavers in a golden brown blend. The pavers are mixed randomly in square and rectangular sizes. This stone has a textured riven surface and slightly chamfered edges. The sealing process begins with pressure washing the entire patio, removing all dirt and debris from the stone surface and in between the joints. Next, Nexgel Techniseal synthetic sand is applied in between the pavers joints and vibrated with a mechanical plate compactor. The plate compactor has rubber rollers to prevent the stones from cracking or scratching. This vibrating process allows the sand to fall in between the joints to densify. Then, we clean the pavers with brooms and landscape blowers, to clean the excess sand from the pavers surface and to evenly spread the sand in between the pavers joints. The next step is to wash the pavers by misting water to penetrate the synthetic sand into the paver joints all the way down below the pavers. The sand and water activate a chemical reaction of the pollen that's in the sand to cause the sand to harden. Finally, the application of the sealer. A two parts components urethane dealer, specially formulated for Gappsi, is applied to the pavers surface and the sand joints to prevent stones from staining, extend their life cycle and further enhance their texture, color, and surface.
https://www.youtube.com/watch?v=Z2t3swbuYXo
 Tile Doctor Ltd
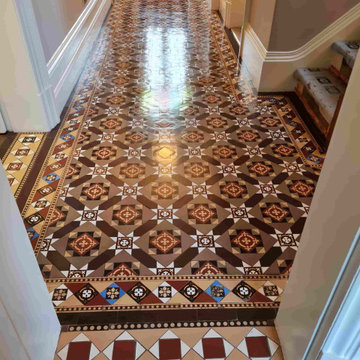
I was recently contacted by a client who had just moved into a large Victorian property in the West Cheshire village of Tarvin about renovating their Victorian tiled hallway. Apparently, the floor was in good condition, and it would just be a case of removing what was left of the old sealer, deep cleaning the tiles and then applying a fresh seal. Unless the floor has been regularly maintained with the same sealer it’s important to remove all traces of old sealers before applying fresh.
Victorian Hallway Before Cleaning Tarvin Cheshire
A lot of the work we do at Tile Doctor can be a lot more involved, often requiring the sourcing of matching replacement tiles and rebuilding large sections of tiled flooring so straight forward clean and seal job is always welcome.
To remove what was left of the sealer and the ingrained dirt from the pores of the Victorian tile I dressed the floor with a strong dilution of Tile Doctor Pro-Clean. On this occasion I used a 1:3 dilution with water and applied it to the floor with a mop. I left it to soak into the tile for fifteen minutes before scrubbing so it could get to work breaking down the old sealer.
During this time, I set up a weighted floor buffer and fitted a black buffing pad, these pads are designed for scrubbing hard floors and lifting out the dirt. I applied a little water as required during this process to ensure the pad was lubricated. Shortly the cleaning solution darkened as the old sealer and dirt was released from the tile.
The soil was rinsed away with water and then removed using a wet vacuum. Once clear the floor was inspected and the process repeated until I was satisfied it was as clean as it could be and free of sealer.
I left the floor to dry off overnight and returned the next day to apply a new sealer. Before doing so however I like to use a damp meter to take moisture readings from the floor. This is needed to ensure it is dry enough to seal which is important as any moisture in the tile can affect the sealer and lead to an inconsistent finish.
To seal I started with the application of a single coat of Tile Doctor Colour Grow which is a colour intensifying breathable impregnator that soaks into the tile improving appearance and adding protection from within. Any excess sealant was removed by wiping the floor with a microfibre cloth and then it was left to dry for an hour.
This was followed with four coats of Tile Doctor Seal and Go Extra which is an acrylic breathable sealer which adds a pleasing subtle shine to the tile. This is an important feature when choosing a sealer for old floors where moisture needs to be allowed to rise through the tile, otherwise it can become trapped under the floor and reach out to the walls causing rising damp.
The customer was very happy with the revamped hallway which made the house a lot brighter and welcoming. Before closing I should mention that for aftercare cleaning I recommend Tile Doctor Neutral cleaner which is designed for the daily cleaning for sealed tiles, this is important as most domestic supermarket cleaners are simply too strong and can prematurely erode the sealer.
Alastair Robb
West Cheshire Tile Doctor
 Woodling Landscape Design
Large, historic home from the 1930's overlooking downtown Santa Cruz. My clients are self-described "plantaholics" and tend to buy many plants, only to have them die. They have an extensive gardening area and low water budget. Our main goal was to make the overall design cohesive between various areas of the garden while utilizing interesting and unusual plant selections - a very fun project for me! We removed over 3,000 square feet of traditional grass and replaced it with several lawn alternatives. The first is a walkable groundcover that uses a fraction of the water of regular grass (and can be seen here in several seasons, one of which has tiny flowers); The second is a California native grass that grows long (or can be kept short) and can tolerate some shade. Both of these are excellent choices for clients with children or dogs who want a green patch without using excessive water. My clients love plants from Australia and South Africa so plants from the Proteacea and other Southern Hemisphere beauties are used predominantly throughout the project. Clean, flowing water is so important for wildlife and the beautiful stone fountain is a constant gathering spot for birds and other animals. My clients are beyond thrilled with their gorgeous, nature-filled garden and ever-expanding plant knowledge.
 Gappsi
Patio, walkway, and front steps were built by Gappsi in Wyandanch Long Island, NY in Suffolk County. The stone used is over-sized ridge brick and ridge circle pavers in a golden brown blend. The pavers are mixed randomly in square and rectangular sizes. This stone has a textured riven surface and slightly chamfered edges. The sealing process begins with pressure washing the entire patio, removing all dirt and debris from the stone surface and in between the joints. Next, Nexgel Techniseal synthetic sand is applied in between the pavers joints and vibrated with a mechanical plate compactor. The plate compactor has rubber rollers to prevent the stones from cracking or scratching. This vibrating process allows the sand to fall in between the joints to densify. Then, we clean the pavers with brooms and landscape blowers, to clean the excess sand from the pavers surface and to evenly spread the sand in between the pavers joints. The next step is to wash the pavers by misting water to penetrate the synthetic sand into the paver joints all the way down below the pavers. The sand and water activate a chemical reaction of the pollen that's in the sand to cause the sand to harden. Finally, the application of the sealer. A two parts components urethane dealer, specially formulated for Gappsi, is applied to the pavers surface and the sand joints to prevent stones from staining, extend their life cycle and further enhance their texture, color, and surface.
https://www.youtube.com/watch?v=Z2t3swbuYXo

 mackmiller design+build
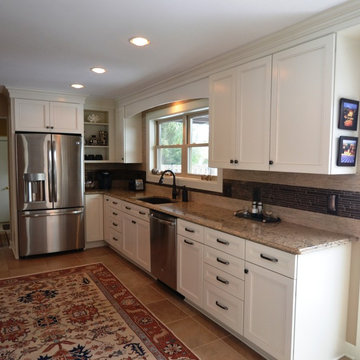
GOAL: Make the bathroom functional for Billy and his caretakers
SOLUTION
- Double the size of the existing bathroom by taking space from the family room.
- Treat the entire bathroom as the shower by waterproofing and tiling walls and floor using the Schluter Kurdy shower system, sloping the floor toward a center drain, and design the floor with no curbing to shower.
- Be sure there is enough room on both sides of the toilet so a shower chair can straddle it.
- Remove vanity and install an ADA wall mounted sink.
- Install a tilting wall mirror over the sink so Billy can see himself in the mirror.
- Even though Billy can’t use his hands, install an ADA single lever vanity faucet and shower faucet so the caregivers can work more efficiently.
- Install a fiberglass door to protect it from excessive moisture.
- Be sure door is 3 ft. wide for easier wheelchair access.
- Install a heated floor so the room can be kept warm by keeping the door closed and the temperature around 80°. This will maximize his comfort once the shower is turned off.
- Install a wall niche for toiletries.
- Design, fabricate and install a retractable changing table designed with a growing boy in mind.
- Install a portable hoist on a ceiling track to move Billy to and from his shower chair, changing table and wheelchair.
PHOTO CREDIT: John Ray
 Woodling Landscape Design
Large, historic home from the 1930's overlooking downtown Santa Cruz. My clients are self-described "plantaholics" and tend to buy many plants, only to have them die. They have an extensive gardening area and low water budget. Our main goal was to make the overall design cohesive between various areas of the garden while utilizing interesting and unusual plant selections - a very fun project for me! We removed over 3,000 square feet of traditional grass and replaced it with several lawn alternatives. The first is a walkable groundcover that uses a fraction of the water of regular grass (and can be seen here in several seasons, one of which has tiny flowers); The second is a California native grass that grows long (or can be kept short) and can tolerate some shade. Both of these are excellent choices for clients with children or dogs who want a green patch without using excessive water. My clients love plants from Australia and South Africa so plants from the Proteacea and other Southern Hemisphere beauties are used predominantly throughout the project. Clean, flowing water is so important for wildlife and the beautiful stone fountain is a constant gathering spot for birds and other animals. My clients are beyond thrilled with their gorgeous, nature-filled garden and ever-expanding plant knowledge.
 Gappsi
Nicolock oyster ridge stone pavers being sealed in Patchogue NY 11772. The sealing process begins with pressure washing the entire patio, removing all dirt/debris from the stone surface and in between the joints. Next, Nexgel Techniseal synthetic sand is applied in between the pavers joints and vibrated with a mechanical plate compactor. The plate compactor has rubber rollers to prevent the stones from cracking or scratching. This vibrating process allows the sand to fall in between the joints and density. Then, we clean the pavers with brooms and landscape blowers, to clean the excess sand from the pavers surface and to evenly spread the sand in between the pavers joints. The next step is to wash the pavers by misting water to penetrate the synthetic sand into the pavers joints all the way down below the pavers. The sand and water activate a chemical reaction of the pollen that’s in the sand to cause the sand to harden. Finally, the application of the sealer, two parts components urethane dealer, specially formulated for Gappsi, is applied to the pavers surface and the sand joints to prevent stones from staining, extend their life cycle and further enhance their texture, color, and surface. Call Gappsi at 631-543-1177 for any cleaning, sealing, paver driveways/patio restoration and repairs in Patchogue 11772 NY.
 Gappsi
Nicolock oyster ridge stone pavers being sealed in Patchogue NY 11772. The sealing process begins with pressure washing the entire patio, removing all dirt/debris from the stone surface and in between the joints. Next, Nexgel Techniseal synthetic sand is applied in between the pavers joints and vibrated with a mechanical plate compactor. The plate compactor has rubber rollers to prevent the stones from cracking or scratching. This vibrating process allows the sand to fall in between the joints and density. Then, we clean the pavers with brooms and landscape blowers, to clean the excess sand from the pavers surface and to evenly spread the sand in between the pavers joints. The next step is to wash the pavers by misting water to penetrate the synthetic sand into the pavers joints all the way down below the pavers. The sand and water activate a chemical reaction of the pollen that’s in the sand to cause the sand to harden. Finally, the application of the sealer, two parts components urethane dealer, specially formulated for Gappsi, is applied to the pavers surface and the sand joints to prevent stones from staining, extend their life cycle and further enhance their texture, color, and surface. Call Gappsi at 631-543-1177 for any cleaning, sealing, paver driveways/patio restoration and repairs in Patchogue 11772 NY.
 Gappsi
Nicolock oyster ridge stone pavers being sealed in Patchogue NY 11772. The sealing process begins with pressure washing the entire patio, removing all dirt/debris from the stone surface and in between the joints. Next, Nexgel Techniseal synthetic sand is applied in between the pavers joints and vibrated with a mechanical plate compactor. The plate compactor has rubber rollers to prevent the stones from cracking or scratching. This vibrating process allows the sand to fall in between the joints and density. Then, we clean the pavers with brooms and landscape blowers, to clean the excess sand from the pavers surface and to evenly spread the sand in between the pavers joints. The next step is to wash the pavers by misting water to penetrate the synthetic sand into the pavers joints all the way down below the pavers. The sand and water activate a chemical reaction of the pollen that’s in the sand to cause the sand to harden. Finally, the application of the sealer, two parts components urethane dealer, specially formulated for Gappsi, is applied to the pavers surface and the sand joints to prevent stones from staining, extend their life cycle and further enhance their texture, color, and surface. Call Gappsi at 631-543-1177 for any cleaning, sealing, paver driveways/patio restoration and repairs in Patchogue 11772 NY.
 Woodling Landscape Design
Large, historic home from the 1930's overlooking downtown Santa Cruz. My clients are self-described "plantaholics" and tend to buy many plants, only to have them die. They have an extensive gardening area and low water budget. Our main goal was to make the overall design cohesive between various areas of the garden while utilizing interesting and unusual plant selections - a very fun project for me! We removed over 3,000 square feet of traditional grass and replaced it with several lawn alternatives. The first is a walkable groundcover that uses a fraction of the water of regular grass (and can be seen here in several seasons, one of which has tiny flowers); The second is a California native grass that grows long (or can be kept short) and can tolerate some shade. Both of these are excellent choices for clients with children or dogs who want a green patch without using excessive water. My clients love plants from Australia and South Africa so plants from the Proteacea and other Southern Hemisphere beauties are used predominantly throughout the project. Clean, flowing water is so important for wildlife and the beautiful stone fountain is a constant gathering spot for birds and other animals. My clients are beyond thrilled with their gorgeous, nature-filled garden and ever-expanding plant knowledge.
 Gappsi
Patio, walkway, and front steps were built by Gappsi in Wyandanch Long Island, NY in Suffolk County. The stone used is over-sized ridge brick and ridge circle pavers in a golden brown blend. The pavers are mixed randomly in square and rectangular sizes. This stone has a textured riven surface and slightly chamfered edges. The sealing process begins with pressure washing the entire patio, removing all dirt and debris from the stone surface and in between the joints. Next, Nexgel Techniseal synthetic sand is applied in between the pavers joints and vibrated with a mechanical plate compactor. The plate compactor has rubber rollers to prevent the stones from cracking or scratching. This vibrating process allows the sand to fall in between the joints to densify. Then, we clean the pavers with brooms and landscape blowers, to clean the excess sand from the pavers surface and to evenly spread the sand in between the pavers joints. The next step is to wash the pavers by misting water to penetrate the synthetic sand into the paver joints all the way down below the pavers. The sand and water activate a chemical reaction of the pollen that's in the sand to cause the sand to harden. Finally, the application of the sealer. A two parts components urethane dealer, specially formulated for Gappsi, is applied to the pavers surface and the sand joints to prevent stones from staining, extend their life cycle and further enhance their texture, color, and surface.
https://www.youtube.com/watch?v=Z2t3swbuYXo
 Tile Doctor Ltd
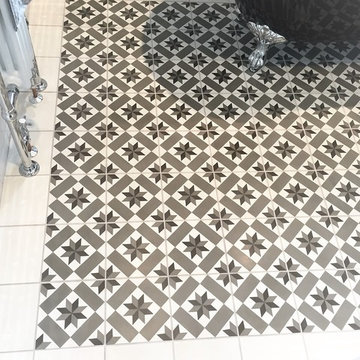
I’m often asked if you should seal a tile before grouting and the answer is a definite yes, and this Encaustic Cement tiled bathroom floor installation in Stockport is a great example as to why. The tiles had not been sealed before grouting and then, once the tiler went to grout the newly installed tiles with a grey grout, the colour ran into the tiles, staining them and leaving them looking grubby and dirty. Had the tiles been sealed it would of made the process of removing the grout from the surface of the tile much easier.
If you haven’t come across them before Encaustic cement tiles are often hand painted and are available in a range of beautifully artistic patterns, so it was a real shame that these tiles were allowed to be spoilt by an avoidable mistake. As you can imagine, the property owner was keen to have the tiles professionally restored, and she contacted me to get the job done. I took some photographs but I’m not sure that they do justice to the problem.
Rather than use a liquid cleaning product, I opted to use diamond encrusted handheld burnishing pads to remove the grout stains. Our burnishing system comprises four pads of varying grits. I started with the Coarse grit burnishing pads applying to the tiles it with a small amount of water as lubricant to grind down the grubby marks. Following this I worked my way through the system, applying Medium, Fine and Very Fine pads to gradually restore the appearance of the floor. Once the burnishing process has been completed I rinsed the tiles and then accelerated the drying process using a heat gun to prepare them to be sealed.
Removing any excess moisture before sealing is essential as even a small amount can cloud the sealer and prevent it from properly protecting the tiles from dirt and stains. Once satisfied that the floor was dry, I proceeded to seal it using Tile Doctor Colour Grow. As an impregnating sealer Colour Grow penetrates deep into the pores of the stone to fill them and thus prevent dirt from becoming ingrained. Colour Grow’s colour intensifying properties also really accentuated the patterns of the Encaustic Cement tiles.
Now that these fantastic tiles have been properly sealed it will be far easier for the customer to keep them clean in future. Needless to say, she was very happy with the result. We recommend topping up your sealer on a regular basis to ensure problems like those which occurred here do not damage the appearance of your tiles.
Steve Keary
Greater Manchester Tile Doctor
17