
Search results for "Replacement methods" in Home Design Ideas
 Hyland Fisher - Architect
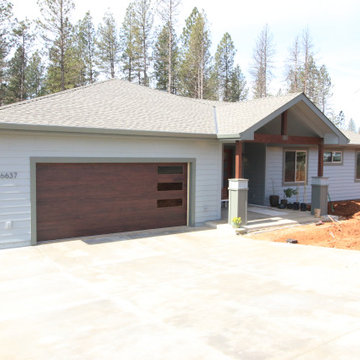
This new 1,560 square foot, three bedroom, two bath residence replaces a Paradise, CA home destroyed in the 2018 Camp Fire. The owners wanted an attractive and modest house to live in while they built their dream home on an adjacent lot. The house will later be used as rental income and provide much needed housing in Paradise.
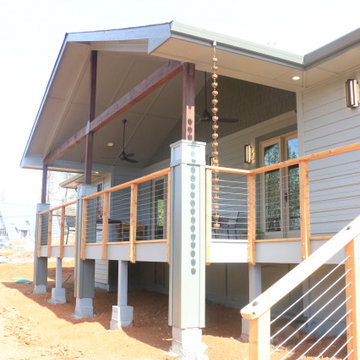
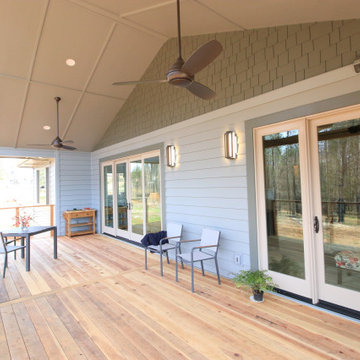
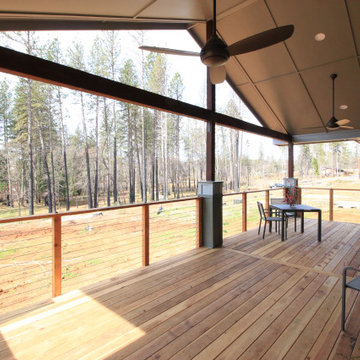
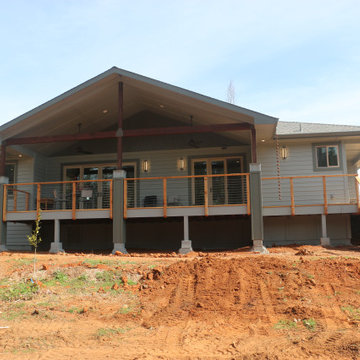
The back of the house faces west towards an excellent view of a stand of oaks that survived the fire. The large rear porch roof provides protection from unwanted glare and the setting summer sun, so the house does not overheat in the summer. The porch also extends the living space and provides excellent year round indoor/outdoor living. It is open framed with rafters so there is an expansive view to the forest and ample diffused daylight throughout the year. It also protects the home from prevailing weather patterns.
The open floor plan provides an outstanding space for entertaining guests with large windows bringing in the outdoors.
Even though the house is built on a sloped lot it is fully barrier free and employs universal design principles throughout including a curbless shower in the Primary Bath.
Several energy efficient materials and methods were used while staying within a modest construction budget. The roof uses a 12” energy heel to allow a consistent insulation blanket in the attic and blown-in blanket (BIB) insulation was used in the walls to provide an R-23 wall assembly, much better than code requirement and better than standard construction. A cool roof, foil backed roof sheathing, heat pump HVAC system, heat pump water heater, and a whole house fan round out the energy efficiency measures of this house.
 Lincoln Lighthill Architect
How do you modernize modernism on a budget? This house had charming midcentury character and lots of potential but had been neglected for many years and was sorely in need of a refresh to bring it up to modern standards of comfort, finish, and sustainability. The tight budget dictated that it would not be a down-to-the-studs, gut remodel, but more of a surgical intervention.
Built in 1955, the house had settled on the downhill side, making the floors slope almost 4” from the front to the back of the house. Using an innovative and inexpensive push-pile method, the foundation was reinforced and the house was jacked back up. It now sits solidly on bedrock and the floor is level to within a half-inch throughout.
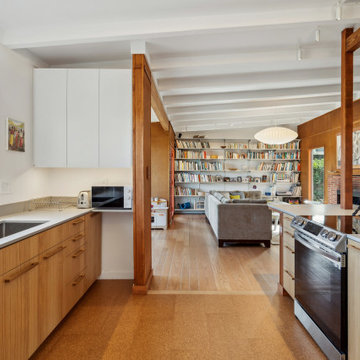
Inside, the original kitchen was worn and needed replacement. This presented an opportunity to remove the walls separating it from the living and dining area and create a wide-open great room with a peninsula counter for guests to gather and an almost continuous wall of windows to take in views of the hills, trees, and bay.
Throughout the rest of the house, most finishes were restored, or replaced when necessary. Wood floors were refinished, and new cork flooring, a slightly less durable but much less expensive alternative to tile and similar materials, was used in all wet areas, with the added benefit of warmth and resiliency. The existing textured walls and ceilings were skim-coated smooth with plaster, dark beams painted white, and existing wood wall paneling in the living room was cleaned and color-matched where new pieces were required. All of the existing frameless, direct-glazed windows were replaced with double pane units, and a new floor-to-ceiling window on the south side of the living room provides a key source of natural light.
In the bathrooms, existing tile and vanities were saved, and a strangely colored tub and sinks were re-glazed. Flooring, toilets, lighting, double medicine cabinets, and paint in each space make these mostly unaltered rooms feel new again.
Sustainability and comfort upgrades include an induction range (step one of an eventual transition to full electrification), spray foam insulation under the floor, spray-in cellulose in the walls, and warm-dim LED lighting throughout on a simple whole-house control system. Combined with a modern thermostat, the house’s systems are all accessible via app from anywhere.
And the most sustainable feature of all? What we didn’t do: tear it down and start over. In a country that demolishes a million homes a year- 1% of our residential housing stock- reusing an existing home is the greenest solution of all.
 Hyland Fisher - Architect
This new 1,560 square foot, three bedroom, two bath residence replaces a Paradise, CA home destroyed in the 2018 Camp Fire. The owners wanted an attractive and modest house to live in while they built their dream home on an adjacent lot. The house will later be used as rental income and provide much needed housing in Paradise.
The back of the house faces west towards an excellent view of a stand of oaks that survived the fire. The large rear porch roof provides protection from unwanted glare and the setting summer sun, so the house does not overheat in the summer. The porch also extends the living space and provides excellent year round indoor/outdoor living. It is open framed with rafters so there is an expansive view to the forest and ample diffused daylight throughout the year. It also protects the home from prevailing weather patterns.
The open floor plan provides an outstanding space for entertaining guests with large windows bringing in the outdoors.
Even though the house is built on a sloped lot it is fully barrier free and employs universal design principles throughout including a curbless shower in the Primary Bath.
Several energy efficient materials and methods were used while staying within a modest construction budget. The roof uses a 12” energy heel to allow a consistent insulation blanket in the attic and blown-in blanket (BIB) insulation was used in the walls to provide an R-23 wall assembly, much better than code requirement and better than standard construction. A cool roof, foil backed roof sheathing, heat pump HVAC system, heat pump water heater, and a whole house fan round out the energy efficiency measures of this house.
Find the right local pro for your project
 Hyland Fisher - Architect
This new 1,560 square foot, three bedroom, two bath residence replaces a Paradise, CA home destroyed in the 2018 Camp Fire. The owners wanted an attractive and modest house to live in while they built their dream home on an adjacent lot. The house will later be used as rental income and provide much needed housing in Paradise.
The back of the house faces west towards an excellent view of a stand of oaks that survived the fire. The large rear porch roof provides protection from unwanted glare and the setting summer sun, so the house does not overheat in the summer. The porch also extends the living space and provides excellent year round indoor/outdoor living. It is open framed with rafters so there is an expansive view to the forest and ample diffused daylight throughout the year. It also protects the home from prevailing weather patterns.
The open floor plan provides an outstanding space for entertaining guests with large windows bringing in the outdoors.
Even though the house is built on a sloped lot it is fully barrier free and employs universal design principles throughout including a curbless shower in the Primary Bath.
Several energy efficient materials and methods were used while staying within a modest construction budget. The roof uses a 12” energy heel to allow a consistent insulation blanket in the attic and blown-in blanket (BIB) insulation was used in the walls to provide an R-23 wall assembly, much better than code requirement and better than standard construction. A cool roof, foil backed roof sheathing, heat pump HVAC system, heat pump water heater, and a whole house fan round out the energy efficiency measures of this house.
 Hyland Fisher - Architect
This new 1,560 square foot, three bedroom, two bath residence replaces a Paradise, CA home destroyed in the 2018 Camp Fire. The owners wanted an attractive and modest house to live in while they built their dream home on an adjacent lot. The house will later be used as rental income and provide much needed housing in Paradise.
The back of the house faces west towards an excellent view of a stand of oaks that survived the fire. The large rear porch roof provides protection from unwanted glare and the setting summer sun, so the house does not overheat in the summer. The porch also extends the living space and provides excellent year round indoor/outdoor living. It is open framed with rafters so there is an expansive view to the forest and ample diffused daylight throughout the year. It also protects the home from prevailing weather patterns.
The open floor plan provides an outstanding space for entertaining guests with large windows bringing in the outdoors.
Even though the house is built on a sloped lot it is fully barrier free and employs universal design principles throughout including a curbless shower in the Primary Bath.
Several energy efficient materials and methods were used while staying within a modest construction budget. The roof uses a 12” energy heel to allow a consistent insulation blanket in the attic and blown-in blanket (BIB) insulation was used in the walls to provide an R-23 wall assembly, much better than code requirement and better than standard construction. A cool roof, foil backed roof sheathing, heat pump HVAC system, heat pump water heater, and a whole house fan round out the energy efficiency measures of this house.
 Hyland Fisher - Architect
This new 1,560 square foot, three bedroom, two bath residence replaces a Paradise, CA home destroyed in the 2018 Camp Fire. The owners wanted an attractive and modest house to live in while they built their dream home on an adjacent lot. The house will later be used as rental income and provide much needed housing in Paradise.
The back of the house faces west towards an excellent view of a stand of oaks that survived the fire. The large rear porch roof provides protection from unwanted glare and the setting summer sun, so the house does not overheat in the summer. The porch also extends the living space and provides excellent year round indoor/outdoor living. It is open framed with rafters so there is an expansive view to the forest and ample diffused daylight throughout the year. It also protects the home from prevailing weather patterns.
The open floor plan provides an outstanding space for entertaining guests with large windows bringing in the outdoors.
Even though the house is built on a sloped lot it is fully barrier free and employs universal design principles throughout including a curbless shower in the Primary Bath.
Several energy efficient materials and methods were used while staying within a modest construction budget. The roof uses a 12” energy heel to allow a consistent insulation blanket in the attic and blown-in blanket (BIB) insulation was used in the walls to provide an R-23 wall assembly, much better than code requirement and better than standard construction. A cool roof, foil backed roof sheathing, heat pump HVAC system, heat pump water heater, and a whole house fan round out the energy efficiency measures of this house.
 Hyland Fisher - Architect
This new 1,560 square foot, three bedroom, two bath residence replaces a Paradise, CA home destroyed in the 2018 Camp Fire. The owners wanted an attractive and modest house to live in while they built their dream home on an adjacent lot. The house will later be used as rental income and provide much needed housing in Paradise.
The back of the house faces west towards an excellent view of a stand of oaks that survived the fire. The large rear porch roof provides protection from unwanted glare and the setting summer sun, so the house does not overheat in the summer. The porch also extends the living space and provides excellent year round indoor/outdoor living. It is open framed with rafters so there is an expansive view to the forest and ample diffused daylight throughout the year. It also protects the home from prevailing weather patterns.
The open floor plan provides an outstanding space for entertaining guests with large windows bringing in the outdoors.
Even though the house is built on a sloped lot it is fully barrier free and employs universal design principles throughout including a curbless shower in the Primary Bath.
Several energy efficient materials and methods were used while staying within a modest construction budget. The roof uses a 12” energy heel to allow a consistent insulation blanket in the attic and blown-in blanket (BIB) insulation was used in the walls to provide an R-23 wall assembly, much better than code requirement and better than standard construction. A cool roof, foil backed roof sheathing, heat pump HVAC system, heat pump water heater, and a whole house fan round out the energy efficiency measures of this house.
Sponsored
Plain City, OH

Kuhns Contracting, Inc.
Central Ohio's Trusted Home Remodeler Specializing in Kitchens & Baths

 Tierney Conner Architecture
On a second story of a storefront in the vibrant neighborhood of Lakeshore Avenue, this studio is a series of surprises. The richness of existing brick walls is contrasted by bright, naturally lit surfaces. Raw steel elements mix with textured wall surfaces, detailed molding and modern fixtures. What was once a maze of halls and small rooms is now a well-organized flow of studio and changing spaces punctuated by large (immense) skylights and windows.
Architecture by Tierney Conner Design Studio
 Tile Doctor Ltd
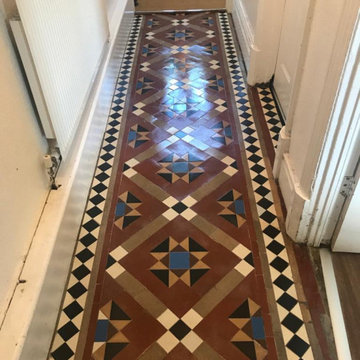
I recently worked on the restoration of a Victorian tiled hallway in Cwmbran Wales which is six miles North of Newport. As you can see from the photographs the floor was in quite a neglected dirty state and many of the the black and white border tiles needed removing and replacing. The worst part was the area by the front door where most of the tiles had been removed and then backfilled with concrete. I can only assume at some point in the past it was deemed to difficult or expensive to restore the floor, so they simply covered it up.
After visiting to survey the floor I did offer to source replacements for the concreted section and restore that as part of the work however my client’s budget would not stretch to that at the time. My quote was therefore focused on the main section of flooring and included replacing border tiles, deep cleaning the whole floor and then sealing the tiles to add protection. Although I did need to check that I could indeed source the replacement tiles before being able to provide the quote which as it turned out would not be an issue.
They were happy to go ahead and we arranged a suitable time to carry out the work which would enable me to work in the property whilst minimising contact with the owners due to the Covid-19 situation.
I spend the first day sorting out the black and white border tiles which needed to be gently prised out of position without upsetting the main part of the floor. The exposed subfloor was then cleaned up to remove old adhesive and replacements were fitted where required and secured into place. The floor would need to be solid before cleaning so that was left for day two so the new adhesive could go off overnight.
On day two I gave the floor an initial clean using a combination of Tile Doctor Pro-Clean and Remove and Go diluted with water. This produces a strong cleaner/stripper that will tackle dirt and remove coatings such as previous sealers. The old tiles had accumulated years of ingrained dirt, so I needed this extra power to remove the years of dirt and contaminates from the tile. It was sprayed onto the tiles and then left to soak in for ten minutes before being actively scrubbed into the tile using a rotary machine fitted with a black scrubbing pad. The soil was then rinsed off with water and extracted with a wet vacuum. The floor was inspected, and the process repeated on the tough stains until I was satisfied all the dirt had been removed.
Next the floor was treated to an acid wash using Tile Doctor Acid Gel using a similar method as before. This is an important treatment for these old Victorian floors that have no damp proof course as it neutralises efflorescent salts trapped in the tile which can appear as white salt deposits later. Once I was happy with the condition of the floor it was given a final rinse and left to dry off. I use a wet vacuum to remove liquids from the floor and on this last extraction I spent extra time to remove as much moisture from the tiles as possible.
I came back a few days later and after checking the tiles were dry using a damp meter, I started the application of the sealer. For this floor I applied seven coats of Tile Doctor Seal and Go for a satin finish. Tile Doctor Seal and Go is a specially formulated water-based sealer that provides both stain resistance and a durable low-sheen finish. It is perfect on a floor of this age where it leaves a lovely finish and will remain durable in what is a essentially a high traffic area.
Although we didn’t manage to sort out the area by the front door the client managed to fit a made to measure coir door mat along with carpet bar which was quite practical and looked fine so they were able to resolve that problem without blowing their budget.
The client was over the moon with results, the floor had a lovely pattern and the colours now shone through. I suggested the use of Tile Doctor Neutral Tile Cleaner to keep the floor clean and in good condition. It is neutral in pH so will ensure that the newly applied sealer stays in place and will ensure maintenance is nice and easy for them.
Paul Wales
Monmouthshire Tile Doctor

 Kitchen Design Concepts
We introduce to you one of our newer services we are providing here at Kitchen Design Concepts: spaces that just need a little reviving! As of recent, we are taking on projects that are in need of minimal updating, as in, spaces that don’t need a full-on remodel. Yes, you heard right! If your space has good bones, you like the layout of your kitchen, and you just need a few cosmetic changes, then today’s feature is for you! Recently, we updated a space where we did just this! The kitchen was in need of a little love, some fresh paint, and new finishes. And if we’re being honest here, the result looks almost as if the kitchen had a full-on remodel! To learn more about this space and how we did our magic, continue reading below:
The Before and After
First, see what an impact new finishes can make! The “before” image shows a kitchen with outdated finishes such as the tile countertops, backsplash, and cabinetry finish. The “after” image, is a kitchen that looks almost as if its brand new, the image speaks for itself!
Cabinetry
With the wooden cabinetry in this kitchen already having great bones, all we needed to do was our refinishing process that involved removing door and drawer fronts, sanding, priming, and painting. The main color of the cabinetry is white (Sherwin Williams Pure White 7005) and as an accent, we applied a deep navy blue that really pops in this space (Sherwin Willaims Naval 6244). As a special design element, we incorporated a natural wooden band across the hood which is subtle but adds an element of surprise.
Countertops
The original countertops in this space were a 12×12 tile with cracks and discolored grout from all the wear and tear. To replace the countertops, we installed a clean and crisp quartz that is not only durable but easy to maintain (no grout here!). The 3cm countertops are a Cambria quartz in a grey-tone color (Carrick).
Backsplash
Keeping things simple, yet classic, we installed a 3×6 subway tile from Interceramic. The crisp white pairs well with all the other finishes of the space and really brighten the space up! To spice things up, we paired the white tile with a contrasting grout color (Cape Grey) that matches the countertop. This is a simple method to add interest to your white backsplash!
Fixtures and Fittings
For the fixtures and fittings of the kitchen, we wanted pieces that made a statement. That’s why we selected this industrial style faucet from Brizo! The faucet is a Brizo LITZE™ PULL-DOWN FAUCET WITH ARC SPOUT AND INDUSTRIAL HANDLE (63044LF-BLGL). The matte black paired with the luxe gold elements really make a statement! To match the gold elements of the faucet, we installed cabinetry hardware from Topknobs in the same gold finish. The hardware is a Channing pull TK743HB. Lastly, the large single bowl sink (who doesn’t want a large sink?!) is a great functional touch to the kitchen. The sink is a Blanco Precision 16″ R10 super single with 16″ Drainer in stainless steel (516216).
 AMLD INTERIOR INC
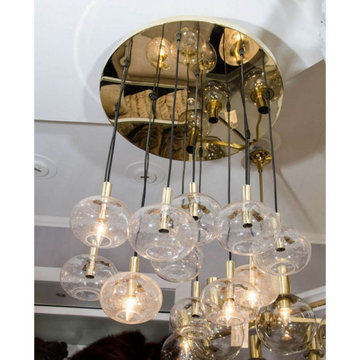
KA1872 SUSPENDED GLOBES
DESCRIPTION:
The pleasant light it spreads is very atmospheric. Completed with the structured glass and brass details, this chandelier will contribute to a luxurious character of the interior. He nicely brass frame of this chandelier is very elegant; the combination of the glass bulbs makes a gorgeous eyecatcher. We really like to play with light and shadow to create an atmosphere within an interior space. Because our lighting is made by a workforce that still relies on traditional working methods, each product is unique and carries with it the sensitivity of the artisan. These unique shapes and colors can be only created using traditional hand-blown glass techniques.
SPECIFICATIONS:
Collection: Vintage
Size: 24” Length x 24” Width x 32” Height (Custom sizes also available)
Extension: Adjustable rod comes in connectable segments customizable up to 12 ft
Shape: Pendant
Frame Finish: Polished Gold (Different options available at no additional cost)
Materials: Brass, Glass
Weight: 25 lbs
Bulbs: 120V UL, cUL Certified
Assembly: Partly assembled
Dimmer Switch Compatible: Optional
Shipping: LTL
Rush Order: 4-6 Weeks; 15% added to the total
Regular Lead Time: 6-10 Weeks
Warranty: 5 Years Full Coverage (includes replacement parts)
SIZE OPTIONS:
Size: Price:
17” Length x 17” Width x 22” Height $1,980.00
20” Length x 20” Width x 27” Height $2,748.00
24” Length x 24” Width x 32” Height (as shown) $3,915.00
28” Length x 28” Width x 37” Height $5,340.00
31” Length x 31” Width x 42” Height $7,570.00
Custom Sizes, Finishes, Colors Available Upon Request
 AMLD INTERIOR INC
KA1872 SUSPENDED GLOBES
DESCRIPTION:
The pleasant light it spreads is very atmospheric. Completed with the structured glass and brass details, this chandelier will contribute to a luxurious character of the interior. He nicely brass frame of this chandelier is very elegant; the combination of the glass bulbs makes a gorgeous eyecatcher. We really like to play with light and shadow to create an atmosphere within an interior space. Because our lighting is made by a workforce that still relies on traditional working methods, each product is unique and carries with it the sensitivity of the artisan. These unique shapes and colors can be only created using traditional hand-blown glass techniques.
SPECIFICATIONS:
Collection: Vintage
Size: 24” Length x 24” Width x 32” Height (Custom sizes also available)
Extension: Adjustable rod comes in connectable segments customizable up to 12 ft
Shape: Pendant
Frame Finish: Polished Gold (Different options available at no additional cost)
Materials: Brass, Glass
Weight: 25 lbs
Bulbs: 120V UL, cUL Certified
Assembly: Partly assembled
Dimmer Switch Compatible: Optional
Shipping: LTL
Rush Order: 4-6 Weeks; 15% added to the total
Regular Lead Time: 6-10 Weeks
Warranty: 5 Years Full Coverage (includes replacement parts)
SIZE OPTIONS:
Size: Price:
17” Length x 17” Width x 22” Height $1,980.00
20” Length x 20” Width x 27” Height $2,748.00
24” Length x 24” Width x 32” Height (as shown) $3,915.00
28” Length x 28” Width x 37” Height $5,340.00
31” Length x 31” Width x 42” Height $7,570.00
Custom Sizes, Finishes, Colors Available Upon Request

 Zelaya Properties LLC
We used: Custom cherry cabinetry in Arts & Crafts Shaker style by Kabinart in Boulder and Espresso stains. Liberty Hardware Venetian bronze 1-1/2" cabinet knobs. KitchenAid Architect II Series 22 CF counter-depth French door refrigerator. KitchenAid Architect Series II 27" convection single wall oven. KitchenAid 36" 6-burner dual fuel freestanding commercial-style range. KitchenAid Architect II Series 24" dishwasher. Sharp Insight Pro Series 24" built-in microwave drawer (Model #KB6524PS). Crystorama Solaris 12" wide pendant lights in English bronze. Granite countertops in Brown Fantasy. 3"x6" polished marble backsplash.
Paint colors:
Walls: Glidden Silver Cloud 30YY 63/024
Ceilings/Trims/Doors: Glidden Swan White GLC23
Robert B. Narod Photography

 Kitchen Design Concepts
We introduce to you one of our newer services we are providing here at Kitchen Design Concepts: spaces that just need a little reviving! As of recent, we are taking on projects that are in need of minimal updating, as in, spaces that don’t need a full-on remodel. Yes, you heard right! If your space has good bones, you like the layout of your kitchen, and you just need a few cosmetic changes, then today’s feature is for you! Recently, we updated a space where we did just this! The kitchen was in need of a little love, some fresh paint, and new finishes. And if we’re being honest here, the result looks almost as if the kitchen had a full-on remodel! To learn more about this space and how we did our magic, continue reading below:
The Before and After
First, see what an impact new finishes can make! The “before” image shows a kitchen with outdated finishes such as the tile countertops, backsplash, and cabinetry finish. The “after” image, is a kitchen that looks almost as if its brand new, the image speaks for itself!
Cabinetry
With the wooden cabinetry in this kitchen already having great bones, all we needed to do was our refinishing process that involved removing door and drawer fronts, sanding, priming, and painting. The main color of the cabinetry is white (Sherwin Williams Pure White 7005) and as an accent, we applied a deep navy blue that really pops in this space (Sherwin Willaims Naval 6244). As a special design element, we incorporated a natural wooden band across the hood which is subtle but adds an element of surprise.
Countertops
The original countertops in this space were a 12×12 tile with cracks and discolored grout from all the wear and tear. To replace the countertops, we installed a clean and crisp quartz that is not only durable but easy to maintain (no grout here!). The 3cm countertops are a Cambria quartz in a grey-tone color (Carrick).
Backsplash
Keeping things simple, yet classic, we installed a 3×6 subway tile from Interceramic. The crisp white pairs well with all the other finishes of the space and really brighten the space up! To spice things up, we paired the white tile with a contrasting grout color (Cape Grey) that matches the countertop. This is a simple method to add interest to your white backsplash!
Fixtures and Fittings
For the fixtures and fittings of the kitchen, we wanted pieces that made a statement. That’s why we selected this industrial style faucet from Brizo! The faucet is a Brizo LITZE™ PULL-DOWN FAUCET WITH ARC SPOUT AND INDUSTRIAL HANDLE (63044LF-BLGL). The matte black paired with the luxe gold elements really make a statement! To match the gold elements of the faucet, we installed cabinetry hardware from Topknobs in the same gold finish. The hardware is a Channing pull TK743HB. Lastly, the large single bowl sink (who doesn’t want a large sink?!) is a great functional touch to the kitchen. The sink is a Blanco Precision 16″ R10 super single with 16″ Drainer in stainless steel (516216).
 Kitchen Design Concepts
We introduce to you one of our newer services we are providing here at Kitchen Design Concepts: spaces that just need a little reviving! As of recent, we are taking on projects that are in need of minimal updating, as in, spaces that don’t need a full-on remodel. Yes, you heard right! If your space has good bones, you like the layout of your kitchen, and you just need a few cosmetic changes, then today’s feature is for you! Recently, we updated a space where we did just this! The kitchen was in need of a little love, some fresh paint, and new finishes. And if we’re being honest here, the result looks almost as if the kitchen had a full-on remodel! To learn more about this space and how we did our magic, continue reading below:
The Before and After
First, see what an impact new finishes can make! The “before” image shows a kitchen with outdated finishes such as the tile countertops, backsplash, and cabinetry finish. The “after” image, is a kitchen that looks almost as if its brand new, the image speaks for itself!
Cabinetry
With the wooden cabinetry in this kitchen already having great bones, all we needed to do was our refinishing process that involved removing door and drawer fronts, sanding, priming, and painting. The main color of the cabinetry is white (Sherwin Williams Pure White 7005) and as an accent, we applied a deep navy blue that really pops in this space (Sherwin Willaims Naval 6244). As a special design element, we incorporated a natural wooden band across the hood which is subtle but adds an element of surprise.
Countertops
The original countertops in this space were a 12×12 tile with cracks and discolored grout from all the wear and tear. To replace the countertops, we installed a clean and crisp quartz that is not only durable but easy to maintain (no grout here!). The 3cm countertops are a Cambria quartz in a grey-tone color (Carrick).
Backsplash
Keeping things simple, yet classic, we installed a 3×6 subway tile from Interceramic. The crisp white pairs well with all the other finishes of the space and really brighten the space up! To spice things up, we paired the white tile with a contrasting grout color (Cape Grey) that matches the countertop. This is a simple method to add interest to your white backsplash!
Fixtures and Fittings
For the fixtures and fittings of the kitchen, we wanted pieces that made a statement. That’s why we selected this industrial style faucet from Brizo! The faucet is a Brizo LITZE™ PULL-DOWN FAUCET WITH ARC SPOUT AND INDUSTRIAL HANDLE (63044LF-BLGL). The matte black paired with the luxe gold elements really make a statement! To match the gold elements of the faucet, we installed cabinetry hardware from Topknobs in the same gold finish. The hardware is a Channing pull TK743HB. Lastly, the large single bowl sink (who doesn’t want a large sink?!) is a great functional touch to the kitchen. The sink is a Blanco Precision 16″ R10 super single with 16″ Drainer in stainless steel (516216).
 Tile Doctor Ltd
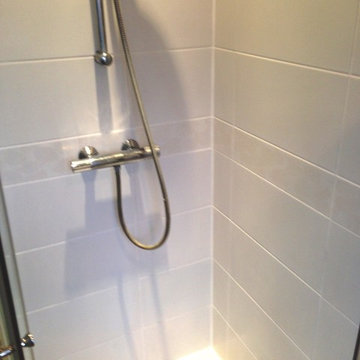
Shower cubicles can be the most difficult of tiled features to keep clean. Most are exposed to various acid-based soaps and shampoos on a daily basis, allowing mould and general muck to quickly build up along the grout lines and silicone. This leaves the entire area looking quite unappealing. In some cases, the grout lines become stained beyond a point where they can be restored to their original condition, so property owners will typically request to have the grout cut out and replaced however a faster and cheaper method is to have the grout completely recoloured.
Such was the case with this Ceramic tiled shower cubicle at a house in Wigan. It would take a lot to get the cubicle looking great again, having not been cleaned properly for a long time. The property owner decided to contact me for a professional refresh, including cleaning, new silicone sealer and recolouring of the grout.
I started the refresh by applying Tile Doctor Mould Away spray to the tiles and grout, and leaving it to dwell for an hour. As the name of the product suggests, Mould Away is a fast and effective cleaner for the removal of mould from silicone and grout, making it ideal for use on shower cubicles similar to this one. I then rinsed the entire area down with water before scrubbing the grout lines and tiles with a stiff grout brush to remove any remaining mould and lime scale, leaving them looking a lot cleaner.
The cleaning process made a big improvement however the grout was still too stained so after removing the silicone strip from around the base of the shower I proceeded to recolour with our white Grout Colourant. The colourant is painted onto the grout and any excess is wiped of the tile before it dries which both improves the appearance of the grout and seals it in to protect it from further staining. The last step was to apply fresh white silicone along the base of the shower.
The customer was very pleased with the refreshed appearance of their shower and you must admit it looks much more inviting now.
Steve Keary
Greater Manchester Tile Doctor

 Atlantis Plumbing
When your pipes burst, a toilet overflows, or you notice suspicious dampness, you need more than a plumber—you need an emergency plumber in Atlanta
you can trust. Meet Atlantis Plumbing, a family-owned, trusted local company serving the greater Atlanta area with fast, friendly, and reliable plumbing services 24/7.
Decades of Experience Rooted in the Community
Established over 60 years ago and now with thousands of satisfied customers, Atlantis Plumbing has built a reputation on steady, dependable service. Their licensed professionals bring years of experience to every job, giving you peace of mind when you're dealing with urgent, unexpected plumbing disasters.
24/7 Availability When You Need It Most
Emergencies don't wait for business hours—and neither does Atlantis. With around-the-clock service, including live operators ready to take your call, they ensure help is just a phone call away. Whether it’s the middle of the night or a busy weekend, Atlantis is on call and on site fast.
Upfront Pricing and Honest Communication
A plumbing emergency shouldn't add financial stress. Atlantis offers transparent, upfront pricing so you're never blindsided. Before any work begins, they'll provide a clear estimate—no hidden fees, no surprises.
Speed Meets Expertise
Emergencies demand swift action—but not at the cost of quality. Atlantis strikes the perfect balance: rapid response paired with the skilled, licensed professionals who understand the complexity of modern plumbing systems.
Fully Equipped to Handle Any Crisis
From burst water lines to sewer backups and leaking water heaters, Atlantis’s team carries the tools and know-how to address your emergency promptly:
• Water leaks: Quick diagnosis and repair, including high water bill analysis.
• Clogged drains and sewer issues: Advanced solutions ranging from snaking to hydro-jetting or camera inspection.
• Sewer repair & replacement: Trenchless methods available to minimize disruption.
• Water heaters: Repair or replacement—gas, electric, or tankless.
• Polybutylene pipes: Experts in identifying and replacing this outdated material.
• Gas leaks: Safe, professional response (after gas company clearance).
Trusted Service with a Personal Touch
Emergencies are stressful. Atlantis eases the burden with professional, courteous technicians who get the job done with respect and care for your home. Their approach is old-fashioned in the best way—friendly, honest, and dedicated to customer satisfaction.
Multiple local voices have recommended them as the one plumber they’d always call. It's that level of trust that assures homeowners and businesses alike in times of crisis.
Comprehensive Coverage Throughout Metro Atlanta
Whether you're in Atlanta proper or surrounding areas—like Marietta, Smyrna, Roswell, or Lawrenceville—Atlantis covers it. Their reach spans Fulton, Cobb, Gwinnett, Dekalb, Cherokee, and more, ensuring emergency plumbing help isn't far when you need it most.
Value Beyond the Emergency
Atlantis doesn’t just put out fires—they help prevent them. With services like free high water bill analysis and long-term maintenance options, they add value that stretches well beyond the immediate fix.
They offer senior and military discounts, plus financing with approved credit—helping ease the financial burden of unavoidable plumbing repairs.
Hiring an Emergency Plumber: Why Atlantis Stands Out
1. 24/7 live support—get help when it counts.
2. Licensed, experienced plumbers—quality you can rely on.
3. Transparent pricing—know what you're paying.
4. Quick, efficient responses—fast relief without sacrificing standards.
5. Wide range of services—from leaks to sewers to water heaters.
6. Easy scheduling and flexible payment options—designed for your convenience.
Sample Emergency Scenarios & How Atlantis Helps
Your Basement Is Flooding at 2 AM
A frozen pipe has burst, sending water everywhere. You call Atlantis. Their team answers immediately, dispatches licensed plumbers within the hour, stops the leak, assesses the damage, and begins cleanup and pipe repair—all before breakfast.
Sewer Backup During Dinner Party
Your main sewer line backs up, and your guests are greeting more than your cooking. Atlantis arrives pronto, uses a camera inspection to pinpoint the blockage, resolves it with hydro-jetting or replacement, and gets everything draining again—without using your yard as a trench.
Unexplained Spike in Your Water Bill
You notice a huge spike in your bill—but no visible leak. Atlantis sends a tech for a free high water bill analysis, finds a small underground leak, and repairs it promptly—saving you money on unnecessary wastage.
Water Heater Fails on a Winter Morning
No hot water on a chilly morning? Atlantis arrives, diagnoses the heater issue, and either repairs it or replaces it with a similarly warranted unit—serving gas, electric, or tankless systems with equal confidence.
Outdated Polybutylene Pipes Start Failing
You suspect your home has older polybutylene piping prone to leaks. Atlantis offers specialized inspection and replacement options, bringing your plumbing system back up to modern safety and reliability standards.
Final Thought
In crisis situations, you don’t want to waste time or money. Atlantis Plumbing delivers fast, knowledgeable, and compassionate emergency plumbing services across Atlanta. With fair pricing, skilled professionals, and full-service capabilities—from leak detection to sewer repair to water heater replacement—you’re not just hiring a plumber. You’re hiring peace of mind.
When plumbing emergencies strike, remember: Atlantis Plumbing is standing by, 24/7, ready to restore order to your home or business.
Sponsored
Plain City, OH
Kuhns Contracting, Inc.
Central Ohio's Trusted Home Remodeler Specializing in Kitchens & Baths
 Kitchen Design Concepts
We introduce to you one of our newer services we are providing here at Kitchen Design Concepts: spaces that just need a little reviving! As of recent, we are taking on projects that are in need of minimal updating, as in, spaces that don’t need a full-on remodel. Yes, you heard right! If your space has good bones, you like the layout of your kitchen, and you just need a few cosmetic changes, then today’s feature is for you! Recently, we updated a space where we did just this! The kitchen was in need of a little love, some fresh paint, and new finishes. And if we’re being honest here, the result looks almost as if the kitchen had a full-on remodel! To learn more about this space and how we did our magic, continue reading below:
The Before and After
First, see what an impact new finishes can make! The “before” image shows a kitchen with outdated finishes such as the tile countertops, backsplash, and cabinetry finish. The “after” image, is a kitchen that looks almost as if its brand new, the image speaks for itself!
Cabinetry
With the wooden cabinetry in this kitchen already having great bones, all we needed to do was our refinishing process that involved removing door and drawer fronts, sanding, priming, and painting. The main color of the cabinetry is white (Sherwin Williams Pure White 7005) and as an accent, we applied a deep navy blue that really pops in this space (Sherwin Willaims Naval 6244). As a special design element, we incorporated a natural wooden band across the hood which is subtle but adds an element of surprise.
Countertops
The original countertops in this space were a 12×12 tile with cracks and discolored grout from all the wear and tear. To replace the countertops, we installed a clean and crisp quartz that is not only durable but easy to maintain (no grout here!). The 3cm countertops are a Cambria quartz in a grey-tone color (Carrick).
Backsplash
Keeping things simple, yet classic, we installed a 3×6 subway tile from Interceramic. The crisp white pairs well with all the other finishes of the space and really brighten the space up! To spice things up, we paired the white tile with a contrasting grout color (Cape Grey) that matches the countertop. This is a simple method to add interest to your white backsplash!
Fixtures and Fittings
For the fixtures and fittings of the kitchen, we wanted pieces that made a statement. That’s why we selected this industrial style faucet from Brizo! The faucet is a Brizo LITZE™ PULL-DOWN FAUCET WITH ARC SPOUT AND INDUSTRIAL HANDLE (63044LF-BLGL). The matte black paired with the luxe gold elements really make a statement! To match the gold elements of the faucet, we installed cabinetry hardware from Topknobs in the same gold finish. The hardware is a Channing pull TK743HB. Lastly, the large single bowl sink (who doesn’t want a large sink?!) is a great functional touch to the kitchen. The sink is a Blanco Precision 16″ R10 super single with 16″ Drainer in stainless steel (516216).
 AMLD INTERIOR INC
SJ2130 MAHLU
DESCRIPTION:
The Mahlu floating circular pendant creates a warm inviting glow by emitting light from both above and below the rings. The pearliest diffuser and wide profile give the Mahlu a discerning elegance, allowing it to seamlessly fit into any interior. The Mahlu has been designed with the versatility to be a statement piece as a single ring or with multiple rings at varying sizes. Because our lighting pieces are made by a workforce that still relies on traditional working methods, each product is unique and carries with it the sensitivity of the artisan. Attract attention, provoke emotion, and inspire the imagination with games of light and matter. Such as the ambition and spark of the existing elements of the space.
SPECIFICATIONS:
Collection: Commercial
Size: 20”/40”/47” Diameter x 30” Adjustable Height (As Shown) (Custom sizes also available!)
Shape: Pendant
Frame Finish: Polished Brass (custom finishes also available)
Materials: Brass, glass
Extension: Adjustable 12-ft cable
Bulbs: 27000K and 3000K
Weight: N/A
Assembly: Some Assembly Required
Dimmer Switch Compatible: Optional
Shipping: Free Worldwide Door-To-Door Shipping
Rush Order: 3-4 Weeks; 15% added to the total
Regular Lead Time: 6-8 Weeks
Warranty: 5-Year Full Coverage Including Parts Replacement
SIZE OPTIONS
Size 3 Rings
Price
12”/16”/20” Diameter x 30” Adjustable Height $2,446.00
24”/28”/32”/36 Diameter x 30” Adjustable Height $3,108.00
20”/40”/47” Diameter x 30” Adjustable Height
$5,988.00
30”/50”/57” Diameter x 30” Adjustable Height
$7,250.00
40”/60”/67” Diameter x 30” Adjustable Height
$9,527.00
60”/70”/77” Diameter x 30” Adjustable Height
$11,614.00
Custom Sizes, Finishes, Colors Available Upon Request
Additional Info:
Single ring available in custom size upon request
 Tile Doctor Ltd
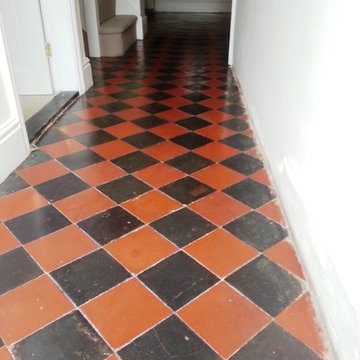
Details below of a restorative clean and seal that I recently completed on a Quarry tiled hallway at a house in the small village of Riseley, North Bedfordshire.
The floor was a mix of fantastic black and red tiles; however, it had lost its character after a long period without professional maintenance. My client commissioned me to strip off the old sealer from the floor and replace it, but not before providing a thorough clean, including tackling some adhesive staining and inherent grout haze.
The first task involved mixing our high alkaline cleaner, known as Tile Doctor Pro-Clean, with water to form a strong solution. The solution was applied to the tiled floor and left to dwell for a short period. This dwelling time allows for the Pro-Clean to seep into the stone to get underneath the ingrained dirt and lift it out. Pro-Clean also contains stripping properties, and thus helped to break down the old (and now ineffectual) sealer.
After completing this initial clean I rinsed the floor using a standard mop and bucket method. With the old sealer removed, it became evident that there was also plaster residue marking the tiles, as well as inherent grout haze on the surface of the tile probably from the original installation. To tack these problems I used Tile Doctor Grout Clean-Up, which is an acid-based cleaner that dissolves the adhesive and the grout. Being an acid you have to be careful and ensure the floor is rinsed thoroughly after use and if you’re considering using this product yourself read the label and make sure you use the right protective equipment.
After the floor was thoroughly rinsed with water it was dried as much as possible using a wet vacuum which literally sucks the water off the floor. The floor was then left to dry for four days, with the help of several air movers. By the time I returned to the house, the floor was completely dry and ready to take the seal.
I opted to use a combination of sealers, including one coat of our colour enhancing, impregnating sealer, known as Colour Grow, followed by three coats of Tile Doctor Seal & Go to provide a truly robust and aesthetically pleasing surface seal.
The photographs demonstrate the finished results better than words can and I think you will agree the floor is quite transformed.
Andrew Evans
Bedfordshire Tile Doctor
8