
Search results for "Replacing damaged" in Home Design Ideas

 Gutter Tex
The owner chose a K Style gutter system for their installation. You can learn more about K style and other gutter options by visiting our website. In this photo of the back yard, you can see the downspout. You can also see the boot under the downspout, this system is designed to evenly disperse rainwater across the lawn. This prevents soil compaction and potential water damage to the home’s foundation.
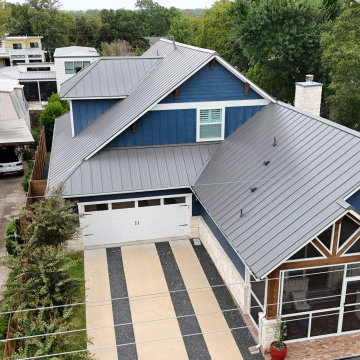
 RoofsOnly.com
This Austin home suffered severe hail damage. The homeowners wanted to upgrade from standard Architectural shingles to a more durable, energy-efficient solution. We installed a 24-gauge Standing Seam Metal Roof in Charcoal Grey. This system not only modernizes the farmhouse aesthetic but also offers a Class 4 impact rating, lowering their insurance premiums. Project completed in 3 days with full site cleanup.

 Cape Fear Kitchen and Baths
This bathroom featured a bathroom divided into two areas, a vanity area and a shower/ toilet room. We we replaced an acrylic shower surround with a custom tile shower. We found a surprise on the exterior wall when we removed the acrylic surround.... termite damage. There were sections of the wall that were literally sawdust! We had to remove the exterior siding and sheathing, reframe the wall and window and install new sheathing and siding before we could move on with the shower.
The custom tile shower is a twist on a classic subway tile. We used larger 8" x 20" tiles for the shower wall instead the traditional 3" x 6" size. We completed the shower with a marble bench, recessed niches and a rain head style shower head with a handheld shower wand.
We carried the wall tile down the exterior wall to create an accent wall in the toilet area.
Find the right local pro for your project
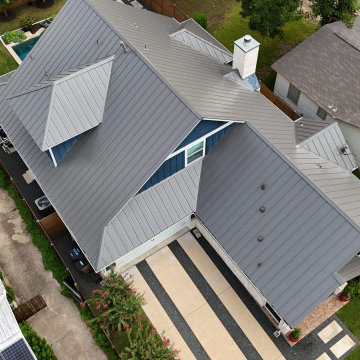 RoofsOnly.com
This Austin home suffered severe hail damage. The homeowners wanted to upgrade from standard Architectural shingles to a more durable, energy-efficient solution. We installed a 24-gauge Standing Seam Metal Roof in Charcoal Grey. This system not only modernizes the farmhouse aesthetic but also offers a Class 4 impact rating, lowering their insurance premiums. Project completed in 3 days with full site cleanup.
 Cape Fear Kitchen and Baths
This bathroom featured a bathroom divided into two areas, a vanity area and a shower/ toilet room. We we replaced an acrylic shower surround with a custom tile shower. We found a surprise on the exterior wall when we removed the acrylic surround.... termite damage. There were sections of the wall that were literally sawdust! We had to remove the exterior siding and sheathing, reframe the wall and window and install new sheathing and siding before we could move on with the shower.
The custom tile shower is a twist on a classic subway tile. We used larger 8" x 20" tiles for the shower wall instead the traditional 3" x 6" size. We completed the shower with a marble bench, recessed niches and a rain head style shower head with a handheld shower wand.
We carried the wall tile down the exterior wall to create an accent wall in the toilet area.

 Home Infatuation
The simplistic, modern design of the patented Puck ottoman/table is a perfect fit for any patio, poolside or deck décor.
The Puck is 36'' in diameter, 16'' high and weighs only 17 lbs for easy maneuverability.
The interior of the Puck is made of polymeric structural foam and layers of cushioning foam that are covered in a waterproof membrane made of marine grade vinyl.
The vinyl has a slightly textured surface that gives it the appearance of real leather. Its firm appearance belies the soft cushiony comfort you experience when you sit down.
It is stain, fungal and mildew resistant and cleans easily with soap and water. The outer cover is removable and easily replaceable with a new cover as it ages or if it is ever damaged.
Materials used in construction are 95% recyclable.

 Braun Building Center
Homeowners chose to replace their 40-year-old rotting redwood deck with a new TimberTech deck from Braun Building Center! Mr. and Mrs. B chose a textured wood-grain composite decking and railing with a true wood-like color and finish to blend with their house. They stressed it had to be low maintenance – no more sanding, staining and sealing! Big plus for them, too, was TimberTech's 30 year Fade & Stain Warranty, and its resistance to mold, mildew, scratches and moisture damage. TimberTech by AZEK Building Products. All construction was done by Backhaus Builders of Manitowoc.
Sponsored
Plain City, OH

Kuhns Contracting, Inc.
Central Ohio's Trusted Home Remodeler Specializing in Kitchens & Baths

 Interiors by Natasha
This house was a new purchase for my clients. I was entrusted with the task to make this 1980’s kitchen into a beautiful chef’s kitchen. The challenge with this kitchen renovation was making sure that I gave my client, a kitchen that a pastry chef would be proud to bake in. Because she is a pastry chef, the original space was not functional for her. It was dark, dated and did not have enough storage. The cabinets were an old traditional expresso finish, small electric drop-in cooktop, and double wall oven with florescent ceiling light fixtures. I wanted to make sure that I capitalized on the square footage in the kitchen and gave them a more Contemporary Style. The first thing, I had to address was the damaged floor. One of the selling points to the house for my clients was the hardwood floors but, a portion of the floor in the kitchen was rotted by years of water decay. We replaced the hardwood floors that were damaged and refinished them. The second, was to open the entryway between the kitchen and dining room and swapping the refrigerator and the pantry. The contractor demoed the kitchen changing the position of the original pantry and the refrigerator. By doing this, provided more floor space for my clients to walk through. The third, was to address the dark cabinet finish. We went with two-tone color cabinetry. The wall and base cabinets are white and the island is a gray finish. As a pastry chef, I had to make sure my client had enough countertop/prep and storage space. The fourth, was very important to her which was replacing the drop-in electric cooktop with a freestanding professional gas range. After addressing these four concerns, my clients are very pleased with the renovation. Happy clients!
Photographer: Haigwood Studios
 Interiors by Natasha
This house was a new purchase for my clients. I was entrusted with the task to make this 1980’s kitchen into a beautiful chef’s kitchen. The challenge with this kitchen renovation was making sure that I gave my client, a kitchen that a pastry chef would be proud to bake in. Because she is a pastry chef, the original space was not functional for her. It was dark, dated and did not have enough storage. The cabinets were an old traditional expresso finish, small electric drop-in cooktop, and double wall oven with florescent ceiling light fixtures. I wanted to make sure that I capitalized on the square footage in the kitchen and gave them a more Contemporary Style. The first thing, I had to address was the damaged floor. One of the selling points to the house for my clients was the hardwood floors but, a portion of the floor in the kitchen was rotted by years of water decay. We replaced the hardwood floors that were damaged and refinished them. The second, was to open the entryway between the kitchen and dining room and swapping the refrigerator and the pantry. The contractor demoed the kitchen changing the position of the original pantry and the refrigerator. By doing this, provided more floor space for my clients to walk through. The third, was to address the dark cabinet finish. We went with two-tone color cabinetry. The wall and base cabinets are white and the island is a gray finish. As a pastry chef, I had to make sure my client had enough countertop/prep and storage space. The fourth, was very important to her which was replacing the drop-in electric cooktop with a freestanding professional gas range. After addressing these four concerns, my clients are very pleased with the renovation. Happy clients!
Photographer: Haigwood Studios

 Charlie Allen Renovations, Inc.
Way back in the late 1970s, the owners of an 1894 Victorian in Somerville hired Charlie Allen Renovations to renovate and restore their home, a landmark property that had been divided into apartments and lost some of its period charm. This was a memorable project and it was a shock when the homeowners called in December 2014 to let us know that their home had been badly damaged by a fire. They asked if we could once again restore it to its original prominence.
This time nearly every original element of the home needed to be restored or rebuilt.
We began the process by carefully removing all original moulding and paneling, which was then catalogued, thoroughly cleaned, and stored away. Belfor, a property restoration firm, was hired to remove soot and smoky odors, which required opening the walls and then rebuilding them. Numerous decorative elements throughout the home, including an intricate stained glass window in the dining room, had been too badly damaged to be restored; these were carefully remade by both our talented team and by an exceptional group of project partners, to match their original design.
All of the windows in the house had to be replaced, and all of its floors needed to be refinished. Tile hearth surrounding the dining room fireplace and the living room fireplace mantel and surround were removed, cleaned, and replaced.
The homeowners also took the opportunity to have some long-desired renovations accomplished, including remodeling the outdated kitchen, which now features an expansive island, pantry closet, new cork flooring, backsplash, and greenhouse window.
Today, the house is fully both meticulously restored and remodeled, and the owners are happily back home. At its conclusion, the project was awarded with the Somerville Historic Preservation Commission’s 2017 Directors Award and a 2018 Contractor of the Year Gold Award.
Along with Belfor, additional project partners include Jackson Schillaci Woodworking, master finisher Wayne Towle, and Jim Anderson Stained Glass.
Photo by Shelly Harrison Photography
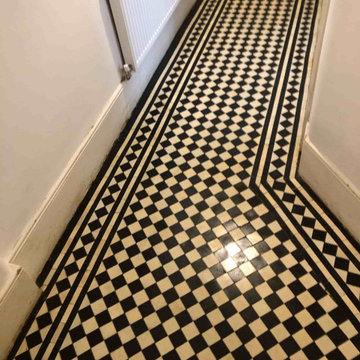
 Tile Doctor Ltd
This property was in theLadbroke Grove area of West London near Kensington. The client had found an old and probably original black and white checkered pattern Victorian tiled floor under their cork tiled flooring. They also reported that it was badly damaged so I thought it would be best if I paid them a visit first to see how extensive the damage was and whether it was repairable. The floor was in a quite a state, the tiles were covered in glue from the cork and had several areas had been back filled with cement.
I reassured them that the damage could be rectified, and that it would be possible to completely restore the floor back to a good standard. I would have to remove the glue, remove the cement that had been used to level the floor and replace with reclaimed tiles to match. They were relieved to find out it could be done and happy with my quote I was instructed to go ahead with the work.
We started by taping up the skirting boards to protect the woodwork. With this done attention was turned to the glue which was softened using a strong dilution of Tile Doctor Remove and Go so it could be carefully scraped off. Multiple techniques and tools were needed to remove the glue including hand-held scrappers and a black pad fitted to a buffing machine. For the stubborn areas steam was applied to help lift the adhesive out the tile.
Once all the glue was removed the floor was rinsed and the alkaline cleaner neutralised with Tile Doctor Grout Clean Up which further cleaned the tiles and removed old traces of grout from the floor. Old floors like this generally don’t have a damp proof membrane underneath so the acids in the Grout Clean-up also counter any efflorescent salts trapped in the tile.
Once this was completed the slurry was removed with a wet vacuum and left to fully dry out overnight.
The following day focus turned to repairing the areas of the floor where the tiles were missing or broken. The main issue being the cemented areas, we see this a lot with Victorian Hallways and generally what happens is a heating engineer digs out the floor to install pipework. Not being tilers, your average plumber then repairs the floor with a self-levelling cement that brings the level up to the surface of the tile so it can be covered with lino, carpet of in this case cork.
The sub floor was then rebuilt with rapid setting self-levelling compound but this time to below the level of the tile.
Once the new base was dry it was a just a question of re-tiling with the replacement tiles to match the original checkered pattern. The replacement reproduction tiles were sourced from Original Features in Crouch End North London. After grouting we left the floor to dry out over the weekend.
When we returned to seal the floor our first step was to check the floor was dry using a moisture meter. This is critical as the sealant will not cure correctly if there is too much moisture in the floor. In this case the extra two days we had allowed had done its job and the test had confirmed it was ready to accept a sealer.
The client wanted the floor finish not to be too shiny once sealed so we opted to seal with two coats of Tile Doctor Seal and Go Extra. This is good choice for old Victorian floors such as this example as it’s special acrylic-based formula allows for moisture vapour transmission which as mentioned previously is a concern where no damp proof membrane has been installed.
I’m please to confirm my clients were delighted with the result, as you can see from the pictures the black and white floor restoration makes for a dramatic entrance well in keeping with the style of the property. For aftercare I recommended the use of Tile Doctor Neutral Tile Cleaner which will keep the tiles in good condition going forward without damaging the new sealer.
Jackson Davis
Central London Tile Doctor

 Jordana Nicholson
Photo: Jordana Nicholson © 2016 Houzz
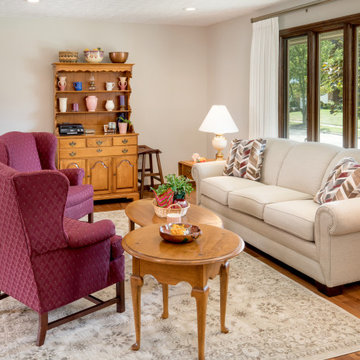
Inspiration for an eclectic living room remodel in Nashville
Inspiration for an eclectic living room remodel in Nashville
 Craftsman's Choice Inc.
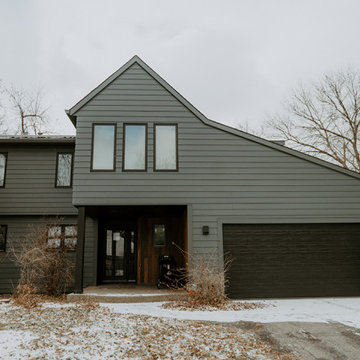
Woodpecker proof siding is what these homeowners in Eden Prairie Minnesota wanted. These homeowner recently tackled a remodeling project that turned a frustrating situation into a stunning transformation. The main catalyst for the upgrade? Persistent woodpecker damage to the home’s existing cedar siding. After years of dealing with the unsightly holes and constant repairs, the homeowners decided to make a lasting change, opting for durable and aesthetically pleasing materials that would stand up to the elements — and the local wildlife.
In addition to the siding, the project included the replacement of the windows with Marvin fiberglass windows in black. The sleek black frames created a striking contrast against the Iron Gray siding, adding a contemporary touch while improving energy efficiency and overall durability.
A standout feature of the remodel was the entryway, which received special attention with the installation of thermally modified wood siding. This unique material, known for its enhanced stability and rich appearance, really set off the entryway, creating a warm and welcoming focal point that contrasted beautifully with the cool tones of the Iron Gray siding.
The homeowners in Eden Prairie now have a home that is not only protected from woodpecker damage but also showcases modern design elements and materials that will last for years to come. The combination of woodpecker proof siding, black Marvin windows, and thermally modified wood has truly transformed the home into a standout in the neighborhood.

 Tile Doctor Ltd
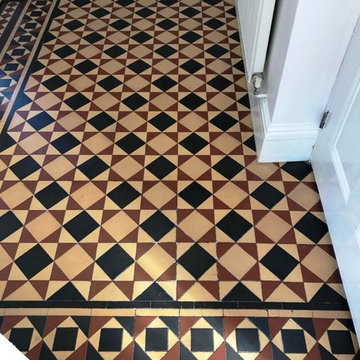
I was recently contacted by the owner of this Minton Victorian tiled floor in Kidderminster. The tiles had been covered over with carpet which I suspect was due to some the tiles being missing. Now uncovered it was stained with glue and carpet underlay was still stuck to the tiles in places. The owner was keen to have the floor fully restored including replacing damaged and missing tiles. We can replace missing or damaged tiles however the problem with old Victorian floors is finding matching replacements due to the unique patterns that many have. Fortunately, due to the popularity of Victorian tiles there are several suppliers who sell reproductions and occasionally you can find originals on ebay.
I went over to survey the floor an could see the tiles were certainly in need of some love and care. As part of the visit I carried out a test clean on a patch of the floor and the results were very satisfactory, so the owner asked me to go ahead.
On the day of arrival my first job was to spray the floor with neat Tile Doctor Remove and Go, this is a powerful cleaner/stripper which set to work on removing the glue and carpet underlay, this product will also remove any old sealer. I then left the solution to dwell and worked the chemical in with my buffer and a black pad removing the slurry with a wet and dry vacuum.
The tiles were then treated to an acid wash using Tile Doctor Acid Gel to further clean them and counter any potential efflorescence problem which is a problem with floors of this age that were installed without a damp-proof membrane. The product was scrubbed into the tile and grout, rinsed off with water and then extracted with the wet vacuum.
Once the floor was clean, I checked the colour of the tiles so I could cut and replace the missing section. I had managed to source some tiles that were a close match and set about cutting all the tiles to size and then fitted them using a flexible rapid set adhesive. The newly laid tiles needed to set, and the floor needed to dry out before we could apply the sealer.
The floor was left to dry overnight, on my return in the morning I tested the floor with a damp meter to check the moisture levels and ensure it was dry enough for sealing. I was satisfied it was dry so was able to proceed and seal the floor. Five coats of Tile Doctor Seal and Go Extra were applied which takes a lot of time as you need to wait for the previous coat to dry before applying the next. This product is a semi-gloss breathable sealer which gives a nice sheen to the tiles and fully protects them. It really allowed the colours and detail of the pattern to shine through and being breathable it will cope with any moisture rising though the floor.
The client was very happy with the overall finish and was really pleased that the Victorian tiles were now restored to their original appearance. It a fact that original features like these are in demand and add a lot of value to a property.
Mark Conway
Worcestershire Tile Doctor
 Craftsman's Choice Inc.
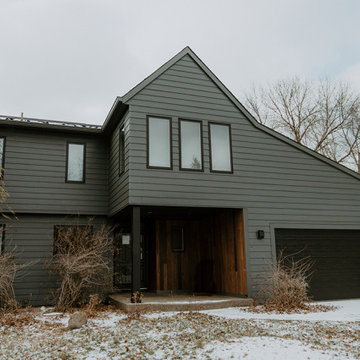
Woodpecker proof siding is what these homeowners in Eden Prairie Minnesota wanted. These homeowner recently tackled a remodeling project that turned a frustrating situation into a stunning transformation. The main catalyst for the upgrade? Persistent woodpecker damage to the home’s existing cedar siding. After years of dealing with the unsightly holes and constant repairs, the homeowners decided to make a lasting change, opting for durable and aesthetically pleasing materials that would stand up to the elements — and the local wildlife.
In addition to the siding, the project included the replacement of the windows with Marvin fiberglass windows in black. The sleek black frames created a striking contrast against the Iron Gray siding, adding a contemporary touch while improving energy efficiency and overall durability.
A standout feature of the remodel was the entryway, which received special attention with the installation of thermally modified wood siding. This unique material, known for its enhanced stability and rich appearance, really set off the entryway, creating a warm and welcoming focal point that contrasted beautifully with the cool tones of the Iron Gray siding.
The homeowners in Eden Prairie now have a home that is not only protected from woodpecker damage but also showcases modern design elements and materials that will last for years to come. The combination of woodpecker proof siding, black Marvin windows, and thermally modified wood has truly transformed the home into a standout in the neighborhood.
 Microworks Handyman
Deck Plank Replacement & Your Entire To-Do List Done! ??️
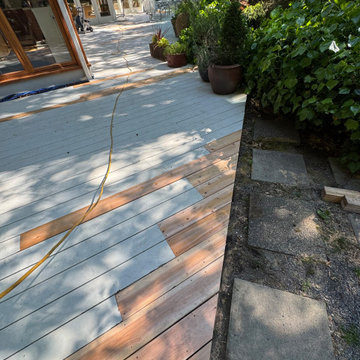
Start by fixing those rotting, splintered, or warped deck boards that make your outdoor space look tired and unsafe, and let us take care of the rest in one seamless visit. With our Ultimate Handyman Block, your professional will kick off the day with a quick property walkthrough to prioritize your exact needs. We will dive straight into carefully removing the damaged decking, inspecting the joists beneath, and seamlessly securing fresh, durable planks so your outdoor living space is safe, solid, and ready for entertaining. Once your deck surface is perfectly restored, we will use the rest of your reserved session to tackle whatever else is weighing on your mind—from mounting heavy TVs and patching drywall to upgrading door hardware and repairing fences. Professional-grade consumables are fully included in the service, and if your project requires specialty composite boards, hidden fastening systems, or specific pressure-treated lumber, we source them for you and pass the items on with zero markup. It is the ultimate, stress-free way to finally catch up on those nagging repairs and get your property back to 100% in a single day.
 Craftsman's Choice Inc.
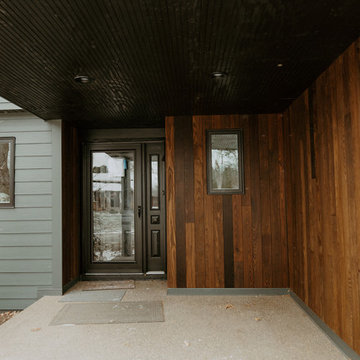
Woodpecker proof siding is what these homeowners in Eden Prairie Minnesota wanted. These homeowner recently tackled a remodeling project that turned a frustrating situation into a stunning transformation. The main catalyst for the upgrade? Persistent woodpecker damage to the home’s existing cedar siding. After years of dealing with the unsightly holes and constant repairs, the homeowners decided to make a lasting change, opting for durable and aesthetically pleasing materials that would stand up to the elements — and the local wildlife.
In addition to the siding, the project included the replacement of the windows with Marvin fiberglass windows in black. The sleek black frames created a striking contrast against the Iron Gray siding, adding a contemporary touch while improving energy efficiency and overall durability.
A standout feature of the remodel was the entryway, which received special attention with the installation of thermally modified wood siding. This unique material, known for its enhanced stability and rich appearance, really set off the entryway, creating a warm and welcoming focal point that contrasted beautifully with the cool tones of the Iron Gray siding.
The homeowners in Eden Prairie now have a home that is not only protected from woodpecker damage but also showcases modern design elements and materials that will last for years to come. The combination of woodpecker proof siding, black Marvin windows, and thermally modified wood has truly transformed the home into a standout in the neighborhood.
Sponsored
Plain City, OH
Kuhns Contracting, Inc.
Central Ohio's Trusted Home Remodeler Specializing in Kitchens & Baths

 Care Free Homes, Inc.
We stripped off the existing roof and inspected all deck boards for water damage or rot. To prevent water damage from ice dams or a driving rain, Ice Dam and Water Shield was installed along all the rakes, eves, vent pipes, chimney, dormers and skylights. This roof is ready for the next blizzard, nor’easter or hurricane! (Speaking of hurricanes – our GAF Timberline HD Lifetime Roofing system can sustain winds up to 130 mile per hour!)
Drip edge was installed along the rakes to improve water shedding efficiency – it pushes water off the roof and away from the home. It also prevents water penetration from a wind-driven rain and deters insects.Underlayment, a felt/paper product, was installed on the entire roof for additional protection between the roofing shingles and roof deck. GAF Pro-Start Eave/Rake Starter Strip was installed for maximum wind resistance. (You can learn more about Starter Course Shingles by reading this roofing blog) A GAF Cobra Ridge Vent was installed to allow proper ventilation of moisture and heat in the attic. This helps prevent mold and ice damming (since we’re talking ice dams – here are a few helpful ice dam protection tips) This GAF roof is featured in Williamsburg Slate, a beautiful color-blended, architectural shingle.
 Microworks Handyman
Deck Plank Replacement & Your Entire To-Do List Done! ??️
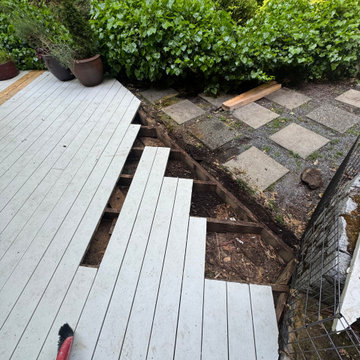
Start by fixing those rotting, splintered, or warped deck boards that make your outdoor space look tired and unsafe, and let us take care of the rest in one seamless visit. With our Ultimate Handyman Block, your professional will kick off the day with a quick property walkthrough to prioritize your exact needs. We will dive straight into carefully removing the damaged decking, inspecting the joists beneath, and seamlessly securing fresh, durable planks so your outdoor living space is safe, solid, and ready for entertaining. Once your deck surface is perfectly restored, we will use the rest of your reserved session to tackle whatever else is weighing on your mind—from mounting heavy TVs and patching drywall to upgrading door hardware and repairing fences. Professional-grade consumables are fully included in the service, and if your project requires specialty composite boards, hidden fastening systems, or specific pressure-treated lumber, we source them for you and pass the items on with zero markup. It is the ultimate, stress-free way to finally catch up on those nagging repairs and get your property back to 100% in a single day.
 Microworks Handyman
Deck Plank Replacement & Your Entire To-Do List Done! ??️
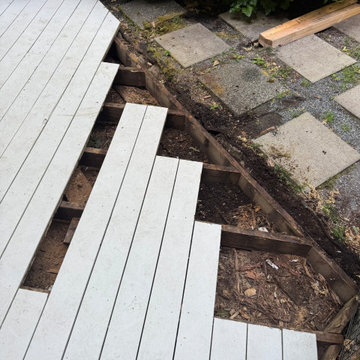
Start by fixing those rotting, splintered, or warped deck boards that make your outdoor space look tired and unsafe, and let us take care of the rest in one seamless visit. With our Ultimate Handyman Block, your professional will kick off the day with a quick property walkthrough to prioritize your exact needs. We will dive straight into carefully removing the damaged decking, inspecting the joists beneath, and seamlessly securing fresh, durable planks so your outdoor living space is safe, solid, and ready for entertaining. Once your deck surface is perfectly restored, we will use the rest of your reserved session to tackle whatever else is weighing on your mind—from mounting heavy TVs and patching drywall to upgrading door hardware and repairing fences. Professional-grade consumables are fully included in the service, and if your project requires specialty composite boards, hidden fastening systems, or specific pressure-treated lumber, we source them for you and pass the items on with zero markup. It is the ultimate, stress-free way to finally catch up on those nagging repairs and get your property back to 100% in a single day.
105