
Search results for "Replacing damaged" in Home Design Ideas

 River Valley Landscapes
This zealous gardener was tired of her pool taking up so much space in her landscape. She asked me for ideas. The answer was simple. Since her garden brings her so much joy, I proposed adding more garden rooms to experience. We removed the large expansive pool and replaced it with a small reflecting pond that doubles as the pool. This allowed us to create 4 new garden spaces. We replaced all concrete pavers with natural PA flagstone. The traditional square lawn provides elements of simplicity, elegance and classical style while creating a new play space for the grand kids. The pergola creates depth and a great focal point from the loggia. We illuminated all the walkways and garden rooms with Escort Lighting. One of the most fun transformations was converting the spa to a fish pond. The pond provides just enough sound to drain out all neighborhood activities. In the front, we created a new permeable brick paving parking area. The parking area was designed to keep visitors from venturing to the back parking. We chose the permeable brick pavers to collect runoff that is becoming more of a problem in the neighborhood. Our final piece to this property was to come up with a unique solution creating additional privacy while minimizing root damage to the existing plant material. Our client was looking for a permanent solution that required little to no maintenance. Masonry walls were out due to the necessary footers. We looked at fence options. Wood and plastics were out, so we created post out of steel “I” beams and setting concrete lintels in between the lintels. It was perfect. This has to be one of my favorite projects to design and implement of my 25 year experience.
 River Valley Landscapes
This zealous gardener was tired of her pool taking up so much space in her landscape. She asked me for ideas. The answer was simple. Since her garden brings her so much joy, I proposed adding more garden rooms to experience. We removed the large expansive pool and replaced it with a small reflecting pond that doubles as the pool. This allowed us to create 4 new garden spaces. We replaced all concrete pavers with natural PA flagstone. The traditional square lawn provides elements of simplicity, elegance and classical style while creating a new play space for the grand kids. The pergola creates depth and a great focal point from the loggia. We illuminated all the walkways and garden rooms with Escort Lighting. One of the most fun transformations was converting the spa to a fish pond. The pond provides just enough sound to drain out all neighborhood activities. In the front, we created a new permeable brick paving parking area. The parking area was designed to keep visitors from venturing to the back parking. We chose the permeable brick pavers to collect runoff that is becoming more of a problem in the neighborhood. Our final piece to this property was to come up with a unique solution creating additional privacy while minimizing root damage to the existing plant material. Our client was looking for a permanent solution that required little to no maintenance. Masonry walls were out due to the necessary footers. We looked at fence options. Wood and plastics were out, so we created post out of steel “I” beams and setting concrete lintels in between the lintels. It was perfect. This has to be one of my favorite projects to design and implement of my 25 year experience.
 River Valley Landscapes
This zealous gardener was tired of her pool taking up so much space in her landscape. She asked me for ideas. The answer was simple. Since her garden brings her so much joy, I proposed adding more garden rooms to experience. We removed the large expansive pool and replaced it with a small reflecting pond that doubles as the pool. This allowed us to create 4 new garden spaces. We replaced all concrete pavers with natural PA flagstone. The traditional square lawn provides elements of simplicity, elegance and classical style while creating a new play space for the grand kids. The pergola creates depth and a great focal point from the loggia. We illuminated all the walkways and garden rooms with Escort Lighting. One of the most fun transformations was converting the spa to a fish pond. The pond provides just enough sound to drain out all neighborhood activities. In the front, we created a new permeable brick paving parking area. The parking area was designed to keep visitors from venturing to the back parking. We chose the permeable brick pavers to collect runoff that is becoming more of a problem in the neighborhood. Our final piece to this property was to come up with a unique solution creating additional privacy while minimizing root damage to the existing plant material. Our client was looking for a permanent solution that required little to no maintenance. Masonry walls were out due to the necessary footers. We looked at fence options. Wood and plastics were out, so we created post out of steel “I” beams and setting concrete lintels in between the lintels. It was perfect. This has to be one of my favorite projects to design and implement of my 25 year experience.
Find the right local pro for your project
 Tile Doctor Ltd
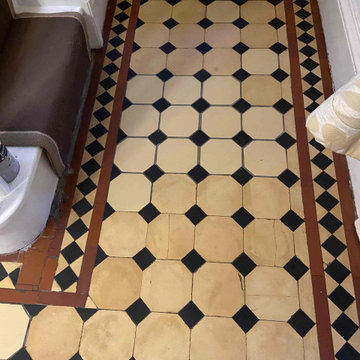
Detailed below is the restoration of a Victorian tiled hallway floor that we started back in June in Preston. Although we started in June there was so much damage to the subfloor and the tiles it took some time to complete, additionally, the client did not like the colour samples of the replacement tiles we had brought along and so decided to source their own which took some time.
Three months later with replacement tiles now sourced we were given the go ahead to start the restoration. The first day’s focus was cleaning the original floor using very coarse 100-grit and 200-grit Diamond pads fitted to a rotary buffer machine and applied to the floor using a strong dilution of Tile Doctor Remove and Go to add extra cleaning power. Tile edges were given special attention using a flex machine fitted with small diamond grit pads.
The floor was rinsed with water to remove the soil generated and this was followed up with an acid rinse using a 1:3 dilution of Tile Doctor Grout Clean Up. This last step in the cleaning process is especially recommend for old floors like this which don’t have a damp proof membrane and can suffer from efflorescence issues.
The next stage focused on repairing the floor and started by carefully knocking out all the broken and chipped tiles. We had previously estimated over 30 tiles needed replacing and so the client had bought two boxes, meaning I had plenty of spares to work with.
Before tiling however, the subfloor had suffered over the years and needed attention first. To deal with this the damaged areas were raked out, cleaned up and then back filled with rapid setting self-levelling screed from Mapie adhesives. Once the sub-base was fixed then we put the new tiles back in, they were not an exact match, about 5mm too short and lighter in tone, but the colour was pretty close.
Tiling an old Victorian floor like this can be a bit like dominoes as you move one out of place 2 decent ones come loose and then they also need refixing. Some of the tiles had hair line cracks in them and once they were loose, they just cracked in half. As such the 20 spare tiles that I thought were spare came into good use and I actually ended up using all of them. I could have done with a few more so it was decided to reset the last four broken tiles and grout them in. Luckily for me the client was very understanding about the nature of tile restoration and had accepted that there would be some imperfections and they were not expecting a new floor.
The Tiles were fixed down using Ultralite Rapid Flex (another product from Mapie) and then grouted using the same adhesive (not a grout, as they did not have grout back in the day, just cement and screed).
The floor was left this to cure overnight, and we came back the next day to finish the clean using a 200-grit diamond pad fitted to a buffing machine and lubricated with water, then one last acid rinse to get the tiles as clean as possible and remove any lingering grout haze. This last clean helps to blend the new tiles in with the original.
Before applying a protective sealer, the floor was left to dry for a couple of days, the tiles need to be thoroughly dry before sealing or you can end up with a patchy appearance.
For this floor with no damp proof membrane, it was important to use a fully breathable sealer that will allow moisture to rise through the tile and evaporate at the surface, so Tile Doctor Colour Grow was chosen. This is a good choice for old floors like this as its fully breathable, head wearing, and it contains a colour enhancer that improves the overall appearance of the tile.
Three coats of Tile Doctor Colour Grow which is a fully breathable, colour enhancing sealer hat works by soaking into the pores of the tile protecting it from within. It has a matt finish, and it works really well with all clay tiles and is ideal for these types of floors.
You can probably spot the lighter coloured tiles in the after photos on this page, however it’s a very subtle difference and I think they have blended in quite well with the original. Certainly, my client was very pleased with the newly restored floor, its completely transformed from when we first visited the client, and the floor has now gained character and history. For aftercare we recommend Tile Doctor Neutral Cleaner, its an effective pH neutral product that is compatible with the new sealer.
Russell Taylor
Lancashire Tile Doctor

 User
When seeking a professional painting contractor in Houston, a thousand things must run through your mind. Let the painting professionals at Duran’s Roofing & Remodeling set your mind at ease. Painting is second nature to us. As you may be good at your job, we’re pretty good at ours. Painting, you might say, is in our blood. Family owned and operated is all we know.
Before our painters put the first brush of paint to your walls, we make sure that your surfaces are clean and free of damage. Preparing a fresh canvas and painting with proper technique makes your old walls look like brand new once again.
Duran’s Roofing & Remodeling works hard to make sure your property looks amazing, inside and out. Our experienced paint crews know how to create beautiful finishes inside your home, while properly protecting your home’s fixtures and non-painted surfaces.
From offices to storefronts, let our experienced commercial paint maintenance specialists make sure your business looks great all year long. Whether it is damage touch-up or whole property repainting, we can do it. We’ll work with your schedule to ensure minimal downtime and inconvenience to your employees and customers.
Our painting services are more than just a few rollers and cans of paint. We take pride in our work and in the relationships we build with our clients. Complete client satisfaction is our goal, and we attain it by keeping the process simple. Our courteous, clean-cut staff will arrive when they say they will, get the job done right, complete all work on time, and finish on job on budget.

 Design Connection, Inc.
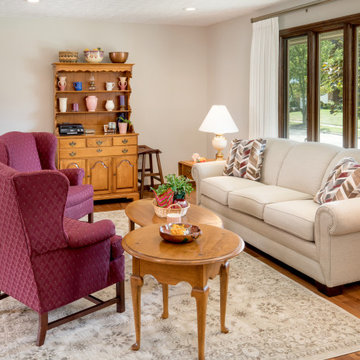
It all started with the dishwasher springing a leak while the clients were on vacation. Their home was built around 2002 and it needed to be updated. With the significant water damage it was the time to call in Arlene Ladegaard of Design Connection, Inc to help create a design plan and selections for the contractor, as well new furnishings to replace the old tired pieces that dated back many years.
The plan for the main floor included: New hardwood floors installed in Hickory imported from Oregon and finished to a dark brown patina, the golden oak throughout darkened to a beautiful rich coffee bean finish, as well as the kitchen cabinets, paint colors, a new kitchen backsplash and hood, countertops, custom cabinets and wall coverings.
Design Connection, Inc. provided: Project Management, designs plans, tile, wall coverings, countertops tops, custom cabinets, furniture, area rugs, lamps, paint selections, faux painting and accessories.
 Design Connection, Inc.
It all started with the dishwasher springing a leak while the clients were on vacation. Their home was built around 2002 and it needed to be updated. With the significant water damage it was the time to call in Arlene Ladegaard of Design Connection, Inc to help create a design plan and selections for the contractor, as well new furnishings to replace the old tired pieces that dated back many years.
With its beautifully lite ceilings and modern furniture the clients were thrilled with their new space. They entertain the grand kids and friends in lower level and enjoy their grand view of the golf course below.
Design Connection, Inc. provided: Project Management, designs plans, tile, wall coverings, countertops tops, custom cabinets, furniture, area rugs, lamps, paint selections, faux painting and accessories.
Sponsored
Plain City, OH

Kuhns Contracting, Inc.
Central Ohio's Trusted Home Remodeler Specializing in Kitchens & Baths

 Houseplay Renovations LLC
It is a truth universally acknowledged that a homeowner in possession of a leaking roof must be in want of repairs.
And though it makes for a fun Jane Austen allusion, an unreliable roof is a serious problem. Water can cause a great deal of damage in a short time, so this homeowner wisely called us in to help.
The roof of this custom-designed home was leaking in myriad locations, so our team removed the existing roof decks to access and repair the exterior trouble spots.
The new deck was constructed atop a Bison pedestal system; in fact, we custom-designed the deck in panels that can be lifted for seasonal roof sweeping and simpler maintenance.
The various roof decks were rebuilt with both reclaimed decking and new ipe decking. Our team also removed several faulty parapet walls and replaced them with a mixture of stainless steel cables and ipe railings.
Finally, we took steps to prevent future drainage problems by applying a sealcoat to the exterior stucco and creating a copper drip-edge too.
Leaking roofs are no laughing matter, but thanks to Houseplay, this story — like Austen’s Pride and Prejudice — had a happy ending.
Photo Credit: Anne Ruthmann Photography
 River Valley Landscapes
This zealous gardener was tired of her pool taking up so much space in her landscape. She asked me for ideas. The answer was simple. Since her garden brings her so much joy, I proposed adding more garden rooms to experience. We removed the large expansive pool and replaced it with a small reflecting pond that doubles as the pool. This allowed us to create 4 new garden spaces. We replaced all concrete pavers with natural PA flagstone. The traditional square lawn provides elements of simplicity, elegance and classical style while creating a new play space for the grand kids. The pergola creates depth and a great focal point from the loggia. We illuminated all the walkways and garden rooms with Escort Lighting. One of the most fun transformations was converting the spa to a fish pond. The pond provides just enough sound to drain out all neighborhood activities. In the front, we created a new permeable brick paving parking area. The parking area was designed to keep visitors from venturing to the back parking. We chose the permeable brick pavers to collect runoff that is becoming more of a problem in the neighborhood. Our final piece to this property was to come up with a unique solution creating additional privacy while minimizing root damage to the existing plant material. Our client was looking for a permanent solution that required little to no maintenance. Masonry walls were out due to the necessary footers. We looked at fence options. Wood and plastics were out, so we created post out of steel “I” beams and setting concrete lintels in between the lintels. It was perfect. This has to be one of my favorite projects to design and implement of my 25 year experience.
 Houseplay Renovations LLC
It is a truth universally acknowledged that a homeowner in possession of a leaking roof must be in want of repairs.
And though it makes for a fun Jane Austen allusion, an unreliable roof is a serious problem. Water can cause a great deal of damage in a short time, so this homeowner wisely called us in to help.
The roof of this custom-designed home was leaking in myriad locations, so our team removed the existing roof decks to access and repair the exterior trouble spots.
The new deck was constructed atop a Bison pedestal system; in fact, we custom-designed the deck in panels that can be lifted for seasonal roof sweeping and simpler maintenance.
The various roof decks were rebuilt with both reclaimed decking and new ipe decking. Our team also removed several faulty parapet walls and replaced them with a mixture of stainless steel cables and ipe railings.
Finally, we took steps to prevent future drainage problems by applying a sealcoat to the exterior stucco and creating a copper drip-edge too.
Leaking roofs are no laughing matter, but thanks to Houseplay, this story — like Austen’s Pride and Prejudice — had a happy ending.
Photo Credit: Anne Ruthmann Photography
 Flooret
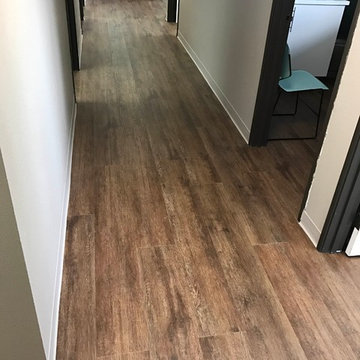
Part of the Modin Vinyl Plank Collection, Available Exclusively From www.Flooret.com
$3.49 / sq ft, 22.08 sq ft per box
50% WIDER. 25% LONGER. TWICE AS DURABLE
Luxury Vinyl Plank, 5 mm x 9" x 60" (1.0 mm / 40 mil wear-layer)
Lifetime Residential Warranty, 20 year Commercial Warranty
Rich, luxurious, refined. A deep tone punctuated by a slight bleached wire-brush. Barin will lift any space, and can live up to the highest design requirements.
REDEFINING DURABILITY
The most important specification for determining the durability of vinyl flooring is the thickness of the wear-layer. The best wear-layers are made of thick, clear virgin PVC, which covers the paper print-film that gives the floor its unique appearance. Once the wear-layer wears through, the paper is damaged and the floor will need replacement.
Most vinyl floors come with a 8-12 mil wear-layer (0.2-3 mm). The top commercial specs in the industry are higher, at 20-22 mil (0.5 mm). A select few manufacturers offer a "super" commercial spec of 28 mil (0.7 mm).
For Modin, we decided to set a new standard: 40 mil (1.0 mm) of premium virgin PVC. This allows us to offer an industry-leading 20 year Commercial Warranty (Lifetime Residential), compared to nearly all other commercial vinyl floors' 10 year Commercial Warranty.
Beyond our superior wear-layer, we also use a patented click mechanism for superior hold, and a ceramic-bead coating.
SIZE MATTERS
Wider and longer planks create a sense of space and luxury. Most vinyl floors come in 6" or 7" widths, and 36" or 48" lengths.
For Modin, we designed our planks to be 9" wide, and 60" long. This extra large size allows our gorgeous designs to be fully expressed.
DETAILS THAT COUNT
We made sure to get all the details right. Real texture, to create the feel of wire-brushed wood. Low sheen level, to ensure a natural look that wears well over time. 4-sided bevels, to more accurately emulate the look of real planks. When added together they help create the unique look that is Modin.
DESIGNS THAT INSPIRE
We spent nearly a year just focusing on our designs, to ensure they provide the right mix of color and depth. Focusing on timeless wire-brush and European Oak styles, as well as more contemporary modern washes, our collection offers truly beautiful design that is both functional and inspiring.

 Kimberley Bryan
Photo: Kimberley Bryan © 2016 Houzz
Inspiration for a 1950s kitchen remodel in Seattle
Inspiration for a 1950s kitchen remodel in Seattle
 River Valley Landscapes
This zealous gardener was tired of her pool taking up so much space in her landscape. She asked me for ideas. The answer was simple. Since her garden brings her so much joy, I proposed adding more garden rooms to experience. We removed the large expansive pool and replaced it with a small reflecting pond that doubles as the pool. This allowed us to create 4 new garden spaces. We replaced all concrete pavers with natural PA flagstone. The traditional square lawn provides elements of simplicity, elegance and classical style while creating a new play space for the grand kids. The pergola creates depth and a great focal point from the loggia. We illuminated all the walkways and garden rooms with Escort Lighting. One of the most fun transformations was converting the spa to a fish pond. The pond provides just enough sound to drain out all neighborhood activities. In the front, we created a new permeable brick paving parking area. The parking area was designed to keep visitors from venturing to the back parking. We chose the permeable brick pavers to collect runoff that is becoming more of a problem in the neighborhood. Our final piece to this property was to come up with a unique solution creating additional privacy while minimizing root damage to the existing plant material. Our client was looking for a permanent solution that required little to no maintenance. Masonry walls were out due to the necessary footers. We looked at fence options. Wood and plastics were out, so we created post out of steel “I” beams and setting concrete lintels in between the lintels. It was perfect. This has to be one of my favorite projects to design and implement of my 25 year experience.

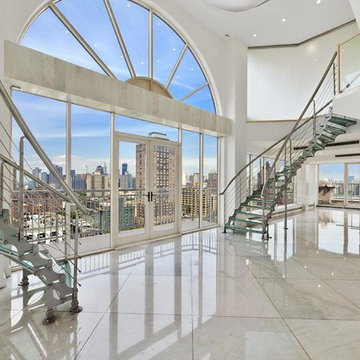
 GIOVANI GLASS
New York Laminated Glass Floors
Laminated glass flooring is produced by bonding two or more layers of heat treated pressured glass together with a plastic resin interlayer, which is known as Polyvinyl Butyral (PVB). Multiple PVB glass sheets are more popularly used by the automobile industry and the airline industry for designing windshields. The PVB interlayer makes glass floors impervious to water damage, it offers sound reduction and blocks 99% of UV rays. PVB interlayers can be customized into different colored sheets to be used by glass manufactures for architects and construction engineers.
The pictures shown below are our projects,some of them we replaced and other we design and install new glass floors.
 River Valley Landscapes
This zealous gardener was tired of her pool taking up so much space in her landscape. She asked me for ideas. The answer was simple. Since her garden brings her so much joy, I proposed adding more garden rooms to experience. We removed the large expansive pool and replaced it with a small reflecting pond that doubles as the pool. This allowed us to create 4 new garden spaces. We replaced all concrete pavers with natural PA flagstone. The traditional square lawn provides elements of simplicity, elegance and classical style while creating a new play space for the grand kids. The pergola creates depth and a great focal point from the loggia. We illuminated all the walkways and garden rooms with Escort Lighting. One of the most fun transformations was converting the spa to a fish pond. The pond provides just enough sound to drain out all neighborhood activities. In the front, we created a new permeable brick paving parking area. The parking area was designed to keep visitors from venturing to the back parking. We chose the permeable brick pavers to collect runoff that is becoming more of a problem in the neighborhood. Our final piece to this property was to come up with a unique solution creating additional privacy while minimizing root damage to the existing plant material. Our client was looking for a permanent solution that required little to no maintenance. Masonry walls were out due to the necessary footers. We looked at fence options. Wood and plastics were out, so we created post out of steel “I” beams and setting concrete lintels in between the lintels. It was perfect. This has to be one of my favorite projects to design and implement of my 25 year experience.
 River Valley Landscapes
This zealous gardener was tired of her pool taking up so much space in her landscape. She asked me for ideas. The answer was simple. Since her garden brings her so much joy, I proposed adding more garden rooms to experience. We removed the large expansive pool and replaced it with a small reflecting pond that doubles as the pool. This allowed us to create 4 new garden spaces. We replaced all concrete pavers with natural PA flagstone. The traditional square lawn provides elements of simplicity, elegance and classical style while creating a new play space for the grand kids. The pergola creates depth and a great focal point from the loggia. We illuminated all the walkways and garden rooms with Escort Lighting. One of the most fun transformations was converting the spa to a fish pond. The pond provides just enough sound to drain out all neighborhood activities. In the front, we created a new permeable brick paving parking area. The parking area was designed to keep visitors from venturing to the back parking. We chose the permeable brick pavers to collect runoff that is becoming more of a problem in the neighborhood. Our final piece to this property was to come up with a unique solution creating additional privacy while minimizing root damage to the existing plant material. Our client was looking for a permanent solution that required little to no maintenance. Masonry walls were out due to the necessary footers. We looked at fence options. Wood and plastics were out, so we created post out of steel “I” beams and setting concrete lintels in between the lintels. It was perfect. This has to be one of my favorite projects to design and implement of my 25 year experience.

 Riverside Construction, LLC
A small West Lafayette kitchen gets a big renovation. When our clients approached us with this kitchen renovation project, their wishes were to have an open, fluid space with more room for storage, upgraded appliances and modern amenities. It was also important to make sure the renovation matched the style and character of the home. Before the kitchen remodel, the kitchen was walled off from the rest of the living area. Riverside Construction knocked down a wall and opened up the space so that the homeowners could enjoy abundant natural light and the beautiful view outside their windows. Ensuring the home’s architectural integrity, we used Mid Century inspired materials that complimented the original wood color and style of the home, taking full advantage of the high ceilings to add more storage. Damaged wood in the kitchen was replaced with new unfinished hardwood that was expertly stained to match the existing hardwood in the nearby hallway. Other key features in this gorgeous kitchen remodel include a porcelain mosaic tile backsplash, Wellborn Milan cabinets in Cherry with light stain and new task and ambient lighting.
Sponsored
Plain City, OH
Kuhns Contracting, Inc.
Central Ohio's Trusted Home Remodeler Specializing in Kitchens & Baths
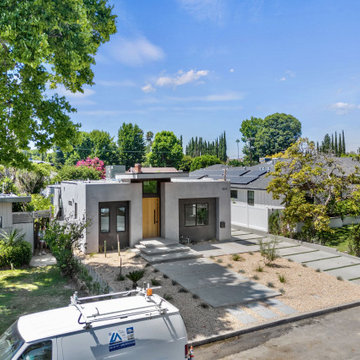
 LA Home Contractor
FULL HOUSE REMODEL – COMPLETE SCOPE OF WORK
1. Pre-Construction Phase
• Initial site inspection and measurements
• Architectural design and layout planning (if required)
• Structural engineering (if load-bearing walls are modified)
• Preparation of plans for city approval
• Permit application and plan check
• Obtain required building permits
• Scheduling of inspections
• Homeowner responsible for permit fees unless otherwise stated.
2. Site Preparation & Protection
• Protect flooring and non-work areas
• Install plastic dust barriers with zipper access
• Cover windows and furniture as needed
• Temporary utility setup if required
• Daily job site cleanup
• Final professional cleaning upon completion
3. Demolition
• Remove existing flooring (tile, wood, carpet, etc.)
• Remove cabinets, countertops, vanities
• Remove interior walls per plans
• Remove drywall where required
• Remove plumbing fixtures
• Remove electrical fixtures
• Haul away all debris
4. Structural & Framing
• Install structural beams if required
• Reframe modified walls
• Install new partitions per approved plans
• Repair or replace damaged framing
• Subfloor repair or replacement as needed
• Install blocking for cabinets and accessories
5. Plumbing (Up to Code)
• Replace old water supply lines (Copper Type L or PEX)
• Replace or modify drain lines (ABS)
• Relocate plumbing fixtures as needed
• Install new shut-off valves and cleanouts
• Water heater replacement if included
• Call for rough and final plumbing inspections
6. Electrical (Up to Code)
• Upgrade electrical panel if required
• Rewire entire house as needed
• Install new outlets and switches
• Install GFCI/AFCI protection per code
• Install recessed lighting and fixtures
• Install smoke and carbon monoxide detectors
• Dedicated circuits for appliances
• Call for rough and final electrical inspections
7. HVAC
• Replace or upgrade HVAC system if included
• Install new ducting and registers
• Install thermostat or mini-split system if applicable
8. Insulation
• Install wall insulation per code requirements
• Install ceiling insulation per code requirements
9. Drywall & Plaster
• Install new drywall
• Tape and mud (Level 4 or 5 finish)
• Texture to match existing or smooth finish
• Patch all affected areas
10. Flooring
• Install tile flooring
• Install engineered wood / hardwood / laminate / vinyl
• Install baseboards
• Floor leveling if required
11. Kitchen Remodel
• Install new cabinets
• Install countertops
• Install backsplash
• Install sink and faucet
• Install appliances (owner supplied unless specified)
12. Bathroom Remodel(s)
• Install new tub or shower system
• Waterproofing system installation
• Install tile on floors and walls
• Install vanity and toilet
• Install shower valve and fixtures
• Install shower glass if included
13. Doors & Windows
• Replace interior and entry doors
• Replace windows if included
• Install hardware
14. Interior & Exterior Paint
• Surface preparation
• Prime and paint walls, ceilings, and trim
• Exterior painting if included
15. Exterior Work (If Included)
• Stucco repair
• Roofing repair or replacement
• Concrete work or pavers
• Drainage improvements
16. Final Phase
• Final inspections
• Punch list completion
• Final cleaning
• Final walk-through with homeowner
Standard California Contract Terms (Summary)
• All work performed in compliance with California Building Code.
• Change orders must be approved in writing.
• Unforeseen conditions may require additional cost.
• One-year labor warranty unless otherwise stated.
• Progress payments per agreed payment schedule.
• Contractor is licensed and insured.
 Davana Floors
flooring installer St Petersburg FL
flooring installer Tampa FL
flooring installer Clearwater FL
flooring installation near me
professional flooring installer
licensed flooring installer Florida
flooring installation services
same day flooring installation
residential flooring installer
commercial flooring installer
flooring contractor St Petersburg FL
flooring contractor Tampa FL
flooring contractor Clearwater FL
licensed flooring contractor Florida
flooring contractor near me
flooring replacement contractor
flooring repair contractor
water damage flooring contractor
insurance flooring contractor
subfloor leveling contractor
flooring store St Petersburg FL
flooring store Tampa FL
flooring store Clearwater FL
flooring retailer near me
local flooring store
flooring showroom near me
buy flooring St Petersburg
wholesale flooring Tampa
discount flooring Clearwater
luxury vinyl plank installation St Petersburg
waterproof flooring Tampa FL
LVP flooring installer Clearwater
SPC flooring installation
hardwood flooring installation St Petersburg
engineered hardwood installer Tampa
waterproof wood flooring Clearwater
hardwood floor replacement
tile flooring installation St Petersburg
bathroom tile installer Tampa
tile contractor Clearwater
porcelain tile installation
lifetime warranty flooring installation
flooring company with lifetime warranty
best flooring installer St Petersburg
5 star flooring company Tampa
trusted flooring contractor Clearwater
high quality flooring installation
flooring installer near me
flooring contractor near me
flooring store near me
local flooring company
flooring installation near me
 Jack Home Construction & Remodeling
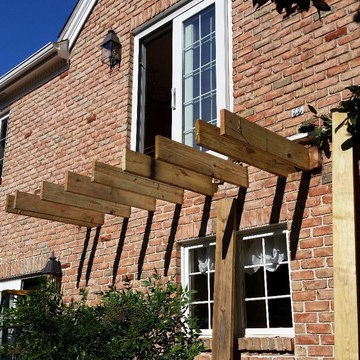
We slid new boards through the holes in the brick alongside the existing joists in the second floor. Like this…
For strength, we had to use lag bolts to secure the new balcony joists to the floor system of the second floor. The problem was to find the least intrusive way to get to those joists inside the second floor of the house. We would have to go inside the house and get to the floor joists from above or below. The ceiling of the room below the balcony was a beautiful finished wood ceiling that really could not be disturbed without causing permanent damage. So getting to the boards inside the second floor through the ceiling of the first floor wasn’t a good option.
The solution was to go into the second floor from above, through the floor of the room and that opens to the balcony. So we moved all the furniture out of the room and pulled back the carpet. We cut out a large section of the plywood and exposed the boards. We were then able to lag bolt the new balcony floor joists to the existing second floor system. We then put down new plywood decking on the floor, then re-stretched the carpet, and moved the furniture back. The room looked just like it did before.
Photo by Shawn Jack.
118