
Search results for "Safety measures" in Home Design Ideas

 Platinum Poolcare
This sleek rectilinear pool measures 10'0" x 27'0", and the hot tub is 10'0" x 6'0". The coping is Valders Wisconsin Limestone. Both the pool and hot tub have their own automatic pool safety covers with custom stone lid systems.
A large top step serves as a sunshelf for the pool-width steps. Adorned by lush turf on several sides, the hardscapes consist of New York Bluestone. Photos by Larry Huene.


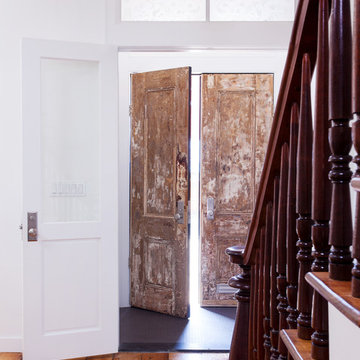
 Bonaventura Architect
Please see this Award Winning project in the October 2014 issue of New York Cottages & Gardens Magazine: NYC&G
http://www.cottages-gardens.com/New-York-Cottages-Gardens/October-2014/NYCG-Innovation-in-Design-Winners-Kitchen-Design/
It was also featured in a Houzz Tour:
Houzz Tour: Loving the Old and New in an 1880s Brooklyn Row House
http://www.houzz.com/ideabooks/29691278/list/houzz-tour-loving-the-old-and-new-in-an-1880s-brooklyn-row-house
Photo Credit: Hulya Kolabas
Find the right local pro for your project
 Colony Pool Service of Delaware, Inc.
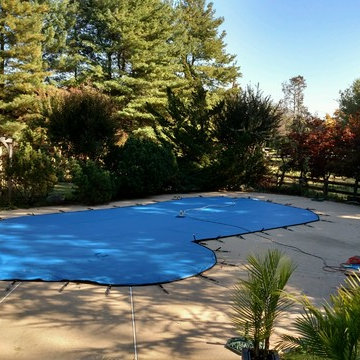
This residential in-ground swimming pool located in Chesapeake City, Maryland received a custom "Pool Guard Professional" Solid Safety Pool Cover (
Color: Blue).
Pool Guard's “tension-secure” solid safety cover offers security plus a complete barrier to water, dirt, dust and sunlight.
Colony Pool Service of Delaware, Inc. measured and installed this Pool Guard cover manufactured by Merlin Industries, Inc. which is custom-designed for your pool providing safety and protection. Your cover will be designed and custom manufactured to accommodate pool steps, angles, and unique configurations to avoid compromising quality and safety.
We are your number one authorized dealer in the area, offering a very competitive price.

 Pike Properties
Example of a country galley medium tone wood floor and brown floor kitchen design in Charlotte with shaker cabinets, white backsplash, subway tile backsplash, stainless steel appliances, an island, white countertops and gray cabinets

 Industrial Projects
Creating a comfortable outdoor living space is a priority for many homeowners and DIY enthusiasts. With rising summer temperatures, installing a shade tarp in your backyard offers an affordable and effective solution for sun protection. We’ve developed this detailed, step-by-step guide to help you confidently install a shade tarp that not only shields you from the sun but also adds aesthetic appeal to your outdoor area.
Benefits of Installing a Backyard Shade Tarp
Before diving into the installation process, let’s explore the key benefits of having a backyard shade tarp:
Provides UV Protection: Keeps your family and guests safe from harmful sun exposure.
Reduces Outdoor Temperatures: Creates a cooler, more enjoyable outdoor space.
Protects Outdoor Furniture: Extends the life of patio furniture by reducing sun damage.
Enhances Outdoor Aesthetics: Adds a modern, stylish look to your yard.
Budget-Friendly: More affordable compared to permanent structures like pergolas.
Materials and Tools You’ll Need
To begin your DIY backyard shade project, gather the following materials and tools:
Materials:
Shade tarp (UV-resistant and breathable)
Sturdy posts or existing structures (trees, fences, walls)
Mounting hardware (eye bolts, D-rings, turnbuckles, snap hooks)
Nylon or polyester rope, or stainless-steel wire
Concrete (if installing new posts)
Tools:
Power drill
Measuring tape
Level
Ladder
Wrench or adjustable spanner
Post hole digger (if installing new posts)
Step 1: Plan Your Shade Tarp Layout
The first step in installing your backyard shade tarp is careful planning. Take time to assess your outdoor area and answer these key questions:
Where is the sun’s path throughout the day?
What size and shape of tarp best suits your space?
Will you anchor the tarp to existing structures or install new posts?
What height do you want the tarp to sit at for maximum shade and airflow?
Pro Tip: Use string or garden hoses to visualize the tarp layout on the ground before making permanent decisions.
Step 2: Measure and Mark Anchor Points
Once you’ve determined the tarp’s location and orientation:
Measure the tarp dimensions.
Mark the exact points where each corner of the tarp will be anchored.
Ensure that the anchor points are at least 5–10% longer than the tarp size to allow for tensioning and slight adjustments.
Consider slope angles for water runoff. Aim for at least a 20-degree angle to prevent water pooling on the tarp.
Step 3: Install Support Posts (If Necessary)
If your backyard lacks existing anchor points like trees or fences, you’ll need to install sturdy support posts:
Dig post holes at least 24 inches deep and 8-12 inches wide for stability.
Set posts in concrete, making sure they remain plumb and level.
Allow the concrete to cure for at least 24–48 hours before applying tension from the tarp.
We recommend using pressure-treated wood, galvanized steel poles, or aluminum posts for longevity and strength.
Step 4: Install Mounting Hardware
With your anchor points ready, it’s time to install the necessary hardware:
Attach eye bolts or pad eyes securely into walls, posts, or other fixed structures.
For added flexibility and adjustability, install turnbuckles or tensioners to fine-tune the tarp’s tightness.
Connect snap hooks, D-rings, or carabiners to make assembly and disassembly easier.
Make sure all hardware is rated for outdoor use to prevent rust and corrosion.
Step 5: Attach and Tension the Shade Tarp
Now it’s time for the most satisfying part—mounting the shade tarp:
Begin by attaching one corner of the tarp to an anchor point.
Gradually attach the remaining corners, moving diagonally for even tension.
Adjust each connection point using your turnbuckles, ropes, or cables.
Pull the tarp tight enough to avoid sagging, but not so tight that it risks tearing.
Check that the tarp maintains the desired slope for rainwater runoff and adjust tension as needed.
Step 6: Final Adjustments and Safety Check
Before enjoying your new shaded area:
Inspect all anchor points and hardware for stability.
Test the tarp’s tension and make adjustments for even distribution.
Ensure that no sharp edges or loose connections remain that could damage the tarp or pose a safety hazard.
Confirm that the tarp is secure in windy conditions by giving it a gentle tug.
If you live in an area with frequent high winds, consider removing the tarp during storms to prevent damage.
Step 7: Enjoy Your Shaded Backyard Oasis
Once installed, your backyard shade tarp provides a comfortable and protective space for outdoor gatherings, relaxation, or family activities. You can decorate underneath with outdoor furniture, string lights, or potted plants to create a personalized outdoor retreat.
Maintenance Tips for Long-Lasting Shade Tarp Performance
To extend the life of your shade tarp, follow these maintenance guidelines:
Regularly check for wear and tear, especially around anchor points and seams.
Clean the tarp periodically with mild soap and water to prevent mildew buildup.
Store the tarp indoors during harsh weather seasons if it's not designed for year-round use.
Tighten hardware as needed to maintain proper tension and avoid sagging.
By following these simple care steps, your shade tarp will continue to deliver years of sun protection and outdoor comfort.
Conclusion: Upgrade Your Outdoor Space with a DIY Shade Tarp
Installing a shade tarp in your backyard is a cost-effective and rewarding DIY project. With careful planning, quality materials, and proper installation techniques, you’ll enjoy cool, shaded outdoor living all season long. This step-by-step guide ensures your project goes smoothly from start to finish.



Sponsored
Delaware, OH

Buckeye Basements, Inc.
Central Ohio's Basement Finishing ExpertsBest Of Houzz '13-'21

 Free Lancing
Effective residential construction project management is crucial in today’s fast-moving building industry. It means overseeing every step of building a home, from planning to finishing, to ensure projects are completed time, within budget, and with high quality. Unlike commercial projects, residential projects require special attention to meet homeowners' unique needs and wishes, requiring a customized approach from the beginning to the end.
In 2025, the construction sector will use advanced technologies like AI and integrated project delivery (IPD) to streamline processes and improve stakeholder collaboration. However, project managers face significant challenges, including managing risks, maintaining quality control, and ensuring effective communication among team members.
A WIP Report (Work-in-Progress Report) is a key tool that helps track a project's budget, progress, and resource use. It provides clear insights, making managing costs easier, avoiding delays, and making informed decisions.
By adopting best practices and using modern construction management tools, project managers can overcome these challenges and deliver successful residential construction projects that meet client expectations and contribute to a sustainable future.
This article provides a brief overview of residential construction project management, highlights its importance, and touches on the challenges faced by project managers while incorporating the latest trends and technologies in the field.
Types of Residential Construction Management
Here are the different types of Residential Construction Management:
Single-Family Homes: These are standalone houses built for individual families. Managing these projects involves overseeing construction from planning to completion, ensuring that the home meets the owner's preferences and budget.
Multi-Family Housing: This includes apartments, condominiums, and townhouses. Projects of this type require managing multiple units, often with shared facilities, and ensuring compliance with local building codes.
Custom Home Building: This involves constructing homes tailored to specific client needs. Close collaboration with architects and designers is required to ensure the house reflects the owner's personality and preferences.
Home Renovation and Remodeling: These projects focus on updating or expanding existing homes. They often involve working with subcontractors for specialized tasks like electrical or plumbing work.
Components of Residential Construction Project Management
Managing a residential construction project requires carefully coordinating people, materials, and timelines. A well-structured approach ensures efficiency, cost control, and high-quality results.
Roles and Responsibilities
A project manager plays a vital role in residential construction. They oversee every step from planning to completion and ensure the project stays on schedule, within budget, and meets quality standards.
Project Manager’s Role in Home Construction
The project manager is responsible for organizing tasks, managing resources, and solving problems that arise during construction. They coordinate between different teams, track progress, and ensure safety regulations are followed.
Collaboration with Contractors, Architects, and Stakeholders
Successful residential construction requires teamwork. Project managers work closely with architects to bring designs to new heights, coordinate with contractors to manage labor and materials, and keep stakeholders (such as homeowners and investors) informed about project updates.
Client Communication and Expectations Management
Clear communication with clients is essential. The project manager keeps homeowners updated on timelines, changes, and challenges. Setting realistic expectations and providing regular updates, they help avoid misunderstandings and keep the project running smoothly.
Project Scope & Planning
Practical project planning sets the foundation for a successful residential construction project. It ensures clear goals, minimizes risks, and keeps the project on track.
Defining Project Objectives and Deliverables:
Clearly outlining what needs to be done and what the final result should look like is essential. This involves setting specific, measurable goals that align with the homeowner's vision and budget.
Managing Homeowner Expectations and Scope Creep:
Homeowners often have changing needs or ideas. Effective project managers must manage these expectations to prevent "scope creep," which can delay projects and increase costs. This involves open communication and setting clear boundaries.
Ensuring Compliance with Zoning Laws and Permits:
Before construction begins, it's crucial to ensure that all necessary permits are obtained and that the project complies with local zoning laws. This step avoids costly fines and delays, ensuring the project moves forward smoothly.
Budgeting & Cost Control
Proper budgeting is essential for keeping residential construction projects financially viable. Effective cost management prevents overspending and ensures profitability.
Accurate Cost Estimation for Residential Projects
A precise cost estimate considers labor, materials, permits, and unexpected expenses. Using historical data and Sage 300 CRE for financial management improves accuracy and helps set realistic budgets.
Budget Allocation and Tracking
Allocating funds efficiently ensures that each phase of the project receives the necessary resources. Tracking expenses through Construction & Financial Dashboards allows for real-time monitoring and early detection of budget deviations.
Preventing Budget Overruns
Uncontrolled costs can derail a project. Regular financial reviews, automated alerts for overspending, and contingency planning help keep expenses in check and prevent financial strain.
Scheduling & Timeline Management
Timely project completion is crucial in residential construction. Effective scheduling minimizes delays and ensures a smooth workflow.
Creating Detailed Project Schedules
A structured schedule outlines all tasks, deadlines, and dependencies. Breaking down the project into phases, planning, execution, and finishing, helps maintain order and clarity.
Preventing Delays & Meeting Deadlines
Delays can result from labor shortages, weather conditions, or supply chain issues. To avoid problems, it’s good to check for risks ahead of time, add extra time to schedules, and keep everyone on the same page.
Using Gantt Charts and Critical Path Methods
CPM for Construction helps identify critical activities that directly impact project completion, while Gantt charts provide a visual timeline of tasks. Both tools optimize scheduling and improve efficiency.
Residential Construction Project Management Phases
Managing a residential construction project effectively requires a structured approach through various phases. Each phase plays a critical role in ensuring the project's success, from initial planning to completion.
Pre-Construction Phase
The pre-construction phase sets the foundation for a smooth and efficient building process. Proper planning at this stage helps prevent costly changes and delays later.
Site Analysis & Approvals: A thorough site analysis assesses soil conditions, topography, and environmental factors. Feasibility studies evaluate project viability, including costs and regulatory compliance. Obtaining zoning approvals, permits, and other legal clearances is crucial before breaking ground.
Selecting Materials and Procurement Strategies: Choosing the right materials impacts durability, sustainability, and cost efficiency. A well-planned procurement strategy, including bulk purchasing and reliable supplier partnerships, ensures timely delivery and cost savings. Using Sage 300 CRE for procurement management helps streamline material sourcing and financial planning.
Construction Phase
The construction phase transforms plans into reality. Effective coordination and strict quality control ensure a successful build.
Resource Allocation and Workflow Coordination: Efficiently managing labor, equipment, and materials is key to maintaining progress. Using CPM for Construction, project managers can allocate resources strategically, prevent bottlenecks, and optimize workflows for timely completion.
Project Closeout & Handover
The final phase of residential construction project management is crucial for ensuring a smooth transition from construction to occupancy. Proper closeout procedures guarantee quality, client satisfaction, and long-term project success.
Final Inspections and Quality Assurance: Before finishing the project, a final inspection checks that everything meets safety rules and quality standards. Any problems need to be fixed quickly. Using Procore helps make inspections and tracking issues easier, ensuring a high-quality final product.
Client Walkthrough and Support: A final check helps homeowners see the finished work, ask questions, and make sure it meets their expectations. This is also a chance to explain important home features and maintenance tips. Good communication here builds trust and strengthens relationships.
Warranty Management and Feedback: Efficient warranty management ensures clients get quick help for any issues after construction. A clear process for tracking requests and keeping in touch with homeowners boosts satisfaction. Collecting feedback helps improve future projects. Using S-Curve Forecasting tracks performance trends and refines management strategies.
Software for Residential Construction Project Management
The integration of technology in residential construction project management has revolutionized the way projects are planned, executed, and monitored. Digital tools streamline operations, reduce costs, and improve communication, making them essential for modern construction firms.
Importance of Digital Tools
Investing in digital tools is crucial for construction firms as it transforms the industry by enhancing efficiency, accuracy, and collaboration across the entire project lifecycle. They also improve project management by streamlining processes, automating tasks, and facilitating real-time stakeholder communication.
Top Construction Management Software for Residential Projects
Several software solutions are available for managing residential construction projects:
Procore: Known for its comprehensive project management features, including document management and collaboration tools.
Sage 300 CRE: Offers robust accounting and financial management capabilities, ideal for large-scale construction projects.
Buildertrend: Specializes in residential construction, providing tools for project scheduling, budgeting, and client communication.
CoConstruct: Focuses on custom home building and remodeling, offering features for estimating, scheduling, and project management.
WIP Reports: Useful for tracking work-in-progress and managing project finances effectively.
Features Comparison and Best Use Cases:
Procore: Best for large projects requiring extensive collaboration and document management.
Sage 300 CRE: Ideal for firms needing robust financial management.
Buildertrend: Suitable for residential builders focusing on client communication and project scheduling.
CoConstruct: Perfect for custom home builders who need detailed estimating and scheduling tools.
WIP Reports: Useful for firms needing to track project finances closely.
How Software Improves Project Efficiency
Construction management software significantly enhances project efficiency in several ways:
Automating Accounting and Job Costing: Software like Sage 300 CRE automates financial tasks, reducing manual errors and improving budget tracking.
Streamlining Document Management and Communication: Tools like Procore centralize documents and facilitate real-time communication among team members, reducing misunderstandings and delays.
Mobile-Friendly Solutions for Real-Time Tracking: Mobile apps from platforms like Buildertrend allow for on-site access to project data, enabling real-time tracking and decision-making.
These digital tools and software solutions are essential for modern residential construction project management, offering benefits such as improved efficiency, enhanced collaboration, and better financial control.
Challenges in Residential Construction Project Management
Residential construction projects face a variety of challenges that can impact their success. Here are some of the key issues project managers encounter:
Managing Subcontractors and Labor Shortages
One of the biggest challenges in residential construction is managing subcontractors and dealing with labor shortages. Subcontractors often have their own schedules and priorities, which can lead to delays if not coordinated properly. Additionally, labor shortages can slow down projects and increase costs due to the need for overtime or hiring temporary workers.
Budget Overruns and Unexpected Costs
Budget overruns are common in residential construction due to factors like material price fluctuations, unexpected site conditions, or changes in project scope. Effective budget management involves regularly monitoring expenses and having contingency plans for unexpected costs.
Changing Construction and Eco Rules
Construction and Eco Rules are always changing, so project managers need to keep up with the latest regulations. This involves following guidelines for saving energy, protecting the environment, and ensuring safety. Ignoring these rules can lead to fines, delays, or even stopping the project.
Best Practices
To ensure your residential construction projects run smoothly and successfully, follow these essential best practices:
Setting Clear Project Goals and Milestones
Clearly defining what you want to achieve is the first step to success. Set specific, measurable, achievable, relevant, and time-bound (SMART) goals. This helps everyone involved understand what needs to be done and by when. For example, instead of saying "build a house," say "build a house with three bedrooms and two bathrooms within the next nine months."
Stakeholder Collaboration
Good communication is key to keeping everyone on the same page. Regular meetings with contractors, suppliers, and homeowners help prevent misunderstandings and ensure that everyone knows what's happening and what's next. This open dialogue also helps resolve issues quickly, preventing small problems from becoming big delays.
Using Data-Driven Insights for Decision-Making
Making decisions based on facts rather than guesses is crucial. Use data and analytics to understand project progress, identify potential issues early, and make informed decisions. For instance, if data shows that a particular material is consistently causing delays, you can plan ahead to avoid those delays in the future.
Proactive Risk Management Strategies
Things don't always go as planned, so being prepared is essential. Identify potential risks early and have a plan to manage them. This might include having backup suppliers, planning for weather conditions, or setting aside extra funds for unexpected expenses. Being proactive can prevent small issues from turning into major problems.
Conclusion
Effective residential construction project management requires careful planning, clear communication, and the right digital tools. From single-family homes to multi-family housing and custom projects, managing timelines, budgets, and quality is essential for success.
By following best practices, using project management software, and staying ahead of industry trends, project managers can ensure smooth execution and client satisfaction despite challenges like labor shortages, budget overruns, and regulatory compliance; modern technology and strategic planning help mitigate risks.
Construction firms can improve efficiency, enhance collaboration, and maintain financial control by adopting advanced tools like Procore, Sage 300 CRE, and Buildertrend. A well-managed project delivers a quality home and builds trust and long-term success in the industry.
FAQs
What is residential construction project management?
It involves overseeing all aspects of building residential properties, from initial planning and design to construction and completion, ensuring projects are completed on time, within budget, and to the desired quality standards.
How can I prevent budget overruns in my construction project?
Accurate cost estimation, continuous budget tracking, and having contingency plans for unexpected expenses are key strategies to prevent budget overruns.
What are the main stages of a residential construction project?
The primary stages include design, pre-construction, procurement, and construction.
How does construction management software improve project efficiency?
It streamlines processes like scheduling, budgeting, and communication, providing real-time data access and collaboration among stakeholders, which enhances overall project efficiency.
How can I ensure my project complies with local building codes and regulations?
Engage professionals familiar with local laws, obtain all necessary permits before starting, and conduct regular inspections to ensure adherence to building codes and regulations.

 Flegel's Construction Co., Inc.
Dean J. Birinyi
Inspiration for a contemporary deck remodel in San Francisco with a pergola
Inspiration for a contemporary deck remodel in San Francisco with a pergola

 Troy Lighting
For over 50 years, Troy Lighting has transcended time and redefined handcrafted workmanship with the creation of strikingly eclectic, sophisticated casual lighting fixtures distinguished by their unique human sensibility and characterized by their design and functionality.
Features:
Vintage bulbs included
Suitable for indoor locations only
UL certified in compliance with nationally recognized product safety standards
Specifications:
Included Canopy measures as 5""L x 17""W x 1 Thick
1-6in, 2-12in, 1-18in stem included
Requires 5 x 75-Watt E26 Medium Base Incandescent Bulbs (Not included)
 DANIELLE Interior Design & Decor
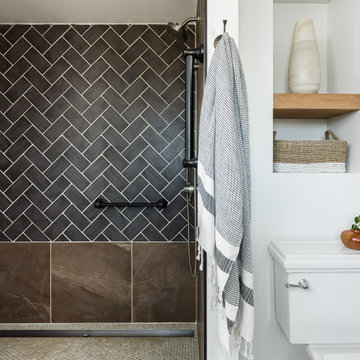
Transforming this small bathroom into a wheelchair accessible retreat was no easy task. Incorporating unattractive grab bars and making them look seamless was the goal. A floating vanity / countertop allows for roll up accessibility and the live edge of the granite countertops make if feel luxurious. Double sinks for his and hers sides plus medicine cabinet storage helped for this minimal feel of neutrals and breathability. The barn door opens for wheelchair movement but can be closed for the perfect amount of privacy.
 Platinum Poolcare
Request Free Quote
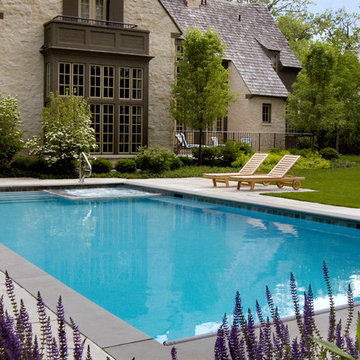
This old world rectilinear pool measures 18'0" x 38'0", and is 3'0" to 6'0" deep. The interior hot tub is 7'0" square. The pool coping is Bluestone, and the decking is Limestone. The pool features an automatic pool safety cover with a custom stone lid system. The minimalist decking and turf outline fits perfectly in this traditional European setting.

 Get My Rugs LLC
Bath mats are vital elements in bathroom decor, beautifully blending style and functionality. These bath rugs offer essential moisture protection, ensuring your floors remain dry while providing slip prevention for safety. When choosing a bath mat, prioritize quality; look for options that are absorbent, comfortable, and add warmth to your space.
Consider the size and proportion of the bath mat in relation to your tub and vanity. If you have a double vanity, you can select individual rugs for each sink or opt for a long runner rug for a cohesive appearance. Always measure your bathroom area to ensure a perfect fit, allowing enough space for doors to open freely.
Durability is another crucial factor. Since bath mats frequently encounter water and foot traffic, choose rugs with a nonslip surface and rubber backing to enhance safety on wet floors. Many options are crafted from high-quality cotton, providing a soft texture and easy maintenance, as most are machine washable. However, some may require professional cleaning, so checking care instructions is advisable.
The choice of bath mat size largely depends on the area you want to cover and the dimensions of your bathroom. Look for a shower mat that is appropriately sized for your tub and vanity, ensuring it provides adequate coverage. If your bathroom features a double vanity, you can opt for either individual rugs for each sink or a long runner rug for a cohesive appearance. Before shopping, take measurements of the spaces to ensure a perfect fit. In smaller bathrooms, remember to leave enough space for the door to swing open without obstructing the rug.
Durability should be a top consideration when selecting a bath mat. Since shower mats are frequently exposed to water and heavy foot traffic, it’s important to prioritize quality. Look for options with a nonslip surface and rubber backing to reduce the risk of slipping when the floor or mat is wet. Additionally, pay attention to the cleaning instructions. Most mats are crafted from cotton or chenille and can be machine washed, but some may require professional cleaning, so it’s best to verify before making a purchase.
moisture and helping prevent slips. When choosing a bath mat, quality is just as essential as aesthetics; you'll want one that not only looks appealing and is absorbent but also feels comfortable underfoot. As you search for the ideal bath rug, consider these helpful tips to guide your decision.
The choice of bath mat size largely depends on the area you want to cover and the dimensions of your bathroom. Look for a shower mat that is appropriately sized for your tub and vanity, ensuring it provides adequate coverage. If your bathroom features a double vanity, you can opt for either individual rugs for each sink or a long runner rug for a cohesive appearance. Before shopping, take measurements of the spaces to ensure a perfect fit. In smaller bathrooms, remember to leave enough space for the door to swing open without obstructing the rug.
Durability should be a top consideration when selecting a bath mat. Since shower mats are frequently exposed to water and heavy foot traffic, it’s important to prioritize quality. Look for options with a nonslip surface and rubber backing to reduce the risk of slipping when the floor or mat is wet. Additionally, pay attention to the cleaning instructions. Most mats are crafted from cotton or chenille and can be machine washed, but some may require professional cleaning, so it’s best to verify before making a purchase.
Having a bubbly pink color, this polyester footmat from Turkey ensures that it gets noticed by one and all. Its oriental patterns follow a definite sense of standard geometry. Buy it for your house and it will become an inseparable part of it for sure.
 Platinum Poolcare
Request Free Quote
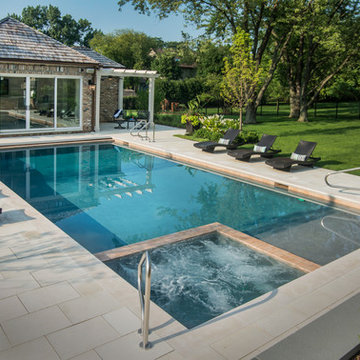
This Swimming Pool and Hot Tub in Burr Ridge IL measures 20'0" x 40'0", and the spa which is inside the pool measures 7'0" x 8'0". Both bodies of water are covered by an automatic pool safety cover. The sunshelf measures 5'0" x 11'0" and has connected steps for entry and exit. The coping is Valders Wisconsin limestone as well as the decking. The pool interior is French Gray. Photos by Larry Huene
 Platinum Poolcare
Request Free Quote
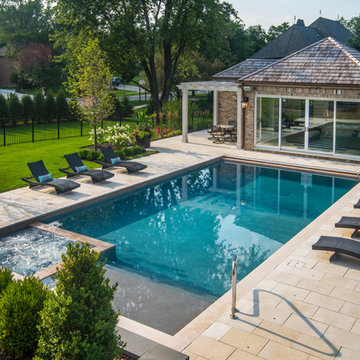
This Swimming Pool and Hot Tub in Burr Ridge IL measures 20'0" x 40'0", and the spa which is inside the pool measures 7'0" x 8'0". Both bodies of water are covered by an automatic pool safety cover. The sunshelf measures 5'0" x 11'0" and has connected steps for entry and exit. The coping is Valders Wisconsin limestone as well as the decking. The pool interior is French Gray. Photos by Larry Huene
 Platinum Poolcare
Request Free Quote
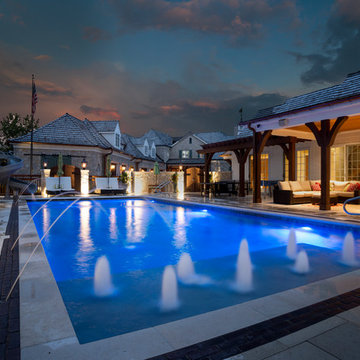
This inground swimming pool and hot tub in Oakbrook, IL measures 20'0" x 45'0", and the hot tub measures 8'0" x 8'0". The Thermal Shelf is 6'0" x 20'0". Valder's Wisconsin Limestone coping caps the swimming pool and hot tub. In-floor cleaning system and automatic swimming pool safety cover with custom walk-on stone lid system provide efficiency and safety. Photos by Larry Huene
 Platinum Poolcare
Request Free Quote
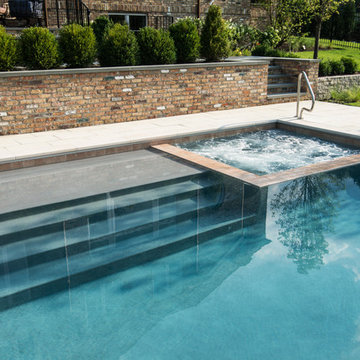
This Swimming Pool and Hot Tub in Burr Ridge IL measures 20'0" x 40'0", and the spa which is inside the pool measures 7'0" x 8'0". Both bodies of water are covered by an automatic pool safety cover. The sunshelf measures 5'0" x 11'0" and has connected steps for entry and exit. The coping is Valders Wisconsin limestone as well as the decking. The pool interior is French Gray. Photos by Larry Huene

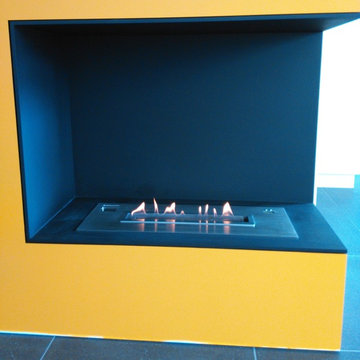
 Art Fireplace Technology Limited
Among the best in art ethanol fireplace design, the AF66 Remote Controlled Electronic Bio Ethanol Fireplace Insert is favored by architects, contractors and high-end designers and offers the discerning client unprecedented quality and safety. In addition to the same vent-free and clean burning flames as manual ethanol fireplace inserts, this art-Fire bio ethanol burner offers much more for both residential and commercial applications:
Remote Control Capability. Due to its electronic operation, powered by a twelve-volt power source, this ethanol fireplace insert may be ignited and extinguished through an on/off switch located on the burner itself, a one-button remote control or through your smart phone by integrating with your Smart Home System.
On-Board Safety Monitoring. The motherboard of this fireplace insert is safety-central. Constantly self-evaluating its operation, this intelligent burner reacts to any condition that appears atypical. Should it sense an excess amount of carbon dioxide emission or heat output, it will automatically cease operation, extinguish the flame and maintain the lock mechanism of the fuel chamber. Additionally, it will self-extinguish should it sense seismic motion or level of tilt making it a shock-proof device. Fuel and battery levels are also constantly evaluated for optimal performance and will give notification through the burner’s LED display, which will indicate operation times and alert you by sound and error message should an event occur.
Sturdy Construction. Constructed of Grade 304 stainless steel, the ethanol burner is corrosion resistant and exhibits excellent resistance to atmospheric, chemical and other exposures. Its top plate measures three millimeters in thickness (3/32 inches). This allows sturdiness, yet promotes a low profile. For added safety, the bioethanol fireplace AF66 offers insulated double hearth construction.
Separate Fuel Reservoir and Burner Tray. Continuing with the unprecedented safety features of this ethanol burner, excess fuel is housed in a sealed reservoir. This not only prevents fuel evaporation and the aromatic release of the raw ethanol, but lessens the amount of “exposed” fuel at any given time. Through a medical grade fuel pump, the ethanol is delivered into the burner tray. Only allowing the burner tray to manage a few centiliters of ethanol fuel at a given time promotes additional safety and minimizes the risk of fire-related dangers.
 Art Fireplace Technology Limited
Among the best in art fireplace design, the AF100 Remote Controlled Electronic Bio Ethanol Burner Insert is favored by architects, contractors and high-end designers and offers the discerning client unprecedented quality and safety. In addition to the same vent-free and clean burning flames as manual ethanol fireplace inserts, this art-Fire bio ethanol burner offers much more for both residential and commercial applications:
Remote Control Capability. Due to its electronic operation, powered by a twelve-volt power source, this ethanol fireplace insert may be ignited and extinguished through an on/off switch located on the burner itself, a one-button remote control or through your smart phone by integrating with your Smart Home System.
On-Board Safety Monitoring. The motherboard of this fireplace insert is safety-central. Constantly self-evaluating its operation, this intelligent burner reacts to any condition that appears atypical. Should it sense an excess amount of carbon dioxide emission or heat output, it will automatically cease operation, extinguish the flame and maintain the lock mechanism of the fuel chamber. Additionally, it will self-extinguish should it sense seismic motion or level of tilt making it a shock-proof device. Fuel and battery levels are also constantly evaluated for optimal performance and will give notification through the burner’s LED display, which will indicate operation times and alert you by sound and error message should an event occur.
Sturdy Construction. Constructed of Grade 304 stainless steel, the ethanol burner is corrosion resistant and exhibits excellent resistance to atmospheric, chemical and other exposures. Its top plate measures three millimeters in thickness (3/32 inches). This allows sturdiness, yet promotes a low profile. For added safety, the bio ethanol burner AF100 offers insulated double hearth construction.
Separate Fuel Reservoir and Burner Tray. Continuing with the unprecedented safety features of this ethanol burner, excess fuel is housed in a sealed reservoir. This not only prevents fuel evaporation and the aromatic release of the raw ethanol, but lessens the amount of “exposed” fuel at any given time. Through a medical grade fuel pump, the ethanol is delivered into the burner tray. Only allowing the burner tray to manage a few centiliters of ethanol fuel at a given time promotes additional safety and minimizes the risk of fire-related dangers.
8