
Search results for "Sealed" in Home Design Ideas


 All Surface Restoration
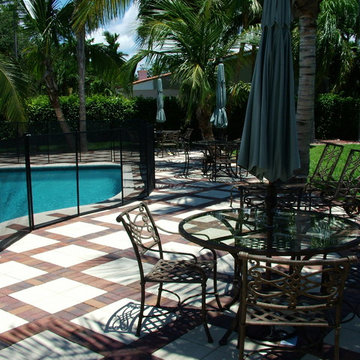
Since 1990, All Surface Restoration specialized in brick paver cleaning, washing, stripping, polymeric sand installation & sealing in Michigan. To request a free estimate visit: http://surfacerestoration.com/services/brick-paver-restoration/
or call 248-475-0004


Find the right local pro for your project

 Bliss Garden Design, LLC
Bliss Garden Design
Inspiration for a contemporary side yard gravel landscaping in Seattle.
Inspiration for a contemporary side yard gravel landscaping in Seattle.


 Tile Doctor Ltd
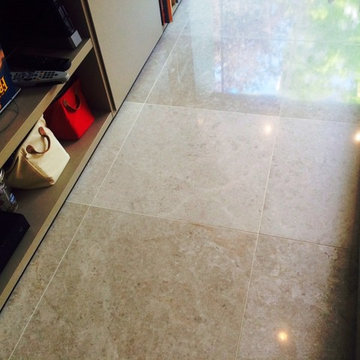
I was recently engaged to refresh the Limestone tiled floor at a house in St. John’s Wood, which is a very affluent area and apparently has the 5th most expensive postcode in London so as you can imagine this was a very expensive floor. The client had requested an improvement condition of the Limestone tiles in the living room and a thorough clean, polishing and seal was required. Over time, the floor in this busy living room – which was also used as a play area for young children – had become dirty and certainly worse for wear with all the use it had been getting. So, I set about my work to get this floor back to looking its best.
Cleaning and burnishing a Limestone floor
My initial task before beginning the cleaning process was to remove any furniture (as well as toys) from the room so I would have a clear area to work in. I then applied a layer of Tile Doctor Pro-Clean cleaner, diluted with water, to the floor. Pro-Clean is also suitable for use on other natural stone floors such as Slate, Granite and Travertine.
After leaving the solution to dwell for a period of a few minutes, I began to scrub the floor with a stiff hand brush. Whilst helping to remove a lot of the built up dirt on the surface of the tiles, the product also stripped off the old sealer and polish. Following this, I paid special attention to the dirty grout lines, cleaning them with Tile Doctor Oxy-Pro, a powerful, high-alkaline cleaner.
After completing the cleaning, I rinsed the floor with clean water to remove any excess cleaning products. I then began to burnish the floor using Tile Doctor Diamond encrusted burnishing pads. This was done in four steps, as I used four different pads (coarse, medium, fine and very fine) rinsing the floor with water between each pad. I would recommend using this setup of four pads for restoring the appearance of polished stone floors; you starting with a coarse pad and the gradually work your way up to the very fine pad achieving a high polish finish in the process. I finished of the process with a quick rinse and a buffing pad to give the floor a final polish before I commenced the sealing.
Sealing a Limestone floor
My choice of sealer was Tile Doctor Colour Grow, which is specifically designed to not only provide durable surface protection, but also to intensify the colour of the tiles. The sealer penetrates deep into the pores of the stone, providing water resistance and long-term protection from ingrained dirt and stains. As you can see from the photos, the sealer really helped to accentuate the fantastic natural colours in the Limestone.
My client was very pleased with the final result, and was amazed by how quickly I had been able to improve the state of her floor which, with a colourful and shiny finish, has really brightened up the living room.
Sponsored
Delaware, OH

Buckeye Basements, Inc.
Central Ohio's Basement Finishing ExpertsBest Of Houzz '13-'21



 All Surface Restoration
Since 1990, All Surface Restoration specialized in brick paver cleaning, washing, stripping, polymeric sand installation & sealing in Michigan. To request a free estimate visit: http://surfacerestoration.com/services/brick-paver-restoration/
or call 248-475-0004
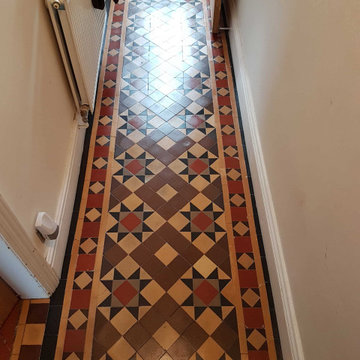 Tile Doctor Ltd
This client had just moved into a property in York and having pulled back the old carpet revealed a lovely old period Victorian tiled floor she didn’t know existed when she bought the house!
I went over at the beginning of this year to survey the floor and could see that fortunately, no glue or carpet grips had been used to secure the carpet; additionally the floor was in good physical condition considering its age with no cracks or loose tiles. The tiles were however very dusty and dirty with ingrained dirt and so had probably been covered with carpet for a very long time. The hallway was quite dark I’m afraid with little natural light so apologies for the photographs.
With old houses like this you never know what you are going to find so whilst I was there surveying the floor, I took some moisture readings with a damp meter on the floors and walls. The readings came back low so no sign of damp which was a relief to the owner.
We agreed a price for the work, and I arranged to come back the following week.
I must admit I do like York, its steeped in history and famous for its Cathedral and Viking museum. The houses in the city have loads of character and period features like this floor are quite common.
I deep cleaned the floor with a strong 1:3 dilution of Tile Doctor Pro-Clean worked in with a black scrubbing pad fitted to a rotary machine. Initially the solution was left to soak into the tile before being agitated by the machine. The soil was then rinsed off with minimal water and then extracted with a wet vacuum.
I followed this up with an Acid Wash using Tile Doctor Acid Gel to further clean up the tiles and help inhibit any potential efflorescent salt issues which are common in floors of this age due to the absence of the damp proof membrane. The floor was given a further rinse and extraction and allowed to dry out fully overnight. I needed the floor to be dry for the next day so it could be sealed.
I came back the next day and started by taking more damp readings which showed similar readings to the day before. Given the low readings I was able to move straight onto sealing which was done using four coats of Tile Doctor Seal and Go. This product works really well on old Victorian Tiles like these and being water based it doesn’t leave a smell as it dries.
Once the final coat of sealer had dried there was a significant improvement in the appearance of the floor which was much appreciated by client who was very happy with the end result.
For aftercare I recommended the use of Tile Doctor Neutral Tile Cleaner to maintain the floor, it has a nice fresh smell and can be used regularly due to its pH neutral nature which won’t prematurely erode the sealer like stronger bleach based cleaners.
Nigel Stoker
North West Yorkshire Tile Doctor


 Chicago Green Design Inc.
This small but very detailed space has all the wonderful accommodations needed for an urban rooftop. Flat screen TV, grill, heat lamp, fire table, and storage. We took the pattern from the chair and recreated it in the fire table. This custom table ties it all together nicely. All while siting in a lush garden that surrounds the seating area. Making it cozy and colorful.

 Everything Home
Unique textures, printed rugs, dark wood floors, and neutral-hued furnishings make this traditional home a cozy, stylish abode.
Project completed by Wendy Langston's Everything Home interior design firm, which serves Carmel, Zionsville, Fishers, Westfield, Noblesville, and Indianapolis.
For more about Everything Home, click here: https://everythinghomedesigns.com/

 Gappsi
Patio, walkway, and front steps were built by Gappsi in Wyandanch Long Island, NY in Suffolk County. The stone used is over-sized ridge brick and ridge circle pavers in a golden brown blend. The pavers are mixed randomly in square and rectangular sizes. This stone has a textured riven surface and slightly chamfered edges. The sealing process begins with pressure washing the entire patio, removing all dirt and debris from the stone surface and in between the joints. Next, Nexgel Techniseal synthetic sand is applied in between the pavers joints and vibrated with a mechanical plate compactor. The plate compactor has rubber rollers to prevent the stones from cracking or scratching. This vibrating process allows the sand to fall in between the joints to densify. Then, we clean the pavers with brooms and landscape blowers, to clean the excess sand from the pavers surface and to evenly spread the sand in between the pavers joints. The next step is to wash the pavers by misting water to penetrate the synthetic sand into the paver joints all the way down below the pavers. The sand and water activate a chemical reaction of the pollen that's in the sand to cause the sand to harden. Finally, the application of the sealer. A two parts components urethane dealer, specially formulated for Gappsi, is applied to the pavers surface and the sand joints to prevent stones from staining, extend their life cycle and further enhance their texture, color, and surface.
https://www.youtube.com/watch?v=Z2t3swbuYXo

 All Surface Restoration
 specializes in stamped colored concrete maintenance, restoration & preservation. We offer complete stamped concrete cleaning, stripping, sealing services. To request a free estimate visit: http://surfacerestoration.com/services/stamped-colored-concrete-restoration/ or call 248-475-0004

 ísARK Studio
It was important to isARK establish a welcoming approach to the home. The grand terraced steps lead you to the unmistakable new front entry and into the foyer.

46