
Search results for "Self acceptance" in Home Design Ideas
 Studio M Interiors
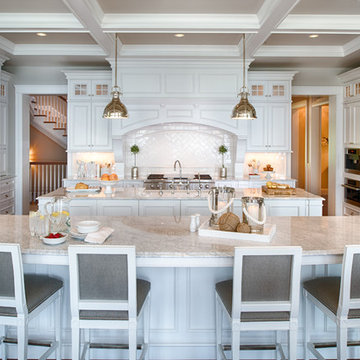
Kitchen - traditional u-shaped dark wood floor kitchen idea in Minneapolis with recessed-panel cabinets, white cabinets, white backsplash, two islands, granite countertops and ceramic backsplash
 Lauren Rubin Architecture
Alyssa Kirsten
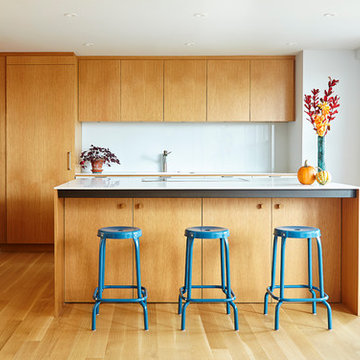
Eat-in kitchen - mid-sized contemporary l-shaped light wood floor eat-in kitchen idea in New York with flat-panel cabinets, light wood cabinets, white backsplash, stainless steel appliances, an island, an undermount sink, solid surface countertops and glass sheet backsplash
Eat-in kitchen - mid-sized contemporary l-shaped light wood floor eat-in kitchen idea in New York with flat-panel cabinets, light wood cabinets, white backsplash, stainless steel appliances, an island, an undermount sink, solid surface countertops and glass sheet backsplash
 Rev-A-Shelf
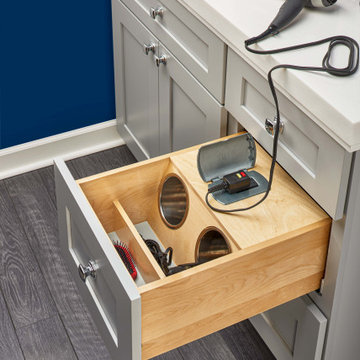
Make the mess of a cluttered vanity a thing of the past with Rev-A-Shelf's outlet drawer. Store hair dryers and curling irons in one easy to access location and additional compartments are perfect for organizing beauty products. With the integrated outlet you always have a free receptacle to plug items in.
Find the right local pro for your project

 Sub-Zero, Wolf, and Cove Showroom Columbia
Jay Greene Photography
Kitchen - transitional l-shaped light wood floor kitchen idea in Baltimore with an undermount sink, gray cabinets, marble countertops, white backsplash, stone tile backsplash, paneled appliances, an island and white countertops
Kitchen - transitional l-shaped light wood floor kitchen idea in Baltimore with an undermount sink, gray cabinets, marble countertops, white backsplash, stone tile backsplash, paneled appliances, an island and white countertops
 Rebecca Loewke Interiors
Michele Lee Willson
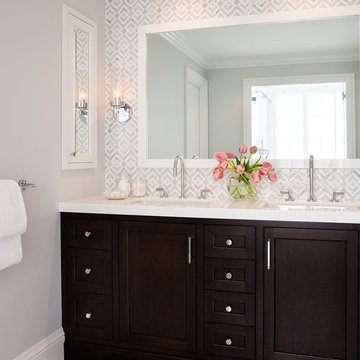
Inspiration for a transitional white tile and stone tile marble floor bathroom remodel in San Francisco with dark wood cabinets, gray walls and shaker cabinets
Inspiration for a transitional white tile and stone tile marble floor bathroom remodel in San Francisco with dark wood cabinets, gray walls and shaker cabinets

 Mark Huff
Keep all of your friends, family, and party guests happy with Allavino's all-new VSWB15-3SST FlexCount Series Side-by-Side Wine and Beverage Center, which has 3 distinct temperature zones that can store red wine, white wine, beer, and soda simultaneously. This beverage center is made up of one beverage refrigerator and one dual-zone wine refrigerator with opposite hinged doors, which are each independently controlled using their own intuitive digital display with push button controls. For maximum convenience, this unit has a front-venting design that can be built-in to cabinetry or used freestanding, and features Allavino's innovative FlexCount shelving that resists sagging while providing more space between shelves than other similarly sized beverage centers.
Store Beverage Cans, Standard Beer Bottles, and Wine Bottles:The VSWB15-3SST has 6 shelves that hold up to 5 wine bottles each, 3 shelves that hold up to 24 cans each, and a bottom shelf that can hold up to 16 cans each for a possible storage capacity of 30 wine bottles and 88 12-oz. beverage cans. The beverage center zone's top shelf can also hold up to 28 standard beer bottles, allowing you to store a wide variety of up to 28 beer bottles, 64 cans, and 30 wine bottles.Digital Display and Controls:Independently control the temperature in all three storage zones using two digital displays with intuitive push-button controls, which take the guesswork out of storing all of your beverages at their optimum temperatures.Blue LED Interior Lighting:Activate the cool blue LED light at the push of a button to elegantly illuminate your collection. LED lights are cooler than standard incandescent bulbs, preventing harmful heat from spoiling your beverages.Innovative New Shelf Design:Allavino's new state-of-the-art shelving design features a durable metal construction that is strong enough to resist sagging, yet is thin enough to allow more space between shelves for maximum storage.Shelves Extend Effortlessly:Every one of Allavino's FlexCount Series shelves glides out smoothly on ball-bearing tracks to make accessing your favorite beverage easier than ever.Built-In Design:The VSWB15-3SST's front-venting design gives you the freedom to build it into your cabinetry or use it as a stylish freestanding unit in any room of your home, so you can have refreshments on hand wherever you need them most.
Height: 33.5"
Width: 30"
Depth: 24"
Unit Weight: 185.2 lbs.
Shipping Weight: 198.4 lbs.
Built-In Capable: Yes
Security Lock: Yes
Multiple / Dual Zone: Yes
Beverage Center: Yes
Cabinet Color / Material: Black Metal
Ada Compliant: No
Commercial Use: Yes
Outdoor Use: No
Energy Star Rated: No
Wine Bottle Count: 30
12-Oz. Can Capacity: 88
Adjustable Thermostat: Yes
Digital: Yes
Type: Compressor
Defrost System: Auto
Front Ventilation: Yes
Type: Glide Out
Number Of Shelves: 10
Material: Metal
Removable: Yes
Adjustable: No
Glide-Out (Roller Assemblies): Yes
Color: Black
Compartments (Distinct Zones): 3
Lighting: Yes
Type: Glass
Number Of Doors: 2
Color / Material: Stainless Steel Frame
Door Handle: Towel Bar
Field Reversible: No
Accepts Custom Panel: No
Tinted / Uv Protective: Yes
Self-Closing: No
Electrical Requirements: 115v / 60 Hz
Running Amps: 2.3 A
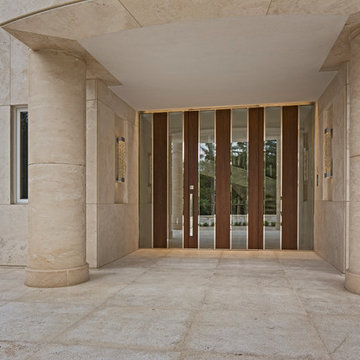
 Vogue furniture
This front entry was originally designed to accept a pair of centered doors with side lights. We chose to approach the entire opening as a single composition creating vertical slabs of walnut separated by ribbons of clear glass, emulating a view through a forest of trees. In order to achieve the illusion of floor to ceiling uninterrupted elements, a complex polished stainless steel framework was engineered and machined to provide the perimeter structure. The polished stainless steel framework incorporates a concealed in floor, self closing hinge for the large center pivot door. This installation incorporated a variety of materials combining engineered walnut panels, insulated glass, machined polished stainless steel and stone surround coordination. Approaching the entrance you are greeted with a multifaceted composition enticing you to enter and experience the rest of this Young & Young architectural masterpiece located in Bloomfield Hills, Michigan completed in September of 2016.


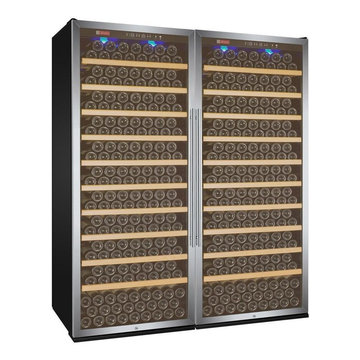 Mark Huff
With versatile adjustable shelves, a massive storage capacity, and plenty of innovative features, Allavino's all-new 2X-YHWR305-1ST Dual-Zone Wine Cellar Refrigerator is the answer to all of your wine storage needs. Made up of two single zone 305-bottle wine refrigerators with opposite hinged doors, it can store an impressive 610 bottles of red and white wine in two distinct zones, each independently controlled using a clear digital display with user-friendly push button controls. Thanks to storage shelves that can be adjusted in 1-1/4" increments to accommodate larger bottles, you are no longer limited in the types of wine that you can store, allowing you complete customization for your personal storage needs.
Dual-Zone Digital Temperature Control:The 2X-YHWR305-1ST features two individual temperature zones that can each be set between 41°F and 72°F, allowing you to store all red, all white, or both red and white wines depending on your needs. Each zone is adjusted using a digital display with push button controls that make controlling your wine's environment easier than ever. For added convenience, you can easily monitor the lighted temperature displays through the glass at any time without needing to open the doors.
Fan-Forced Cooling:To provide additional cooling and help prevent large differences in temperature between the upper and lower zones, internal fans circulate air throughout the cabinets. These fan reduce initial cool down time by 50% and create a frost-free environment so you will not have to hassle with defrosting the unit.
Blue LED Interior Lights:Find the perfect bottle quickly and easily thanks to the YHWR305-1ST's cool blue LED lights, which illuminate your bottles without the heat created by incandescent bulbs. You can leave these lights on to show off your collection without needing to worry about a harmful hot spot affecting your wine.
Easy Rolling Hardwood Shelves:This wine cellar can safely store up to 610 standard size wine bottles on it's extra thick hardwood shelves, which glide-out smoothly on ball bearing tracks to provide easy access to every bottle. Twenty shelves can store up to 28 standard size bottles each, and two bottom shelves can store larger bottles or up to 25 standard bottles. Each shelf can be adjusted in 1-1/4" increments to accommodate larger diameter bottles.
Tinted Glass Door with Lock:Frost-free and condensation-free UV-protected glass doors provide an excellent view of your wine while keeping it safe from harmful light. The door comes equipped with a built-in key lock for added security, and two keys are included so that you can always have a spare on hand.
Height: 78-1/2"
Width: 63"
Depth: 27-1/2" (29-1/4" w/Handle)
Unit Weight: 650 lbs. (2 units - 325 lbs. each)
Labor: 1 Year
Parts: 1 Year
Compressor (Parts Only): 5 Years
Built-In Capable: No
Security Lock: Yes
Multiple / Dual Zone: Yes
Beverage Center: No
Cabinet Color / Material: Black
Ada Compliant: No
Commercial Use: No
Outdoor Use: No
Energy Star Rated: No
Wine Bottle Count: Up to 610 Bottles
Adjustable Thermostat: Yes
Digital: Yes
Type: Compressor
Defrost System: Auto
Front Ventilation: No
Type: Wood Presentation
Number Of Shelves: 20
Material: Hardwood
Removable: Yes
Adjustable: Yes
Glide-Out (Roller Assemblies): Yes
Bottles Per Shelf: 28
Color: Black
Compartments (Distinct Zones): 2
Lighting: Blue LED
Type: Glass
Number Of Doors: 2
Color / Material: Stainless Steel Frame
Door Handle: Towel Bar
Field Reversible: NO
Accepts Custom Panel: NO
Tinted / Uv Protective: Yes
Self-Closing: No
Dimensions
Height
78-1/2"
Width
63"
Depth
27-1/2" (29-1/4" w/Handle)
Weight
Unit Weight
650 lbs. (2 units - 325 lbs. each)
Warranty
Labor
1 Year
Parts
1 Year
Compressor (Parts Only)
5 Years
Key Features
Built-in Capable
No
Security Lock
Yes
Multiple / Dual Zone
Yes
Beverage Center
No
Cabinet Color / Material
Black
ADA Compliant
No
Commercial Use
No
Outdoor Use
No
Energy Star Rated
No
Capacity
Wine Bottle Count
Up to 610 Bottles
Controls
Adjustable Thermostat
Yes
Digital
Yes
Cooling System
Type
Compressor
Defrost System
Auto
Front Ventilation
No
Shelving
Type
Wood Presentation
Number of Shelves
20
Material
Hardwood
Removable
Yes
Adjustable
Yes
Glide-Out (Roller Assemblies)
Yes
Bottles per Shelf
28
Interior
Color
Black
Compartments (Distinct Zones)
2
Lighting
Blue LED
Door
Type
Glass
Number of Doors
2
Color / Material
Stainless Steel Frame
Door Handle
Towel Bar
Field Reversible
NO
Accepts Custom Panel
NO
Tinted / UV Protective
Yes
Self-Closing
No

 Tile Doctor Ltd
We received a request to renovate Victorian tiled hallway floor at a house in the London borough of Harlesden NW10. My client had modernised the heating system and this unfortunately required a section of the tiled flooring to be dug up so new pipework could be laid.
After speaking on the phone, I arranged an initial visit to the property so I could properly assess the work required and provide a price for restoring the floor. During my visit I could see there was another section of missing tiles at one of the door thresholds which would need attention. Except for the missing sections of floor I could see that the tiles themselves were in good condition for their age and would respond well to a deep clean and fresh seal.
I was confident on being able to source matching replacements for the missing tiles and reassured my client that we would be able not only repair the floor but also renovate it to a good standard. I gave them a price to do the restoration which they were happy to accept, and the work was booked.
After some research I managed to source replacement tiles from the Vintage Floor Tile Company in Kent; Victorian tiles are still popular so there a few companies that keep stock so we can usually find a match.
With the replacements in hand, work started by removing the cement and loose material from the missing sections of flooring and backfilling with self-levelling compound to bring the exposed base up to the right level for tiling.
The tiles were then cut to shape as required to match the existing patten and fixed into place with a quick setting adhesive and then grouted.
The floor was left to overnight to allow the adhesive to harden fully, and I returned the next day to deep clean the whole floor. To give the tiles are deep clean a strong dilution of Tile Doctor Remove and Go was sprayed onto the floor and left to soak in for ten minutes. It was then scrubbed into the floor using a rotary machine fitted with a with a black pad. This action lifted the dirt out of the tiles and the resulting slurry was removed with the wet vacuum.
It turned out that the pores of the tiles were holding a lot of dirt, so the process was repeated until I was satisfied. Due to the age of the property, there was no damp-proof membrane installed so I do try to minimise the amount of water I use in this process as there is always a chance of exacerbating any latent efflorescence issues.
Efflorescence occurs where moisture rises through the tile bringing with it salts from underneath the floor as it evaporates on the surface. This can lead to unsightly white marks appearing on the tile. To counteract this potential problem the cleaning was followed by an acid wash using Tile Doctor Acid Gel applied with a 100 then 200-grit pad, before finishing on a 400-grit burnishing pad. The floor was again rinsed with water after the application of each pad to remove the slurry and extracted with a wet vacuum.
Once I was satisfied the floor was as clean as possible, we left site and the area was left to dry over the weekend ready for application of a new sealer.
I returned on the Monday and started by taking a few moisture readings to check the floor was dry. The floor was in an acceptable range, so I applied the first of 4 coats of sealer. For this floor I chose Tile Doctor Seal and Go Extra which is specially formulated product that provides stain resistance with a hard wearing low-sheen finish.
This product is also breathable which is an important feature for old floors, anything that blocks moisture from rising through the tile will cause it to become trapped underneath where it will pool and eventually reach out to the walls and result in rising damp.
Once complete the floor looked brand new and I’m pleased to say with the deep clean and a fresh sealer applied it was impossible to tell the difference between the original and repaired sections of flooring.
For the aftercare of sealed Victorian tiled floors, I recommend Tile Doctor Neutral Cleaner, it’s a mild day to day cleaner with a neutral pH that won’t damage the sealer. Many of the tile cleaning products you find in supermarkets are simply too strong.
Andrew Newstead
North London Tile Doctor
 Tile Doctor Ltd
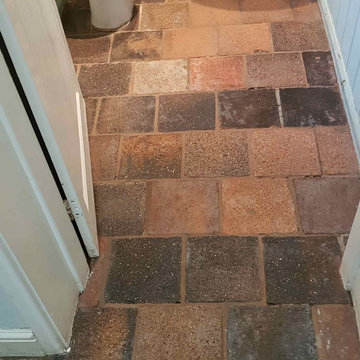
We were contacted by a client from Formby asking for advice on how to remove a thick layer of floor leveller from her Quarry tiled floor. I suspect at some point in the past a previous owner had decided to cover the tiles with lino and a cement-based levelling compound was applied to level the floor first. My client had tried to remove it herself but found it very hard going and after realising she had quite a project on her hands decided to call us instead and see if we could help with the restoration.
I worked out a quote for the client which would include removing the self-levelling compound, cleaning up the tiles and then sealing them to improve its appearance and protect it going forward. The quote was accepted, and a date agreed for the restoration to be completed which would take two days.
We have a variety of tools that we can use for removing cement but in this case, I decided to use an air operated pin gun. The head of the gun has long pins of different length which are fired at the floor gently chipping away at the floor compound, this made short work of breaking up the cement so it could be swept away. A lot easier than the method the client had previously tried.
With the floor clear of cement, it was given an acid wash with Tile Doctor Acid Gel scrubbed in with a buffing machine fitted with a black pad. The acidic formula cleans up the stone of old cement including fine particles of dust. Afterwards the gel was rinsed off the floor with water and extracted with a wet vacuum.
We let the floor dry out overnight and returned the next morning to apply the sealer. For the best results, the stone needs to be dry so before sealing I always take several moisture readings with a damp meter to make sure. The results were good so the first of what would be three coats of sealer were applied to the floor. I used Tile Doctor Colour Grow for sealing, it is an impregnating sealer that works by occupying the pores in the store thereby protecting it from within, it also brings out the colour in the stone.
Once done the floor looked great, the old self-levelling compound was gone and the rich colours in the tile had been restored. In fact is was only when finished did we realise these were in fact Baked Clay Quarry Tiles, minerals are added during manufacturing to give then colour, although 95% clay they are very tough like stone. The client was over the moon with the outcome, the floor had been restored to its’ former glory.
For aftercare I recommended the use of Tile Doctor Neutral Tile Cleaner to keep the floor in good condition. It is pH neutral so will ensure the newly applied sealer is not compromised and the floor will continue to look good for a long while to come.
Andrew Robb
Merseyside Tile Doctor
 Tile Doctor Ltd
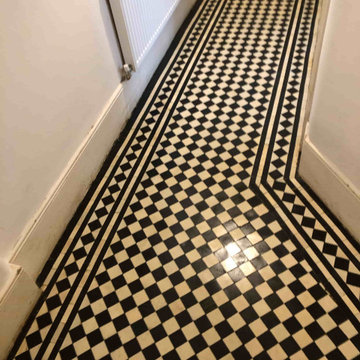
This property was in theLadbroke Grove area of West London near Kensington. The client had found an old and probably original black and white checkered pattern Victorian tiled floor under their cork tiled flooring. They also reported that it was badly damaged so I thought it would be best if I paid them a visit first to see how extensive the damage was and whether it was repairable. The floor was in a quite a state, the tiles were covered in glue from the cork and had several areas had been back filled with cement.
I reassured them that the damage could be rectified, and that it would be possible to completely restore the floor back to a good standard. I would have to remove the glue, remove the cement that had been used to level the floor and replace with reclaimed tiles to match. They were relieved to find out it could be done and happy with my quote I was instructed to go ahead with the work.
We started by taping up the skirting boards to protect the woodwork. With this done attention was turned to the glue which was softened using a strong dilution of Tile Doctor Remove and Go so it could be carefully scraped off. Multiple techniques and tools were needed to remove the glue including hand-held scrappers and a black pad fitted to a buffing machine. For the stubborn areas steam was applied to help lift the adhesive out the tile.
Once all the glue was removed the floor was rinsed and the alkaline cleaner neutralised with Tile Doctor Grout Clean Up which further cleaned the tiles and removed old traces of grout from the floor. Old floors like this generally don’t have a damp proof membrane underneath so the acids in the Grout Clean-up also counter any efflorescent salts trapped in the tile.
Once this was completed the slurry was removed with a wet vacuum and left to fully dry out overnight.
The following day focus turned to repairing the areas of the floor where the tiles were missing or broken. The main issue being the cemented areas, we see this a lot with Victorian Hallways and generally what happens is a heating engineer digs out the floor to install pipework. Not being tilers, your average plumber then repairs the floor with a self-levelling cement that brings the level up to the surface of the tile so it can be covered with lino, carpet of in this case cork.
The sub floor was then rebuilt with rapid setting self-levelling compound but this time to below the level of the tile.
Once the new base was dry it was a just a question of re-tiling with the replacement tiles to match the original checkered pattern. The replacement reproduction tiles were sourced from Original Features in Crouch End North London. After grouting we left the floor to dry out over the weekend.
When we returned to seal the floor our first step was to check the floor was dry using a moisture meter. This is critical as the sealant will not cure correctly if there is too much moisture in the floor. In this case the extra two days we had allowed had done its job and the test had confirmed it was ready to accept a sealer.
The client wanted the floor finish not to be too shiny once sealed so we opted to seal with two coats of Tile Doctor Seal and Go Extra. This is good choice for old Victorian floors such as this example as it’s special acrylic-based formula allows for moisture vapour transmission which as mentioned previously is a concern where no damp proof membrane has been installed.
I’m please to confirm my clients were delighted with the result, as you can see from the pictures the black and white floor restoration makes for a dramatic entrance well in keeping with the style of the property. For aftercare I recommended the use of Tile Doctor Neutral Tile Cleaner which will keep the tiles in good condition going forward without damaging the new sealer.
Jackson Davis
Central London Tile Doctor
 Natural Stone Institute
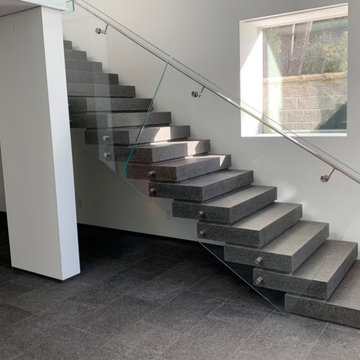
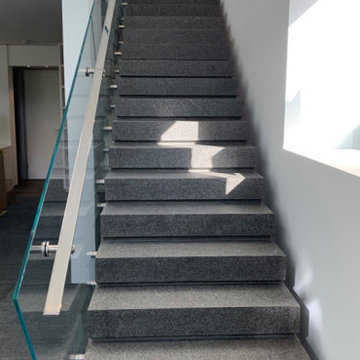
No greater compliment of a material is possible than when stone is selected for a historic property renovation within a home rich in tradition and with a celebrated past. This new feature stair addition to a private residence in Toronto, Canada, has an equally compelling story to tell.
Originally envisioned as a wall-supported, cantilevered stone stair, the owner boldly accepted a unique solution for their showpiece element. The 19-tread stair would be designed with 550 lb. solid stone treads, and fully
liberated from traditional supports and the adjacent rubble wall. To say, “it would float” is not an exaggeration. The stair would be designed as a monolithic beam spanning 16.5 feet, 10 feet high and 41 inches wide. Aesthetically bold, with a reduced tone from
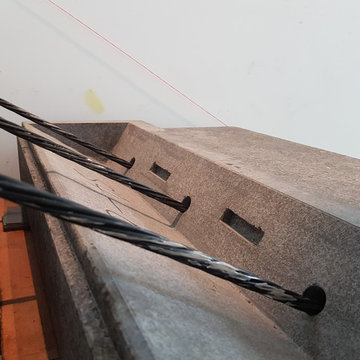
pure black, the basalt stone was the perfect contrast for the white modern interior of the home. The 3-1/2" tension cables played the most important role by resisting the large bending moment generated by the stone load and stair geometry. Fabrication required precise coordination and care to ensure perfect alignment of the interlocking key, and the corresponding cable holes.
The fabrication challenge was achieving the highest level of accuracy in notching, coring, and replicating each tread identically. Expert precision and skill were key to nesting each tread in sequence and simultaneously with the strands. Meticulous alignment and exacting tolerance assured the true performance and aesthetics were delivered. Hydraulic post-tensioning pulled each cable to 120 kiloNewtons or 27,000 lbs, infusing strength and structural integrity. Removing the temporary support and testing was the last critical step—it was the first time the stone stair would be self-supporting.
The “floating” stair is an ultimate achievement and example of innovation, material strength, fabrication quality, installation precision, and expert coordination. A perfect final chapter to a historical journey and modern ode to stone as structure.
 Natural Stone Institute
No greater compliment of a material is possible than when stone is selected for a historic property renovation within a home rich in tradition and with a celebrated past. This new feature stair addition to a private residence in Toronto, Canada, has an equally compelling story to tell.
Originally envisioned as a wall-supported, cantilevered stone stair, the owner boldly accepted a unique solution for their showpiece element. The 19-tread stair would be designed with 550 lb. solid stone treads, and fully
liberated from traditional supports and the adjacent rubble wall. To say, “it would float” is not an exaggeration. The stair would be designed as a monolithic beam spanning 16.5 feet, 10 feet high and 41 inches wide. Aesthetically bold, with a reduced tone from
pure black, the basalt stone was the perfect contrast for the white modern interior of the home. The 3-1/2" tension cables played the most important role by resisting the large bending moment generated by the stone load and stair geometry. Fabrication required precise coordination and care to ensure perfect alignment of the interlocking key, and the corresponding cable holes.
The fabrication challenge was achieving the highest level of accuracy in notching, coring, and replicating each tread identically. Expert precision and skill were key to nesting each tread in sequence and simultaneously with the strands. Meticulous alignment and exacting tolerance assured the true performance and aesthetics were delivered. Hydraulic post-tensioning pulled each cable to 120 kiloNewtons or 27,000 lbs, infusing strength and structural integrity. Removing the temporary support and testing was the last critical step—it was the first time the stone stair would be self-supporting.
The “floating” stair is an ultimate achievement and example of innovation, material strength, fabrication quality, installation precision, and expert coordination. A perfect final chapter to a historical journey and modern ode to stone as structure.
 Natural Stone Institute
No greater compliment of a material is possible than when stone is selected for a historic property renovation within a home rich in tradition and with a celebrated past. This new feature stair addition to a private residence in Toronto, Canada, has an equally compelling story to tell.
Originally envisioned as a wall-supported, cantilevered stone stair, the owner boldly accepted a unique solution for their showpiece element. The 19-tread stair would be designed with 550 lb. solid stone treads, and fully
liberated from traditional supports and the adjacent rubble wall. To say, “it would float” is not an exaggeration. The stair would be designed as a monolithic beam spanning 16.5 feet, 10 feet high and 41 inches wide. Aesthetically bold, with a reduced tone from
pure black, the basalt stone was the perfect contrast for the white modern interior of the home. The 3-1/2" tension cables played the most important role by resisting the large bending moment generated by the stone load and stair geometry. Fabrication required precise coordination and care to ensure perfect alignment of the interlocking key, and the corresponding cable holes.
The fabrication challenge was achieving the highest level of accuracy in notching, coring, and replicating each tread identically. Expert precision and skill were key to nesting each tread in sequence and simultaneously with the strands. Meticulous alignment and exacting tolerance assured the true performance and aesthetics were delivered. Hydraulic post-tensioning pulled each cable to 120 kiloNewtons or 27,000 lbs, infusing strength and structural integrity. Removing the temporary support and testing was the last critical step—it was the first time the stone stair would be self-supporting.
The “floating” stair is an ultimate achievement and example of innovation, material strength, fabrication quality, installation precision, and expert coordination. A perfect final chapter to a historical journey and modern ode to stone as structure.
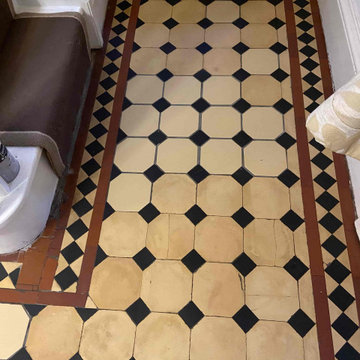 Tile Doctor Ltd
Detailed below is the restoration of a Victorian tiled hallway floor that we started back in June in Preston. Although we started in June there was so much damage to the subfloor and the tiles it took some time to complete, additionally, the client did not like the colour samples of the replacement tiles we had brought along and so decided to source their own which took some time.
Three months later with replacement tiles now sourced we were given the go ahead to start the restoration. The first day’s focus was cleaning the original floor using very coarse 100-grit and 200-grit Diamond pads fitted to a rotary buffer machine and applied to the floor using a strong dilution of Tile Doctor Remove and Go to add extra cleaning power. Tile edges were given special attention using a flex machine fitted with small diamond grit pads.
The floor was rinsed with water to remove the soil generated and this was followed up with an acid rinse using a 1:3 dilution of Tile Doctor Grout Clean Up. This last step in the cleaning process is especially recommend for old floors like this which don’t have a damp proof membrane and can suffer from efflorescence issues.
The next stage focused on repairing the floor and started by carefully knocking out all the broken and chipped tiles. We had previously estimated over 30 tiles needed replacing and so the client had bought two boxes, meaning I had plenty of spares to work with.
Before tiling however, the subfloor had suffered over the years and needed attention first. To deal with this the damaged areas were raked out, cleaned up and then back filled with rapid setting self-levelling screed from Mapie adhesives. Once the sub-base was fixed then we put the new tiles back in, they were not an exact match, about 5mm too short and lighter in tone, but the colour was pretty close.
Tiling an old Victorian floor like this can be a bit like dominoes as you move one out of place 2 decent ones come loose and then they also need refixing. Some of the tiles had hair line cracks in them and once they were loose, they just cracked in half. As such the 20 spare tiles that I thought were spare came into good use and I actually ended up using all of them. I could have done with a few more so it was decided to reset the last four broken tiles and grout them in. Luckily for me the client was very understanding about the nature of tile restoration and had accepted that there would be some imperfections and they were not expecting a new floor.
The Tiles were fixed down using Ultralite Rapid Flex (another product from Mapie) and then grouted using the same adhesive (not a grout, as they did not have grout back in the day, just cement and screed).
The floor was left this to cure overnight, and we came back the next day to finish the clean using a 200-grit diamond pad fitted to a buffing machine and lubricated with water, then one last acid rinse to get the tiles as clean as possible and remove any lingering grout haze. This last clean helps to blend the new tiles in with the original.
Before applying a protective sealer, the floor was left to dry for a couple of days, the tiles need to be thoroughly dry before sealing or you can end up with a patchy appearance.
For this floor with no damp proof membrane, it was important to use a fully breathable sealer that will allow moisture to rise through the tile and evaporate at the surface, so Tile Doctor Colour Grow was chosen. This is a good choice for old floors like this as its fully breathable, head wearing, and it contains a colour enhancer that improves the overall appearance of the tile.
Three coats of Tile Doctor Colour Grow which is a fully breathable, colour enhancing sealer hat works by soaking into the pores of the tile protecting it from within. It has a matt finish, and it works really well with all clay tiles and is ideal for these types of floors.
You can probably spot the lighter coloured tiles in the after photos on this page, however it’s a very subtle difference and I think they have blended in quite well with the original. Certainly, my client was very pleased with the newly restored floor, its completely transformed from when we first visited the client, and the floor has now gained character and history. For aftercare we recommend Tile Doctor Neutral Cleaner, its an effective pH neutral product that is compatible with the new sealer.
Russell Taylor
Lancashire Tile Doctor
 Tile Doctor Ltd
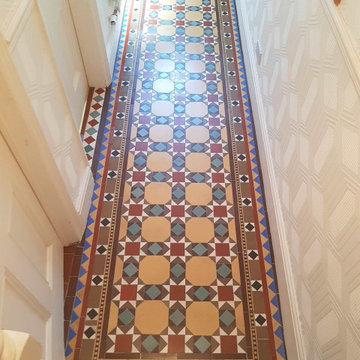
Recently we were asked to quote on restoring a Victorian tiled hallway floor in one of the large houses in the North Wales seaside resort of Rhos-on-Sea. It was a lovely period property that overlooked the sea and the floor a fine example of Victorian tiling and a real asset to the property.
Naturally, we have to take precautions when visiting properties these days, especially when surveying floors inside properties however we have amended our working practices to include more PPE and social distancing and so its not a problem.
On first impressions the floor looked to be in good order however it had some broken and loose tiles that needed replacing and then the floor given a good clean and seal. Fortunately, Victorian tiles are still popular, and you can find replacements, I also know that difficult to source tiles can often be found by asking other Tile Doctors many of whom have quite a collection. A quote was given for the work, which was accepted, and a date set to commence the work which would take three days.
Rhos-on-Sea is a very picturesque town situated between Llandudno and Colwyn Bay by passed by north wales main trunk road A55 leading to the main ferry port of Holyhead to Ireland. When you turn off the A55 into Rhos-on-Sea your transferred to a large seaside promenade with a wide walkway which is used by the towns many retired residents who appreciate the splendid coastal views.
The first job was to cut out and remove the damaged tiles then prepare the subbase with rapid set self-levelling compound to take the new tiles. Once this had set, I was able to cut and fit the replacements. There were a few areas that needed attention and so this work took up by most of the first day.
Once the sealer was dry, we were able to let the owner see the result who was really pleased and apparently has since received many compliments. For aftercare we recommend using Tile Doctor Neutral Cleaner which has a effective neutral pH formula that won’t prematurely erode the sealer with use like stronger products you find in supermarkets.
Andrew Robb
North Wales Tile Doctor
 Natural Stone Institute
No greater compliment of a material is possible than when stone is selected for a historic property renovation within a home rich in tradition and with a celebrated past. This new feature stair addition to a private residence in Toronto, Canada, has an equally compelling story to tell.
Originally envisioned as a wall-supported, cantilevered stone stair, the owner boldly accepted a unique solution for their showpiece element. The 19-tread stair would be designed with 550 lb. solid stone treads, and fully
liberated from traditional supports and the adjacent rubble wall. To say, “it would float” is not an exaggeration. The stair would be designed as a monolithic beam spanning 16.5 feet, 10 feet high and 41 inches wide. Aesthetically bold, with a reduced tone from
pure black, the basalt stone was the perfect contrast for the white modern interior of the home. The 3-1/2" tension cables played the most important role by resisting the large bending moment generated by the stone load and stair geometry. Fabrication required precise coordination and care to ensure perfect alignment of the interlocking key, and the corresponding cable holes.
The fabrication challenge was achieving the highest level of accuracy in notching, coring, and replicating each tread identically. Expert precision and skill were key to nesting each tread in sequence and simultaneously with the strands. Meticulous alignment and exacting tolerance assured the true performance and aesthetics were delivered. Hydraulic post-tensioning pulled each cable to 120 kiloNewtons or 27,000 lbs, infusing strength and structural integrity. Removing the temporary support and testing was the last critical step—it was the first time the stone stair would be self-supporting.
The “floating” stair is an ultimate achievement and example of innovation, material strength, fabrication quality, installation precision, and expert coordination. A perfect final chapter to a historical journey and modern ode to stone as structure.

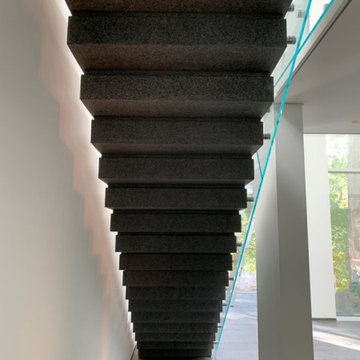 Natural Stone Institute
No greater compliment of a material is possible than when stone is selected for a historic property renovation within a home rich in tradition and with a celebrated past. This new feature stair addition to a private residence in Toronto, Canada, has an equally compelling story to tell.
Originally envisioned as a wall-supported, cantilevered stone stair, the owner boldly accepted a unique solution for their showpiece element. The 19-tread stair would be designed with 550 lb. solid stone treads, and fully
liberated from traditional supports and the adjacent rubble wall. To say, “it would float” is not an exaggeration. The stair would be designed as a monolithic beam spanning 16.5 feet, 10 feet high and 41 inches wide. Aesthetically bold, with a reduced tone from
pure black, the basalt stone was the perfect contrast for the white modern interior of the home. The 3-1/2" tension cables played the most important role by resisting the large bending moment generated by the stone load and stair geometry. Fabrication required precise coordination and care to ensure perfect alignment of the interlocking key, and the corresponding cable holes.
The fabrication challenge was achieving the highest level of accuracy in notching, coring, and replicating each tread identically. Expert precision and skill were key to nesting each tread in sequence and simultaneously with the strands. Meticulous alignment and exacting tolerance assured the true performance and aesthetics were delivered. Hydraulic post-tensioning pulled each cable to 120 kiloNewtons or 27,000 lbs, infusing strength and structural integrity. Removing the temporary support and testing was the last critical step—it was the first time the stone stair would be self-supporting.
The “floating” stair is an ultimate achievement and example of innovation, material strength, fabrication quality, installation precision, and expert coordination. A perfect final chapter to a historical journey and modern ode to stone as structure.
1