
Search results for "Separation matters" in Home Design Ideas
 Chester County Kitchen & Bath
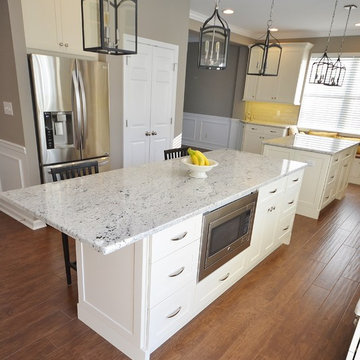
This spacious West Chester kitchen features Fabuwood cabinetry with Galaxy style doors in linen. The counter tops are Colonial White, and the back splash is Ocean Sand Dollar 3”x9” subway tile. This duel island kitchen features modern amenities such as state of the art stainless appliances, (including a microwave drawer) and cabinetry with soft close drawers and doors.
Previously, the kitchen was small, dark, closed in, and not very functional. We realized we could make an awesome space to share with family and friends by removing a 13 foot partition wall separating the kitchen from a lightly used dining/living area. The result was spectacular!
The new kitchen extends all the way to the outside wall where we created a custom bench under the large window for a cozy cat nap, or a back seat cook. While we were at it, we replaced the flooring throughout with sawmill Oak engineered wood.
We thought of everything for this young family- dimmable LED under cabinet lights and recessed lighting add to the versatility of this massive space, while the elegant hanging pendants add interest and warmth to this bright and airy kitchen! No Doubt, a clean, classic look that will last and last.
 Modern Citi Group: Renovations & Remodeling
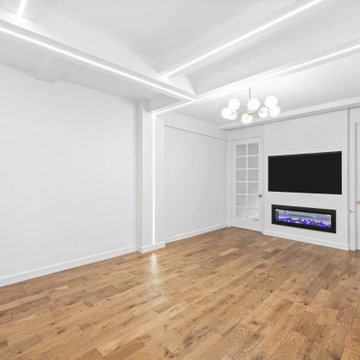
We helped the Sacara family renovate their 1,200-square-foot home in the prime Upper West Side location. The original layout included two bedrooms with a shared bathroom, a combined living/dining room area, and a separate kitchen. The family wanted to complete a full apartment renovation and make the layout more functional by adding a second bathroom, laundry room, and additional closets as well as creating an open kitchen concept.
The design challenge was to deliver a modern yet classic aesthetic for the entire apartment that captured the family’s vision for a perfect home.
The goal was to combine the kitchen and living room areas creating a harmonious flow of natural light and air; add a kitchen island with an additional seating area, and utilize every inch of usable space in the kitchen.
The design solution offered a cozy seating area by the window for a morning cup of coffee which simultaneously served as a cover for all the plumbing communications and radiator.
A built-in fireplace wall separated the living and dining room zones visually yet allowed them to stay bright and functional.
The design and architectural teams collaborated to create multiple layouts and design solutions so the Sacara family had options. Finally, the choice was made and the clients felt confident in their decision.
At the building stage, the full apartment renovation included the removal and installation of all walls, bathroom and laundry room addition, and complete closet reconfiguration.
Kitchen remodeling featured custom cabinetry, decorative wood island paneling, and a white marble countertop for a luxurious look.
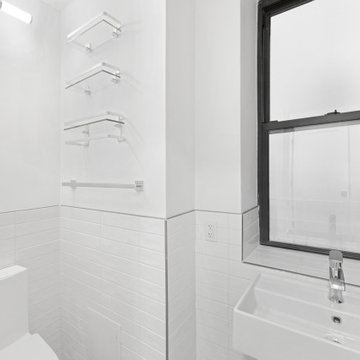
The bathroom renovation highlighted herringbone and onyx tiling for color accents. Additionally, the team replaced all hardwood floors throughout the apartment, installed new baseboards, painted all walls and ceilings, and built the new LED channel lighting with dimmer switches.
In a matter of a few months, the Sacara family had a fully-remodeled home that expressed their style, vision, and improved functionality.
 Modern Citi Group: Renovations & Remodeling
We helped the Sacara family renovate their 1,200-square-foot home in the prime Upper West Side location. The original layout included two bedrooms with a shared bathroom, a combined living/dining room area, and a separate kitchen. The family wanted to complete a full apartment renovation and make the layout more functional by adding a second bathroom, laundry room, and additional closets as well as creating an open kitchen concept.
The design challenge was to deliver a modern yet classic aesthetic for the entire apartment that captured the family’s vision for a perfect home.
The goal was to combine the kitchen and living room areas creating a harmonious flow of natural light and air; add a kitchen island with an additional seating area, and utilize every inch of usable space in the kitchen.
The design solution offered a cozy seating area by the window for a morning cup of coffee which simultaneously served as a cover for all the plumbing communications and radiator.
A built-in fireplace wall separated the living and dining room zones visually yet allowed them to stay bright and functional.
The design and architectural teams collaborated to create multiple layouts and design solutions so the Sacara family had options. Finally, the choice was made and the clients felt confident in their decision.
At the building stage, the full apartment renovation included the removal and installation of all walls, bathroom and laundry room addition, and complete closet reconfiguration.
Kitchen remodeling featured custom cabinetry, decorative wood island paneling, and a white marble countertop for a luxurious look.
The bathroom renovation highlighted herringbone and onyx tiling for color accents. Additionally, the team replaced all hardwood floors throughout the apartment, installed new baseboards, painted all walls and ceilings, and built the new LED channel lighting with dimmer switches.
In a matter of a few months, the Sacara family had a fully-remodeled home that expressed their style, vision, and improved functionality.
Find the right local pro for your project
 User
UserWith a custom ADU-garage conversion in San Diego from an expert like ADU Contractors, one can now dream of living in a spacious abode, within an additional building or unit in an adjacent location. This is how expert home remodelers work, by building separate accommodation units within a property for addressing the issue of space at residences.
ADU Construction in San Diego, CA - https://www.aducontractorca.com/
 Top Tread Stairways
Custom Curved Wooden Slides by Top Tread Stairways ~
Transform Your Home Into Something Extraordinary
Custom Curved Wooden Slides
When was the Last Time Someone Walked Into Your Home and Their Jaw Literally Dropped?
When was the last time someone walked into your home and their jaw literally dropped?
Picture this: Your guests arrive for dinner. They step into your foyer, and suddenly—silence. Wide eyes. A moment of pure disbelief. Then, inevitably, the question: “Is that really what I think it is?”
Welcome to the world of custom curved wooden slides, where Top Tread Stairways turns childhood dreams into sophisticated architectural statements.
The Secret is Out
For years, Clyde Martin and his team at Top Tread Stairways in Sierra Vista, Arizona, have been quietly building something extraordinary. While most stair companies focus on traditional projects, TopTread Stairways has been perfecting the art of custom hardwood slides—creating installations so remarkable that we joke about renaming the business “Chutes and Ladders.”
The truth? These aren’t just slides. They’re conversation pieces. Works of functional art. The kind of architectural element that sets your home apart from every other one on the planet.
And we build so many of them that we’ve shipped custom slides all over North America and beyond.
Four Ways to Make Your Home Unforgettable
Every slide project we undertake is unique, but they generally fall into four categories:
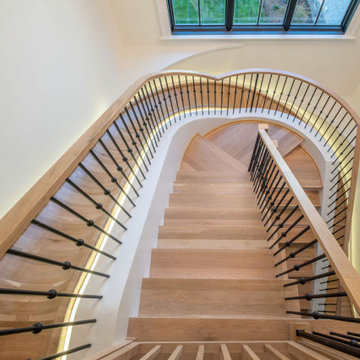
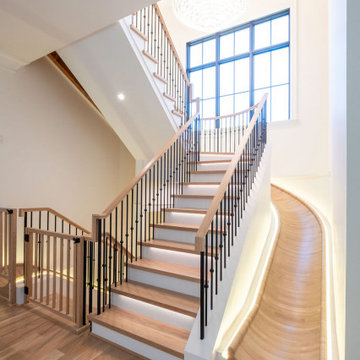
1. Curved Stair-Slide Combinations – The ultimate space-efficient solution, where stairs and slide spiral together in a stunning combination of form and function.
2. Curved Slides Separate from Stairways – For those who want the drama of a standalone curved slide that makes its own architectural statement.
3. Straight Stair-Slide Combinations – Perfect for modern, linear spaces where clean lines meet playful innovation.
4. Straight Slides Separate from Stairways – Sometimes simplicity creates the most powerful impact.
But here’s where it gets interesting: Some slides feature flat seat areas with vertical sides. Others embrace a barrel shape for enhanced comfort. We’ve built slides wide enough for several people to descend shoulder-to-shoulder, laughing all the way down. And we’ve crafted intimate slides designed for solo adventures, regardless of age or size.
Our clients? They absolutely love them.
Stories That Will Make You Rethink What’s Possible
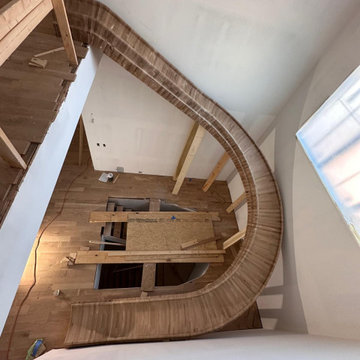
Take the 11,000-square-foot home in Beverly Hills, overlooking the famous Sunset Strip. In one child’s bedroom, we installed a 12-foot curved slide crafted from white oak. Understated location, extraordinary feature.
Or consider the 35-foot-high round tower room in an 8,500-square-foot custom home bordering the Sacramento River in Northern California. This project has become our most famous installation—a stunning 33-foot curved stair-slide combination built entirely from solid black walnut, featuring 445 layers of cross-laminated hardwood and a spiral newel post that took eight months to construct in our shop.
The homeowners had searched for eight years to find someone “crazy enough” to build their dream. When we completed it, one of Clyde’s trusted business partners—someone who’d seen him tackle countless unique projects—admitted he thought Clyde had lost his mind taking this one on. He genuinely didn’t believe we could pull it off.
We did. And the homeowners? Still thrilled years later.
Where Imagination Meets Reality
But these slides aren’t just for private estates. We’ve installed a 24-foot hickory slide in an elementary school library just east of Dallas, where kids absolutely love it. And here’s something that will make you smile: We built the longest wood slide ever for a children’s hospital in Springfield, Illinois.
Have you ever heard a child beg to go to the doctor?
We’re pretty sure it happens in Springfield. That walnut slide stretches 45 feet long and 3 feet wide—spacious enough for three children to sit side-by-side or for an adult and child to slide together comfortably. We built it in one piece, filling an entire semi-trailer for transport. It lives in the hospital lobby, and no appointment is needed to experience it yourself.
In Raleigh, North Carolina, we installed a 36-foot white oak slide in a custom home. The client loved it so much they ordered a second one—literally 15 minutes after we finished the installation. When Clyde returned to the office, there was already a check in the mailbox for slide number two. This 14,000-square-foot home now features 72 linear feet of curved white oak slide: one connecting the second floor to the main level, another linking the main floor to the finished basement.
What a ride, indeed.
Then there’s the curved stair-slide combination in Visalia, California—32 feet of knotty alder complemented by a hanging netted loft and climbing wall. Creative? Absolutely. Fun? Beyond measure.
The People Behind the Dreams
What inspires us most isn’t the technical challenge of building these slides—though engineering a 33-foot curved slide from 445 layers of cross-laminated hardwood certainly keeps us engaged. It’s working with clients who refuse to think inside the box.
These are creative individuals willing to explore ideas that set their homes and businesses apart. They dream of installations that make people stop and stare. They understand that architecture can—and should—inspire joy.
Listening to them describe their visions, explaining their dreams of a slide design unlike anything else on earth? That’s a privilege. And bringing those dreams to life? That’s what we live for.
My team and I have as much fun designing and building these slides as our clients have riding them. We’d love nothing better than to hear from you!
Custom Curved Wooden Slides
What Sets Top Tread Stairways Apart
Since 2006, Clyde Martin has built Top Tread Stairways on a simple premise: there’s a better way to build stairs. With roots in eastern Pennsylvania and years of experience installing hundreds of pre-built stairways, Clyde brought that expertise west and founded a company dedicated to exceptional craftsmanship.
We stock thousands of stair parts in more than ten wood species—hickory, jatoba, maple, cherry, mahogany, alder, red oak, white oak, poplar, Douglas fir, and walnut. Quality levels are high. Lead times are short. We understand the urgency of your project schedule and deliver accordingly.
But here’s what really matters: When it comes to custom wooden slides, Top Tread Stairways is one of—if not the—premier builders of indoor wooden slides in the United States. This isn’t a side project for us. It’s a specialty we’ve refined through years of experience, countless installations, and an unwavering commitment to turning impossible dreams into breathtaking reality.
Your Home, Reimagined
Whether you’re envisioning a straight wooden stand-alone slide for your office or a jaw-dropping curved wooden slide/stairway combination that will become your home’s signature feature, we’d love to hear from you.
We’re not here to build ordinary. We’re here to build extraordinary.
Ready to set your home apart?
~ Custom Curved Wooden Slides ~ ART YOU RIDE!
 User
UserWith a custom ADU-garage conversion in San Diego from an expert like ADU Contractors, one can now dream of living in a spacious abode, within an additional building or unit in an adjacent location. This is how expert home remodelers work, by building separate accommodation units within a property for addressing the issue of space at residences.
ADU Construction in San Diego, CA - https://www.aducontractorca.com/
 Top Tread Stairways
Custom Curved Wooden Slides by Top Tread Stairways ~
Transform Your Home Into Something Extraordinary
Custom Curved Wooden Slides
When was the Last Time Someone Walked Into Your Home and Their Jaw Literally Dropped?
When was the last time someone walked into your home and their jaw literally dropped?
Picture this: Your guests arrive for dinner. They step into your foyer, and suddenly—silence. Wide eyes. A moment of pure disbelief. Then, inevitably, the question: “Is that really what I think it is?”
Welcome to the world of custom curved wooden slides, where Top Tread Stairways turns childhood dreams into sophisticated architectural statements.
The Secret is Out
For years, Clyde Martin and his team at Top Tread Stairways in Sierra Vista, Arizona, have been quietly building something extraordinary. While most stair companies focus on traditional projects, TopTread Stairways has been perfecting the art of custom hardwood slides—creating installations so remarkable that we joke about renaming the business “Chutes and Ladders.”
The truth? These aren’t just slides. They’re conversation pieces. Works of functional art. The kind of architectural element that sets your home apart from every other one on the planet.
And we build so many of them that we’ve shipped custom slides all over North America and beyond.
Four Ways to Make Your Home Unforgettable
Every slide project we undertake is unique, but they generally fall into four categories:
1. Curved Stair-Slide Combinations – The ultimate space-efficient solution, where stairs and slide spiral together in a stunning combination of form and function.
2. Curved Slides Separate from Stairways – For those who want the drama of a standalone curved slide that makes its own architectural statement.
3. Straight Stair-Slide Combinations – Perfect for modern, linear spaces where clean lines meet playful innovation.
4. Straight Slides Separate from Stairways – Sometimes simplicity creates the most powerful impact.
But here’s where it gets interesting: Some slides feature flat seat areas with vertical sides. Others embrace a barrel shape for enhanced comfort. We’ve built slides wide enough for several people to descend shoulder-to-shoulder, laughing all the way down. And we’ve crafted intimate slides designed for solo adventures, regardless of age or size.
Our clients? They absolutely love them.
Stories That Will Make You Rethink What’s Possible
Take the 11,000-square-foot home in Beverly Hills, overlooking the famous Sunset Strip. In one child’s bedroom, we installed a 12-foot curved slide crafted from white oak. Understated location, extraordinary feature.
Or consider the 35-foot-high round tower room in an 8,500-square-foot custom home bordering the Sacramento River in Northern California. This project has become our most famous installation—a stunning 33-foot curved stair-slide combination built entirely from solid black walnut, featuring 445 layers of cross-laminated hardwood and a spiral newel post that took eight months to construct in our shop.
The homeowners had searched for eight years to find someone “crazy enough” to build their dream. When we completed it, one of Clyde’s trusted business partners—someone who’d seen him tackle countless unique projects—admitted he thought Clyde had lost his mind taking this one on. He genuinely didn’t believe we could pull it off.
We did. And the homeowners? Still thrilled years later.
Where Imagination Meets Reality
But these slides aren’t just for private estates. We’ve installed a 24-foot hickory slide in an elementary school library just east of Dallas, where kids absolutely love it. And here’s something that will make you smile: We built the longest wood slide ever for a children’s hospital in Springfield, Illinois.
Have you ever heard a child beg to go to the doctor?
We’re pretty sure it happens in Springfield. That walnut slide stretches 45 feet long and 3 feet wide—spacious enough for three children to sit side-by-side or for an adult and child to slide together comfortably. We built it in one piece, filling an entire semi-trailer for transport. It lives in the hospital lobby, and no appointment is needed to experience it yourself.
In Raleigh, North Carolina, we installed a 36-foot white oak slide in a custom home. The client loved it so much they ordered a second one—literally 15 minutes after we finished the installation. When Clyde returned to the office, there was already a check in the mailbox for slide number two. This 14,000-square-foot home now features 72 linear feet of curved white oak slide: one connecting the second floor to the main level, another linking the main floor to the finished basement.
What a ride, indeed.
Then there’s the curved stair-slide combination in Visalia, California—32 feet of knotty alder complemented by a hanging netted loft and climbing wall. Creative? Absolutely. Fun? Beyond measure.
The People Behind the Dreams
What inspires us most isn’t the technical challenge of building these slides—though engineering a 33-foot curved slide from 445 layers of cross-laminated hardwood certainly keeps us engaged. It’s working with clients who refuse to think inside the box.
These are creative individuals willing to explore ideas that set their homes and businesses apart. They dream of installations that make people stop and stare. They understand that architecture can—and should—inspire joy.
Listening to them describe their visions, explaining their dreams of a slide design unlike anything else on earth? That’s a privilege. And bringing those dreams to life? That’s what we live for.
My team and I have as much fun designing and building these slides as our clients have riding them. We’d love nothing better than to hear from you!
Custom Curved Wooden Slides
What Sets Top Tread Stairways Apart
Since 2006, Clyde Martin has built Top Tread Stairways on a simple premise: there’s a better way to build stairs. With roots in eastern Pennsylvania and years of experience installing hundreds of pre-built stairways, Clyde brought that expertise west and founded a company dedicated to exceptional craftsmanship.
We stock thousands of stair parts in more than ten wood species—hickory, jatoba, maple, cherry, mahogany, alder, red oak, white oak, poplar, Douglas fir, and walnut. Quality levels are high. Lead times are short. We understand the urgency of your project schedule and deliver accordingly.
But here’s what really matters: When it comes to custom wooden slides, Top Tread Stairways is one of—if not the—premier builders of indoor wooden slides in the United States. This isn’t a side project for us. It’s a specialty we’ve refined through years of experience, countless installations, and an unwavering commitment to turning impossible dreams into breathtaking reality.
Your Home, Reimagined
Whether you’re envisioning a straight wooden stand-alone slide for your office or a jaw-dropping curved wooden slide/stairway combination that will become your home’s signature feature, we’d love to hear from you.
We’re not here to build ordinary. We’re here to build extraordinary.
Ready to set your home apart?
~ Custom Curved Wooden Slides ~ ART YOU RIDE!
Sponsored
Sunbury, OH

J.Holderby - Renovations
Franklin County's Leading General Contractors - 2X Best of Houzz!
 Top Tread Stairways
Custom Curved Wooden Slides by Top Tread Stairways ~
Transform Your Home Into Something Extraordinary
Custom Curved Wooden Slides
When was the Last Time Someone Walked Into Your Home and Their Jaw Literally Dropped?
When was the last time someone walked into your home and their jaw literally dropped?
Picture this: Your guests arrive for dinner. They step into your foyer, and suddenly—silence. Wide eyes. A moment of pure disbelief. Then, inevitably, the question: “Is that really what I think it is?”
Welcome to the world of custom curved wooden slides, where Top Tread Stairways turns childhood dreams into sophisticated architectural statements.
The Secret is Out
For years, Clyde Martin and his team at Top Tread Stairways in Sierra Vista, Arizona, have been quietly building something extraordinary. While most stair companies focus on traditional projects, TopTread Stairways has been perfecting the art of custom hardwood slides—creating installations so remarkable that we joke about renaming the business “Chutes and Ladders.”
The truth? These aren’t just slides. They’re conversation pieces. Works of functional art. The kind of architectural element that sets your home apart from every other one on the planet.
And we build so many of them that we’ve shipped custom slides all over North America and beyond.
Four Ways to Make Your Home Unforgettable
Every slide project we undertake is unique, but they generally fall into four categories:
1. Curved Stair-Slide Combinations – The ultimate space-efficient solution, where stairs and slide spiral together in a stunning combination of form and function.
2. Curved Slides Separate from Stairways – For those who want the drama of a standalone curved slide that makes its own architectural statement.
3. Straight Stair-Slide Combinations – Perfect for modern, linear spaces where clean lines meet playful innovation.
4. Straight Slides Separate from Stairways – Sometimes simplicity creates the most powerful impact.
But here’s where it gets interesting: Some slides feature flat seat areas with vertical sides. Others embrace a barrel shape for enhanced comfort. We’ve built slides wide enough for several people to descend shoulder-to-shoulder, laughing all the way down. And we’ve crafted intimate slides designed for solo adventures, regardless of age or size.
Our clients? They absolutely love them.
Stories That Will Make You Rethink What’s Possible
Take the 11,000-square-foot home in Beverly Hills, overlooking the famous Sunset Strip. In one child’s bedroom, we installed a 12-foot curved slide crafted from white oak. Understated location, extraordinary feature.
Or consider the 35-foot-high round tower room in an 8,500-square-foot custom home bordering the Sacramento River in Northern California. This project has become our most famous installation—a stunning 33-foot curved stair-slide combination built entirely from solid black walnut, featuring 445 layers of cross-laminated hardwood and a spiral newel post that took eight months to construct in our shop.
The homeowners had searched for eight years to find someone “crazy enough” to build their dream. When we completed it, one of Clyde’s trusted business partners—someone who’d seen him tackle countless unique projects—admitted he thought Clyde had lost his mind taking this one on. He genuinely didn’t believe we could pull it off.
We did. And the homeowners? Still thrilled years later.
Where Imagination Meets Reality
But these slides aren’t just for private estates. We’ve installed a 24-foot hickory slide in an elementary school library just east of Dallas, where kids absolutely love it. And here’s something that will make you smile: We built the longest wood slide ever for a children’s hospital in Springfield, Illinois.
Have you ever heard a child beg to go to the doctor?
We’re pretty sure it happens in Springfield. That walnut slide stretches 45 feet long and 3 feet wide—spacious enough for three children to sit side-by-side or for an adult and child to slide together comfortably. We built it in one piece, filling an entire semi-trailer for transport. It lives in the hospital lobby, and no appointment is needed to experience it yourself.
In Raleigh, North Carolina, we installed a 36-foot white oak slide in a custom home. The client loved it so much they ordered a second one—literally 15 minutes after we finished the installation. When Clyde returned to the office, there was already a check in the mailbox for slide number two. This 14,000-square-foot home now features 72 linear feet of curved white oak slide: one connecting the second floor to the main level, another linking the main floor to the finished basement.
What a ride, indeed.
Then there’s the curved stair-slide combination in Visalia, California—32 feet of knotty alder complemented by a hanging netted loft and climbing wall. Creative? Absolutely. Fun? Beyond measure.
The People Behind the Dreams
What inspires us most isn’t the technical challenge of building these slides—though engineering a 33-foot curved slide from 445 layers of cross-laminated hardwood certainly keeps us engaged. It’s working with clients who refuse to think inside the box.
These are creative individuals willing to explore ideas that set their homes and businesses apart. They dream of installations that make people stop and stare. They understand that architecture can—and should—inspire joy.
Listening to them describe their visions, explaining their dreams of a slide design unlike anything else on earth? That’s a privilege. And bringing those dreams to life? That’s what we live for.
My team and I have as much fun designing and building these slides as our clients have riding them. We’d love nothing better than to hear from you!
Custom Curved Wooden Slides
What Sets Top Tread Stairways Apart
Since 2006, Clyde Martin has built Top Tread Stairways on a simple premise: there’s a better way to build stairs. With roots in eastern Pennsylvania and years of experience installing hundreds of pre-built stairways, Clyde brought that expertise west and founded a company dedicated to exceptional craftsmanship.
We stock thousands of stair parts in more than ten wood species—hickory, jatoba, maple, cherry, mahogany, alder, red oak, white oak, poplar, Douglas fir, and walnut. Quality levels are high. Lead times are short. We understand the urgency of your project schedule and deliver accordingly.
But here’s what really matters: When it comes to custom wooden slides, Top Tread Stairways is one of—if not the—premier builders of indoor wooden slides in the United States. This isn’t a side project for us. It’s a specialty we’ve refined through years of experience, countless installations, and an unwavering commitment to turning impossible dreams into breathtaking reality.
Your Home, Reimagined
Whether you’re envisioning a straight wooden stand-alone slide for your office or a jaw-dropping curved wooden slide/stairway combination that will become your home’s signature feature, we’d love to hear from you.
We’re not here to build ordinary. We’re here to build extraordinary.
Ready to set your home apart?
~ Custom Curved Wooden Slides ~ ART YOU RIDE!
 Chester County Kitchen & Bath
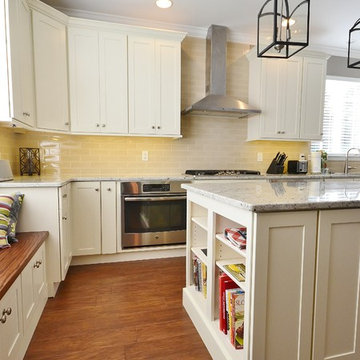
This spacious West Chester kitchen features Fabuwood cabinetry with Galaxy style doors in linen. The counter tops are Colonial White, and the back splash is Ocean Sand Dollar 3”x9” subway tile. This duel island kitchen features modern amenities such as state of the art stainless appliances, (including a microwave drawer) and cabinetry with soft close drawers and doors.
Previously, the kitchen was small, dark, closed in, and not very functional. We realized we could make an awesome space to share with family and friends by removing a 13 foot partition wall separating the kitchen from a lightly used dining/living area. The result was spectacular!
The new kitchen extends all the way to the outside wall where we created a custom bench under the large window for a cozy cat nap, or a back seat cook. While we were at it, we replaced the flooring throughout with sawmill Oak engineered wood.
We thought of everything for this young family- dimmable LED under cabinet lights and recessed lighting add to the versatility of this massive space, while the elegant hanging pendants add interest and warmth to this bright and airy kitchen! No Doubt, a clean, classic look that will last and last.
 safe ZOnea
Every year, the same thing happens. The first real snowfall arrives, demand for de-icing materials spikes overnight, and the businesses that waited too long find themselves scrambling for supply at the worst possible moment. Facility managers, property owners, contractors, and municipalities all depend on a steady supply of salt and ice melt to keep their properties safe and operational through winter. The ones who plan ahead sail through. The ones who don't pay more, wait longer, and take on real risk.
Sourcing de-icing materials well is not complicated, but it does require thinking ahead and understanding the options. The choices you make about what to buy, how to buy it, and who to buy it from have a direct effect on your costs, your reliability, and your ability to keep people safe when conditions turn dangerous. This article lays out what matters.
Why Your Choice of Supplier Matters More Than You Think
It is easy to treat de-icing material as a commodity, something you grab whenever you need it without much thought about where it comes from. That works fine until the moment it doesn't, usually in the middle of a storm when everyone needs supply at once and the casual sources have run dry. At that point, the relationships you built before the season become the difference between staying stocked and being stuck.
Reliable supply is the whole game in winter operations. A property that runs out of ice melt during a storm faces safety hazards, liability exposure, and disruption, none of which can wait for a back-ordered shipment. This is why establishing relationships with dependable rock salt suppliers before the season starts is one of the smartest moves a facility manager or contractor can make. It locks in supply, often locks in better pricing, and removes a major source of mid-winter stress.
The lesson here is to treat sourcing as a planning decision rather than a last-minute errand. The businesses that come through winter smoothly are almost always the ones that secured their supply chain early, chose suppliers who could actually deliver when it counted, and never had to gamble on finding material during a shortage. Reliability bought in advance is far cheaper than scarcity paid for in a crisis.
Bagged or Bulk: Matching the Material to the Job
One of the first practical decisions is whether to buy de-icing material in bags or in bulk, and the right answer depends entirely on the operation. Each format has clear advantages, and many operations end up using both for different purposes.
Bagged material offers convenience, control, and easy storage. It is simple to handle, easy to distribute to different locations or crews, straightforward to store without special equipment, and convenient for spot application by hand. It suits smaller properties, businesses without bulk storage, and situations where portion control and tidiness matter. Bulk material, on the other hand, tends to make sense for large operations that go through high volumes, where buying in quantity lowers the per-unit cost and the operation has the equipment and space to store and handle it. The tradeoff is between the convenience and flexibility of bags and the volume economics of bulk.
For many operations, the right approach is a mix: bulk for the high-volume core of the work and bags for flexibility, spot treatment, and locations where bulk handling is impractical. The key is to match the format to how the material will actually be stored, moved, and applied, rather than defaulting to one or the other out of habit. Thinking this through in advance avoids both the waste of over-buying bulk you can't handle and the expense of relying entirely on bags for a large operation.
Rock Salt Is Not Your Only Option
Rock salt, or sodium chloride, is the workhorse of winter de-icing for good reason. It is effective, widely available, and cost-efficient, which makes it the default choice for most operations most of the time. But it has limits, and understanding the alternatives helps you choose the right material for the conditions you actually face.
The most important limitation is temperature. Rock salt becomes less effective as temperatures drop, and in genuinely cold conditions it can struggle to do the job at all. This is where alternatives come in. Calcium chloride, for instance, works at much lower temperatures than rock salt and acts quickly, which makes it valuable when conditions are severe or when fast melting matters. Operations that face hard freezes or need dependable performance in extreme cold often keep calcium chloride for sale on hand for exactly those situations, using it alongside rock salt rather than instead of it.
The practical approach is to understand the conditions your property faces and stock accordingly. For many operations, rock salt handles the bulk of the work while a faster, colder-rated material like calcium chloride covers the extreme days when ordinary salt falls short. Matching the material to the temperature and the urgency of the situation is what separates an operation that stays ahead of winter from one that is constantly reacting to it.
Securing Your Supply Before the Season
Knowing what to buy is only half the equation. The other half is making sure you can actually get it when you need it, which means securing your supply before winter arrives rather than after it has already started. Timing is one of the most underrated factors in winter operations.
The logic is simple. Demand for de-icing materials is highly seasonal and spikes sharply during storms, when everyone needs supply simultaneously. Prices and availability both move against the buyer at exactly those moments. By contrast, planning ahead, estimating your needs and arranging supply before the season, puts you in a far stronger position. Working with established rock salt suppliers ahead of time means your material is accounted for before the rush, often at better pricing and with the confidence that it will be there when the first storm hits.
This kind of planning also lets you think clearly rather than react under pressure. You can estimate your seasonal needs based on your property and past winters, decide on the right mix of materials and formats, and arrange storage in advance. Operations that do this consistently spend less, worry less, and never find themselves making frantic calls during a storm. The effort of planning ahead is modest, and the payoff in reliability and cost savings is substantial.
Storing and Handling What You Buy
Securing supply is not much use if the material degrades before you can use it, which makes proper storage and handling an important and often overlooked part of the equation. De-icing materials are sensitive to moisture, and poor storage can turn a good supply into a clumped, hardened mess that is difficult to apply.
The fundamentals are straightforward. Keep material dry and protected from moisture, since salt and ice melt readily absorb water and can harden if exposed. Store it in a way that suits the format, whether that means a proper bulk storage area or a dry space for stacked bags. Keep it accessible, so crews can get to it quickly when a storm hits and time is short. And handle it with the right equipment for the format and volume, which protects both the material and the people working with it. None of this is complicated, but neglecting it can undermine even a well-planned supply.
Good storage practices protect the investment you made in securing supply early. There is little point in arranging your materials ahead of the season only to have them degrade before use. Treating storage and handling as part of the overall plan, rather than an afterthought, ensures that the material you secured is actually usable when the moment comes. It is the final link in a supply chain built to perform under winter conditions.
Estimating How Much You Actually Need
One question trips up operations of every size: how much de-icing material to buy. Order too little and you risk running short during a storm. Order too much and you tie up money and storage space in material you may not use. Getting the estimate reasonably right is a meaningful part of sourcing well.
Several factors shape the answer. The size and type of the areas you treat, sidewalks, lots, entrances, and drive lanes, set the baseline for how much material each application consumes. The local climate matters too, since colder regions and those with frequent snowfall go through far more material than milder ones. Application frequency depends on how often storms hit and how quickly surfaces need to be cleared, which varies with the kind of property and the expectations of the people who use it. And the type of material plays a role, since different products are applied at different rates.
Past experience is often the best guide. Operations that track what they used in previous winters, adjusted for the size of the property and the severity of the season, can estimate their needs with reasonable confidence. For newer operations without that history, it helps to plan conservatively and to work with a supplier who can replenish stock reliably, so that a low estimate does not turn into a mid-storm shortage.
The goal is not perfect precision but a sound, slightly cautious estimate paired with a dependable supply relationship. That combination lets an operation keep enough material on hand to handle the season without over-committing to volume it cannot store or use. Thinking this through before winter, rather than guessing during it, is one more way that planning ahead pays off when the snow starts to fall.
The Bottom Line
Sourcing de-icing materials well comes down to a few straightforward principles: plan ahead, choose reliable suppliers before the season, match your materials and formats to your actual needs and conditions, and store what you buy properly. The operations that follow these principles move through winter with confidence, while those that improvise pay more and take on needless risk.
Winter is predictable in one respect: it arrives every year, and demand for de-icing material spikes the moment it does. The businesses that prepare for that reality, rather than being surprised by it, are the ones that keep their properties safe, their costs controlled, and their operations running no matter what the season throws at them. A little foresight before the first snowfall pays off through every storm that follows.
 safe ZOnea
Ask a kitchen designer in Chicago which countertop question comes up most and you will hear the same answer: white or off-white quartz, and which shade. Homeowners walk into showrooms with a photo saved on their phone, usually a bright, veined slab from a magazine spread, and leave an hour later realizing there are a dozen versions of that same look. The confusion is not about taste. It is about the fact that "white quartz" covers a huge range of patterns, undertones, and price points, and nobody explains the differences before the sale.
Older bungalows and newer builds alike are getting stripped of their dated laminate and butcher block in favor of quartz, and the reasons are practical rather than trendy. Quartz does not need sealing, resists the kind of staining that granite can suffer over decades, and holds up to the freeze-thaw humidity swings that Chicago basements and kitchens go through every year. Once a homeowner commits to quartz, though, the real decision starts: which white, and does the pattern justify the difference in cost.
This piece walks through three specific slabs that keep showing up in Chicago renovation projects, why designers reach for them in different rooms, and what actually separates a flat white surface from one with real depth. None of this requires a design background to follow. It is mostly about paying attention to how a slab behaves under kitchen lighting, how busy the vending gets, and how it photographs versus how it looks in person.
Why White Quartz Took Over Chicago Kitchens
Ten years ago, granite dominated Chicago kitchen remodels almost by default. It was durable, it looked expensive, and every fabricator in the metro area carried a wide range of colors. Quartz has since taken over that position, and the shift happened faster than most contractors expected. Engineered stone gave homeowners a more predictable surface, since natural granite varies slab to slab while quartz is manufactured to a consistent pattern batch after batch.
The other driver is light. Chicago winters are long and gray, and a lot of kitchens, especially in older two-flats and courtyard buildings, do not get much direct sun. A dark granite countertop in a dim kitchen can make the whole room feel smaller. White and light-toned quartz reflects what little natural light comes through the windows, and it makes a galley kitchen or a north-facing space feel noticeably brighter without touching the cabinetry or the layout.
There is also a resale argument that local real estate agents bring up constantly. White quartz photographs well for listings, reads as updated and low-maintenance to buyers touring in person, and does not compete visually with whatever cabinet color the next owner might prefer. It is a safer bet than a bold veined marble look or a colored quartz that might feel dated in five years.
Arctic White and the Cost Question
Among the flatter, more uniform whites, arctic white quartz price comes up constantly in budget conversations because the slab sits at a more approachable point than the heavily veined Italian-marble-inspired patterns. It reads as clean and bright without the busy movement that some homeowners find overwhelming in a small kitchen. Fabricators in the Chicago area tend to keep it in stock precisely because demand stays steady across both new construction and remodel projects.
Part of what keeps this slab affordable relative to its heavily patterned cousins comes down to manufacturing complexity. A quartz surface with minimal veining and a consistent white base is simpler to produce at scale than one that mimics the irregular, high-contrast movement of natural Calacatta marble. That production difference shows up directly in what a homeowner pays per square foot, and it is worth asking a fabricator to walk through that pricing before assuming every white quartz costs the same.
Homeowners planning a full kitchen, including an island, backsplash, and perimeter counters, often use a flatter white like this specifically because it lets other elements carry the visual interest. A patterned tile backsplash or a bold cabinet color reads more clearly against a calm countertop than against one already fighting for attention with heavy veining. Designers frequently pair simpler whites with statement lighting fixtures for exactly this reason.
What Makes Calacatta Patterns Different
Calacatta refers to a family of marble originally quarried in Italy, known for a bright white background broken up by bold, often gold-toned veining that moves in thick, dramatic streaks rather than thin gray lines. Natural Calacatta marble is soft, porous, and expensive to maintain, which is exactly why quartz manufacturers spent years developing engineered versions that replicate the look without the upkeep headaches.
The challenge with any Calacatta-style quartz is getting the veining to look organic instead of printed. Early generations of engineered stone struggled with repetitive patterns that gave away the fact the slab was manufactured rather than cut from actual marble. Modern digital printing and layering techniques have closed that gap considerably, and the better Calacatta-inspired quartz lines now vary the veining across each slab batch so two counters in the same kitchen do not look identical.
Chicago designers gravitate toward Calacatta patterns for kitchens that function as the visual centerpiece of an open floor plan, which describes a large share of the gut renovations happening in neighborhoods like Lincoln Park, Roscoe Village, and the North Shore suburbs. When the kitchen island is visible from the living room and dining area, a dramatic veined surface becomes part of the home's overall design language rather than a purely functional work surface.
Calacatta Arno Under Kitchen Lighting
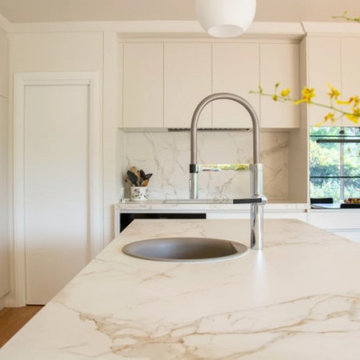
One of the more popular options in this category, calacatta arno quartz, balances a warm white base with soft gray and gold veining that avoids looking too stark under the cooler LED lighting common in newer Chicago builds. Homeowners touring showrooms sometimes make the mistake of judging a slab entirely under warm incandescent lighting, then get surprised when the same surface looks slightly different once installed under their kitchen's actual fixtures.
What separates this particular pattern from flatter competitors is how the veining clusters rather than spreading evenly across the slab. That clustering mimics the way real quarried marble forms, with denser mineral deposits in some sections and cleaner stretches in others. Fabricators cutting a large island slab from a single piece will often orient the pattern intentionally so the busiest veining lands somewhere visually interesting rather than getting cut off at an edge.
Because the background reads warmer than a stark white, this pattern tends to pair well with brass or matte gold hardware, a combination that has been showing up repeatedly in Chicago kitchen remodels over the past few renovation seasons. Cabinet painters report a similar trend, with more clients requesting warm white or greige cabinet colors specifically because they complement this kind of veined quartz better than a cooler, blue-toned white would.
Silestone's Version of the Calacatta Look
Manufacturers compete directly in this Calacatta-inspired category, and silestone eternal calacatta gold represents one brand's specific take on the pattern, distinguished by richer gold veining set against a brighter white base than some competing slabs in the same family. Silestone has built a reputation around anti-bacterial surface treatments in addition to the standard quartz durability, a detail some homeowners specifically ask about for kitchens used heavily by families with young children.
The veining in this particular slab tends to run in longer, more continuous lines compared to the clustered pattern found in some other Calacatta-style options, which gives large island surfaces a sense of visual flow from one end to the other. Fabricators working with bigger islands, the kind increasingly common in open-concept Chicago remodels, often favor patterns like this because there is less need to worry about seams interrupting a busy, disconnected pattern.
Price positioning for this slab tends to sit toward the upper end of the engineered quartz category, reflecting both the brand's manufacturing process and the complexity of replicating that continuous gold veining consistently across production batches. Homeowners weighing this option against other Calacatta-style quartz should ask their fabricator directly about batch availability, since premium patterns sometimes have longer lead times than standard stock colors.
Living With Quartz Day to Day
Beyond how a slab looks in a showroom or a listing photo, the daily experience of owning quartz countertops matters more once the renovation dust settles. Quartz resists scratching far better than laminate and holds up to the acidic spills, hot pans, and general abuse of an active kitchen without the sealing maintenance that natural stone requires every year or two. That low-maintenance reputation is a large part of why quartz overtook granite in the first place.
Heat resistance is a detail that gets less attention than it should. While quartz handles moderate heat well, manufacturers generally recommend using a trivet or pad for very hot pots straight off the stove, since sudden temperature shock can occasionally cause stress marks in the resin binder that holds the engineered stone together. This is a minor precaution rather than a major limitation, but it is worth mentioning to anyone assuming quartz is entirely indestructible.
Cleaning routines stay simple across almost every pattern in this category. A damp cloth and mild soap handle daily messes, and the nonporous surface means wine, coffee, and tomato-based sauces do not soak in the way they can with unsealed granite or marble. Homeowners moving from an older stone counter often mention how much less they worry about everyday spills once quartz is installed, which is a quality-of-life change that rarely makes it into the initial design conversation.
Choosing Between the Three
There is no single correct answer among these three slabs, and that is exactly why they keep coming up together in the same design conversations across Chicago renovation projects. A flatter white with minimal veining suits kitchens where other elements need to carry the visual interest, while a bolder Calacatta-inspired pattern makes sense when the countertop itself is meant to be the centerpiece of an open floor plan.
Budget matters too, and it is worth having a direct conversation with a fabricator about where each option lands before falling in love with a specific slab in a showroom. Lighting, cabinet color, and how the kitchen connects to the rest of the home all play into which pattern will actually look right once installation is finished rather than just in a photo.
Whatever direction a homeowner leans, seeing a full slab in person under actual kitchen lighting remains the single most useful step before signing off. Photos only go so far once the countertop is sitting in the room it will live in for years.
 Modern Citi Group: Renovations & Remodeling
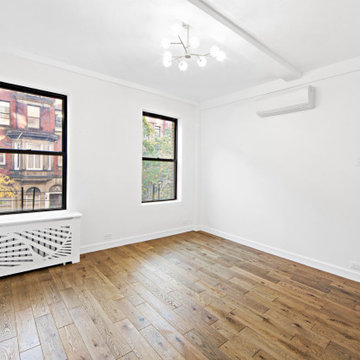
We helped the Sacara family renovate their 1,200-square-foot home in the prime Upper West Side location. The original layout included two bedrooms with a shared bathroom, a combined living/dining room area, and a separate kitchen. The family wanted to complete a full apartment renovation and make the layout more functional by adding a second bathroom, laundry room, and additional closets as well as creating an open kitchen concept.
The design challenge was to deliver a modern yet classic aesthetic for the entire apartment that captured the family’s vision for a perfect home.
The goal was to combine the kitchen and living room areas creating a harmonious flow of natural light and air; add a kitchen island with an additional seating area, and utilize every inch of usable space in the kitchen.
The design solution offered a cozy seating area by the window for a morning cup of coffee which simultaneously served as a cover for all the plumbing communications and radiator.
A built-in fireplace wall separated the living and dining room zones visually yet allowed them to stay bright and functional.
The design and architectural teams collaborated to create multiple layouts and design solutions so the Sacara family had options. Finally, the choice was made and the clients felt confident in their decision.
At the building stage, the full apartment renovation included the removal and installation of all walls, bathroom and laundry room addition, and complete closet reconfiguration.
Kitchen remodeling featured custom cabinetry, decorative wood island paneling, and a white marble countertop for a luxurious look.
The bathroom renovation highlighted herringbone and onyx tiling for color accents. Additionally, the team replaced all hardwood floors throughout the apartment, installed new baseboards, painted all walls and ceilings, and built the new LED channel lighting with dimmer switches.
In a matter of a few months, the Sacara family had a fully-remodeled home that expressed their style, vision, and improved functionality.
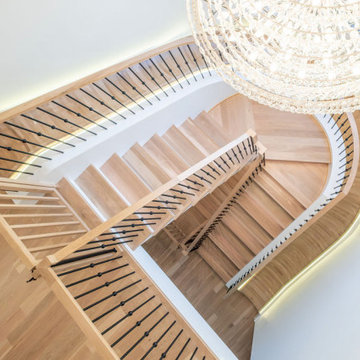 Top Tread Stairways
Custom Curved Wooden Slides by Top Tread Stairways ~
Transform Your Home Into Something Extraordinary
Custom Curved Wooden Slides
When was the Last Time Someone Walked Into Your Home and Their Jaw Literally Dropped?
When was the last time someone walked into your home and their jaw literally dropped?
Picture this: Your guests arrive for dinner. They step into your foyer, and suddenly—silence. Wide eyes. A moment of pure disbelief. Then, inevitably, the question: “Is that really what I think it is?”
Welcome to the world of custom curved wooden slides, where Top Tread Stairways turns childhood dreams into sophisticated architectural statements.
The Secret is Out
For years, Clyde Martin and his team at Top Tread Stairways in Sierra Vista, Arizona, have been quietly building something extraordinary. While most stair companies focus on traditional projects, TopTread Stairways has been perfecting the art of custom hardwood slides—creating installations so remarkable that we joke about renaming the business “Chutes and Ladders.”
The truth? These aren’t just slides. They’re conversation pieces. Works of functional art. The kind of architectural element that sets your home apart from every other one on the planet.
And we build so many of them that we’ve shipped custom slides all over North America and beyond.
Four Ways to Make Your Home Unforgettable
Every slide project we undertake is unique, but they generally fall into four categories:
1. Curved Stair-Slide Combinations – The ultimate space-efficient solution, where stairs and slide spiral together in a stunning combination of form and function.
2. Curved Slides Separate from Stairways – For those who want the drama of a standalone curved slide that makes its own architectural statement.
3. Straight Stair-Slide Combinations – Perfect for modern, linear spaces where clean lines meet playful innovation.
4. Straight Slides Separate from Stairways – Sometimes simplicity creates the most powerful impact.
But here’s where it gets interesting: Some slides feature flat seat areas with vertical sides. Others embrace a barrel shape for enhanced comfort. We’ve built slides wide enough for several people to descend shoulder-to-shoulder, laughing all the way down. And we’ve crafted intimate slides designed for solo adventures, regardless of age or size.
Our clients? They absolutely love them.
Stories That Will Make You Rethink What’s Possible
Take the 11,000-square-foot home in Beverly Hills, overlooking the famous Sunset Strip. In one child’s bedroom, we installed a 12-foot curved slide crafted from white oak. Understated location, extraordinary feature.
Or consider the 35-foot-high round tower room in an 8,500-square-foot custom home bordering the Sacramento River in Northern California. This project has become our most famous installation—a stunning 33-foot curved stair-slide combination built entirely from solid black walnut, featuring 445 layers of cross-laminated hardwood and a spiral newel post that took eight months to construct in our shop.
The homeowners had searched for eight years to find someone “crazy enough” to build their dream. When we completed it, one of Clyde’s trusted business partners—someone who’d seen him tackle countless unique projects—admitted he thought Clyde had lost his mind taking this one on. He genuinely didn’t believe we could pull it off.
We did. And the homeowners? Still thrilled years later.
Where Imagination Meets Reality
But these slides aren’t just for private estates. We’ve installed a 24-foot hickory slide in an elementary school library just east of Dallas, where kids absolutely love it. And here’s something that will make you smile: We built the longest wood slide ever for a children’s hospital in Springfield, Illinois.
Have you ever heard a child beg to go to the doctor?
We’re pretty sure it happens in Springfield. That walnut slide stretches 45 feet long and 3 feet wide—spacious enough for three children to sit side-by-side or for an adult and child to slide together comfortably. We built it in one piece, filling an entire semi-trailer for transport. It lives in the hospital lobby, and no appointment is needed to experience it yourself.
In Raleigh, North Carolina, we installed a 36-foot white oak slide in a custom home. The client loved it so much they ordered a second one—literally 15 minutes after we finished the installation. When Clyde returned to the office, there was already a check in the mailbox for slide number two. This 14,000-square-foot home now features 72 linear feet of curved white oak slide: one connecting the second floor to the main level, another linking the main floor to the finished basement.
What a ride, indeed.
Then there’s the curved stair-slide combination in Visalia, California—32 feet of knotty alder complemented by a hanging netted loft and climbing wall. Creative? Absolutely. Fun? Beyond measure.
The People Behind the Dreams
What inspires us most isn’t the technical challenge of building these slides—though engineering a 33-foot curved slide from 445 layers of cross-laminated hardwood certainly keeps us engaged. It’s working with clients who refuse to think inside the box.
These are creative individuals willing to explore ideas that set their homes and businesses apart. They dream of installations that make people stop and stare. They understand that architecture can—and should—inspire joy.
Listening to them describe their visions, explaining their dreams of a slide design unlike anything else on earth? That’s a privilege. And bringing those dreams to life? That’s what we live for.
My team and I have as much fun designing and building these slides as our clients have riding them. We’d love nothing better than to hear from you!
Custom Curved Wooden Slides
What Sets Top Tread Stairways Apart
Since 2006, Clyde Martin has built Top Tread Stairways on a simple premise: there’s a better way to build stairs. With roots in eastern Pennsylvania and years of experience installing hundreds of pre-built stairways, Clyde brought that expertise west and founded a company dedicated to exceptional craftsmanship.
We stock thousands of stair parts in more than ten wood species—hickory, jatoba, maple, cherry, mahogany, alder, red oak, white oak, poplar, Douglas fir, and walnut. Quality levels are high. Lead times are short. We understand the urgency of your project schedule and deliver accordingly.
But here’s what really matters: When it comes to custom wooden slides, Top Tread Stairways is one of—if not the—premier builders of indoor wooden slides in the United States. This isn’t a side project for us. It’s a specialty we’ve refined through years of experience, countless installations, and an unwavering commitment to turning impossible dreams into breathtaking reality.
Your Home, Reimagined
Whether you’re envisioning a straight wooden stand-alone slide for your office or a jaw-dropping curved wooden slide/stairway combination that will become your home’s signature feature, we’d love to hear from you.
We’re not here to build ordinary. We’re here to build extraordinary.
Ready to set your home apart?
~ Custom Curved Wooden Slides ~ ART YOU RIDE!
Sponsored
Columbus, OH

Structural Remodeling
Franklin County's Heavy Timber Specialists | Best of Houzz 2020!
 TOC design & construction inc.
DESIGNED BY TOC design
CONSTRUCTION BY TOC design & Construction inc.
PHOTOS BY : Tania Scardellato
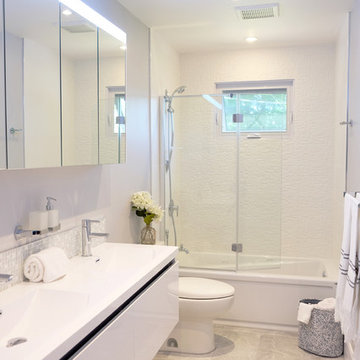
I was fortunate to have a young family approach me in desperate need to renovate there only 3 piece bathroom. This space was In dire need of a remodel, with old brown wall to wall tiles and a dated bulky yellow brown single sink vanity.
Storage was a must, lighting a necessity, and proper accessibility to the shower bath area.
We had a tight budget to respect, but a full gut of this bathroom was required. And a good thing too, once we started doing the demolition we noticed that mildew and rotting floors and walls had accumulated throughout the years. Doing it right the first time is no joke when dealing with water and electrical issues.
We discarded all reminisce of old and built from scratch, new walls, new plumbing, new electrical ,new insulation and a new window, a new fan that actually exhausted outside ( I say this laughing as you would be amazed at how many fans are installed but don’t exhaust outside, and you the client would never know unless you go inside the attic space.
Once all the hard stuff was done, the rest is just a matter of smart design. If you have a small bathroom here are some tips to guide you.
10 tips for making a small bathroom feel larger
Is your tiny bathroom cramping your functionality and style, leaving you longing for the enormous bathrooms gracing the pages of design magazines? Even if your bathroom is a fraction of the size, all it takes is some design savvy to make the most of the space you have. Consider these 10 smart tips that will help your bathroom look, feel and function like those larger contenders.
1-Get creative with corners
Space is at a premium in small bathrooms, so it's important to maximize every inch. Corners, for example, provide extra space for shelving, storage units and even hooks. Get creative and install unique design solutions that are not only functional, but also eye-catching. If you love the airiness of floating cabinets, add baskets or decorative boxes under for extra storage. If you are installing floating cabinets insure that they are installed securely to studs or plywood at wall.
2- Let solid colors shine
Busy patterns have a shrinking effect and make small bathrooms seem even smaller. Conversely, light natural hues make a space feel more open. If you're itching to get creative with design, experiment with textures but keep overpowering patterns to a minimum. Tone on tone is the best to achieve this.
3 - Maximize your bathtub
A bathtub takes up a significant portion of the room, but modern, compact options with curved basins, can make the tub feel larger when in use, all while conserving space.
4 - Select a smaller faucet
A faucet is jewelry for the bathroom. And just as accessories can overpower an outfit, a big bulky faucet isn't flattering in a small bath. Single-handle designs conserve counter space, while a wall-mount installation frees it up all together and can create quite the wow-factor, if the budget can accommodate the required changes to plumbing behind the wall.
5 - Make vanity storage simple
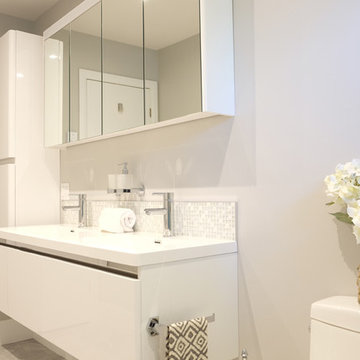
If you're in a storage war with your small bathroom, you're not alone in the battle. Toiletries and personal supplies without a place to call home only add clutter and chaos. Store smart with a space-saving vanity, the dual sink vanity shown here, looks quite simple, but in reality it has 4 sets of full extension drawers, and the vanity tower adds extra storage without overpowering the use of space.
6 - Show off the shower
Shower curtains may be pretty, but they interrupt the visual flow of a bathing space and make it feel significantly smaller. In bathrooms with small footprints, opt for a clear glass sliding shower door that doesn't require the clearance of one with a hinged design. Or as shown in this design and for fraction less expensive a half hinged panel installed on a fixed tempered glass panel. If you're embarking on a big remodel, create the illusion of more space by using same tile in the shower that's used throughout; instead of seeing them as two separate zones, the eye will read them as one.
7 - Discover the treasure of hidden storage
Work with a contractor, and you just might find some serious storage potential hidden behind your walls. Whether it's utilizing space between the studs for shallow shelving or a creating a small linen closet by annexing space from an adjacent room, even small additions can make a big difference.
8 - Focal Point
Tile is a beautiful, durable addition to any bathroom. For dainty spaces, consider installing tile at a diagonal to accentuate the focal point or as in this bathroom I used an oversized textured pattern to bring depth to the space at the window wall.
9 - Choose the right lights
Strategically install light to reflect and brighten a small bathroom to make it appear larger. Recessed lighting is an affordable solution for tiny rooms, offering ample light while taking up little space. Wall sconces alongside a mirror also reflect off the walls and make a room feel bright and airy. I always recommend going with LED lighting at 2800 to 3000K.
10 – Accessorize
This is your time to shine in your decorating skills, have fun with your towels, you can change the color scheme daily just by adding pops of color in your accessories, make sure to get items that serve a dual purpose, like baskets, boxes they can always be used as hampers, storing of towels and even a nice display for your guest.
 TOC design & construction inc.
DESIGNED BY TOC design
CONSTRUCTION BY TOC design & Construction inc.
PHOTOS BY : Tania Scardellato
I was fortunate to have a young family approach me in desperate need to renovate there only 3 piece bathroom. This space was In dire need of a remodel, with old brown wall to wall tiles and a dated bulky yellow brown single sink vanity.
Storage was a must, lighting a necessity, and proper accessibility to the shower bath area.
We had a tight budget to respect, but a full gut of this bathroom was required. And a good thing too, once we started doing the demolition we noticed that mildew and rotting floors and walls had accumulated throughout the years. Doing it right the first time is no joke when dealing with water and electrical issues.
We discarded all reminisce of old and built from scratch, new walls, new plumbing, new electrical ,new insulation and a new window, a new fan that actually exhausted outside ( I say this laughing as you would be amazed at how many fans are installed but don’t exhaust outside, and you the client would never know unless you go inside the attic space.
Once all the hard stuff was done, the rest is just a matter of smart design. If you have a small bathroom here are some tips to guide you.
10 tips for making a small bathroom feel larger
Is your tiny bathroom cramping your functionality and style, leaving you longing for the enormous bathrooms gracing the pages of design magazines? Even if your bathroom is a fraction of the size, all it takes is some design savvy to make the most of the space you have. Consider these 10 smart tips that will help your bathroom look, feel and function like those larger contenders.
1-Get creative with corners
Space is at a premium in small bathrooms, so it's important to maximize every inch. Corners, for example, provide extra space for shelving, storage units and even hooks. Get creative and install unique design solutions that are not only functional, but also eye-catching. If you love the airiness of floating cabinets, add baskets or decorative boxes under for extra storage. If you are installing floating cabinets insure that they are installed securely to studs or plywood at wall.
2- Let solid colors shine
Busy patterns have a shrinking effect and make small bathrooms seem even smaller. Conversely, light natural hues make a space feel more open. If you're itching to get creative with design, experiment with textures but keep overpowering patterns to a minimum. Tone on tone is the best to achieve this.
3 - Maximize your bathtub
A bathtub takes up a significant portion of the room, but modern, compact options with curved basins, can make the tub feel larger when in use, all while conserving space.
4 - Select a smaller faucet
A faucet is jewelry for the bathroom. And just as accessories can overpower an outfit, a big bulky faucet isn't flattering in a small bath. Single-handle designs conserve counter space, while a wall-mount installation frees it up all together and can create quite the wow-factor, if the budget can accommodate the required changes to plumbing behind the wall.
5 - Make vanity storage simple
If you're in a storage war with your small bathroom, you're not alone in the battle. Toiletries and personal supplies without a place to call home only add clutter and chaos. Store smart with a space-saving vanity, the dual sink vanity shown here, looks quite simple, but in reality it has 4 sets of full extension drawers, and the vanity tower adds extra storage without overpowering the use of space.
6 - Show off the shower
Shower curtains may be pretty, but they interrupt the visual flow of a bathing space and make it feel significantly smaller. In bathrooms with small footprints, opt for a clear glass sliding shower door that doesn't require the clearance of one with a hinged design. Or as shown in this design and for fraction less expensive a half hinged panel installed on a fixed tempered glass panel. If you're embarking on a big remodel, create the illusion of more space by using same tile in the shower that's used throughout; instead of seeing them as two separate zones, the eye will read them as one.
7 - Discover the treasure of hidden storage
Work with a contractor, and you just might find some serious storage potential hidden behind your walls. Whether it's utilizing space between the studs for shallow shelving or a creating a small linen closet by annexing space from an adjacent room, even small additions can make a big difference.
8 - Focal Point
Tile is a beautiful, durable addition to any bathroom. For dainty spaces, consider installing tile at a diagonal to accentuate the focal point or as in this bathroom I used an oversized textured pattern to bring depth to the space at the window wall.
9 - Choose the right lights
Strategically install light to reflect and brighten a small bathroom to make it appear larger. Recessed lighting is an affordable solution for tiny rooms, offering ample light while taking up little space. Wall sconces alongside a mirror also reflect off the walls and make a room feel bright and airy. I always recommend going with LED lighting at 2800 to 3000K.
10 – Accessorize
This is your time to shine in your decorating skills, have fun with your towels, you can change the color scheme daily just by adding pops of color in your accessories, make sure to get items that serve a dual purpose, like baskets, boxes they can always be used as hampers, storing of towels and even a nice display for your guest.
 TOC design & construction inc.
DESIGNED BY TOC design
CONSTRUCTION BY TOC design & Construction inc.
PHOTOS BY : Tania Scardellato
I was fortunate to have a young family approach me in desperate need to renovate there only 3 piece bathroom. This space was In dire need of a remodel, with old brown wall to wall tiles and a dated bulky yellow brown single sink vanity.
Storage was a must, lighting a necessity, and proper accessibility to the shower bath area.
We had a tight budget to respect, but a full gut of this bathroom was required. And a good thing too, once we started doing the demolition we noticed that mildew and rotting floors and walls had accumulated throughout the years. Doing it right the first time is no joke when dealing with water and electrical issues.
We discarded all reminisce of old and built from scratch, new walls, new plumbing, new electrical ,new insulation and a new window, a new fan that actually exhausted outside ( I say this laughing as you would be amazed at how many fans are installed but don’t exhaust outside, and you the client would never know unless you go inside the attic space.
Once all the hard stuff was done, the rest is just a matter of smart design. If you have a small bathroom here are some tips to guide you.
10 tips for making a small bathroom feel larger
Is your tiny bathroom cramping your functionality and style, leaving you longing for the enormous bathrooms gracing the pages of design magazines? Even if your bathroom is a fraction of the size, all it takes is some design savvy to make the most of the space you have. Consider these 10 smart tips that will help your bathroom look, feel and function like those larger contenders.
1-Get creative with corners
Space is at a premium in small bathrooms, so it's important to maximize every inch. Corners, for example, provide extra space for shelving, storage units and even hooks. Get creative and install unique design solutions that are not only functional, but also eye-catching. If you love the airiness of floating cabinets, add baskets or decorative boxes under for extra storage. If you are installing floating cabinets insure that they are installed securely to studs or plywood at wall.
2- Let solid colors shine
Busy patterns have a shrinking effect and make small bathrooms seem even smaller. Conversely, light natural hues make a space feel more open. If you're itching to get creative with design, experiment with textures but keep overpowering patterns to a minimum. Tone on tone is the best to achieve this.
3 - Maximize your bathtub
A bathtub takes up a significant portion of the room, but modern, compact options with curved basins, can make the tub feel larger when in use, all while conserving space.
4 - Select a smaller faucet
A faucet is jewelry for the bathroom. And just as accessories can overpower an outfit, a big bulky faucet isn't flattering in a small bath. Single-handle designs conserve counter space, while a wall-mount installation frees it up all together and can create quite the wow-factor, if the budget can accommodate the required changes to plumbing behind the wall.
5 - Make vanity storage simple
If you're in a storage war with your small bathroom, you're not alone in the battle. Toiletries and personal supplies without a place to call home only add clutter and chaos. Store smart with a space-saving vanity, the dual sink vanity shown here, looks quite simple, but in reality it has 4 sets of full extension drawers, and the vanity tower adds extra storage without overpowering the use of space.
6 - Show off the shower
Shower curtains may be pretty, but they interrupt the visual flow of a bathing space and make it feel significantly smaller. In bathrooms with small footprints, opt for a clear glass sliding shower door that doesn't require the clearance of one with a hinged design. Or as shown in this design and for fraction less expensive a half hinged panel installed on a fixed tempered glass panel. If you're embarking on a big remodel, create the illusion of more space by using same tile in the shower that's used throughout; instead of seeing them as two separate zones, the eye will read them as one.
7 - Discover the treasure of hidden storage
Work with a contractor, and you just might find some serious storage potential hidden behind your walls. Whether it's utilizing space between the studs for shallow shelving or a creating a small linen closet by annexing space from an adjacent room, even small additions can make a big difference.
8 - Focal Point
Tile is a beautiful, durable addition to any bathroom. For dainty spaces, consider installing tile at a diagonal to accentuate the focal point or as in this bathroom I used an oversized textured pattern to bring depth to the space at the window wall.
9 - Choose the right lights
Strategically install light to reflect and brighten a small bathroom to make it appear larger. Recessed lighting is an affordable solution for tiny rooms, offering ample light while taking up little space. Wall sconces alongside a mirror also reflect off the walls and make a room feel bright and airy. I always recommend going with LED lighting at 2800 to 3000K.
10 – Accessorize
This is your time to shine in your decorating skills, have fun with your towels, you can change the color scheme daily just by adding pops of color in your accessories, make sure to get items that serve a dual purpose, like baskets, boxes they can always be used as hampers, storing of towels and even a nice display for your guest.
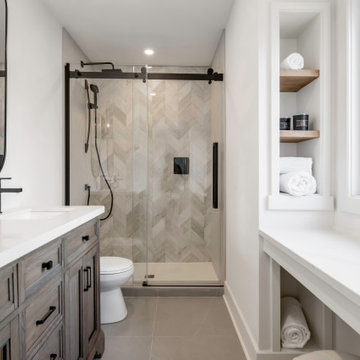
 Unique Home Solutions Inc.
This bathroom has some many cute storage ideas. There is a built-in makeup counter with open shelving for your towels and accessories. It is a great use of space!
If you are looking to sell your home, give us a call. We work with realtors, homeowners, house flippers and investors. How your home looks, matters more today than it ever had since many are shopping online for their 'forever home'!
Sponsored
Sunbury, OH
J.Holderby - Renovations
Franklin County's Leading General Contractors - 2X Best of Houzz!
 TOC design & construction inc.
DESIGNED BY TOC design
CONSTRUCTION BY TOC design & Construction inc.
PHOTOS BY : Tania Scardellato
I was fortunate to have a young family approach me in desperate need to renovate there only 3 piece bathroom. This space was In dire need of a remodel, with old brown wall to wall tiles and a dated bulky yellow brown single sink vanity.
Storage was a must, lighting a necessity, and proper accessibility to the shower bath area.
We had a tight budget to respect, but a full gut of this bathroom was required. And a good thing too, once we started doing the demolition we noticed that mildew and rotting floors and walls had accumulated throughout the years. Doing it right the first time is no joke when dealing with water and electrical issues.
We discarded all reminisce of old and built from scratch, new walls, new plumbing, new electrical ,new insulation and a new window, a new fan that actually exhausted outside ( I say this laughing as you would be amazed at how many fans are installed but don’t exhaust outside, and you the client would never know unless you go inside the attic space.
Once all the hard stuff was done, the rest is just a matter of smart design. If you have a small bathroom here are some tips to guide you.
10 tips for making a small bathroom feel larger
Is your tiny bathroom cramping your functionality and style, leaving you longing for the enormous bathrooms gracing the pages of design magazines? Even if your bathroom is a fraction of the size, all it takes is some design savvy to make the most of the space you have. Consider these 10 smart tips that will help your bathroom look, feel and function like those larger contenders.
1-Get creative with corners
Space is at a premium in small bathrooms, so it's important to maximize every inch. Corners, for example, provide extra space for shelving, storage units and even hooks. Get creative and install unique design solutions that are not only functional, but also eye-catching. If you love the airiness of floating cabinets, add baskets or decorative boxes under for extra storage. If you are installing floating cabinets insure that they are installed securely to studs or plywood at wall.
2- Let solid colors shine
Busy patterns have a shrinking effect and make small bathrooms seem even smaller. Conversely, light natural hues make a space feel more open. If you're itching to get creative with design, experiment with textures but keep overpowering patterns to a minimum. Tone on tone is the best to achieve this.
3 - Maximize your bathtub
A bathtub takes up a significant portion of the room, but modern, compact options with curved basins, can make the tub feel larger when in use, all while conserving space.
4 - Select a smaller faucet
A faucet is jewelry for the bathroom. And just as accessories can overpower an outfit, a big bulky faucet isn't flattering in a small bath. Single-handle designs conserve counter space, while a wall-mount installation frees it up all together and can create quite the wow-factor, if the budget can accommodate the required changes to plumbing behind the wall.
5 - Make vanity storage simple
If you're in a storage war with your small bathroom, you're not alone in the battle. Toiletries and personal supplies without a place to call home only add clutter and chaos. Store smart with a space-saving vanity, the dual sink vanity shown here, looks quite simple, but in reality it has 4 sets of full extension drawers, and the vanity tower adds extra storage without overpowering the use of space.
6 - Show off the shower
Shower curtains may be pretty, but they interrupt the visual flow of a bathing space and make it feel significantly smaller. In bathrooms with small footprints, opt for a clear glass sliding shower door that doesn't require the clearance of one with a hinged design. Or as shown in this design and for fraction less expensive a half hinged panel installed on a fixed tempered glass panel. If you're embarking on a big remodel, create the illusion of more space by using same tile in the shower that's used throughout; instead of seeing them as two separate zones, the eye will read them as one.
7 - Discover the treasure of hidden storage
Work with a contractor, and you just might find some serious storage potential hidden behind your walls. Whether it's utilizing space between the studs for shallow shelving or a creating a small linen closet by annexing space from an adjacent room, even small additions can make a big difference.
8 - Focal Point
Tile is a beautiful, durable addition to any bathroom. For dainty spaces, consider installing tile at a diagonal to accentuate the focal point or as in this bathroom I used an oversized textured pattern to bring depth to the space at the window wall.
9 - Choose the right lights
Strategically install light to reflect and brighten a small bathroom to make it appear larger. Recessed lighting is an affordable solution for tiny rooms, offering ample light while taking up little space. Wall sconces alongside a mirror also reflect off the walls and make a room feel bright and airy. I always recommend going with LED lighting at 2800 to 3000K.
10 – Accessorize
This is your time to shine in your decorating skills, have fun with your towels, you can change the color scheme daily just by adding pops of color in your accessories, make sure to get items that serve a dual purpose, like baskets, boxes they can always be used as hampers, storing of towels and even a nice display for your guest.
 TOC design & construction inc.
DESIGNED BY TOC design
CONSTRUCTION BY TOC design & Construction inc.
PHOTOS BY : Tania Scardellato
I was fortunate to have a young family approach me in desperate need to renovate there only 3 piece bathroom. This space was In dire need of a remodel, with old brown wall to wall tiles and a dated bulky yellow brown single sink vanity.
Storage was a must, lighting a necessity, and proper accessibility to the shower bath area.
We had a tight budget to respect, but a full gut of this bathroom was required. And a good thing too, once we started doing the demolition we noticed that mildew and rotting floors and walls had accumulated throughout the years. Doing it right the first time is no joke when dealing with water and electrical issues.
We discarded all reminisce of old and built from scratch, new walls, new plumbing, new electrical ,new insulation and a new window, a new fan that actually exhausted outside ( I say this laughing as you would be amazed at how many fans are installed but don’t exhaust outside, and you the client would never know unless you go inside the attic space.
Once all the hard stuff was done, the rest is just a matter of smart design. If you have a small bathroom here are some tips to guide you.
10 tips for making a small bathroom feel larger
Is your tiny bathroom cramping your functionality and style, leaving you longing for the enormous bathrooms gracing the pages of design magazines? Even if your bathroom is a fraction of the size, all it takes is some design savvy to make the most of the space you have. Consider these 10 smart tips that will help your bathroom look, feel and function like those larger contenders.
1-Get creative with corners
Space is at a premium in small bathrooms, so it's important to maximize every inch. Corners, for example, provide extra space for shelving, storage units and even hooks. Get creative and install unique design solutions that are not only functional, but also eye-catching. If you love the airiness of floating cabinets, add baskets or decorative boxes under for extra storage. If you are installing floating cabinets insure that they are installed securely to studs or plywood at wall.
2- Let solid colors shine
Busy patterns have a shrinking effect and make small bathrooms seem even smaller. Conversely, light natural hues make a space feel more open. If you're itching to get creative with design, experiment with textures but keep overpowering patterns to a minimum. Tone on tone is the best to achieve this.
3 - Maximize your bathtub
A bathtub takes up a significant portion of the room, but modern, compact options with curved basins, can make the tub feel larger when in use, all while conserving space.
4 - Select a smaller faucet
A faucet is jewelry for the bathroom. And just as accessories can overpower an outfit, a big bulky faucet isn't flattering in a small bath. Single-handle designs conserve counter space, while a wall-mount installation frees it up all together and can create quite the wow-factor, if the budget can accommodate the required changes to plumbing behind the wall.
5 - Make vanity storage simple
If you're in a storage war with your small bathroom, you're not alone in the battle. Toiletries and personal supplies without a place to call home only add clutter and chaos. Store smart with a space-saving vanity, the dual sink vanity shown here, looks quite simple, but in reality it has 4 sets of full extension drawers, and the vanity tower adds extra storage without overpowering the use of space.
6 - Show off the shower
Shower curtains may be pretty, but they interrupt the visual flow of a bathing space and make it feel significantly smaller. In bathrooms with small footprints, opt for a clear glass sliding shower door that doesn't require the clearance of one with a hinged design. Or as shown in this design and for fraction less expensive a half hinged panel installed on a fixed tempered glass panel. If you're embarking on a big remodel, create the illusion of more space by using same tile in the shower that's used throughout; instead of seeing them as two separate zones, the eye will read them as one.
7 - Discover the treasure of hidden storage
Work with a contractor, and you just might find some serious storage potential hidden behind your walls. Whether it's utilizing space between the studs for shallow shelving or a creating a small linen closet by annexing space from an adjacent room, even small additions can make a big difference.
8 - Focal Point
Tile is a beautiful, durable addition to any bathroom. For dainty spaces, consider installing tile at a diagonal to accentuate the focal point or as in this bathroom I used an oversized textured pattern to bring depth to the space at the window wall.
9 - Choose the right lights
Strategically install light to reflect and brighten a small bathroom to make it appear larger. Recessed lighting is an affordable solution for tiny rooms, offering ample light while taking up little space. Wall sconces alongside a mirror also reflect off the walls and make a room feel bright and airy. I always recommend going with LED lighting at 2800 to 3000K.
10 – Accessorize
This is your time to shine in your decorating skills, have fun with your towels, you can change the color scheme daily just by adding pops of color in your accessories, make sure to get items that serve a dual purpose, like baskets, boxes they can always be used as hampers, storing of towels and even a nice display for your guest.
 TOC design & construction inc.
DESIGNED BY TOC design
CONSTRUCTION BY TOC design & Construction inc.
PHOTOS BY : Tania Scardellato
I was fortunate to have a young family approach me in desperate need to renovate there only 3 piece bathroom. This space was In dire need of a remodel, with old brown wall to wall tiles and a dated bulky yellow brown single sink vanity.
Storage was a must, lighting a necessity, and proper accessibility to the shower bath area.
We had a tight budget to respect, but a full gut of this bathroom was required. And a good thing too, once we started doing the demolition we noticed that mildew and rotting floors and walls had accumulated throughout the years. Doing it right the first time is no joke when dealing with water and electrical issues.
We discarded all reminisce of old and built from scratch, new walls, new plumbing, new electrical ,new insulation and a new window, a new fan that actually exhausted outside ( I say this laughing as you would be amazed at how many fans are installed but don’t exhaust outside, and you the client would never know unless you go inside the attic space.
Once all the hard stuff was done, the rest is just a matter of smart design. If you have a small bathroom here are some tips to guide you.
10 tips for making a small bathroom feel larger
Is your tiny bathroom cramping your functionality and style, leaving you longing for the enormous bathrooms gracing the pages of design magazines? Even if your bathroom is a fraction of the size, all it takes is some design savvy to make the most of the space you have. Consider these 10 smart tips that will help your bathroom look, feel and function like those larger contenders.
1-Get creative with corners
Space is at a premium in small bathrooms, so it's important to maximize every inch. Corners, for example, provide extra space for shelving, storage units and even hooks. Get creative and install unique design solutions that are not only functional, but also eye-catching. If you love the airiness of floating cabinets, add baskets or decorative boxes under for extra storage. If you are installing floating cabinets insure that they are installed securely to studs or plywood at wall.
2- Let solid colors shine
Busy patterns have a shrinking effect and make small bathrooms seem even smaller. Conversely, light natural hues make a space feel more open. If you're itching to get creative with design, experiment with textures but keep overpowering patterns to a minimum. Tone on tone is the best to achieve this.
3 - Maximize your bathtub
A bathtub takes up a significant portion of the room, but modern, compact options with curved basins, can make the tub feel larger when in use, all while conserving space.
4 - Select a smaller faucet
A faucet is jewelry for the bathroom. And just as accessories can overpower an outfit, a big bulky faucet isn't flattering in a small bath. Single-handle designs conserve counter space, while a wall-mount installation frees it up all together and can create quite the wow-factor, if the budget can accommodate the required changes to plumbing behind the wall.
5 - Make vanity storage simple
If you're in a storage war with your small bathroom, you're not alone in the battle. Toiletries and personal supplies without a place to call home only add clutter and chaos. Store smart with a space-saving vanity, the dual sink vanity shown here, looks quite simple, but in reality it has 4 sets of full extension drawers, and the vanity tower adds extra storage without overpowering the use of space.
6 - Show off the shower
Shower curtains may be pretty, but they interrupt the visual flow of a bathing space and make it feel significantly smaller. In bathrooms with small footprints, opt for a clear glass sliding shower door that doesn't require the clearance of one with a hinged design. Or as shown in this design and for fraction less expensive a half hinged panel installed on a fixed tempered glass panel. If you're embarking on a big remodel, create the illusion of more space by using same tile in the shower that's used throughout; instead of seeing them as two separate zones, the eye will read them as one.
7 - Discover the treasure of hidden storage
Work with a contractor, and you just might find some serious storage potential hidden behind your walls. Whether it's utilizing space between the studs for shallow shelving or a creating a small linen closet by annexing space from an adjacent room, even small additions can make a big difference.
8 - Focal Point
Tile is a beautiful, durable addition to any bathroom. For dainty spaces, consider installing tile at a diagonal to accentuate the focal point or as in this bathroom I used an oversized textured pattern to bring depth to the space at the window wall.
9 - Choose the right lights
Strategically install light to reflect and brighten a small bathroom to make it appear larger. Recessed lighting is an affordable solution for tiny rooms, offering ample light while taking up little space. Wall sconces alongside a mirror also reflect off the walls and make a room feel bright and airy. I always recommend going with LED lighting at 2800 to 3000K.
10 – Accessorize
This is your time to shine in your decorating skills, have fun with your towels, you can change the color scheme daily just by adding pops of color in your accessories, make sure to get items that serve a dual purpose, like baskets, boxes they can always be used as hampers, storing of towels and even a nice display for your guest.
8