
Search results for "Simple tool" in Home Design Ideas
 Greenington LLC
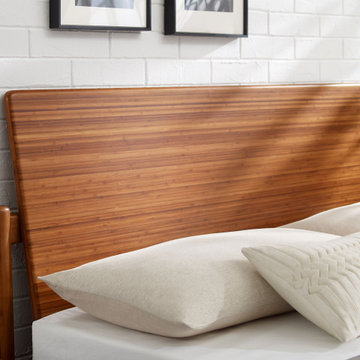
The modern style and simple clean lines of the Monterey platform bed show off the rich variety of Amber’s colors. The expert construction features a craftsman-built frame in solid sustainable bamboo, with softly rounded edges, and turned and tapered legs. The prominent headboard provides a restful surface, angled for good looks and comfortable lounging in bed. Sustainable and earth friendly, Amber is not a surface stain, the color is the result of an innovative new process using earth friendly heat and steam, to entirely transform the solid bamboo material into Amber’s deep color. Variation in grain and color enrich the natural beauty of bamboo furniture and make each piece unique. Slight differences in bamboo shade colors are signs that the furniture has been crafted from solid bamboo and is considered a benchmark of quality. The Monterey platform bed is designed for use with a mattress only, which is supported with a solid bamboo European slat system, eliminating the need for a box spring, and providing constant ventilation for your mattress. Available in Queen & Eastern King. Discover the expert craftsmanship packed into each piece of Greenington bamboo furniture. Greenington furniture is made using an earth friendly, renewable resource harvested from fully sustainable and rapidly growing forests.
Features:
• Crafted in 100% solid Moso bamboo
• No plywood, particle board, or MDF
• Earth friendly, sustainable resource
• 20% harder than Red Oak
• Amber bamboo coloring is achieved through heat & pressure - No stain
• Beautifully finished all the way around
• Solid bamboo slat system, no box spring needed
• Tough metal to metal connecting hardware
• Easy Assembly, no tools required
 Rocky Tops Granite & Marble LLC
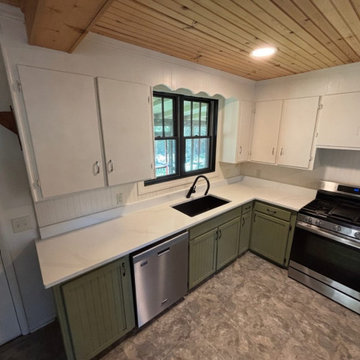
We put MSI Calacatta Elysio into a kitchen in Columbia, and it's one of those quartzes that just works in a room where people actually cook and live. Elysio's an engineered quartz manufactured right here in the great state of South Carolina. It features a bright clean background with soft gray and gold veining moving through it, the kind of look that reads calm from across the room but still gives you something to study up close at the counter.
Engineered quartz like this is consistent in a way natural stone just can't be. Every slab off the line looks close enough to the next that we're not fighting to match veining across seams or worrying about a wild vein hitting the sink cutout wrong. That consistency matters in a kitchen with multiple runs of counter, because the eye catches it immediately if the pattern jumps from one section to the next. Templating still has to be dead on, and we take the time at the seams to keep that veining looking like it keeps moving instead of stopping and starting over.
Day to day, Elysio holds up the way good quartz should. It doesn't need sealing, it resists stains from coffee, wine, and the everyday mess of a working kitchen, and it shrugs off scratches better than people expect. We still tell folks to use a trivet for hot pans straight off the stove, just good practice with any engineered surface. The edge is eased, clean and simple, the kind of detail you settle on at the end and then don't think about again because it just looks right.
Columbia kitchens see a lot of real use, families cooking, kids doing homework at the island, company gathered around while dinner's going. A quartz like Elysio fits that life. It's bright enough to open the room up, patterned enough to keep from looking flat, and tough enough that it's still going to look this good years from now. That's what we're after on every job in the Midlands, something that looks sharp walking in and keeps earning its keep long after we've packed up the tools.
 Rocky Tops Granite & Marble LLC
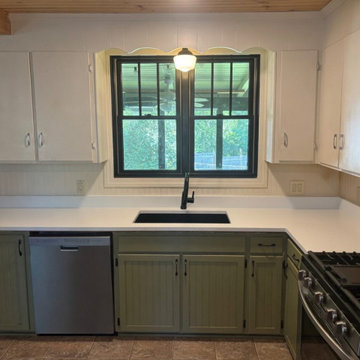
We put MSI Calacatta Elysio into a kitchen in Columbia, and it's one of those quartzes that just works in a room where people actually cook and live. Elysio's an engineered quartz manufactured right here in the great state of South Carolina. It features a bright clean background with soft gray and gold veining moving through it, the kind of look that reads calm from across the room but still gives you something to study up close at the counter.
Engineered quartz like this is consistent in a way natural stone just can't be. Every slab off the line looks close enough to the next that we're not fighting to match veining across seams or worrying about a wild vein hitting the sink cutout wrong. That consistency matters in a kitchen with multiple runs of counter, because the eye catches it immediately if the pattern jumps from one section to the next. Templating still has to be dead on, and we take the time at the seams to keep that veining looking like it keeps moving instead of stopping and starting over.
Day to day, Elysio holds up the way good quartz should. It doesn't need sealing, it resists stains from coffee, wine, and the everyday mess of a working kitchen, and it shrugs off scratches better than people expect. We still tell folks to use a trivet for hot pans straight off the stove, just good practice with any engineered surface. The edge is eased, clean and simple, the kind of detail you settle on at the end and then don't think about again because it just looks right.
Columbia kitchens see a lot of real use, families cooking, kids doing homework at the island, company gathered around while dinner's going. A quartz like Elysio fits that life. It's bright enough to open the room up, patterned enough to keep from looking flat, and tough enough that it's still going to look this good years from now. That's what we're after on every job in the Midlands, something that looks sharp walking in and keeps earning its keep long after we've packed up the tools.
Find the right local pro for your project
 Greenington LLC
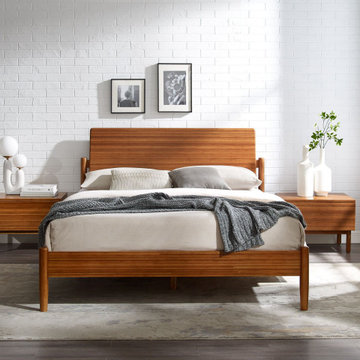
The modern style and simple clean lines of the Monterey platform bed show off the rich variety of Amber’s colors. The expert construction features a craftsman-built frame in solid sustainable bamboo, with softly rounded edges, and turned and tapered legs. The prominent headboard provides a restful surface, angled for good looks and comfortable lounging in bed. Sustainable and earth friendly, Amber is not a surface stain, the color is the result of an innovative new process using earth friendly heat and steam, to entirely transform the solid bamboo material into Amber’s deep color. Variation in grain and color enrich the natural beauty of bamboo furniture and make each piece unique. Slight differences in bamboo shade colors are signs that the furniture has been crafted from solid bamboo and is considered a benchmark of quality. The Monterey platform bed is designed for use with a mattress only, which is supported with a solid bamboo European slat system, eliminating the need for a box spring, and providing constant ventilation for your mattress. Available in Queen & Eastern King. Discover the expert craftsmanship packed into each piece of Greenington bamboo furniture. Greenington furniture is made using an earth friendly, renewable resource harvested from fully sustainable and rapidly growing forests.
Features:
• Crafted in 100% solid Moso bamboo
• No plywood, particle board, or MDF
• Earth friendly, sustainable resource
• 20% harder than Red Oak
• Amber bamboo coloring is achieved through heat & pressure - No stain
• Beautifully finished all the way around
• Solid bamboo slat system, no box spring needed
• Tough metal to metal connecting hardware
• Easy Assembly, no tools required
 CNJ Builders
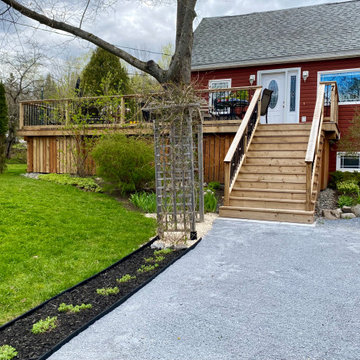
From Backyard to Breathtaking Oasis: Crafting Your Dream Deck
Imagine stepping out your back door and entering a paradise – a place where summer evenings melt into laughter and relaxation. This is exactly what we achieved for a homeowner recently with the construction of a sprawling new deck.
Our team of experts transformed a simple backyard into a stunning outdoor living area, perfect for soaking up the sunshine and enjoying the company of loved ones.
Setting the Stage: A Foundation for Fun
The journey began with a sturdy and secure base. We constructed the deck using high-quality materials, ensuring it could withstand years of gatherings and barbecues. The size of the deck was carefully planned to accommodate the homeowner's vision of a large outdoor oasis.
Light Up the Night: Extending the Fun After Dark
Long summer days are a gift, but the magic shouldn't end when the sun sets. To extend the enjoyment well into the night, we installed lighting around the entire perimeter of the deck. This thoughtful addition allows for safe navigation after dark while creating a warm and inviting atmosphere. Recessed lighting perfectly complemented the overall aesthetic.
A Place for Everything: Built-in Storage for Effortless Maintenance
A beautiful deck deserves to stay clutter-free. That's why we incorporated a large storage area underneath the deck itself. This clever solution provides a designated space for patio furniture cushions, pool toys, gardening tools, or anything else that needs to be tucked away but kept readily accessible.
Seamless Transitions: The Perfect Patio Door
The key to a truly integrated indoor-outdoor living experience lies in effortless access. To achieve this, we installed a modern sliding patio door. This creates a smooth transition from the house to the deck, allowing for easy flow of traffic and conversation. Whether it's carrying plates of grilled food or simply stepping out to enjoy the fresh air, the sliding door ensures a seamless connection.
Grand Entrances: A Double Dose of Elegance
For added convenience and a touch of grandeur, we constructed two beautiful staircases leading up to the deck. This not only provides easy access from different points in the yard but also adds a touch of architectural interest. The design of the staircases were tailored to the overall style of the house and deck.
The final product? A breathtaking outdoor living area that extends the homeowner's living space and creates a haven for relaxation and entertainment. This project is a perfect example of our ability to transform a backyard into a functional and beautiful extension of the home, allowing our clients to create lasting memories under the summer sun.
 China Marmoglass Co.,Limited
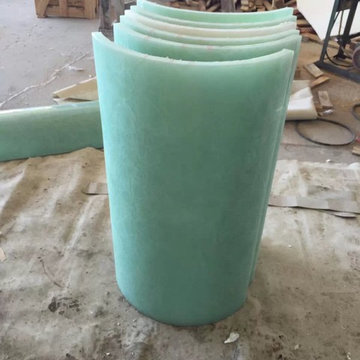
Solid Marmoglass Glass2 Slab
Here you can find detail of Solid Marmoglass Glass2, we are the factory for Solid Marmoglass Glass2, we have Solid Marmoglass Glass2 Slabs 3000 x 1400 x 20mm.
Crystallized Glass2,Crystallized stone2,Crystallized glass panel Glass2
Application:
1). Interior & external wall cladding
2). Flooring Tile, Stair, Column cladding
3). Basin, Countertop, Table, Bar
4). bath, Kitchen, any tops, round pillar and furniture decoration etc.
You can get best 3D Glassos Panels Glass2 here, You can get the Glass 2 Panel here,we are 3D Glassos Panels slabs,tiles,countertops manufacturer
glass2 is a high grade, inorganic material produced by high temperature forging; it is an environmentally friendly material for countertops, bar tops, vanities, shower doors, flooring, interior and exterior wall cladding and paneling. It can be used for both indoor and outdoor applications. glass2 is resistant to weathering from wind, rain, and sunlight. glass2 is produced from 99% fused recycled glass and is resin free. This material is easy to clean and 100% non-porous. glass2 is available three (3) slab thickness: 16mm, 20mm, and 30mm. glass2 is now produced with an epoxy/nylon mesh backing to improve its ability to withstand abuse during transportation and to give extra strength for cut-outs (sinks, stove tops etc.).
Slab Model: 2400 x 1200 , 3000 x 1400
Thickness: 16mm, 20mm, 30mm
What is glass2?
Glass2is 99% recycled glass. Glass2 contains no resin or epoxy; it is pure glass.
What thickness range is available for glass2 ?
Glass2 standard thicknesses are 20mm yet 16mm is available upon request ... changed is for customize.
Can glass2 be used for countertops?
Yes. Glass2 can be used for countertops, as well as for wall cladding, flooring, and fascia of buildings.
Will glass2 stain?
Glass2 will not stain. Glass2 will not absorb anything, including acid and wine.
How easy can glass2 be fabricated?
Glass2 can be fabricated by both stone and glass fabricators using industry standard tools and equipment. Glass2 can be cut in most shapes by following simple guidelines.
Can glass2 be used for columns?
Yes, glass2 can be bent to shape in production and can be used for columns. (Custom orders only)
Can glass2 be repaired if scratched?
Glass2 can be repaired if scratched, using standard glass industry tools, supplies, and principles to achieve a repolished surface very close to the factory finish.
Is glass2tempered?
No, glass2 is not a tempered product.
China Marmoglass Co.,Limited offer all kinds of Glassos, 3D Marmoglass, Glass2 exporter, supplier, factory. You can buy Glassos, 3D Marmoglass, Glass2 exporter, supplier, factory from China Marmoglass Co.,Limited at Chinamarmoglass.com
You can get best 3D Glassos Panels here, we are 3D Glassos Glass2 Panels slabs,tiles,countertops manufacturer.
 China Marmoglass Co.,Limited
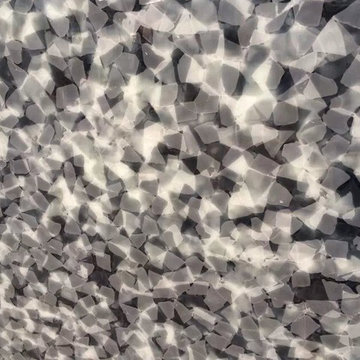
Solid Marmoglass Glass2 Slab
Glass2 is an environmentally friendly product constructed from 99% recycled glass, containing no chemicals or glue. The flexibility of glass2 allows for its application in kitchen and bathroom countertops, bartops, tables, and fireplace surroundings. Glass2 is stain-resistant, bacteria-free, and requires virtually no maintenance. Glass2 is both easy to sustain and elegant in its appearance, meeting the needs of many customers and fabricators.
Here you can find detail of Solid Marmoglass Glass2, we are the factory for Solid Marmoglass Glass2, we have Solid Marmoglass Glass2 Slabs 3000 x 1400 x 20mm.
Crystallized Glass2,Crystallized stone2,Crystallized glass panel Glass2
Application:
1). Interior & external wall cladding
2). Flooring Tile, Stair, Column cladding
3). Basin, Countertop, Table, Bar
4). bath, Kitchen, any tops, round pillar and furniture decoration etc.
You can get best 3D Glassos Panels Glass2 here, You can get the Glass 2 Panel here,we are 3D Glassos Panels slabs,tiles,countertops manufacturer
glass2 is a high grade, inorganic material produced by high temperature forging; it is an environmentally friendly material for countertops, bar tops, vanities, shower doors, flooring, interior and exterior wall cladding and paneling. It can be used for both indoor and outdoor applications. glass2 is resistant to weathering from wind, rain, and sunlight. glass2 is produced from 99% fused recycled glass and is resin free. This material is easy to clean and 100% non-porous. glass2 is available three (3) slab thickness: 16mm, 20mm, and 30mm. glass2 is now produced with an epoxy/nylon mesh backing to improve its ability to withstand abuse during transportation and to give extra strength for cut-outs (sinks, stove tops etc.).
Slab Model: 2400 x 1200 , 3000 x 1400
Thickness: 16mm, 20mm, 30mm
What is glass2?
Glass2is 99% recycled glass. Glass2 contains no resin or epoxy; it is pure glass.
What thickness range is available for glass2 ?
Glass2 standard thicknesses are 20mm yet 16mm is available upon request ... changed is for customize.
Can glass2 be used for countertops?
Yes. Glass2 can be used for countertops, as well as for wall cladding, flooring, and fascia of buildings.
Will glass2 stain?
Glass2 will not stain. Glass2 will not absorb anything, including acid and wine.
How easy can glass2 be fabricated?
Glass2 can be fabricated by both stone and glass fabricators using industry standard tools and equipment. Glass2 can be cut in most shapes by following simple guidelines.
Can glass2 be used for columns?
Yes, glass2 can be bent to shape in production and can be used for columns. (Custom orders only)
Can glass2 be repaired if scratched?
Glass2 can be repaired if scratched, using standard glass industry tools, supplies, and principles to achieve a repolished surface very close to the factory finish.
Is glass2tempered?
No, glass2 is not a tempered product.
China Marmoglass Co.,Limited offer all kinds of Glassos, 3D Marmoglass, Glass2 exporter, supplier, factory. You can buy Glassos, 3D Marmoglass, Glass2 exporter, supplier, factory from China Marmoglass Co.,Limited at Chinamarmoglass.com
You can get best 3D Glassos Panels here, we are 3D Glassos Glass2 Panels slabs,tiles,countertops manufacturer.
Sponsored
Sunbury, OH

J.Holderby - Renovations
Franklin County's Leading General Contractors - 2X Best of Houzz!

 eLuxury LLC
North American Pine Artisan Bed Frame Specification:
Crafted with extra strong North American Pine by skilled artisans
Available in beautiful walnut, almond, or Gray finishes
Snaps together in under 5 minutes by one person with no tools!
Constructed for Twin, Twin XL, Full, Queen, King, California King mattresses
Rated for up to 900 lbs.
7 layer slats that are about 6" apart
6 1/2" ground clearance
Matches perfectly with our 10" Gel Memory Foam Mattress
100% made in the USA
North American Pine Artisan Bed Frame Dimensions:
Twin: 76.5" x 40.75" x 13.5"
Twin XL: 81.5" x 40.75" x 13.5"
Full: 76.5" x 55.75" x 13.5"
Queen: 80.5" x 61.75" x 13.5"
King: 81.5" x 77.75" x 13.5"
California King: 85.5" x 73.75" x 13.5"
North American Pine Artisan Bed Frame Description:
Several months ago, we at eLuxurySupply had a protoype wooden platform bed constructed for use in an upcoming photoshoot for our best-selling mattress. Customers almost immediately began inquiring about where they purchase one of the platform beds for themselves. We began working with one of the most skilled team of artisan wood manufacturers in the Midwest. Today, we are proud to offer high quality wooden platform beds for sale in a variety of finishes for the home consumer. The bed is delivered directly to you door via parcel mail and fits together in less than five minutes!
Update your bed and go modern with the eLuxurySupply Artisan Platform Bed.

 California Closets of Michigan
"Lighted countertops and specialized storage transform this room into a keepsake-maker's dream space. Innovative, specialized gift wrap holders prevent damage and provide easy access to wrapping paper when needed, along with a specialized Ribbon Drawer that's designed to keep spooled items neat. A universal storage solution, wire baskets can hold a variety of items. Built with a sliding mechanism, they make accessing stored items simple.
Our Fusion Track Wall add both a functional and decorative touch, providing a creative storage solution for empty walls and narrow spaces. You also have a variety of styles and patterns available with Fabric Board Back Panels that can add a sophisticated, personalized touch to a design.
The Chroma Countertop is produced from optical grade engineered resin, featuring a durable matte texture that can be easily refinished throughout its lifetime. This materiel incorporates 40% recycled content and is available in a variety of colors and styles."
 Andover Landscape Design & Construction
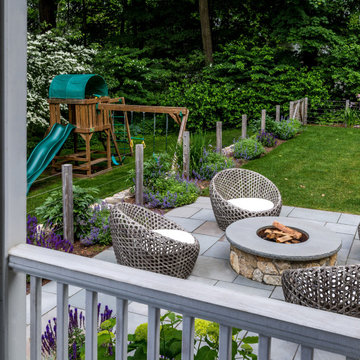
Situated mid-way between the historic Philips Academy campus and the bustling downtown area, this property came to life with a design that’s both functional and beautiful. When we initially sat down with the homeowners to discuss their lifestyle, they had just gotten a very exuberant puppy that needed a place to run and play. A traditional fence would isolate the yard and really restrict it’s flow, so we created a ‘puppy lawn’ surrounded by a stainless steel cable system that allows for a safe-dog environment while simultaneously keeping the sight lines open to the remainder of the property.
A circular fieldstone fire pit with a hand-tooled, two-piece cap sits perfectly within the bluestone patio. Located adjacent to the screened porch in the most private part of the yard, the location is optimal for this ultimate four-season retreat.
“The attention to detail is so critical to our builds. I constantly obsess over the ultimate ‘look’ as well as the fit and finish, as I believe it’s these details that the homeowners deserve. The bluestone cap on this fire pit was spec’d as two pieces to keep the joints minimal and clean. The exterior edge was rock-faced on-site by our masons and a stainless-steel ring in the center will protect the masonry from the heat of the flames. Careful stone selection as well as furniture choices create a composition that’s so very pleasing to the eye.” Russell
Throughout the remainder of the property, matching fieldstone walls help with the slight grade change and is complemented by a variety of flowering perennials designed to have a succession of blooms, all within a cool color tone.
Sit around the fire pit with a glass of wine on a crisp fall night and enjoy this perfect retreat within the energy of the downtown area; the dog is sure to join you.

 OKLAHOMA SHUTTERS
Benefits of Plantation Shutters
Plantation shutters offer advantages and benefits to homeowners over other window coverings including:
• A permanent addition to a house: While they don't add much to the sale price and don't guarantee a return on investment, the curb appeal helps the house sell faster. The permanency of plantation shutters allows them to be included in appraisals.
• Versatility: Many have the ability to open only halfway if desired. If you want to let in all the light, plantation shutters swing away from the window to grant an unobstructed view.
• Insulation: When all louvers are closed, a good insulating barrier is created, trapping unwanted temperatures and saving you money on your energy bill.
• Easy maintenance: With wide louvers, a simple wipe-down is often all that's needed. Vinyl shutters can be taken off their hinges and sprayed off for a major cleaning.
• Elegance: The classic, yet modern look conveys a permanency like no other window dressing can. Whether painted or natural wood, they all have a look that says; welcome home.
Wood vs. Faux Wood
It's not hard to argue that natural wood is more appealing than vinyl or PVC. However, "faux wood," as it's sometimes called, has some advantages:
• Price -- Faux wood shutters are often lower in price than real wood.
• Weight -- Because some shutters are made "hollow core" (as opposed to vinyl-wrapped medium density fiberboard, MDF), they can be significantly lighter.
• Moisture Resistance -- If you live in an area with high humidity, hollow faux wood or aluminum core will resist expanding and sagging. (MDF core louvers will tend to expand and crack as the material swells with moisture.)
Natural wood is the choice for those who have a very healthy budget or for whom a specific appearance is a must. Among the advantages are:
• Size -- Because wood plantation shutters are made of hardwood, they can be quite a bit larger than plastic or vinyl. Vinyl shutters larger than 29 inches may be prone to sag, so they need divider rails or other supports which can destroy the traditional look of a plantation shutter.
• Natural -- While vinyl or plastic shutters can be painted to match any color scheme, the natural shades and finishes of the various species of wood have something for every look.
• Classic -- While many plastic shutters can be made to look like real wood, the faux wood finishes can vary significantly depending on manufacturer and model. Up close, it can be easy to tell they're plastic. The warmth of natural wood is a classic feel that's impossible to beat.
Popular Plantation Shutter Brands
When you go to purchase your plantation shutters, brands names may offer a good representation of high-, mid-, and low-cost range of what's available. Which one you choose depends on your budget and your tastes. Hunter-Douglas and Norman Shutters produce three lines of plantation shutters in both real wood and faux wood styles. A higher-end product, Hunter-Douglas may be worth the cost for beauty and quality of workmanship. The Window Outfitters and Sunland produce a mid-cost line of shutters. The mid-range pricing may be for those who are balancing aesthetics with a budget. National franchise and or box stores may not offer an in-house expert or designer. Look to local companies that specialize in plantation shutters looking online may offer a low-cost brand for budget-minded DIYers. Available in both faux and real wood, the affordability combines with the visual appeal to make this a very popular choice for plantation shutters. Regardless of which line you go with, be sure to ask about frames. Generally all manufactures offer frame choices and may add to the cost, but they add an unsurpassed beauty and warmth to a room with plantation shutters.
Plantation shutters look like similar to wooden blinds, but there are significant differences. Blinds are often narrow, made of aluminum or vinyl, and the slats tilt based on a gear and pulley mechanism and they hang in the window with cords. By contrast, plantation shutters have wide compound louvers that fit into a frame and are controlled by way of a wooden rod running up the middle. When not needed, they can be manufactured to swing back onto the wall. Options to are available to build a more contemporary look with a larger view with a “hidden tilt” feature.
Cost of Plantation Shutters
Nationally, the cost of plantation shutters, depending on their size and the material, whether or not they are custom arches and colors or stains, may vary. Most manufacturers want their shutters to be professionally installed to keep the warranty intact which is a benefit to the customer in the long run. They will usually have a limited lifetime warranty.
Cost of Installation
Costs for having plantation shutters installed by a contractor are a bit more predictable. Contractors who have installed plantation shutters before can quickly get accurate measurements and suggest which materials would work best in different rooms. For example, while natural wood may look beautiful in your living room, it might not be so practical in a bathroom where moisture will cause the wood to warp. The size, material, and quality of the shutter will have a significant effect on the cost. Contractors usually go through a shutter supplier and can get various sizes that are not normally available at home improvement stores. Hiring a professional team of knowledgeable suppliers and installers is a good choice.
Here are some sample prices of the shutters most contractors use for standard-sized windows: In general, plantation shutters should cost approximately $20 to $26 per square foot. Labor costs depend on factors such as the contractor's workload, remoteness of the location, environment, and the contractor's overhead. Labor generally runs about $100 per hour and will be added to the shutter cost.
• 16x20 -- Faux wood $120. Real wood $156
• 24x50 -- Faux wood $160. Real wood $208
• 36x54 -- Faux wood $270. Real wood $351
• 36x60 -- Faux wood $300 Real wood $390
• 42x72 -- Faux wood $420. Real wood $546
• 48x82 -- Faux wood $550. Real wood $715
DIY
Plantation shutters can be purchased and installed by the homeowners. How much they cost will depend on size and material. Faux wood shutter’s cost depends on size and wooden shutter’s cost will depend on size and whether or not they are painted or stained.
• Natural wood is $90-$600 depending on size. Many companies offer standard stained selection but custom color matching may be available from $175 -$250.
• Faux wood will be from $120-$500.
• Additional tools include: Hang Strips $4-$15 and about $4 for mounting hardware. Locks or closures can cost up to $15 for each shutter.
Finally, if you order them online, you can expect to pay $30-$70 shipping per shutter or per set of shutters per window depending on the supplier. Keep in mind that even if you're handy with tools, installing shutters can be time-consuming if you've never done it before there is defiantly a learning curve.


 Raven Roofing & Restoration, LLC
At Raven Roofing and Restoration, it’s our goal to provide quality Jacksonville roof repair, because we know how important it is to take care of your home. From leaky roofs to storm damage repair, no roof repair job is too big or too small for our team.
Many other roofing contractors will insist on a complete roof replacement if you call them to fix a simple leak in your roof. You can trust our professional Jacksonville roofers to quickly diagnose and properly repair the exact areas of your roof that are in need of repair.
Quality Roof Repair in Jacksonville, FL
Our roofing experts have created exclusive repair specifications designed to ensure permanent repair solutions for your asset. We do not perform simple patchwork. All of our service professionals have been trained and certified in our exclusive methods. This enables us to guarantee all of our repairs and offer the best-extended roof warranty available in today’s market.
You can rely on us for high quality standards for roof replacement and repair, the best trained repair technicians and the most efficient service delivery. Our dedication to the highest quality of service and workmanship is backed by a full warranty and a 100% satisfaction guarantee. This ensures you receive competitive prices—guaranteed.


 Industrial Projects
Creating a comfortable outdoor living space is a priority for many homeowners and DIY enthusiasts. With rising summer temperatures, installing a shade tarp in your backyard offers an affordable and effective solution for sun protection. We’ve developed this detailed, step-by-step guide to help you confidently install a shade tarp that not only shields you from the sun but also adds aesthetic appeal to your outdoor area.
Benefits of Installing a Backyard Shade Tarp
Before diving into the installation process, let’s explore the key benefits of having a backyard shade tarp:
Provides UV Protection: Keeps your family and guests safe from harmful sun exposure.
Reduces Outdoor Temperatures: Creates a cooler, more enjoyable outdoor space.
Protects Outdoor Furniture: Extends the life of patio furniture by reducing sun damage.
Enhances Outdoor Aesthetics: Adds a modern, stylish look to your yard.
Budget-Friendly: More affordable compared to permanent structures like pergolas.
Materials and Tools You’ll Need
To begin your DIY backyard shade project, gather the following materials and tools:
Materials:
Shade tarp (UV-resistant and breathable)
Sturdy posts or existing structures (trees, fences, walls)
Mounting hardware (eye bolts, D-rings, turnbuckles, snap hooks)
Nylon or polyester rope, or stainless-steel wire
Concrete (if installing new posts)
Tools:
Power drill
Measuring tape
Level
Ladder
Wrench or adjustable spanner
Post hole digger (if installing new posts)
Step 1: Plan Your Shade Tarp Layout
The first step in installing your backyard shade tarp is careful planning. Take time to assess your outdoor area and answer these key questions:
Where is the sun’s path throughout the day?
What size and shape of tarp best suits your space?
Will you anchor the tarp to existing structures or install new posts?
What height do you want the tarp to sit at for maximum shade and airflow?
Pro Tip: Use string or garden hoses to visualize the tarp layout on the ground before making permanent decisions.
Step 2: Measure and Mark Anchor Points
Once you’ve determined the tarp’s location and orientation:
Measure the tarp dimensions.
Mark the exact points where each corner of the tarp will be anchored.
Ensure that the anchor points are at least 5–10% longer than the tarp size to allow for tensioning and slight adjustments.
Consider slope angles for water runoff. Aim for at least a 20-degree angle to prevent water pooling on the tarp.
Step 3: Install Support Posts (If Necessary)
If your backyard lacks existing anchor points like trees or fences, you’ll need to install sturdy support posts:
Dig post holes at least 24 inches deep and 8-12 inches wide for stability.
Set posts in concrete, making sure they remain plumb and level.
Allow the concrete to cure for at least 24–48 hours before applying tension from the tarp.
We recommend using pressure-treated wood, galvanized steel poles, or aluminum posts for longevity and strength.
Step 4: Install Mounting Hardware
With your anchor points ready, it’s time to install the necessary hardware:
Attach eye bolts or pad eyes securely into walls, posts, or other fixed structures.
For added flexibility and adjustability, install turnbuckles or tensioners to fine-tune the tarp’s tightness.
Connect snap hooks, D-rings, or carabiners to make assembly and disassembly easier.
Make sure all hardware is rated for outdoor use to prevent rust and corrosion.
Step 5: Attach and Tension the Shade Tarp
Now it’s time for the most satisfying part—mounting the shade tarp:
Begin by attaching one corner of the tarp to an anchor point.
Gradually attach the remaining corners, moving diagonally for even tension.
Adjust each connection point using your turnbuckles, ropes, or cables.
Pull the tarp tight enough to avoid sagging, but not so tight that it risks tearing.
Check that the tarp maintains the desired slope for rainwater runoff and adjust tension as needed.
Step 6: Final Adjustments and Safety Check
Before enjoying your new shaded area:
Inspect all anchor points and hardware for stability.
Test the tarp’s tension and make adjustments for even distribution.
Ensure that no sharp edges or loose connections remain that could damage the tarp or pose a safety hazard.
Confirm that the tarp is secure in windy conditions by giving it a gentle tug.
If you live in an area with frequent high winds, consider removing the tarp during storms to prevent damage.
Step 7: Enjoy Your Shaded Backyard Oasis
Once installed, your backyard shade tarp provides a comfortable and protective space for outdoor gatherings, relaxation, or family activities. You can decorate underneath with outdoor furniture, string lights, or potted plants to create a personalized outdoor retreat.
Maintenance Tips for Long-Lasting Shade Tarp Performance
To extend the life of your shade tarp, follow these maintenance guidelines:
Regularly check for wear and tear, especially around anchor points and seams.
Clean the tarp periodically with mild soap and water to prevent mildew buildup.
Store the tarp indoors during harsh weather seasons if it's not designed for year-round use.
Tighten hardware as needed to maintain proper tension and avoid sagging.
By following these simple care steps, your shade tarp will continue to deliver years of sun protection and outdoor comfort.
Conclusion: Upgrade Your Outdoor Space with a DIY Shade Tarp
Installing a shade tarp in your backyard is a cost-effective and rewarding DIY project. With careful planning, quality materials, and proper installation techniques, you’ll enjoy cool, shaded outdoor living all season long. This step-by-step guide ensures your project goes smoothly from start to finish.

 Elizabeth Aldrich
10 Ideas for Turning Your Garage into a Modern Industrial Neighborhood Bar
By Elizabeth Aldrich
Host happy hours and cocktail parties worthy of a full page spread – in your own garage.
Leave the brick exposed, the concrete floors as is, and the wood unfinished and it costs more? The sophisticated older brother of the shabby-chic trend, urban industrial style, is taking over. Real estate agents are able to tack on a few extra grand to a flat if they can include “exposed brick” in their advertisements, and designer chefs and master mixologists are moving into warehouses and industrial districts in urban areas across the nation. A friend recently invited me to dinner at Portland, Oregon’s newest, hippest charcuterie spot, and when we pulled up to the building it was in a warehouse where I used to go to underground raves in high school.
These industrial style spaces that were once seen as unfinished or lacking in coziness are now seriously coveted. Their rawness is considered authentic, their grit a mark of character. But if you’re a homeowner, there’s a good chance you already have one of them built right into your house: your garage.
I like to preach about how much people underutilize their garage spaces, piling them full of storage bins they never touch. Whether you turn it into a workspace or a playroom, there’s a lot of value in a creatively-used garage space. For the overly ambitious, the design lover, or the hostess with the mostess, here’s one idea that blows the rest out of the water.
Turn your garage into a multi-purpose, urban industrial wonderland for work and play.
Originally outfitted for factories and warehouses, the industrial style facilitates productivity. Now that it’s also being appreciated as a great aesthetic for bars and restaurants, these rooms can serve both form and function, doubling as work and entertaining spaces. This is great for people who have always dreamed of having that extra basement space for hosting friends, complete with a wet bar and a billiards table, but lack the square footage. Just keep in mind that your friends might love it so much, they’ll start ditching their favorite happy hour spot and showing up at your doorstep instead.
Here are ten ideas forbuilding the perfect workshop by day and cocktail bar by night in your garage.
1. Clean out the space. Get rid of everything you don’t need. Part of the beauty of industrial style designs is their simplicity and abundance of open space. Excessive clutter can make people feel boxed in, and that’s not conducive to productivity or to social activity. Out of sight, out of mind. Build shelving up high for storing must-keep belongings, much like a warehouse.
For bonus points, store your belongings in wooden crates for aesthetic consistency. Or consider stacking them on a pallet, wrapping them in excessive amounts of plastic wrap, and loading them onto the next cross-country freighter. You won’t miss them.
2. Install storage for frequently used objects. The brilliant thing about the urban industrial look is that your tools, tool boxes, and tool storage cabinets already fit right in. Metal storage cabinets and file cabinets are perfect additions to the space. While grey is certainly the color pallet for this style, 50 shades might be a few too many. Mix it up by spray painting one of your cabinetsto add a pop of color. Make a small pegboard to hold up your tools and hang larger items such as bicycles and recreational equipment by pegs. If you have a lot of storage bins that you have to keep, look upward instead of storing them on the floor. Insert a tracking system onto your garage ceiling and slide the bins into place.
For extra credit, get an old locker to use as a coat closet when guests come over.
3. Heat the space.Since you’re not turning the garage into a full-time living space, such as a spare bedroom, you really don’t need to go through the work and additional cost of installing full-blown heating and insulation systems. If you don’t need to use the space when the temperature drops, or if you live in a consistently temperate climate, you might not need to do anything. But if you do want to be able to host people through the winter, a simple garage heater will suffice. Here are some good options for installing garage heating.
Take it one step further, and get a couple patio heaters to help with the next step.
4. Turn your driveway into a patio space. Even the best restaurants and cocktail bars are nothing in the summertime without a solid patio space. Leave the garage door open on warmer nights and invite your guests to go outdoors. Place some stylish folding chairs and a patio table out for comfort. Place a few potted plants here and there to make the space feel more inviting.
For a really lively patio scene, put a portable fire pit out on the driveway or front lawn and surround it with workbenches from your garage.
5. Build your bar. Pick a corner in your garage for the bar, and get started. You can build a bar pretty cheaply and easily with reclaimed pallets, and get some industrial-style barstools. Behind the bar, you’ll have both your tools and your liquor, and there’s no need to build expensive cabinetry. If you’re serving quality, why cover it up? Build shelving or open cubicles to house your liquor. Put out metal buckets filled with ice to chill beers.Be sure to serve up cocktails worthy of the space. The Hemingway Daiquiri served straight up is a unique way to dress down, or industrialize, a traditionally frou-frou cocktail.
To go the extra mile, build a bar with laid brick.Install an extra fridge in the garage so you can avoid having to trek into the kitchen to refill chilled drinks, and you can store dips, vegetables, and other hors d'oeuvres right at your fingertips.
6. Bring on the games. To really turn your hosting space into a fun time, be sure to offer ample play options. For the low on space, a dart board will suffice, whereas if you’ve got a five-car garage and can’t manage to fill the space, put in a couple billiard tables. Ping pong tables are ideal for most because they’re great fun and can easily be folded up and stored.
If you want to keep your guests playing until the wee hours of the morning, get an old pinball machine, a vintage arcade game, or a small Skee-Ball alley.
7. The heart of your space.Build along worktable that doubles as a table for your guests right in the center of your garage. It should be tall enough to be used while standing, although you can place a few barstools along with it. Having a table space for drinks but limited seating will encourage guests to walk around and mingle. Build it out of wood and make sure to maintain a natural finish.
Don’t be afraid to rough up the work table by day. The dings and marks created while you build will only lend authenticity to the piece.
8. Install lighting. Remember, the urban industrial style is all about function and showcasing materials in their raw form. There’s no need to buy expensive floor lamps or install a fancy lighting system. The most popular lighting in these types of spaces is exposed bulb lighting. Just open up the wiring on your current lighting system and drop down some bulbs.
For additional lighting, string up exposed bulb patio lights and place some vintage metal desk lamps on the tables and bar area.
9. Brand your space. Use the designs for the stuff you build by day as wall art. Blow up sketches, blueprints, schematics, and architectural drawings to hang up for decoration. Choose one wall that could use a splash of color, perhaps the wall behind your bar, and get a friend to paint a mural, or whip out the spray paint for a real urban feel.
Splurge a little and get a custom neon sign made of your last name or the word “bar” to hang behind the bar.
10. The garage door. For the finishing touch, and to really wow your guests, get a brand new modern, industrial style garage door installed. Look for the window-paneled types that restaurants use, like this contemporary aluminum and glass beauty. You can leave it half open when you want to utilize your driveway-patio space.
On nights when you have to close it all the way, the glass panels let your guests still look out onto the stars, making it feel like a patio space even when it’s too cold for one.
Once your garage bar is up and running, put on your denim suit and get ready to call yourself the Joneses. No one will be able to keep up with you.

 Sierra Living Concepts Inc
Dimension:
130"L X 21"D X 89"H
Traditional style marries modern utility in our Orick Solid Wood Entertainment Center for TVs Up To 60".
This solid wood entertainment center is a reminder of classic construction that is built to last. It is an all-in-one media room solution complementing a range of tastes and decor styles. The main body of this unit features two spacious drawers that provide ample storage space for all your essentials, while its glass front cabinet doors serve to keep your DVD or gaming consoles within easy access of your remotes. Flanking this section are two solid wood bookcases designed to house all of your DVD or video game collections alongside a range of decor pieces. A longer shelf bridges the distance above the TV opening. Complete with built-in grommet, this TV center keeps wires tucked neatly out of sight.
This streamlined entertainment unit captures an impressive silhouette made entirely of high-quality rosewood material in a handcrafted construction crafted by way of generational woodworking techniques and tools. Along with this resounding hardwood construction, elegant top moldings complete the handsome and functional look in a sleek dark finish deserving of its commanding design. The rear backing with grooves enhances this aesthetic for greater dimension and resounding appeal.
Special Features:
• 100% Handcrafted
• Constructed from solid rosewood for durability and style
• Two pull-out drawers
• Two glass front cabinet doors for console use
• Nine shelves provide plenty of space for storage
• Adds a traditional style to any room
Note: Real wood is a product of nature, and as such, no two pieces are alike. Variations in solid wood grain patterns are to be expected and make each furniture uniquely beautiful, just like us humans.

 Bluworld HOMelements
With a double panel of multi-colored Indian Rajah slate, the Nojoqui Falls Double fountain creates a display that is irresistible to the eye and combines a sound that is soothing to the ear. Capturing the raw beauty of its namesake, the beautiful 164 foot Nojoqui Falls near Solvang, California, our fountain combines natural elements with modern technology to bring nature's majesty to your living room. Nearly five feet tall and over four feet wide, this wall mounted fountain makes its presence felt in your home or office.
These water fountains feature your choice of four contemporary finishes framing double panels of Rajah slate layered onto lightweight composite material. The fountain is made with a splash-free design and features LED lighting to bring even more attention to the water falling past the slate. An adjustable flow valve allows you to adjust the rate of the falling water based on your mood, from a tranquil, calming curtain to a torrential cascade. Even with these features, installation is still a breeze, with no special tools. For truly unique and functional decorations, our indoor water fountains are beyond compare.
This water fountain can be customized with your logo.
NSI Slate™ – Water fountains made with our NSI™ Slate use our patent pending technology which sheers a layer of genuine Indian Raja Slate and fuses it to composite material with the same chipped edge technique as slab slate. They are indistinguishable from a thick slab of slate. All the beauty is retained and the weight is reduced by over 90% making it easier to hang a wall fountain.
*Please note that these units are handmade and measurements may vary slightly. Texture and color of the copper and slate may also vary slightly with each fountain.
Sponsored
Columbus, OH

Hope Restoration & General Contracting
Columbus Design-Build, Kitchen & Bath Remodeling, Historic Renovations
 Design Studio West
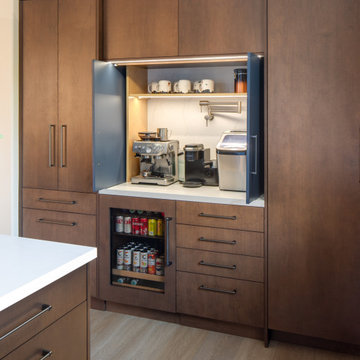
What began as a dated, constrained kitchen has been transformed into a warm, welcoming centerpiece of the home. At its core is a generous island—both a gathering spot and a hardworking culinary hub—featuring a Miele 48" range, a live-edge walnut bar top, and thoughtfully planned drawer and pull-out systems that keep everything within reach.
Custom alder cabinetry in a warm stain, paired with soft blue accents, creates a tailored palette that feels both inviting and distinctive. Smart storage is woven into every corner: a hidden coffee station, a recessed corner pantry with tall retractable doors, discreet appliance storage for everyday tools, dedicated wine and tray storage, pull-out spice organization, and wide drawers designed for pots, pans, and larger essentials.
In the evenings, toe-kick lighting and alabaster pendants cast a soft, ambient glow—making the kitchen not only functional, but an effortless place to gather and entertain.
 StoneUnlimited Kitchen and Bath Remodeling
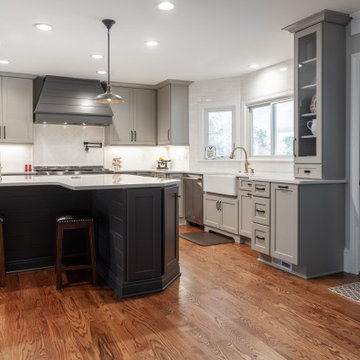
Choosing to abandon uniformity in your kitchen can be a great choice if you're looking to opt out of a monochrome aesthetic. Two-toned kitchen cabinets add visual interest and contrast while drawing focus to different features within the space. Designs utilizing two-toned cabinets have become very popular in recent years and it's not a trend that will be fading out any time soon.
Our clients opted for a combination of Earl Grey and Macchiato Classic cabinetry in their two-toned kitchen. The large island with its second faucet, sink, microwave drawer and lower storage is the focal point of the room and a great work surface for food prep and entertaining. A vertical pull out PowerDock was installed into the top of the island for plugging in kitchen tools, phones and laptops. Dolomite Marble subway tile and Brunello quartz countertops brighten up the kitchen and balance out the tone of the cabinets creating a light and airy feel. The addition of contrasting touches such as the Honey Bronze, Flat Black hardware and Champaign Bronze faucets, accessories the room beautifully. The subdued and sophisticated style of this two-toned kitchen is exquisite and shows the various ways that two-tone cabinets can be versatile and appealing.
Some of the other areas that were remodeled in this home included the complete overhaul of the existing stair well, a guest bath and laundry area.
The guest bath has beautiful vanity cabinets in Celest finish, Monochrome Lotus Deco tile and very reflective Midnight Dots in the shower floor and niche. The combination of all three give a striking white, blue and black design that will inspire and show that you can use pattern and texture in small spaces. A twenty four inch wall mounted shower seat can be lifted and secured when in use and tucked away to allow access out of the shower. A pocket door from the guest bathroom provides a second access point to the hallway with the laundry that has also been revamped with the same style and finish of cabinetry.
 Metamorphosis Architecture Chandigarh - 9316511166
RESIDENCE FOR Mr PRADEEP JAIN
Location: Sector 28, Chandigarh
Year of Construction : 2005
So the old sewage connection was retained..........basically to save oneself from harassment from the sharks in the various departments connected with house sanction, and concomitant procedures.
The plot was a large one – upwards of around 1500 sq yds. - which could qualify locally as a 3 kanal house. (1 kanal = 1/8 of an acre = 4840/8=605 sq yds.)
We’ll not get into the travails of getting the plot transferred to oneself, and the subsequent sanction of the building plans – but it was relatively easy compared to the norm – thanx to a dynamic young AEO in the Estate Office.
Since the Owner was based in Ambala, the plans for the house were relatively simple – considering that the construction firm was based out of Meerut........!!!
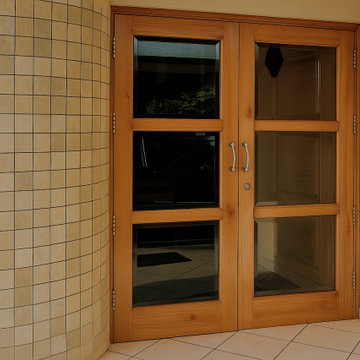
So the program was for the house to be born out of 9 squares of around 16’ side each, (the traditional Vastu Purusha Mandala) with an additional 8’ wide wrap around space where needed – ie the SE, the SW and the NW sides.
While the SW side had an insulating wrap of walk-in closets and toilets, the SE and the NW sides had a verandah – with suitable pop-outs of study-rooms, etc. to shade the glazing from the low East and West sun.
The central square was designed like an atrium, with an attic above, just under the peak of the pyramidal roof topping the house. To allow for an unique character – this pyramid was clad in terracotta tiles.
As the sketch of the plan shows – there is a square each for the entrance lobby, the living room, and the kitchen. The lobby has a powder room attached on the left, behind which is the kitchen.
On the right, and opening onto a huge garden at the rear (NW) is the large living room – occupying 1.5 squares of space. And there is a 8’ wide verandah insulating this living room from the rear garden. Although packed with flowers from the Potted Plant Committee...........
The central Atrium is the Dining room – with suitable storage all around for crockery and other decorative memorabilia.......and leading onto another family seating (the TV area) between the 3 bedrooms adjoining this atrium.
The staircase to the FF is just SW of this lounge, with a hobby room or tool room (the owner is an engineer who loves to tinker) as is the exit to the SW garden.
As aforesaid – the SW side of the house is insulated from the afternoon sun with a set of toilets and walk-in closets. On both floors.
From the FF one can look down and communicate with the GF easily, leading to a great feeling of space.
The FF also has additional rooms used as a gym, and games room, while a large deck is left open as a verandah of the NE side. If a 70’ long x 17’ wide space plus more seems reasonable. - instead of large.
Well, there you are – supposed to be impressed with all those large spaces – which is what the house was supposed to do to the visitor in the first place.......!!!!
70