
Search results for "Snapped" in Home Design Ideas

 SF Design LLC.
The kitchen is a space the home owners wanted to be able to sit in and eat breakfast or for their daughters to be able to have space to do their homework while preparing meals. The kitchen is the center of the home. We used wood plank tile on the floors carried through from the entry/foyer to give it a more open feel. We also used beautiful wood cabinets, the home owners really love brown and beige but we broke it up with touches of metal from the appliances, the back splash and granite countertops. We wanted to keep things simple and bright for the backsplash to keep the space feeling open and bright. We did a herringbone pattern to add some interest and the tiles are beveled to add texture and the tiles almost sparkle as the light hits them.

 Sub-Zero, Wolf, and Cove Showroom Columbia
Jay Greene Photography
Kitchen - contemporary l-shaped light wood floor kitchen idea in Baltimore with an undermount sink, light wood cabinets, granite countertops, black backsplash, stone slab backsplash, paneled appliances, a peninsula and black countertops
Kitchen - contemporary l-shaped light wood floor kitchen idea in Baltimore with an undermount sink, light wood cabinets, granite countertops, black backsplash, stone slab backsplash, paneled appliances, a peninsula and black countertops

 Legrand
APMT27TM2: adorne® 27" Modular Track
APCB2TM2: adorne® Control Box with Paddle Dimmer with GFCI Outlet
APTR15TM4 - adorne® Outlet Module (15A)
adorne® 27" Modular Track -
"The adorne modular track system is a flexible and modular solution designed to eliminate kitchen clutter. Fully customizable, you can select from several types of modules and modify your system in minutes. Simply pop out an existing module and replace it with a new module at any time
The Modular Tracks simply plug together to create a full system coustm designed for any kitchen. They form the base of the system, housing all of the wiring that connects the modules."
Each Under-Cabinet Lighting System must include a control box that is either hardwired to existing wiring or plugged into an outlet on the backsplash.
Modular tracks simply plug together, enabling easy installation.
Track provides 120V power via 15A outlet modules and 20A pass-through.
Modular track features a sleek titanium finish.
adorne® Control Box with Paddle Dimmer with GFCI Outlet -
The adorne® Control Box with Paddle Dimmer and 15A GFCI provides power for hardwired Under-Cabinet Lighting System by connecting to existing in-wall wiring.
Designed to fit on end of Modular Track. Adds approximately 5.25" onto end of system.
Includes a 450W CFL/LED Paddle Dimmer to control adorne Puck and Linear LED Lights and a 15A GFCI Outlet.
Designed for professional, hardwired installations only.
adorne® Outlet Module (15A) -
The adorne® Outlet Module (15A) provides two standard power outlets by simply snapping into any module opening on the track.
Tamper-resistant outlet is designed with a patented shutter system, keeping children safe by preventing them from pushing small objects into the outlet.
Included with purchase of 12", 18", or 27" Modular Tracks.
Find the right local pro for your project

 Allen's Fine Woodworking, Inc.
Feel right at home in this classic white painted kitchen with an accenting dark stained island. This stunning kitchen was designed and installed by Allen's Fine Woodworking. Featuring cabinetry from Medallion Cabinetry kitchen: Lancaster door style, maple painted Divinity, island: Lancaster door style, maple stained Gingersnap. Photos by Zach Luellen Photography

 Bagnato Architecture & Interiors
Front entry path with feature cement render wall, travertine tiles & floating 1st floor copper clad main bedroom.
Photography AXIOM
Example of a trendy two-story exterior home design in Melbourne
Example of a trendy two-story exterior home design in Melbourne

 Keuka Studios, Inc
Keuka Sttudios Curved Keuka Style cable railing on this outdoor deck with dining area.
Railings by Keuka Studios
Inspiration for a rustic deck remodel in Seattle
Inspiration for a rustic deck remodel in Seattle

 Natural Stone Institute
Tucker Design Awards celebrate the innovation and vision that designers bring to their projects through the specification and use of natural stone materials. For members of the Natural Stone Institute, acknowledgment as a contributor to a Tucker Design Awards winning project is a genuine tribute to their traditional values, physicality of work, and dedication to precise specifications required in the realization of such accomplished architectural design.
Landscape Architect
Design Workshop, Aspen, CO
Landscape Contractor/
Installer
Landscape Workshop, Carbondale, CO
Stone Installer
JD Masonry, Arvada, CO
Stone Suppliers
Coldspring, Cold Spring, MN
Gallegos Corporation, Vail, CO
Through a collective dialogue between landscape, architecture and interior design, a new vision reimagines the disturbed site into a livable landscape, emblematic of our American West. The residence – an ensemble of structures designed in a modern ranch vernacular – is effortlessly unified through layered, interconnected outdoor gathering spaces and regional materials that elaborates upon the experience of moving between structures, heightening and renewing one’s sense of place. Upon entering the courtyard, one is immediately aware of seamless and unfolding relationships between architecture and landscape through a sophisticated, regional palette of natural stone, water, and plants. Set upon architectural focal points, two perpendicular sandstone paths descend into the space and converge upon a monolithic, hand-carved granite fountain. The design of the fountain is purposefully quiet, both in its detailing and operation. The feature includes a recessed interior, allowing water to become still before it reaches the surface, with lightly cleft sides, allowing the water to delicately bounce as it descends into the geometric lower granite basin. The landscape architect’s selection of various stone material extends the tones of the home’s granite walls and contextual surroundings into the garden, but also be detailed in a manner that balances rural and modern qualities. The majority of the paving is constructed of rectilinear gray sandstone with a natural finish and snapped edges, laid in a staggered running bond organization. Throughout the garden, thoughtful attention was also given to the configuration and layout of terraces, pathways, and steps. In doing so, this ensured that the edges of the terrace and its interface to other elements were designed so that no “leftover” stone paver pieces would be found. Within the central courtyard, split-faced stone stairs descend into a rectilinear plinth of lawn, punctuated by a carved granite fire pit. Leveraging the property’s existing topographic relief, a shallow infinity-edge dipping pool abstracts the transparent and cavity-like pools found throughout the Rocky Mountains. The design purposefully achieves the illusion of a larger water feature with the distant pond and offers a refreshing recreational element. Containing the infinity edge, a designed granite escarpment emerges from the meadow, juxtaposing the geometric water feature and providing informal seating ledges. The site’s prior use required the landscape architect to incorporate a highly technical and complex sub-surface structural system. The initial geotechnical report identified the building envelopes rested on 12 feet of man-placed fill. Assuming a 1 percent settlement, the team faced concerns that the terraces would settle up to 12 inches. In response, a grid of structural micro-piles provides the necessary foundation for the construction of terraces immediately outside of the architecture, under the water features and site walls. The solution enabled the crisp detailing and design resolution of the architectural structures to seamlessly connect with the horizontal stone terraces.

 Tinsel House
Master bathroom. Original antique door hardware. Glass Shower with white subway tile and gray grout. Black shower door hardware. Antique brass faucets. Marble hex tile floor. Painted gray cabinets. Painted white walls and ceilings. Painted original clawfoot tub. Lakefront 1920's cabin on Lake Tahoe.

 Sustainable Design, LLC
A balance of modern and warm wood finishes.
We turned this sunny artist's studio into a cozy guesthouse. Utilizing every square inch, this space offers everything anyone could need for a comfortable visit. Some amenities include a full shower, small breakfast table, heated floor, large sunny deck, variety of storage options, refrigerator, and a large comfortable bed.

 Sandra Hambley
Gina Simpson of Decor and You DC and Monarch Design Remodeling created multiple layouts for the kitchen. Warm maple gingersnap cabinets compliment a lighter Silestone countertop to create a cozy feel. Universal design elements include a sink and multiple wall cabinets that lift and lower, as well as an under counter microwave and drawers.
Jonathan Miller
 Natural Stone Institute
Tucker Design Awards celebrate the innovation and vision that designers bring to their projects through the specification and use of natural stone materials. For members of the Natural Stone Institute, acknowledgment as a contributor to a Tucker Design Awards winning project is a genuine tribute to their traditional values, physicality of work, and dedication to precise specifications required in the realization of such accomplished architectural design.
Landscape Architect
Design Workshop, Aspen, CO
Landscape Contractor/
Installer
Landscape Workshop, Carbondale, CO
Stone Installer
JD Masonry, Arvada, CO
Stone Suppliers
Coldspring, Cold Spring, MN
Gallegos Corporation, Vail, CO
Through a collective dialogue between landscape, architecture and interior design, a new vision reimagines the disturbed site into a livable landscape, emblematic of our American West. The residence – an ensemble of structures designed in a modern ranch vernacular – is effortlessly unified through layered, interconnected outdoor gathering spaces and regional materials that elaborates upon the experience of moving between structures, heightening and renewing one’s sense of place. Upon entering the courtyard, one is immediately aware of seamless and unfolding relationships between architecture and landscape through a sophisticated, regional palette of natural stone, water, and plants. Set upon architectural focal points, two perpendicular sandstone paths descend into the space and converge upon a monolithic, hand-carved granite fountain. The design of the fountain is purposefully quiet, both in its detailing and operation. The feature includes a recessed interior, allowing water to become still before it reaches the surface, with lightly cleft sides, allowing the water to delicately bounce as it descends into the geometric lower granite basin. The landscape architect’s selection of various stone material extends the tones of the home’s granite walls and contextual surroundings into the garden, but also be detailed in a manner that balances rural and modern qualities. The majority of the paving is constructed of rectilinear gray sandstone with a natural finish and snapped edges, laid in a staggered running bond organization. Throughout the garden, thoughtful attention was also given to the configuration and layout of terraces, pathways, and steps. In doing so, this ensured that the edges of the terrace and its interface to other elements were designed so that no “leftover” stone paver pieces would be found. Within the central courtyard, split-faced stone stairs descend into a rectilinear plinth of lawn, punctuated by a carved granite fire pit. Leveraging the property’s existing topographic relief, a shallow infinity-edge dipping pool abstracts the transparent and cavity-like pools found throughout the Rocky Mountains. The design purposefully achieves the illusion of a larger water feature with the distant pond and offers a refreshing recreational element. Containing the infinity edge, a designed granite escarpment emerges from the meadow, juxtaposing the geometric water feature and providing informal seating ledges. The site’s prior use required the landscape architect to incorporate a highly technical and complex sub-surface structural system. The initial geotechnical report identified the building envelopes rested on 12 feet of man-placed fill. Assuming a 1 percent settlement, the team faced concerns that the terraces would settle up to 12 inches. In response, a grid of structural micro-piles provides the necessary foundation for the construction of terraces immediately outside of the architecture, under the water features and site walls. The solution enabled the crisp detailing and design resolution of the architectural structures to seamlessly connect with the horizontal stone terraces.

 Metro Tile Inc
Alcove shower - small contemporary 3/4 gray tile, white tile and matchstick tile porcelain tile and beige floor alcove shower idea in New York with a one-piece toilet


 Window Quilt Muskoka
Hunter Douglas Custom Angled Honeycomb shades - Window Quilt Muskoka
Home theater - traditional home theater idea in Toronto
Home theater - traditional home theater idea in Toronto
 Natural Stone Institute
Tucker Design Awards celebrate the innovation and vision that designers bring to their projects through the specification and use of natural stone materials. For members of the Natural Stone Institute, acknowledgment as a contributor to a Tucker Design Awards winning project is a genuine tribute to their traditional values, physicality of work, and dedication to precise specifications required in the realization of such accomplished architectural design.
Landscape Architect
Design Workshop, Aspen, CO
Landscape Contractor/
Installer
Landscape Workshop, Carbondale, CO
Stone Installer
JD Masonry, Arvada, CO
Stone Suppliers
Coldspring, Cold Spring, MN
Gallegos Corporation, Vail, CO
Through a collective dialogue between landscape, architecture and interior design, a new vision reimagines the disturbed site into a livable landscape, emblematic of our American West. The residence – an ensemble of structures designed in a modern ranch vernacular – is effortlessly unified through layered, interconnected outdoor gathering spaces and regional materials that elaborates upon the experience of moving between structures, heightening and renewing one’s sense of place. Upon entering the courtyard, one is immediately aware of seamless and unfolding relationships between architecture and landscape through a sophisticated, regional palette of natural stone, water, and plants. Set upon architectural focal points, two perpendicular sandstone paths descend into the space and converge upon a monolithic, hand-carved granite fountain. The design of the fountain is purposefully quiet, both in its detailing and operation. The feature includes a recessed interior, allowing water to become still before it reaches the surface, with lightly cleft sides, allowing the water to delicately bounce as it descends into the geometric lower granite basin. The landscape architect’s selection of various stone material extends the tones of the home’s granite walls and contextual surroundings into the garden, but also be detailed in a manner that balances rural and modern qualities. The majority of the paving is constructed of rectilinear gray sandstone with a natural finish and snapped edges, laid in a staggered running bond organization. Throughout the garden, thoughtful attention was also given to the configuration and layout of terraces, pathways, and steps. In doing so, this ensured that the edges of the terrace and its interface to other elements were designed so that no “leftover” stone paver pieces would be found. Within the central courtyard, split-faced stone stairs descend into a rectilinear plinth of lawn, punctuated by a carved granite fire pit. Leveraging the property’s existing topographic relief, a shallow infinity-edge dipping pool abstracts the transparent and cavity-like pools found throughout the Rocky Mountains. The design purposefully achieves the illusion of a larger water feature with the distant pond and offers a refreshing recreational element. Containing the infinity edge, a designed granite escarpment emerges from the meadow, juxtaposing the geometric water feature and providing informal seating ledges. The site’s prior use required the landscape architect to incorporate a highly technical and complex sub-surface structural system. The initial geotechnical report identified the building envelopes rested on 12 feet of man-placed fill. Assuming a 1 percent settlement, the team faced concerns that the terraces would settle up to 12 inches. In response, a grid of structural micro-piles provides the necessary foundation for the construction of terraces immediately outside of the architecture, under the water features and site walls. The solution enabled the crisp detailing and design resolution of the architectural structures to seamlessly connect with the horizontal stone terraces.

 Industrial Projects
Creating a comfortable outdoor living space is a priority for many homeowners and DIY enthusiasts. With rising summer temperatures, installing a shade tarp in your backyard offers an affordable and effective solution for sun protection. We’ve developed this detailed, step-by-step guide to help you confidently install a shade tarp that not only shields you from the sun but also adds aesthetic appeal to your outdoor area.
Benefits of Installing a Backyard Shade Tarp
Before diving into the installation process, let’s explore the key benefits of having a backyard shade tarp:
Provides UV Protection: Keeps your family and guests safe from harmful sun exposure.
Reduces Outdoor Temperatures: Creates a cooler, more enjoyable outdoor space.
Protects Outdoor Furniture: Extends the life of patio furniture by reducing sun damage.
Enhances Outdoor Aesthetics: Adds a modern, stylish look to your yard.
Budget-Friendly: More affordable compared to permanent structures like pergolas.
Materials and Tools You’ll Need
To begin your DIY backyard shade project, gather the following materials and tools:
Materials:
Shade tarp (UV-resistant and breathable)
Sturdy posts or existing structures (trees, fences, walls)
Mounting hardware (eye bolts, D-rings, turnbuckles, snap hooks)
Nylon or polyester rope, or stainless-steel wire
Concrete (if installing new posts)
Tools:
Power drill
Measuring tape
Level
Ladder
Wrench or adjustable spanner
Post hole digger (if installing new posts)
Step 1: Plan Your Shade Tarp Layout
The first step in installing your backyard shade tarp is careful planning. Take time to assess your outdoor area and answer these key questions:
Where is the sun’s path throughout the day?
What size and shape of tarp best suits your space?
Will you anchor the tarp to existing structures or install new posts?
What height do you want the tarp to sit at for maximum shade and airflow?
Pro Tip: Use string or garden hoses to visualize the tarp layout on the ground before making permanent decisions.
Step 2: Measure and Mark Anchor Points
Once you’ve determined the tarp’s location and orientation:
Measure the tarp dimensions.
Mark the exact points where each corner of the tarp will be anchored.
Ensure that the anchor points are at least 5–10% longer than the tarp size to allow for tensioning and slight adjustments.
Consider slope angles for water runoff. Aim for at least a 20-degree angle to prevent water pooling on the tarp.
Step 3: Install Support Posts (If Necessary)
If your backyard lacks existing anchor points like trees or fences, you’ll need to install sturdy support posts:
Dig post holes at least 24 inches deep and 8-12 inches wide for stability.
Set posts in concrete, making sure they remain plumb and level.
Allow the concrete to cure for at least 24–48 hours before applying tension from the tarp.
We recommend using pressure-treated wood, galvanized steel poles, or aluminum posts for longevity and strength.
Step 4: Install Mounting Hardware
With your anchor points ready, it’s time to install the necessary hardware:
Attach eye bolts or pad eyes securely into walls, posts, or other fixed structures.
For added flexibility and adjustability, install turnbuckles or tensioners to fine-tune the tarp’s tightness.
Connect snap hooks, D-rings, or carabiners to make assembly and disassembly easier.
Make sure all hardware is rated for outdoor use to prevent rust and corrosion.
Step 5: Attach and Tension the Shade Tarp
Now it’s time for the most satisfying part—mounting the shade tarp:
Begin by attaching one corner of the tarp to an anchor point.
Gradually attach the remaining corners, moving diagonally for even tension.
Adjust each connection point using your turnbuckles, ropes, or cables.
Pull the tarp tight enough to avoid sagging, but not so tight that it risks tearing.
Check that the tarp maintains the desired slope for rainwater runoff and adjust tension as needed.
Step 6: Final Adjustments and Safety Check
Before enjoying your new shaded area:
Inspect all anchor points and hardware for stability.
Test the tarp’s tension and make adjustments for even distribution.
Ensure that no sharp edges or loose connections remain that could damage the tarp or pose a safety hazard.
Confirm that the tarp is secure in windy conditions by giving it a gentle tug.
If you live in an area with frequent high winds, consider removing the tarp during storms to prevent damage.
Step 7: Enjoy Your Shaded Backyard Oasis
Once installed, your backyard shade tarp provides a comfortable and protective space for outdoor gatherings, relaxation, or family activities. You can decorate underneath with outdoor furniture, string lights, or potted plants to create a personalized outdoor retreat.
Maintenance Tips for Long-Lasting Shade Tarp Performance
To extend the life of your shade tarp, follow these maintenance guidelines:
Regularly check for wear and tear, especially around anchor points and seams.
Clean the tarp periodically with mild soap and water to prevent mildew buildup.
Store the tarp indoors during harsh weather seasons if it's not designed for year-round use.
Tighten hardware as needed to maintain proper tension and avoid sagging.
By following these simple care steps, your shade tarp will continue to deliver years of sun protection and outdoor comfort.
Conclusion: Upgrade Your Outdoor Space with a DIY Shade Tarp
Installing a shade tarp in your backyard is a cost-effective and rewarding DIY project. With careful planning, quality materials, and proper installation techniques, you’ll enjoy cool, shaded outdoor living all season long. This step-by-step guide ensures your project goes smoothly from start to finish.
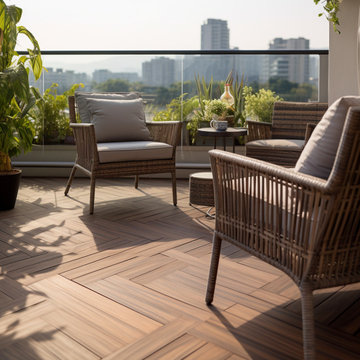
 3rd Street Inn
★ 3RD STREET INN® DECK TILES - 3rd Street Inn® Deck Tiles are made from 100% solid acacia hardwood. Acacia is known for its excellent resistance to rot and decay from outdoor elements including rain, sun, mold, mildew, and insects. Each 3rd Street Inn® Interlocking Patio Tile provides 12"x12" (1 Square Foot) of coverage and is available as a 6-pack (6 Square Feet), 10-pack (10 Square Feet), and 20-pack (20 Square Feet).
★ EASY INSTALLATION & NO HARDWARE NEEDED - 3RD STREET INN® interlocking deck flooring features snap-lock connectors for easy DIY installation without the use of tools or hardware. Install our interlocking deck cover tiles in your area by lining them up and then stepping on the seams until you hear an audible "click" to lock them in. All 3rd Street Inn® deck flooring options are made completely hardware free so that there aren't any components to rust and break down in the outdoor elements like other inferior tile patio decking
★ INDOOR AND OUTDOOR DECK FLOORING - 3rd Street Inn® Patio Tiles create a beautiful space both inside and outside. All that is needed is a solid surface and the deck flooring can be laid directly on top of it. Our composite deck tiles can be installed on top of concrete, wood, carpet, pavers, or any other solid surface. Great for decks, patios, balconies, around pools, saunas, showers, sun rooms, mud rooms, bedrooms, and more.
★ DURABLE BEAUTY - 3rd Street Inn® interlocking composite deck tiles are sanded and oiled for a beautiful, scratch resistant finish. All 3rd Street Inn® outdoor patio flooring is non-slip and great for high or low traffic areas inside or outside of the home. To increase the lifespan of your tile decking when used for outdoor applications, standard decking care is recommended. For best results, coat your decking with a UV-rated weatherproofing sealer twice a year and re-stain as needed. The tile decking can also be painted different colors in order to create the look that you want!
★ VERSATILE INSTALLATION OPTIONS- 3rd Street Inn® Interlocking Flooring Tiles not only look great in permanent installations on decks, patios, and around pools, they also offer a great temporary solution for installations in apartments and condos that can easily be removed when needed. For a custom fit, the interlocking patio tiles can be easily cut with a skill saw or jigsaw to accommodate areas of all shapes and sizes. Add 3rd Street Inn® Wooden Deck Flooring to your home and bring your space to life!
We recommend using a UV rated weatherproof sealant twice yearly. This sealant is a crucial step in the life of the decking tiles and can extend the life of the decking tiles, in some cases, pending the climate, by 1 to 2 years.
The life of a decking tile is heavily dependent on the climate of where they are located. Hot, humid climates, rainy climates, and cold, snowy climates can cause the decking tiles to deteriorate faster than using them in a climate controlled environment, like inside of a house or indoor venue.

 Tomecek Studio Architecture
Project by Studio H:T principal in charge Brad Tomecek (now with Tomecek Studio Architecture). This project tests the theory of bringing high quality design to a prefabricated factory setting. Enrolled in the LEED-Home Pilot, this residence completed certification. The modular home was conceived as two boxes that slide above one another to create outdoor living space and a lower covered rear entry. The passive solar design invites large amounts of light from the south while minimizing openings to the east and west. Factory construction saves both time and costs while reducing waste and using a controlled labor force.
Built in a factory north of Denver, the home arrived by flatbed truck in two pieces and was craned into place in about 4 hours providing a fast, sustainable, cost effective alternative to traditional homebuilding techniques. Upgraded lighting fixtures, plumbing fixtures, doors, door hardware, windows, tile and bamboo flooring were incorporated into the design. 80% of the residence was completed in the factory in less than 3 weeks and other items were finished on site including the exterior stucco, garage, metal railing and stair.
Stack-Slide-Stitch describes the conceptual process of how to tie together two distinct modular boxes. Stack refers to setting one modular directly on top of the other. Slide refers to the action that creates an upper southern deck area while simultaneously providing a covered rear entry area. The stitching or interlocking occurs with the upward extension of the lower volume with the front deck walls and with the rear two story vertical.
 Natural Stone Institute
Tucker Design Awards celebrate the innovation and vision that designers bring to their projects through the specification and use of natural stone materials. For members of the Natural Stone Institute, acknowledgment as a contributor to a Tucker Design Awards winning project is a genuine tribute to their traditional values, physicality of work, and dedication to precise specifications required in the realization of such accomplished architectural design.
Landscape Architect
Design Workshop, Aspen, CO
Landscape Contractor/
Installer
Landscape Workshop, Carbondale, CO
Stone Installer
JD Masonry, Arvada, CO
Stone Suppliers
Coldspring, Cold Spring, MN
Gallegos Corporation, Vail, CO
Through a collective dialogue between landscape, architecture and interior design, a new vision reimagines the disturbed site into a livable landscape, emblematic of our American West. The residence – an ensemble of structures designed in a modern ranch vernacular – is effortlessly unified through layered, interconnected outdoor gathering spaces and regional materials that elaborates upon the experience of moving between structures, heightening and renewing one’s sense of place. Upon entering the courtyard, one is immediately aware of seamless and unfolding relationships between architecture and landscape through a sophisticated, regional palette of natural stone, water, and plants. Set upon architectural focal points, two perpendicular sandstone paths descend into the space and converge upon a monolithic, hand-carved granite fountain. The design of the fountain is purposefully quiet, both in its detailing and operation. The feature includes a recessed interior, allowing water to become still before it reaches the surface, with lightly cleft sides, allowing the water to delicately bounce as it descends into the geometric lower granite basin. The landscape architect’s selection of various stone material extends the tones of the home’s granite walls and contextual surroundings into the garden, but also be detailed in a manner that balances rural and modern qualities. The majority of the paving is constructed of rectilinear gray sandstone with a natural finish and snapped edges, laid in a staggered running bond organization. Throughout the garden, thoughtful attention was also given to the configuration and layout of terraces, pathways, and steps. In doing so, this ensured that the edges of the terrace and its interface to other elements were designed so that no “leftover” stone paver pieces would be found. Within the central courtyard, split-faced stone stairs descend into a rectilinear plinth of lawn, punctuated by a carved granite fire pit. Leveraging the property’s existing topographic relief, a shallow infinity-edge dipping pool abstracts the transparent and cavity-like pools found throughout the Rocky Mountains. The design purposefully achieves the illusion of a larger water feature with the distant pond and offers a refreshing recreational element. Containing the infinity edge, a designed granite escarpment emerges from the meadow, juxtaposing the geometric water feature and providing informal seating ledges. The site’s prior use required the landscape architect to incorporate a highly technical and complex sub-surface structural system. The initial geotechnical report identified the building envelopes rested on 12 feet of man-placed fill. Assuming a 1 percent settlement, the team faced concerns that the terraces would settle up to 12 inches. In response, a grid of structural micro-piles provides the necessary foundation for the construction of terraces immediately outside of the architecture, under the water features and site walls. The solution enabled the crisp detailing and design resolution of the architectural structures to seamlessly connect with the horizontal stone terraces.
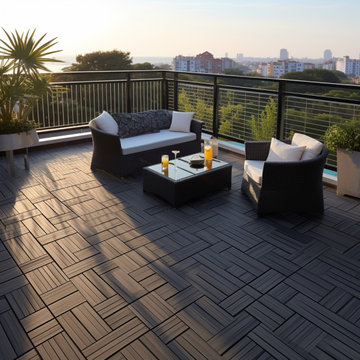 3rd Street Inn
★ 3RD STREET INN® DECK TILES - 3rd Street Inn® Deck Tiles are made from 100% solid acacia hardwood. Acacia is known for its excellent resistance to rot and decay from outdoor elements including rain, sun, mold, mildew, and insects. Each 3rd Street Inn® Interlocking Patio Tile provides 12"x12" (1 Square Foot) of coverage and is available as a 6-pack (6 Square Feet), 10-pack (10 Square Feet), and 20-pack (20 Square Feet).
★ EASY INSTALLATION & NO HARDWARE NEEDED - 3RD STREET INN® interlocking deck flooring features snap-lock connectors for easy DIY installation without the use of tools or hardware. Install our interlocking deck cover tiles in your area by lining them up and then stepping on the seams until you hear an audible "click" to lock them in. All 3rd Street Inn® deck flooring options are made completely hardware free so that there aren't any components to rust and break down in the outdoor elements like other inferior tile patio decking
★ INDOOR AND OUTDOOR DECK FLOORING - 3rd Street Inn® Patio Tiles create a beautiful space both inside and outside. All that is needed is a solid surface and the deck flooring can be laid directly on top of it. Our composite deck tiles can be installed on top of concrete, wood, carpet, pavers, or any other solid surface. Great for decks, patios, balconies, around pools, saunas, showers, sun rooms, mud rooms, bedrooms, and more.
★ DURABLE BEAUTY - 3rd Street Inn® interlocking composite deck tiles are sanded and oiled for a beautiful, scratch resistant finish. All 3rd Street Inn® outdoor patio flooring is non-slip and great for high or low traffic areas inside or outside of the home. To increase the lifespan of your tile decking when used for outdoor applications, standard decking care is recommended. For best results, coat your decking with a UV-rated weatherproofing sealer twice a year and re-stain as needed. The tile decking can also be painted different colors in order to create the look that you want!
★ VERSATILE INSTALLATION OPTIONS- 3rd Street Inn® Interlocking Flooring Tiles not only look great in permanent installations on decks, patios, and around pools, they also offer a great temporary solution for installations in apartments and condos that can easily be removed when needed. For a custom fit, the interlocking patio tiles can be easily cut with a skill saw or jigsaw to accommodate areas of all shapes and sizes. Add 3rd Street Inn® Wooden Deck Flooring to your home and bring your space to life!
We recommend using a UV rated weatherproof sealant twice yearly. This sealant is a crucial step in the life of the decking tiles and can extend the life of the decking tiles, in some cases, pending the climate, by 1 to 2 years.
The life of a decking tile is heavily dependent on the climate of where they are located. Hot, humid climates, rainy climates, and cold, snowy climates can cause the decking tiles to deteriorate faster than using them in a climate controlled environment, like inside of a house or indoor venue.
180