
Search results for "Specific process" in Home Design Ideas
 David Lund Design
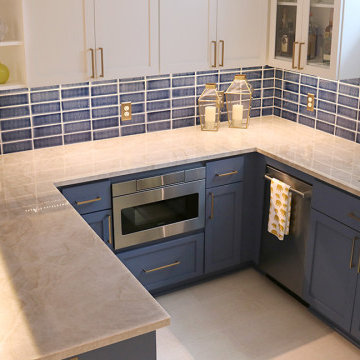
Like most kitchens, this basement bar kitchenette was all about the materials. Making the right selections is critical to a project's success, especially a kitchen, so how does that work?
To make sure we get the selections right, we follow a plan, or more accurately, a selection sequence, that ensures we make the right selections in the right order.
For kitchens and bathrooms, material selections follow a simple cadence - one, two, three. First countertops and tile, then plumbing fixtures, and, finally, hardware and accessories.
So, why countertops and tile first?
Simple, they have the greatest impact on the look, color, and mood of a room, and, much like the foundation, they are critical to the stability of a house. Selecting the right countertops (and corresponding tile) is critical to the aesthetic stability of a space.
In our three step process, the selection of countertops is intricately linked to the selection of tile. Yes, we begin with the countertops, but tile selection is only a half step behind. The two materials work in tandem given their proximity to each other ( often they actually touch each other).
Another consideration is selection flexibility. There are literally hundreds of thousands of tile options, making it easier to find the right tile to match the chosen countertops than it is to find countertops to match a specific tile.
To the cool and creamy quartzite countertop, we added a dark, rich counterpart - walnut. The elevated countertop, the one where friends sit and upon which drinks are set is warm and welcoming.

 DreamMaker Bath and Kitchen - Utah
Photographer: Michael Brewer
In order to help the homeowners achieve their vision Heather, our designer, knew that some walls needed to be removed. We removed one L-shaped wall to open up the kitchen area to the rest of the home, this relieved high traffic areas in the home and improved the flow of the main level tremendously. We also removed a closet to help maximize their space. We added a mudroom off of the kitchen with lockers for easy organization of the kid’s backpacks, coats, and shoes.
The homeowners had some specific ideas in mind for the style of the kitchen. They wanted two-toned shaker cabinets, white backsplash with a unique design, and they requested large floor tiles. Heather helped them through the selection process and they happily landed on:
- Light Maple Upper Cabinets
- Dark Maple Lower Cabinets
- White Subway Tile Backsplash in a Herringbone
Pattern
- Large 17x35 porcelain tile flooring
- Light Granite Counter Tops
 Leo’s Magic Glass
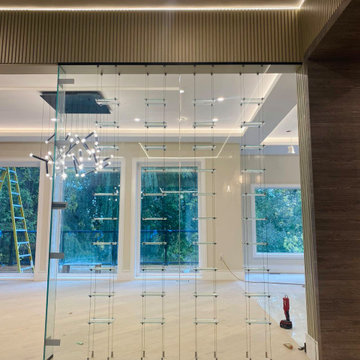
A wine cabinet in glass installation typically involves the placement of a glass-enclosed cabinet in a room or space, designed specifically for storing and displaying wine bottles. These cabinets may range in size from small countertop models to larger, floor-standing pieces, and can feature a range of design elements to suit different styles and preferences.
The glass enclosure of the wine cabinet serves multiple purposes. Firstly, it allows for easy visibility of the wine bottles, making it simple to find and select a bottle for consumption. Secondly, the glass helps to protect the wine from sunlight and other environmental factors that can affect its flavor and quality. Finally, the glass adds an element of sophistication and style to the room, providing an elegant focal point that can enhance the overall aesthetic.
In terms of installation, wine cabinets in glass typically require professional installation due to their size, weight, and complexity. The installation process may involve anchoring the cabinet to the wall or floor, or incorporating additional support structures to ensure the cabinet is stable and secure.
Overall, a wine cabinet in glass installation is an excellent option for wine enthusiasts who want to store and display their wine collection in a stylish and functional way. With a range of design options available, it's possible to find a wine cabinet that perfectly suits your tastes and preferences while also enhancing the overall aesthetic of your home or space.
Find the right local pro for your project

 Braen Supply
Building a Dream Backyard
When this homeowner started the design process of a new backyard, Braen Supply was immediately there to supply all the stone materials. The home was part of a new development, so the challenge was to make the home stand out while still addressing specific areas of the existing backyard, such as the steep grade.
Working With the Experts
Taking the steep grade into consideration, moss rock boulders were selected to create stairs down to the lower area of the backyard where the fire pit sits. The grade of the backyard also allowed for the infinity pool, full color bluestone pattern was selected as the veneer for the back wall of the infinity pool.
Braen Supply chose Tennessee gray and bluestone to create a seamless transition from the front of the house to the back of the house. Although they are two different stones, they work nicely together to complete the overall design and tone of the home. It all came together and made the perfect backyard.
Materials Used:
Belgium Blocks
Full Color Bluestone Pattern
Bluestone Caps
Tennessee Gray Irregular
Moss Rock Boulders
Full Color Bluestone Irregular
Kearney Stone Steps
Granite Mosaic Veneer
Completed Areas:
Front Walkway & Porch
Driveway Edging
Backyard Walkways
Pool Patio & Coping
Pool Water Features
Fireplace Hearth & Mantal
Wading Pool
Raised Hot Tub

 Bright Steel Centre
 is a trusted Goel Pipes Manufacturer in India, offering high-quality piping solutions known for durability, strength, and long service life. These products are widely used in construction, infrastructure, industrial, and engineering applications for dependable performance. As a reliable Goel Pipes Supplier, premium-grade materials and advanced manufacturing processes are used to ensure superior quality, corrosion resistance, and compliance with international industry standards.
Recognized among leading Goel Pipes Manufacturers, a wide range of sizes, grades, and specifications is available to meet diverse industrial requirements. As a dependable Goel Pipes Supplier in India, strict quality inspections ensure dimensional accuracy, high tensile strength, and excellent performance in demanding environments. These Goel Pipes are ideal for applications requiring durability, reliability, and efficient operation across multiple sectors including fabrication and heavy engineering industries.
In addition to Goel Pipes, we are well-known manufacturers of Pipes, Stainless Steel Pipes, Aluminium 6061 T6 Plate, and Carbon Steel Seamless Pipes. This extensive product range supports industries requiring high-performance, corrosion-resistant, and durable materials for critical applications. Our diversified portfolio ensures reliable supply, superior quality, and complete industrial solutions for construction, engineering, and infrastructure projects
 Cerno
Cerno’s mission is to design and build original products in California. To make this possible we advocate for creativity and ingenuity in every step of the process. Our philosophy is grounded in the utmost respect for the materials, the craftsmanship and our entire team.
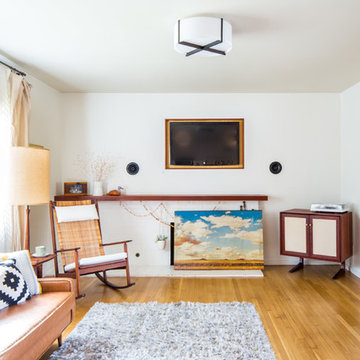
The Plura is a simple, straight forward fixture that is excellently executed. With the Plura it was about resolving the seams and edges and their relationships to one another. The result is a scalable fixture that has a sharp, sophisticated feel.
Features:
Wood Grain Will Vary
Energy Efficient LED Light Source
Handmade
Eco-Friendly
Switch Location: Hardwired
Damp Location rated to accommodate any room in the home including bathrooms, kitchens, covered patios, dining rooms, living rooms, bedrooms, hallways, entryways, foyers, and everything in between.
Specifications:
Voltage: 120-277V AC
Requires 1 x 19.5-Watt LED Module (Integrated)
1690 Lumes, 90 CRI, 2700K (Warm) Color Temperature
Compatible with TRIAC / ELV Dimmer / 0-10V Dimmers

 pipexai
Pipex.ai is an example of an efficient sourcing option through a reliable B2B platform, where buyers can search for relevant components of intricate piping systems. The bleed ring flange can be used between two flanges to provide a safe way to measure the pressure, sample the fluid, and vent the pipeline without breaking the pipeline. This element is also extensively used in oil and gas, refineries, petrochemical plants, and power plants, where the aspects of operational safety and control are paramount. A buyer can also compare specifications, compliance information, and order certified bleed ring flanges that would fit in the high-pressure, high-temperature environment and ensure the system reliability, maintenance control, and continuous industrial processes.
In case of critical pipeline installations, the Bleed Ring Flanges Manufacturers prepare components that are built to fit between normal flanges without pressure reduction. The bleed ring flange will enable the controlled monitoring and isolation, which will reduce downtime even when inspection or sampling is in progress. A B2B Portal assists buyers in accessing qualified suppliers that will supply the products and materials that have been machined correctly, and a reliable supply. Adequate selection of the Bleed Ring Flange of the system would enhance safety precautions, system diagnostics, and add to the future efficacy of the systems, hence a required change in the case of industries operating with pressurized and hazardous media.

 The Stonehill Company
Eat-in kitchen - coastal galley dark wood floor and brown floor eat-in kitchen idea in Orange County with a farmhouse sink, shaker cabinets, white cabinets, white backsplash, subway tile backsplash, stainless steel appliances, an island and black countertops
 Twelve Stones Designs, LLC
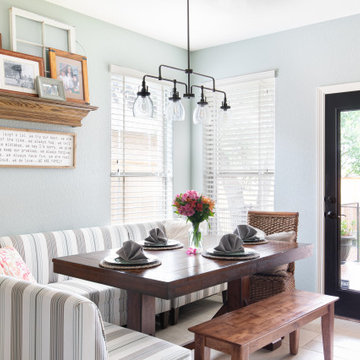
The owners of this kitchen had spent the money to upgrade the finishes in their kitchen upon building the home 12 years ago, but after living in the space for several years they realized how nonfunctional the layout really was. The (then) two preschool aged children had grown into busy, hungry teenagers with many friends who also liked to hang out at the house. So the family needed a more functional kitchen with better traffic flow, space for daily activities revolving around the kitchen at different times of day, and a kitchen that could accommodate cooking for and serving large groups. Furthermore, the dark, traditional finishes no longer reflected the homeowners’ style. They requested a brighter, more relaxed, coastal style that reflected their love of the seaside cities they like to visit.
Originally, the kitchen was U-shaped with a narrow island in the middle. The island created narrow aisles that bottle-necked at the dishwasher, refrigerator, and cooktop areas. There was a pass-through from the foyer into the kitchen, but the owners never liked that the pass-through was also located so close to the powder room. The awkward proximity was unappealing and made guests feel uncomfortable.
The kitchen’s storage was made up of lots of narrow cabinets, apothecary drawers, clipped corner units, and very few drawers. It lacked useful storage for the larger items the family used on a daily basis. And the kitchen’s only pantry was small closet that had only builder-grade, narrow shelving with no illumination to be able to see the contents inside.
Overall, the kitchen’s lighting plan was poorly executed. Only six recessed cans illuminated the entire kitchen and nook areas. The under cabinet lighting was not evenly distributed either. In fact, the builder had mis-placed the under cabinet lighting around the decorative pilasters which made for choppy, dark cubbies. Further, the builder didn’t include any lighting over the sink or the bar area, which meant whoever was doing the dishes was always in their own shadow. That, coupled with the steep overhang of the game room above made the bar area feel like a dim, cavernous space that wasn’t inviting or task oriented. The kitchen looked out into the main living space, but the raised bar and a narrow wall (which held the only large cabinet in the kitchen) created more of a barrier than a relationship to the living room or breakfast nook. In fact, one couldn’t even see the breakfast nook from the cooktop or sink areas due to its orientation. The raised bar top was too narrow to comfortably sit to either dine at or chat from due to the lack of knee space. The the homeowners confided that the kitchen felt more like a dark, dirty prison than place where the family, or their guests, wanted to gather and commune.
The clients' needs and desires were:
➢ to create a kitchen that would be a space the family loved to be in; to relate to the adjacent spaces all around, and to have better flow for entertaining large groups
➢ to remove the walls between the breakfast nook and living area and to be able to utilize the natural light from the windows in both those areas
➢ to incorporate a functional chopping block for prepping fresh food for home cooked meals, an island with a large sink and drain board, 2 pull out trash cans, and seating for at least the 2 teens to eat or do homework
➢ to design a kitchen and breakfast nook with an airy, coastal, relaxed vibe that blended with the rest of the house's coastal theme
➢ to integrate a layered lighting plan which would include ample general illumination, specific task lighting, decorative lighting, and lots of illuminated storage
➢ to design a kitchen with not only more storage for all the husband’s kitchen gadgets and collection of oils and spices, but smart storage, including a coffee/breakfast bar and a place to store and conceal the toaster oven and microwave
➢ to find a way to utilize the large open space between the kitchen, pantry area, and breakfast nook
Twelve Stones Designs achieved the owner's goals by:
➢ removing the walls between the kitchen and living room to allow the natural light to filter in from the adjacent rooms and to create a connection between the kitchen, nook, and living spaces for a sense of unity and communion
➢ removing the existing pantry and designing 3 large pantry style cabinets with LED tape lights and rollout drawers to house lots of kitchen appliances, gadgets, and tons of groceries. We also took the cabinets all the way up to the 9’ ceiling for additional storage for seasonal items and bulk storage.
➢ designing 2 islands - 1 with a gorgeous black walnut chopping block that houses a drawer for chopping and carving knives and a custom double pull out trash unit for point of use utilization - and 1 that houses the dishwasher, a large Blanco Gourmet sink with integrated drain board, woven baskets for fresh root vegetables and kitchen towels, plenty of drawer storage for kitchen items, and bar seating for up to 4 diners.
➢ closing off the space between the kitchen and the powder room to create a beautiful new private alcove for the powder room as well as adding some decorative storage. This also gave us space to include more tall storage near the new range for precision placement of the husband’s extensive oil and spice collection as well as a location for a combo-steam oven the wife wanted for baking and cooking healthy meals.
The project is enhanced functionally by:
➢ incorporated USB and standard receptacles for the kids’ laptops and phone charging in the large island
➢ designing the small island to include additional open shelving for items used on a daily basis such as a variety of bowls, plates, and colanders. This set up also works well for the husband who prefers to “plate” his dinners in restaurant-style fashion before presenting them to the table.
➢ the integration of specific storage units, such as double stacked cutlery drawers, a custom spice pull-out, a Kuerig coffee and tea pod drawer, and custom double stacked utensil drawers
➢ moving the refrigerator to the old oven location - this eliminated the bottle neck as well as created a better relationship to the eating table. It also utilizes the floor space between the pantry, nook, and kitchen
➢ creating a banquet style breakfast nook - this banquette seating not only doubles the amount of seating for large gatherings but it better utilizes the odd space between the kitchen and the previous nook area. It also helps to create a distinct pathway from the mudroom room through the pantry area, kitchen, nook, and living room.
➢ the coffee/breakfast bar area which includes the perfect location for the concealed microwave and toaster oven, convenient storage for the coffee pods and tea accoutrements. Roll-out drawers below also house the smoothie maker, hot water kettle, and a plethora of smoothie-making ingredients such as protein powders, smoothie additives, etc. Furthermore, the drawers below the Keurig house measuring utensil, cutlery, baking supplies and tupperware storage.
➢ incorporating lots of wide drawers and pullouts to accommodate large cookware.
➢ utilizing as much vertical space as possible by building storage to the ceiling which accommodates the family’s abundant amount of serving platters, baking sheets, bakeware, casserole dishes, and additional cutting boards.
The project is enhanced aesthetically by:
➢ new 5-piece Versailles pattern porcelain tile that now seamlessly joins the entire down stairs area together creating a bright, cohesiveness feeling instead of choppy separated spaces - it also adds a coastal feeling
➢ designing a cabinet to conceal the microwave and toaster oven
➢ the coastal influenced light fixtures over the nook table and island
➢ the sandy colors of the Langdon Cambria countertops. The swirling pattern and sparkling quartz pieces remind the homeowner of black-and-tan sandy beaches
➢ the striped banquet seating whose creamy white background and blue-green stripes were the inspiration for the cabinet and wall colors.
➢ All the interior doors were painted black to coordinate with the blacks and grays in the backsplash tile and countertop. This also adds a hint of tailored formality to an otherwise casual space.
➢ the use of WAC's Oculux small aperture LED units for the overhead lighting complimented with Diode LED strips for task lighting under the cabinets and inside the pantry and glass wall cabinets. All of the lighting applications are on separate dimmer switches.
Innovative uses of materials or construction methods by Realty Restoration LLC:
➢ Each 1-1/2” x 3” block of reclaimed end-grain black walnut that makes up the center island chopping block was hand milled and built in the shop. It was designed to look substantial and proportional to the surrounding elements, executed by creating the 4 inch tall top with a solid wood chamfered edge band.
➢ The metal doors on either side of the vent hood were also custom designed for this project and built in the Realty Restoration LLC shop. They are made 1x2, 11-gauge mild steel with ribbed glass. Weighing 60 lbs a piece, heavy duty cabinet hinges were added to support the weight of the door and keep them from sagging.
➢ Under-cabinet receptacles were added along the range wall in order to have a clean, uninterrupted backsplash.
Design obstacles to overcome:
➢ Because we were removing the demising walls between the kitchen and living room, we had to find a way to plumb and vent the new island. We did this by tunneling through the slab (the slab had post tension cables which prevented us from just trenching) to run a new wet vent through a nearby structural wall. We pulled the existing hot and cold lines between upper floor joists and ran them down the structural wall as well and up through a conduit in the tunnel.
➢ Since we were converting from wall overs to a gas range it allowed us to utilize the 220 feed for the wall ovens to provide a new sub panel for all the new kitchen circuits
➢ Due to framing deficiencies inherited from the original build there was a 1-1/2” differential in the floor-to-ceiling height over a 20 foot span; by utilizing the process of cutting and furring coupled with the crown moulding details on the cabinet elevations we were able to mask the problem and provide seamless transitions between the cabinet components.
Evidence of superior craftsmanship:
➢ uniquely designed, one-of-a-kind metal “X” end panels on the large island. The end panels were custom made in the Realty Restoration LLC shop and fitted to the exact dimensions of the island. The welding seams are completely indistinguishable - the posts look like they are cut from a single sheet of metal
➢ square metal posts on the small island were also custom made and designed to compliment and carry through the metal element s throughout the kitchen
➢ the beautiful, oversized end panels on the pantry cabinets which give the breakfast nook a tailored look
➢ integrating a large format 5 piece Versailles tile pattern to seamlessly flow from the existing spaces into the new kitchen space
➢ By constructing a custom cabinet that jogged around a corner we could not remodel (housing the entry way coat closet) we were able to camouflage the adjacent wall offset within the upper and lower cabinets. By designing around the existing jog in the structural walls we accomplished a few things: we were able to find the space to house, and hide, the microwave and toaster oven yet still have a clean cohesive appearance from the kitchen side. Additionally, the owners were able to keep their much needed coat closet and we didn’t have to increase the budget with unnecessary structural work.
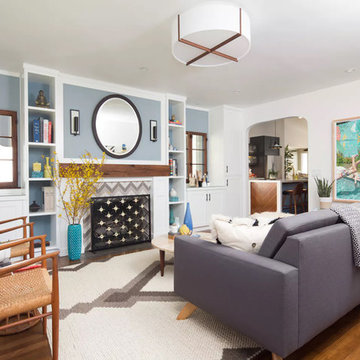 Cerno
Cerno’s mission is to design and build original products in California. To make this possible we advocate for creativity and ingenuity in every step of the process. Our philosophy is grounded in the utmost respect for the materials, the craftsmanship and our entire team.
The Plura is a simple, straight forward fixture that is excellently executed. With the Plura it was about resolving the seams and edges and their relationships to one another. The result is a scalable fixture that has a sharp, sophisticated feel.
Features:
Wood Grain Will Vary
Energy Efficient LED Light Source
Handmade
Eco-Friendly
Switch Location: Hardwired
Damp Location rated to accommodate any room in the home including bathrooms, kitchens, covered patios, dining rooms, living rooms, bedrooms, hallways, entryways, foyers, and everything in between.
Specifications:
Voltage: 120-277V AC
Requires 1 x 19.5-Watt LED Module (Integrated)
1690 Lumes, 90 CRI, 2700K (Warm) Color Temperature
Compatible with TRIAC / ELV Dimmer / 0-10V Dimmers
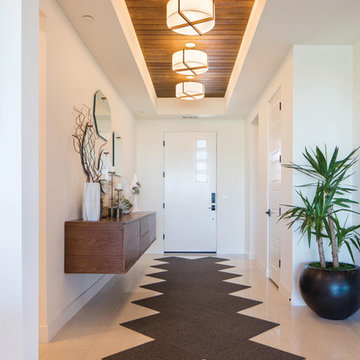 Cerno
Cerno’s mission is to design and build original products in California. To make this possible we advocate for creativity and ingenuity in every step of the process. Our philosophy is grounded in the utmost respect for the materials, the craftsmanship and our entire team.
The Plura is a simple, straight forward fixture that is excellently executed. With the Plura it was about resolving the seams and edges and their relationships to one another. The result is a scalable fixture that has a sharp, sophisticated feel.
Features:
Wood Grain Will Vary
Energy Efficient LED Light Source
Handmade
Eco-Friendly
Switch Location: Hardwired
Damp Location rated to accommodate any room in the home including bathrooms, kitchens, covered patios, dining rooms, living rooms, bedrooms, hallways, entryways, foyers, and everything in between.
Specifications:
Included canopy measures as 5"" Width x 0.3"" Thick
Voltage: 120-277V AC
Requires 1 x 32.5-Watt LED Module (Integrated)
2815 Lumes, 90 CRI, 2700K (Warm) Color Temperature
Compatible with TRIAC / ELV Dimmer / 0-10V Dimmers

 Edgewater Design Group
As written in Northern Home & Cottage by Elizabeth Edwards
In general, Bryan and Connie Rellinger loved the charm of the old cottage they purchased on a Crooked Lake peninsula, north of Petoskey. Specifically, however, the presence of a live-well in the kitchen (a huge cement basin with running water for keeping fish alive was right in the kitchen entryway, seriously), rickety staircase and green shag carpet, not so much. An extreme renovation was the only solution. The downside? The rebuild would have to fit into the smallish nonconforming footprint. The upside? That footprint was built when folks could place a building close enough to the water to feel like they could dive in from the house. Ahhh...
Stephanie Baldwin of Edgewater Design helped the Rellingers come up with a timeless cottage design that breathes efficiency into every nook and cranny. It also expresses the synergy of Bryan, Connie and Stephanie, who emailed each other links to products they liked throughout the building process. That teamwork resulted in an interior that sports a young take on classic cottage. Highlights include a brass sink and light fixtures, coffered ceilings with wide beadboard planks, leathered granite kitchen counters and a way-cool floor made of American chestnut planks from an old barn.
Thanks to an abundant use of windows that deliver a grand view of Crooked Lake, the home feels airy and much larger than it is. Bryan and Connie also love how well the layout functions for their family - especially when they are entertaining. The kids' bedrooms are off a large landing at the top of the stairs - roomy enough to double as an entertainment room. When the adults are enjoying cocktail hour or a dinner party downstairs, they can pull a sliding door across the kitchen/great room area to seal it off from the kids' ruckus upstairs (or vice versa!).
From its gray-shingled dormers to its sweet white window boxes, this charmer on Crooked Lake is packed with ideas!
- Jacqueline Southby Photography
 Tile Doctor Ltd
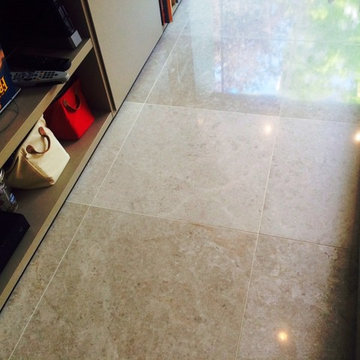
I was recently engaged to refresh the Limestone tiled floor at a house in St. John’s Wood, which is a very affluent area and apparently has the 5th most expensive postcode in London so as you can imagine this was a very expensive floor. The client had requested an improvement condition of the Limestone tiles in the living room and a thorough clean, polishing and seal was required. Over time, the floor in this busy living room – which was also used as a play area for young children – had become dirty and certainly worse for wear with all the use it had been getting. So, I set about my work to get this floor back to looking its best.
Cleaning and burnishing a Limestone floor
My initial task before beginning the cleaning process was to remove any furniture (as well as toys) from the room so I would have a clear area to work in. I then applied a layer of Tile Doctor Pro-Clean cleaner, diluted with water, to the floor. Pro-Clean is also suitable for use on other natural stone floors such as Slate, Granite and Travertine.
After leaving the solution to dwell for a period of a few minutes, I began to scrub the floor with a stiff hand brush. Whilst helping to remove a lot of the built up dirt on the surface of the tiles, the product also stripped off the old sealer and polish. Following this, I paid special attention to the dirty grout lines, cleaning them with Tile Doctor Oxy-Pro, a powerful, high-alkaline cleaner.
After completing the cleaning, I rinsed the floor with clean water to remove any excess cleaning products. I then began to burnish the floor using Tile Doctor Diamond encrusted burnishing pads. This was done in four steps, as I used four different pads (coarse, medium, fine and very fine) rinsing the floor with water between each pad. I would recommend using this setup of four pads for restoring the appearance of polished stone floors; you starting with a coarse pad and the gradually work your way up to the very fine pad achieving a high polish finish in the process. I finished of the process with a quick rinse and a buffing pad to give the floor a final polish before I commenced the sealing.
Sealing a Limestone floor
My choice of sealer was Tile Doctor Colour Grow, which is specifically designed to not only provide durable surface protection, but also to intensify the colour of the tiles. The sealer penetrates deep into the pores of the stone, providing water resistance and long-term protection from ingrained dirt and stains. As you can see from the photos, the sealer really helped to accentuate the fantastic natural colours in the Limestone.
My client was very pleased with the final result, and was amazed by how quickly I had been able to improve the state of her floor which, with a colourful and shiny finish, has really brightened up the living room.


 Braen Supply
Building a Dream Backyard
When this homeowner started the design process of a new backyard, Braen Supply was immediately there to supply all the stone materials. The home was part of a new development, so the challenge was to make the home stand out while still addressing specific areas of the existing backyard, such as the steep grade.
Working With the Experts
Taking the steep grade into consideration, moss rock boulders were selected to create stairs down to the lower area of the backyard where the fire pit sits. The grade of the backyard also allowed for the infinity pool, full color bluestone pattern was selected as the veneer for the back wall of the infinity pool.
Braen Supply chose Tennessee gray and bluestone to create a seamless transition from the front of the house to the back of the house. Although they are two different stones, they work nicely together to complete the overall design and tone of the home. It all came together and made the perfect backyard.
Materials Used:
Belgium Blocks
Full Color Bluestone Pattern
Bluestone Caps
Tennessee Gray Irregular
Moss Rock Boulders
Full Color Bluestone Irregular
Kearney Stone Steps
Granite Mosaic Veneer
Completed Areas:
Front Walkway & Porch
Driveway Edging
Backyard Walkways
Pool Patio & Coping
Pool Water Features
Fireplace Hearth & Mantal
Wading Pool
Raised Hot Tub

 INSPIRED KITCHEN DESIGN
While Teresa did countless hours of research on design Web sites such as Pinterest, she also wanted to get the kitchen done quickly.
That meant taking some risks, she says.
“I wanted to renovate the kitchen immediately after moving into the new house. This required me to take measurements, pictures and video all in one visit. So, my measurements were a little off,” she explains. Luckily IKD’s design team provided her with a detailed inventory list [as part of its design process and helped out with specific custom looks, she notes.
“With IKD’s design guidance I actually over ordered versus under ordered and simply had to return a few cabinets and pieces [rather than make a return trip to IKEA],” she concludes.
With her project now complete, Teresa says she is ready to move onto greener pastures.
But first, there are some specific tips she wanted to share for any future IKEA kitchen remodeler.
“I would say to do your research, and remember that no detail is too small. Also, be sure to visit an IKEA no matter where you live at least once to be able to see the kitchens in person. And, definitely use IKD but be sure to have a clear kitchen idea to convey!” she says.
With that said, Teresa was able to complete her IKEA kitchen in a timely manner and in a budget friendly way as well.
“I would say our budget was mid-level [for this project]. Since we did most of the work ourselves we saved a ton of money. We really have a glowing pride in accomplishing this project and it turned out to be not as difficult as we thought!” she concludes.
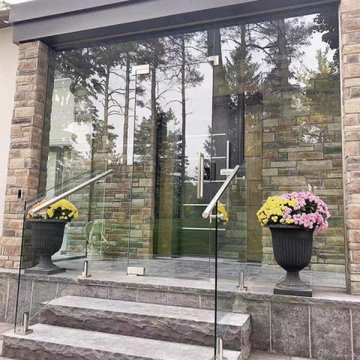 Leo’s Magic Glass
A winter storm door in glass installation typically involves the placement of a glass-enclosed door in the entryway of a home or building, designed specifically to provide an additional layer of insulation and protection against harsh winter weather conditions.
The glass panel in the winter storm door is typically double-paned, which provides an extra layer of insulation and helps to reduce heat loss. This can help to improve energy efficiency and lower heating costs during the winter months.
In terms of installation, a winter storm door in glass is typically mounted on the exterior of an existing entry door, and may feature a variety of design options such as decorative glass, hardware, and finishes. The installation process may involve anchoring the door securely to the frame of the entryway, and ensuring that the door is properly sealed to prevent air leaks and drafts.
Winter storm doors in glass offer several advantages over traditional doors. They can help to improve energy efficiency and lower heating costs, while also providing an extra layer of protection against harsh winter weather conditions. Additionally, they can enhance the overall aesthetic of a home or building, adding a touch of elegance and sophistication to the entryway.
Overall, a winter storm door in glass installation is a popular choice for those seeking to improve energy efficiency and protect against harsh winter weather conditions. With a range of design options available, it's possible to find a winter storm door in glass that perfectly suits your needs and enhances the overall aesthetic of your home or building.
 Edgewater Design Group
As written in Northern Home & Cottage by Elizabeth Edwards
In general, Bryan and Connie Rellinger loved the charm of the old cottage they purchased on a Crooked Lake peninsula, north of Petoskey. Specifically, however, the presence of a live-well in the kitchen (a huge cement basin with running water for keeping fish alive was right in the kitchen entryway, seriously), rickety staircase and green shag carpet, not so much. An extreme renovation was the only solution. The downside? The rebuild would have to fit into the smallish nonconforming footprint. The upside? That footprint was built when folks could place a building close enough to the water to feel like they could dive in from the house. Ahhh...
Stephanie Baldwin of Edgewater Design helped the Rellingers come up with a timeless cottage design that breathes efficiency into every nook and cranny. It also expresses the synergy of Bryan, Connie and Stephanie, who emailed each other links to products they liked throughout the building process. That teamwork resulted in an interior that sports a young take on classic cottage. Highlights include a brass sink and light fixtures, coffered ceilings with wide beadboard planks, leathered granite kitchen counters and a way-cool floor made of American chestnut planks from an old barn.
Thanks to an abundant use of windows that deliver a grand view of Crooked Lake, the home feels airy and much larger than it is. Bryan and Connie also love how well the layout functions for their family - especially when they are entertaining. The kids' bedrooms are off a large landing at the top of the stairs - roomy enough to double as an entertainment room. When the adults are enjoying cocktail hour or a dinner party downstairs, they can pull a sliding door across the kitchen/great room area to seal it off from the kids' ruckus upstairs (or vice versa!).
From its gray-shingled dormers to its sweet white window boxes, this charmer on Crooked Lake is packed with ideas!
- Jacqueline Southby Photography
 Tile Doctor Ltd
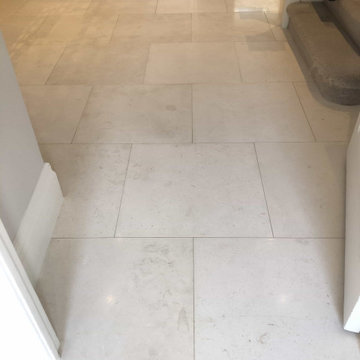
This client from Highgate in North London, N6 contacted us about their large honed Limestone tiled floor that was installed throughout the ground floor. It had been laid seven years prior and was now grubby and in need of a deep clean and seal including the grout which had turned black with dirt.
I visited the property to survey and assess what was required and provided the owner with a quotation for the renovation. The hallway pictured was in the worst condition, it was a busy house with young children and dogs and over the years the sealer had worn down leaving it vulnerable to ingrained dirt. Without a sealer to protect the stone it had become heavily soiled and lost its original polished appearance.
Happy with the quote we scheduled a date for the work to go ahead. The quote included deep cleaning and burnishing the stone to bring back the polish, grout cleaning and re-sealing the Limestone to protect it.
We arrived on the first day and prepared the area by taping up the skirting and woodwork to protect them from potential splashing. Next step was to burnish the floor using a set of Tile Doctor Diamond Burnishing Pads, specifically the 400, 800 and 1500 grit pads fitted to a rotary machine, these were used in sequence running each pad over the tiles several times with water to lubricate the process. The water turns into a fine slurry as pores in the stone are opened and the dirt is released, the slurry is rinsed off with more water and extracted using an industrial wet vacuum after each pad. The finer 800 and 1500-grit pads slowly close the pores and refine the appearance of the stone building up the polish in the process.
A strong dilution of Tile Doctor Pro-Clean was then applied to the grout lines, leaving it for a short while to soak in and then hand scrubbing with a grout brush. The dirty cleaning solution and were then removed from the floor with the wet vacuum.
This process was repeated across the different sections of the Limestone floor until I was satisfied with its appearance. Before leaving for the day, I rinsed the floor again using a buffing machine fitted with a brush fitted to give it a final clean. The floor was dried as much as possible using the wet vacuum and then allowed it to dry off fully overnight.
The following day the final 3000-grit pad in the four-pad set was applied to the floor to bring up the polish even further. The pad is applied dry with only a little water sprayed onto the tile. We call this process a “Spray Burnish” and as well as leaving the floor nice and dry ready for sealing it adds a nice subtle shine to the stone.
The floor was then sealed with two coats of Tile Doctor Colour Grow sealer. This is a colour intensifying impregnating sealer that works by occupying the pores in the stone so dirt cannot become ingrained there. It will provide durable protection and make the floor much easier to keep clean. It worked well on the pale Limestone and beautifully enhanced the colour and features in stone. Once complete the floor looked brand new again.
I left a complimentary bottle of Tile Doctor Stone Soap with the client and gave them some information about how best to maintain the floor. This product is pH neutral and cleans whilst maintaining the patina on the stone helping to keep the floor in great condition.
The client was delighted with the result and left us a great review.
“Andrew is excellent and gets on with the job and we got a fantastic result. Highly recommend. By Aaron S, Highgate, 15 March 2021”
Andrew Newstead
North London Tile Doctor
 Braen Supply
Building a Dream Backyard
When this homeowner started the design process of a new backyard, Braen Supply was immediately there to supply all the stone materials. The home was part of a new development, so the challenge was to make the home stand out while still addressing specific areas of the existing backyard, such as the steep grade.
Working With the Experts
Taking the steep grade into consideration, moss rock boulders were selected to create stairs down to the lower area of the backyard where the fire pit sits. The grade of the backyard also allowed for the infinity pool, full color bluestone pattern was selected as the veneer for the back wall of the infinity pool.
Braen Supply chose Tennessee gray and bluestone to create a seamless transition from the front of the house to the back of the house. Although they are two different stones, they work nicely together to complete the overall design and tone of the home. It all came together and made the perfect backyard.
Materials Used:
Belgium Blocks
Full Color Bluestone Pattern
Bluestone Caps
Tennessee Gray Irregular
Moss Rock Boulders
Full Color Bluestone Irregular
Kearney Stone Steps
Granite Mosaic Veneer
Completed Areas:
Front Walkway & Porch
Driveway Edging
Backyard Walkways
Pool Patio & Coping
Pool Water Features
Fireplace Hearth & Mantal
Wading Pool
Raised Hot Tub
27