
Search results for "Specific process" in Home Design Ideas
 United Porte Inc
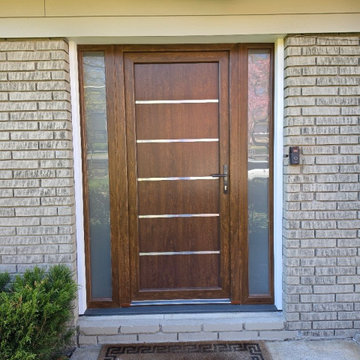
Introducing the Manux collection of modern metal-plastic doors in a sleek Walnut color. These doors are expertly crafted from durable metal-plastic material and feature European roller hinges and an aluminum threshold, ensuring both longevity and security for your home.
The exterior design boasts five No Glass panels, creating a modern and stylish look that will enhance the curb appeal of any home. The Walnut color provides a sophisticated and contemporary feel, perfect for those who want to make a bold statement with their entrance.
The interior design also features five No Glass panels, creating a cohesive and stylish look throughout the home.
With the Manux collection, you can have both style and function. These modern front doors are perfect for homeowners who want to elevate the look of their home's exterior while also ensuring their property's safety and security. And with our easy ordering process and user-friendly website, you can have your new door delivered right to your doorstep.
Upgrade your home's curb appeal and make a statement with the Manux collection of modern metal-plastic doors in sleek Walnut. Order yours today and experience the perfect combination of style and function.
Specifications:
Model - 8415 Manux
Core - Metal-plastic
Color - Walnut
Door thickness - 2 1/3"
Door slab width — 29"
Frame thickness - 2 3/4"
Swing direction - Inswing only, right or left
Hardware included:
Metal-plastic 2 3/4" thick frame - dimensions of the door with frame is 32" x 82".
Aluminum threshold.
European roller hinges (3D adjustment).
Handle set with lock Vorne and cylinder (5 keys included).
Sealants - 2 rows of seals protect against blowing.

 Jayant Saini
Elegant in its simplicity, this Delicate Pearl Bracelet features a genuine freshwater pearl suspended on a fine sterling silver chain. This minimalist piece is a timeless symbol of purity and grace—perfect for everyday wear, bridal jewelry, or a meaningful gift.
Whether you're stacking it with other dainty pieces or wearing it solo, this bracelet is designed to add a subtle glow to your wrist. A must-have for lovers of classic, feminine jewelry.
-------------------------------------
✨ Features:
• Real freshwater pearl
• Dainty and lightweight design
• Made in solid 925 sterling silver
• Ideal for gifting and layering
-------------------------------------
? Perfect For:
• June birthstone gift (Pearl is June's birthstone)
• Bridesmaids & bridal parties
• Minimalist jewelry lovers
• Graduation, anniversary, or birthday gift
• First pearl jewelry for teens or daughters
-------------------------------------
? Specifications:
• Pearl Size: ~12mm (Round)
• Metal: 925 Sterling Silver
• Finish: High-polish, tarnish-resistant
• Handmade with care in India
-----------------------------------
? Shipping & Packaging:
• Securely packed in a branded gift box
• Worldwide shipping with tracking
• Processing time: 1–3 business days
-------------------------------------
? Care Tips:
• Gently wipe with a soft cloth after wearing
• Store in a cool, dry place away from moisture
• Avoid perfumes, lotions, and water contact
-------------------------------------
? FAQs:
• Is the pearl real?
Yes, each bracelet features a genuine freshwater pearl with its natural luster and unique shape.
• Can I request gift wrapping?
Definitely! Just leave a note at checkout, and we’ll wrap it with love
-------------------------------------
? Our Guarantee:
Your satisfaction is our top priority. If for any reason you're not happy with your purchase, please reach out—we'll make it right.

 Buju Architects
 was instructed to design 6 new holiday homes in the coastal village of Rhosneigr. Now four years later, construction nears completion. Consisting of a combination of 3 townhouses and 3 detached houses, each home is designed carefully to maximise sea views and sit comfortably in context.
With just a short walk to the beachfront, it was quickly established early on that we wanted to take full advantage of these stunning coastal views. To achieve this, we decided to flip the floor layouts around and created an “upside-down home”. By positioning all of the bedrooms at ground level and the living spaces to the top floor meant that the amazing views could be fully appreciated from the high vaulted living spaces throughout the day.
These views are also maximised by utilising large feature glazed gables each with their own spacious balconies. The feature gable on the detached houses were also carefully designed and specifically orientated at a 45-degree angle towards these views for maximum effect.
A similar palette of materials was used as those of surrounding buildings and a strong design theme was created across the site. Local stone, cedar cladding and white render clad these fantastic properties. The density of development was carefully considered to allow enough space for access and amenity, whilst respecting local residents.
Services: Buju Architects were appointed for RIBA Stages 1-6 as Architect and Principal Designer. From developing the concept design, through planning, tender and construction. Buju Architects coordinated the design process and managed correspondence with the local Council.
“..Buju Architects produced three alternative schemes and once the preferred scheme had been chosen they very quickly produced several visualisation models which proved extremely helpful in view of the gradient and context of this development. Modelling at this early stage is often not provided and with a difficult site such as this can be vital in obtaining the correct interaction between buildings.” – Rockview Developments
Find the right local pro for your project
 Tile Doctor Ltd
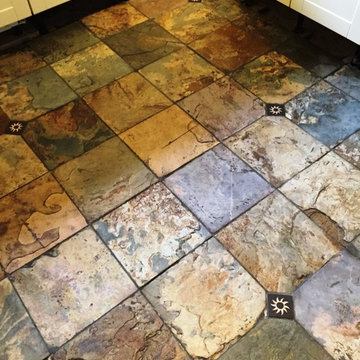
I recently visited a client living in the market town of Woodstock in Oxfordshire to rejuvenate a fantastic multi-coloured Slate floor that had been hidden under several years’ worth of dirt in their kitchen. Slate is a typically hard-wearing tile used for flooring high traffic areas of houses and public buildings but does need sealing to bring out its best features and in this case the sealer had long since worn off and dirt had become ingrained in the stone.
My first task in the cleaning process was to mix a strong solution of Tile Doctor Pro-Clean, which is a strong alkaline cleaner safe to use on Tile and Stone, and NanoTech HBU (Heavy Build-up Remover), which is a particularly powerful product that uses nano-sized particles to tackle muck in areas of the stone where typical cleaners simply can’t reach. I spread this solution across the floor and left it to seep into the stone, to get underneath and lift out the ingrained dirt.
After allowing the solution adequate time to dwell, I scrubbed the floor with a carbon brush to gradually reveal the fantastic natural colours of the Slate hidden beneath. Following this, I rinsed the entire floor several times with clean water, before soaking up the resulting soiled residue with a wet vacuum.
The next part of the cleaning process entailed paying particular attention to the grout lines. I used Tile Doctor Grout Clean-Up to scrub the grout lines and also to treat a small amount of efflorescence. The resulting residue was promptly extracted with the wet vacuum and I finished by giving the whole floor a rinse with Tile Doctor pH Neutral Tile Cleaner. This is a day to day tile cleaning product which is recommended for stone floors, many supermarket tile cleaning products are only suitable for ceramic tiles due to their acidic formula and can damage a floor over years of use so you should always read the label. I then left the floor to dry completely overnight.
On day two, the Slate tiled floor was dry and ready to seal. The floor had to be completely dry, as any excess moisture has the potential to the damage the performance of the sealer. Since my client had specifically requested a matte finish, I opted to use Tile Doctor Colour Grow. Colour Grow is an impregnating sealer that provides durable surface protection from within while also enhancing all of the natural mineral shades.
My client was very pleased with the results, particularly as they hadn’t realised they had such a great looking floor in their house when they had first purchased it!
Barry Woodward
Oxfordshire Tile Doctor
 Flip 2 Hardwood Floors
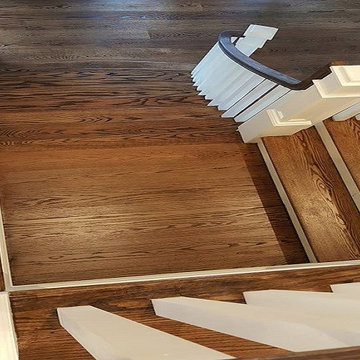
Wood flooring adds style and warmth to a home. It can greatly enhance the overall beauty of a home and make it look visually pleasing. Although the popularity of wooden flooring has increased significantly in recent years, many people are not aware of the fact that solid hardwood flooring is not the only option available to them. They can also install engineered wood floors and laminate floors in homes and offices.
Although, laminate and engineered wood floors look like solid hardwood floors, but they are very different. Engineered wood flooring is made from natural materials. In this type of flooring, several layers of ply are bonded together. Laminate flooring, on the other hand, is made from synthetic materials.
Let’s take a look at how engineered wood floors and laminate floors stack up against each other-
- Composition
- Installation
- Maintenance
- Life Expectancy and Cost
- Options

 Braen Supply
Building a Dream Backyard
When this homeowner started the design process of a new backyard, Braen Supply was immediately there to supply all the stone materials. The home was part of a new development, so the challenge was to make the home stand out while still addressing specific areas of the existing backyard, such as the steep grade.
Working With the Experts
Taking the steep grade into consideration, moss rock boulders were selected to create stairs down to the lower area of the backyard where the fire pit sits. The grade of the backyard also allowed for the infinity pool, full color bluestone pattern was selected as the veneer for the back wall of the infinity pool.
Braen Supply chose Tennessee gray and bluestone to create a seamless transition from the front of the house to the back of the house. Although they are two different stones, they work nicely together to complete the overall design and tone of the home. It all came together and made the perfect backyard.
Materials Used:
Belgium Blocks
Full Color Bluestone Pattern
Bluestone Caps
Tennessee Gray Irregular
Moss Rock Boulders
Full Color Bluestone Irregular
Kearney Stone Steps
Granite Mosaic Veneer
Completed Areas:
Front Walkway & Porch
Driveway Edging
Backyard Walkways
Pool Patio & Coping
Pool Water Features
Fireplace Hearth & Mantal
Wading Pool
Raised Hot Tub

 Edgewater Design Group
As written in Northern Home & Cottage by Elizabeth Edwards
In general, Bryan and Connie Rellinger loved the charm of the old cottage they purchased on a Crooked Lake peninsula, north of Petoskey. Specifically, however, the presence of a live-well in the kitchen (a huge cement basin with running water for keeping fish alive was right in the kitchen entryway, seriously), rickety staircase and green shag carpet, not so much. An extreme renovation was the only solution. The downside? The rebuild would have to fit into the smallish nonconforming footprint. The upside? That footprint was built when folks could place a building close enough to the water to feel like they could dive in from the house. Ahhh...
Stephanie Baldwin of Edgewater Design helped the Rellingers come up with a timeless cottage design that breathes efficiency into every nook and cranny. It also expresses the synergy of Bryan, Connie and Stephanie, who emailed each other links to products they liked throughout the building process. That teamwork resulted in an interior that sports a young take on classic cottage. Highlights include a brass sink and light fixtures, coffered ceilings with wide beadboard planks, leathered granite kitchen counters and a way-cool floor made of American chestnut planks from an old barn.
Thanks to an abundant use of windows that deliver a grand view of Crooked Lake, the home feels airy and much larger than it is. Bryan and Connie also love how well the layout functions for their family - especially when they are entertaining. The kids' bedrooms are off a large landing at the top of the stairs - roomy enough to double as an entertainment room. When the adults are enjoying cocktail hour or a dinner party downstairs, they can pull a sliding door across the kitchen/great room area to seal it off from the kids' ruckus upstairs (or vice versa!).
From its gray-shingled dormers to its sweet white window boxes, this charmer on Crooked Lake is packed with ideas!
- Jacqueline Southby Photography
 Windy City Painters
Iron Fence Painting in Wicker Park: A Windy City Painters Case Study
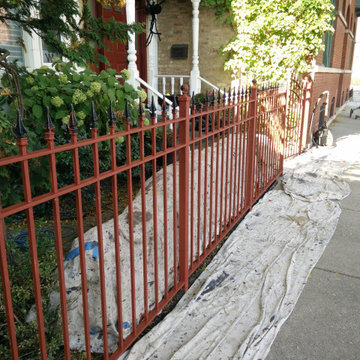
Iron fence painting in Wicker Park is one of the most requested exterior services Windy City Painters performs each season, and this recent project shows exactly why. Set behind an ornate 1890s greystone two-flat, the client's wrought iron fence had endured years of Chicago winters without professional attention. Rust had spread across the pickets, the original black enamel was flaking away in sheets, and the fence's structural hardware had begun to loosen at several joints.
As the trusted local expert for Chicago's North Side and Near West Side, Windy City Painters approached this project the same way we approach every iron fence painting job in Wicker Park: with a methodical, multi-step process designed to outlast Midwest weather rather than simply mask the damage.
The Process, Step by Step
Step 1 — Rust Removal and Surface Preparation. Our crew wire-brushed and mechanically ground every rusted section down to clean, stable metal. For pitted or heavily corroded areas, we applied a chemical rust converter to neutralize corrosion at the molecular level before any coating touched the surface. Furthermore, because this greystone was built well before 1978, Windy City Painters tested the existing paint layers for lead and followed strict containment protocols throughout the removal process.
Step 2 — Spot Repairs. Loose pickets were re-secured, small pits were filled, and hardware at the gate hinges was tightened. In contrast to a quick spray-paint refresh, this stage ensures the fence is structurally sound before a single drop of primer goes on.
Step 3 — Priming. A full coat of rust-inhibiting primer, engineered specifically for ferrous metal, was applied by brush to every surface — with particular attention to welds and joints where moisture tends to collect and restart the corrosion cycle.
Step 4 — Topcoat Application. Two finish coats of industrial-grade, direct-to-metal enamel were applied by brush and roller. This built a durable, uniform barrier in classic gloss black, the most popular finish among Wicker Park's historic properties. Finally, our team inspected every inch of the fence for thin spots or missed sections before calling the job complete.
Project Specs
Surface: Ornamental wrought iron fence, posts, and gate hardware
Products used: Rust-inhibiting DTM primer, chemical rust converter, industrial-grade direct-to-metal enamel
Coats applied: 1 primer coat, 2 finish coats
Finish: Gloss black
Timeline: Completed in under two days
Advice for Wicker Park Homeowners
Before starting a similar iron fence painting project in Wicker Park, homeowners should keep a few things in mind. Notably, never paint directly over active rust — trapped moisture underneath will cause the new coat to fail within a season. Additionally, always ask whether a contractor tests for lead paint on pre-1978 homes, since many Wicker Park greystones fall into that category. Meanwhile, hand brushwork matters: the intricate scrollwork common on Wicker Park ironwork requires careful, detailed application that spray equipment simply cannot replicate. Therefore, hiring a crew experienced specifically in historic Chicago ironwork, like Windy City Painters, makes a measurable difference in the finished result.
Windy City Painters also handles related exterior and interior work for Wicker Park properties, including interior painting, drywall and plaster repair, and additional metal refinishing for porches and railings.
Iron fence painting in Wicker Park protects one of the neighborhood's most defining architectural features while restoring curb appeal instantly. As a result, this greystone now has a fence that matches the quality of the home behind it — and will hold up through many more Chicago winters.
See more of our work and request a free estimate at www.windypainters.com.
Ready to transform your Wicker Park home? Contact Windy City Painters for a free estimate — visit www.windypainters.com today. Proudly serving Wicker Park, West Town, Lincoln Park, Roscoe Village, Lakeview, Ukrainian Village, River North, and all of Chicago.
 Braen Supply
Building a Dream Backyard
When this homeowner started the design process of a new backyard, Braen Supply was immediately there to supply all the stone materials. The home was part of a new development, so the challenge was to make the home stand out while still addressing specific areas of the existing backyard, such as the steep grade.
Working With the Experts
Taking the steep grade into consideration, moss rock boulders were selected to create stairs down to the lower area of the backyard where the fire pit sits. The grade of the backyard also allowed for the infinity pool, full color bluestone pattern was selected as the veneer for the back wall of the infinity pool.
Braen Supply chose Tennessee gray and bluestone to create a seamless transition from the front of the house to the back of the house. Although they are two different stones, they work nicely together to complete the overall design and tone of the home. It all came together and made the perfect backyard.
Materials Used:
Belgium Blocks
Full Color Bluestone Pattern
Bluestone Caps
Tennessee Gray Irregular
Moss Rock Boulders
Full Color Bluestone Irregular
Kearney Stone Steps
Granite Mosaic Veneer
Completed Areas:
Front Walkway & Porch
Driveway Edging
Backyard Walkways
Pool Patio & Coping
Pool Water Features
Fireplace Hearth & Mantal
Wading Pool
Raised Hot Tub

 Gallery KBNY
The owner of this historic and landmarked town-home renovation in Hudson Square, originally built in 1826, hired Gallery Kitchen and Bath to fully gut-renovate this 3-unit row-home. The scope of work included a full-scale renovation of the owners unit, including the renovation of the kitchen, one 4-piece master ensuite bathroom, one 3-piece bathroom with a walk-in steam shower, and a beautiful powder room. Additional work in the owners unit also included flooring, electrical upgrade, major plumbing work, new HVAC system, restoration of a fireplace, installation of a fully integrated smart home system and landmarked approved windows.
CELLAR RENOVATION IN NYC LANDMARKED TOWN-HOME
Rounding out the owners unit we renovated the cellar, which was converted into an entertainment space and featured a custom glass curtain wall, along with a custom staircase with an exposed brick wall. During the demolition phase of the cellar, our team discovered 56 wine jugs filled with wine from the prohibition era, leading us to name this project the prohibition house. For the two tenant units, Gallery Kitchen and Bath undertook the renovation of 2 kitchens, 4 bathrooms, new hardwood flooring throughout, along with detailed carpentry work in the entire home.
WHY GALLERY KITCHEN AND BATH
After interviewing multiple contractors, our client decided on Gallery Kitchen and Bath primarily because of our turnkey design, selection, and build process. In a renovation of this magnitude it is crucial to have a centralized full service contractor under one roof to handle all of the aspects and simultaneous moving parts of the project. Decentralizing the entire process by having multiple unaffiliated vendors handle various parts of the process can easily become chaotic, time consuming, and costly.
Because Gallery Kitchen and Bath undertook the entire process, from the design of the entire space to the selection and procurement of all finishes and fixtures, down to the procurement of all permits and LPC filings, it made a seemingly chaotic project a’lot more manageable.
PHASE 1: DESIGN, SELECTION, PROCUREMENT
Our client wanted the renovation to incorporate a fully modern design into his Hudson Square town-house. Being that this is a landmarked property, the exterior facade had to be restored and kept with the original aesthetic, the interior of the home however was a whole different story.
In keeping up with the modern aesthetic, our designers went to work to design a custom kitchen that included fully custom flat panel base cabinets in a white high gloss finish and an absolute matte black appliance/pantry wall. The kitchen design also included a white quartz countertop and backsplash with a waterfall edge island. To bring warmth to the modern kitchen, our designers incorporated a rifted and quartered select oak wood floor in a herringbone pattern, and custom blended stain with matte polyurethane finish. For continuity, the wood floor was also extended throughout the entire owners unit.
In the ensuite bathroom we created a “wet area” which houses a standalone soaking tub as well as a beautiful rainfall shower, completely leveled with the rest of the floor in the bathroom. Some highlights within this space include a tiled square drain, large niche cutouts with a carrera marble accents. Once again, to bring warmth to this modern bathroom, our designers incorporated a floating rustic oak vanity and carrera marble mosaic floor tile.
Last on the list on the owners unit floor was the cellar, which our client wanted to utilize as an entertainment space for his friends and family. During the design phase, we incorporated an open concept layout, wedding the indoor and outdoor space with a custom glass curtain wall. The design also included custom walnut built-ins that serve as a custom wet bar and storage piece.
With the design approved and selections made our office liaisons moved to procure all of the material selections and finishes.
PHASE 2: DEMO
Because this home is almost two centuries old, we had to take extra precaution during the interior demolition phase of the project. One specific area that we had to pay special attention to was the existing brick. Over time the mortar in old brick homes deteriorates and turns into dust – for this reason it was extremely important that a thorough and ongoing inspection of the exteriors and interior walls took place during the demolition of the space.
After 14 30-yard debris containers and 56 wine filled jugs from the prohibition era later , the demolition of this historic Hudson Square town-home came to an end. If you are wondering whether we tried the wine? After notifying the owner we agreed to open one of the jugs and try them together – nothing but vinegar.
PHASE 3: BUILD
One of the challenges in a renovation project of this scope is nailing down the logistics and delivery of fixtures and finish material. Adding to this challenge was a narrow entry door that required us to use a boom truck in order to deliver some of the larger materials on site. To ensure a succinct time schedule, we boomed all of the materials through the 3rd floor for the entire project and worked our renovation work from top floor to cellar. This technique also insured that any unexpected water issues during the renovation process would not damage a finished floor.
With all roughing and framing complete, the Gallery KBNY team proceeded to execute on the design plan.
THE REVEAL
From what was once a dilapidated town-home with nothing but potential, to a glamorous and luxurious modern interior space – the prohibition house was complete. Ready to speak with us about your renovation project? Contact us to schedule your free consultation and let Gallery KBNY show you why our all-inclusive approach to your renovation is the smartest way to renovating in NYC.
 Braen Supply
Building a Dream Backyard
When this homeowner started the design process of a new backyard, Braen Supply was immediately there to supply all the stone materials. The home was part of a new development, so the challenge was to make the home stand out while still addressing specific areas of the existing backyard, such as the steep grade.
Working With the Experts
Taking the steep grade into consideration, moss rock boulders were selected to create stairs down to the lower area of the backyard where the fire pit sits. The grade of the backyard also allowed for the infinity pool, full color bluestone pattern was selected as the veneer for the back wall of the infinity pool.
Braen Supply chose Tennessee gray and bluestone to create a seamless transition from the front of the house to the back of the house. Although they are two different stones, they work nicely together to complete the overall design and tone of the home. It all came together and made the perfect backyard.
Materials Used:
Belgium Blocks
Full Color Bluestone Pattern
Bluestone Caps
Tennessee Gray Irregular
Moss Rock Boulders
Full Color Bluestone Irregular
Kearney Stone Steps
Granite Mosaic Veneer
Completed Areas:
Front Walkway & Porch
Driveway Edging
Backyard Walkways
Pool Patio & Coping
Pool Water Features
Fireplace Hearth & Mantal
Wading Pool
Raised Hot Tub
 Braen Supply
Building a Dream Backyard
When this homeowner started the design process of a new backyard, Braen Supply was immediately there to supply all the stone materials. The home was part of a new development, so the challenge was to make the home stand out while still addressing specific areas of the existing backyard, such as the steep grade.
Working With the Experts
Taking the steep grade into consideration, moss rock boulders were selected to create stairs down to the lower area of the backyard where the fire pit sits. The grade of the backyard also allowed for the infinity pool, full color bluestone pattern was selected as the veneer for the back wall of the infinity pool.
Braen Supply chose Tennessee gray and bluestone to create a seamless transition from the front of the house to the back of the house. Although they are two different stones, they work nicely together to complete the overall design and tone of the home. It all came together and made the perfect backyard.
Materials Used:
Belgium Blocks
Full Color Bluestone Pattern
Bluestone Caps
Tennessee Gray Irregular
Moss Rock Boulders
Full Color Bluestone Irregular
Kearney Stone Steps
Granite Mosaic Veneer
Completed Areas:
Front Walkway & Porch
Driveway Edging
Backyard Walkways
Pool Patio & Coping
Pool Water Features
Fireplace Hearth & Mantal
Wading Pool
Raised Hot Tub
 Braen Supply
Building a Dream Backyard
When this homeowner started the design process of a new backyard, Braen Supply was immediately there to supply all the stone materials. The home was part of a new development, so the challenge was to make the home stand out while still addressing specific areas of the existing backyard, such as the steep grade.
Working With the Experts
Taking the steep grade into consideration, moss rock boulders were selected to create stairs down to the lower area of the backyard where the fire pit sits. The grade of the backyard also allowed for the infinity pool, full color bluestone pattern was selected as the veneer for the back wall of the infinity pool.
Braen Supply chose Tennessee gray and bluestone to create a seamless transition from the front of the house to the back of the house. Although they are two different stones, they work nicely together to complete the overall design and tone of the home. It all came together and made the perfect backyard.
Materials Used:
Belgium Blocks
Full Color Bluestone Pattern
Bluestone Caps
Tennessee Gray Irregular
Moss Rock Boulders
Full Color Bluestone Irregular
Kearney Stone Steps
Granite Mosaic Veneer
Completed Areas:
Front Walkway & Porch
Driveway Edging
Backyard Walkways
Pool Patio & Coping
Pool Water Features
Fireplace Hearth & Mantal
Wading Pool
Raised Hot Tub
 Braen Supply
Building a Dream Backyard
When this homeowner started the design process of a new backyard, Braen Supply was immediately there to supply all the stone materials. The home was part of a new development, so the challenge was to make the home stand out while still addressing specific areas of the existing backyard, such as the steep grade.
Working With the Experts
Taking the steep grade into consideration, moss rock boulders were selected to create stairs down to the lower area of the backyard where the fire pit sits. The grade of the backyard also allowed for the infinity pool, full color bluestone pattern was selected as the veneer for the back wall of the infinity pool.
Braen Supply chose Tennessee gray and bluestone to create a seamless transition from the front of the house to the back of the house. Although they are two different stones, they work nicely together to complete the overall design and tone of the home. It all came together and made the perfect backyard.
Materials Used:
Belgium Blocks
Full Color Bluestone Pattern
Bluestone Caps
Tennessee Gray Irregular
Moss Rock Boulders
Full Color Bluestone Irregular
Kearney Stone Steps
Granite Mosaic Veneer
Completed Areas:
Front Walkway & Porch
Driveway Edging
Backyard Walkways
Pool Patio & Coping
Pool Water Features
Fireplace Hearth & Mantal
Wading Pool
Raised Hot Tub

 Braen Supply
Building a Dream Backyard
When this homeowner started the design process of a new backyard, Braen Supply was immediately there to supply all the stone materials. The home was part of a new development, so the challenge was to make the home stand out while still addressing specific areas of the existing backyard, such as the steep grade.
Working With the Experts
Taking the steep grade into consideration, moss rock boulders were selected to create stairs down to the lower area of the backyard where the fire pit sits. The grade of the backyard also allowed for the infinity pool, full color bluestone pattern was selected as the veneer for the back wall of the infinity pool.
Braen Supply chose Tennessee gray and bluestone to create a seamless transition from the front of the house to the back of the house. Although they are two different stones, they work nicely together to complete the overall design and tone of the home. It all came together and made the perfect backyard.
Materials Used:
Belgium Blocks
Full Color Bluestone Pattern
Bluestone Caps
Tennessee Gray Irregular
Moss Rock Boulders
Full Color Bluestone Irregular
Kearney Stone Steps
Granite Mosaic Veneer
Completed Areas:
Front Walkway & Porch
Driveway Edging
Backyard Walkways
Pool Patio & Coping
Pool Water Features
Fireplace Hearth & Mantal
Wading Pool
Raised Hot Tub

 Thompson Remodeling
 really enjoyed working with this Grand Rapids family to remodel their basement into a family space where they could showcase their favorite sports memorabilia and other memories from their home state of Maryland.
After remodeling their previous home just 6 months earlier, circumstances required the family to move. One day upon returning to their new home, they found their basement flooded! Realizing they needed to act fast to repair the damage they contacted Thompson Remodeling to help.
When discussing the design for the project, our clients told us how much they had loved the updates they made to their last home and were hoping to use similar warm tones and rustic materials. We looked at photos of that home for inspiration and developed a design that would serve as an entertaining and gathering space that would allow their fantastic collection of Maryland sports memorabilia to shine. Careful consideration was given on how to use every nook and cranny of space, as was the selection process for specific rustic materials that would contribute warmth and visual interest.
We used Ghost Wood to create a rich accent wall in the tv viewing area. The fireplace is made of stacked tile that looks like stone and the mantel is a handpicked, old barn beam. The clients told our designer that they wanted to hang a Maryland flag in the basement so she found this fantastic flag made of distressed wood which was hung above the mantel. For the flooring, we selected a gorgeous vinyl plank for easy cleaning and maintenance.
 Tile Doctor Ltd
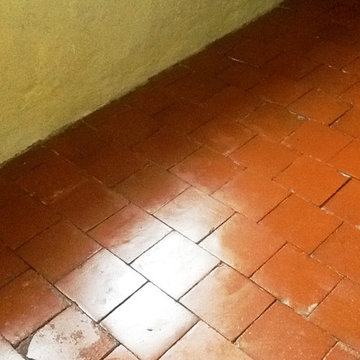
Here’s an interesting work I recently completed on a red Quarry tiled floor at a house in the town of Abington, Northampton. In post-war Britain (more specifically in the 1940s and 1950s), many new homes were built with Quarry tiled hallways and kitchens, so quite a popular feature back then. These floors are typically quite hard wearing and therefore ideal for such high traffic areas; additionally they don’t need a great deal of maintenance but their appearance will degrade over time.
In this particular house, the Quarry tiled floor had been covered with linoleum for many years, causing significant patches of visible black mould. The floor also had a loose tile (which I promptly reset to mitigate the potential tripping hazard) and splashes of paint due to a lack of precaution while the house was being renovated. Needless to say, the floor needed a lot of work.
Before beginning the cleaning I made sure to vacuum up all of the loose debris from the floor. I then applied Tile Doctor Remove & Go to the tiles, left it to dwell for a short period, and then agitated the area with a black stripping pad, adding water to aid the process. This helped to break down any old and ineffectual sealer, along with the paint splashes marking the tiles, leaving a much cleaner and more refined appearance.
I followed this up with Tile Doctor Grout Clean-Up to eliminate the odd speck of cement and grout haze dating back to when the floor was first installed; Gout Clean-up has an acid base so it’s not advised to leave it on the tiles for too long, consequently as soon as I was happy it had done the job I rinsed it off with water and give the floor a thorough wash down.
I used a wet-vacuum machine to extract as much water as possible and gave the floor a once over with steam cleaner which improves the evaporation of any remaining moisture by heating up the tiles.
After completing the cleaning process, I left the house to allow time for the floor to dry completely. Upon my return, I conducted a damp test which showed the floor needed to dry further before sealing so I left an industrial fan in place for a couple of hours to help speed things up.
Once I was satisfied that the floor was dry enough to take the sealant, I sealed the floor using Tile Doctor Colour Grow which is an interesting product that will not only provide durable stain protection but also improves the natural colours of the tile.
While the floor required a lot of time and work to restore, I think you will agree the results were certainly worth waiting for.
Phil Vissian
Northamptonshire Tile Doctor

 Guggenheim Architecture + Design Studio
Josh Partee Photography
With sweeping views of the Willamette river and Mt. Hood, this Atwater Place condo was designed with a balance of minimalism and livability in mind. A complete kitchen remodel brought a dark interior kitchen to the light and a full furnishings package welcomed Los Angeles transplants home to their new modern and bright residence. Our clients, a retired camera operator for both feature films and television and a producer/production manager on numerous television series including Weeds and The Middle, relocated from their traditionally-styled LA bungalow to Portland in the Summer of 2014. The couple sought a design departure from their long-term California residence and a fresh start for their new life in the South Waterfront.
With only two pieces of sentimental furniture and a handful of artwork included in the plan, we set out to create a comfortable and clean-lined furnishings package complimenting the broad southeast views. Organically shaped upholstery pieces juxtaposed with angular steel and wood tables create a soft balance in the open floor plan. Several custom pieces, including a dining table designed by our studio and a custom hand-blown glass chandelier crafted by Scott Schiesel with Lightlite compliment timeless pieces from Knoll, Herman Miller, and B&B Italia.
The kitchen is designed to reflect light and create brilliance in a space that is otherwise naturally dark. A material balance of stainless steel, back painted glass, quartz composite, lacquer, and mirror all play their part in creating a vibrant cooking environment. We collectively decided to forgo the traditional island pendant for a linear commercial fixture that provides tremendous light to the prep surface and creates an unexpected architectural element. The mirrored prep island creates the illusion of open space while concealing casework and wine storage on the working side of the kitchen.
It is worth noting that this project was designed and installed almost entirely while our clients were still living in LA and wrapping up professional obligations and selling their home. This afforded us the tremendous opportunity to send our clients to showrooms not available in Portland to view key pieces before final specification. Textiles and finish samples were approved via mail and communication took place over e-mail, telephone, and an occasional office visit. This unique process lead to a successful result and a beautifully balanced living environment.
 Braen Supply
Building a Dream Backyard
When this homeowner started the design process of a new backyard, Braen Supply was immediately there to supply all the stone materials. The home was part of a new development, so the challenge was to make the home stand out while still addressing specific areas of the existing backyard, such as the steep grade.
Working With the Experts
Taking the steep grade into consideration, moss rock boulders were selected to create stairs down to the lower area of the backyard where the fire pit sits. The grade of the backyard also allowed for the infinity pool, full color bluestone pattern was selected as the veneer for the back wall of the infinity pool.
Braen Supply chose Tennessee gray and bluestone to create a seamless transition from the front of the house to the back of the house. Although they are two different stones, they work nicely together to complete the overall design and tone of the home. It all came together and made the perfect backyard.
Materials Used:
Belgium Blocks
Full Color Bluestone Pattern
Bluestone Caps
Tennessee Gray Irregular
Moss Rock Boulders
Full Color Bluestone Irregular
Kearney Stone Steps
Granite Mosaic Veneer
Completed Areas:
Front Walkway & Porch
Driveway Edging
Backyard Walkways
Pool Patio & Coping
Pool Water Features
Fireplace Hearth & Mantal
Wading Pool
Raised Hot Tub
32