
Search results for "Starting watering" in Home Design Ideas

 Eden Condensed
Blooming perennials and a stone turtle dress up a small balcony.
Example of a small classic balcony container garden design in Los Angeles
Example of a small classic balcony container garden design in Los Angeles

 Michael Nash Design, Build & Homes
Starting Each Day Clean and Refreshed In This Classically-Modern, Marble Masterpiece
In 1985, the previous owner of the house had added an addition of which part included a 17 feet by 13 feet space off the master bedroom for both a master bath and walk-in closet. Irrespective of the dated red carpet that blanketed the entire bathroom of this 1964 colonial in Annandale, VA, the combination bathroom/closet space had its other oddities, primarily in that there was no shower. The current homeowners -- a family of five, who has been in the home for 7 years, was tired of going down the hall to use the kids’ bathroom to take a shower before work. The renovation that they have created now is a bright and luxurious space that one could bask in all day. They used this bathroom renovation opportunity to total remake the layout and function of this essential room that sets the tone for the day ahead.
Prior to the renovation, the existing bathroom oddly had two entrances, a typical one off of the master bedroom, but another straight off the upstairs hallway. As the toilet was out in the open in the previous design, ensuring that this second door was closed when company was in town was essential and a nuisance. As you entered the room, situated below the arc window, a large soaking tub that was covered on three sides with wooden steps dominated the room from the corner it projected. A relatively small 42” single bowl sink did not leave much space for his and hers toiletries, and there was no other linen closet or cabinetry for storage in the bathroom. The 8 foot by 5 foot closet with accordion doors had poorly laid out rungs not letting the storage space to be fully utilized. At over 220 square feet, the room did offer considerable space to work with, yet the existing layout, which even included a partition wall behind the vanity, felt cramped and dysfunctional.
The homeowners wished to create a classic yet modern, private, deluxe bathroom that would better integrate into their master suite and enable them to start and end each day in a luxurious way. They wanted to maintain having a soaking tub, add in a large shower, have an enclosed commode, expand to include double sinks, and add more storage for toiletries and linens. We worked with the customer to develop a creative design with extensive plumbing rework that accomplished all these needs and more.
The first order of business was to gut out all the carpet, tub, cabinetry, and non-load bearing partition walls. The new tub would be generally in the same location, but as the previous walk-in closet would be repurposed for the commode and the walk-in shower additional water lines, plumbing, and draining needed to be added; fortunately the room below is the garage, which enabled the team to frame out some bulkheads to accomplish this complex plumbing. Following the framing, including walling up the second entrance to the bathroom, adding in a pocket door for the commode, and creating the shape of the new shower, the team also laid down the wiring for one of the luxuries of this room – heated flooring. A glossy percaline boarder, and two-inch hexagon shape percaline tiles cover the entire floor, making it much easier and cleaner than the previous carpet.
Marble look tile is predominant throughout the bathroom as despite the angled frameless glass door, the entire shower is covered in 18 inch polished marble look tiles. The shower coats the user in water from either the overhead rain head, large main showerhead and/or the hand held sprayer. Over 7 feet of white Italian Statuetto marble countertop, enable the couple to have two sink bowls and plenty of room on each side. The bowls are exposed in this stainless steel console sink design which required the team to ensure that the exposed plumbing looked pristine, and painting the bottom of the porcelain bowl to match the coloring.
The white cast-iron 72-inch Cecilia claw-foot soaking tub and its chrome lion’s paws complement that other chrome and white used throughout the room. A tall, almost floor-to-ceiling linen closet finished in arctic white is nestled in the corner near the tub, enabling ample storage of towels, etc. Other cabinetry includes an 18 inch-wide vanity with decorative footing is centered between the two sinks, and a 27 inch wall mounted cabinet with shelf is above the Kohler Devonshire elongated toilet.
Billowing cloud colored grey blue paint was a great choice for this room to pick up on the veining in the marble. Mirrored medicine chests, a chandelier, wall sconces, and overhead recessed lighting also were incorporated into the design and function of the new room.
The artful combination of classic design from material choices, such as free-standing Victorian claw-foot tub along with the modern design as seen in the angled shower, frameless medicine cabinet mirrors, and frosted glass pocket door on the commode, make this bathroom quite a masterpiece.
The clients are enjoying having their private space and not having the use the kids’ bathroom anymore.

 Mottram Architecture
Timber frame homes offer unique challenges during a remodel. What often makes them beautiful and attractive to most homeowners, also makes them challenging for space requirements.
Context: The lovely couple that owned this home were struggling with some interesting floor plan challenges that just didn't work for their family. The loved the beautiful timbers and woodwork of their home, but the dramatically sloping ceilings on the second floor, particularly in the bathroom, just didn't work for this 1 1/2 bath home. Needing to use the skylight to approach the toilet was a less then ideal scenario. Although the bathroom footprint was more then adequate, the sloped ceiling only made half of the space useable. Check out the Before/After post on our blog to see the photos of the house pre-renovation. As much as they loved all the wood features in their home, another challenge they had was light. The wood ceiling made everything inside the house darker, even with a fantastic array of south facing windows, there were spaces in the home that felt dark and small. When they contacted us they wanted to know how could they make their brighter and more inviting, were there solutions to the 2nd floor sloped ceiling issues, and if they were going to do all of this work, how could they make their home more comfortable and efficient. A nagging water leak in the upstairs bathroom spurred them into action and here is how we solved their dilemma.
Conclusion: First, we added a little dormer to the rear of the house so we could get full headroom in nearly all of the upstairs bathroom! Then we decided to extend that dormer one more timber bay over to create a walk in closet with natural light and plenty of space. Since we were contemplating energy efficiency, we resolved a nagging issue that is present in a lot of timber frame construction, air tightness. Commonly found in timber frame construction, fiberglass insulation is installed in the rafter bays and board ceilings are installed over top. Unfortunately, board ceilings are anything but air tight, and fiberglass insulation needs to be in an airtight cavity for maximum effectiveness. So we were able to solve two issues at the same time for this homeowner. We removed the board ceiling and fiberglass insulation, we dense packed the rafter bays with cellulose insulation, and installed sheetrock in place of the boards. The boards were salvaged for re-use by the homeowner, and the space and light quality was dramatically improved. Some may think that losing the board ceiling took something away from the space, but what you'll see in the pictures is that it highly accentuates the heavy timbers and really makes them stand out in a beautiful way. Now with this added airtightness, better insulation, and brighter space, the homeowner hardly runs their wood stove, and it's so quiet in the space, an added bonus from changing the insulation. It became necessary to also add a sheetrock ceiling to the living room to hide the plumbing from the new bathroom layout above. Changing this ceiling gave the homeowner some real quality lighting that was lacking in the living room before. The brighter ceiling and new lighting layout completely transforms the living room into a space you want to hang out, even though the layout didn't change at all. When the homeowner saw the finished spaces she said "I can't believe this is my house, I want to live in this house"
Energy Efficiency: I touched a little on the efficiency above, but like all projects done with Mottram Architecture, we always want to leave you with a little extra. Timber frame construction with board ceilings and fiberglass insulation are notoriously leaky! If you want to know what we think about fiberglass insulation, check our our blog post on Why Fiberglass Insulation Sucks. By installing cellulose insulation and covering it with sheetrock we were able to greatly reduce the heat flowing out of this home. It not only improves cashflow it improves the comfort level in the space. Who wants to sit in their living room and feel a draft? Let us remind you, we are not saying cellulose insulation is an air barrier, we use the sheetrock to help with that, but it does significantly reduce the air flow over fiberglass insulation. And when we reduce the airflow, we reduce the heat flow. And when we reduce the heat flow, we reduce the need to re-heat that drafty air from outside. When it comes to energy efficiency the first and best place to start is air infiltration. We greatly reduced the air infiltration with the new insulation, but we also added a hat and warm boots. What I mean by that is, we improved the insulation in the roof, and we installed insulation in the basement. Maybe it's a silly analogy, but when you think about keeping warm, we always start with the hat and boots! With sustainability in mind, the next project will be to add a deck to the front of this house with rain catchment barrels from the metal roof. They are planning to plant a garden in the spring and the rain catchment system will help to irrigate the new garden.
Builder: East Shore Builders
Photographer: Michael Eric Berube
Find the right local pro for your project

 Paradise Found Construction
Cecelia and Neil loved their home in Cary, NC, but felt that their Master Bath was outdated and not serving well to provide the space that they wanted. The large garden tub did not appeal to them, and took up too much floor space, making the shower enclosure feel small.
Our solution was to remove the old tub, shower enclosure, vanity, and tile and start over.
The liked the “Retro Look” of a claw foot free-standing tub and bright “Subway Tile” and the warm rich feel of dark wood.
We positioned the claw-foot in a fraction of the space that the old tub took up, allowing us to increase the size of the shower enclosure. We added the bright “Subway tile” to the shower enclosure, and laid octagonal mosaic tile on the floor, with a black accent line running along the perimeter of the bathroom.
We installed a warm rich dark wood “Furniture Style” vanity, with a luxurious Carrara marble top. We crowned the half-wall separating the water closet from the main room with matching Carrara marble, and added a wall hung cabinet for extra storage. As a special touch, we installed Carrara marble on top of the shower curb and installed the shower glass on top of the curb.
All of the design elements came together to create a bright yet inviting “Retro-Style” Master Bath that Cecelia and Neil enjoy using every day!

 The Outdoor Kitchen Design Store
Old Lyme, CT. Prime property for good reason, beach homes beckon you outside by appealing to the senses. The lulling sounds of rolling waves, the beauty of a seemingly eternal body of water, the salty smell of evening breezes, and the tickle of changing terrain underfoot all make waterside setups particularly peaceful. So with sand and sea bumping up to their backyard, these Connecticut homeowners were ready to max out their space for maximum outdoor living. To take on the transformation, they hired designer Michael Gotowala, president of Preferred Properties Landscaping & Masonry.
Multiple terraces of stone and granite patios feature a breakfast nook, seating under a sail-inspired cloth shade, fire pit, and hot tub installed in stone. The outdoor kitchen’s design is especially distinct for two reasons: One, this section is built out and fully finished with stone and granite, and two, the space is sunken into the landscape to block the wind and protect from the elements.
Outfitted with all the appliances needed for gourmet grilling in the great outdoors, additional amenities such as the gas fireplace for warmth and ambiance as well as a granite surround for seating complete this Connecticut cookery for optimum outdoor living. For more Outdoor kitchen ideas go to THE OUTDOOR KITCHEN DESIGN STORE by PREFERRED PROPERTIES.. www.OUTDOORKITCHENDESIGNER.com
Are you satisfied with your outdoor beach side space? If not reconsider your design. You too can feel fabulous about living beyond the walls of your home. It begins with a fabulous design and ends with meticulous workmanship. CALL 1-855- GET OUTDOORS to get started today
Michael Gotowala founder of THE OUTDOOR KITCHEN DESIGN STORE by PREFERRED PROPERTIES
 The Outdoor Kitchen Design Store
Old Lyme, CT. Prime property for good reason, beach homes beckon you outside by appealing to the senses. The lulling sounds of rolling waves, the beauty of a seemingly eternal body of water, the salty smell of evening breezes, and the tickle of changing terrain underfoot all make waterside setups particularly peaceful. So with sand and sea bumping up to their backyard, these Connecticut homeowners were ready to max out their space for maximum outdoor living. To take on the transformation, they hired designer Michael Gotowala, president of Preferred Properties Landscaping & Masonry.
Multiple terraces of stone and granite patios feature a breakfast nook, seating under a sail-inspired cloth shade, fire pit, and hot tub installed in stone. The outdoor kitchen’s design is especially distinct for two reasons: One, this section is built out and fully finished with stone and granite, and two, the space is sunken into the landscape to block the wind and protect from the elements.
Outfitted with all the appliances needed for gourmet grilling in the great outdoors, additional amenities such as the gas fireplace for warmth and ambiance as well as a granite surround for seating complete this Connecticut cookery for optimum outdoor living. For more Outdoor kitchen ideas go to THE OUTDOOR KITCHEN DESIGN STORE by PREFERRED PROPERTIES.. www.OUTDOORKITCHENDESIGNER.com
Are you satisfied with your outdoor beach side space? If not reconsider your design. You too can feel fabulous about living beyond the walls of your home. It begins with a fabulous design and ends with meticulous workmanship. CALL 1-855- GET OUTDOORS to get started today

 Triple Dot Design Studio
Our Award Nominated project,Violet street was a huge transformation from start to finish. Our goal was to take the main floor of the house from the 80’s to the 21st century by creating an open concept living area and a chef’s kitchen.
Removing the unnecessary walls created and open concept main floor with a chef's kitchen and an island that is over eleven feet long. Storage was a concern in the previously small kitchen; with that in mind we added in some full height pantry units with roll out shelves. The pantry units flank a built in desk and glass cabinets which has quickly become the landing zone for the kitchen and the perfect spot for planning their dinner menu. We elevated the look of the desk by running the back splash from the floor right up to the top as the backing inside the glass cabinets.
The living room was also given a new lease on life. All the cabinetry was done in a white washed oak to define the living space from the kitchen; this is especially important in open concept. Built in cabinetry now frames the fireplace, giving the living room a focal point.
Violet St has now been elevated to the present time and is a wonderful space to entertain and test your culinary abilities.
Now this home is ready to be filled with many happy memories and moments.
Sponsored
Columbus, OH
Free consultation for landscape design!

Peabody Landscape Group
Columbus' Reliable Landscape Design & Contracting
 Triple Dot Design Studio
Our Award Nominated project,Violet street was a huge transformation from start to finish. Our goal was to take the main floor of the house from the 80’s to the 21st century by creating an open concept living area and a chef’s kitchen.
Removing the unnecessary walls created and open concept main floor with a chef's kitchen and an island that is over eleven feet long. Storage was a concern in the previously small kitchen; with that in mind we added in some full height pantry units with roll out shelves. The pantry units flank a built in desk and glass cabinets which has quickly become the landing zone for the kitchen and the perfect spot for planning their dinner menu. We elevated the look of the desk by running the back splash from the floor right up to the top as the backing inside the glass cabinets.
The living room was also given a new lease on life. All the cabinetry was done in a white washed oak to define the living space from the kitchen; this is especially important in open concept. Built in cabinetry now frames the fireplace, giving the living room a focal point.
Violet St has now been elevated to the present time and is a wonderful space to entertain and test your culinary abilities.
Now this home is ready to be filled with many happy memories and moments.
 The Outdoor Kitchen Design Store
Old Lyme, CT. Prime property for good reason, beach homes beckon you outside by appealing to the senses. The lulling sounds of rolling waves, the beauty of a seemingly eternal body of water, the salty smell of evening breezes, and the tickle of changing terrain underfoot all make waterside setups particularly peaceful. So with sand and sea bumping up to their backyard, these Connecticut homeowners were ready to max out their space for maximum outdoor living. To take on the transformation, they hired designer Michael Gotowala, president of Preferred Properties Landscaping & Masonry.
Multiple terraces of stone and granite patios feature a breakfast nook, seating under a sail-inspired cloth shade, fire pit, and hot tub installed in stone. The outdoor kitchen’s design is especially distinct for two reasons: One, this section is built out and fully finished with stone and granite, and two, the space is sunken into the landscape to block the wind and protect from the elements.
Outfitted with all the appliances needed for gourmet grilling in the great outdoors, additional amenities such as the gas fireplace for warmth and ambiance as well as a granite surround for seating complete this Connecticut cookery for optimum outdoor living. For more Outdoor kitchen ideas go to THE OUTDOOR KITCHEN DESIGN STORE by PREFERRED PROPERTIES.. www.OUTDOORKITCHENDESIGNER.com
Are you satisfied with your outdoor beach side space? If not reconsider your design. You too can feel fabulous about living beyond the walls of your home. It begins with a fabulous design and ends with meticulous workmanship. CALL 1-855- GET OUTDOORS to get started today
 Paradise Found Construction
Cecelia and Neil loved their home in Cary, NC, but felt that their Master Bath was outdated and not serving well to provide the space that they wanted. The large garden tub did not appeal to them, and took up too much floor space, making the shower enclosure feel small.
Our solution was to remove the old tub, shower enclosure, vanity, and tile and start over.
The liked the “Retro Look” of a claw foot free-standing tub and bright “Subway Tile” and the warm rich feel of dark wood.
We positioned the claw-foot in a fraction of the space that the old tub took up, allowing us to increase the size of the shower enclosure. We added the bright “Subway tile” to the shower enclosure, and laid octagonal mosaic tile on the floor, with a black accent line running along the perimeter of the bathroom.
We installed a warm rich dark wood “Furniture Style” vanity, with a luxurious Carrara marble top. We crowned the half-wall separating the water closet from the main room with matching Carrara marble, and added a wall hung cabinet for extra storage. As a special touch, we installed Carrara marble on top of the shower curb and installed the shower glass on top of the curb.
All of the design elements came together to create a bright yet inviting “Retro-Style” Master Bath that Cecelia and Neil enjoy using every day!

 OMNIA Group Architects
Perched above the beautiful Delaware River in the historic village of New Hope, Bucks County, Pennsylvania sits this magnificent custom home designed by OMNIA Group Architects. According to Partner, Brian Mann,"This riverside property required a nuanced approach so that it could at once be both a part of this eclectic village streetscape and take advantage of the spectacular waterfront setting." Further complicating the study, the lot was narrow, it resides in the floodplain and the program required the Master Suite to be on the main level. To meet these demands, OMNIA dispensed with conventional historicist styles and created an open plan blended with traditional forms punctuated by vast rows of glass windows and doors to bring in the panoramic views of Lambertville, the bridge, the wooded opposite bank and the river. Mann adds, "Because I too live along the river, I have a special respect for its ever changing beauty - and I appreciate that riverfront structures have a responsibility to enhance the views from those on the water." Hence the riverside facade is as beautiful as the street facade. A sweeping front porch integrates the entry with the vibrant pedestrian streetscape. Low garden walls enclose a beautifully landscaped courtyard defining private space without turning its back on the street. Once inside, the natural setting explodes into view across the back of each of the main living spaces. For a home with so few walls, spaces feel surprisingly intimate and well defined. The foyer is elegant and features a free flowing curved stair that rises in a turret like enclosure dotted with windows that follow the ascending stairs like a sculpture. "Using changes in ceiling height, finish materials and lighting, we were able to define spaces without boxing spaces in" says Mann adding, "the dynamic horizontality of the river is echoed along the axis of the living space; the natural movement from kitchen to dining to living rooms following the current of the river." Service elements are concentrated along the front to create a visual and noise barrier from the street and buttress a calm hall that leads to the Master Suite. The master bedroom shares the views of the river, while the bath and closet program are set up for pure luxuriating. The second floor features a common loft area with a large balcony overlooking the water. Two children's suites flank the loft - each with their own exquisitely crafted baths and closets. Continuing the balance between street and river, an open air bell-tower sits above the entry porch to bring life and light to the street. Outdoor living was part of the program from the start. A covered porch with outdoor kitchen and dining and lounge area and a fireplace brings 3-season living to the river. And a lovely curved patio lounge surrounded by grand landscaping by LDG finishes the experience. OMNIA was able to bring their design talents to the finish materials too including cabinetry, lighting, fixtures, colors and furniture.
 The Outdoor Kitchen Design Store
Old Lyme, CT. Prime property for good reason, beach homes beckon you outside by appealing to the senses. The lulling sounds of rolling waves, the beauty of a seemingly eternal body of water, the salty smell of evening breezes, and the tickle of changing terrain underfoot all make waterside setups particularly peaceful. So with sand and sea bumping up to their backyard, these Connecticut homeowners were ready to max out their space for maximum outdoor living. To take on the transformation, they hired designer Michael Gotowala, president of Preferred Properties Landscaping & Masonry.
Multiple terraces of stone and granite patios feature a breakfast nook, seating under a sail-inspired cloth shade, fire pit, and hot tub installed in stone. The outdoor kitchen’s design is especially distinct for two reasons: One, this section is built out and fully finished with stone and granite, and two, the space is sunken into the landscape to block the wind and protect from the elements.
Outfitted with all the appliances needed for gourmet grilling in the great outdoors, additional amenities such as the gas fireplace for warmth and ambiance as well as a granite surround for seating complete this Connecticut cookery for optimum outdoor living. For more Outdoor kitchen ideas go to THE OUTDOOR KITCHEN DESIGN STORE by PREFERRED PROPERTIES.. www.OUTDOORKITCHENDESIGNER.com
Are you satisfied with your outdoor beach side space? If not reconsider your design. You too can feel fabulous about living beyond the walls of your home. It begins with a fabulous design and ends with meticulous workmanship. CALL 1-855- GET OUTDOORS to get started today
 Paradise Found Construction
Cecelia and Neil loved their home in Cary, NC, but felt that their Master Bath was outdated and not serving well to provide the space that they wanted. The large garden tub did not appeal to them, and took up too much floor space, making the shower enclosure feel small.
Our solution was to remove the old tub, shower enclosure, vanity, and tile and start over.
The liked the “Retro Look” of a claw foot free-standing tub and bright “Subway Tile” and the warm rich feel of dark wood.
We positioned the claw-foot in a fraction of the space that the old tub took up, allowing us to increase the size of the shower enclosure. We added the bright “Subway tile” to the shower enclosure, and laid octagonal mosaic tile on the floor, with a black accent line running along the perimeter of the bathroom.
We installed a warm rich dark wood “Furniture Style” vanity, with a luxurious Carrara marble top. We crowned the half-wall separating the water closet from the main room with matching Carrara marble, and added a wall hung cabinet for extra storage. As a special touch, we installed Carrara marble on top of the shower curb and installed the shower glass on top of the curb.
All of the design elements came together to create a bright yet inviting “Retro-Style” Master Bath that Cecelia and Neil enjoy using every day!

Sponsored
Sunbury, OH

J.Holderby - Renovations
Franklin County's Leading General Contractors - 2X Best of Houzz!
 The Outdoor Kitchen Design Store
Old Lyme, CT. Prime property for good reason, beach homes beckon you outside by appealing to the senses. The lulling sounds of rolling waves, the beauty of a seemingly eternal body of water, the salty smell of evening breezes, and the tickle of changing terrain underfoot all make waterside setups particularly peaceful. So with sand and sea bumping up to their backyard, these Connecticut homeowners were ready to max out their space for maximum outdoor living. To take on the transformation, they hired designer Michael Gotowala, president of Preferred Properties Landscaping & Masonry.
Multiple terraces of stone and granite patios feature a breakfast nook, seating under a sail-inspired cloth shade, fire pit, and hot tub installed in stone. The outdoor kitchen’s design is especially distinct for two reasons: One, this section is built out and fully finished with stone and granite, and two, the space is sunken into the landscape to block the wind and protect from the elements.
Outfitted with all the appliances needed for gourmet grilling in the great outdoors, additional amenities such as the gas fireplace for warmth and ambiance as well as a granite surround for seating complete this Connecticut cookery for optimum outdoor living. For more Outdoor kitchen ideas go to THE OUTDOOR KITCHEN DESIGN STORE by PREFERRED PROPERTIES.. www.OUTDOORKITCHENDESIGNER.com
Are you satisfied with your outdoor beach side space? If not reconsider your design. You too can feel fabulous about living beyond the walls of your home. It begins with a fabulous design and ends with meticulous workmanship. CALL 1-855- GET OUTDOORS to get started today
Michael Gotowala founder of THE OUTDOOR KITCHEN DESIGN STORE by PREFERRED PROPERTIES

 Tile Doctor Ltd
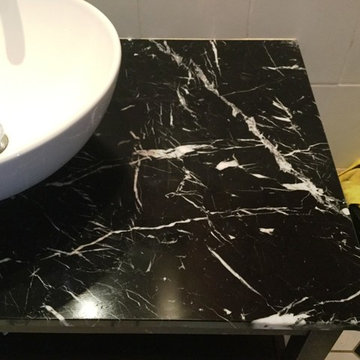
Marble is known for its premium quality, toughness and aesthetic, making it a very popular choice for bathroom countertops, such as this one at a house in Northampton. However just because it’s tough doesn’t mean that Marble can be cleaned with the usual household cleaners. Like all natural stone, Marble is acid sensitive and unsuitable products can have a very damaging effect on its appearance.
In this situation, the property owner had used a limescale remover to remove some unsightly marks from the countertop. Unfortunately, the product was acid-based and instead of making an improvement it just made it worse and caused severe etching.
The first photo above shows the limescale marks from where toiletries have been placed on the side whilst wet. Since Northampton is a hard water area, the limescale deposits over time caused these marks to appear.
The only way to effectively remove the Limestone deposits – while at the same time rectifying the damaged caused by the botched cleaning attempt – was to use a system of hand-held diamond encrusted pads and hand help blocks of various grits to cut back the stone and re-polish it, a process we call burnishing.
Before officially beginning the burnishing process, I ran a few tests to determine the type of pad I would need to use to achieve the best results. I found that, in most areas, I would need to use the Tile Doctor 400 Grit (Coarse) pad to resurface the tile and remove the damaged layer of stone, but in some areas where the etching was worse, I would need to use the 200 Grit (Very Coarse) pad.
After burnishing the affected areas with the Coarse and Very Coarse grit pads, I started to incrementally polish the stone to achieve a high-quality shine, working my up through the Medium, Fine and Very grit pads.
No chemicals were used during this process – only water for lubrication, combined with the six-inch diamond encrusted burnishing pads fitted to a hand-held buffing machine.
The final part of the restoration was to seal the stone to maintain a long-lasting, deep polished appearance. To do this, I used Tile Doctor Shine Powder, which is a crystallising sealer in powder form. The powder is applied directly and combined with water, before being worked into the stone to seal it.
The customer was very happy with the results and the level of shine achieved. I gave the customer a complimentary bottle of Tile Doctor Stone Soap, which is our aftercare cleaner for polished natural stone, along with instructions on periodic maintenance to help maintain the finish we had achieved for as long as possible.
Phil Vissian
Northamptonshire Tile Doctor
 Triple Dot Design Studio
Our Award Nominated project,Violet street was a huge transformation from start to finish. Our goal was to take the main floor of the house from the 80’s to the 21st century by creating an open concept living area and a chef’s kitchen.
Removing the unnecessary walls created and open concept main floor with a chef's kitchen and an island that is over eleven feet long. Storage was a concern in the previously small kitchen; with that in mind we added in some full height pantry units with roll out shelves. The pantry units flank a built in desk and glass cabinets which has quickly become the landing zone for the kitchen and the perfect spot for planning their dinner menu. We elevated the look of the desk by running the back splash from the floor right up to the top as the backing inside the glass cabinets.
The living room was also given a new lease on life. All the cabinetry was done in a white washed oak to define the living space from the kitchen; this is especially important in open concept. Built in cabinetry now frames the fireplace, giving the living room a focal point.
Violet St has now been elevated to the present time and is a wonderful space to entertain and test your culinary abilities.
Now this home is ready to be filled with many happy memories and moments.
Sponsored
Columbus, OH

Snider & Metcalf Interior Design, LTD
Leading Interior Designers in Columbus, Ohio & Ponte Vedra, Florida
 The Outdoor Kitchen Design Store
Old Lyme, CT. Prime property for good reason, beach homes beckon you outside by appealing to the senses. The lulling sounds of rolling waves, the beauty of a seemingly eternal body of water, the salty smell of evening breezes, and the tickle of changing terrain underfoot all make waterside setups particularly peaceful. So with sand and sea bumping up to their backyard, these Connecticut homeowners were ready to max out their space for maximum outdoor living. To take on the transformation, they hired designer Michael Gotowala, president of Preferred Properties Landscaping & Masonry.
Multiple terraces of stone and granite patios feature a breakfast nook, seating under a sail-inspired cloth shade, fire pit, and hot tub installed in stone. The outdoor kitchen’s design is especially distinct for two reasons: One, this section is built out and fully finished with stone and granite, and two, the space is sunken into the landscape to block the wind and protect from the elements.
Outfitted with all the appliances needed for gourmet grilling in the great outdoors, additional amenities such as the gas fireplace for warmth and ambiance as well as a granite surround for seating complete this Connecticut cookery for optimum outdoor living. For more Outdoor kitchen ideas go to THE OUTDOOR KITCHEN DESIGN STORE by PREFERRED PROPERTIES.. www.OUTDOORKITCHENDESIGNER.com
Are you satisfied with your outdoor beach side space? If not reconsider your design. You too can feel fabulous about living beyond the walls of your home. It begins with a fabulous design and ends with meticulous workmanship. CALL 1-855- GET OUTDOORS to get started today
Michael Gotowala founder of THE OUTDOOR KITCHEN DESIGN STORE by PREFERRED PROPERTIES
 Triple Dot Design Studio
Our Award Nominated project,Violet street was a huge transformation from start to finish. Our goal was to take the main floor of the house from the 80’s to the 21st century by creating an open concept living area and a chef’s kitchen.
Removing the unnecessary walls created and open concept main floor with a chef's kitchen and an island that is over eleven feet long. Storage was a concern in the previously small kitchen; with that in mind we added in some full height pantry units with roll out shelves. The pantry units flank a built in desk and glass cabinets which has quickly become the landing zone for the kitchen and the perfect spot for planning their dinner menu. We elevated the look of the desk by running the back splash from the floor right up to the top as the backing inside the glass cabinets.
The living room was also given a new lease on life. All the cabinetry was done in a white washed oak to define the living space from the kitchen; this is especially important in open concept. Built in cabinetry now frames the fireplace, giving the living room a focal point.
Violet St has now been elevated to the present time and is a wonderful space to entertain and test your culinary abilities.
Now this home is ready to be filled with many happy memories and moments.
 Tile Doctor Ltd
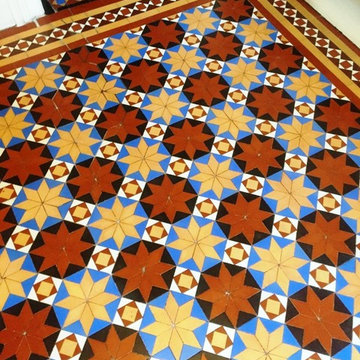
Victorian tiled floors are known for their interesting and unique mosaic patterns – and this one was no different. It was installed at a house in the historic West Midlands town of Stourbridge (famous for its glass industry). Unfortunately it was now looking worse for wear and was in dire need of not just cleaning and sealing, but also some minor repairs and the owner was keen to have it restored back to its former glory.
This particular Victorian tiled floor had been arranged in a fantastic pattern comprising tiles in shades of yellow, blue, red and white. There were, however, some missing tiles but fortunately I know a number of specialist suppliers where I can source replacements. I spent the first day making minor repairs and replacing the missing tiles, including the grouting, and then left the treated areas to set overnight.
On the second day I returned to the house to complete the cleaning process starting with a combination of Tile Doctor Remove & Go – a powerful sealer stripper – and Tile Doctor NanoTech HBU cleaner to lift out ingrained dirt and break down old layers of sealer. NanoTech HBU is particularly effective as it utilises tiny nano sized particles to penetrate deep into the stone and lift out the dirt. The resultant slurry was rinsed off the floor and removed using a wet vacuum.
The next step was to give the floor an acid wash using Tile Doctor Acid Gel, this product can remove old grout haze and other mineral deposits, additionally being in a gel form makes it easy to control and although primarily designed for use on walls it works really well on floors as well. Following this I gave the floor a thorough rinse, dried as much as possible with a wet vacuum and left it to dry overnight, ready to be sealed the next day.
Upon my return to the house on the third day I set about sealing the floor, checking first that the area was completely dried by running damp tests with damp meter, all was well so I able to start applying the sealer. The sealer chosen for this floor was Tile Doctor Seal and Go which is a water based product which is a popular choice as it gives the floor a nice sheen and doesn’t leave the smell that the solvent based sealers do; three thin coats were applied to provide a robust surface seal and to achieve a semi-shine finish, as per the client’s requested.
My client was extremely pleased with the results, with a lot achieved over the space of roughly two and a half days. They left the following feedback:
“Mick did a fantastic job. He was polite and friendly and kept us informed at every stage of the work. He is extremely professional and it is obvious that he takes a great deal of pride in his work. We are thrilled with our ‘new’ floor.”
Michael Leonard
Worcestershire Tile Doctor
176