
Search results for "Starting watering" in Home Design Ideas
 Tile Doctor Ltd
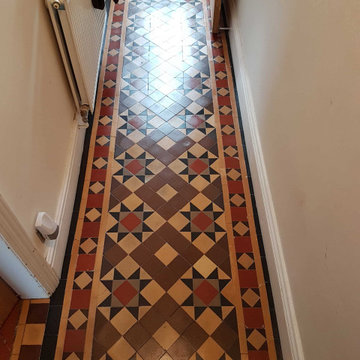
This client had just moved into a property in York and having pulled back the old carpet revealed a lovely old period Victorian tiled floor she didn’t know existed when she bought the house!
I went over at the beginning of this year to survey the floor and could see that fortunately, no glue or carpet grips had been used to secure the carpet; additionally the floor was in good physical condition considering its age with no cracks or loose tiles. The tiles were however very dusty and dirty with ingrained dirt and so had probably been covered with carpet for a very long time. The hallway was quite dark I’m afraid with little natural light so apologies for the photographs.
With old houses like this you never know what you are going to find so whilst I was there surveying the floor, I took some moisture readings with a damp meter on the floors and walls. The readings came back low so no sign of damp which was a relief to the owner.
We agreed a price for the work, and I arranged to come back the following week.
I must admit I do like York, its steeped in history and famous for its Cathedral and Viking museum. The houses in the city have loads of character and period features like this floor are quite common.
I deep cleaned the floor with a strong 1:3 dilution of Tile Doctor Pro-Clean worked in with a black scrubbing pad fitted to a rotary machine. Initially the solution was left to soak into the tile before being agitated by the machine. The soil was then rinsed off with minimal water and then extracted with a wet vacuum.
I followed this up with an Acid Wash using Tile Doctor Acid Gel to further clean up the tiles and help inhibit any potential efflorescent salt issues which are common in floors of this age due to the absence of the damp proof membrane. The floor was given a further rinse and extraction and allowed to dry out fully overnight. I needed the floor to be dry for the next day so it could be sealed.
I came back the next day and started by taking more damp readings which showed similar readings to the day before. Given the low readings I was able to move straight onto sealing which was done using four coats of Tile Doctor Seal and Go. This product works really well on old Victorian Tiles like these and being water based it doesn’t leave a smell as it dries.
Once the final coat of sealer had dried there was a significant improvement in the appearance of the floor which was much appreciated by client who was very happy with the end result.
For aftercare I recommended the use of Tile Doctor Neutral Tile Cleaner to maintain the floor, it has a nice fresh smell and can be used regularly due to its pH neutral nature which won’t prematurely erode the sealer like stronger bleach based cleaners.
Nigel Stoker
North West Yorkshire Tile Doctor

 Hillcrest Builders
Hillcrest is very proud to present this custom country estate. Our journey to provide this home for our customer started with our Realty division searching for land for them. After we found the gorgeous countryside site with an old pond, wetland and pastures we managed complex re-zoning and permitting. Because every direction offers distinct views, we spent a lot of time with our customers to place the home and create a layout that maximizes views from every living space. Our design department created a two story main dwelling with an open concept, modern country style custom kitchen, dining area with two sided fireplace, and abutting three season porch. With the kitchen being the hub, it accesses the office, front hall foyer, stairs to the second floor, and the breezeway to the auxiliary part of the home. The living room is semi-open of the dinette, and has chauffeured ceilings. The second floor contains the master suite with a very luxurious bathroom and stunning views. The other two bedrooms also provide great, far flung views. The auxiliary part of the home is perhaps the most unique part of this estate. It offers a long hallway with glass to the south overlooking a large patio with a hot tub. The other side of the hallway has a large laundry with a dumbwaiter to return the laundry upstairs, a shower and powder room for direct access from the hot tub and swimming pond, and a large mudroom. It terminates in the rear foyer with access to the garage and the crown jewel, the sports bar. The customer wanted a brew pub to make and serve his home made beer. The brew pub contains heated, stained concrete floors, concrete counters, and very tall vaulted ceilings. The walls and ceilings are clad with wire brushed grey stained pine and lots of windows overlook the hot tub patio and 270 degree views. The customer also wanted a barn, as both he and she grew up on a farm and shared the love of barns with Hillcrest’s owner. We designed the “perfect gentleman’s barn”, of course red with white trim and with a covered porch which extends on one side into a small greenhouse. Hillcrest also designed and built extensive landscaping features including a winding plank walk to a large swimming pond in the woods. Because of the ample ground water, we created a second swimming pond next to the house which is stays crystal clear and ended up functioning as an outdoor pool.
 Tile Doctor Ltd
This was a substantial engagement at a luxury rental apartment in Brighton rejuvenating the Limestone tiles in two bathrooms and a hallway taking six days of hard work. In addition, I would be working around two decorators, making for even more testing work conditions.
I first set to work on the smallest bathroom, which featured limestone tiles from floor to ceiling, as well as a large bath, copper sink and a tiled surround. Limestone is a very popular choice for interior and exterior decoration, but the tiles in this bathroom were in need of some care to get them looking their best again. My initial task was to strip away any previous sealer by hand; this was done using a mixture of warm water and Tile Doctor Pro-Clean which, along with Limestone, is also suitable for use on other types of natural stone, such as Granite, Slate and Travertine. Pro-Clean serves both as an effective stripper and cleaner, meaning that once the sealer had been stripped away, the tiles also received a thorough clean. Once I had cleaned the tiles, I sucked up any excess water and residue using a Wet-Dry Vac machine.
Since the tiles would have to be left to dry for a couple of days, I offered to restore the copper sink for the customer, even though this was not actually part of my job description. After conducting some research into copper cleaning, I opted to use a combination of lemon juice, vinegar and salt. The research paid off as, once I began to apply the solution to the sink, the bright orange and brown colours of the copper quickly rose to the surface. Within the space of an hour, I had transformed what initially appeared to be a ruined sink into a lovely, shimmering copper feature for the bathroom. Both the decorators and I were truly amazed at the results – but all credit goes to Google!
The larger of the two bathrooms was a much stiffer test for the Tile Doctor products. It had not been left in great condition, as the shower area had clearly not been sealed correctly, and the tiles had been left in such a manner that soap scum from shampoos, soaps and shower gels had built up on the window sill. In fact, the damage was significant enough that I had to explain to the customer before starting the work that whilst I could greatly improve the appearance of the tiles, I would not be able to restore them to new. This is because many shampoo and body wash products are acidic and can cause permanent damage to stone work especially when left to dwell for a long time.
My choice of product was Tile Doctor Mould Away, a formula which, over time, seeps deeply into the pores of the stone, effectively lifting away the muck. In cases of particularly stubborn areas, it is necessary to apply another covering of Mould Away and leave it for an extended period of time. This is exactly what I did over the next few days, leaving the product overnight to work its magic. The change was certainly drastic, if not perfect.
As both bathrooms required extended periods of drying, I spent two days working on the hallway, which had been partially covered with a plastic sealing for the previous six months due to building work. Needless to say, the hallway was in need of a good clean. I set about cleaning the hallway with a solution of warm water and Tile Doctor Pro-Clean, before once again using a Wet-Dry Vac machine to remove any excess water to prepare the floor for sealing at a later point. It is very important to remove any residue of cleaning solution before sealing, as this may impact the performance of the sealer. Following this, I left the hallway to dry for two days, providing the builders with strict instructions to cover it with blankets for protection while they were working.
While the floor was drying, I sealed the bathrooms – both now fully dried – with Tile Doctor Colour Grow Sealer, a solvent-based sealer that was highly effective at enhancing the colour of the brown tiles around the sinks. The product will also provide durable surface protection. I spent the final of the six days sealing the hallway floor with Tile Doctor Seal & Go, which provides both a stain-resistant surface seal and a durable, low-sheen finish. This was an ideal choice of product, as the customer requested a hard-wearing, yet shiny finish.
The hard work really paid off, as both the customer and the decorators were very impressed with the final results in the two bathrooms and the hallway. I was extremely pleased that I was able to complete this big job to the highest possible standards.
Find the right local pro for your project
 Dimensions in Wood Inc
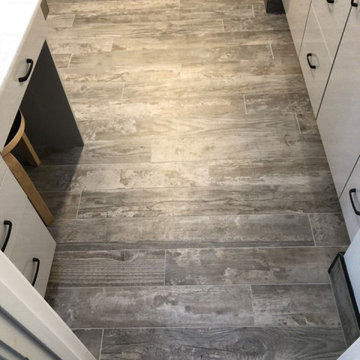
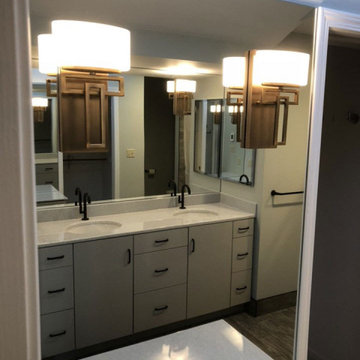
This Columbia, Missouri home’s master bathroom was a full gut remodel. Dimensions In Wood’s expert team handled everything including plumbing, electrical, tile work, cabinets, and more!
Electric, Heated Tile Floor
Starting at the bottom, this beautiful bathroom sports electrical radiant, in-floor heating beneath the wood styled non-slip tile. With the style of a hardwood and none of the drawbacks, this tile will always be warm, look beautiful, and be completely waterproof. The tile was also carried up onto the walls of the walk in shower.
Full Tile Low Profile Shower with all the comforts
A low profile Cloud Onyx shower base is very low maintenance and incredibly durable compared to plastic inserts. Running the full length of the wall is an Onyx shelf shower niche for shampoo bottles, soap and more. Inside a new shower system was installed including a shower head, hand sprayer, water controls, an in-shower safety grab bar for accessibility and a fold-down wooden bench seat.
Make-Up Cabinet
On your left upon entering this renovated bathroom a Make-Up Cabinet with seating makes getting ready easy. A full height mirror has light fixtures installed seamlessly for the best lighting possible. Finally, outlets were installed in the cabinets to hide away small appliances.
Every Master Bath needs a Dual Sink Vanity
The dual sink Onyx countertop vanity leaves plenty of space for two to get ready. The durable smooth finish is very easy to clean and will stand up to daily use without complaint. Two new faucets in black match the black hardware adorning Bridgewood factory cabinets.
Robern medicine cabinets were installed in both walls, providing additional mirrors and storage.
Contact Us Today to discuss Translating Your Master Bathroom Vision into a Reality.

 JRP Design & Remodel
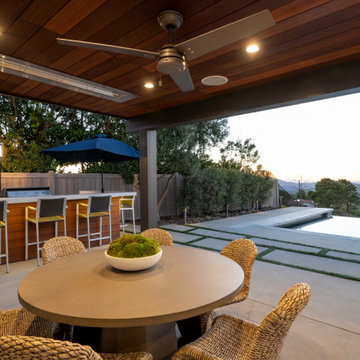
One look at this remodel and you will see that opening up the interior living space to the spectacular backyard views was a simple decision at this home. With the addition of a La Cantina bi-fold door, this newly combined indoor/outdoor entertaining space has been transformed into the essence of breathtaking modern serenity.
The moment you step outside, you are welcomed by an entertainer’s dream space. The new BBQ bar is wrapped in Mangaris hardwood. Topped in Dekton countertops, which takes its inspiration from elegant Italian marble, the white and grey Opera surface provides the perfect seating, serving and gathering area to toast the chef! The under-counter storage cabinets, drawers and beverage refrigerator keep all the accessories close at hand.
The main motivation for this makeover was a dated patio that was failing and obsolete second story deck that had long since lost its luster. This re-fresh starts from the ground up where old concrete decking is replaced with new concrete pads and grass joints that create a soothing pattern to meet the pool and newly defined landscaping.
The upper deck provides the perfect patio cover and now features a Mangaris premium hardwood ceiling with fans, inset heaters and lighting. This richly-toned ceiling coordinates beautifully with the bbq bar. The serene protected patio lounge seating area is now the perfect gathering spot for after-dinner aperitifs or late night movie night.
The oversized patio table and bold woven seating offers a comfortable space to watch magnificent SoCal sunsets beyond the glass-like surface of the infinity pool or relax and enjoy an intimate conversation by the warmth of the backyard firepit.
To complete the remodel, the modern and sleek upper deck railing now tops this new breathtaking outdoor living space. This backyard’s modern serenity is designed to fully enjoy the surrounding nature and magnificent views.
Photographer: Andrew - OpenHouse VC

 Sunset Construction & Design
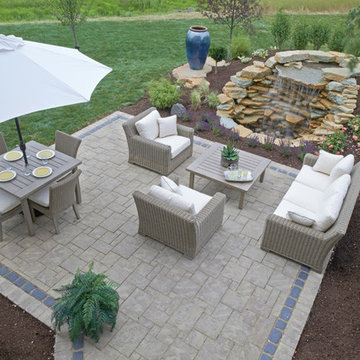
Sunset Construction and Design specializes in creating residential patio retreats, outdoor kitchens with fireplaces and luxurious outdoor living rooms. Our design-build service can turn an ordinary back yard into a natural extension of your home giving you a whole new dimension for entertaining or simply unwinding at the end of the day.
Today, almost any activity you enjoy inside your home you can bring to the outside. Depending on your budget, your outdoor room can be simple, with a stamped concrete patio, a grill and a table for dining, or more elaborate with a fully functional outdoor kitchen complete with concrete countertops for preparing and serving food, a sink and a refrigerator. You can take the concept even further by adding such amenities as a concrete pizza oven, a fireplace or fire-pit, a concrete bar-top for serving cocktails, an architectural concrete fountain, landscape lighting and concrete statuary.
Cooking
Something to cook with, such as a barbecue grill or wood-fired pizza oven, and countertops for food preparation and serving are key elements in a well-designed outdoor kitchen. Concrete countertops offer the advantages of weather resistance and versatility, since they can be formed into any shape you desire to suit the space. A coat of sealer will simplify cleanup by protecting your countertop from stains. Other amenities, such as concrete bar-tops and outdoor sinks with plumbing, can expand your entertainment options.
Hearth
Wood-burning or gas fireplaces, fire pits, chimineas and portable patio heaters extend the enjoyment of outdoor living well into the evening while creating a cozy conversation area for people to gather around.
If you’re interested in converting a boring back yard or starting from scratch in a new home, look us up! A great patio and outdoor living area can easily be yours. Greg, Sunset Construction & Design in Fresno, CA.
 Tile Doctor Ltd
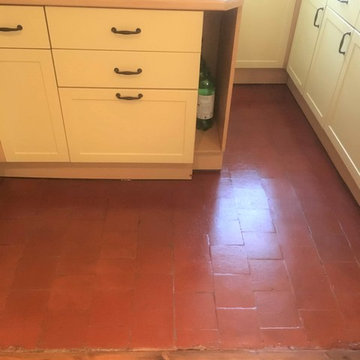
I received a call from this client in Old Marston around two miles north east of the centre of Oxford. They had lifted a lino floor in their kitchen and found an old Quarry Tiled floor underneath and decided to see if they could have it restored.
I went over to survey the floor and could see that the tiles had been covered with a thin layer of levelling screed to ensure the lino didn’t sink into the recesses. I ran some tests to demonstrate how the screed could be removed which worked well and it was apparent that the tiles underneath were intact and could be renovated. I submitted a quotation for removing all the screed, deep cleaning the Quarry tiles and then sealing the tiles to protect them. The client was really pleased that we could restore the floor and the quote was accepted, with a date booked to do the work.
To start the work, I applied undiluted Tile Doctor Grout Clean-up worked in with a small carbide brush attached to a hand-held rotary buffer. The combination of the acid in the Tile Doctor Grout Clean-up combined with the scrubbing action of the brush were effective at removing most of the screed. The small bits of remaining screed were carefully removed by hand, using a floor scraper. The floor was then rinsed with water and the soil removed with a wet vacuum.
For the second phase of the cleaning process I applied Tile Doctor Oxy-Gel which was scrubbed into the floor with a stiff brush rinsing after with water and the soil extracted again using the wet vacuum. After cleaning the floor to remove the dirt I could still see some evidence of the screed on the tiles, so I decided to give the floor an Acid Wash using Tile Doctor Acid Gel which was scrubbed into the floor and rinsed off as before. Tile Doctor Acid Gel is of course an acidic product so once it was removed, I decided to rinse the floor with Tile Doctor Neutral Cleaner to neutralise the pH levels in the floor. The wet vacuum was used again to remove as much moisture from the Quarry tiles as possible before leaving the now clean floor to dry off fully overnight.
I returned to seal this floor the next day. First, I checked the floor was fully dry with the damp meter, it was within the recommended range, so I was ready to complete the sealing process.
The client was not too sure if they wanted a matt or sheen finish, so I first put a coat of Tile Doctor Colour Grow on the floor to show them the matt finish. Colour Grow is an impregnating sealer that enhances natural colour and protects from within by occupying the pores in the tile. After reviewing the floor, they decided it was not for them, so I followed up by applying several coats of Tile Doctor Seal & Go which adds a nice sheen finish and is compatible with Colour Grow.
The combination of sealers worked very well together, and they were very satisfied with the final result and of course that we had been able to restore the Quarry tiles.
Barry Woodward
Oxfordshire Tile Doctor


 Design Perspective Interior Design, LLC
We were hired to combine the main hall bath and a 1/2 bath of the master bedroom. The main bathroom was partially gutted when we started the design project as a severe water event had occurred. The client wanted an economical, but modern looking remodel that would be appealing to buyers in the future when she needed to sell and move to a retirement community as she currently lived alone.
The new tub/shower is in the location of the original 1/2 bath. Our homeowner wanted an easy to clean. but modern looking shower and vanity. Lanmark by Lane Marble was chosen as it has no grout and is a seamless product similar to Corian. We created 2 niches in the shower to store bottles to keep them off the tub deck and prevent them from slipping into the shower. An American Standard Princeton bathtub was chosen, so when the client eventually left her home, her home would be appealing to families with small children. For the vanity the same Lanmark color was chosen with 2 integrated sinks for easy cleaning.
Delta and Moen faucets, showerheads, and accessories were mix and matched to update the bathroom. Vinyl flooring was also chosen for its ease of cleaning and care.
Bamboo cabinetry was added to provide a modern,, timeless, and warm wood tone to the space. In this small home, storage is badly needed so I created a large linen cabinet with a pull-out shelf on the lower shelf for easier access for that shelf.
The original 1/2 bath window in the new tub/shower area was replaced with a new vinyl window and wrapped with Lanmark to provide a watertight system.
To give plenty of lighting at the vanity, George Kovacs LED lights fixtures were installed over each sink. This bathroom is now a light and bright space that will be functional and beautiful for years to come.
This project was designed for and completed by Corvallis Custom Kitchens and Baths.
Photos by: H. Needham
 Tile Doctor Ltd
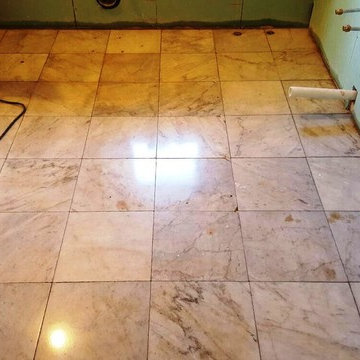
Windlestraw is a picturesque Edwardian manor hotel overlooking the Tweed Valley, near Walkerburn in the Scottish Borders area of Scotland. One of the bathrooms in the manor was in the process of being refurbished when two layers of floor tiles were removed, unveiling an original Marble tiled floor dating back to the 1920s.
After the top layers of tile had been removed the Marble was still covered in old adhesive and cement and although Marble is known for its quality and durability the hotel owner didn’t want the building contractor to proceed any further in case they damaged it. The owner was keen to restore the Marble floor as an original feature so we were called in to set the situation right.
To restore the floor I used two processes known as milling and burnishing. Milling literally involves grinding down uneven or rough surfaces using very coarse, diamond encrusted pads. The pads are usually used to resolve lippage issues on natural stone but in this case we needed to use the very coarse abrasive pads to grind off the adhesive and cement. I used a set of three coarse milling pads rinsing with water between each pad and starting with a 50 grit pad, before moving on to 100 and 200 grit pads. This process was very effective and ground off the cement and adhesive, while also removing any lippage in the tiles to leave a completely flat surface.
Milling leaves the surface of the Marble tiles clean but in a rough condition and this is where the second process Burnishing comes in. Similar to milling, burnishing focuses on achieving a polished finish with the application of ever finer grades of polishing pads and is often used to bring back the polish on Limestone and Travertine as well as Marble. Moving on to the burnishing, I worked my way through the four diamond encrusted pad system lubricating with a little water and again rinsing between each pad to remove the slurry. The grits go from Coarse (400 grit), Medium (800 grit), Fine (1500 grit) and then eventually Very Fine (3000 grit) and come in a 17” pad for use on a rotary floor machine and were applied twice in sequence to achieve a fantastic polished shine.
The floor was given a final rinse and then dried with a wet-vacuum before we proceeded to seal the floor using Tile Doctor Shine Powder which is a crystallizing powder that is applied directly to the floor and worked in using a buffing pad fitted to a rotary machine.
Shine Powder provides a very high shine (as you can see from the photos), along with a tough durable finish. On top of this, it is suitable for sealing all natural stone, including, of course, Marble, along with Limestone, Granite, Slate and Travertine.
The customer was absolutely delighted with the results as were we although it’s now up to them to ensure the bathroom fitters take appropriate care when completing the room which I’m sure will look absolutely fantastic when complete and no doubt add to the allure of this magnificent hotel in the Scottish Borders.
Thomas Wilson
Edinburgh Tile Doctor
 S Squared Design, LLC
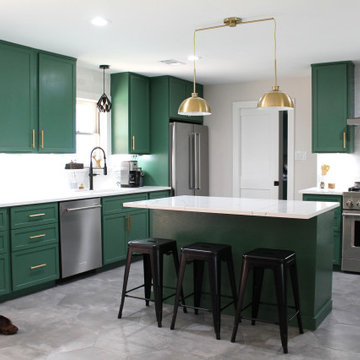
This remodel was one worth waiting for! Clients had a need for more storage, more counter and more room for entertaining friends and family. They love color and low maintenance materials so we went with a lovely happy green cabinet color, quartz counters, fun large hex porcelain floor tile and easy to clean backsplash. The original kitchen was lacking good flow, ample storage for this family.
We started in the laundry room but re configuring the layout so now the W/D and fridge could be on one wall which opened up space for a drop area. We removed the old small closet that was the pantry and replaced the old water heater with a tank-less one to allow more place where they needed it the most. Drop area has outlets for charging and one in the broom cabinet as well. We removed the door to allow for us to relocate the garage entry door which now sits in the mud room instead of right in the middle of the kitchen. We added an actual walk in pantry which is equipped with drawers and plenty of shelf storage, we put the small appliances in here to allow for more counter space in the kitchen. To access the kitchen is now through a pocket door which is a big space saver and allows a more open feel.
Let's get to this kitchen design! This was a odd layout before, now we have the fridge tucked away in it's proper home instead of sticking out. We relocated the garage entry door to the mud room to allow for this 36" range in its place featuring a pot filler as well. To maximize the kitchen footprint we closed up the door that went to the office and now we have a full L corner with plenty of storage and added some wood shelves for a sense of warmth and displace space in a beverage bar area, which also features an under-counter beverage fridge. Under-cabinet lighting, island fixture , a pendant above the sink and relocated the recessed lights to work better with the new kitchen layout. The island was a new addition which replaced the peninsula that used to cut off the kitchen from the rest of the home. We also removed a built in bookshelf and relocated the return air to the ceiling to free up even more floor space to truly transform this kitchen into the heart of the home.
 JRP Design & Remodel
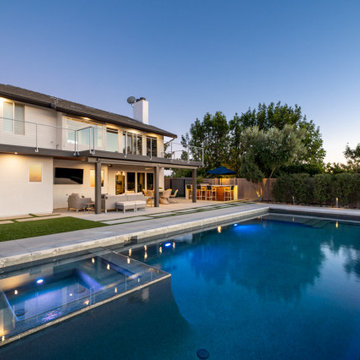
One look at this remodel and you will see that opening up the interior living space to the spectacular backyard views was a simple decision at this home. With the addition of a La Cantina bi-fold door, this newly combined indoor/outdoor entertaining space has been transformed into the essence of breathtaking modern serenity.
The moment you step outside, you are welcomed by an entertainer’s dream space. The new BBQ bar is wrapped in Mangaris hardwood. Topped in Dekton countertops, which takes its inspiration from elegant Italian marble, the white and grey Opera surface provides the perfect seating, serving and gathering area to toast the chef! The under-counter storage cabinets, drawers and beverage refrigerator keep all the accessories close at hand.
The main motivation for this makeover was a dated patio that was failing and obsolete second story deck that had long since lost its luster. This re-fresh starts from the ground up where old concrete decking is replaced with new concrete pads and grass joints that create a soothing pattern to meet the pool and newly defined landscaping.
The upper deck provides the perfect patio cover and now features a Mangaris premium hardwood ceiling with fans, inset heaters and lighting. This richly-toned ceiling coordinates beautifully with the bbq bar. The serene protected patio lounge seating area is now the perfect gathering spot for after-dinner aperitifs or late night movie night.
The oversized patio table and bold woven seating offers a comfortable space to watch magnificent SoCal sunsets beyond the glass-like surface of the infinity pool or relax and enjoy an intimate conversation by the warmth of the backyard firepit.
To complete the remodel, the modern and sleek upper deck railing now tops this new breathtaking outdoor living space. This backyard’s modern serenity is designed to fully enjoy the surrounding nature and magnificent views.
Photographer: Andrew - OpenHouse VC
 Sunset Construction & Design
Sunset Construction and Design specializes in creating residential patio retreats, outdoor kitchens with fireplaces and luxurious outdoor living rooms. Our design-build service can turn an ordinary back yard into a natural extension of your home giving you a whole new dimension for entertaining or simply unwinding at the end of the day.
Today, almost any activity you enjoy inside your home you can bring to the outside. Depending on your budget, your outdoor room can be simple, with a stamped concrete patio, a grill and a table for dining, or more elaborate with a fully functional outdoor kitchen complete with concrete countertops for preparing and serving food, a sink and a refrigerator. You can take the concept even further by adding such amenities as a concrete pizza oven, a fireplace or fire-pit, a concrete bar-top for serving cocktails, an architectural concrete fountain, landscape lighting and concrete statuary.
Cooking
Something to cook with, such as a barbecue grill or wood-fired pizza oven, and countertops for food preparation and serving are key elements in a well-designed outdoor kitchen. Concrete countertops offer the advantages of weather resistance and versatility, since they can be formed into any shape you desire to suit the space. A coat of sealer will simplify cleanup by protecting your countertop from stains. Other amenities, such as concrete bar-tops and outdoor sinks with plumbing, can expand your entertainment options.
Hearth
Wood-burning or gas fireplaces, fire pits, chimineas and portable patio heaters extend the enjoyment of outdoor living well into the evening while creating a cozy conversation area for people to gather around.
If you’re interested in converting a boring back yard or starting from scratch in a new home, look us up! A great patio and outdoor living area can easily be yours. Greg, Sunset Construction & Design in Fresno, CA.
 Tile Doctor Ltd
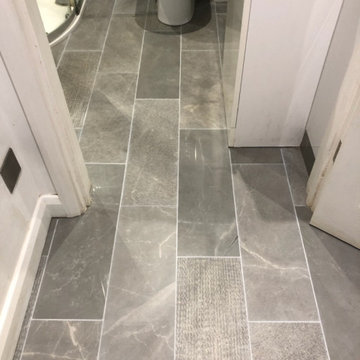
The pictures below detail the renovation of a Porcelain Tiled Floor I completed at a property in Ipswich. Installed throughout the Kitchen and into the adjacent WC the porcelain tile and grout were in a very dirty state and the client was desperate to get them clean. The situation wasn’t helped by their two dogs with grubby paws. She had tried all the usual household cleaners she could find, and nothing seemed to work. Unfortunately, household cleaners can make the problem worse due the strong chemicals they contain.
I visited the property to survey the floor and was able to reassure the client that although the grout was heavily stained it could be renovated by recolouring it with a Tile Doctor Grout Colourant. I was confident we would soon be able to get the floor looking great again and demonstrated the process I would use on a small part of the floor. The demonstration went well and happy with the result we agreed a date for my return the following week to complete the work which should be completed in a single day.
Returning on the agreed date we started by protecting the by applying a clear silicone sealant to the MDF skirting boards and kitchen base units. We left this to dry for an hour before proceeding with the cleaning.
The Porcelain tile and grout was cleaned with a strong dilution of Tile Doctor Pro-Clean using 3 parts cleaner to 5 parts water. The solution was applied to the tile and grout and then left to soak in for ten minutes before being worked in using a rotary machine fitted with a Black Scrubbing Pad. Tile Doctor Pro-Clean is a concentrated, multi-purpose high-alkaline cleaner which is designed for deep cleaning tile, stone and grout of dirt and grease and can also remove sealers.
Pads can struggle to reach into the recesses of the grout line so once I was finished with the tile, I hand scrubbed the grout with a wire brush. The floor was then rinsed with water and the resultant slurry extracted off the floor with wet vacuum.
The floor took about three hours to deep clean which was just the right timing for us to have lunch whilst the floor dried. The grout was much improved by the cleaning process but as suspected there were too many deep-seated stains to be able to guarantee a consistent finish. So as previously agreed with the client we set about colouring the grout using a light grey colourant. This took most of the afternoon as there was a lot of grout.
The Porcelain tiles were the non-porous type that won’t take a sealer and the colourant acts as a barrier over the grout protecting it and making it easy to clean so once I was done colouring there was no need to apply a sealer.
My client was relieved to have the floor looking clean and presentable again. For aftercare I recommended that moving forward it would be best to use Tile Doctor Neutral Tile Cleaner which is a pH neutral cleaner. This will ensure that with regular cleaning the floor will keep clean and the grout won’t be compromised by overly strong products.
Bruce Copping
Suffolk Tile Doctor

Sponsored
Sunbury, OH

J.Holderby - Renovations
Franklin County's Leading General Contractors - 2X Best of Houzz!
 JRP Design & Remodel
One look at this remodel and you will see that opening up the interior living space to the spectacular backyard views was a simple decision at this home. With the addition of a La Cantina bi-fold door, this newly combined indoor/outdoor entertaining space has been transformed into the essence of breathtaking modern serenity.
The moment you step outside, you are welcomed by an entertainer’s dream space. The new BBQ bar is wrapped in Mangaris hardwood. Topped in Dekton countertops, which takes its inspiration from elegant Italian marble, the white and grey Opera surface provides the perfect seating, serving and gathering area to toast the chef! The under-counter storage cabinets, drawers and beverage refrigerator keep all the accessories close at hand.
The main motivation for this makeover was a dated patio that was failing and obsolete second story deck that had long since lost its luster. This re-fresh starts from the ground up where old concrete decking is replaced with new concrete pads and grass joints that create a soothing pattern to meet the pool and newly defined landscaping.
The upper deck provides the perfect patio cover and now features a Mangaris premium hardwood ceiling with fans, inset heaters and lighting. This richly-toned ceiling coordinates beautifully with the bbq bar. The serene protected patio lounge seating area is now the perfect gathering spot for after-dinner aperitifs or late night movie night.
The oversized patio table and bold woven seating offers a comfortable space to watch magnificent SoCal sunsets beyond the glass-like surface of the infinity pool or relax and enjoy an intimate conversation by the warmth of the backyard firepit.
To complete the remodel, the modern and sleek upper deck railing now tops this new breathtaking outdoor living space. This backyard’s modern serenity is designed to fully enjoy the surrounding nature and magnificent views.
Photographer: Andrew - OpenHouse VC
 Tile Doctor Ltd
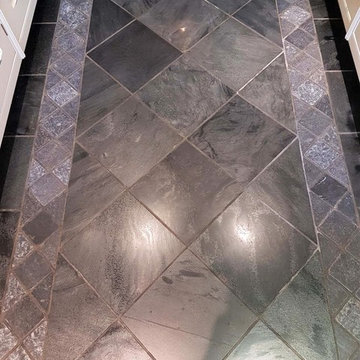
I was recently asked to survey an unusual stone floor at a house in in Harrogate comprising of Slate inlaid with Granite. The client advised that it had not been cleaned properly for 20 years and wanted it renovating! It was now definitely overdue a deep clean and professional attention. Fortunately, having worked on these floors for many years I knew I could make a substantial impact and transform its appearance. Fossilized slate is a beautiful stone when cleaned and sealed correctly.
The owner confessed they had actually been sealing the floor every two years but without a deep clean first, so they were effectively sealing in the dirt each time. I discussed with them the process I would use to clean and re-seal the floor and we agreed a price to carry to out the work.
To remove the layers of old sealer and dirt used a set of Tile Doctor Diamond Burnishing pads. The pads are attached to a rotary floor machine starting with the coarse 400-grit pad which was lubricated with a dilution of Tile Doctor Remove and Go to help strip the floor of dirt and layers of sealer. After rinsing and extracting the soil I worked through the different grades of pads in sequence finishing with the 1500-grit and this time using just water for lubrication.
A set of diamond handheld burnishing blocks were then used to clean up the edges and corners where the large 17” pads struggle to reach. This ensures all areas are treated and free of dirt and old sealer.
The floor was then rinsed and extracted again to remove the remaining soil. I find a wet vacuum is an invaluable tool for this. The floor was then left to dry out overnight ready for sealing the next day.
I returned the next day to seal the floor, first checking with a damp meter that the floor was dry, and the moisture reading was below the acceptable level. These results were fine, so I had a green light to continue and seal the stone.
The customer wanted a shine on the floor so rather than apply a satin sealer which I felt wouldn’t adhere to the stone properly I decided to polish the floor further with a the last of the four burnishing pads which is a very fine 3000-grit pad. You don’t need to use a lot of water with this last pad just a small amount sprayed onto the floor using a technique we refer to as a ‘Spray Burnish’.
To seal the floor, two coats of Tile Doctor Colour Grow were applied. This is an impregnating matt sealer which intensifies the natural colours of this beautiful stone and provides long lasting durable protection.
Even I was impressed with the finished result but more importantly the client was over the moon. To keep the floor looking its best I recommended they use Tile Doctor Stone Soap which is pH neutral. You should always read the label in detail when choosing a floor cleaning product as many are too strong and not recommended for sealed stone surfaces as they will prematurely erode the sealer.
Nigel Stoker
North West Yorkshire Tile Doctor
 Dimensions in Wood Inc
This Columbia, Missouri home’s master bathroom was a full gut remodel. Dimensions In Wood’s expert team handled everything including plumbing, electrical, tile work, cabinets, and more!
Electric, Heated Tile Floor
Starting at the bottom, this beautiful bathroom sports electrical radiant, in-floor heating beneath the wood styled non-slip tile. With the style of a hardwood and none of the drawbacks, this tile will always be warm, look beautiful, and be completely waterproof. The tile was also carried up onto the walls of the walk in shower.
Full Tile Low Profile Shower with all the comforts
A low profile Cloud Onyx shower base is very low maintenance and incredibly durable compared to plastic inserts. Running the full length of the wall is an Onyx shelf shower niche for shampoo bottles, soap and more. Inside a new shower system was installed including a shower head, hand sprayer, water controls, an in-shower safety grab bar for accessibility and a fold-down wooden bench seat.
Make-Up Cabinet
On your left upon entering this renovated bathroom a Make-Up Cabinet with seating makes getting ready easy. A full height mirror has light fixtures installed seamlessly for the best lighting possible. Finally, outlets were installed in the cabinets to hide away small appliances.
Every Master Bath needs a Dual Sink Vanity
The dual sink Onyx countertop vanity leaves plenty of space for two to get ready. The durable smooth finish is very easy to clean and will stand up to daily use without complaint. Two new faucets in black match the black hardware adorning Bridgewood factory cabinets.
Robern medicine cabinets were installed in both walls, providing additional mirrors and storage.
Contact Us Today to discuss Translating Your Master Bathroom Vision into a Reality.

 Carmel Stone Imports
Large elegant l-shaped terra-cotta tile and red floor enclosed kitchen photo in San Francisco with a farmhouse sink, raised-panel cabinets, dark wood cabinets, quartzite countertops, beige backsplash, ceramic backsplash, stainless steel appliances, an island and beige countertops


 Julie Schuster Design Studio
Make a good first impression! Be sure to clear entryways to allow for the clear flow of energy.
Photo Credit: Travis Mark
Foyer - large transitional dark wood floor foyer idea in New York with white walls and a black front door
Foyer - large transitional dark wood floor foyer idea in New York with white walls and a black front door

 Gappsi
After the construction of a two-story colonial brick house, this backyard was left as an open canvas for a full creative design that included a plethora of amenities. Starting with a raised patio and balcony railing, this allows comfortable daily use to walk out of the house to the barbecue or to use the spa. The spa was built on a raised platform for easy access from the top patio. The patio steps were paved with flamed Amagansett granite pavers and treads. The brick columns were built on the raised patio to enhance the railing and decorated with flower pots. The raised patio allows a perfect view of the entire backyard. Many amenities were included in the backyard design. The 16’x32’ vinyl swimming pool was built with an auto cover and a self-contained sheer descend water feature set across from the pool. The patio around the pool was constructed with mocha travertine. A mosaic stone pebble inlay of a bloomed rose highlights the pool steps. Decorative flower pots are seasonally decorated around the pool. The pool house was built with a bathroom, T.V. room and an outdoor bar. The bocci court was built with crushed white marble dust and is equipped with lights for nighttime use. A Versa basketball court that includes lights, basketball hoop, and surrounded by netting so the basketball doesn't go outside the property line. A dog run was built with synthetic turf and is surrounded by a black chain link fence. The remaining space in the backyard was covered with artificial turf in which a putting green was inlaid. This backyard was designed and built with low maintenance in mind. From the evergreen shrubs to the natural stone travertine patio and synthetic grass. There is no need for lawnmowers or any weekly maintenance. These homeowners can enjoy their backyard all year round without interruption from weekly up keeping. Caste aluminum furniture ornate the patio and allows comfortable seating in backyard patio areas. For more information about Gappsi services and estimates visit www.gappsi.com or call us at 631-543-1177
 Design Perspective Interior Design, LLC
We were hired to combine the main hall bath and a 1/2 bath of the master bedroom. The main bathroom was partially gutted when we started the design project as a severe water event had occurred. The client wanted an economical, but modern looking remodel that would be appealing to buyers in the future when she needed to sell and move to a retirement community as she currently lived alone.
The new tub/shower is in the location of the original 1/2 bath. Our homeowner wanted an easy to clean. but modern looking shower and vanity. Lanmark by Lane Marble was chosen as it has no grout and is a seamless product similar to Corian. We created 2 niches in the shower to store bottles to keep them off the tub deck and prevent them from slipping into the shower. An American Standard Princeton bathtub was chosen, so when the client eventually left her home, her home would be appealing to families with small children. For the vanity the same Lanmark color was chosen with 2 integrated sinks for easy cleaning.
Delta and Moen faucets, showerheads, and accessories were mix and matched to update the bathroom. Vinyl flooring was also chosen for its ease of cleaning and care.
Bamboo cabinetry was added to provide a modern,, timeless, and warm wood tone to the space. In this small home, storage is badly needed so I created a large linen cabinet with a pull-out shelf on the lower shelf for easier access for that shelf.
The original 1/2 bath window in the new tub/shower area was replaced with a new vinyl window and wrapped with Lanmark to provide a watertight system.
To give plenty of lighting at the vanity, George Kovacs LED lights fixtures were installed over each sink. This bathroom is now a light and bright space that will be functional and beautiful for years to come.
This project was designed for and completed by Corvallis Custom Kitchens and Baths.
Photos by: H. Needham
195