
Search results for "Starting watering" in Home Design Ideas
 A+ Home Improvements, LLC
New flooring into master bedroom
Now this was a fun project! We had the privilege of stopping out to perform a consultation for this client’s bathroom, and what a project it was! The existing bathroom provided plenty of room for a renovation, but the home owner was a little unsure of exactly what they wanted. They presented us with a wish list, and asked for our advice on how to fit everything into their dream master bathroom. The key factor for the hole project centered around the shower. Number one priority was a spacious, luxurious shower of their dreams. We worked hand in hand with them to provide the perfect layout, which included moving the toilet across the bathroom to make room. The old layout included a shower room that housed the toilet. To provide the biggest possible space, we converted the WHOLE room into one large shower.
While the shower size was adequate for the typical home owner, it simply was not what our client wanted. We replace the window with glass block and moved the toilet out of the room. Then we proceeded to install 2 separate shower faucets with diverter valves and slide bar mounted hand-held shower wands
The tile our client selected paired perfectly, and provided an eye-popping tiled shower enclosure.
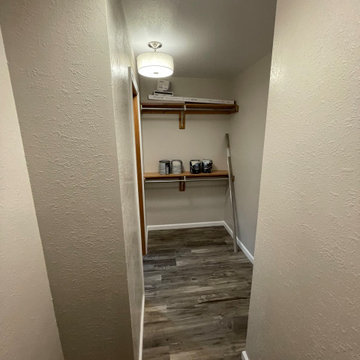
The closet was originally sectioned off into 2 rooms with an entrance from not only the bedroom, but also the bathroom. We eliminated this separating to allow a better flow and more storage options. The tub was completed deleted to make room for a longer, more elegant vanity to take its place.
Our client liked the idea of continuing water proof vinyl plank flooring from the bathroom through their master bedroom as well.
We enjoy all of the projects that we are blessed to participate in. However, there are some that just stand apart from the field. We thoroughly enjoyed bringing this client’s dream to reality, and look forward to them enjoying their dream master bathroom for years to come. Give A+ Home Improvements a call to get your project started today!
 S Squared Design, LLC
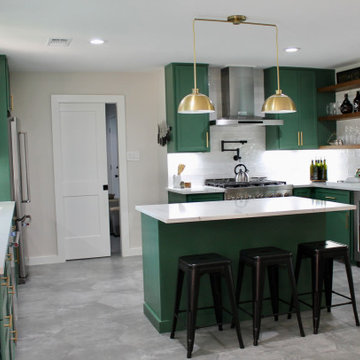
This remodel was one worth waiting for! Clients had a need for more storage, more counter and more room for entertaining friends and family. They love color and low maintenance materials so we went with a lovely happy green cabinet color, quartz counters, fun large hex porcelain floor tile and easy to clean backsplash. The original kitchen was lacking good flow, ample storage for this family.
We started in the laundry room but re configuring the layout so now the W/D and fridge could be on one wall which opened up space for a drop area. We removed the old small closet that was the pantry and replaced the old water heater with a tank-less one to allow more place where they needed it the most. Drop area has outlets for charging and one in the broom cabinet as well. We removed the door to allow for us to relocate the garage entry door which now sits in the mud room instead of right in the middle of the kitchen. We added an actual walk in pantry which is equipped with drawers and plenty of shelf storage, we put the small appliances in here to allow for more counter space in the kitchen. To access the kitchen is now through a pocket door which is a big space saver and allows a more open feel.
Let's get to this kitchen design! This was a odd layout before, now we have the fridge tucked away in it's proper home instead of sticking out. We relocated the garage entry door to the mud room to allow for this 36" range in its place featuring a pot filler as well. To maximize the kitchen footprint we closed up the door that went to the office and now we have a full L corner with plenty of storage and added some wood shelves for a sense of warmth and displace space in a beverage bar area, which also features an under-counter beverage fridge. Under-cabinet lighting, island fixture , a pendant above the sink and relocated the recessed lights to work better with the new kitchen layout. The island was a new addition which replaced the peninsula that used to cut off the kitchen from the rest of the home. We also removed a built in bookshelf and relocated the return air to the ceiling to free up even more floor space to truly transform this kitchen into the heart of the home.
 Wood-Mode Fine Custom Cabinetry
A life of inspired beauty featuring touches of elegance with a little old-fashioned detail combine to create the transitional spaces throughout this home. Creating a whole-home design centered around an open-plan kitchen and living space, the home features custom, handcrafted Wood-Mode cabinetry in the walk-in pantry, bar, master bath, and powder room.
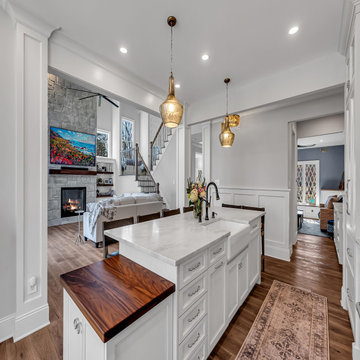
For these New Jersey homeowners wanting touches of elegance with a little old-fashioned detail, Penterman Kitchen & Bath created bright and roomy transitional spaces throughout the home. Starting in the heart of the home, the kitchen, collaborating with Wood-Mode on a design centered on its Arlington Recessed doors handcrafted of maple wood and finished in Vintage Bright White. Capped with dark, natural walnut countertops and Belwith Keeler Trellis hardware in polished nickel, finish out the overarching cabinetry design, creating a bright, open kitchen and living space. Beautiful mullion cabinets are faced with mirrors allowing light to be reflected around the room and hide items that the homeowner does not want on display. Stainless steel Wolf-Sub Zero appliances, including a gas stove with herringbone marble backsplash and oil rubbed bronze water appliances including a pot filler, coordinate to ground the transitional design. An oversized island is capped with a beautiful grey marble top and houses a strategically placed apron front ceramic farmhouse sink, allowing the homeowners to watch TV and engage with family members in the living area while washing dishes.
The walk-in pantry continues the design, white cabinetry with striking walnut countertops, and an overabundance of under counter dry and refrigerated storage. Matching handcrafted walnut shelving becomes a featured architectural element as Hafele under shelf lighting and high gloss white tile create a bright, open space. Plenty of electrical outlets allow the homeowner to keep entertaining prep in the pantry, allowing for clean kitchen countertops.
A breakfast nook featuring a ring of windows is drawn into the room with the same walnut wood from the countertops utilized on the nooks built-in benches. The family dog even has a place at the table with a feeding area and cabinet above to hold dog food and supplies. To soften and melt into the adjacent room, the bar area features marble countertops with the coordinating herringbone marble backsplash. Glass front upper cabinets allow the homeowner to display treasured glassware while matching hardware pulls the specialized area into the overall space design.
Find the right local pro for your project
 S Squared Design, LLC
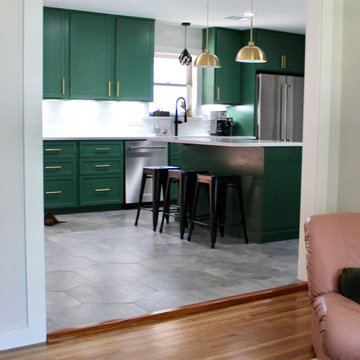
This remodel was one worth waiting for! Clients had a need for more storage, more counter and more room for entertaining friends and family. They love color and low maintenance materials so we went with a lovely happy green cabinet color, quartz counters, fun large hex porcelain floor tile and easy to clean backsplash. The original kitchen was lacking good flow, ample storage for this family.
We started in the laundry room but re configuring the layout so now the W/D and fridge could be on one wall which opened up space for a drop area. We removed the old small closet that was the pantry and replaced the old water heater with a tank-less one to allow more place where they needed it the most. Drop area has outlets for charging and one in the broom cabinet as well. We removed the door to allow for us to relocate the garage entry door which now sits in the mud room instead of right in the middle of the kitchen. We added an actual walk in pantry which is equipped with drawers and plenty of shelf storage, we put the small appliances in here to allow for more counter space in the kitchen. To access the kitchen is now through a pocket door which is a big space saver and allows a more open feel.
Let's get to this kitchen design! This was a odd layout before, now we have the fridge tucked away in it's proper home instead of sticking out. We relocated the garage entry door to the mud room to allow for this 36" range in its place featuring a pot filler as well. To maximize the kitchen footprint we closed up the door that went to the office and now we have a full L corner with plenty of storage and added some wood shelves for a sense of warmth and displace space in a beverage bar area, which also features an under-counter beverage fridge. Under-cabinet lighting, island fixture , a pendant above the sink and relocated the recessed lights to work better with the new kitchen layout. The island was a new addition which replaced the peninsula that used to cut off the kitchen from the rest of the home. We also removed a built in bookshelf and relocated the return air to the ceiling to free up even more floor space to truly transform this kitchen into the heart of the home.
 Tile Doctor Ltd
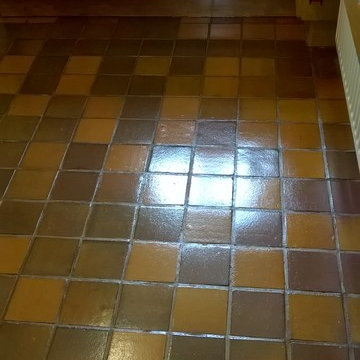
This Quarry tiled kitchen floor was in very good condition, with no cracked or broken tiles. However, my customer, who lives in the town of Tutbury, near Burton-on-Trent, was keen to boost the condition of the tiles further through professional maintenance, including a deep clean and a fresh seal to restore the sheen to the Quarry. NB, did you know it’s estimated that Tutbury has actually been inhabited for 3000 years, having once been the site of an Iron Age hill fort, this house of course was a lot more recent.
To clean the tiles, I chose to use our tried and trusted alkaline cleaner, Tile Doctor Pro Clean. We use Pro Clean on most types of natural stone floor, including Quarry, Slate, and Victorian. I applied Pro Clean liberally across the floor and left it to dwell for a short period, giving it time to seep into the tile to get underneath and lift out any ingrained dirt. The cleaner was then agitated using a scrubbing pad fitted to a rotary machine to remove the dirt and other general muck.
I then rinsed the floor with cold water and soaked up the resulting slurry with a wet-vac machine. Some areas of the floor proved to be quite stubborn to clean, so in these areas the cleaning process was repeated until satisfactory results were achieved. Finally, the floor was given another rinse and left to dry off overnight.
The next day I returned to the property and checked that the floor was ready to seal by running several damp tests, with the results indicating that was no excess moisture remaining on the tiles. We carry out these tests before sealing because moisture can cloud the sealer and prevent it from properly protecting the tiles.
My choice of sealer was Tile Doctor Seal & Go, a cost effective topical sealer that builds up a robust layer of protection on the surface of the floor and provides a durable sheen finish that, as you can see from the photographs, really lifts the appearance of the tiles.
It’s a fact that any sealed tiled floor will need to be regularly maintained as sealers do wear off over time, especially in the high traffic areas, and this is when the floor starts to lose its appearance as dirt becomes trapped in the pores of the stone. The life of the sealer can be extended however by ensuring you only clean the floor with a PH Neutral cleaner.
Trevor Preeece

 B Designs Interior's
Before and afters at Susan's. I promise a complete story once the custom glass shower door is installed but it's nice to look at photos along with the video. Their is a lot here to talk about. The project started as part of a five year'ish plan to downsize. Susan wanted something that would help resale value without over-improving, but also wanted to enjoy her Bathroom while still there. That meant classic white. I noticed immediately that their was enough space to add a double vanity. That's huge in a Master Bath. The two, large, beveled frameless mirrors add depth and light, while larger floor tiles makes the space [though you can't tell from these photos] seem much larger. Susan really liked her original light gray walls so we kept them. They do harmonize with the marble finishes and that tiny toilet was replaced with a Koehler Cimarron comfort height with water sense technology. I like the Cimarron for its value and interchangeable style. It also has a great flush. The bathroom also had a tiny window at an odd height that bothered me, so I suggested replacing it with a larger window, which also adds more light and helps to make the bathroom appear larger. Susan wanted a simple shade for privacy. Here we used a Graber faux silk pleated shade with bottom up top down. Let's not forget the cherry on the top, the stunning Herringbone Marble Shower that replaced a dated and small, fiberglass shower surrounded. All in all we doubled the storage and added a lot more light, while updating to create a very classic Bathroom. -B Designs, "Creating beautiful livable spaces as unique as you!" #anotherbdesigns #bathroomdesigner #classicbathroomdesign #allnthedetails #Bdesignsbsthroomdesign #whitebathrooms #jackandjill #Kohler #grohe #grabercustomshades #saratogainteriordesigner #albanyinteriordesigner #loudonvilleinteriordesigner #niskayunainteriordesigner #bathroomdesign #albanymarble #whitebathroomvanities #vanitymirrors #herringbonebathrooms #herringbonetile #herringboneshower
 Wood-Mode Fine Custom Cabinetry
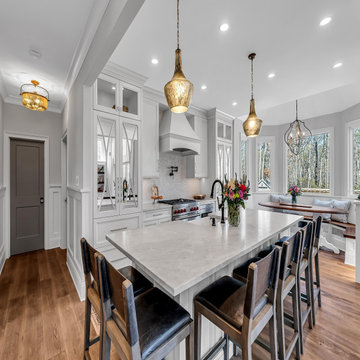
A life of inspired beauty featuring touches of elegance with a little old-fashioned detail combine to create the transitional spaces throughout this home. Creating a whole-home design centered around an open-plan kitchen and living space, the home features custom, handcrafted Wood-Mode cabinetry in the walk-in pantry, bar, master bath, and powder room.
For these New Jersey homeowners wanting touches of elegance with a little old-fashioned detail, Penterman Kitchen & Bath created bright and roomy transitional spaces throughout the home. Starting in the heart of the home, the kitchen, collaborating with Wood-Mode on a design centered on its Arlington Recessed doors handcrafted of maple wood and finished in Vintage Bright White. Capped with dark, natural walnut countertops and Belwith Keeler Trellis hardware in polished nickel, finish out the overarching cabinetry design, creating a bright, open kitchen and living space. Beautiful mullion cabinets are faced with mirrors allowing light to be reflected around the room and hide items that the homeowner does not want on display. Stainless steel Wolf-Sub Zero appliances, including a gas stove with herringbone marble backsplash and oil rubbed bronze water appliances including a pot filler, coordinate to ground the transitional design. An oversized island is capped with a beautiful grey marble top and houses a strategically placed apron front ceramic farmhouse sink, allowing the homeowners to watch TV and engage with family members in the living area while washing dishes.
The walk-in pantry continues the design, white cabinetry with striking walnut countertops, and an overabundance of under counter dry and refrigerated storage. Matching handcrafted walnut shelving becomes a featured architectural element as Hafele under shelf lighting and high gloss white tile create a bright, open space. Plenty of electrical outlets allow the homeowner to keep entertaining prep in the pantry, allowing for clean kitchen countertops.
A breakfast nook featuring a ring of windows is drawn into the room with the same walnut wood from the countertops utilized on the nooks built-in benches. The family dog even has a place at the table with a feeding area and cabinet above to hold dog food and supplies. To soften and melt into the adjacent room, the bar area features marble countertops with the coordinating herringbone marble backsplash. Glass front upper cabinets allow the homeowner to display treasured glassware while matching hardware pulls the specialized area into the overall space design.
Sponsored
Columbus, OH
Free consultation for landscape design!

Peabody Landscape Group
Columbus' Reliable Landscape Design & Contracting
 Reico Kitchen & Bath
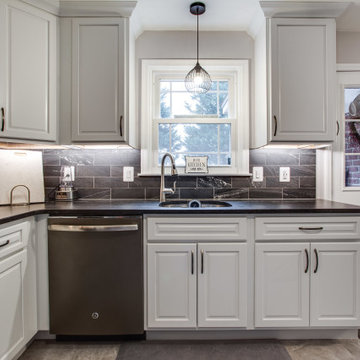
Designed by Bryan Hunt of Reico Kitchen & Bath in Frederick MD in collaboration with Walker Works, Inc., this small white transitional kitchen remodel features Merillat Masterpiece cabinets in the Fox Court door style in Maple with a Dove White finish. The kitchen countertops are Caesarstone Black Tempal.
The kitchen remodel also includes Portofino Grigio 18x18 floor tile and tile backsplash in Italgraniti 4x12 Fjord Creek.
“The space was definitely older in style. There were laminate floors and flat medium brown doors on the cabinets. The counter tops were crowded as there wasn’t any dedicated storage space for items,” said Bryan. “The biggest thing for this project was to update the space and have better storage capabilities. I was able to combine the wine and coffee into a single area with a water cooler and took the spices off the counter top with a wood tiered spice organizer in the top drawer by the range. There is a better access to the pots and pans with a pullout in the blind corner cabinet. The entire project turned out great. I love the pairing of the back splash tile and countertop.”
“I can sum up my experience in just three letters - WOW! Our new kitchen brought tears of joy to my eyes after completing it. I have more counter space, and cooking and baking are a cinch! Even a simple chore like emptying a dishwasher is much easier after moving the dishwasher from right to left. I have a pull-out cabinet and a Lazy Susan corner cabinet, which eliminates bending down to find pots and pans,” said the client.
“Bryan was so helpful from the very start. I told him what I needed, and he made it happen. He is a model for delivering quality customer service and often says, “I want you to be happy!” I can honestly say that choosing Reico was the right choice.”
Photos courtesy of BTW Images LLC.
 S Squared Design, LLC
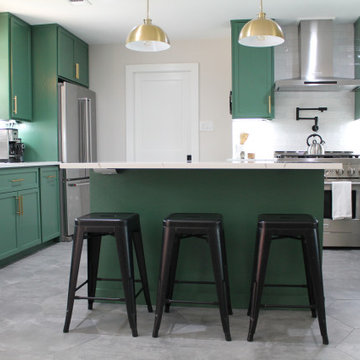
This remodel was one worth waiting for! Clients had a need for more storage, more counter and more room for entertaining friends and family. They love color and low maintenance materials so we went with a lovely happy green cabinet color, quartz counters, fun large hex porcelain floor tile and easy to clean backsplash. The original kitchen was lacking good flow, ample storage for this family.
We started in the laundry room but re configuring the layout so now the W/D and fridge could be on one wall which opened up space for a drop area. We removed the old small closet that was the pantry and replaced the old water heater with a tank-less one to allow more place where they needed it the most. Drop area has outlets for charging and one in the broom cabinet as well. We removed the door to allow for us to relocate the garage entry door which now sits in the mud room instead of right in the middle of the kitchen. We added an actual walk in pantry which is equipped with drawers and plenty of shelf storage, we put the small appliances in here to allow for more counter space in the kitchen. To access the kitchen is now through a pocket door which is a big space saver and allows a more open feel.
Let's get to this kitchen design! This was a odd layout before, now we have the fridge tucked away in it's proper home instead of sticking out. We relocated the garage entry door to the mud room to allow for this 36" range in its place featuring a pot filler as well. To maximize the kitchen footprint we closed up the door that went to the office and now we have a full L corner with plenty of storage and added some wood shelves for a sense of warmth and displace space in a beverage bar area, which also features an under-counter beverage fridge. Under-cabinet lighting, island fixture , a pendant above the sink and relocated the recessed lights to work better with the new kitchen layout. The island was a new addition which replaced the peninsula that used to cut off the kitchen from the rest of the home. We also removed a built in bookshelf and relocated the return air to the ceiling to free up even more floor space to truly transform this kitchen into the heart of the home.
 Tile Doctor Ltd
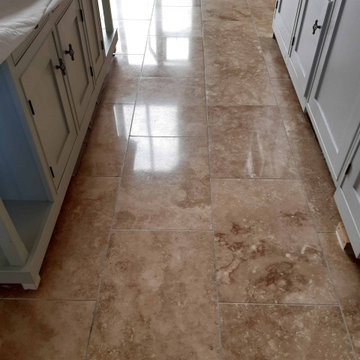
Located in Burgh Castle West of Great Yarmouth, this Travertine stone floor was a classic example of an incomplete installation. By incomplete I mean the tiler had done a fine job of laying and grouting the tiles but had left it at that and not sealed the stone. Natural stone like Travertine is porous and needs a sealer to stop dirt becoming ingrained in its pores, a sealer will also improve its appearance.
Without a sealer this floor now looked very dull, pale, rather damaged with pitting and heavily soiled with ingrained dirt. Pitting in stone like this is a natural feature of Travertine however it can be exacerbated with the use of acid cleaning products. This was a floor in urgent need of a face lift, and I was confident it could be transformed into a very beautiful floor.
I think it is true to say that most tilers will skilfully lay a floor for you but usually don’t have the knowledge, experience or equipment to finish the surface properly and when it comes to sealing many will recommend a product and suggest you take care of it yourself. Naturally if your find yourself in that position don’t insist the tiler does it, better to give us a call and have it done properly.
Our first job was to backfill the larger pits in the stone which as I mentioned are a natural feature of travertine material, but they can trap dirt and so its best if they are plugged with a suitably rigid filler. Also, if left alone the larger holes can quickly become larger as their edges crumble and break up leading to the entire tile becoming unstable. Replacing a tile in a floor like this is possible however its an extremely awkward job to do and it can be difficult to find an exact match for replacement.
Filling was done using a two-part, neutral cream-coloured polyester compound which gels in about fifteen minutes after addition of the catalyst. After this initial period, the excess product is trimmed off level with the surface of the tile before it sets harder than the stone itself in around sixty minutes. The fully cured compound can then be cut and machined as though it were part of the stone structure.
Our second job was to remove deep scratches caused by the unprotected feet of workmen’s ladders. This was done using Tile Doctor 50-grit and 100-grit diamond hand burnishing pads with a little water as a cutting medium. Shallower scratching present across the rest of the floor was removed using a Tile Doctor 200-grit soft milling pad driven by our Klindex 17″ rotary machine.
This abrasive action produces a fine slurry which was then rinsed with water and extracted using our 400psi Ninja machine in preparation for the next stage of the refinishing process. These machines were an expensive investment for our business however they are very robust and effective producing a good result that saves time.
Next task was to restore the polished appearance of the Travertine which was done using the application of a set of Tile Doctor burnishing pads. The process starts by applying a coarse 400-grit diamond pad, again fitted to the Klindex rotary machine. This cleans the tile and improves the matt finish left by the milling pad; again, the slurry was rinse-extracted before moving on to the next pad in the set. Next came the finer diamond polishing stages of 800 grit and 1500 grit, slurry being removed as before between the grades. By this time, all the scratches had been removed and the Travertine floor had visually pleasing even sheen across the whole surface. The last pad in the set is applied dry with a little water sprayed onto the tile so we left the area to dry out thoroughly overnight with the assistance of our large capacity dehumidifier.
Returning the following morning, we found that the floor had dried out perfectly and was ready to be vacuumed and spray burnished with the last pad in the set which is a 3000-grit very fine pad applied using a small amount of water sprayed from a trigger bottle resulting in a deep, rich shine across the floor surface.
Last step in the face lift was to seal the floor with a generous coat of Tile Doctor Ultra-Seal, a premium grade penetrating sealer recommended for use in Kitchens and food preparation areas. Having left the floor to soak up as much of the Tile Doctor Ultra-Seal as it could, the excess product was removed and the whole area allowed to dry completely with the assistance of our industrial air moving fan. Finally, the floor was spray buffed to a deep shine using a white maintenance pad.
The client was extremely pleased with our results and was amazed at the variation of colours within the stone which had never been visible previously.
Nick White
Norfolk Tile Doctor
 Wood-Mode Fine Custom Cabinetry
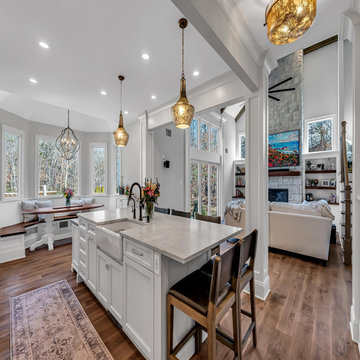
A life of inspired beauty featuring touches of elegance with a little old-fashioned detail combine to create the transitional spaces throughout this home. Creating a whole-home design centered around an open-plan kitchen and living space, the home features custom, handcrafted Wood-Mode cabinetry in the walk-in pantry, bar, master bath, and powder room.
For these New Jersey homeowners wanting touches of elegance with a little old-fashioned detail, Penterman Kitchen & Bath created bright and roomy transitional spaces throughout the home. Starting in the heart of the home, the kitchen, collaborating with Wood-Mode on a design centered on its Arlington Recessed doors handcrafted of maple wood and finished in Vintage Bright White. Capped with dark, natural walnut countertops and Belwith Keeler Trellis hardware in polished nickel, finish out the overarching cabinetry design, creating a bright, open kitchen and living space. Beautiful mullion cabinets are faced with mirrors allowing light to be reflected around the room and hide items that the homeowner does not want on display. Stainless steel Wolf-Sub Zero appliances, including a gas stove with herringbone marble backsplash and oil rubbed bronze water appliances including a pot filler, coordinate to ground the transitional design. An oversized island is capped with a beautiful grey marble top and houses a strategically placed apron front ceramic farmhouse sink, allowing the homeowners to watch TV and engage with family members in the living area while washing dishes.
The walk-in pantry continues the design, white cabinetry with striking walnut countertops, and an overabundance of under counter dry and refrigerated storage. Matching handcrafted walnut shelving becomes a featured architectural element as Hafele under shelf lighting and high gloss white tile create a bright, open space. Plenty of electrical outlets allow the homeowner to keep entertaining prep in the pantry, allowing for clean kitchen countertops.
A breakfast nook featuring a ring of windows is drawn into the room with the same walnut wood from the countertops utilized on the nooks built-in benches. The family dog even has a place at the table with a feeding area and cabinet above to hold dog food and supplies. To soften and melt into the adjacent room, the bar area features marble countertops with the coordinating herringbone marble backsplash. Glass front upper cabinets allow the homeowner to display treasured glassware while matching hardware pulls the specialized area into the overall space design.
 Tile Doctor Ltd
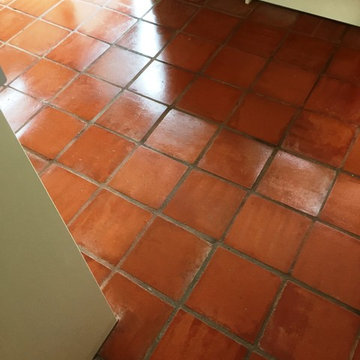
Newly built properties are not without their problems and often take a while to resolve all the snagging which occasionally extends to resolving problems with newly laid tiled floors. At this new property in the village of Malvern, and overlooked by the Malvern hills, the builders had left the Terracotta tiled kitchen floor covered in grout smears (also known as Grout Haze) following installation. They had also neglected to seal the tiles, which was actually quite fortunate in this case as they would have sealed in the grout haze, making it more difficult to remove.
Naturally, the property owner wanted the problem to be resolved as soon as possible, and for me to make the tiles easy to keep clean in future, which can be achieved by sealing the tile.
Before starting work, I made sure to fully protect any exposed woodwork with a plastic sheet covering to protect them from potential damage. I then proceeded to give the floor a thorough clean, using Tile Doctor Remove and Go to clean the floor and eradicate some stains that had been left behind as a result of the building work.
Next, I paid special attention to the grout, where the very visible problem of grout haze had arisen. To neutralise these smears I used Tile Doctor Grout Clean Up, a concentrated phosphoric acid cleaner that can also remove alkaline mineral deposits and efflorescence. Grout Clean Up is only to be used on acid resistant stone, as sensitive stone can suffer from irreparable etching if it comes into contact with the product.
Once completely clean and free of grout smears the floor was thoroughly rinsed with water to remove any trace of product and then dried as much as possible with a wet vacuum, afterwards an air mover was installed to speed up the drying process.
Later that afternoon the floor was dry and I was able to apply a sealer. To do this I opted to use several coats of Tile Doctor Seal and Go Extra, a topical, fully breathable sealer that works really well on Terracotta.
The sealer builds up a layer of protection on the surface of the tiles, protecting against ingrained dirt and stains. Seal and Go Extra also provides a high quality sheen finish which really did well to enhance the look of the Terracotta.
The property owner was exceptionally pleased with the results, and to have this problem dealt with quickly and efficiently, additionally the sealer will ensure the Kitchen floor is easy to keep clean in the future.
 S Squared Design, LLC
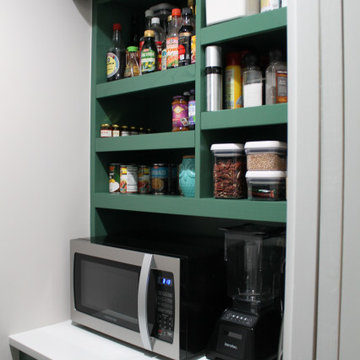
This remodel was one worth waiting for! Clients had a need for more storage, more counter and more room for entertaining friends and family. They love color and low maintenance materials so we went with a lovely happy green cabinet color, quartz counters, fun large hex porcelain floor tile and easy to clean backsplash. The original kitchen was lacking good flow, ample storage for this family.
We started in the laundry room but re configuring the layout so now the W/D and fridge could be on one wall which opened up space for a drop area. We removed the old small closet that was the pantry and replaced the old water heater with a tank-less one to allow more place where they needed it the most. Drop area has outlets for charging and one in the broom cabinet as well. We removed the door to allow for us to relocate the garage entry door which now sits in the mud room instead of right in the middle of the kitchen. We added an actual walk in pantry which is equipped with drawers and plenty of shelf storage, we put the small appliances in here to allow for more counter space in the kitchen. To access the kitchen is now through a pocket door which is a big space saver and allows a more open feel.
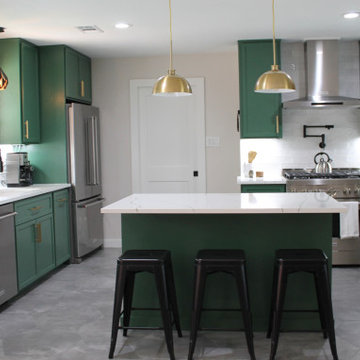
Let's get to this kitchen design! This was a odd layout before, now we have the fridge tucked away in it's proper home instead of sticking out. We relocated the garage entry door to the mud room to allow for this 36" range in its place featuring a pot filler as well. To maximize the kitchen footprint we closed up the door that went to the office and now we have a full L corner with plenty of storage and added some wood shelves for a sense of warmth and displace space in a beverage bar area, which also features an under-counter beverage fridge. Under-cabinet lighting, island fixture , a pendant above the sink and relocated the recessed lights to work better with the new kitchen layout. The island was a new addition which replaced the peninsula that used to cut off the kitchen from the rest of the home. We also removed a built in bookshelf and relocated the return air to the ceiling to free up even more floor space to truly transform this kitchen into the heart of the home.

 S Squared Design, LLC
This remodel was one worth waiting for! Clients had a need for more storage, more counter and more room for entertaining friends and family. They love color and low maintenance materials so we went with a lovely happy green cabinet color, quartz counters, fun large hex porcelain floor tile and easy to clean backsplash. The original kitchen was lacking good flow, ample storage for this family.
We started in the laundry room but re configuring the layout so now the W/D and fridge could be on one wall which opened up space for a drop area. We removed the old small closet that was the pantry and replaced the old water heater with a tank-less one to allow more place where they needed it the most. Drop area has outlets for charging and one in the broom cabinet as well. We removed the door to allow for us to relocate the garage entry door which now sits in the mud room instead of right in the middle of the kitchen. We added an actual walk in pantry which is equipped with drawers and plenty of shelf storage, we put the small appliances in here to allow for more counter space in the kitchen. To access the kitchen is now through a pocket door which is a big space saver and allows a more open feel.
Let's get to this kitchen design! This was a odd layout before, now we have the fridge tucked away in it's proper home instead of sticking out. We relocated the garage entry door to the mud room to allow for this 36" range in its place featuring a pot filler as well. To maximize the kitchen footprint we closed up the door that went to the office and now we have a full L corner with plenty of storage and added some wood shelves for a sense of warmth and displace space in a beverage bar area, which also features an under-counter beverage fridge. Under-cabinet lighting, island fixture , a pendant above the sink and relocated the recessed lights to work better with the new kitchen layout. The island was a new addition which replaced the peninsula that used to cut off the kitchen from the rest of the home. We also removed a built in bookshelf and relocated the return air to the ceiling to free up even more floor space to truly transform this kitchen into the heart of the home.
 B Designs Interior's
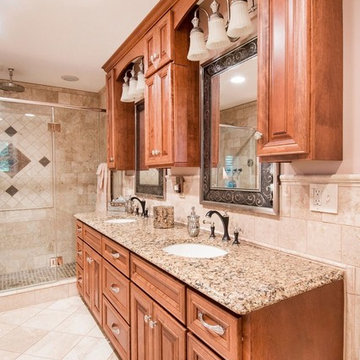
Before and afters at Susan's. I promise a complete story once the custom glass shower door is installed but it's nice to look at photos along with the video. Their is a lot here to talk about. The project started as part of a five year'ish plan to downsize. Susan wanted something that would help resale value without over-improving, but also wanted to enjoy her Bathroom while still there. That meant classic white. I noticed immediately that their was enough space to add a double vanity. That's huge in a Master Bath. The two, large, beveled frameless mirrors add depth and light, while larger floor tiles makes the space [though you can't tell from these photos] seem much larger. Susan really liked her original light gray walls so we kept them. They do harmonize with the marble finishes and that tiny toilet was replaced with a Koehler Cimarron comfort height with water sense technology. I like the Cimarron for its value and interchangeable style. It also has a great flush. The bathroom also had a tiny window at an odd height that bothered me, so I suggested replacing it with a larger window, which also adds more light and helps to make the bathroom appear larger. Susan wanted a simple shade for privacy. Here we used a Graber faux silk pleated shade with bottom up top down. Let's not forget the cherry on the top, the stunning Herringbone Marble Shower that replaced a dated and small, fiberglass shower surrounded. All in all we doubled the storage and added a lot more light, while updating to create a very classic Bathroom. -B Designs, "Creating beautiful livable spaces as unique as you!" #anotherbdesigns #bathroomdesigner #classicbathroomdesign #allnthedetails #Bdesignsbsthroomdesign #whitebathrooms #jackandjill #Kohler #grohe #grabercustomshades #saratogainteriordesigner #albanyinteriordesigner #loudonvilleinteriordesigner #niskayunainteriordesigner #bathroomdesign #albanymarble #whitebathroomvanities #vanitymirrors #herringbonebathrooms #herringbonetile #herringboneshower
 S Squared Design, LLC
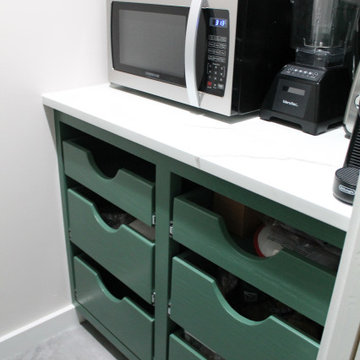
This remodel was one worth waiting for! Clients had a need for more storage, more counter and more room for entertaining friends and family. They love color and low maintenance materials so we went with a lovely happy green cabinet color, quartz counters, fun large hex porcelain floor tile and easy to clean backsplash. The original kitchen was lacking good flow, ample storage for this family.
We started in the laundry room but re configuring the layout so now the W/D and fridge could be on one wall which opened up space for a drop area. We removed the old small closet that was the pantry and replaced the old water heater with a tank-less one to allow more place where they needed it the most. Drop area has outlets for charging and one in the broom cabinet as well. We removed the door to allow for us to relocate the garage entry door which now sits in the mud room instead of right in the middle of the kitchen. We added an actual walk in pantry which is equipped with drawers and plenty of shelf storage, we put the small appliances in here to allow for more counter space in the kitchen. To access the kitchen is now through a pocket door which is a big space saver and allows a more open feel.
Let's get to this kitchen design! This was a odd layout before, now we have the fridge tucked away in it's proper home instead of sticking out. We relocated the garage entry door to the mud room to allow for this 36" range in its place featuring a pot filler as well. To maximize the kitchen footprint we closed up the door that went to the office and now we have a full L corner with plenty of storage and added some wood shelves for a sense of warmth and displace space in a beverage bar area, which also features an under-counter beverage fridge. Under-cabinet lighting, island fixture , a pendant above the sink and relocated the recessed lights to work better with the new kitchen layout. The island was a new addition which replaced the peninsula that used to cut off the kitchen from the rest of the home. We also removed a built in bookshelf and relocated the return air to the ceiling to free up even more floor space to truly transform this kitchen into the heart of the home.
 S Squared Design, LLC
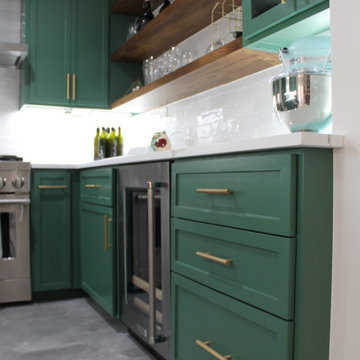
This remodel was one worth waiting for! Clients had a need for more storage, more counter and more room for entertaining friends and family. They love color and low maintenance materials so we went with a lovely happy green cabinet color, quartz counters, fun large hex porcelain floor tile and easy to clean backsplash. The original kitchen was lacking good flow, ample storage for this family.
We started in the laundry room but re configuring the layout so now the W/D and fridge could be on one wall which opened up space for a drop area. We removed the old small closet that was the pantry and replaced the old water heater with a tank-less one to allow more place where they needed it the most. Drop area has outlets for charging and one in the broom cabinet as well. We removed the door to allow for us to relocate the garage entry door which now sits in the mud room instead of right in the middle of the kitchen. We added an actual walk in pantry which is equipped with drawers and plenty of shelf storage, we put the small appliances in here to allow for more counter space in the kitchen. To access the kitchen is now through a pocket door which is a big space saver and allows a more open feel.
Let's get to this kitchen design! This was a odd layout before, now we have the fridge tucked away in it's proper home instead of sticking out. We relocated the garage entry door to the mud room to allow for this 36" range in its place featuring a pot filler as well. To maximize the kitchen footprint we closed up the door that went to the office and now we have a full L corner with plenty of storage and added some wood shelves for a sense of warmth and displace space in a beverage bar area, which also features an under-counter beverage fridge. Under-cabinet lighting, island fixture , a pendant above the sink and relocated the recessed lights to work better with the new kitchen layout. The island was a new addition which replaced the peninsula that used to cut off the kitchen from the rest of the home. We also removed a built in bookshelf and relocated the return air to the ceiling to free up even more floor space to truly transform this kitchen into the heart of the home.
Sponsored
Columbus, OH
Free consultation for landscape design!
Peabody Landscape Group
Columbus' Reliable Landscape Design & Contracting
 A+ Home Improvements, LLC
New flooring into master bedroom
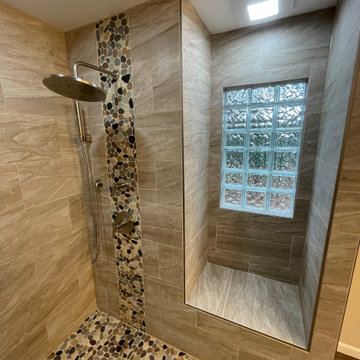
Now this was a fun project! We had the privilege of stopping out to perform a consultation for this client’s bathroom, and what a project it was! The existing bathroom provided plenty of room for a renovation, but the home owner was a little unsure of exactly what they wanted. They presented us with a wish list, and asked for our advice on how to fit everything into their dream master bathroom. The key factor for the hole project centered around the shower. Number one priority was a spacious, luxurious shower of their dreams. We worked hand in hand with them to provide the perfect layout, which included moving the toilet across the bathroom to make room. The old layout included a shower room that housed the toilet. To provide the biggest possible space, we converted the WHOLE room into one large shower.
While the shower size was adequate for the typical home owner, it simply was not what our client wanted. We replace the window with glass block and moved the toilet out of the room. Then we proceeded to install 2 separate shower faucets with diverter valves and slide bar mounted hand-held shower wands
The tile our client selected paired perfectly, and provided an eye-popping tiled shower enclosure.
The closet was originally sectioned off into 2 rooms with an entrance from not only the bedroom, but also the bathroom. We eliminated this separating to allow a better flow and more storage options. The tub was completed deleted to make room for a longer, more elegant vanity to take its place.
Our client liked the idea of continuing water proof vinyl plank flooring from the bathroom through their master bedroom as well.
We enjoy all of the projects that we are blessed to participate in. However, there are some that just stand apart from the field. We thoroughly enjoyed bringing this client’s dream to reality, and look forward to them enjoying their dream master bathroom for years to come. Give A+ Home Improvements a call to get your project started today!

 Missouri Botanical Garden
“Courtesy Missouri Botanical Garden PlantFinder”
'Dardom' cultivar of Hydrangea arborescens usually sold as White Dome.
 Reico Kitchen & Bath
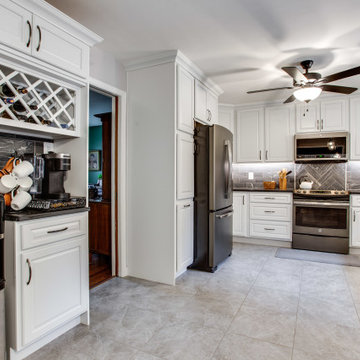
Designed by Bryan Hunt of Reico Kitchen & Bath in Frederick MD in collaboration with Walker Works, Inc., this small white transitional kitchen remodel features Merillat Masterpiece cabinets in the Fox Court door style in Maple with a Dove White finish. The kitchen countertops are Caesarstone Black Tempal.
The kitchen remodel also includes Portofino Grigio 18x18 floor tile and tile backsplash in Italgraniti 4x12 Fjord Creek.
“The space was definitely older in style. There were laminate floors and flat medium brown doors on the cabinets. The counter tops were crowded as there wasn’t any dedicated storage space for items,” said Bryan. “The biggest thing for this project was to update the space and have better storage capabilities. I was able to combine the wine and coffee into a single area with a water cooler and took the spices off the counter top with a wood tiered spice organizer in the top drawer by the range. There is a better access to the pots and pans with a pullout in the blind corner cabinet. The entire project turned out great. I love the pairing of the back splash tile and countertop.”
“I can sum up my experience in just three letters - WOW! Our new kitchen brought tears of joy to my eyes after completing it. I have more counter space, and cooking and baking are a cinch! Even a simple chore like emptying a dishwasher is much easier after moving the dishwasher from right to left. I have a pull-out cabinet and a Lazy Susan corner cabinet, which eliminates bending down to find pots and pans,” said the client.
“Bryan was so helpful from the very start. I told him what I needed, and he made it happen. He is a model for delivering quality customer service and often says, “I want you to be happy!” I can honestly say that choosing Reico was the right choice.”
Photos courtesy of BTW Images LLC.
199