
Search results for "Step involves" in Home Design Ideas

 Michael Nash Design, Build & Homes
NARI CAPITAL COTY, HONORABLE MENTION AWARD WINNER, RESIDENTIAL KITCHEN $50,000 TO $100,000
The owners of this Mount Vernon home purchased it with plans to remodel the kitchen. The original space was tired, dark and disorganized. A peninsula separated the kitchen from the breakfast area and the adjacent sunroom was only accessed via a single door. The back pantry was poorly designed and there was no logic to the kitchen’s work space.
The first step in this stunning transformation involved replacing the original peninsula with a large central island. Built using espresso stained furniture-quality cabinets with icon legs, open bottoms and exotic dark granite countertops, all kitchen traffic now flows around the island.
The outside wall of the kitchen, featuring a 48” Thermador range, stainless steel range hood and glass tile backsplash, is the focal point of the new space. A stainless steel farm-style sink sits beneath one of two large windows that provide lots of natural light into the room. To the right, sits a 48” Sub Zero refrigerator/freezer.
The wall adjacent to the family room was never used properly. Now it is home to two tall pantries, double ovens and a microwave. Creative pass through arches let the homeowner attend to guests while preparing food in the kitchen. The butler area adjacent to the dining room is filled with glass front cabinetry and additional cabinetry for extra storage.
The kitchen is now part of an open concept design flowing from kitchen to dining room to sun room. By replacing a bearing wall with a structural header, traffic can flow from one room to the next making it brighter and more conducive to entertaining.
More spacious than ever, this new kitchen is the hub of the home for this couple who love to cook and entertain.
 Michael Nash Design, Build & Homes
NARI CAPITAL COTY, HONORABLE MENTION AWARD WINNER, RESIDENTIAL KITCHEN $50,000 TO $100,000
The owners of this Mount Vernon home purchased it with plans to remodel the kitchen. The original space was tired, dark and disorganized. A peninsula separated the kitchen from the breakfast area and the adjacent sunroom was only accessed via a single door. The back pantry was poorly designed and there was no logic to the kitchen’s work space.
The first step in this stunning transformation involved replacing the original peninsula with a large central island. Built using espresso stained furniture-quality cabinets with icon legs, open bottoms and exotic dark granite countertops, all kitchen traffic now flows around the island.
The outside wall of the kitchen, featuring a 48” Thermador range, stainless steel range hood and glass tile backsplash, is the focal point of the new space. A stainless steel farm-style sink sits beneath one of two large windows that provide lots of natural light into the room. To the right, sits a 48” Sub Zero refrigerator/freezer.
The wall adjacent to the family room was never used properly. Now it is home to two tall pantries, double ovens and a microwave. Creative pass through arches let the homeowner attend to guests while preparing food in the kitchen. The butler area adjacent to the dining room is filled with glass front cabinetry and additional cabinetry for extra storage.
The kitchen is now part of an open concept design flowing from kitchen to dining room to sun room. By replacing a bearing wall with a structural header, traffic can flow from one room to the next making it brighter and more conducive to entertaining.
More spacious than ever, this new kitchen is the hub of the home for this couple who love to cook and entertain.
 Michael Nash Design, Build & Homes
NARI CAPITAL COTY, HONORABLE MENTION AWARD WINNER, RESIDENTIAL KITCHEN $50,000 TO $100,000
The owners of this Mount Vernon home purchased it with plans to remodel the kitchen. The original space was tired, dark and disorganized. A peninsula separated the kitchen from the breakfast area and the adjacent sunroom was only accessed via a single door. The back pantry was poorly designed and there was no logic to the kitchen’s work space.
The first step in this stunning transformation involved replacing the original peninsula with a large central island. Built using espresso stained furniture-quality cabinets with icon legs, open bottoms and exotic dark granite countertops, all kitchen traffic now flows around the island.
The outside wall of the kitchen, featuring a 48” Thermador range, stainless steel range hood and glass tile backsplash, is the focal point of the new space. A stainless steel farm-style sink sits beneath one of two large windows that provide lots of natural light into the room. To the right, sits a 48” Sub Zero refrigerator/freezer.
The wall adjacent to the family room was never used properly. Now it is home to two tall pantries, double ovens and a microwave. Creative pass through arches let the homeowner attend to guests while preparing food in the kitchen. The butler area adjacent to the dining room is filled with glass front cabinetry and additional cabinetry for extra storage.
The kitchen is now part of an open concept design flowing from kitchen to dining room to sun room. By replacing a bearing wall with a structural header, traffic can flow from one room to the next making it brighter and more conducive to entertaining.
More spacious than ever, this new kitchen is the hub of the home for this couple who love to cook and entertain.
Find the right local pro for your project

 New Energy Works Timberframers
Phil and Rocio, little did you know how perfect your timing was when you came to us and asked for a “small but perfect home”. Fertile ground indeed as we thought about working on something like a precious gem, or what we’re calling a NEW Jewel.
So many of our clients now are building smaller homes because they simply don’t need a bigger one. Seems smart for many reasons: less vacuuming, less heating and cooling, less taxes. And for many, less strain on the finances as we get to the point where retirement shines bright and hopeful.
For the jewel of a home we wanted to start with 1,000 square feet. Enough room for a pleasant common area, a couple of away rooms for bed and work, a couple of bathrooms and yes to a mudroom and pantry. (For Phil and Rocio’s, we ended up with 1,140 square feet.)
The Jewel would not compromise on design intent, envelope or craft intensity. This is the big benefit of the smaller footprint, of course. By using a pure and simple form for the house volume, a true jewel would have enough money in the budget for the highest quality materials, net-zero levels of insulation, triple pane windows, and a high-efficiency heat pump. Additionally, the doors would be handcrafted, the cabinets solid wood, the finishes exquisite, and craftsmanship shudderingly excellent.
Our many thanks to Phil and Rocio for including us in their dream home project. It is truly a Jewel!
From the homeowners (read their full note here):
“It is quite difficult to express the deep sense of gratitude we feel towards everyone that contributed to the Jewel…many of which I don’t have the ability to send this to, or even be able to name. The artistic, creative flair combined with real-life practicality is a major component of our place we will love for many years to come.
Please pass on our thanks to everyone that was involved. We look forward to visits from any and all as time goes by."
–Phil and Rocio
Read more about the first steps for this Jewel on our blog.
Reclaimed Wood, Kitchen Cabinetry, Bedroom Door: Pioneer Millworks
Entry door: NEWwoodworks
Professional Photos: Loren Nelson Photography

 Century Stair Company
This multistory Craftsman staircase brings warmth and simplicity to the home. Clean horizontal lines define the design, from the rectangular wood treads to the custom newels, balusters, and handrail system. These lines create a warm open flow that connects each level with natural elegance and timeless simplicity.
1976-2025 © Century Stair Company
 Windy City Painters
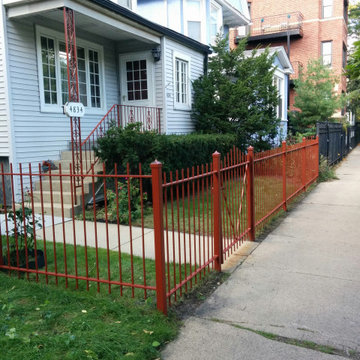
ver look at your iron fence and wonder how rust crept up so fast? For homeowners across Chicago's North Side and Near West Side, that moment of recognition often comes too late. Windy City Painters built this project guide to help you understand exactly what a professional iron fence restoration involves, what products matter, and what Chicago's climate demands from every coat of paint applied to exposed metal.
PROJECT OVERVIEW
This iron fence restoration involved a multi-unit property featuring an ornamental iron perimeter fence typical of Chicago's greystone and courtyard building streetscape. The fence presented moderate-to-severe surface rust, multiple areas of paint delamination, and two sections with deep pitting requiring needle gun descaling before any coating could be applied. The goal was full rust remediation and a durable topcoat finish built for Chicago's demanding climate. Windy City Painters completed the project in two days with zero damage to surrounding hardscape.
MATERIALS AND PRODUCTS
Ospho Rust Converter - A phosphoric acid-based treatment that chemically transforms iron oxide into iron phosphate, halting active corrosion before primer is applied. Essential on Chicago iron exposed to decades of salt air and freeze-thaw cycling.
Corroseal Rust-Inhibitive Primer - A water-based latex primer with built-in rust inhibitors, applied over converted surfaces to seal and prepare metal for topcoating.
Sherwin-Williams DTM Acrylic Coating - Direct-to-Metal formulation delivering exceptional adhesion, flexibility, and corrosion resistance. Available in satin and semi-gloss, ideal for ornamental iron fence painting across Chicago properties.
THE PROCESS
Step 1 - Mechanical Surface Preparation: Wire wheel grinding with angle grinder attachments removed all loose rust scale, failing paint, and surface contamination. Heavily pitted sections received needle gun descaling to expose clean stable metal beneath. This step determines everything. No primer or topcoat performs correctly over compromised metal, regardless of product quality. Windy City Painters treats prep as the primary investment on every iron fence project.
Step 2 - Rust Conversion: Ospho was applied liberally to all areas showing active rust. The phosphoric acid reaction was allowed to complete fully before any priming began. On severely oxidized sections, a second Ospho application ensured complete conversion. This step is non-negotiable in Chicago where freeze-thaw cycles push moisture into every surface irregularity.
Step 3 - Priming with Corroseal: Full coverage Corroseal primer coat sealed the converted surface and established adhesion for the finish coats. Corroseal's rust-inhibitive chemistry adds a secondary barrier against moisture penetration, extending the effective life of the topcoat by years in Chicago's humid lakefront environment.
Step 4 - DTM Topcoat Application: Two coats of Sherwin-Williams DTM acrylic in satin black were applied by brush to ensure full penetration into ornamental detail. DTM's flexibility accommodates the metal expansion and contraction Chicago temperatures demand, from minus-15 winters to 95-degree July afternoons. Final coverage was uniform and true to color.
CHICAGO-SPECIFIC CHALLENGES
Chicago iron faces challenges most other markets do not. Lake Michigan humidity accelerates surface oxidation year-round. Road salt from winter de-icing migrates to fence bases and lower rails. Freeze-thaw cycling cracks poorly adhered coatings within a single winter. Greystones, two-flats, and Victorian brownstones often feature original ornamental ironwork with decades of layered paint that must be assessed before any new coating is added. Windy City Painters factors all of these conditions into every iron fence estimate and material selection.
WHAT TO EXPECT LONG-TERM
A properly prepared and coated iron fence using the Ospho, Corroseal, and Sherwin-Williams DTM system should deliver 5-8 years of performance in Chicago conditions. Annual visual inspection for chips or scratches, followed by prompt spot priming, extends that timeline significantly. Full refinishing cycles become less frequent when the initial prep work is done correctly.
PRO TIPS
Tip 1 - Never skip the rust converter. Painting over active rust with even the best topcoat guarantees early failure. Ospho or a comparable phosphoric acid treatment must precede any primer on iron showing orange or brown oxidation.
Tip 2 - Assess for weld repairs before scheduling painting. If rust has eaten through the metal creating structural voids or broken sections, a welder must address those areas before painting begins. Windy City Painters identifies weld repair needs during the free estimate.
Tip 3 - Choose satin or semi-gloss finish on iron. Flat finishes on metal hold moisture and show wear faster. Satin DTM provides enough sheen to shed water while maintaining the traditional look Chicago ornamental iron demands.
Ready to restore your iron fence the right way? Visit windypainters.com to schedule your free estimate with Windy City Painters.
FAQ
Q: What does iron fence painting cost in Chicago?
A: Most residential iron fence projects range from $500 to $1,800 depending on linear footage, rust severity, and prep requirements. Windy City Painters provides free detailed on-site estimates for accurate iron fence painting cost in Chicago.
Q: How do I know if my fence needs rust conversion or just repainting?
A: Any visible orange or brown rust requires chemical conversion before priming. Windy City Painters evaluates every fence during the estimate to determine whether Ospho, mechanical prep, or weld repair is needed before coating begins.
Q: Can you paint iron in cold Chicago weather?
A: DTM coatings have lower application temperature thresholds than standard exterior paint, but we avoid application below 35 degrees Fahrenheit. Windy City Painters schedules iron fence projects for appropriate weather windows throughout the season.
Q: How long does iron fence paint last in Chicago?
A: With complete rust conversion, Corroseal priming, and Sherwin-Williams DTM topcoat, iron fence painting in Chicago lasts 5-8 years. Annual inspections and prompt touch-ups of chips extend that timeline further.
Q: Do I need a welder before an iron fence can be painted?
A: Only if rust has created structural voids or breaks in the metal. Windy City Painters assesses this during the free estimate and can coordinate with welders when needed before our painting crew begins.
Q: What is the difference between Ospho and Corroseal?
A: Ospho is a rust converter applied directly to active rust to chemically neutralize it. Corroseal is a rust-inhibitive primer applied over converted or clean metal. Windy City Painters often uses both in sequence for maximum protection on Chicago iron.
Q: How often should Chicago iron fences be inspected?
A: Annual inspection is recommended, ideally in early spring after winter salt and freeze-thaw exposure. Catching small chips and bare spots early allows simple touch-up rather than full iron fence repainting, saving significant cost.

 Julie Schuster Design Studio
Custom metallic bronze finished sculptural wall treatment in the breezeway and foyer complimented by river-stone flooring.
Photo Credit: Donna Dotan Photography

 New Energy Works Timberframers
Phil and Rocio, little did you know how perfect your timing was when you came to us and asked for a “small but perfect home”. Fertile ground indeed as we thought about working on something like a precious gem, or what we’re calling a NEW Jewel.
So many of our clients now are building smaller homes because they simply don’t need a bigger one. Seems smart for many reasons: less vacuuming, less heating and cooling, less taxes. And for many, less strain on the finances as we get to the point where retirement shines bright and hopeful.
For the jewel of a home we wanted to start with 1,000 square feet. Enough room for a pleasant common area, a couple of away rooms for bed and work, a couple of bathrooms and yes to a mudroom and pantry. (For Phil and Rocio’s, we ended up with 1,140 square feet.)
The Jewel would not compromise on design intent, envelope or craft intensity. This is the big benefit of the smaller footprint, of course. By using a pure and simple form for the house volume, a true jewel would have enough money in the budget for the highest quality materials, net-zero levels of insulation, triple pane windows, and a high-efficiency heat pump. Additionally, the doors would be handcrafted, the cabinets solid wood, the finishes exquisite, and craftsmanship shudderingly excellent.
Our many thanks to Phil and Rocio for including us in their dream home project. It is truly a Jewel!
From the homeowners (read their full note here):
“It is quite difficult to express the deep sense of gratitude we feel towards everyone that contributed to the Jewel…many of which I don’t have the ability to send this to, or even be able to name. The artistic, creative flair combined with real-life practicality is a major component of our place we will love for many years to come.
Please pass on our thanks to everyone that was involved. We look forward to visits from any and all as time goes by."
–Phil and Rocio
Read more about the first steps for this Jewel on our blog.
Reclaimed Wood, Kitchen Cabinetry, Bedroom Door: Pioneer Millworks
Entry door: NEWwoodworks
Professional Photos: Loren Nelson Photography
 New Energy Works Timberframers
Phil and Rocio, little did you know how perfect your timing was when you came to us and asked for a “small but perfect home”. Fertile ground indeed as we thought about working on something like a precious gem, or what we’re calling a NEW Jewel.
So many of our clients now are building smaller homes because they simply don’t need a bigger one. Seems smart for many reasons: less vacuuming, less heating and cooling, less taxes. And for many, less strain on the finances as we get to the point where retirement shines bright and hopeful.
For the jewel of a home we wanted to start with 1,000 square feet. Enough room for a pleasant common area, a couple of away rooms for bed and work, a couple of bathrooms and yes to a mudroom and pantry. (For Phil and Rocio’s, we ended up with 1,140 square feet.)
The Jewel would not compromise on design intent, envelope or craft intensity. This is the big benefit of the smaller footprint, of course. By using a pure and simple form for the house volume, a true jewel would have enough money in the budget for the highest quality materials, net-zero levels of insulation, triple pane windows, and a high-efficiency heat pump. Additionally, the doors would be handcrafted, the cabinets solid wood, the finishes exquisite, and craftsmanship shudderingly excellent.
Our many thanks to Phil and Rocio for including us in their dream home project. It is truly a Jewel!
From the homeowners (read their full note here):
“It is quite difficult to express the deep sense of gratitude we feel towards everyone that contributed to the Jewel…many of which I don’t have the ability to send this to, or even be able to name. The artistic, creative flair combined with real-life practicality is a major component of our place we will love for many years to come.
Please pass on our thanks to everyone that was involved. We look forward to visits from any and all as time goes by."
–Phil and Rocio
Read more about the first steps for this Jewel on our blog.
Reclaimed Wood, Kitchen Cabinetry, Bedroom Door: Pioneer Millworks
Entry door: NEWwoodworks
Professional Photos: Loren Nelson Photography
 Michael Nash Design, Build & Homes
2010 NARI CAPITAL COTY GRAND AWARD WINNER
A young couple with toddlers purchased this home and decided to do extensive renovations before they moved in. The existing galley kitchen and dining room were too small and separated by a load bearing wall. The sunken family room floor was less than ideal for small children to have to climb up and down.
The first step in the renovation involved eliminating the load bearing walls and replacing them with a new steel beam capable of handling the load. By doing so, Michael Nash Design, Build & Homes was able to combine the galley kitchen and dining room into one large family kitchen with an eating area.
The focal point of the new space is a large multi-purpose island with a cooktop. Cherry stained cabinetry with a dark granite countertop provides plenty of storage and workspace, as well as bar seating. The same materials are used around the perimeter of the kitchen.
One wall features upper and lower cabinets which surround a stainless steel refrigerator and double wall ovens. A large pantry is included on this wall. The second wall houses the main kitchen sink and built-in dishwasher. A large window sits above the sink area allowing the parents to watch over children playing in the backyard. A butler area features a utility sink and an under-the-counter beverage refrigerator that is easy for the kids to access.
The family room floor was raised to be level with the rest of the first floor and Brazilian cherry wood floors provide continuity and richness throughout the space. Archways were built for style and pleasant viewing from each room.
The end result of the project is that this kitchen is the heart of the home. The living and dining area is now large enough for family gatherings and entertaining.

 Chester County Kitchen & Bath
Awesome Norristown PA bi-level home remodel. We gutted the whole first level of this home down to the bare bones. We redesigned the space to an open floorplan. New structural framing, insulation, windows and doors, and all mechanicals were relocated and improved. Lighting! Lighting! Lighting! everywhere and it makes all the difference. Led lighting and smart switches were used for up lighting above cabinetry, task lighting under cabinetry, general room lighting, accent lighting under bar top, and all decorative fixtures as well. The kitchen was designed around a central island with elevated seating that is designed around the new structural columns required to open the whole area. Fabuwood cabinetry in Galaxy Horizon finish make up the perimeter cabinets accented by Galaxy Cobblestone finish used for the island cabinetry. Both cabinetry
tones coordinate perfect with the new Luxury vinyl plank flooring in Uptown Chic Forever Friends. I’ve said it before and I’ll say it again. Luxury vinyl is Awesome! It looks great its ultra durable and even water proof as well as less expensive than true hardwood. New stair treads, railings, and posts were installed stained to match by us; giving the steps new life. An accent wall of nickel gap boards was installed on the fireplace wall giving it some interest along with being a great clean look. The recessed niche behind the range, the dry stacked stone tile at the islands seating area, the new tile entry in a herringbone pattern just add to all the great details of this project. The New River White granite countertops are a show stopper as well; not only is it a beautiful stone the installation and seaming is excellent considering the pattern of the stone. I could go on forever we did so much. The clients were terrific and a pleasure to work with. I am glad we were able to be involved in making this dream come true.
 Michael Nash Design, Build & Homes
NARI CAPITAL COTY, HONORABLE MENTION AWARD WINNER, RESIDENTIAL KITCHEN $50,000 TO $100,000
The owners of this Mount Vernon home purchased it with plans to remodel the kitchen. The original space was tired, dark and disorganized. A peninsula separated the kitchen from the breakfast area and the adjacent sunroom was only accessed via a single door. The back pantry was poorly designed and there was no logic to the kitchen’s work space.
The first step in this stunning transformation involved replacing the original peninsula with a large central island. Built using espresso stained furniture-quality cabinets with icon legs, open bottoms and exotic dark granite countertops, all kitchen traffic now flows around the island.
The outside wall of the kitchen, featuring a 48” Thermador range, stainless steel range hood and glass tile backsplash, is the focal point of the new space. A stainless steel farm-style sink sits beneath one of two large windows that provide lots of natural light into the room. To the right, sits a 48” Sub Zero refrigerator/freezer.
The wall adjacent to the family room was never used properly. Now it is home to two tall pantries, double ovens and a microwave. Creative pass through arches let the homeowner attend to guests while preparing food in the kitchen. The butler area adjacent to the dining room is filled with glass front cabinetry and additional cabinetry for extra storage.
The kitchen is now part of an open concept design flowing from kitchen to dining room to sun room. By replacing a bearing wall with a structural header, traffic can flow from one room to the next making it brighter and more conducive to entertaining.
More spacious than ever, this new kitchen is the hub of the home for this couple who love to cook and entertain.
 Brett Hardy Landscapes Ltd
Our clients came to us looking for a complete country-style garden design and landscape build.
Their existing garden was an open space dominated by a sloping lawn, a feature summerhouse in the top corner and a shed for storage. There were two raised beds for growing home produce and some small trees in the existing garden.
They wanted design inspiration to create a feature path to the summerhouse. It must be easy to mow the lawns and have considered planting in the beds. They didn’t want anything high maintenance to look after.
Our clients wanted a crisp and clean formal feel to the country-style garden design, and we knew they enjoyed their Yew Topiary balls. Our other consideration for the brief was that they wanted some privacy from neighbours.
Our garden designer took up the challenge and worked with the client to create their garden. Before we started, we surveyed the space in detail as we do before we start any project.
After discussing their needs and desires, we knew they needed to create a feature landscaped pathway to the destination summerhouse with an adjoined gorgeous seating area.
Among this, it was essential to create a level lawn area that was flat and trouble-free and fill the planting areas with perennials and shrubs in the customer’s preferred colours of white, blue and purple.
Brett came along and presented me with a very professional and beautiful design to turn my unloved outdoor space into something to be proud of. I had to wait for the transformation, but once it was underway, it soon became clear that it had been worth it. The lads were hard-working and polite and left me with a lovely new feature.
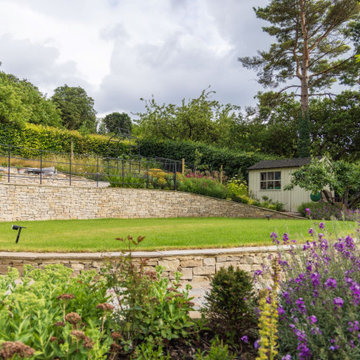
A flat oval lawn on the mid-level was integral to the design and surrounded by a sweeping curved pathway leading to the summerhouse. The sett cobbled path takes you up and around to the top seating area.
landscape country style garden design
A GARDEN PARADISE
To the back of the oval lawn is a spectacular feature stone retaining topped wall finished with country-style estate-style fencing for safety and effect.
On the highest level by the summerhouse, there is a spacious seating terrace to relax.
Head through the arch of black galvanised steel, where you will find several raised beds for vegetables and fruit crops. This added to their established apple tree collection. Then we planted some espalier fruit tree screens to define the garden’s zones. This abundant growing area is surrounded by wildflower meadow planting to attract wildlife and pollinators.
For privacy, there are trees strategically planted on the boundaries to provide effective green screening.
Descending from the lawn, you will find stepping stones to take you down to the shed. Here you will find a delightfully secluded seating spot.
The area closest to the house has stepped levels of planted banks. They are filled with easy-to-care-for shrubs and perennial planting that will return year after year. The roses and lavender fill the air with a glorious scent as you pass them.
We are proud to have been involved in this thrilling country-style garden project from start to finish.
 New Energy Works Timberframers
Phil and Rocio, little did you know how perfect your timing was when you came to us and asked for a “small but perfect home”. Fertile ground indeed as we thought about working on something like a precious gem, or what we’re calling a NEW Jewel.
So many of our clients now are building smaller homes because they simply don’t need a bigger one. Seems smart for many reasons: less vacuuming, less heating and cooling, less taxes. And for many, less strain on the finances as we get to the point where retirement shines bright and hopeful.
For the jewel of a home we wanted to start with 1,000 square feet. Enough room for a pleasant common area, a couple of away rooms for bed and work, a couple of bathrooms and yes to a mudroom and pantry. (For Phil and Rocio’s, we ended up with 1,140 square feet.)
The Jewel would not compromise on design intent, envelope or craft intensity. This is the big benefit of the smaller footprint, of course. By using a pure and simple form for the house volume, a true jewel would have enough money in the budget for the highest quality materials, net-zero levels of insulation, triple pane windows, and a high-efficiency heat pump. Additionally, the doors would be handcrafted, the cabinets solid wood, the finishes exquisite, and craftsmanship shudderingly excellent.
Our many thanks to Phil and Rocio for including us in their dream home project. It is truly a Jewel!
From the homeowners (read their full note here):
“It is quite difficult to express the deep sense of gratitude we feel towards everyone that contributed to the Jewel…many of which I don’t have the ability to send this to, or even be able to name. The artistic, creative flair combined with real-life practicality is a major component of our place we will love for many years to come.
Please pass on our thanks to everyone that was involved. We look forward to visits from any and all as time goes by."
–Phil and Rocio
Read more about the first steps for this Jewel on our blog.
Reclaimed Wood, Kitchen Cabinetry, Bedroom Door: Pioneer Millworks
Entry door: NEWwoodworks
Professional Photos: Loren Nelson Photography
 Design Studio West
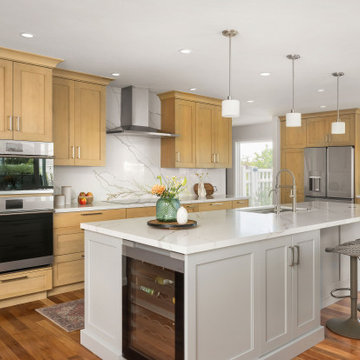
A new island layout encourages gathering with room for four. In addition to an outlet on one side of the island, a pop-up outlet at the other end allows for the utilization of small kitchen appliances and casual usage of laptops and personal devices.
 Tile Doctor Ltd
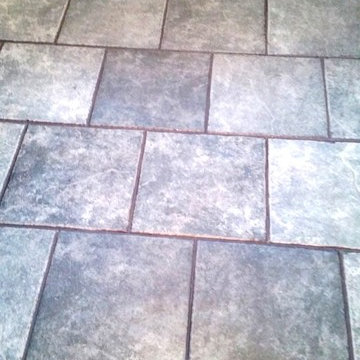
Here’s a quick grout cleaning and re-colouring job I completed in the town of Canvey Island, Essex. Canvey Island lies on the south east coast, and lies just above sea level which in my job is always worth noting as the area can be prone to flooding. This wasn’t the problem here though, simply put, my client was unhappy with the colour of their grout, and wanted it re-coloured to a darker shade to match the grey Ceramic floor tiles.
Cleaning the grout before re-colouring is essential because, as many readers are probably well aware, grouts are porous and therefore can very easily absorb dirt and grease. Most often this will result in grout discolouration if not dealt with promptly.
So, as mentioned above the first step in the re-colouring process involved cleaning the grout lines. For this Tile Doctor has a special Pre-Treat Cleaner which is sprayed on and scrubbed into the grout to both remove any existing dirt and also to prepare the grout joints for a superior bond with the Grout Colourant. Once complete the grout lines looked clean and refreshed.
To clean the ceramic I diluted one part Tile Doctor Pro-Clean to three parts water, and used it to wash down the Ceramic tiles, leaving a consistent level of cleanliness across the entire floor. I then rinsed the floor with water which was then extracted using a wet vacuum and waited for 3 hours for the floor to dry.
Once dry, I began the process of applying the Charcoal Grey (as chosen by the client) Grout Colourant to the grout lines. As well as changing the colour the colourant also forms a barrier over the grout sealing it in and protecting it from future staining for years to come.
Then, once dry, the floor was given another quick clean using a light spray of water and a white buffing pad, resulting in an aesthetically pleasing sheen finish. My client was very happy with the outcome and now has the floor they wanted.
Nick Murphy
South Essex Tile Doctor
 Tile Doctor Ltd
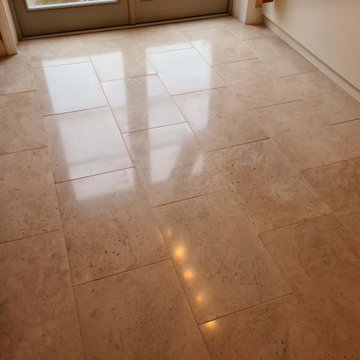
I recently went to survey a floor in Harrogate which I immediately recognised as beige Moleanos Limestone which comes from Portugal. If you have been reading my previous posts you will remember I am not a fan of this type of stone as it is very difficult to clean, polish or seal. This particular floor was laid around 5 years prior and was now looking quite dull and was in need of reviving.
The client didn’t want to spend much so l suggested l could spray burnish the floor to get her shine back again and remove the splash marks. We do this a lot for owners of polished stone floors as part of an annual maintenance package, it is a low cost option that uses a very fine 3,000 grit burnishing pad to renovate the stone and bring up the shine. However, I pointed out to her that this process wouldn’t clean her grout which was making her floor look scruffy.
I priced up the different options and after weighing up the quotes I’m pleased to say she decided to go for a full clean and seal. The full process involves the use of different grades of diamond encrusted burnishing pads from low to very fine grits to renovate the Limestone and also a chemical clean of the grout followed by a fresh seal.
I returned on the scheduled date and after preparing the floor I started cleaning the Limestone by running over the tiles with a 400-grit coarse burnishing pad lubricated with water. The soil was rinsed off with more water and extracted with a wet vacuum. This process was repeated with the 800 and 1500-grit pads which starts to build-up the polish on the stone.
I then turned my attention to the grout with a strong dilution of Tile Doctor Pro-Clean which was left to soak into the grout for ten minutes before scrubbing it by hand with a stiff brush. After a final rinse and extraction with the wet vacuum the tile and grout were looking much cleaner and was left to dry off overnight.
On Day 2 I stated with the application of the 3,000-grit pad which is the last step in the polishing processed and builds up a lovely satin finish on the stone floor. This is done using only a little water and is basically the spray burnish technique I referred to earlier. This process has the added advantage of leaving the floor dry.
With the stone tiles looking lovely and the grout clean the last step was to seal it all in and protect it from dirt and future staining with the application of a sealer. For this I used two coats of Tile Doctor Ultra Seal.
My client was very pleased she had spent the extra money to achieve the floor she had always wanted, apparently it had never looked this good even when new. We discussed the annual maintenance plan to ensure the floor remained looking this good.
Nigel Stoker
North West Yorkshire TIle Doctor
 Michael Nash Design, Build & Homes
2011 NARI CAPITAL COTY FINALIST AWARD WINNER
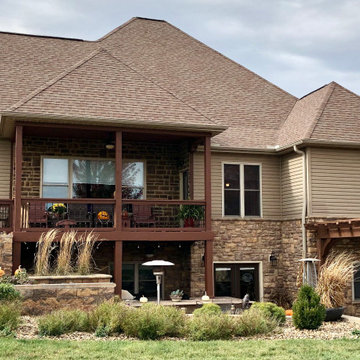
This family of four has recently purchased this home and their life style is involved with kids and outdoor activities. They disliked their current kitchen and the existing breakfast area was too small. The old wooden deck was small and falling apart, and they wanted to replace it with an area in which they could entertain and have a place for the kids to play.
The first step in the renovation was to tear down the back wall of the existing kitchen and breakfast room. A major load bearing wall holding up part of the second floor, major structural beams had to be put in place. Once installed, a 10’ x 24’ addition was added to extend the kitchen and breakfast room.
An interior laundry entrance was relocated to allow for pantry and bigger refrigerator to be installed. A large bay window was placed over the sink to bring more natural light into the workspace.
The new kitchen layout offers a lot more storage and counter space. A large island offers a prep sink and significant counter space for cooking, having a buffet, doing homework or having a quick meal. The maple cabinetry with slight glaze of mocha, granite counters, a stone accented backsplash and stainless steel appliances give this kitchen remodel a real spark.
Large double windows and transoms offer mom and dad full view of the built-in sandbox just outside so they can watch the children. New French doors lead onto the 20’ x 28’ flagstone patio. A short stone wall provides privacy and embedded lights make the space usable after sunset.
The outcome has been a delight for this family and achieved their goals. They can entertain indoors or outdoors and the kids have a great place to play.

 Joe Gray's Flooring
Staircase - large modern wooden curved metal railing staircase idea in Miami with painted risers

48