
Search results for "Stubborn stains" in Home Design Ideas
 Tile Doctor Ltd
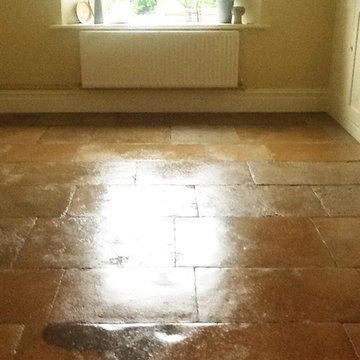
This property was situated in the tiny, yet picturesque village of Grafton Underwood in Kettering, Northamptonshire. The village has only a population numbering a few hundred and, interestingly enough, is the childhood home of the famous ‘Bridget Jones’ character. I have previously worked on a number of floors in Grafton Underwood, and on this particular occasion I was called to complete the job through a recommendation – which is always welcome!
This particular customer had two floors that needed re-finishing; the first was a polished Limestone tiled conservatory (which I will cover in a separate post as the process was different) and the second a Flagstone tiled living room; so on a rather dull day in November, I began my work.
The sealer on the Flagstone tiled living room had failed in certain places, resulting in the floor becoming difficult to clean due to dirt becoming ingrained in the stone. The decline in the sealer is not uncommon, as they do wear down over time – especially in an area of high traffic like a living room. To resolve this issue, the old surface seal needed to be stripped back and re-sealed.
To remove what was left of the old sealer, I applied a dilution of Tile Doctor Remove and Go and scrubbed it into the floor using a rotary machine fitted with black stripping pads. I then gave the floor an initial rinse, before paying special attention to scrubbing the stubborn spots, making sure all of the sealer was removed.
I then gave the floor an acid wash using Tile Doctor Grout Clean-Up in order to remove grout haze and other mineral deposits which were evident. Due to its acidic properties, you have to be very careful with this product on any type of stone, so I didn’t let it dwell for too long and made sure the floor was thoroughly rinsed down afterwards, with all solutions extracted using a wet-vac machine.
The floor was left to dry for more than 24 hours, before I returned to re-seal it using Tile Doctor Seal & Go. This product provides both a stain resistant surface seal and the durable low-sheen finish requested by my client. Seal & Go is suitable for use on internal unsealed, porous surfaces.
I guess the photographs don’t really do the transformation justice however the freshly re-sealed Flagstone living room certainly brightened up what was a very dreary autumn day!
Phil Vissian
Northamptonshire Tile Doctor
 Tile Doctor Ltd
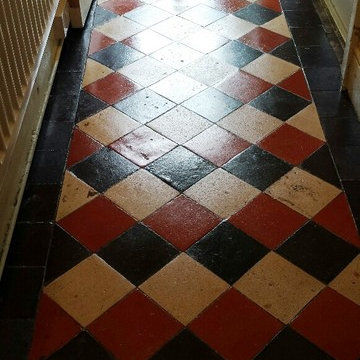
The pictures below were taken at a house in the town of Merthyr Tydfil, which is located not too far north of Cardiff. My client was keen to keep her very old Quarry tiled floor – which dated back to 1905 – intact. The floor had understandably seen a large amount of traffic in its lifetime, and was now in dire need of a professional restoration, including a thorough clean and seal.
First, I completed a survey of the area and provided my client with a quote. After completing many similar jobs in the past, I generally have a good idea of what the final result will look like. I passed on some images of a final result to my client, who was happy for me to begin my work.
On the first day, my first task was to take run some damp tests which were fine; it’s always good to know up front if there are likely to be any damp issues. Next I covered the floor with water to take the surface suction out and waited fifteen minutes before applying a cocktail of Tile Doctor NanoTech Heavy Build-Up cleaner mixed with Pro-Clean and Grout clean-up covering the whole floor. I then immediately starting to work the solution into the floor with a rotary machine fitted with a coarse black pad. The solution was then rinsed off with water which was then extracted with a wet vacuum as I worked. For stubborn areas I applied more of the previously mixed solution scrubbed into the floor with coarse wire wool by hand followed by further rinsing with water.
Each of the products used serves a particular purpose. Pro-Clean is a strong high-alkaline cleaner for natural stone, while NanoTech HBU is a particularly powerful cleaner that uses nano-sized particles to penetrate deep into the stone to get underneath and lift out ingrained dirt and stains. Grout Clean-Up, as the name implies, is a product for resolving grout related problems such as removing grout smears from tile surfaces aka grout haze.
After completing the clean I left the house for 48 hours, to leave enough time for the floor to dry completely in preparation for sealing. Upon my arrival back at the house I conducted some more damp tests to check that the floor was dry enough to seal using the previous readings as a benchmark. The results indicated that I was fine to proceed with the seal, so I applied a total of eight coats of Tile Doctor Seal & Go for durable protection. This was the product I recommended to my client as she wanted a nice, soft shine for her surface seal.
As you can see from the photos, the desired result was achieved to a high standard and needless to say my client was delighted with the transformation.
Julian Iancono
South East Wales
 Tile Doctor Ltd
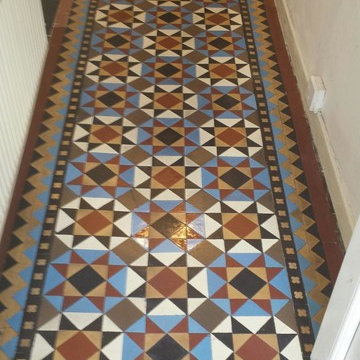
This set of photographs are from a house in the Warrington suburb of Stockton Heath where my client had discovered a Victorian Tiled floor under carpet in the hallway and was keen to have it restored back to its original condition. You can see from the photograph below that it was in quite a state with dirt and paint splashes however I was confident we could manage it.
On arrival I started to protect the skirting boards and entrance carpet to another room. Once that was done i started to strip the paint splashed and any remaining sealer from the floor using Tile Doctor Remove and Go which is an effective coatings and sealer remover that unlike some products is perfect safe to use on Victorian tiles
Working on the floor the product was diluted, scrubbed into the tile and then left to dwell for twenty minutes before being rinsed off with water which was then removed using a wet vacuum. The floor was now looking a lot cleaner, however I could see a number of stubborn areas that were going to need further treatment so I mixed the Remove and Go 50/50 with another Tile Doctor product called NanoTech HBU (Heavy Build-up Remover), which adds abrasive particles to the solution. This solution was scrubbed in and then rinsed off when i was happy with the condition of the floor. This process took much of the day and once done it was left to dry overnight ready for sealing the next day.
On my return the next morning i tested the floor in several places with a damp meter to ensure it was dry. When i was happy the floor was dry i started sealing with thin coats of Tile Doctor Seal and Go leaving thirty minutes between coats to allow it to dry; in total i gave the floor seven coats of sealer which gave the floor a nice shine which the customer was very happy with. As well as enhancing the look of the floor the sealer will provide stain protection going forward.
Alastair Robb
West Cheshire Tile Doctor
Find the right local pro for your project
 Tile Doctor Ltd
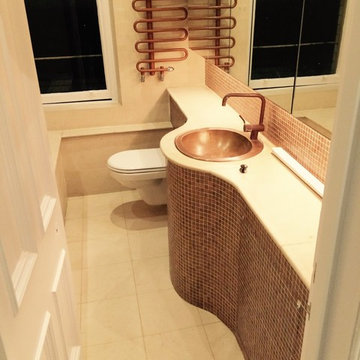
This was a substantial engagement at a luxury rental apartment in Brighton rejuvenating the Limestone tiles in two bathrooms and a hallway taking six days of hard work. In addition, I would be working around two decorators, making for even more testing work conditions.
I first set to work on the smallest bathroom, which featured limestone tiles from floor to ceiling, as well as a large bath, copper sink and a tiled surround. Limestone is a very popular choice for interior and exterior decoration, but the tiles in this bathroom were in need of some care to get them looking their best again. My initial task was to strip away any previous sealer by hand; this was done using a mixture of warm water and Tile Doctor Pro-Clean which, along with Limestone, is also suitable for use on other types of natural stone, such as Granite, Slate and Travertine. Pro-Clean serves both as an effective stripper and cleaner, meaning that once the sealer had been stripped away, the tiles also received a thorough clean. Once I had cleaned the tiles, I sucked up any excess water and residue using a Wet-Dry Vac machine.
Since the tiles would have to be left to dry for a couple of days, I offered to restore the copper sink for the customer, even though this was not actually part of my job description. After conducting some research into copper cleaning, I opted to use a combination of lemon juice, vinegar and salt. The research paid off as, once I began to apply the solution to the sink, the bright orange and brown colours of the copper quickly rose to the surface. Within the space of an hour, I had transformed what initially appeared to be a ruined sink into a lovely, shimmering copper feature for the bathroom. Both the decorators and I were truly amazed at the results – but all credit goes to Google!
The larger of the two bathrooms was a much stiffer test for the Tile Doctor products. It had not been left in great condition, as the shower area had clearly not been sealed correctly, and the tiles had been left in such a manner that soap scum from shampoos, soaps and shower gels had built up on the window sill. In fact, the damage was significant enough that I had to explain to the customer before starting the work that whilst I could greatly improve the appearance of the tiles, I would not be able to restore them to new. This is because many shampoo and body wash products are acidic and can cause permanent damage to stone work especially when left to dwell for a long time.
My choice of product was Tile Doctor Mould Away, a formula which, over time, seeps deeply into the pores of the stone, effectively lifting away the muck. In cases of particularly stubborn areas, it is necessary to apply another covering of Mould Away and leave it for an extended period of time. This is exactly what I did over the next few days, leaving the product overnight to work its magic. The change was certainly drastic, if not perfect.
As both bathrooms required extended periods of drying, I spent two days working on the hallway, which had been partially covered with a plastic sealing for the previous six months due to building work. Needless to say, the hallway was in need of a good clean. I set about cleaning the hallway with a solution of warm water and Tile Doctor Pro-Clean, before once again using a Wet-Dry Vac machine to remove any excess water to prepare the floor for sealing at a later point. It is very important to remove any residue of cleaning solution before sealing, as this may impact the performance of the sealer. Following this, I left the hallway to dry for two days, providing the builders with strict instructions to cover it with blankets for protection while they were working.
While the floor was drying, I sealed the bathrooms – both now fully dried – with Tile Doctor Colour Grow Sealer, a solvent-based sealer that was highly effective at enhancing the colour of the brown tiles around the sinks. The product will also provide durable surface protection. I spent the final of the six days sealing the hallway floor with Tile Doctor Seal & Go, which provides both a stain-resistant surface seal and a durable, low-sheen finish. This was an ideal choice of product, as the customer requested a hard-wearing, yet shiny finish.
The hard work really paid off, as both the customer and the decorators were very impressed with the final results in the two bathrooms and the hallway. I was extremely pleased that I was able to complete this big job to the highest possible standards.
 Tile Doctor Ltd
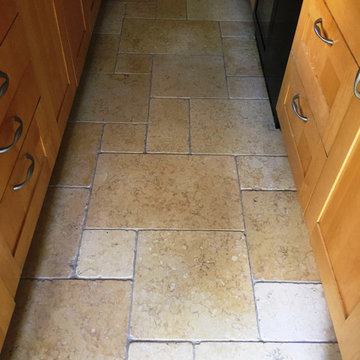
This customer from the south side Shepperton has a galley kitchen installed around twelve years ago with a Limestone floor. Since that time the floor had not been professionally cleaned or the stone re-sealed. The old sealer had long since worn down and was no longer providing any protection to the floor allowing soil and grease from cooking to penetrate the stone and darken the grout. It was now looking permanently dirty and the owner decided it was time to have it renovated.
Shepperton is a suburban village in the borough of Spelthorne, the Thames river is to the south and much of the east. It is set between the towns of Chertsey and Sunbury-on-Thames. The village has a long history and is even mentioned in a document of 959 AD and in the Domesday Book when it was primary farm land, it’s also my base of operation.
To deep clean the stone floor and grout I started with a mixture of Tile Doctor Remove and Go combined 50:50 with Tile Doctor Pro-Clean. This cocktail of sealer remover and cleaning agent was applied to the floor and left to soak in for ten minutes in order to get to work breaking down all the dirt, grease and what was left of the old sealer.
The solution was then worked into the Limestone tiles and grout using a rotary machine fitted with a black scrubbing pad. These pads can struggle to reach into the recesses of the grout lines, so afterwards the grout was scrubbed by hand using a stiff brush along with the more difficult to reach corners that the machine had missed. The floor was then rinsed with water and the products and soil vacuumed off the floor. I repeated the process in a couple of areas where the dirt was a little stubborn. The floor was then clean and after drying out overnight it would be ready for a new seal.
The following day I returned to apply the sealer first checking the floor was dry using a moisture meter. The readings were good, so I set about applying a colour enhancing impregnator sealer Tile Doctor Colour Grow to the Limestone. Tile Doctor Colour Grow works by seeping into the pores of the stone intensifying natural colour, preventing staining and providing a durable protection. Two coats of sealer were applied to the Limestone tile and grout which was all that was needed to return the floor back to its original condition.
The client was very happy with the finished floor and wanted to know how to keep it looking its best going forward. I explained that the best way to keep it looking good is to get maximum longevity from the sealer which will wear down over time but can be prematurely damaged with strong cleaning products. So, for aftercare I recommended the use of Tile Doctor Stone Soap which is designed for everyday cleaning of sealed stone floors.
Jonathan Oldham
South Middlesex Tile Doctor
 Tile Doctor Ltd
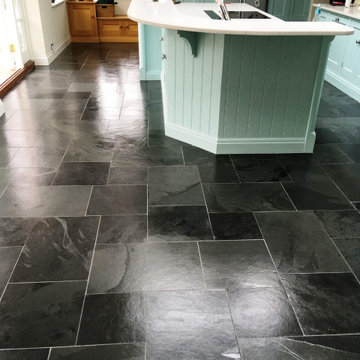
Our client had previously employed another company to tackle this large Slate floor in Walton on Thames but they hadn’t managed to remove the old sealer due to it being an old varnish seal. Varnish was used as a traditional way of sealing stone but can be damaged by scratching and it does little to improve the look of the stone. Varnish is also very difficult to break down which is a problem as it’s important to remove the old sealant before applying new, applying a new sealer onto Varnish simply wouldn’t work.
I visited the property to survey the floor and work out which combination of products and methods would work best and after some testing and I was able to confirm that not only could the old varnish be removed but once re-sealed with a modern sealer the slate would be transformed.
The client was over the moon to hear this news as they had thought there was nothing, they could do to improve the floor.
With a price and schedule agreed I returned to the property at a later date and started by tackling the varnish. The method I used was to apply Tile Doctor Remove and Go, let it soak into the floor for ten minutes and then work it in with a heavy rotary scrubbing machine fitted with a black pad. The soil was then rinsed with water and extracted off the floor with a wet vacuum.
The floor was then inspected, and each tile checked to ensure the varnish was completely gone, any stubborn areas were then spot treated and scrubbed by hand. Once I was satisfied, I set about giving the stone a deep clean by repeating the same process with Tile Doctor Pro-Clean. As before all the soil and cleaning products were then low pressure rinsed off the stone and vacuumed away. The floor was then left to dry overnight.
I returned the following day to apply a new modern sealer. First, I tested the floor was dry using the moisture meter. It was in the acceptable readings range, so I was able to start applying the sealer straight away.
For this floor I chose to apply Tile Doctor Seal and Go, it works really well on Slate tiles and as you can see from the photographs it completely transformed the appearance of the stone. Seal and Go is a water-based blend of acrylic polymers that provides both a stain resistant surface seal and a durable low-sheen finish, being water based it has the added advantage of not giving off any odour as it dries. The client had specified earlier that they didn’t want the floor to look shiny to the resultant silky appearance was the perfect solution. Thee coats were applied, and my client was very pleased with the finish.
Jonathan Oldham
South Middlesex Tile Doctor
 Tile Doctor Ltd
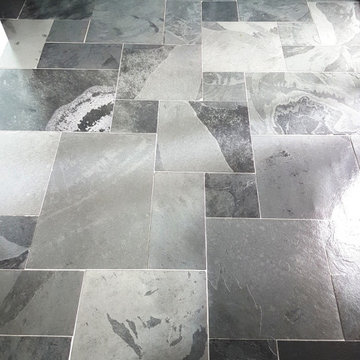
The pictures below are of a Riven Slate floor at a house in in the Leeds suburb of Horsforth which had been laid ten years prior. It’s probably difficult to appreciate from the images but the sealer on this floor was well worn through in the high traffic areas making it patchy in places. Without the protection of the sealer dirt was now ingrained in the pores of the stone leaving it looking dull. Riven slate is always tricky to clean thoroughly due to the rough surface and that combined with the ingrained dirt was making it very difficult to keep clean.
The floor now needed to be stripped of old sealer and then resealed and although I can provide a price for this over the phone my preference is to visit the property and survey the floor. In the case the owner had sent me some photographs via email however they were not too clear and so I felt it would be best if I paid the customer a visit to ensure I could give them an accurate price.
The floor was indeed overdue a clean and seal, as suspected dirt was ingrained into the areas where the seal had worn off. The house was home to a very busy family, so the area was subject to the significant traffic. I carried out a test clean on a small area and they were surprised by the results, when you live with a floor for so long you don’t notice the very slow decline in its appearance. They agreed to my quote and we arranged a time to return and carry the deep clean out.
When I arrived, I started off by protecting the skirting and surrounding woodwork. Given the rough surface of the floor I first applied Tile Doctor Wax Away which is a very effective coatings remover that is designed for removing wax but works very well in these situations. The product was left to dwell for a round ten minutes so it could get to work breaking down the old sealer and then scrubbed in using a black scrubbing pad fitted to a rotary machine.
This process removed most of the dirt and old sealer, but some stubborn patches remained. To treat these, I replaced the black pad with a coarse 200-grit burnishing pad and finally some handheld diamond burnishing blocks for the edges and corners where more intricate work was required, and the circular pads struggle to reach.
I gave the floor a rinse, and extracted the soil with a wet vacuum, the floor was then left to dry off overnight.
The next day I returned, first the slate floor was checked for moisture using the moisture meter. Once I was happy it was within the correct parameters, I then sealed with four coats of Tile Doctor Seal and Go. This is a modern water-based blend of acrylic polymers that provides both a stain resistant surface seal and a durable low-sheen finish also being water based there’s no smell as it dries.
The sealer really brought the stone to back to life and the lovely colours in the natural stones were now evident. The patchy appearance of the floor was gone, and the customer was happy.
I discussed with them how they should maintain the floor and advised them to use Tile Doctor Neutral Tile Cleaner. This is pH neutral cleaner that won’t prematurely erode the new sealer like the stronger products you find in Supermarkets which are only for use on Vinyl and Ceramic floors.
Nigel Stoker
North West Yorkshire Tile Doctor
Sponsored
Sunbury, OH

J.Holderby - Renovations
Franklin County's Leading General Contractors - 2X Best of Houzz!
 Tile Doctor Ltd
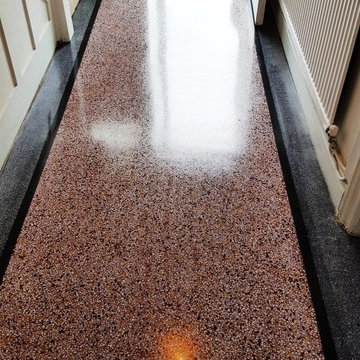
Terrazzo is a quite a bit different from the natural stone floors we most commonly work with. It’s a type of flooring material that was made popular by Venetian builders in Italy in the 1920s, but is ultimately descended from styles of design that date back hundreds of years. A typical Terrazzo floor consists of chips of marble or granite set in concrete and polished to result in a smooth surface.
This Terrazzo floor, installed in the hallway of a property in Bridgend, South Wales, was in relatively good physical condition, but it had clearly lost its shine due to the build-up of dirt and muck over the years. In fact, it was first installed in around 1940! The owner was keen to have it rejuvenated to its best possible condition, so they asked me to come in to see what I could do.
My first course of action was to apply Tile Doctor Pro Clean liberally across the floor and leave it to dwell for a short period. This is a high alkaline cleaner that is designed to deal with light to moderate soil build-up, and to strip away any old sealer remaining on the floor. I scrubbed the product in using a black pad fitted to a rotary machine and vacuumed up the resulting cleaning with a wet-vac machine.
Next, to restore the shine to the floor, I undertook a process known as burnishing, which involves the application of diamond encrusted polishing pads. We will typically start with a Coarse grit pad to level off any uneven areas of the floor and grind down any particularly stubborn marks and stains. Then, we gradually refine the polish on the floor using Medium and Fine grit pads. A small amount of water is used as lubrication with each pad.
After I had finished applying the first three pads in our four-pad system, I gave the floor a thorough rinse and left it to dry overnight.
I returned to the property the next day and immediately ran some damp tests to check for excess moisture issues, which one might expect with an old floor like this one. Thankfully, the floor proved dry – and I could finish the burnishing process with the fourth and final Very Fine diamond encrusted burnishing pad, which achieved a beautiful shine finish.
Finally, I sealed the floor with three coats of Tile Doctor Colour Grow, an impregnating sealer which provides robust protection and enhances the coloured patterns in the Terrazzo.
As you can see from the photos above, the floor is looking so much more colourful and bright after a deep clean, polish and a fresh seal. The customer was over the moon!
Julian Iancono
South East Wales Tile Doctor
 Tile Doctor Ltd
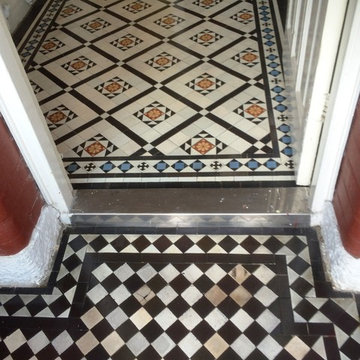
Recently I travelled down to the village of Prestwood in the Chiltern Hills of southern Buckinghamshire, to work on a Victorian tiled porch and hallway. Victorian tiles are commonly found in the entrance areas of older houses and unfortunately in this case the tiles had become heavily ingrained with dirt over time, and had suffered from additional paint and plaster spillages. The result was an unsightly mess; my client was considering covering the floor with lino after several unsuccessful attempts at cleaning it. I was called upon to provide a professional clean and seal, restoring these great Victorian tiles back to looking their best again.
On my first day at the house, I mixed up a solution of 50 per cent Tile Doctor Pro-Clean, a high alkaline cleaner, and NanoTech HBU (formerly known as Ultra Clean), which is a cleaning product that contains nano-sized abrasive particles that penetrate deep into the stone to lift ingrained dirt to the surface. This solution was worked into the tiles using abrasive scrubbing pads fitted to one of my commercial rotary machines.
The cleaning process left over a slurry of residue which I rinsed away with clean water and extracted with a wet vacuum. I was still left with the issue of stubborn paint spillages, so I applied a layer of Tile Doctor Remove & Go, a stripper with cleaning properties which is very effective at breaking down paint and adhesive stains.
Once the paint spillages had been dealt with I gave the area another rinse with clean water. I then left the house, allowing the floor enough time to dry overnight.
Upon my return the day I set about sealing the newly cleaned Victorian tiles. Before starting the sealing process I inspected the floor to check for any dampness, knowing that any excess moisture could potentially damage the performance of the sealer.
When I was satisfied that the tiles were fully dried, I applied Tile Doctor Seal & Go, a sealer which offers durable surface protection, along with an aesthetically pleasing, low-sheen finish which brings out the colour in the stone. This product can be used to seal internal, porous surfaces including Victorian, Slate, textured Quarry and Sandstone tiles.
The process made an amazing difference to the floor as you can see from the photographs; additionally the restoration of such an original feature adds a lot of value and looks so much better than lino!
Colin Ford
South Buckinghamshire Tile Doctor
 Tile Doctor Ltd
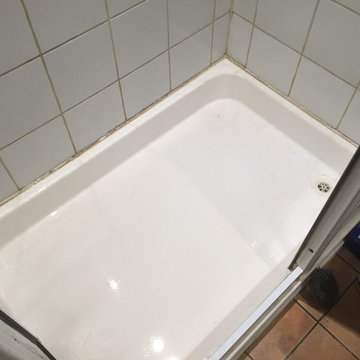
The photographs below are taken from a house in the old market town of Basingstoke which is now the largest town in Hampshire. I was asked to address a very severe case of Limescale build-up in a shower cubicle. The wall tiles were Ceramic and a shocking amount of Limescale had deposited itself on them and the shower tray over the years; the owners were going to have to replace everything if Tile Doctor could not come to the rescue!
The photos below really demonstrate the extent of the problem and needless to say the Gauntlet had been laid down and I was ready for a challenge!
My first task was to provide the Ceramic tiled walls with an initial clean. I did this by firstly mixing a diluted solution of the high alkaline cleaner known as Tile Doctor Pro Clean and then applying this on the tiles and leaving it to dwell for a while before scrubbing it in by hand in order to remove any surface dirt and scum. This was then washed off and I set my mind to the main task at hand: the Limescale removal.
To remove the Limescale it is necessary to apply an acidic product. However, there is an issue for homeowners that most products readily available on the market come in a liquid form, which of course simply drips down the tile, and therefore does not work to the best of its abilities. Fortunately, Tile Doctor recently launched a new product by the name of Acid Gel. Since it’s in a gel form it stays put on the surface and does not evaporate or dry out too quickly. This allows it time to break down the Limescale and other difficult stains.
Acid Gel was thus applied to the affected areas and left to dwell for a short while. I then scrubbed it deeply into the tile and grout lines, and follow up with an application of steam to tackle the stubborn areas and help the Acid Gel to tackle the Limescale.
The results were absolutely fantastic, and even the shower tray – which was in a very poor state indeed – came up very clean. Needless to say, my client was very pleased that they now do not have to replace the shower!
Charles Okwechime
Hampshire Tile Doctor
 Tile Doctor Ltd
Yorkstone is a variety of Sandstone unique to Yorkshire, and is known for its hard wearing and durable qualities. It was first manufactured during medieval times, but is still used for a range of building and construction purposes including, of course, tiled floors in houses. Yorkstone comes in a variety of natural colours, depending on the mineral makeup of the stone, and means that the tiled floors often have a unique look to them.
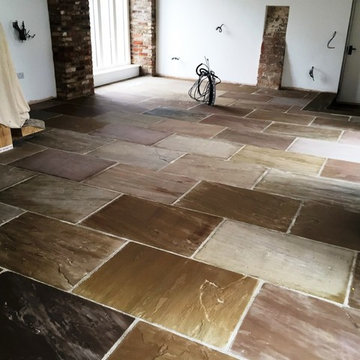
This customer, living in the small Yorkshire town of Driffield is the lucky owner of a fantastic new Yorkstone tiled living room floor. Unfortunately, the floor had been installed by an independent builder, as opposed to a professional tiling company, and had been left with no sealer to ensure it would stay looking great for a long time to come. Over time, the lack of a sealer has allowed the dirt to become ingrained in the stone, making it increasingly difficult for the customer to keep the tiles clean. I was called in to bring completion to what was an unfinished job!
As you can see from the photographs, the entire floor was quite dusty and dull looking following the recent installation. To get the tiles clean, I mixed a strong 60-40 mix of Tile Doctor Pro Clean and clean water. Pro Clean is a reliable alkaline cleaner suitable for use on most natural stone floors, including Sandstone, Quarry, and Slate.
The cleaning solution was applied to the floor and left to dwell for 20 minutes, allowing it time to penetrate the stone. Then, using my 17” rotary machine fitted with a black scrubbing pad, I proceeded to deep clean the tiles, leaving them looking immediately cleaner and more vibrant. Any resulting cleaning residue was promptly soaked up using a wet vacuum.
The process was repeated in the more stubborn areas, and I gave the floor a final rinse with water and left it to dry. Typically, we would leave a 12 to 24 hour drying period, depending on whether there is a damp proof membrane installed. However, this floor had underfloor heating and so dried really quickly, allowing me to seal it on the same day.
The customer wished to have a matt, natural finish for the Yorkstone tiled living room, so I applied two coats of Tile Doctor Colour Grow, our impregnating sealer which offers a natural, no-sheen look for textured floors, while providing durable protection against ingrained dirt and stains.
As the name of the product suggests, Colour Grow contains colour intensifying properties which really helped to accentuate the rich variety of colours in the customer’s Yorkstone tiles. The results were fantastic and you can see from the water test we performed after the sealer dried how water now bubbles up on the surface of the stone.
Ronnie Phipps
East Yorkshire Tile Doctor
 Tile Doctor Ltd
This Victorian floor was discovered at a house in Swiss Cottage in the London borough of Camden when the current owner took the old carpet up. It was in need of substantial restoration to bring it back to its former glory however we have had really good results from restoring similar floors so we were confident it could be done.
The carpet had literally just been taken away so we had to remove the gripper rods, underlay and deal with the adhesive which we managed to tackle using a strong solution of Tile Doctor Remove and Go which was left to dwell and penetrate the glue for ten minutes before being scrubbed in.
Once the glue was removed the tiles were given a thorough clean using Tile Doctor Pro-Clean using the same process of leaving it to soak in and then actively scrubbing it into the floor to get the tile and grout as clean as possible. The floor was then rinsed and stubborn areas re-treated until we were satisfied with the result.
The last cleaning step was to use a steam cleaner to pull as much dirt out of the pores of the tiles as possible and a wet vacuum to extract the liquids and get the floor as dry as possible and we also re-grouted where necessary due to the damage caused by the gripper rods.
We also gave the Victorian tiles in the entrance lobby a thorough clean using the same process, although they had not been covered in carpet they were still in need of a deep clean.
The floor was left to dry and when we returned the whole floor was ready to be sealed and for this we used five coats of Tile Doctor Seal and Go which adds a nice shine to the floor as well as providing a surface seal that will help protect the tiles from stains going forward. For the entrance lobby we used two coats of Colour Grow which doesn’t add the shine but as an impregnating sealer we felt it would perform better with the wear at the front of the house.
The owner of the house was very pleased with the outcome and left the following testimonial:
Prompt, courteous, hard working and great results !.
Nigel Voyce
North London Tile Doctor
 Tile Doctor Ltd
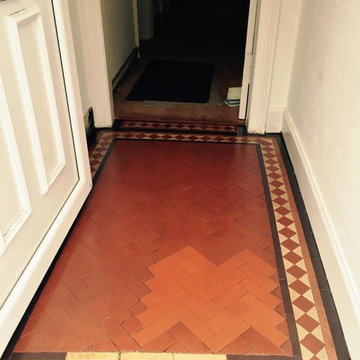
This job was at house in Polwarth, a small parish through which flows the Union Canal, running from Falkirk to Edinburgh. The client had requested a clean for a Victorian tiled hallway set in the narrow reception area of the house.
The tiled floor had been painted over by the previous owners of the house using a thick, red paint. Painting a tile floor in such a way can affect its wash-ability, and the paint can peel off over time especially in a high-traffic area such as a reception area or hallway such as this. The red paint would have to be removed in order to restore the tile underneath and reveal its natural state, as well as provide a thorough and much-needed clean.
The first step in the paint removal process was to spray the floor with a strong solution of Tile Doctor Pro-Clean mixed with Remove & Go. Pro-Clean is a heavy duty cleaner and degreaser, suitable for use on tile, stone and grout. Pro-Clean combines well with Remove and Go, which is a multi-purpose stripper capable of removing most sealers, adhesives and, particularly important for this case, paint. The solution was left to dwell after application to allow it to soak into the tile and soften the paint and dirt.
After 10 to 15 minutes we scrubbed the floor in order to remove as much of the paint as possible. The owner of the house was surprised to see the true colours of the tile appearing, which had been hidden beneath the paint for a significant period of time. As the red paint coating was particularly thick, we had to scrub the floor multiple times. In some areas the paint proved tricky to remove so it was necessary to use a steamer to steam clean the stubborn areas.
Once all of the paint had been successfully removed, the unveiled tile floor was treated to another clean using Pro-Clean, before being given a wash down and neutralised using Concentrated Neutral Tile & Stone Cleaner. It’s important to ensure any trace of strong cleaning products are removed from floor before the next step of sealing as it can impact the sealer leading to un-even results.
The floor was left to dry off overnight and we came back the next day to seal the tiles using four coats of Tile Doctor Seal & Go which is an ideal sealer for Victorian tiles as it provides stain protection whilst also bringing out the colours resulting in a subtle sheen appearance.
You can see from the photos that after a thorough cleaning and sealing the floor was back to looking its best. I do wonder why someone would want to paint over such a fantastic Victorian tiled floor!
Sponsored
Sunbury, OH
J.Holderby - Renovations
Franklin County's Leading General Contractors - 2X Best of Houzz!
 Tile Doctor Ltd
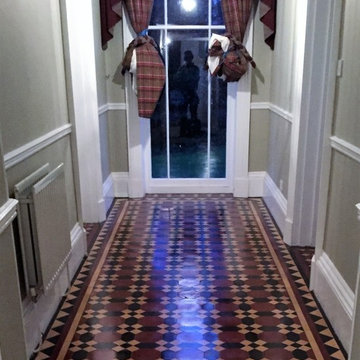
It’s fairly common for owners of older properties – especially houses those that are over 100 years old or more – to find original Victorian tiled flooring hidden underneath carpet. It can wait years for the tiles to be discovered, by which time they have amassed huge amounts of dirt and dust.
Such was the case at this property in Bridlington, a Yorkshire town through which a stream known as the ‘Gypsey Race’ runs, before emptying in the North Sea at the Bridlington Harbour. Interestingly enough, folklore says that when the stream is flowing, bad fortune is at hand. The stream must not have been running on the day that we restored this Victorian hallway, as we managed to achieve some truly fantastic results!!
The hallway had been severely dulled after going years without professional care. We set about giving it the thorough clean and fresh seal that I’d des partly needed. Here’s how we did it.
Our first task was to remove any old, no longer effectual sealer. We did this by liberally applying a strong dilution of our alkaline-based Tile a Doctor Pro Clean, which doubles as a reliable cleaner and a stripper capable of stripping away old sealer. The product was worked into the tiles using a black stripping pad fitted to a 17″ rotary machine, and the process was repeated three times.
I noticed that there was still some stubborn dirt and old sealer around the edges of the hallway, so I used some of our handheld diamond encrusted burnishing blocks to grind it away. To finish the cleaning process, we washed the floor with Tile Doctor pH Neutral Tile Cleaner, leaving it fresh and ready to be sealed once left to dry overnight.
Upon our return to the property the next day, we ran some quick tests to check for any excess moisture (even a small amount could have damaged the performance of the new sealer). Once satisfied with the the condition of the floor, we proceeded to see it with an impregnating sealer, meaning a sealer that penetrates into the pores of the tile to fill them and therefore prevent trapped dirt and ingrained stains.
Our impregnating sealer, Tile Doctor Colour Grow, has the added benefit of being colour intensifying, which really highlights the unique colourful patterns of the tiles. To give the floor a durable sheen finish, as requested by the customer, we also added a coat of Tile Doctor Seal and Go sealer.
The result was a complete transformation of the condition and appearance of this great Victorian tiled hallway. Our customer is very pleased – the floor is now a complete asset to any property, and will now be easier to keep looking great in future.
Ronnie Phipps
East Yorkshire Tile Doctor
 Tile Doctor Ltd
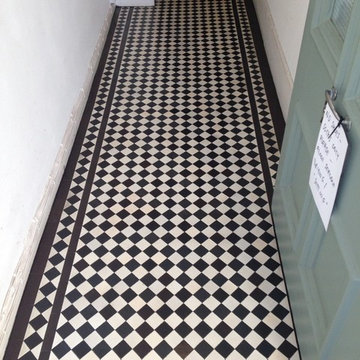
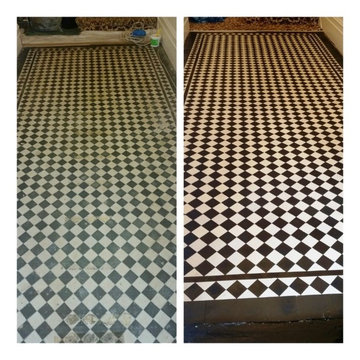
Victorian black and white tiles in the hallway of a house in Wanstead (E11), laid in what is often referred to as the York Pattern with a Kingsley Border, however sadly neglected for many years after being covered with a heavy underlay and carpet.
First we cleaned the tiles with a dilution of Tile Doctor Pro-clean which releases the dirt stuck in the pores of the tiles; the solution was scrubbed into the floor with a buffer machine fitted with a black scrubbing pad and then the released soil extracted with a wet vacuum. The floor was then rinsed with water and extracted again with the wet vacuum. It was left to dry for thirty minutes and the floor inspected which revealed a few stubborn areas that were then treated using Nano-Tech Heavy Build-up remover (HBU) which was left to dwell for forty minutes and then scrubbed and then extracted again with water.
To Slow down or stop the possibility of an issue we sometimes have with older floors such as Victorian Tiles we often use a product developed by Tile Doctor called Acid Gel, this is left on the surface for 5 minutes and then removed with light agitation and water and a wet vac machine, the floor is then rinsed with water again just to make sure there is no Acid Gel left in the Tile or on the surface. The Acid Gel not only Keeps mineral salts (efflorescence) at bay but also helps as a bonding agent for the sealer to make sealing theses type of tiles a lot easier.
After leaving the floor to dry overnight I came back the next day to seal the floor using four coats of Tile Doctor Seal and Go which is ideal for Victorian tiled floors as it leaves a low sheen finish whilst providing excellent stain protection.
Didi Mohammed
Central London Tile Doctor
 Tile Doctor Ltd
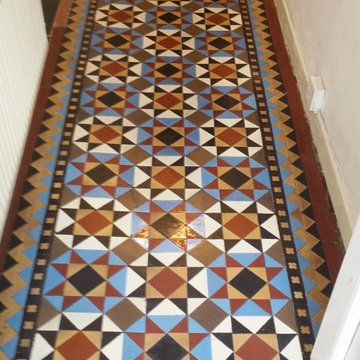
When you uncover a tiled floor after it has been covered by carpet for many years, it’s almost a given that it will be in a bad state. However, my customer, who lives in the town of Lymm, wasn’t expecting the Victorian tiled hallway they had recently uncovered to be in quite so terrible a state. As you can see from the photograph, it has been completely devastated by paint plaster and a big pool of cement floor leveller. Understandably, the formerly colourful appearance of the tiles had completely drained and it would require a through restoration to get them back into a usable condition.
To begin the restoration, I mixed a strong cleaning solution which consisted of Tile Doctor Remove & Go combined 50/50 with Tile Doctor Pro Clean. Remove & Go is a heavy duty remover that breaks down old sealers, along with adhesives, paint stains and other tough soil build up where as Pro-Clean is a versatile alkaline-based cleaner that reliably eradicates dirt on a wide variety of natural stone floors.
The solution was applied liberally across the floor, and left to dwell for a short period, allowing time for it to soften up the paint plaster. Next, I fitted a coarse scrubbing pad to my rotary cleaning machine and began to scrub the solution into the tiles, with a big difference to the appearance of the tiles being made quite quickly. The resulting cleaning slurry was promptly removed using a wet-vac machine.
I repeated the process two times to provide an extra thorough clean and then give the floor a thorough rinse. Some particularly stubborn marks remained on the floor which I was able to remove using Tile a Doctor Acid Gel, a blend of phosphoric and hydrochloric acids in gel form that’s easy to control. The floor was then left to dry fully overnight.
The next morning, I returned to the property and ran some damp tests. This is incredibly important to do before sealing any tiled floor because any excess moisture can cloud the sealer and prevent it from doing its job properly.
Once satisfied that the floor could be sealed, I applied several coats of Tile Doctor Seal and Go, our topical sealer which provides both a robust surface seal and a long-lasting low sheen finish in one and ideal for Victorian tiles.
It would be an understatement to say that this Victorian tiled floor was transformed. The customer was amazed at the results considering how bad a state the tiles had been in just a day earlier. When you have a situation like this, it’s hard to believe the tiles could ever be fully restored. Nonetheless, we could now see them in their full and original glory, and needless to say, the customer was very, very pleased with the result.
Alastair Robb
West Cheshire Tile Doctor
 Tile Doctor Ltd
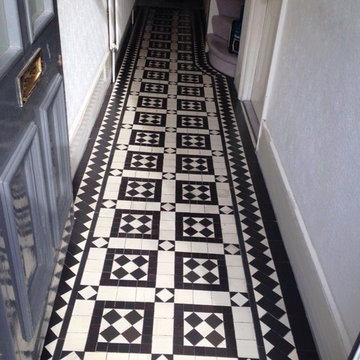
The photographs below are from a Victorian tiled hallway floor at a property in Stoke Newington in London. The floor was in need of repair with a large area very uneven and partly sunk in the middle of the pattern. The repairs were made using as many existing tiles as possible.
The first task was to set about cleaning the tiles using Tile Doctor Pro-Clean and Remove & Go on the stubborn areas. Both products were applied in the same way using black scrubbing pads to work the products into the tile to release the dirt. Hand brushes were used to clean up the grout lines and the floor was rinsed and soil removed using a wet vacuum.
At this point the large loose area of tiles were removed to be cleaned of grout/adhesive for use later and the sunken area that was revealed was levelled in line with the rest of the floor base. Once the new cement base had set and the tiles useable again they were re-laid and set in position to fit the matching pattern of the remaining floor.
Once the tile adhesive had set the last thing to do was to re-grout the repaired area making the hallway whole again and left to go off.
When we returned the whole floor was ready to be sealed and for this we used five coats of Tile Doctor Seal and Go which adds a nice shine to the floor as well as providing a surface seal that will help protect the tiles from stains going forward.
A lot of effort went into the restoration but what a transformation and well worth the work, certainly the customer was pleased and left the following testimonial.
Rob Voyce responded very quickly to my request for a quote, and was able to complete the work to a very good standard in the agreed time. The work caused minimum disruption to the household and everything was left clean and tidy at the end of each day. I would certainly recommend the services of the Tile Doctor and I am very happy with the work that has been done on old tiles in my Victorian hallway.
Nigel Voyce
North London Tile Doctor

 Tile Doctor Ltd
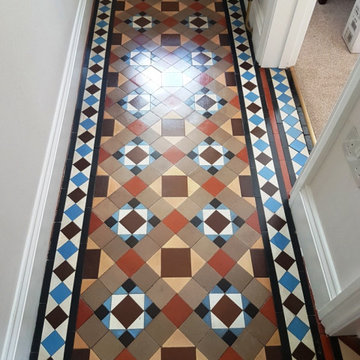
I was contacted by a homeowner who had moved into a property in the small Yorkshire market town of Masham and discovered a Victorian tiled floor under the hallway carpet. Realising this was a valuable period feature he was keen to see if it could be restored. As you can imagine he was delighted when I told him that it should be possible, and he was keen to get it uncovered and back on show.
After discussing the floor on the phone, I visited the property and removed the carpet so we could take a long look at the Victorian tile’s underneath. The carpet had protected the floor well and it was in good physical order, (i.e. no cracks etc.) it was just very dirty but was also marked with paint splashes from some untidy decorating work from the past. I confirmed none of these issues should present a problem and got the go ahead for the work to start.
There was no sealer on the floor, so I started the cleaning process using a medium dilution of Tile Doctor Pro-Clean which was worked into the tiles using a coarse 200-grit pad fitted to a rotary floor buffer. I then used a 400-grit hand-held diamond block to clean the edges which couldn’t be reached by the machine. This also removed the paint splashes which should have been on the skirting boards and not the floor!
The floor was then rinsed with water and the soil extracted with a wet vacuum. I was able to inspect the floor at this stage and spot treat areas that needed more work as they were a little stubborn. It wasn’t a large hallway and except for the paint it only needed a light clean. The result was I was able to complete the cleaning process by lunch time. I dried the floor as much as possible and left an air blower in the space for a couple of hours.
I returned later that afternoon and checked the floor for moisture using a damp meter. The floor was mostly dry, but some areas needed some more help with a heat gun. It was late summer and so still warm and so there was no need on this occasion to leave the floor overnight.
Once I was happy the floor was dry, I started sealing the tiles with the first of four coats of Tile Doctor Seal and Go. This is a specially formulated water-based blend of acrylic polymers that provides both a stain resistant surface seal and a durable low-sheen finish. It is perfect for a floor of this age as it allows moisture vapour to pass through, this is an important feature when considering a sealer for old floors which will not have a damp-proof membrane installed. If you were to apply a non-breathable sealer moisture can get trapped under the floor causing it to spread out to the walls resulting in rising damp.
The combination of the cleaning and new sealer brought the floor back to life and it now looked in keeping with the rest of the property which had numerous other period features. My client was over the moon with the difference and very happy to see the back of the grubby carpet.
Nigel Stoker
North West Yorkshire Tile Doctor
 Tile Doctor Ltd
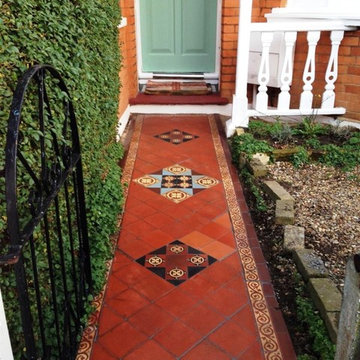
At first sight, this Victorian tiled pathway in Palmers Green, N13 did not appear to need too many repairs, with just a few obvious broken and loose tiles to be fixed. On closer inspection however it became clear it was in need of a deep clean and fresh seal.
To start, we applied Tile Doctor Remove & Go across the entire length of the pathway to break down and strip off the old sealer and provide an initial clean. In the more stubborn and difficult to reach areas where we saw the buildup of efflorescence, we applied Tile Doctor Acid Gel to neutralise the alkaline salts.
Acid Gel, as the name indicates, is a pH1 blend of Phosphoric and Hydrochloric acid in gel form, making it easier to apply to tricky areas, including sloped or vertical surfaces. Users should be aware not to use this type of product on acid-sensitive stone such as Limestone, as this can cause etching if left on too long.
Once the dirt and efflorescence buildups had been dealt with, I focused my attention towards the tile repairs, quickly realising that the extent of damage was greater than initially thought. Firstly, the numerous loose and broken tiles were removed and individually cleaned in a similar way to the rest of the floor. We then repaired the sub base ready for the existing and newly sourced tiles to be re-laid, before leaving the floor to set and dry overnight.
The next day, the pathway was grouted, before being sealed with Tile Doctor’s colour enhancing, impregnating sealer, Colour Grow to bring back the life and character to the Victorian tiles.
I was also asked to renovate the Edwardian hallway tiles in the house so once finished with the pathway they were deep cleaned using a strong dilution of Tile Doctor Pro Clean. This also helped to break down the old sealers and waxes – followed by a careful cleaning of the grout lines using Tile Doctor Grout Clean Up in combination with 3m black pads and detail brushes.
To ensure any pre existing sealer was completely removed, I followed up with a steam clean and left the tiles to dry overnight.
Upon my return to the property the next day, I completed re-grouting in the necessary areas, before sealing the tiles with five coats of Tile Doctor Seal & Go, providing an aesthetically pleasing satin finish. Seal & Go is a topical, solvent-based sealer which forms a layer of durable protection on the surface of the tiles, protecting against dirt and stains.
The hard work invested in restoring these two floors certainly paid off, as the client was exceptionally pleased with the results, going as far as to leave the following feedback:
“I wanted to restore my tired Edwardian tiled hallway and was given Rob Voyce’s
contact details. I was very impressed with Rob and his team; they were very
professional and friendly. Rob explained the stages of the work to be carried out and
we agreed a date and the job was completed much to my satisfaction. Very pleased.”
Nigel Voyce
North London Tile Doctor
 Tile Doctor Ltd
This ground floor flat in the City of Oxford had been converted from a shop which as you can imagine, was quite complex. One significant element involved in the conversation was the restoration of an old Quarry tiled floor which ran through the main hallway and had for many years been covered in a commercial linoleum covering.
When the linoleum covering was removed, the sheer amount of glue which had been used to affix it had completely ruined the appearance and condition of the Quarry tiles. There was also a lot of concrete in the bathroom, and our client was keen to have this removed in the hope that the tiles beneath were salvageable.
My first task at the property was to deal with the adhesive. I covered the entire floor area with Tile Doctor Remove and Go and then covered it with a plastic sheet and leaving it to soak into the glue and break it down overnight. Remove and Go is powerful stripper with a long-dwell time, formulated to break down adhesives and paint stains, amongst other coatings.
I returned the next day and, removing the plastic sheeting, I scrubbed the floor with a carbon brush attached to a rotary floor scrubber to remove the huge glue deposits. I worked in sections, rinsing each area of the floor with water after it had been scrubbed. Once I had finished the entire floor there was still some glue remaining, so I covered it again with a solution of Remove and Go combined with Tile Doctor HBU Nanotech, which utilises nano-sized particles to get underneath tough stains, dissolve them, and lift them out. I left this solution on the floor for about two hours to dwell and scrubbed it again.
During the next day of work, I used a very coarse 100 grit diamond burnishing pad to manually grind away the remaining stubborn bits of glue. Paying attention to the bathroom, I used a 50-grit coarse milling pad followed up with a 100-grit diamond burnishing pad to do the same to the area of concrete.
The next part of the process was to use Tile Doctor Grout Clean Up to acid wash the floor. This was successful in removing the last bits of cement and the remaining residue of the glue. To complete the cleaning process, I then rinsed the floor with plenty of water and vacuumed up any soiled solution.
I opted to leave the floor alone for a couple of days to fully dry off so that it could be sealed upon my return. This is crucial as any moisture or damp issues can damage the performance of the sealer and expose the floor to further ingrained dirt and staining.
To seal the floor, I used Tile Doctor Colour Grow. This is an impregnating sealer that also enhances the natural reddish shades in the Quarry. I applied two coats of the sealer, giving the floor the natural look matte finish the customer desired.
The customer was very impressed with the results of this thorough restoration. She even left the following feedback:
“I cannot recommend this service enough. The Oxford Tile Doctor (Barry) was a superstar: he cleaned up the tiles in my hallway, which were covered in a very thick layer of glue, and removed concrete from the tiles. They now look superb and I’m really happy with the outcome. Barry was always on time, considerate, and kept me up to date. The quote for the job was exactly right. I would not hesitate to recommend him.”
4