
Search results for "Tools processed" in Home Design Ideas
 Talon Construction Inc.
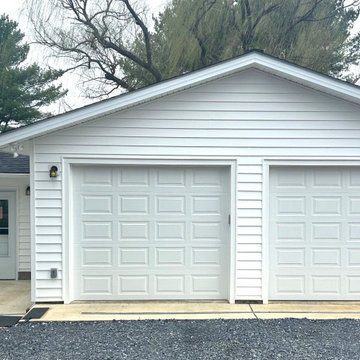
Looking to build a garage addition in the Frederick area?
Talon Construction is here to help! We are thrilled to showcase our recently completed garage addition and remodel in Middletown, MD.
At Talon Construction, we specialize in seamless design-build projects that look like they’ve always been part of your home. Whether you need extra space for vehicles, a new workshop, or a dedicated hobby area, our team manages the entire process—from initial permits to the final coat of paint.
Why choose Talon Construction for your addition?
• Design-Build Experts: We handle both the design and the build, ensuring your vision is executed perfectly while staying on budget.
• Award-Winning Quality: Voted Frederick’s Best for 13 consecutive years!
• Professionalism: We treat your home like our own, maintaining a clean and respectful job site every single day.
• Local Experience: With over 25 years serving Frederick and Montgomery Counties, we know the local styles and building codes inside and out.
Ready to start your own home transformation? Visit our website to see more of our Home Addition Portfolio or give us a call to discuss your project!
 Twelve Stones Designs, LLC
The owners of this kitchen had spent the money to upgrade the finishes in their kitchen upon building the home 12 years ago, but after living in the space for several years they realized how nonfunctional the layout really was. The (then) two preschool aged children had grown into busy, hungry teenagers with many friends who also liked to hang out at the house. So the family needed a more functional kitchen with better traffic flow, space for daily activities revolving around the kitchen at different times of day, and a kitchen that could accommodate cooking for and serving large groups. Furthermore, the dark, traditional finishes no longer reflected the homeowners’ style. They requested a brighter, more relaxed, coastal style that reflected their love of the seaside cities they like to visit.
Originally, the kitchen was U-shaped with a narrow island in the middle. The island created narrow aisles that bottle-necked at the dishwasher, refrigerator, and cooktop areas. There was a pass-through from the foyer into the kitchen, but the owners never liked that the pass-through was also located so close to the powder room. The awkward proximity was unappealing and made guests feel uncomfortable.
The kitchen’s storage was made up of lots of narrow cabinets, apothecary drawers, clipped corner units, and very few drawers. It lacked useful storage for the larger items the family used on a daily basis. And the kitchen’s only pantry was small closet that had only builder-grade, narrow shelving with no illumination to be able to see the contents inside.
Overall, the kitchen’s lighting plan was poorly executed. Only six recessed cans illuminated the entire kitchen and nook areas. The under cabinet lighting was not evenly distributed either. In fact, the builder had mis-placed the under cabinet lighting around the decorative pilasters which made for choppy, dark cubbies. Further, the builder didn’t include any lighting over the sink or the bar area, which meant whoever was doing the dishes was always in their own shadow. That, coupled with the steep overhang of the game room above made the bar area feel like a dim, cavernous space that wasn’t inviting or task oriented. The kitchen looked out into the main living space, but the raised bar and a narrow wall (which held the only large cabinet in the kitchen) created more of a barrier than a relationship to the living room or breakfast nook. In fact, one couldn’t even see the breakfast nook from the cooktop or sink areas due to its orientation. The raised bar top was too narrow to comfortably sit to either dine at or chat from due to the lack of knee space. The the homeowners confided that the kitchen felt more like a dark, dirty prison than place where the family, or their guests, wanted to gather and commune.
The clients' needs and desires were:
➢ to create a kitchen that would be a space the family loved to be in; to relate to the adjacent spaces all around, and to have better flow for entertaining large groups
➢ to remove the walls between the breakfast nook and living area and to be able to utilize the natural light from the windows in both those areas
➢ to incorporate a functional chopping block for prepping fresh food for home cooked meals, an island with a large sink and drain board, 2 pull out trash cans, and seating for at least the 2 teens to eat or do homework
➢ to design a kitchen and breakfast nook with an airy, coastal, relaxed vibe that blended with the rest of the house's coastal theme
➢ to integrate a layered lighting plan which would include ample general illumination, specific task lighting, decorative lighting, and lots of illuminated storage
➢ to design a kitchen with not only more storage for all the husband’s kitchen gadgets and collection of oils and spices, but smart storage, including a coffee/breakfast bar and a place to store and conceal the toaster oven and microwave
➢ to find a way to utilize the large open space between the kitchen, pantry area, and breakfast nook
Twelve Stones Designs achieved the owner's goals by:
➢ removing the walls between the kitchen and living room to allow the natural light to filter in from the adjacent rooms and to create a connection between the kitchen, nook, and living spaces for a sense of unity and communion
➢ removing the existing pantry and designing 3 large pantry style cabinets with LED tape lights and rollout drawers to house lots of kitchen appliances, gadgets, and tons of groceries. We also took the cabinets all the way up to the 9’ ceiling for additional storage for seasonal items and bulk storage.
➢ designing 2 islands - 1 with a gorgeous black walnut chopping block that houses a drawer for chopping and carving knives and a custom double pull out trash unit for point of use utilization - and 1 that houses the dishwasher, a large Blanco Gourmet sink with integrated drain board, woven baskets for fresh root vegetables and kitchen towels, plenty of drawer storage for kitchen items, and bar seating for up to 4 diners.
➢ closing off the space between the kitchen and the powder room to create a beautiful new private alcove for the powder room as well as adding some decorative storage. This also gave us space to include more tall storage near the new range for precision placement of the husband’s extensive oil and spice collection as well as a location for a combo-steam oven the wife wanted for baking and cooking healthy meals.
The project is enhanced functionally by:
➢ incorporated USB and standard receptacles for the kids’ laptops and phone charging in the large island
➢ designing the small island to include additional open shelving for items used on a daily basis such as a variety of bowls, plates, and colanders. This set up also works well for the husband who prefers to “plate” his dinners in restaurant-style fashion before presenting them to the table.
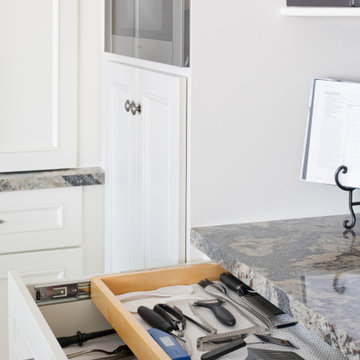
➢ the integration of specific storage units, such as double stacked cutlery drawers, a custom spice pull-out, a Kuerig coffee and tea pod drawer, and custom double stacked utensil drawers
➢ moving the refrigerator to the old oven location - this eliminated the bottle neck as well as created a better relationship to the eating table. It also utilizes the floor space between the pantry, nook, and kitchen
➢ creating a banquet style breakfast nook - this banquette seating not only doubles the amount of seating for large gatherings but it better utilizes the odd space between the kitchen and the previous nook area. It also helps to create a distinct pathway from the mudroom room through the pantry area, kitchen, nook, and living room.
➢ the coffee/breakfast bar area which includes the perfect location for the concealed microwave and toaster oven, convenient storage for the coffee pods and tea accoutrements. Roll-out drawers below also house the smoothie maker, hot water kettle, and a plethora of smoothie-making ingredients such as protein powders, smoothie additives, etc. Furthermore, the drawers below the Keurig house measuring utensil, cutlery, baking supplies and tupperware storage.
➢ incorporating lots of wide drawers and pullouts to accommodate large cookware.
➢ utilizing as much vertical space as possible by building storage to the ceiling which accommodates the family’s abundant amount of serving platters, baking sheets, bakeware, casserole dishes, and additional cutting boards.
The project is enhanced aesthetically by:
➢ new 5-piece Versailles pattern porcelain tile that now seamlessly joins the entire down stairs area together creating a bright, cohesiveness feeling instead of choppy separated spaces - it also adds a coastal feeling
➢ designing a cabinet to conceal the microwave and toaster oven
➢ the coastal influenced light fixtures over the nook table and island
➢ the sandy colors of the Langdon Cambria countertops. The swirling pattern and sparkling quartz pieces remind the homeowner of black-and-tan sandy beaches
➢ the striped banquet seating whose creamy white background and blue-green stripes were the inspiration for the cabinet and wall colors.
➢ All the interior doors were painted black to coordinate with the blacks and grays in the backsplash tile and countertop. This also adds a hint of tailored formality to an otherwise casual space.
➢ the use of WAC's Oculux small aperture LED units for the overhead lighting complimented with Diode LED strips for task lighting under the cabinets and inside the pantry and glass wall cabinets. All of the lighting applications are on separate dimmer switches.
Innovative uses of materials or construction methods by Realty Restoration LLC:
➢ Each 1-1/2” x 3” block of reclaimed end-grain black walnut that makes up the center island chopping block was hand milled and built in the shop. It was designed to look substantial and proportional to the surrounding elements, executed by creating the 4 inch tall top with a solid wood chamfered edge band.
➢ The metal doors on either side of the vent hood were also custom designed for this project and built in the Realty Restoration LLC shop. They are made 1x2, 11-gauge mild steel with ribbed glass. Weighing 60 lbs a piece, heavy duty cabinet hinges were added to support the weight of the door and keep them from sagging.
➢ Under-cabinet receptacles were added along the range wall in order to have a clean, uninterrupted backsplash.
Design obstacles to overcome:
➢ Because we were removing the demising walls between the kitchen and living room, we had to find a way to plumb and vent the new island. We did this by tunneling through the slab (the slab had post tension cables which prevented us from just trenching) to run a new wet vent through a nearby structural wall. We pulled the existing hot and cold lines between upper floor joists and ran them down the structural wall as well and up through a conduit in the tunnel.
➢ Since we were converting from wall overs to a gas range it allowed us to utilize the 220 feed for the wall ovens to provide a new sub panel for all the new kitchen circuits
➢ Due to framing deficiencies inherited from the original build there was a 1-1/2” differential in the floor-to-ceiling height over a 20 foot span; by utilizing the process of cutting and furring coupled with the crown moulding details on the cabinet elevations we were able to mask the problem and provide seamless transitions between the cabinet components.
Evidence of superior craftsmanship:
➢ uniquely designed, one-of-a-kind metal “X” end panels on the large island. The end panels were custom made in the Realty Restoration LLC shop and fitted to the exact dimensions of the island. The welding seams are completely indistinguishable - the posts look like they are cut from a single sheet of metal
➢ square metal posts on the small island were also custom made and designed to compliment and carry through the metal element s throughout the kitchen
➢ the beautiful, oversized end panels on the pantry cabinets which give the breakfast nook a tailored look
➢ integrating a large format 5 piece Versailles tile pattern to seamlessly flow from the existing spaces into the new kitchen space
➢ By constructing a custom cabinet that jogged around a corner we could not remodel (housing the entry way coat closet) we were able to camouflage the adjacent wall offset within the upper and lower cabinets. By designing around the existing jog in the structural walls we accomplished a few things: we were able to find the space to house, and hide, the microwave and toaster oven yet still have a clean cohesive appearance from the kitchen side. Additionally, the owners were able to keep their much needed coat closet and we didn’t have to increase the budget with unnecessary structural work.
 Windy City Painters
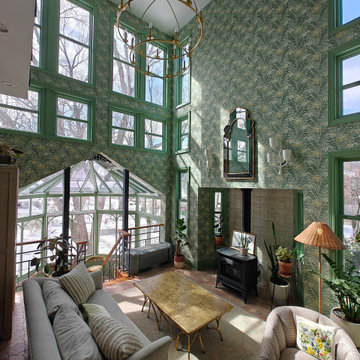
Professional wallpaper installation transformed this Evanston sunroom into a stunning focal point. Evanston's diverse architecture, from historic homes to contemporary residences, requires specialized expertise to ensure wallpaper installation complements existing design elements.
Materials and Products
We utilized premium moisture-resistant wallpaper specifically designed for sunroom environments, paired with professional-grade adhesives from trusted manufacturers like Roman and Zinsser for superior bonding and longevity.
Installation Process
First, thorough surface preparation including cleaning and priming. Second, precise measurements and pattern planning for seamless alignment. Third, careful adhesive application using professional tools. Fourth, meticulous installation with attention to corners and edges.
Chicago Home Challenges
Evanston properties face unique challenges including temperature fluctuations, humidity variations, and aging surfaces. Our wallpaper installation process addresses these concerns through proper surface preparation and climate-appropriate materials.
Results Achieved
The finished sunroom showcases flawless wallpaper installation with perfect pattern matching, smooth application, and professional-quality results that will withstand years of use and seasonal changes.
H2 Professional Tips
Always prime surfaces before wallpaper installation, choose moisture-resistant papers for sunrooms, and hire experienced professionals familiar with Chicago's climate challenges and building characteristics.
See more work and request free estimate at windypainters.com.
Q: What type of wallpaper works best for Evanston sunrooms? / A: Moisture-resistant vinyl or fabric-backed wallpaper handles humidity and temperature changes better than standard paper in sunroom wallpaper installation projects.
Q: How long does professional wallpaper installation take? / A: Most sunroom wallpaper installation projects require 1-2 days depending on room size, pattern complexity, and surface preparation needs.
Q: Can you install wallpaper over existing paint? / A: Yes, wallpaper installation over painted surfaces is possible after proper cleaning, priming, and surface preparation to ensure adhesion.
Q: Do you remove old wallpaper before installation? / A: Professional wallpaper installation often includes complete removal of existing coverings and thorough surface preparation for optimal results.
Q: What preparation is needed for wallpaper installation? / A: Wallpaper installation requires clean, smooth, primed surfaces with all imperfections filled and sanded for professional results.
Q: How do you handle wallpaper seams and patterns? / A: Expert wallpaper installation includes precise measuring, cutting, and alignment to create invisible seams and perfect pattern matching.
Q: Is wallpaper installation suitable for high-humidity areas? / A: Yes, proper wallpaper installation using moisture-resistant materials and techniques works excellently in sunrooms and humid environments.
Q: What warranty do you provide on wallpaper installation? / A: Windy City Painters backs all wallpaper installation work with comprehensive warranties covering materials and workmanship for customer peace of mind.
Q: Can wallpaper installation be done in winter? / A: Professional wallpaper installation can be performed year-round with proper climate control and material handling for optimal adhesion.
Q: How do you ensure wallpaper installation quality? / A: Our wallpaper installation process includes thorough preparation, premium materials, professional techniques, and detailed quality inspection for lasting results.
Find the right local pro for your project

 L Carter Interiors
Complete remodel and addition to the master bathroom. We took the original tiny bathroom, and tore down a wall to an oversized walk in closet, to make room for this luxurious walk in shower and tub combo. There's generous room in the shower to allow for a built in bench that carries over to the deck mounted tub filler. The large ledge around the tub serves multiple functions; first as seating space for the owners to be able to bathe their young children and second, for them to rest a glass of wine while soaking to relax at the end of a long day.

 Kathleen Jennison
An Arts & Crafts Bungalow is one of my favorite styles of homes. We have quite a few of them in our Stockton Mid-Town area. And when C&L called us to help them remodel their 1923 American Bungalow, I was beyond thrilled.
As per usual, when we get a new inquiry, we quickly Google the project location while we are talking to you on the phone. My excitement escalated when I saw the Google Earth Image of the sweet Sage Green bungalow in Mid-Town Stockton. "Yes, we would be interested in working with you," I said trying to keep my cool.
But what made it even better was meeting C&L and touring their home, because they are the nicest young couple, eager to make their home period perfect. Unfortunately, it had been slightly molested by some bad house-flippers, and we needed to bring the bathroom back to it "roots."
We knew we had to banish the hideous brown tile and cheap vanity quickly. But C&L complained about the condensation problems and the constant fight with mold. This immediately told me that improper remodeling had occurred and we needed to remedy that right away.
The Before: Frustrations with a Botched Remodel
The bathroom needed to be brought back to period appropriate design with all the functionality of a modern bathroom. We thought of things like marble countertop, white mosaic floor tiles, white subway tile, board and batten molding, and of course a fabulous wallpaper.
This small (and only) bathroom on a tight budget required a little bit of design sleuthing to figure out how we could get the proper look and feel. Our goal was to determine where to splurge and where to economize and how to complete the remodel as quickly as possible because C&L would have to move out while construction was going on.
The Process: Hard Work to Remedy Design and Function
During our initial design study, (which included 2 hours in the owners’ home), we noticed framed images of William Morris Arts and Crafts textile patterns and knew this would be our design inspiration. We presented C&L with three options and they quickly selected the Pimpernel Design Concept.
We had originally selected the Black and Olive colors with a black vanity, mirror, and black and white floor tile. C&L liked it but weren’t quite sure about the black, We went back to the drawing board and decided the William & Co Pimpernel Wallpaper in Bayleaf and Manilla color with a softer gray painted vanity and mirror and white floor tile was more to their liking.
After the Design Concept was approved, we went to work securing the building permit, procuring all the elements, and scheduling our trusted tradesmen to perform the work.
We did uncover some shoddy work by the flippers such as live electrical wires hidden behind the wall, plumbing venting cut-off and buried in the walls (hence the constant dampness), the tub barely balancing on two fence boards across the floor joist, and no insulation on the exterior wall.
All of the previous blunders were fixed and the bathroom put back to its previous glory. We could feel the house thanking us for making it pretty again.
The After Reveal: Cohesive Design Decisions
We selected a simple white subway tile for the tub/shower. This is always classic and in keeping with the style of the house.
We selected a pre-fab vanity and mirror, but they look rich with the quartz countertop. There is much more storage in this small vanity than you would think.
The Transformation: A Period Perfect Refresh
We began the remodel just as the pandemic reared and stay-in-place orders went into effect. As C&L were already moved out and living with relatives, we got the go-ahead from city officials to get the work done (after all, how can you shelter in place without a bathroom?).
All our tradesmen were scheduled to work so that only one crew was on the job site at a time. We stayed on the original schedule with only a one week delay.
The end result is the sweetest little bathroom I've ever seen (and I can't wait to start work on C&L's kitchen next).
Thank you for joining me in this project transformation. I hope this inspired you to think about being creative with your design projects, determining what works best in keeping with the architecture of your space, and carefully assessing how you can have the best life in your home.
 Tile Doctor Ltd
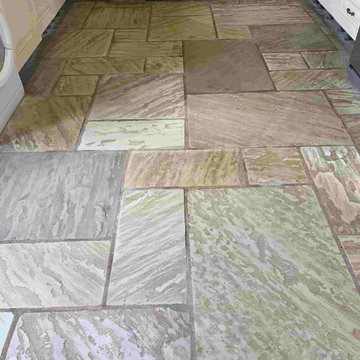
This client at a property in Bamber Bridge was really fed up with his Indian sandstone kitchen floor. The sandstone suited the age of the property but due to its course rough texture he was having issues keeping the stone clean and maintaining it to a decent standard. Ideally, he wanted something long lasting that was easier to keep clean.
Sealers can only help so much on a rough stone like this, in my opinion really rough stone is best sold for use outside in patio’s etc. My client didn’t want to rip it up as it ran underneath the kitchen units and it cost them a lot of money to have it laid, so having been on our website and checked out our previous work they realised we could mill the stone and smooth down the rough texture to a much smoother finish and yet still leave enough texture in the stone for it to look very natural.
We have developed a system at Tile Doctor called “Milling” which is very similar to sanding rough wood to reveal the inner patina. Once done we then we give it one more clean before adding a fresh sealer to add protection. Milling does change the look of the stone as you will see on the before and after pictures on this page, so it is not for everyone. It is however a one-off process so once done it will never need to be milled again. Like all stone floors it will still benefit from a deep clean and re-seal every five years (depending on use) just to keep it looking its best but after milling you will be able to walk on the stone in bare feet or socks and slippers as it really does make a big difference to the finish.
By milling we mainly use coarse-grit burnishing pads that contain segments made from hard industrial diamonds. Working our way up the different grits the pads are applied using a weighted floor buffer which is run over each tile several times to cut the stone back. The process is so effective we often find that the pads are all you need to clean the stone so hardly ever use any chemicals with this process, apart from the sealer which is applied once fully dry.
I should mention that Milling is not something a customer should consider doing themselves as you need invest in a heavy-duty weighted buffing machine which are rarely available for hire.
To seal internal Sandstone floors, I usually use Tile Doctor Colour Grow which brings out the natural colours in the stone. On this occasion however two coats of Tile Doctor Ultra Seal were applied to the stone and grout which results in an invisible natural finish and better matched the clients’ requirements.
My client was really pleased with the new floor and left the following feedback:
“Only finished today but looks so good now. Russell did a great job milling the flags to a much smoother finish. Two coats of sealant applied by Heidi on last day which hopefully will keep it looking that way. Mark F. Bamber Bridge”
For aftercare cleaning I left them with a bottle of Tile Doctor Neutral Cleaner which is specially designed for cleaning sealed floors. You need to be very careful when using supermarket cleaners as many are tool strong and will slowly strip the sealer off the floor, always read the label.
Russell Taylor
Lancashire Tile Doctor
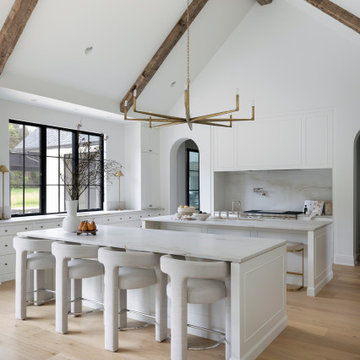
 Manomin Resawn Timbers
This vaulted kitchen at a modern minimalist home in White Oaks Savannah outside Stillwater is crowned by hand hewn box beams crossing the ceiling, with a brass angular chandelier hanging at the peak. A white marble-topped island with matching counter stools, a marble backsplash, and arched doorways carry through the home's clean, sophisticated minimalist palette, while black steel windows bring in natural light.
Our hand hewn box beams are made in the Hand Hewn style, recovered from timbers that were shaped by hand with axes and adzes across the American Midwest. That process left behind the marks and dents of the inexact hand tools once used to build the farms and barns of the region, giving each beam a truly one of a kind rustic character. Even in a home built on clean lines and understated luxury, these beams bring depth, history, and warmth to soaring ceilings like this one.
Whether you are a homebuilder, a home remodeling contractor, a homeowner, or a designer planning a minimalist kitchen like this, Manomin Resawn Timbers has the reclaimed wood box beams to bring warmth and character to your space. Visit our showroom in Hugo, MN or reach out to us with a call or a message. 15152 Freeland Avenue North, Hugo MN 55038. Mon–Thu 8am–4:30pm, Fri 8am–4pm. 651.464.1771.
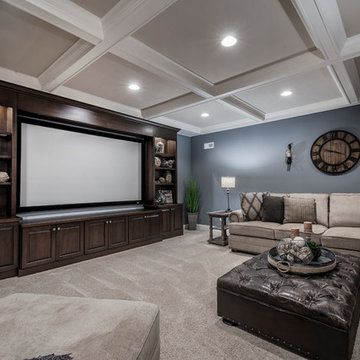
Sponsored
Delaware, OH

Buckeye Basements, Inc.
Central Ohio's Basement Finishing ExpertsBest Of Houzz '13-'21

 INSPIRED KITCHEN DESIGN
One of the most impressive parts of the kitchen is that Adam installed it himself – even though he admits that initially the idea was daunting.
“When we found that IKEA cabinets might be a fit for our project, we took a trip to our closest IKEA to look at their cabinets. We found the choices both amazing and overwhelming,” he says.“We also felt that we could not renovate our kitchen by just using the IKEA design tool.We were looking to get some help on optimizing the space. A Google search brought IKD up as the option that best fit what our needs were – so we started working with IKD.”
Calling the design process with IKD “a breeze” Adam decided to take the next several months to research how to install the kitchen.
“We visited IKEA again to better understand how the cabinets were put together. I’m glad that I really focused on the IKEA kitchen installation guide at the beginning of the installation to help get my rails installed properly and to really speed up putting the cabinets onto the wall,” he adds.
He also points out that he got lucky as the BODBYN cabinet fronts were on sale when he was ready to purchase – making the cabinetry a cost effective choice as well.
He concludes: “We were really attracted to that fact that we could reduce our kitchen’s cost by installing it ourselves. Doing this required watching a number of YouTube videos and reading numerous articles on how to do it as well as having smaller scale home improvement projects to have the skillset necessary to do the work.”
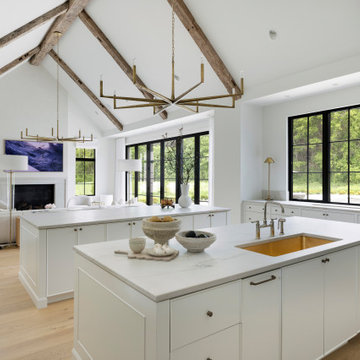 Manomin Resawn Timbers
This vaulted kitchen at a modern minimalist home in White Oaks Savannah outside Stillwater is crowned by hand hewn box beams crossing the ceiling, with a brass angular chandelier hanging at the peak. A white marble-topped island with matching counter stools, a marble backsplash, and arched doorways carry through the home's clean, sophisticated minimalist palette, while black steel windows bring in natural light.
Our hand hewn box beams are made in the Hand Hewn style, recovered from timbers that were shaped by hand with axes and adzes across the American Midwest. That process left behind the marks and dents of the inexact hand tools once used to build the farms and barns of the region, giving each beam a truly one of a kind rustic character. Even in a home built on clean lines and understated luxury, these beams bring depth, history, and warmth to soaring ceilings like this one.
Whether you are a homebuilder, a home remodeling contractor, a homeowner, or a designer planning a minimalist kitchen like this, Manomin Resawn Timbers has the reclaimed wood box beams to bring warmth and character to your space. Visit our showroom in Hugo, MN or reach out to us with a call or a message. 15152 Freeland Avenue North, Hugo MN 55038. Mon–Thu 8am–4:30pm, Fri 8am–4pm. 651.464.1771.

 User
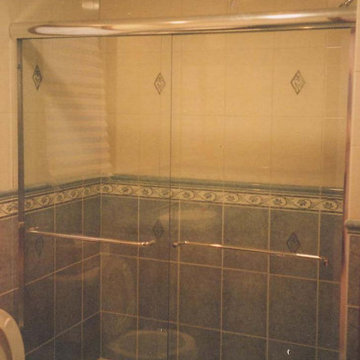
In the shower, oval accent tile runs vertically rather than horizontally, breaking up the expanse of white. Chrome rain shower head, massage hand held shower, and chrome fixtures are echoed in the metal edge that surrounds the storage niche, a more modern touch than traditional white bullnose tile.


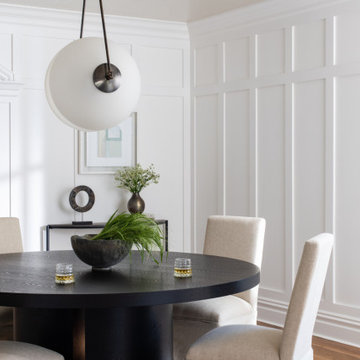


 Manomin Resawn Timbers
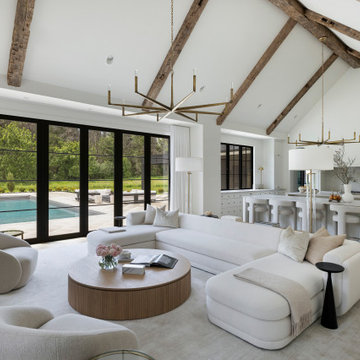
This vaulted living room is part of a modern minimalist home in White Oaks Savannah outside Stillwater, where hand hewn box beams cross the ceiling to bring warmth and texture to a space built around simplicity, light, and indoor-outdoor connection. A white sectional sofa, swivel chairs, and a round wood coffee table sit beneath brass and black chandeliers, while walls of black steel doors open the living room to a pool and patio beyond, blurring the line between inside and out.
Our hand hewn box beams are made in the Hand Hewn style, recovered from timbers that were shaped by hand with axes and adzes across the American Midwest. That process left behind the marks and dents of the inexact hand tools once used to build the farms and barns of the region, giving each beam a truly one of a kind rustic character. Even in a home built on clean lines and understated luxury, these beams bring depth, history, and warmth to soaring ceilings like this one.
Whether you are a homebuilder, a home remodeling contractor, a homeowner, or a designer planning a minimalist home like this, Manomin Resawn Timbers has the reclaimed wood box beams to bring warmth and character to your space. Visit our showroom in Hugo, MN or reach out to us with a call or a message. 15152 Freeland Avenue North, Hugo MN 55038. Mon–Thu 8am–4:30pm, Fri 8am–4pm. 651.464.1771.

 Tuscanbasins
The Berkeley is designed with clean and simple styling in mind and finished in an elegant mocha stain. The Berkeley makes any living room, den or man cave really stand out.
The Berkeley TV lift cabinet was inspired by the same construction and finish of the Brookside TV lift cabinet. Taking from it's subtle lines and mocha finish it has quickly become one of our most popular units. The Berkeley features interior shelf lighting and tons of room behind the cabinet doors for your component and media storage.
The Berkeley accommodates most 60" diagonal flat panel plasma and LCD TVs, measuring 55"W x 4.5"D x 35"H. Behind the front doors is ample storage space for your DVD movie & video game boxes. The cabinet is equipped with sliding rear panels for easy access to your TV connections.
Video
Product Features:
Universal Mounting System: Simple mounting kit includes all the hardware and brackets you need to hold your flat screen TV on the Touchstone lift mechanism.
Component Storage Space: The Berkeley has 8" of vertical storage height and 50" of width horizontal space for your Satellite Box, Cable Box, Recorders, Amps, Surround Sound, and Video Games.
Personal Storage Space: The Berkeley has 4 adjustable shelves for your DVD boxes, Video Game boxes and CD cases.
RF Remote Control: Includes 1 RF remote control for raising/lowering the lift mechanism without requiring line of sight.
Backup Wired Remote Control: Each unit has a backup on/off switch and set control switch inside the cabinet.
Finishing Process: Our thorough 7 step finishing process uses a combination of hand-staining and automated application tools that insures all woods and stains are applied uniformly and precisely to produce a quality cabinet that will last a lifetime.
English Dovetail Joints: A time-honored fine cabinet-making technique, Dovetail joints become self-locking even before the glue is applied, so solid overall construction can be guaranteed.
Solid Wood Tongue and Groove Corner Blocks: Incorporates the side panels of the cabinet with the foot of the cabinet, adding structural support which enhances durability.
24 point QC audit inspection of every cabinet.
Specifications
Cabinet Wood Finish: Mocha
Unit Dimensions: 59"W x 23"D x 41.5"H
Maximum Cabinet TV Size: 55"W x 4.5"D x 35"H (TV plus component height)
Unit Weight: 321 lbs.
Unit Shipping Weight:395 lbs.
Touchstone's TV Lift System
The Berkeley is ready for entertainment action with Touchstone's quiet and smooth TV lift system for your flatscreen television. The Berkeley includes a wireless RF remote control for operation of the cabinet's lift as well as a backup controller wired into the inside of the cabinet just in case you ever lose or can’t find the wireless remote.
 Manomin Resawn Timbers
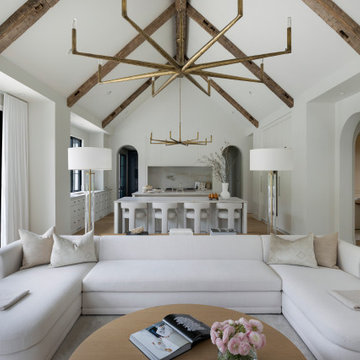
This vaulted living room is part of a modern minimalist home in White Oaks Savannah outside Stillwater, where hand hewn box beams cross the ceiling to bring warmth and texture to a space built around simplicity, light, and indoor-outdoor connection. A white sectional sofa, swivel chairs, and a round wood coffee table sit beneath brass and black chandeliers, while walls of black steel doors open the living room to a pool and patio beyond, blurring the line between inside and out.
Our hand hewn box beams are made in the Hand Hewn style, recovered from timbers that were shaped by hand with axes and adzes across the American Midwest. That process left behind the marks and dents of the inexact hand tools once used to build the farms and barns of the region, giving each beam a truly one of a kind rustic character. Even in a home built on clean lines and understated luxury, these beams bring depth, history, and warmth to soaring ceilings like this one.
Whether you are a homebuilder, a home remodeling contractor, a homeowner, or a designer planning a minimalist home like this, Manomin Resawn Timbers has the reclaimed wood box beams to bring warmth and character to your space. Visit our showroom in Hugo, MN or reach out to us with a call or a message. 15152 Freeland Avenue North, Hugo MN 55038. Mon–Thu 8am–4:30pm, Fri 8am–4pm. 651.464.1771.
 Cavalier Homes Inc
Do you have a bathroom that needs to be updated? The Home Remodeling services from Cavalier Homes offer a fantastic opportunity to update a bathroom that is already functional or completely renovate one that requires a makeover. We can help with an aesthetic upgrade, whether your bathroom requires a minor repair or a complete renovation.
There are various reasons why you might want to renovate your bathroom. Ultimately, there are three main reasons why most homeowners remodel their bathrooms.
Increasing comfort
Enhancing aesthetic
Increasing the resale value
There are a few things you should think about before beginning the bathroom renovation process if you want to create the bathroom of your dreams. Here are some of the important ones:
Budget:
Your budget should be taken into consideration first. You’ll be better able to make key choices during the renovation process if you’ve established a budget and know exactly how much you’re willing to spend on various products.
Space:
Since bathrooms are typically the smallest rooms in a home, it’s critical to make the most of every square inch that is available. There is nothing more annoying than buying fixtures that don’t fit, so take into account the layout of your bathroom and take precise measurements!
Design and style:
There are many styles and designs that can be achieved in the bathroom, regardless of whether you want it to blend in with the other rooms in your house or be completely different. Whatever style you’re trying to achieve—whether it’s something more traditional or more contemporary—we can assist you.
Accessories:
Small details can make a big difference, which is why you should carefully consider the style of each bathroom accessory you choose. With so many taps, showers, and other bathroom fixtures on the market today, making a decision isn’t as simple as you might think. Therefore, consider the style you want to achieve and make a decision accordingly.
Storage Needs:
If you’re short on space, try to be creative with your storage. Purchase furniture with lots of storage that doesn’t take up more floor space. For instance, vanity units are ideal because they are compact, offer excellent storage, and complement your preferred style.
Utilize your space wisely and creatively. All shampoos and shower gels will be able to be stored in shelving units. Remember to incorporate it in the initial layout.
Heating:
By adding a top-notch heating system, you can keep your bathroom cozy. You can use underfloor heating systems or a conventional radiator. This will raise the temperature in each bathroom, enhancing comfort and warmth.
This is not always a complete list. Many different delicate aspects that make your bathroom modern may require your consideration. The functionality of the bathroom has changed as a result of modern technology. Contact Cavalier Homes Inc. in West Islip, Long Island and one of our experts will walk you through your options.
For bathroom remodeling, we offer affordable and individualized design, fabrication, and installation services. Our cutting-edge tools, supplies, and procedures have stood the test of time. We can use your personal plans or ideas to design a stunning and useful bathroom.
Your home is your calling card, and your happiness is our greatest goal, as well as our greatest pleasure. Cavalier Homes will make your dream home a reality.

 TOC design & construction inc.
Have fun with your color choices by: Tania Scardellato - TOC design
Every unforgettable living room design begins with a fabulous paint color. The right color scheme can set the tone for any space, embodying whichever mood or style you wish, whether it be elegantly traditional or edgy and modern. As you stand in front of that daunting display filled with hundreds of tiny paint swatches, each color more perfect than the next, you may be asking yourself how to choose just one shade. Selecting living room color schemes can be an easy and enjoyable process if you have fabulous inspiration and the right design tools.
A beautiful color palette will instantly transform any drab and outdated living room into a trendy contemporary den found on the pages of your favorite designer magazines. The right shade can set the tone for the entire space, embodying whichever décor concept you desire. For this reason, when searching those isles for the perfect color scheme it is very important to choose wisely, understanding the particular look and style that each hue will evoke. Every great design will begin with fabulous inspiration.. Imagine your room in a rainbow of outstanding new hues, and then select the color that best reflects your home’s personality and individual décor style.
The importance to color is repeat, Don’t use too much of the same color in large amounts and always repeat a small touch of that color in your open concept.
For This young couple we went with a neutral pallet as they desired pops of colors with their furnishings, The wall paint color acted as a canvas, and the furniture, painting and accessories as there focal point.
 Kitchen Designs by Ken Kelly, Inc. (CKD, CBD, CR)
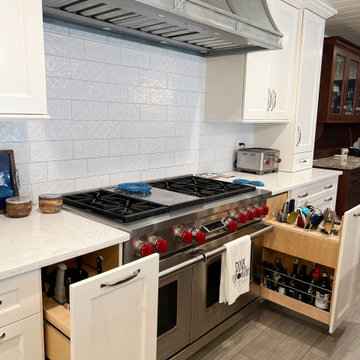
This luxuriously elegant, large scale white kitchen design by Ken Kelly is in a spectacular home in historic Oyster Bay, New York. The challenge was to include every amenity while merging the latest in kitchen technology with the warmth and coziness of home. We sought to create a large, open-spaced, and very organized kitchen for a family of chefs who frequently entertain on a large scale. All the cooks were involved in the design discussions throughout the process, and each person’s unique perspective was incorporated into the final design. The kitchen’s center island has an enormous amount of storage space with flawless, well- designed drawer configurations. If there was an inch available, we used it to perfect the design. The huge countertop gives the family plenty of room to work together when prepping meals and cooking for parties.
13