
Search results for "Tools processed" in Home Design Ideas

 Cantoni Irvine
Designed By: Sarah Buehlman
Marc and Mandy Maister were clients and fans of Cantoni before they purchased this harbor home on Balboa Island. The South African natives originally met designer Sarah Buehlman and Cantoni’s Founder and CEO Michael Wilkov at a storewide sale, and quickly established a relationship as they bought furnishings for their primary residence in Newport Beach.
So, when the couple decided to invest in this gorgeous second home, in one of the ritziest enclaves in North America, they sought Sarah’s help in transforming the outdated 1960’s residence into a modern marvel. “It’s now the ultimate beach house,” says Sarah, “and finished in Cantoni from top to bottom—including new custom cabinetry installed throughout.”
But let’s back up. This project began when Mandy contacted Sarah in the midst of the remodel process (in December 2010), asking if she could come take a look and help with the overall design.
“The plans were being drawn up with an architect, and they opted not to move anything major. Instead, they updated everything—as in the small carpeted staircase that became a gorgeous glass and metal sculpture,” Sarah explains. She took photographs and measurements, and then set to work creating the scaled renderings. “Marc and Mandy were drawn to the One and Only Collection. It features a high-gloss brown and white color scheme which served as inspiration for the project,” says Sarah.
Primary pieces in the expansive living area include the Mondrian leather sectional, the Involution sculpture, and a pair of Vladimir Kagan Corkscrew swivel chairs. The Maisters needed a place to house all their electronics but didn’t want a typical entertainment center. The One and Only buffet was actually modified by our skilled shop technicians, in our distribution center, so it could accommodate all the couple’s media equipment. “These artisans are another one of our hidden strengths—in addition to the design tools, inventory and extensive resources we have to get a job done,” adds Sarah. Marc and Mandy also fell in love with the exotic Makassar ebony wood in the Ritz Collection, which Sarah combined in the master bedroom with the Ravenna double chaise to provide an extra place to sit and enjoy the beautiful harbor views.
Beyond new furnishings, the Maisters also decided to completely redo their kitchen. And though Marc and Mandy did not have a chance to actually see our kitchen displays, having worked with Sarah over the years, they had immense trust in our commitment to craftsmanship and quality. In fact, they opted for new cabinetry in four bathrooms as well as the laundry room based on our 3D renderings and lacquer samples alone—without ever opening a drawer. “Their trust in my expertise and Cantoni’s reputation were a major deciding factor,” says Sarah.
This plush second home, complete with a private boat dock right out back, counts as one of Sarah’s proudest accomplishments. “These long-time clients are great. They love Cantoni and appreciate high quality Italian furnishings in particular. The home is so gorgeous that once you are inside and open the Nano doors, you simply don’t want to leave.” The job took almost two years to complete, but everyone seems quite happy with the results, proving that large or small—and in cases necessitating a quick turnaround or execution of a long-term vision—Cantoni has the resources to come through for all clients.
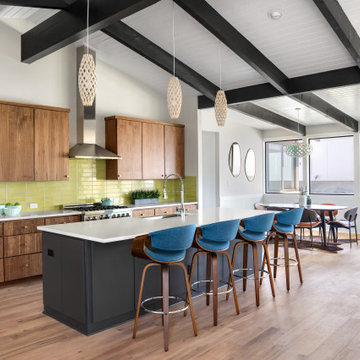
 Danze & Davis Architects, Inc.
Mid-sized mid-century modern galley medium tone wood floor and beige floor open concept kitchen photo in Austin with an undermount sink, flat-panel cabinets, quartzite countertops, green backsplash, subway tile backsplash, stainless steel appliances, an island and white countertops


Find the right local pro for your project
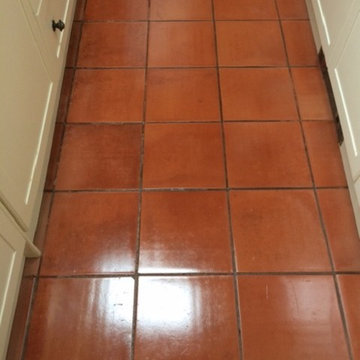
 Tile Doctor Ltd
Terracotta is an interesting type of stone manufactured using a variety of techniques dependant on the country of origin which leads to a number of differences such as Spanish Terracotta being less porous than its Mexican counterpart: the former is semi-hand made and finished in a factory kiln, while the latter is completely handmade. Spanish Terracotta is therefore a lot less than porous and ultimately, of a higher quality.
But despite the Spanish Terracotta being less porous, and therefore being less prone to ingrained dirt, it still, like any other stone, needs regular maintenance to keep it looking smart. In the tiling trade, we quite often refer to this as a good old fashioned ‘Clean and Seal’ and this is exactly what was requested by this property owner in Halifax, for their Spanish Terracotta tiled floors in the kitchen and adjacent hallway.
I cleaned both sets of Terracotta tiles using the same process, which involved the application of our reliable alkaline cleaner known as Tile a Doctor Pro Clean, diluted with five parts of warm water. Once the solution had been left to dwell for a short period, it was scrubbed into the tiles to remove all dust, dirt, and general muck. This created a slurry of cleaning residue, which I promptly soaked up using a wet vac. A wet vac machine is an essential tool when it comes to cleaning porous tiles since, unlike a traditional mop and bucket, it sucks the excess trapped dirt out of the clay and thus provides a superior clean.
Following this, I applied a small amount of our heavy duty remover, known as Tile Doctor Remove & Go, to deal with some of the more stubborn stains and paint splashes, before rinsing with clean water and wet vaxing in a similar fashion to before.
Once the clean had been completed I left the tiles to dry completely. This can take 12 to 24 hours depending on numerous factors including whether a Damp proof Membrane and underfloor heating has been installed which can really help reduce drying times. Letting the tiles dry completely before sealing is paramount as moisture can cloud the sealer and affect its performance.
Upon my return to the property I ran some quick damp tests, which revealed the tiles were ready to be sealed. I then applied several coats of Tile Doctor Seal and Go, our topical sealer which provides a satin finish and accentuates colour. A new coat of this product is recommended every six months on Terracotta to ensure the continuous protection of the tiles’ soft clay particles.
My customer was extremely pleased with her refreshed Terracotta tiles. It goes to show what a big difference a bit of regular maintenance can make. I advised the customer that an everyday cleaner called Tile Doctor pH Neutral cleaner can also be used regularly to keep the tiles looking great without damaging the sealer.
Nigel Stoker
North West Yorkshire Tile Doctor

 Anonymous
Every web hosting company comes with a different package according to the requirements of the customers so that their websites keep on running in a smooth way. Ittotally depends on you which hosting package you choose in order to enjoy the best services for your website.
The common options in web hosting include shared web hosting, VPS, dedicated web hosting, cloud web hosting and more. It is easy to decide what type of web host to choose but choosing the right package is not that easy. Here are top5 features which make your web hosting package the most favorable one:
1. OperationSystem
Operating system is the software which runs on your host. This OS is responsible for managing the server hardware. It also helps in optimizing the use of disk space, RAM, CPU and the network. This OS might not be the same as what you get for thedesktops. The best OS will ensure that the management functions of your website keep on running.
2. WebServer
Usually, the hosting companies provide UNIX Apache or the Microsoft IIS servers. The server should be capable of processing the requests of the users fast. It must further have the SSL certificate.
3. Bandwidth
Thebandwidth provided should be just as accurate. In case your websitehosts thousands of visitors, it is recommended that you choose a large bandwidth so that your revenue stream is not interrupted. In case you have plans of business expansion, the package should have flexibility of bandwidth expansion too. Some hosting companies do offer unlimited bandwidthbut make sure you go to the depth for learning about the package and its pros and cons.
4. Domain
All of the hosting providers usually offer the sub domains but some also provide the external DNS entries to the account which is called add-on domain. This will let you buy additional domains and you will be able to run more than one website even if they are unrelated to each other.
5. ControlPanel
Control panel is the place where you get to manage your web hosting account and you have access to different features and tools for that purpose. There are 2 types of control panels; one is cPanel and the other one is Plesk. You can also get a custom control panel. Usually, cPanel is the most offered and chosen because it comes with amazing features of managing utilities. It allows you to configure the system, web server, email, website, DNS and more.
There are many other features to look for when you are choosing a web hosting package such as DMCA ignore hosting, applications provided, database and FTP. You are required to perform some research on the providers. For that, it is important to know your business needs so that the hosting package you choose caters your business needs in the most precise way. With the understanding of these features, it will get easier to make a wise decision while selecting the web hosting package for your website.
For more Info Please visit us - http://anonymous-offshore.host/

 Industrial Projects
Creating a comfortable outdoor living space is a priority for many homeowners and DIY enthusiasts. With rising summer temperatures, installing a shade tarp in your backyard offers an affordable and effective solution for sun protection. We’ve developed this detailed, step-by-step guide to help you confidently install a shade tarp that not only shields you from the sun but also adds aesthetic appeal to your outdoor area.
Benefits of Installing a Backyard Shade Tarp
Before diving into the installation process, let’s explore the key benefits of having a backyard shade tarp:
Provides UV Protection: Keeps your family and guests safe from harmful sun exposure.
Reduces Outdoor Temperatures: Creates a cooler, more enjoyable outdoor space.
Protects Outdoor Furniture: Extends the life of patio furniture by reducing sun damage.
Enhances Outdoor Aesthetics: Adds a modern, stylish look to your yard.
Budget-Friendly: More affordable compared to permanent structures like pergolas.
Materials and Tools You’ll Need
To begin your DIY backyard shade project, gather the following materials and tools:
Materials:
Shade tarp (UV-resistant and breathable)
Sturdy posts or existing structures (trees, fences, walls)
Mounting hardware (eye bolts, D-rings, turnbuckles, snap hooks)
Nylon or polyester rope, or stainless-steel wire
Concrete (if installing new posts)
Tools:
Power drill
Measuring tape
Level
Ladder
Wrench or adjustable spanner
Post hole digger (if installing new posts)
Step 1: Plan Your Shade Tarp Layout
The first step in installing your backyard shade tarp is careful planning. Take time to assess your outdoor area and answer these key questions:
Where is the sun’s path throughout the day?
What size and shape of tarp best suits your space?
Will you anchor the tarp to existing structures or install new posts?
What height do you want the tarp to sit at for maximum shade and airflow?
Pro Tip: Use string or garden hoses to visualize the tarp layout on the ground before making permanent decisions.
Step 2: Measure and Mark Anchor Points
Once you’ve determined the tarp’s location and orientation:
Measure the tarp dimensions.
Mark the exact points where each corner of the tarp will be anchored.
Ensure that the anchor points are at least 5–10% longer than the tarp size to allow for tensioning and slight adjustments.
Consider slope angles for water runoff. Aim for at least a 20-degree angle to prevent water pooling on the tarp.
Step 3: Install Support Posts (If Necessary)
If your backyard lacks existing anchor points like trees or fences, you’ll need to install sturdy support posts:
Dig post holes at least 24 inches deep and 8-12 inches wide for stability.
Set posts in concrete, making sure they remain plumb and level.
Allow the concrete to cure for at least 24–48 hours before applying tension from the tarp.
We recommend using pressure-treated wood, galvanized steel poles, or aluminum posts for longevity and strength.
Step 4: Install Mounting Hardware
With your anchor points ready, it’s time to install the necessary hardware:
Attach eye bolts or pad eyes securely into walls, posts, or other fixed structures.
For added flexibility and adjustability, install turnbuckles or tensioners to fine-tune the tarp’s tightness.
Connect snap hooks, D-rings, or carabiners to make assembly and disassembly easier.
Make sure all hardware is rated for outdoor use to prevent rust and corrosion.
Step 5: Attach and Tension the Shade Tarp
Now it’s time for the most satisfying part—mounting the shade tarp:
Begin by attaching one corner of the tarp to an anchor point.
Gradually attach the remaining corners, moving diagonally for even tension.
Adjust each connection point using your turnbuckles, ropes, or cables.
Pull the tarp tight enough to avoid sagging, but not so tight that it risks tearing.
Check that the tarp maintains the desired slope for rainwater runoff and adjust tension as needed.
Step 6: Final Adjustments and Safety Check
Before enjoying your new shaded area:
Inspect all anchor points and hardware for stability.
Test the tarp’s tension and make adjustments for even distribution.
Ensure that no sharp edges or loose connections remain that could damage the tarp or pose a safety hazard.
Confirm that the tarp is secure in windy conditions by giving it a gentle tug.
If you live in an area with frequent high winds, consider removing the tarp during storms to prevent damage.
Step 7: Enjoy Your Shaded Backyard Oasis
Once installed, your backyard shade tarp provides a comfortable and protective space for outdoor gatherings, relaxation, or family activities. You can decorate underneath with outdoor furniture, string lights, or potted plants to create a personalized outdoor retreat.
Maintenance Tips for Long-Lasting Shade Tarp Performance
To extend the life of your shade tarp, follow these maintenance guidelines:
Regularly check for wear and tear, especially around anchor points and seams.
Clean the tarp periodically with mild soap and water to prevent mildew buildup.
Store the tarp indoors during harsh weather seasons if it's not designed for year-round use.
Tighten hardware as needed to maintain proper tension and avoid sagging.
By following these simple care steps, your shade tarp will continue to deliver years of sun protection and outdoor comfort.
Conclusion: Upgrade Your Outdoor Space with a DIY Shade Tarp
Installing a shade tarp in your backyard is a cost-effective and rewarding DIY project. With careful planning, quality materials, and proper installation techniques, you’ll enjoy cool, shaded outdoor living all season long. This step-by-step guide ensures your project goes smoothly from start to finish.

Sponsored
Delaware, OH

Buckeye Basements, Inc.
Central Ohio's Basement Finishing ExpertsBest Of Houzz '13-'21

 Outwater Industries Inc
Encompassing a range of baluster rails, newel posts and complementary decorative accessories, Outwater's new, maintenance free Cast Stone Balustrade System is manufactured utilizing a unique process that combines a mixture of resins with crushed limestone and impregnated fade resistant textured colors to create balustrades that look and feel just like authentic limestone balusters at less than half of their cost and weight.
Intended for indoor or outdoor applications, which can be assembled by laypeople using traditional carpentry tools without the need for masonry, Outwater's Cast Stone Balustrade System meets the 4-inch sphere code when properly set up, and can be placed on sized dimensional lumber without the need for steel supports.
Moreover, unlike lesser quality balustrade systems, which use regular screws to attach their components, also taking into account that the screws' imminent corrosion renders them as an unsafe means by which to attach baluster rails, Outwater's Cast Stone Balustrade System employs a unique incorporated pipe system, connector pins and spacers to increase the Balustrade System's stability while allowing for a more secure and professional installation with barely perceptible seams.
Offered in 34-in. and 48-in. overall heights with a nominal 7-in rail width, baluster rails are sold by the foot up to 16-ft. long to accommodate most any installation.
100% mold resistant, non-porous and unaffected by the harshest elements, Outwater's Cast Stone Balustrade System does not require priming, painting or even occasional touch ups, further enhancing its appeal.
Product Features:
• Create balustrades that look and feel just like authentic stone balusters at less than half of their cost and weight
• Intended for indoor or outdoor use
• Can be installed by laypeople using traditional carpentry tools without the need for masonry
• Meets the 4-inch sphere code when properly set up, and can be placed on sized dimensional lumber without the need for steel supports
• Employs a unique incorporated pipe system, connector pins and spacers to increase stability while allowing for a more secure and professional installation
• Offered in 34-in. and 48-in. overall heights with a nominal 7-in rail width, baluster rails are sold by the foot up to 16-ft. long
• 100% mold resistant, non-porous and unaffected by the harshest elements. Does not require priming, painting or even occasional touch ups
Contact:
Architectural Products by Outwater
Sales & Product Information (USA & Canada):
1-800-631-8375 / 1-201-498-8750
Fax (USA & Canada): 1-800-888-3315 / 1-201-498-8751
Sales & Product Information (Outside of the USA & Canada):
1-201-498-8750
Fax (Outside of the USA & Canada): 1-201-498-8751
Email: info@outwaterplastics.com
Web: www.outwater.com
Visit us!
East Coast:
24 River Road
Bogota, NJ 07603
1-201-498-8750
West Coast:
4720 West Van Buren
Phoenix, AZ 85043
1-602-447-0936
About Architectural Products by Outwater:
It really is easy to shop with us!
Relied upon by more than 1,000,000 builders, renovators, architects designers, woodworkers, cabinet and furniture manufacturers, OEM's and retail consumers since 1972, Architectural Products by Outwater is an international manufacturer and distributor of more than 65,000 innovative and traditional Decorative Building Products that you possibly never knew existed or for which you simply could not find a reliable source. This is where Outwater truly shines!
“Now you can design, buy, build and dream like the Pros…”
Outwater’s products are, to say the least, very competitively priced and include interior and exterior architectural mouldings and millwork; columns and capitals; LED lighting and lighting accessories; balustrading; faux stone panels; faux wood beams; genuine stone tiles; decorative wood carvings; wrought iron components; stamped steel and polymer ceiling panels and backsplashes; wainscoting; wall coverings; fireplace surrounds and mantels; plastic "glass" block; period and contemporary hardware; home organization systems; kitchen and bath accessories; kitchen and bath cabinetry; bath vanities; furniture & cabinet components; knobs & pulls; casters; laminates; brass tubing & fittings; surfacing materials… and so much more!
In addition, with warehouse and distribution facilities in New Jersey and Arizona totaling over 300,000 square feet, Outwater facilitates purchases with reduced lead times and shipping costs, enabling us to fulfill and ship over 98% of our orders from stock within one to two business days!
At a time when many companies appear to have rapidly transitioned away from personalized customer service, having replaced their knowledgeable and immensely valuable human sales representatives with inanimate online marketing channels, which can be helpful to you if you were to know exactly what you might need and were not to encounter difficulties in placing your order, here at Outwater, we still believe that human interaction with a live, well versed, non-commissioned sales representative will undoubtedly better serve your needs in the long run. Even though you can always shop with us at www.outwater.com, you can also always deal directly with our extremely well versed and friendly sales and customer service representatives for their unparalleled support and assistance, most of whom have worked at Outwater for more than 15 years.
Whether you have been one of our loyal customers over the years or this is your first time in doing business with us, we would like to thank you for your expressed interest in our company and the products that we carry.
Please feel free to contact us with any questions at 1-800-631-8375 or visit us online at www.outwater.com
We look forward to serving you in the near future.


 Cantoni Irvine
Designed By: Sarah Buehlman
Marc and Mandy Maister were clients and fans of Cantoni before they purchased this harbor home on Balboa Island. The South African natives originally met designer Sarah Buehlman and Cantoni’s Founder and CEO Michael Wilkov at a storewide sale, and quickly established a relationship as they bought furnishings for their primary residence in Newport Beach.
So, when the couple decided to invest in this gorgeous second home, in one of the ritziest enclaves in North America, they sought Sarah’s help in transforming the outdated 1960’s residence into a modern marvel. “It’s now the ultimate beach house,” says Sarah, “and finished in Cantoni from top to bottom—including new custom cabinetry installed throughout.”
But let’s back up. This project began when Mandy contacted Sarah in the midst of the remodel process (in December 2010), asking if she could come take a look and help with the overall design.
“The plans were being drawn up with an architect, and they opted not to move anything major. Instead, they updated everything—as in the small carpeted staircase that became a gorgeous glass and metal sculpture,” Sarah explains. She took photographs and measurements, and then set to work creating the scaled renderings. “Marc and Mandy were drawn to the One and Only Collection. It features a high-gloss brown and white color scheme which served as inspiration for the project,” says Sarah.
Primary pieces in the expansive living area include the Mondrian leather sectional, the Involution sculpture, and a pair of Vladimir Kagan Corkscrew swivel chairs. The Maisters needed a place to house all their electronics but didn’t want a typical entertainment center. The One and Only buffet was actually modified by our skilled shop technicians, in our distribution center, so it could accommodate all the couple’s media equipment. “These artisans are another one of our hidden strengths—in addition to the design tools, inventory and extensive resources we have to get a job done,” adds Sarah. Marc and Mandy also fell in love with the exotic Makassar ebony wood in the Ritz Collection, which Sarah combined in the master bedroom with the Ravenna double chaise to provide an extra place to sit and enjoy the beautiful harbor views.
Beyond new furnishings, the Maisters also decided to completely redo their kitchen. And though Marc and Mandy did not have a chance to actually see our kitchen displays, having worked with Sarah over the years, they had immense trust in our commitment to craftsmanship and quality. In fact, they opted for new cabinetry in four bathrooms as well as the laundry room based on our 3D renderings and lacquer samples alone—without ever opening a drawer. “Their trust in my expertise and Cantoni’s reputation were a major deciding factor,” says Sarah.
This plush second home, complete with a private boat dock right out back, counts as one of Sarah’s proudest accomplishments. “These long-time clients are great. They love Cantoni and appreciate high quality Italian furnishings in particular. The home is so gorgeous that once you are inside and open the Nano doors, you simply don’t want to leave.” The job took almost two years to complete, but everyone seems quite happy with the results, proving that large or small—and in cases necessitating a quick turnaround or execution of a long-term vision—Cantoni has the resources to come through for all clients.
 Tile Doctor Ltd
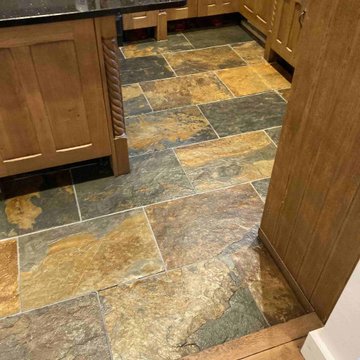
This Multi-Coloured Slate floor looks nice in the Kitchen of this property in Hythe, however due to the riven surface of the tile and the deep grout lines my customer had struggled to keep it clean. Additionally, the Slate has lost all of its lustre over the years since it had been installed and it was now due a deep clean and reseal.
The combination of durability and price makes Slate a popular choice for floor covering, it is also available in a number of colours, ranging from plain black to a more diverse array of shades. Like any natural stone floor though it need sealing to keep the dirt out of the pores of the stone however sealers wear off with use
Hythe by the way is a lovely medieval coastal market town with its own beach on the edge of Romney Marsh and close to Folkestone.
Before starting I removed the kickboards underneath the kitchen units and protected the exposed woodwork with a thin film. To deep clean the Slate floor and remove any remaining sealer I applied Tile Doctor Remove and Go and left it to soak in for ten minutes before scrubbing it in with a light carbide brush. As well as removing the old sealer this process releases the dirt from the pores of the stone and brings it to the surface where it can be extracted.
I have probably mentioned this before, but I’ve invested in a powerful van mounted pressure extraction system for removing the dirt, old sealer and emulsified soils released from the stone. The system works by applying water at high pressure on the floor via a spinner tool and then simultaneously extracts the waste under suction back to a grey water tank on the van. From the customers point of view, it makes light work of cleaning the floor and more importantly leaves the floor dry and leaves no mess.
Having a dry floor at this stage is important as it means I can usually seal the floor on the same day. Its not a good idea to apply a sealer to damp floor as it will affect the way it cures and lead to an undesirable finish. The way to make sure the floor its dry is to use a moisture meter and take readings in several places around the floor. You can use an air mover to improve drying times however older floors can take a very long time to dry and for those I tend to book another day to apply the sealer.
With the floor dry I set about applying the first of two coats of Tile Doctor X-Tra Seal which provides both a hardwearing sheen to the slate as well as enhancing its natural colourings. It has strong water repellency characteristics which makes it ideal for use in a kitchen where spillages are quite common.
This was quite a small kitchen, so the work was completed in one day. My client was amazed at the transformation and grateful for our advice on continued maintenance which for this floor I recommended the use of Tile Doctor Stone Soap for daily cleaning.
Michael Conlon
South Kent Tile Doctor
 Windy City Painters
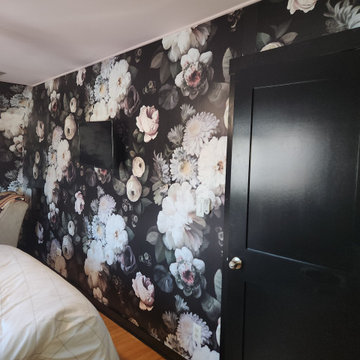
Professional wallpaper installation Lakeview bedroom demonstrates superior craftsmanship in one of Chicago's premier neighborhoods. This elegant project showcases how quality installation transforms vintage condo interiors while respecting architectural integrity.
## Materials and Products
We utilized premium wallpaper adhesive, specialized primers, and professional-grade smoothing tools. Additionally, we selected moisture-resistant materials perfect for Chicago's climate variations.
## Installation Process
First, we thoroughly prepared walls by cleaning and repairing any imperfections. Next, we applied specialized primer to ensure optimal wallpaper adhesion. Then, we precisely measured and cut each panel for perfect pattern alignment. Finally, we installed wallpaper using professional techniques that prevent bubbles and ensure longevity.
## Chicago Home Challenges
Lakeview's vintage buildings often present unique installation challenges. Moreover, lead paint considerations require careful preparation. Additionally, older plaster walls may need special attention. Furthermore, Chicago's humidity fluctuations demand climate-appropriate materials and techniques.
## Results Achieved
The finished installation features flawless seams, perfect pattern matching, and professional-quality durability. Additionally, the wallpaper enhances the room's architectural character while providing lasting beauty.
## Professional Tips
Always hire experienced installers for complex patterns. Moreover, proper wall preparation is crucial for longevity. Additionally, climate considerations are essential in Chicago homes.
See more work and request free estimate at windypainters.com.
Q: How do you ensure wallpaper installation lasts in Chicago homes? / A: Windy City Painters uses climate-appropriate adhesives and proper preparation techniques for lasting wallpaper installation results.
Q: Can you install wallpaper in vintage Lakeview buildings? / A: Absolutely! We specialize in wallpaper installation in Chicago's historic buildings with careful attention to unique requirements.
Q: What preparation is needed for wallpaper installation? / A: Proper wallpaper installation requires wall cleaning, repairs, priming, and moisture testing for optimal results.
Q: Do you match wallpaper patterns perfectly? / A: Our experienced team ensures precise pattern matching for seamless professional wallpaper installation in every project.
Q: How long does bedroom wallpaper installation take? / A: Most bedroom wallpaper installation projects are completed within 1-2 days depending on complexity and room size.
Q: What wallpaper types work best in Chicago homes? / A: We recommend moisture-resistant wallpapers designed for Chicago's climate variations during professional installation consultations.
Q: Do you remove old wallpaper before installation? / A: Yes, proper wallpaper installation includes complete removal of existing materials and thorough surface preparation.
Q: Is professional wallpaper installation worth the investment? / A: Professional wallpaper installation ensures longevity, perfect results, and protects your investment in quality materials.
Q: Can you install wallpaper in bathrooms and kitchens? / A: We provide specialized wallpaper installation for all rooms using appropriate moisture-resistant materials and techniques.
Q: Do you offer wallpaper installation warranties? / A: Windy City Painters backs all wallpaper installation work with comprehensive warranties ensuring your complete satisfaction.
 Tile Doctor Ltd
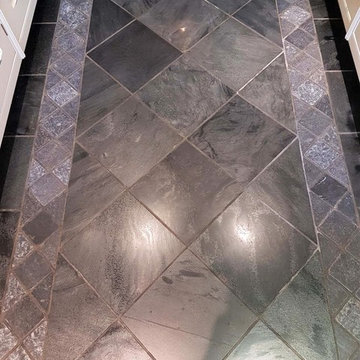
I was recently asked to survey an unusual stone floor at a house in in Harrogate comprising of Slate inlaid with Granite. The client advised that it had not been cleaned properly for 20 years and wanted it renovating! It was now definitely overdue a deep clean and professional attention. Fortunately, having worked on these floors for many years I knew I could make a substantial impact and transform its appearance. Fossilized slate is a beautiful stone when cleaned and sealed correctly.
The owner confessed they had actually been sealing the floor every two years but without a deep clean first, so they were effectively sealing in the dirt each time. I discussed with them the process I would use to clean and re-seal the floor and we agreed a price to carry to out the work.
To remove the layers of old sealer and dirt used a set of Tile Doctor Diamond Burnishing pads. The pads are attached to a rotary floor machine starting with the coarse 400-grit pad which was lubricated with a dilution of Tile Doctor Remove and Go to help strip the floor of dirt and layers of sealer. After rinsing and extracting the soil I worked through the different grades of pads in sequence finishing with the 1500-grit and this time using just water for lubrication.
A set of diamond handheld burnishing blocks were then used to clean up the edges and corners where the large 17” pads struggle to reach. This ensures all areas are treated and free of dirt and old sealer.
The floor was then rinsed and extracted again to remove the remaining soil. I find a wet vacuum is an invaluable tool for this. The floor was then left to dry out overnight ready for sealing the next day.
I returned the next day to seal the floor, first checking with a damp meter that the floor was dry, and the moisture reading was below the acceptable level. These results were fine, so I had a green light to continue and seal the stone.
The customer wanted a shine on the floor so rather than apply a satin sealer which I felt wouldn’t adhere to the stone properly I decided to polish the floor further with a the last of the four burnishing pads which is a very fine 3000-grit pad. You don’t need to use a lot of water with this last pad just a small amount sprayed onto the floor using a technique we refer to as a ‘Spray Burnish’.
To seal the floor, two coats of Tile Doctor Colour Grow were applied. This is an impregnating matt sealer which intensifies the natural colours of this beautiful stone and provides long lasting durable protection.
Even I was impressed with the finished result but more importantly the client was over the moon. To keep the floor looking its best I recommended they use Tile Doctor Stone Soap which is pH neutral. You should always read the label in detail when choosing a floor cleaning product as many are too strong and not recommended for sealed stone surfaces as they will prematurely erode the sealer.
Nigel Stoker
North West Yorkshire Tile Doctor
 Tile Doctor Ltd
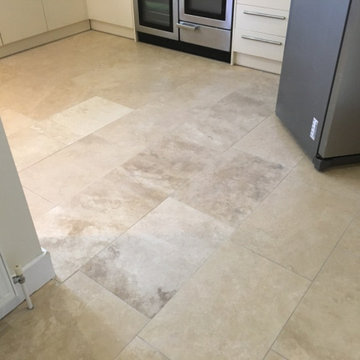
This client from Cobham contacted me in despair, she was quite concerned about her Travertine tiled floor which was cracking. She had the Kitchen and Dining room tiled with Travertine six years ago and recently several cracks had begun to appear in a long line crossing five tiles.
Several holes had also begun to appear and across the threshold to the kitchen from the dining area a serious lip had formed where a tile had risen above its neighbour causing a trip hazard.
After removing a tile from an unobtrusive area, I began to see where the issues lay. The tiler had dabbed the adhesive. This mean that instead of spreading the adhesive equally across the tile and floor they had splurged four lumps in each corner then set the tile down. This is poor working practice that will sooner or later become apparent. It means the areas were no adhesive was applied are eventually compromised resulting in cracking. This could take years or weeks to surface.
After some discussion we decided that I would remove and replace six tiles in total. The client was happy for me to go ahead and agreed a cost for the works to be done.
Returning the following week, firstly I had to remove the grout. This was done with a handheld Fein tool fitted with an oscillating blade. I thought this would be good experience from my son during the holidays, so I took him along and whilst I was working on the grout, he was able to gather the dust in a vacuum cleaner.
Next, I started to remove the cracked tiles with a chisel, starting from the cracks where the tiles would be weakest. This was noisy and messy work which required ear defenders and safety goggles. The process took several hours with the help of my son on general assistance duties. Once the tiles were removed this just left the remaining adhesive attached to the floor to get removed. This was the hardest part of the job, a lot of hammer and chisel work with as much dust gathered as possible to try and contain the mess. I had warned the customer that a considerable amount of mess would be produced and request that she should remove as much items as possible and to tape up her cupboards. Finally, I filled several holes in the sub floor so I would have a flat surface to lay the new tiles on. I left it there for the night to solidify.
Returning the next day, I began laying the replacement tiles down. Colour matching replacement tiles is a difficult task as Travertine is a natural product and colours vary greatly so these were a pretty good match.
Once the adhesive had set, I grouted in the newly laid tiles and once that was dry set about applying a sealer. For this I used two coats of Tile Doctor Ultra Seal which is an impregnating sealer that doesn’t alter the colour of the stone. This would ensure they were nicely protected and hopefully the client will not experience any further issues.
She was very happy with the result and was pleased the floor no long looked unsightly or posed a tripping hazard.
Rupert Mcleod
West Surrey Tile Doctor
 Tile Doctor Ltd
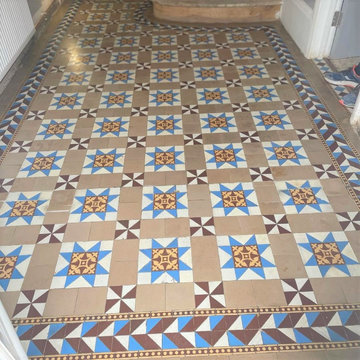
These pictures of a Victorian Tiled Hallway are from a property in Canterbury that was once a nursing home and was now being renovated to become a children’s home. The building was being gutted and extended at the same time and when the carpet was pulled up in the hallway, they were surprised to find a relatively intact Victorian tiled floor underneath.
Whilst they thought it bizarre that anyone would want to cover up such an attractive floor the carpet had protected it over the years. They realized it would make a marvellous feature at the entrance to the property, but professional restoration would be needed to do it justice. After a bit of research, they came across Tile Doctor and got in touch.
Canterbury comes under my North Kent designation, so I went to visit the property and survey the floor and quote for doing the restoration. There were a few missing and loose tiles that would need replacing and refixing also there was a lot of ingrained dirt so a deep clean and application of a new sealer would be required. I gave them a price for the work which they readily accepted, and we arranged a suitable time to carry out the work. Subject to the building schedule I had calculated the floor would take three days to restore.
On the first day I set about replacing and re-fixing the missing, broken, and loose tiles. This is delicate work as you need to extract the old tile without disturbing its neighbours and then clean up the area ready for its replacement. Being a Tile Doctor I keep a selection of stock tiles for repairs, some are reclaimed, and some are replica. Also, there are several companies still making Victorian style tiles so I can usually source what I need.
After the individual missing and broken tiles had been replaced and the adhesive had set, it was then a matter of renovating the floor as a whole. The tiles were covered in a thick layer of carpet adhesive which needed a combination of specialist tools and products to remove. First, a liberal layer of Tile Doctor Remove and Go was applied and left to dwell for thirty minutes. Next, Tile Doctor Pro-Clean was added and scrubbed in with a black pad.
This process softened the adhesive sufficiently in readiness for the next stage which involves using a set of diamond burnishing pads on a weighted buffing machine. Several applications were needed, each time with a successively finer grade of diamond pad and rinsing off the slurry in between. The tiles were first milled using a very coarse 50-grit pad, followed by 100, 200 and finally burnished with a 400-grit burnishing pads. This removed all the adhesive and dirt in the tiles, which was cleaned up using the wet vacuum.
Old Victorian floors like this do not have a damp proof membrane installed under the floor, and with a lot of water being used in the cleaning process I was concerned White efflorescence salts could appear later as the floor dried. To counter this, I gave the floor an acid wash using Tile Doctor Acid Gel to counter and dissolve the salts, it also gives the tiles another clean and will remove any old grout smears further improving the appearance of the tiles. Once done the floor was left to dry overnight.
On my return I tested the floor was dry by taking several moisture readings around the floor with a damp meter. Applying sealer to a damp floor is never advised and can lead to clouding and an unwanted finish.
Happy that the tiles were dry, a single coat of Tile Doctor Colour Grow sealer was applied. This is an impregnating sealer with a colour enhancing component to ‘lift’ the stronger colours of the floor. Colour Grow however does leave a matt appearance and as the client had asked for a shiny finish it was topped up with five coats of Tile Doctor Seal and Go. This is a compatible topical sealer which added a mid to high sheen.
By the end of the third day the Victorian floor looked brand new, and I received the following feedback from the client. Its rare to receive feedback from commercial customers so they were clearly overwhelmed with the transformation.
Did not think this glued covered bad old floor could look sooooo good Fabulous Fantastic job Looks Amazing Thank you
For aftercare I recommend the use of Tile Doctor Neutral Cleaner which isn’t as harsh as many of the products you find in supermarket. Stronger products can actually strip off the sealer over time leaving it vulnerable to dirt and detracting from its appearance.
Graham Davis
North Kent Tile Doctor

 Zelaya Properties LLC
We used: Custom cherry cabinetry in Arts & Crafts Shaker style by Kabinart in Boulder and Espresso stains. Liberty Hardware Venetian bronze 1-1/2" cabinet knobs. KitchenAid Architect II Series 22 CF counter-depth French door refrigerator. KitchenAid Architect Series II 27" convection single wall oven. KitchenAid 36" 6-burner dual fuel freestanding commercial-style range. KitchenAid Architect II Series 24" dishwasher. Sharp Insight Pro Series 24" built-in microwave drawer (Model #KB6524PS). Crystorama Solaris 12" wide pendant lights in English bronze. Granite countertops in Brown Fantasy. 3"x6" polished marble backsplash.
Paint colors:
Walls: Glidden Silver Cloud 30YY 63/024
Ceilings/Trims/Doors: Glidden Swan White GLC23
Robert B. Narod Photography

 Home Improvement
In the world of wigs, convenience and realism are two of the most sought-after qualities. Women want wigs that not only look natural but also require minimal effort to wear and style. Enter wear and go wigs combined with bleached knots—a powerful duo that transforms the wig-wearing experience. These wigs offer a flawless, natural hairline and are ready to wear immediately, making them ideal for busy lifestyles without sacrificing beauty.
What Are Wear and Go Wigs?
Wear and go wigs are pre-styled wigs designed for instant wear. Unlike traditional wigs that require lace trimming, knot bleaching, or customization, wear and go wigs come ready for action right out of the box.
Key Features:
- Pre-plucked hairline and baby hairs
- Glueless design with adjustable straps and combs for secure fit
- Available in various textures such as straight, curly, and wavy
- Made with 100% human hair for authentic look and feel
- Often pre-styled into trendy cuts and shapes
- Time Saver: Perfect for women with busy schedules who want instant glam
- User-Friendly: No professional installation needed—ideal for beginners
- Protective Styling: Allows your natural hair to rest and grow healthy
- Versatile: Can be styled further with heat tools or left as is
- Reusable: Durable with proper care, lasting several months
- Lightened knots on lace for a natural scalp appearance
- Available in lace front, full lace, and 360 lace varieties
- Made with high-quality 100% human hair
- Pre-plucked hairline often accompanies bleached knots
- Customizable with parting styles and baby hairs
- Ultra-Realistic: Mimics the natural scalp for an undetectable hairline
- Styling Freedom: Allows for multiple parting options and updos
- Comfortable: Breathable lace cap keeps the scalp cool
- Protective: Keeps your natural hair shielded from heat and damage
- Long-Lasting: When cared for properly, can maintain a fresh look for months

 Moss Yaw Design studio
Engineered cedar siding creates beautiful gray-blue tones at the exterior of the home, while adding a textural element to activate the simple exterior design.
 Cantoni Irvine
Designed By: Sarah Buehlman
Marc and Mandy Maister were clients and fans of Cantoni before they purchased this harbor home on Balboa Island. The South African natives originally met designer Sarah Buehlman and Cantoni’s Founder and CEO Michael Wilkov at a storewide sale, and quickly established a relationship as they bought furnishings for their primary residence in Newport Beach.
So, when the couple decided to invest in this gorgeous second home, in one of the ritziest enclaves in North America, they sought Sarah’s help in transforming the outdated 1960’s residence into a modern marvel. “It’s now the ultimate beach house,” says Sarah, “and finished in Cantoni from top to bottom—including new custom cabinetry installed throughout.”
But let’s back up. This project began when Mandy contacted Sarah in the midst of the remodel process (in December 2010), asking if she could come take a look and help with the overall design.
“The plans were being drawn up with an architect, and they opted not to move anything major. Instead, they updated everything—as in the small carpeted staircase that became a gorgeous glass and metal sculpture,” Sarah explains. She took photographs and measurements, and then set to work creating the scaled renderings. “Marc and Mandy were drawn to the One and Only Collection. It features a high-gloss brown and white color scheme which served as inspiration for the project,” says Sarah.
Primary pieces in the expansive living area include the Mondrian leather sectional, the Involution sculpture, and a pair of Vladimir Kagan Corkscrew swivel chairs. The Maisters needed a place to house all their electronics but didn’t want a typical entertainment center. The One and Only buffet was actually modified by our skilled shop technicians, in our distribution center, so it could accommodate all the couple’s media equipment. “These artisans are another one of our hidden strengths—in addition to the design tools, inventory and extensive resources we have to get a job done,” adds Sarah. Marc and Mandy also fell in love with the exotic Makassar ebony wood in the Ritz Collection, which Sarah combined in the master bedroom with the Ravenna double chaise to provide an extra place to sit and enjoy the beautiful harbor views.
Beyond new furnishings, the Maisters also decided to completely redo their kitchen. And though Marc and Mandy did not have a chance to actually see our kitchen displays, having worked with Sarah over the years, they had immense trust in our commitment to craftsmanship and quality. In fact, they opted for new cabinetry in four bathrooms as well as the laundry room based on our 3D renderings and lacquer samples alone—without ever opening a drawer. “Their trust in my expertise and Cantoni’s reputation were a major deciding factor,” says Sarah.
This plush second home, complete with a private boat dock right out back, counts as one of Sarah’s proudest accomplishments. “These long-time clients are great. They love Cantoni and appreciate high quality Italian furnishings in particular. The home is so gorgeous that once you are inside and open the Nano doors, you simply don’t want to leave.” The job took almost two years to complete, but everyone seems quite happy with the results, proving that large or small—and in cases necessitating a quick turnaround or execution of a long-term vision—Cantoni has the resources to come through for all clients.
15