
Search results for "Topic prior" in Home Design Ideas
 Tile Doctor Ltd
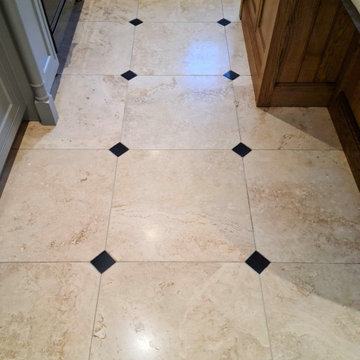
The pictures show a large Limestone floor laid through much of the ground floor of a property situated on the outskirts of York seventeen years prior.
The owners had three dogs that slept in their own doggy room. The floor in this room was in the worst condition of the five rooms as it had been subject to significant wear and tear. The Limestone tiles looked dull with ingrained dirt and the grout was stained and patchy.
The original tiler had laid the floor well, but he had applied a satin topical sealer to the stone most of which had worn off over the years. A floor like this would need a little maintenance and the sealer reapplying from time to time to maintain it.
I completed a test clean for the client to show them what could be achieved which came out well. Happy with the result they accepted my quote for the restoration work, and we booked in a suitable time to complete the work.
The area was quite large, so I separated the job into rooms and started by protecting the skirtings and woodwork from splashing etc. I decided to do a chemical clean first to remove what was left of the old sealer but more importantly to give the grout a thorough clean which was making the floor look scruffy.
For this I opted to apply a strong dilution of Tile Doctor Pro-Clean which was left to dwell for a short while and then worked in with a mechanical rotary cleaner. It gets to work on the ingrained dirt and sealer. It should also help to get rid of the doggy smells. This process turns the cleaning solution black and is then extracted using a wet vacuum keeping the mess to a minimum. I paid particular attention to the grout which was deeply discoloured and found that some areas required going over a couple of times to get them clean. I was only just getting started on the cleaning but immediately the floor was looking so much better.
I then deep cleaned the Limestone with a set of diamond burnishing pads, working in sequence from the 400 grit through to 1500 grit. A small amount of water was used to aid the lubrication and after each pad have been over the entire area few times the solution is rinsed off with more water and extracted with the wet vacuum.
The floor came back to almost new and as the client wanted a satin finish, I ended by applying a 3000-grit pad to add a deeper polish to the Limestone. The floor was then left overnight to dry.
The last step of polishing with the 3000-grit pad already leaves the floor quite dry however I always like to check before sealing so just to be sure I took some reading with a damp meter. The readings were fine, so I started applying the first of two coats of Tile Doctor Ultra Seal to finish the floor. This is an impregnating sealer (as opposed to the previous topical sealer) that soaks into the stone protecting it from within but without affecting its appearance. This product was chosen in consultation with the client who was specific about how they wanted to floor to look.
The floor now looked superb. Both the client and l were very pleased with the finished floor and so where the dogs! For aftercare I recommended Tile Doctor Stone Soap which is designed for cleaning polished stone floors like these, it’s a gentle stone cleaner that helps maintain the patina and ideal for this type of floor.
Nigel Stoker
North West Yorkshire Tile Doctor
 Tile Doctor Ltd
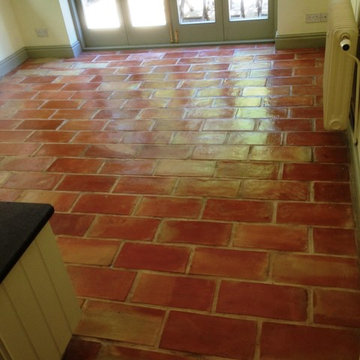
This is an interesting Terracotta brick tiled floor installed in a house in the village of Alderly Edge. The Terracotta tiles were made in a brick shape which was a popular design found in rural buildings in the 19th century. Although the floor was in good condition the sealer was starting to wear off and being clay Terracotta are porous and trap dirt if not sealed. You can see this in the before photograph below where you can see how the grout and Terracotta has darkened with ingrained dirt.
To get the Terracotta tiles clean and free of any remaining sealer I soaked tiles in a strong dilution of Tile Doctor Pro-Clean and left it to dwell for twenty minutes, Pro-Clean is an alkaline product and so safe to use on tiled floors. Then using a large 17inch black scrubbing pad fitted to a rotary machine and a stiff grout brush proceeded to work the cleaning solution into the tile and grout. The now dirty cleaning solution was removed using a wet vacuum and the floor rinsed down with hot water. Some stubborn areas were spot treated using the same process and once happy with the overall condition of the floor the tiles were thoroughly rinsed three times using hot water to remove any trace of cleaning product prior to sealing and then left to dry overnight.
I returned the next day to seal the floor testing it first with a damp meter to make sure it had dried. I then started to seal the tiles and with Terracotta being a very porous material it took eight coats of sealer to do the job. I used Tile Doctor Seal and Go which is a topical sealer that gives Terracotta a subtle gloss finish, it’s also water based so it doesn’t leave a smell as it dries.
Find the right local pro for your project
1