
Search results for "Trickier" in Home Design Ideas
 YOUR PERFECT KITCHEN
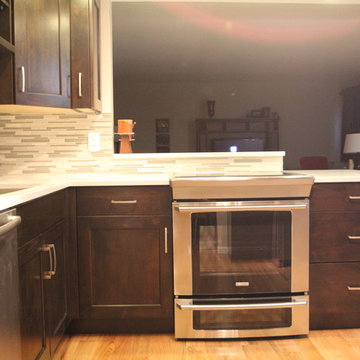
Inspiration for a small modern u-shaped light wood floor eat-in kitchen remodel in Denver with an undermount sink, shaker cabinets, dark wood cabinets, quartz countertops, white backsplash, mosaic tile backsplash, stainless steel appliances and a peninsula
 Ania Omski-Talwar Interior Design
Ania Omski-Talwar
Location: Danville, CA, USA
The house was built in 1963 and is reinforced cinder block construction, unusual for California, which makes any renovation work trickier. The kitchen we replaced featured all maple cabinets and floors and pale pink countertops. With the remodel we didn’t change the layout, or any window/door openings. The cabinets may read as white, but they are actually cream with an antique glaze on a flat panel door. All countertops and backsplash are granite. The original copper hood was replaced by a custom one in zinc. Dark brick veneer fireplace is now covered in white limestone. The homeowners do a lot of entertaining, so even though the overall layout didn’t change, I knew just what needed to be done to improve function. The husband loves to cook and is beyond happy with his 6-burner stove.
https://www.houzz.com/ideabooks/90234951/list/zinc-range-hood-and-a-limestone-fireplace-create-a-timeless-look
davidduncanlivingston.com
 Ania Omski-Talwar Interior Design
Ania Omski-Talwar
Location: Danville, CA, USA
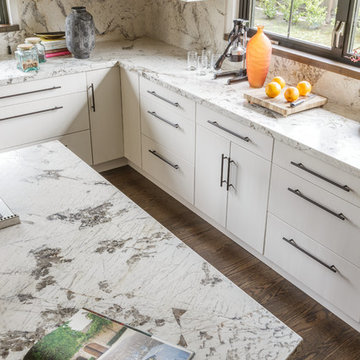
The house was built in 1963 and is reinforced cinder block construction, unusual for California, which makes any renovation work trickier. The kitchen we replaced featured all maple cabinets and floors and pale pink countertops. With the remodel we didn’t change the layout, or any window/door openings. The cabinets may read as white, but they are actually cream with an antique glaze on a flat panel door. All countertops and backsplash are granite. The original copper hood was replaced by a custom one in zinc. Dark brick veneer fireplace is now covered in white limestone. The homeowners do a lot of entertaining, so even though the overall layout didn’t change, I knew just what needed to be done to improve function. The husband loves to cook and is beyond happy with his 6-burner stove.
https://www.houzz.com/ideabooks/90234951/list/zinc-range-hood-and-a-limestone-fireplace-create-a-timeless-look
davidduncanlivingston.com
Find the right local pro for your project

 Steve Masley Consulting and Design
Spinach is easy to grow in shallow pots or window boxes, and you can harvest leaves as needed for sandwiches, salads, and soups. Photo by Steve Masley
 Ania Omski-Talwar Interior Design
East Bay Mediterranean stuccoed courtyard with late summer planting
Ania Omski-Talwar
Location: Danville, CA, USA
The house was built in 1963 and is reinforced cinder block construction, unusual for California, which makes any renovation work trickier. The kitchen we replaced featured all maple cabinets and floors and pale pink countertops. With the remodel we didn’t change the layout, or any window/door openings. The cabinets may read as white, but they are actually cream with an antique glaze on a flat panel door. All countertops and backsplash are granite. The original copper hood was replaced by a custom one in zinc. Dark brick veneer fireplace is now covered in white limestone. The homeowners do a lot of entertaining, so even though the overall layout didn’t change, I knew just what needed to be done to improve function. The husband loves to cook and is beyond happy with his 6-burner stove.
https://www.houzz.com/ideabooks/90234951/list/zinc-range-hood-and-a-limestone-fireplace-create-a-timeless-look
davidduncanlivingston.com
 Ania Omski-Talwar Interior Design
Ania Omski-Talwar
Location: Danville, CA, USA
The house was built in 1963 and is reinforced cinder block construction, unusual for California, which makes any renovation work trickier. The kitchen we replaced featured all maple cabinets and floors and pale pink countertops. With the remodel we didn’t change the layout, or any window/door openings. The cabinets may read as white, but they are actually cream with an antique glaze on a flat panel door. All countertops and backsplash are granite. The original copper hood was replaced by a custom one in zinc. Dark brick veneer fireplace is now covered in white limestone. The homeowners do a lot of entertaining, so even though the overall layout didn’t change, I knew just what needed to be done to improve function. The husband loves to cook and is beyond happy with his 6-burner stove.
https://www.houzz.com/ideabooks/90234951/list/zinc-range-hood-and-a-limestone-fireplace-create-a-timeless-look
davidduncanlivingston.com
 Ania Omski-Talwar Interior Design
East Bay Mediterranean stuccoed courtyard with late summer planting
Ania Omski-Talwar
Location: Danville, CA, USA
The house was built in 1963 and is reinforced cinder block construction, unusual for California, which makes any renovation work trickier. The kitchen we replaced featured all maple cabinets and floors and pale pink countertops. With the remodel we didn’t change the layout, or any window/door openings. The cabinets may read as white, but they are actually cream with an antique glaze on a flat panel door. All countertops and backsplash are granite. The original copper hood was replaced by a custom one in zinc. Dark brick veneer fireplace is now covered in white limestone. The homeowners do a lot of entertaining, so even though the overall layout didn’t change, I knew just what needed to be done to improve function. The husband loves to cook and is beyond happy with his 6-burner stove.
https://www.houzz.com/ideabooks/90234951/list/zinc-range-hood-and-a-limestone-fireplace-create-a-timeless-look


 Josh Partee | Architectural Photographer
© Josh Partee 2013
Design by Vanillawood: http://www.houzz.com/pro/vanillawood/vanillawood
 Gutter Tex
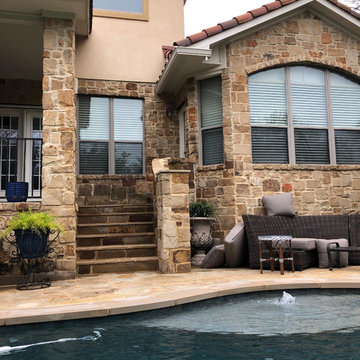
This photo is the home’s back yard area. You see our gutter installation on the right-hand side, which extends beyond the roof.
This is a trickier install because we did not want the runoff flowing into the pool. You will notice there are no downspouts in this picture. That is because, they are off to the side, where their placement protects the house and yard, as normal, and also the water quality of this yard’s spectacular feature.
 Tile Doctor Ltd
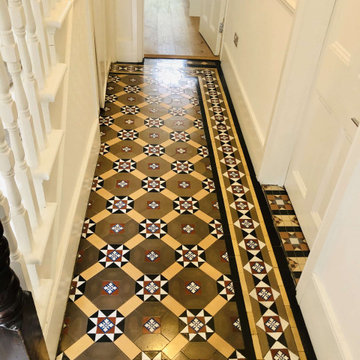
This customer had just moved into a property in Chesham around eighteen months ago. During that time, they had completely renovated the property and in the process had pulled up the hallway carpet to discover a lovely Victorian tiled floor which appeared to be in good condition but very dirty. Period features like these can add a lot of value to a house these days and so they decided to investigate having it professionally cleaned and contacted me for a quote.
Although I can give some indication of price over the phone you never know exactly what to expect so my preference is to visit the property a conduct a test clean. It’s a little trickier to do this now due to COVID-19 but using a combination of PPE, maximum ventilation and social distancing measures I was able to work on the floor. The tiles were in good order with no replacements needed so my focus would be removing carpet adhesive and ingrained dirt. The test went well, and I followed up with a quotation which was accepted, and a date arranged to do the work.
I had worked out previously that the quickest was to deep clean the floor and remove the glue and any old seal was to apply Tile Doctor Remove and Go which as its name suggests is a coatings removed designed for Tiled floors. My method was to spray strong a dilution of Remove and Go onto the Victorian tiles and leave it to soak in for fifteen minutes. Then it was scrubbed in with a black scrubbing pad fitted to a rotary machine. The soil was rinsed off using a minimal of water and extracted with a wet vacuum.
Once the floor had dried, I inspected the tiles and could see more work would be needed to get the white tiles really sparkling. For this I went over the floor using a 200-grit resurfacing pad using water to lubricate the process, I also used handheld burnishing blocks of different grits to do the edges. With this extra effort and another rinse with water to remove the soil the floor looked great, and so I left for the day so it could dry out ready for sealing.
I came back the next day and started by taking moisture readings with a damp meter to ensure the tiles were dry and ready for sealing. This is important as you don’t want to apply sealer to a damp tile and old floors can suffer from damp issues due to the lack of a damp proof membrane.
All was well with the floor, so I was able to move straight onto sealing which started with the application of a single coat of Tile Doctor Colour Grow. This is an impregnating sealer that soaks into the pores of the tile enhancing colour and adding protection. Once this had dried, I followed up with another seven coats of Tile Doctor Seal and Go which adds further protection and leaves a nice subtle sheen to the tiles. This product works really well on old Victorian Tiles like these and being water based it doesn’t leave a smell as it dries.
Andrew Newstead
South Buckinghamshire Tile Doctor
 Tile Doctor Ltd
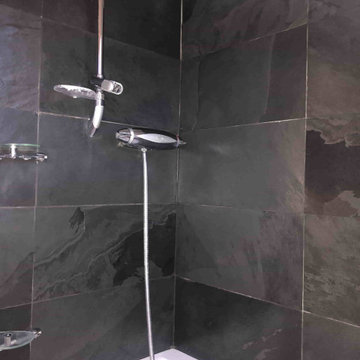
The photographs below are from a bathroom in Maida Vale W9 which had a lovely Slate tiled wall over a bath with shower. Unfortunately, the Slate tiles had been ruined by the use of harsh cleaning chemicals in an attempt to remove the limescale caused by hard water. The slate had now lost all its natural colour and looked completely washed out. The property had recently changed hands and the new owner was keen to have it renovated.
I went over to take a look and work out a solution, this in itself is a lot trickier these days with all the COVID precautions we need to take when working in someone’s house. It was clear that a strong acidic limescale remover had been used on the slate and this had etched the stone, leached all the natural oils away and generally ruined its appearance.
Fortunately, we have a solution for this (see below) and after conducting a small test I was able to confirm the problem could be resolved and gave them a quote which included a day’s labour, abrasive pads, stone oil and sealer. Our quote was gratefully accepted, and we booked a time in to carry out the work.
I returned to the property and I set about burnishing the slate wall tiles using a very coarse 200-grit six-inch burnishing pad fitted to a handheld buffing machine. This process resurfaces the stone slightly to remove the etching caused by the limescale remover. I used a medium dilution of Tile Doctor Grout Clean-up to lubricate the process and to remove the remaining limescale. Once done the slurry that is generated is rinsed off with more water. In a bathroom, it is easy the slurry can just be drained away. In other areas we would use a wet vacuum.
After the 200-grit pad the surface of the Slate was further refined using a 400-grit pad and then an 800-grit pad, this time only using water and giving the stone a thorough rinse after each pad to remove the soil.
The slate was then left to dry off over lunch and given more encouragement with a heat gun afterwards so I could move onto the next step. This involved applying a coat of Tile Doctor Stone Oil which puts back the natural oils back into the stone improving its appearance.
Once the Stone Oil had fully dried, I moved onto sealing for which I applied two coats of Tile Doctor Ultra-Seal; this is penetrating sealer that soaks into the stone to provide maximum stain protection without changing the colour of the stone. It is also an excellent grout sealer which is a bonus.
Before leaving I talked the client about how best to maintain the Slate and left them a complimentary bottle of Tile Doctor Aqua Pro tile cleaner which will help keep the limescale at bay. It is gentle enough to use every day but will help prevent the previous build-up and unlike the previous products used will not damage the newly applied sealer.
Jackson Davis
Central London Tile Cleaning
 Tile Doctor Ltd
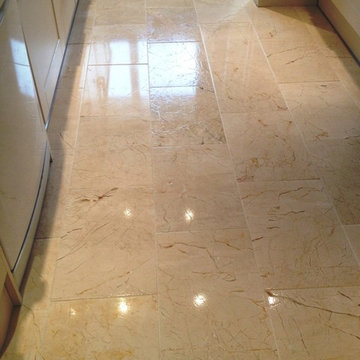
For this job I travelled to the town of Albrighton, which is actually the most easterly settlement in the whole of Shropshire. My client had an issue with their Marble tiled floor which was installed in the kitchen and hallway. They had dropped and broke a bottle of vinegar in the kitchen, and the substance unfortunately came in contact with the tiles. Since Marble is highly sensitive to acid, the vinegar (an acetic acid) had basically etched the surface of the tiles make it impossible clean chemically.
Although the tiles were a nice, expensive Marble, the person who had first installed them had done a poor job, leaving lippage of up to 5mm in some areas, which would make work trickier. Undeterred I could see it would be possible to restore the floor using a combination of burnishing for the tiles and cleaning with a high alkaline product for the grout lines. I demonstrated this to my client on one tile which went well and I was then given the go ahead to restore the entire floor.
My first task focused on cleaning the grout lines using a solution of Tile Doctor Pro-Clean worked in with a stiff grout brush. Pro-Clean is a high alkaline cleaner suitable for use on most types of natural stone floor. It helped to alleviate most of the grout staining caused by the vinegar, whilst also lifting out any ingrained dirt and muck, and this left the grout looking a lot cleaner.
After cleaning the grout lines I was able to move on to burnishing the tiles. As previously mentioned, no chemical product would be able to have an effect on the damaged tiles, so I resolved to burnish them using a system of four diamond encrusted burnishing pads fitted to a rotary machine. Working first with a coarse burnishing pad, and moving through to medium, fine and very fine pads, lubricated with a little water, I was able to significantly reduce the appearance of the acid stains, while also giving the tiles a nice polished finish.
Following the cleaning and burnishing processes I gave the tiles a good rinse to remove any remaining residue and then ensured the floor was completely dry before starting on the sealing.
To seal the floor and maximise the appearance I used Tile Doctor Colour Grow and Tile Doctor Shine powder. Colour Grow is an impregnating sealer that seeps into the pores of the stone intensifying and enhancing the natural shades and colours in the stone whilst also providing stain protection;
Shine Powder on the other hand is a crystallising powder that is ground directly into the tiles to provide a high shine finish and durable surface protection.
My client and her husband were really happy with the results and left the following message on the Tile Doctor Feedback system:
“Jozsef was a charming young man in every respect, who worked very hard and achieved an amazing result. The tiles look better than the day they were laid. We are absolutely delighted with the work he has done and will recommend him to all our acquaintances. Thank you, Jozsef!”
Jozsef Hoffmann
Shropshire Tile Doctor
 Royalty Construction
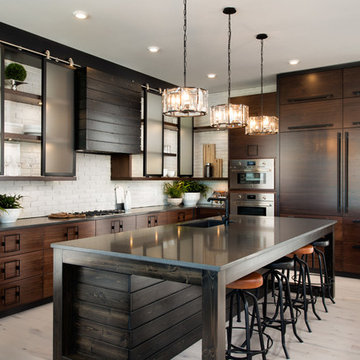
Eat-in kitchen - large industrial l-shaped light wood floor and beige floor eat-in kitchen idea in Other with an undermount sink, flat-panel cabinets, dark wood cabinets, white backsplash, brick backsplash, paneled appliances, an island and soapstone countertops
 Shannon Pepper Design
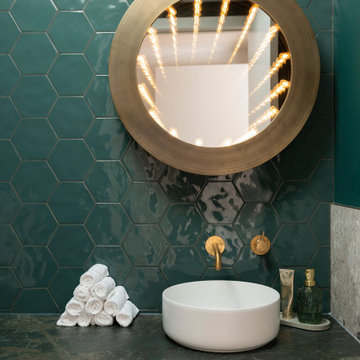
Inspiration for a small coastal green tile and porcelain tile light wood floor powder room remodel in Auckland with green cabinets, a one-piece toilet, green walls, a vessel sink, quartz countertops, green countertops and a floating vanity
3